
Chapter 8. Libraries Used in Part II: Sarissa, Scriptaculous
In this chapter
▪ 8.1 Overview of the Use Cases
▪ 8.2 Libraries Used in Part II of This Book
Part I of this book gives you a good understanding of the basics of AJAX, but it doesn’t give you a complete understanding of how you would implement it. Part II fills in that gap, solving real-world problems by using libraries that would be a good choice for any AJAX implementation you choose. Chapter 8 provides an introduction to two of the libraries, with Chapter 9, “Libraries Used in Part II: HTML_AJAX,” following up with a third library that we will be using in the use cases.
A total of three use cases are presented in this section of the book, showing how AJAX can be used in realistic situations. The cases strive to show not only how to use specific techniques, but also how each one improves the user’s experience over a standard site. They also show how you can use various open source libraries to add AJAX without a lot of hard work on your part. The libraries used throughout these use cases are covered in the rest of this chapter.
8.1 Overview of the Use Cases
The three use cases presented in this book are as follows:
• The first case is focused on improving data display. It takes a large amount of data and displays it in an interactive grid that shows how AJAX can remove a common cause of “click and wait.”
• The second case looks at using AJAX to build login systems. Updating the standard process allows for quicker feedback and makes it easier to add logins to applications like the comment systems on blogs.
• The final case is a Web-based trouble ticketing system used to provide technical support. This case focuses on building a complete AJAX application. It shows various techniques that can be used to manage an application that is written primarily in JavaScript. It also shows what a lightweight server back end would look like.
8.2 Libraries Used in Part II of This Book
Many powerful libraries exist in the AJAX world, especially if you’re looking for one available under an open source license. Most are focused on one area or were developed with a specific Web development framework in mind. This section covers the basic usage of these libraries:
• Sarissa: XML usage, including XSLT
• scriptaculous: Visual effects and drag-and-drop
• HTML_AJAX: Communications with tight PHP integration
8.3 Sarissa
Sarissa is a GPL license library focusing on providing a cross-browser wrapper for the native JavaScript XML APIs. It provides an ECMA style API on all browsers it supports, which allows you to write to the standard no matter what browser you might be using. Its major features are AJAX communications, XPath, and XSLT support. Sarissa supports most major browsers, including Firefox and other Mozilla-based browsers, Internet Explorer (MSXML 3.0+), Konqueror (KDE 3.3+), Safari, and Opera. The code has reached a stable level and no longer has frequent releases, but the forums are busy and the developers respond to questions. Sarissa can be downloaded from http://sourceforge.net/projects/sarissa, and it has online documentation available at http://sarissa.sourceforge.net/.
8.3.1 Installation
Sarissa is a pure JavaScript library, so it’s quite easy to install. Download the zip file from the SourceForge.net download page, and extract its contents to an accessible location on your Web server. The examples in this chapter use Sarissa version 0.9.6.1 installed at http://localhost/sarissa/; the Sarissa code is extracted into a subdirectory below that.
The release includes API documentation, including a basic tutorial located in the doc directory. It also includes unit tests that can be run by loading testsarissa.html and a sample application, minesweeper, in the sample-apps/minesweeper directory.
8.3.2 Making an AJAX Request
Sarissa gives you the ability to access XMLHttpRequest directly (or on IE6, a wrapper classes that looks the same), but that’s not how you usually want to use it to make AJAX requests. Sarissa is designed around loading XML documents, so you can easily use the load command on its DOM documents to make a remote request.
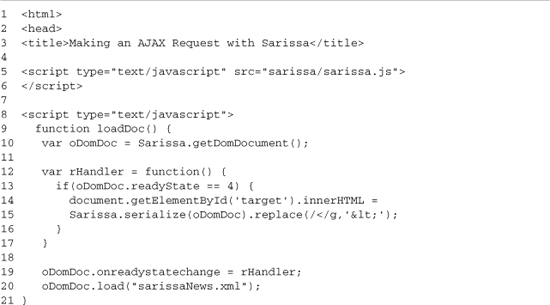
Listing 8-1 does three main tasks: It includes the Sarissa library, creates a loadDoc function (which does an AJAX load of an XML file), and provides a simple UI for running the loadDoc function. The Sarissa library is included on line 5; in this example, the library is installed in the Sarissa subdirectory. Lines 9–21 define the loadDoc function; it’s made up of a number of subtasks. Line 10 gets an empty Sarissa DomDocument. Lines 12–17 define a handler function that is called each time the ready state of the DomDocument is called. This ready state handler is just like the one on XMLHttpRequest; state 4 is reached when the document is fully loaded. When this state is reached (line 13), we use the Sarissa.serialize method to turn the loaded document back into its textual XML representation and then turn < into its entity form so that we can show the XML document in an HTML document (lines 14–15). Line 19 attaches the handler we defined to the DomDocument, and line 20 loads the sarissaNews.xml file from the server. In most cases, this XML file would be a dynamically generated file, but to keep this example simple, a static file is used.
Listing 8-1. SarissaMakingAnAJAXRequest.html

8.3.3 Basic XML Features
The Sarissa library focuses on providing good cross-browser XML support. To provide this, it creates a standardized interface to DOM documents loaded from any source. Most of this work is providing compatibility methods for Internet Explorer, hiding the fact that the XML capabilities are provided by the MSXML ActiveX control instead of by native JavaScript objects.
8.3.4 Working with DOM Documents
DOM documents are created in Sarissa through the use of the Sarissa.getDomDocument() method. Once you have a document, you can load content into it using three different methods. You can load remote data using AJAX (as shown in Listing 8-1), you can parse a string that contains XML data, or you can create the elements using standard DOM functions. Sarissa also includes a utility method, Sarissa.serialize(), for working with DOM documents. This prints out the document as its XML output, which is useful for debugging or in cases in which you want to send XML payloads to the server. To use the serialize method, just send the method a DOM document; a basic example is shown here:
Sarissa.serialize(domDoc);
8.3.4.1 Loading DOM Documents from a String
Loading DOM documents from a string gives you the ability to load a number of XML documents in a single request and then parse them into DOM documents to work with them. This can be a useful strategy for preloading XML during the normal page load, or it can be used with XMLHttpRequests that return data other than XML. (An example of such data is JSON.) A small example HTML page, which loads a short XML string into a Sarissa DOM document, is shown in Listing 8-2.
Listing 8-2. SarissaDOMDocumentString.html

In Listing 8-2, all the Sarissa interaction takes place within the loadDoc function, which is defined on lines 10–17. The Sarissa library is loaded on lines 4–5, and an example XML string is defined on line 8. In practice, this string would be generated from a server-side language like PHP, allowing XML data to be accessed without an extra HTTP request. Line 10 starts our worker loadDoc functions. First we create a DOMParser (line 11), and then we use its parseFromString method to parse our XML string data contained in the xmlData var (lines 12–13). parseFromString takes two parameters: the XML string and its content-type. Content-type is usually text/xml, but application/xml and application/xhtml+xml can also be used. The parseFromString method returns a DOM document, which can be used just like the one from Sarissa.getDomDocument().
On lines 15–16, we print out the document using some basic entity replacement so that we can see the output in the browser. The rest of the XML is a link to run the example, line 21, and a pre-element that we use as a target for the printed-out DOM node.
8.3.4.2 Creating a DOM Document Manually
Because Sarissa works with DOM documents, all the normal DOM methods and properties are available. This allows you to create a DOM document with just its root node specified and then append additional nodes to it. In most cases, you won’t use this functionality to create a complete DOM document; instead, you will use it to update a document loaded by one of the other methods. When creating a document manually, you’ll want to specify the root node to create to the getDomDocument method; this is done by filling in getDomDocument’s optional parameters. Sarissa.getDomDocument takes two parameters: the namespace of the root and the local name of the root node. Listing 8-3 shows a small example using this method.
Listing 8-3. SarissaCreateNodesWithDom.html

Listing 8-3 follows the same pattern as the previous examples: A loadDoc function is called by a small HTML interface. On lines 5–6, we include the Sarissa library, followed by the main JavaScript block, which defines loadDoc (lines 8–24). Line 10 creates the empty DOM document; we’re not setting the XML namespace, so we pass null into that property, and the root node has a value of foo. Line 12 creates a new element with a tag name of bar; this is appended to the document on line 13. The bar element is appended to the firstChild of the DOM document, not directly to the document. This appending is done because an XML document can have only a single root element.
Lines 15–19 repeat the same process for an element with the tag name of “baz”. This time, however, the difference is that we add a child node to “baz”. In this case, it is a DOM text node with the value of “Some Text”, but it could also be any other XML element. There are two main types of nodes you work with in XPath: element nodes, which represent the XML tags, and text nodes, which hold the content within tags. This distinction also exists in HTML, but you don’t see it as often because you can use the innerHTML property to grab the text content without worrying about DOM notes. Lines 21–22 use Sarissa.serialize to output the generated document to the target element.
8.3.5 Using XPath to Find Nodes in a Document
Many times, when you’re displaying data from an XML document, you’ll want to look only at specific portions of the document. This is especially true for formats such as RSS that contain a number of news entries. XPath is an XML technology that allows you to select specific nodes within a document. A basic XPath follows the nodes from the root of the document to the element you’re specifying. Each element can be directly addressed by a path; these paths start with a / and contain a / between each node (/rss/item). Further specificity can be provided by adding a bracketed number after the node name (/rss/item[1]). This path selects a particular occurrence of the node when there are multiple instances of a tag in this particular branch of the document. XPath can also query a document by starting with a double slash (//); these paths return any matching nodes (//item). Listing 8-4 shows an XML document that is used in some subsequent examples in this chapter.
Listing 8-4. An Example XML File

You can refer to the nodes of this document in a number of different ways. First, there are absolute paths. The path /rss/item[1] refers to the item node that starts on line 2 and ends on line 4. The path /rss/item[2]/title refers to the title node on line 6. You can also query style paths; the path //item refers to both the item node on lines 2–4 and the item node on lines 5–6. These queries can also look at attributes by using an “@”; the path //item[@new="true"]/title refers to the title node on line 6.
XPath is able to do more complex queries than what is shown in this simple overview. If you’re dealing with XML documents in the browser, you will find XPath to be an important tool. XPath is a W3C standard, so you can easily find more information to move past the basics.
Sarissa provides the IE XPath API to all the browsers it supports, which provides an easy to use cross-browser API. The API consists of two methods on a DOM document: the selectSingleNode method and the selectNodes method. Each method takes an XPath, with selectSingleNode returning a single DOM node and selectNodes returning a node collection that you can iterate over to access all the nodes. Listing 8-5 is a small example page that shows how to use these XPath methods.
Listing 8-5. SarissaSearchingWithXpath.html


Lines 1–8 perform the basic HTML setup. Besides including the main Sarissa library file, we also include the sarissa_ieeme_xpath.js file. This file provides the IE XPath API to other browsers, and it is how Sarissa provides cross-browser XPath support. Lines 12–27 define a loadDoc function, which loads the remote XML document we will be searching in this example. This code is identical to the earlier AJAX XML loading examples. The only exception is that now, we’re defining the domDoc variable outside of the function so that it can be used elsewhere. In addition, we’re showing a DIV element, which contains more links when the document is loaded instead of just printing it out. This file is continued in Listing 8-6 where the logic appears for searching the DOM using XPath.
Listing 8-6. SarissaSearchingWithXpath.html Continued
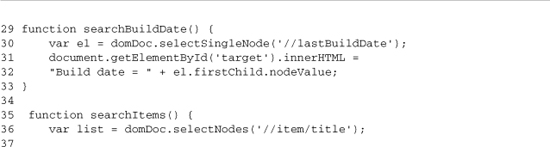

Lines 29–33 define the searchBuildDate function; this function performs an XPath query against the loaded document to find the last build date of the document. This information is provided in a single tag called lastBuildDate, so the XPath to get the information is //lastBuildDate. The XPath query happens on line 30 when we call selectSingleNode. The value of the resulting node is then displayed in the target element. Because the lastBuildNode is from an XML document, we can’t just use the innerHTML attribute. Instead, we access the text node inside the returned element and get its value (line 32).
Lines 35–45 define the searchItems function; this function performs an XPath query that selects all the title nodes that are inside item nodes from the document and then outputs their value in the target element. The XPath query takes place on line 36; it returns a node collection to the list variable. On line 39, we use the collection’s length attribute to output the number of items in the loaded RSS document. Lines 42–45 loop over the returned nodes, outputting the value of the nodes to the target; this lists the title of each item in the RSS feed.
Lines 50–55 create the document’s basic user interface. Links are provided to run each JavaScript function with the search links that are accessible only after the RSS document is loaded. This delay is accomplished by putting them inside a DIV that is hidden until the document’s onreadystatechange change callback shows it on line 21.
8.3.6 Transforming XML with XSLT
XSLT is a powerful XML-based template language. XPaths are used inside the template, which allows you to easily apply multiple subtemplates to different XML templates. Describing how to create an XSLT template could take a book as long as this one, so we focus only on the API that Sarissa provides to transform documents. The API is easy to use; you create a new XSLTProcessor, load a stylesheet that contains the transformation rules, and then transform the document using the processor’s transformToDocument method. You’ll usually want to import the resulting document into the main HTML document using its importNode method so that you can add it to the DOM and display the results. A short example is shown in Listing 8-7. The data is the same RSS feed of the Sarissa news used earlier; the only exception is that the stylesheet is shown in Listing 8-7.

This is a really basic stylesheet with a single template that matches the root rss element in the document (lines 5–11). Inside this template, we output a DIV container so that we have an HTML element encasing the rest of the output, which will make it easy to add to the main document. Lines 8–10 loop over the results from an XPath query. The query //item selects each item node in the document. The code then displays the value of the title of each item inside an h2 tag (line 9). The rest of the file is basic XSLT boilerplate. This XSLT stylesheet is used by an HTML and JavaScript page to transform an XML document; this page is shown in Listing 8-8.
Listing 8-8. SarissaTransformWithXSLT.html


Listing 8-8 takes the sarissaNews.xml file, transforms it with the transform.xsl XSLT stylesheet, and then adds its results to the main document’s DOM. The Sarissa library is included on lines 5–8. Notice that we’re including the cross-browser XSLT support files as well as the main library file. On lines 11–14, we set up the objects we will use on the rest of the transformation process. On line 5, we set up an empty DomDocument into which we will load our RSS feed; then, on line 6, we create a similar object into which to load the stylesheet. On line 13, we load transform.xsl into the styleSheet document; you could also use the string parser to load transform.xsl. This would be accomplished by loading the contents of transform.xsl into a JavaScript variable and then creating the DomDocument using the DOMParser. Doing this would let you reduce the number of HTTP requests needed to load the document, which is helpful from a performance standpoint as long as the stylesheet is small. Finishing the basic setup, we create a new XSLTProcessor on line 14.
Lines 16–30 define the loadDoc function, which loads sarissaNews.xml so that it can later be transformed. This works the same as the earlier examples; we’re just adding a few more actions to perform after the document is loaded. On lines 20–21, we output a message saying the document is loaded, giving the user feedback that something has happened. Then, on lines 23–24, we show a DIV in the main HTML document. This DIV contains the links that do the actual transformation; by keeping it hidden until the document is loaded, we are able to prevent errors from happening. The rest of the method contains the simple Sarissa document loading processes; on line 28, we register the callback function, and on line 29, we load the sarissaNews.xml document.
Lines 32–39 define a JavaScript function that does the transformation. This is a three-part process. On line 33, we import the stylesheet we previously set up, and then on line 34, we transform the document assigning the result to a variable. We finish the processes on lines 36–38, selecting an output element and then appending the output to it after importing it to the HTML document. When importing the nodes, passing a Boolean value of true as the second parameter to importNode makes the method perform a deep import. A deep import imports the element passed in and all its children; without this flag, only the top-level element is imported.
The rest of the document is the basic HTML user interface. A link is provided on line 43 to load the sarissaNews.xml document, with the transform link enclosed in a hidden DIV so that it will be available only after the news document is loaded (lines 44–46). We finish up with a target DIV on line 47 that we use for giving messages to the user and for showing the transformed document.
8.3.7 Sarissa Development Tips
Sarissa is a highly focused library that provides an easy-to-use, cross-browser API to the major browsers’ XML functionality. If you’re looking to use XML technologies such as XSLT or XPath, then Sarissa is a perfect solution for you. While using Sarissa, keep in mind these tips:
• Be sure to include the sarissa_ieemu_xpath.js or sarissa_ieemu_xslt.js files if you’re working with XPath or XSLT. Without them, your scripts will work only in Internet Explorer.
• Use the XML string-loading capabilities to cut down on the number of individual XML files that you need to load.
• Run the test cases in testsarissa.html to make sure your browser is supported if you’re on a less commonly used browser.
• Mix Sarissa with other libraries if Sarissa meets only some of your needs; Sarissa is focused on XML.
• XPath is extremely effective at searching XML documents; try using it before creating custom solutions to search XML.
• If you have a question about what method to use, check out the project’s Web site; it contains complete API documentation.
8.4 Scriptaculous
Scriptaculous is an MIT-licensed JavaScript library that provides visual effects, drag-and-drop support, and controls, such as sliders, to HTML pages. It is built on top of the Prototype JavaScript library, which provides AJAX support (and a number of other features) to the Ruby on Rail Web application framework. Because it’s built on Prototype, scriptaculous has AJAX support, but its main focus is on providing highly interactive visual components that can take an AJAX application to the next level.
8.4.1 Installation
You can download scriptaculous from http://script.aculo.us. After extracting the archive, copy the contents of the src and lib subdirectories into a directory in the document root of your Web server. After doing that, you just need to include the prototype and scriptaculous libraries in your HTML files. The components of scriptaculous will be automatically included as needed as long as they are in the same directory as scriptaculous.js. An example of these includes is shown here:

8.4.2 Visual Effects
One of the most exciting features of scriptaculous is its visual effects. These effects can be used to notify the user that an event has happened or that some content is updated. The effects can be applied to any DOM element, making them very versatile, because they will work no matter what the display type of the element is. To apply an effect, you create a new instance of a method of the Effects class, passing in the element to update. This element can be an ID or a DOM element accessed directly in JavaScript.
A wide variety of effects are provided. They perform two main tasks: showing or hiding elements and drawing attention to an element. Some of the show/hide effects are available in pairs and can be used with the Effect.toggle method to hide or show an element, doing the opposite of the element’s current status. The rest of the functions can be used individually, like the simple examples in the following list of effects. An effects tester is also included so that you can see what each effect looks like. Scriptaculous also includes the lower-level methods that can be used to build new effects; the API for these methods is included on its Web site.
8.4.3 Hide/Show Pairs
BlindDown hides the element, and BlindUp shows it:
new Effect.toggle(element,'blind'),
new Effect.BlindDown(element);
new Effect.BlindUp(element);
SlideDown hides the element, and SlideUp shows it:
new Effect.toggle(element,'slide'),
new Effect.SlideDown(element);
new Effect.SlideUp(element);
Fade hides the element, and Appear shows it:
new Effect.toggle(element,'appear'),
new Effect.Fade(element);
new Effect.Appear(element);
A large number of nonpaired effects for hiding elements is also included:

The Grow effect is the only unpaired effect for showing an element:
new Effect.Grow(element);
The Effects class also contains a number of methods for drawing attention to an element:
new Effect.Pulsate(element);
new Effect.Shake(element);
new Effect.Highlight(element);
The effects tester is located in the scriptaculousViewAllEffects.html file. Listing 8-9 shows a short example of how to apply various effects.
Listing 8-9. ScriptaculousViewAllEffects.html

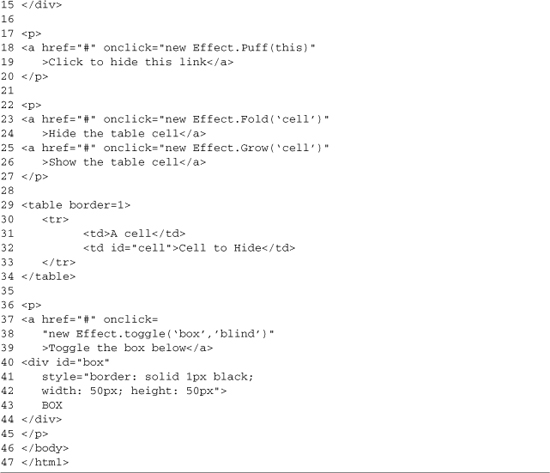
One way to attach an event is to tie it to the click event of a DOM element; this passes the element being clicked and performs the effect directly on the current element. This approach is easy to do and is shown on line 13 against a block-level element, and on line 18 against an inline element. There are few cases where this direct attachment is useful; in most cases, you’ll want the effect to be performed against another element on the page because the point of the effect is to draw attention to the action that is happening. Line 23 hides the element with an ID of cell by using the Fold effect, whereas line 25 shows the same element using the Grow effect. Line 38 shows the toggle utility method, which alternately shows and hides an element. This method is useful for building interface elements that show optional information.
8.4.4 Drag-and-Drop
Drag-and-drop gives you the ability to visually drag elements around the page and have other elements that accept the drop. The scriptaculous implementation separates the drag-and-drop components into two parts, allowing you to make elements draggable without providing a place to drop them. This can be useful for adding palettes or note elements that can be moved anywhere within the window by the user. To create a draggable element, create a new instance of the Draggable class, passing in the element to drag and any options. A common option is revert; when it is set to true, the item returns to its original position when the user lets up on the mouse:
new Draggable(element,{revert:true});
In the second half of drag-and-drop, the drop target is provided by the Droppables class. Drop targets are useful in a number of cases, from building a visual shopping cart to allowing you to visually move mail to a new folder. Drop targets can be any element and can take a number of options, including an accept parameter that limits the elements that can dropped to those with a matching class. They can also include an onDrop handler, which is run when an element is added to the drop target:
Droppables.add(el, { onDrop: function(e) { alert(e); });
Listing 8-10 shows a small drag-and-drop application. In this listing, there are three draggable boxes and one drop target. Only the first two boxes can be dropped on the target because the third box has a class that isn’t in the accept list of the drop target. This example also uses the $() alias function; it works the same way as document.getElementById. Formatting for this example is done with CSS, which is included in a separate file to decrease the amount of noise.
Listing 8-10. ScriptaculousDragNDrop.html


Most of this page is set up in HTML with a small amount of JavaScript code to activate the drag-and-drop functionality. The page starts with a basic setup. Lines 4–7 include the scriptaculous JavaScript library, and lines 9–10 include a CSS file to do some basic formatting. Lines 13–18 create the basic user interface; it is made up of three 200×200 pixel boxes that are floated next to each other. Below that is a 100×400 pixel drop target.
Lines 21–32 make these boxes draggable and create a drop target for them. Lines 22–24 create the draggable boxes; the first parameter is the ID of the box, and the second is a hash of options. On line 23, we set the revert property of the second box to false; this lets us drag it around the screen. This property isn’t very useful for dragging to a drop target, but it can be useful for other use cases. Lines 26–30 create the drop target; the first parameter is the ID of the element, and its second parameter is a hash of options. Here we’re setting two options. The first is the accept variable, which takes a class to accept; in this case, it’s set to box, which allows box 1 and 2, but not box 3, to be dropped. The second option is the onDrop function; this is called when a draggable element is released while over the drop target. The function displays some simple feedback displaying the ID of the dropped element in the drop target.
8.4.5 Sortables
A sortable is a predefined component built from the drag-and-drop building blocks that scriptaculous provides. Sortables make it easy to build graphically reorderable lists and can even be used to let you move items between multiple lists. Sortables are usually used with HTML lists, but they can also be used with floated elements. To create a sortable list, you simply run Sortable.create, passing in an ID and any options you want to specify, like so:
Sortable.create("element",{ghosting:true});
Some of the more commonly used properties are overlap, ghosting, and onChange:
• The overlap property, which takes the values of horizontal, vertical, or false, limits how you can drag the elements around; the false setting has no limits.
• Setting the ghosting property to true leaves the element in its current position; the user then drags a faded version until it is dropped.
• The onChange property lets you set a callback function, which is called after an item has been moved.
If the elements in your sortable have the ID property set using the naming convention of name_item, you can use the Sortable.serialize method to quickly build a query string, which can be sent to the server and used to update the order on the server. An example output from the serialize method is this:
list[]=one&list[]=three&list[]=two&list[]=four
If you used this string as the query string on a request to a PHP page, $_GET['list'] will be populated with an array that contains the updated positions of the list. The array is ordered in its new position, with the value being the specified ID. Listing 8-11 shows an example of this operation.
Listing 8-11. ScriptaculousSortable.php


This page is mainly an HTML/JavaScript page with a small amount of PHP mixed in to show how a server-side language parses the output of Sortable.serialize(). The script starts with a basic setup, with lines 4–7 including the scriptaculous library. Then, on lines 9–12, we include a small amount of CSS, which gives all the sortable elements a pointer cursor. This is an important usability step; without it, the elements will have a text select cursor, and the user won’t realize they are sortable. Lines 17–22 build the list that will be sorted; each item has an ID in it, which defines the value that will be returned to the server. Lines 24–25 complete the user interface, creating a link that reloads the page and sends the list’s new order to the server.
Lines 27–31 contain the small amount of PHP code in this script. If the list variable has been passed in by the query string, its outputs are echoed out using a debugging function. PHP and many other Web development languages automatically turn the query string provided by Sortable.serialize into an array; from here you could update the database with the new order.
Lines 33–40 contain the JavaScript for this example. On line 34, we make the list element sortable, using most of the default options because they are optimized for use with HTML lists. Then, on lines 36–40, we build a small function that builds a query string using Sortable.serialize (line 37) and then reloads the page by setting window.location.
8.4.6 Slider Control
Scriptaculous also provides a slider control, which is useful for selecting values that are in a range. This control can be used in its basic state to build something like a color selector. It can also be used as a building block for more advanced elements, such as a JavaScript-powered scrollbar for an AJAX grid. An example of the slider control in both horizontal and vertical modes is shown in Figure 8-1
Figure 8-1. The scriptaculous slider control shown in both horizontal and vertical modes

Scriptaculous provides only the behavior of the slider, not its looks. As long as you follow the pattern of a container element with a slide handle inside of it, you can make the slider look any way you want. Because you control the look of the sliders, you also control their usability. One simple usability tip is to set the cursor of the slide handle to a value of move. This gives you the browser’s standard cursor icon for items that can be moved around, which helps users understand how to move the control. The slider returns a value from 0 to 1 as you scroll across its range; to translate this to a more usable value, you simply multiply it by the maximum value of your target range, rounding it if you want an integer, like so:
var outputValue = Math.round(100*sliderValue);
Listing 8-12 shows an example page that implements both a horizontal slider and a vertical slider.
Listing 8-12. ScriptaculousSlider.html

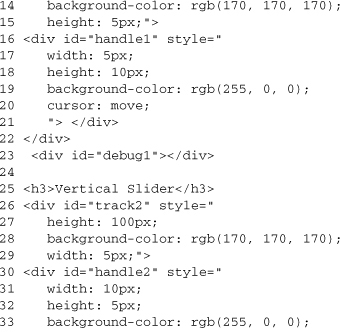
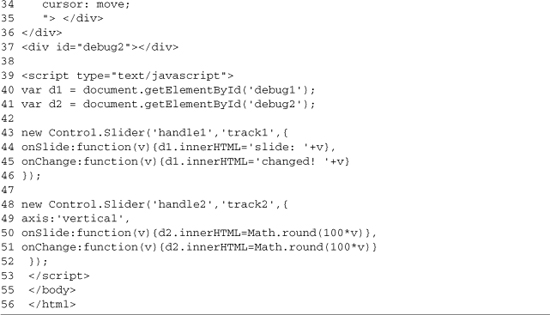
Like the rest of the scriptaculous examples (Listings 8-9–8-11), this page includes the JavaScript library files in its header (lines 4–7). After that, the HTML for the sliders is laid out: first the horizontal slider (lines 11–23) and then the vertical slider (lines 25–37). Both sliders follow a similar pattern; first the slider track is defined, setting its ID, width, height, and color (lines 12–15 and 26–29). Then, the handles for the sliders are defined (lines 16–21 and 30–35). The handles set most of the same basic style elements as the track, adding a cursor of move for improved usability. The HTML definitions are finished by creating empty DIV elements to display the current value of the slider (lines 23 and 37).
The next section of the page is the JavaScript that turns these DIV groups into sliders. We start this process by assigning the debug DIV elements to variables so that we can easily reference them later (lines 40–41). Then we create a slider instance for the horizontal slider control (lines 43–46). The Control.Slider function takes three parameters: the track element, the handle element, and any options. In this case, we are setting two options: the onSlide and onChange event handlers. The onSlide handler is called as we move the handle around; the onChange handler is called when we’re done dragging the handle. The onSlide handler is usually used to provide feedback, whereas the onChange handler is used to make the value of the slide accessible to other parts of the page, storing its value in an input box or JavaScript variable.
Lines 48–52 follow much of the same process for the vertical slider. In this case, we set an extra option, axis, to the value of vertical setting. This does what it suggests and makes the slider work in a vertical fashion. We also translate the value of the slider to a 0–100 scale in the onSlide and onChange handlers.
8.4.7 Scriptaculous Development Tips
Scriptaculous contains functionality for creating visually impressive Web sites. While using it, keep these tips in mind:
• Most scriptaculous functions have further documentation and examples at http://script.aculuo.us, so if you’re not sure how to make a function operate, start there.
• Scriptaculous contains a variety of prepackaged effects and components, but if they don’t meet your needs, it also provides the tools to build new ones.
• Besides the Web site, you can find more scriptaculous examples in the tests directory, in the scriptaculous download. The functional tests are very useful in this regard.
• Scriptaculous contains a number of additional controls that you should explore before building your own. These include the following:
• Autocompleter: Provides Google Suggest style auto completing text fields
• InPlaceEditor: Provides click-to-edit content with AJAX saving the changes
8.5 Summary
Sarissa and scriptaculous are powerful AJAX libraries. Sarissa is focused on XML, making it a great choice if you already heavily use XML throughout your tool chain. Its main features include the following:
• Cross-browser support
• The ability to create DOM documents from XML strings
• XSLT support for transforming XML documents
• XPath support for querying nodes within XML documents
Scriptaculous offers many of the exciting features that AJAX applications are known for. Using it, you can easily create highly interactive applications that are both visually appealing and easy to use. The main features of scriptaculous include the following:
• Visual effects, such as fade in/out elements
• Drag-and-drop support
• Sortable lists
• Slider controls
Both of these libraries make a good building block for an AJAX application. They offer clean API, useful functionality, and a tight enough focus that they are easy to combine with other libraries. In the next chapter, we look at HTML_AJAX. It is a JavaScript/PHP library that focuses on server interaction, simplifying using PHP as the back end for an AJAX application.