Once you’ve acquired your digital images, you’ll need to size them for your project (as well as ultimate output). For many Photoshop users, such as photographers, this may be as straightforward as cropping and sizing. This chapter explores several techniques for sizing your images. You’ll learn about the concept of resampling, which addresses how the computer adds or subtracts information from a digital image while trying to retain detail and clarity.
Chapter 3 looked closely at the process of acquiring digital images. If you skipped ahead or just skimmed that chapter, go back—a solid understanding of those concepts is required. Quite simply, you must know the capabilities of your scanner or digital camera to process information.
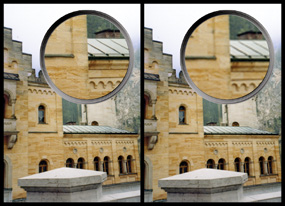
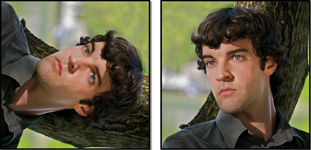
This photo was scanned at two different resolutions. The image on the left was scanned at 300 spi, and the image on the right was scanned at 72 spi. Examine the detailed enlargements to see the impact of different scanner settings.
Previous chapters also briefly discussed output requirements for different formats. The second part of the image-sizing puzzle is a clear understanding of these output requirements. What resolution does your printer need? Are you sending the image to a service provider such as a developer or commercial printer? You’ll need to make lots of choices, but they should be based on where the image needs to end up. Do not make assumptions when starting a project. Know the destination of your image so you’ll know which path to take.
Tip: Start Out Right: Digital Cameras
If you’re acquiring a digital image, be sure to capture enough pixels. If you want a 5 × 7 inch print and need 300 dpi, do the math before shooting. Take the inch size and multiply it by the print resolution. In this example: 5 × 300 = 1500 and 7 × 300 = 2100. Therefore, 1500 × 2100 = 3,150,000, which is about 3.1 megapixels. To allow for cropping, you may want to shoot at an even higher resolution.
The process of resampling allows you to change the pixel dimensions of your image. This will affect the display and print size of your image. This part of the resizing process is important for several reasons:
Images will print faster when they are sized properly for your output device.
Images will print clearer when you size them to a target size, and then run a sharpening filter to enhance the edge detail.
Images appear crisper when they are displayed at 100 percent on a computer screen (such as for a PowerPoint presentation).
The process of resampling is often identified based on whether you are scaling the image smaller (downsampling) or larger (upsampling):
Downsampling: If you decrease the number of pixels in an image, you are downsampling the image. When you downsample an image, you permanently discard data. You can specify an interpolation method (discussed in the next section) to determine how pixels are deleted. After an image has been downsampled and saved, you cannot restore the discarded data.
Upsampling: If you increase the number of pixels in an image, you are upsampling the image. When upsampling, you create new pixels to expand the image. Again, you can specify an interpolation method to determine how pixels are added. When upsampling, you add information that did not previously exist, which generally just makes a larger image that is not any sharper than the original.
Tip: Avoiding Upsampling
You can avoid the need for upsampling by scanning or creating the image at a sufficiently high resolution. If you want to preview the effects of changing pixel dimensions on-screen or to print proofs at different resolutions, resample a duplicate of your image.
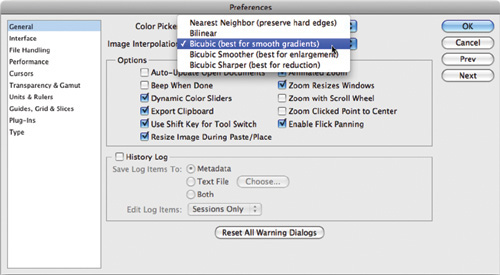
When you resample an image, Photoshop creates new pixels. Those new pixels are created based on the neighboring pixels. How those new pixels are formed is determined by the interpolation method you specify. Photoshop offers up to five methods to resample your image.
Choose one of the following methods:
Nearest Neighbor: This method is fast but not very precise. It is useful for resizing illustrations. However, it can produce jagged edges.
Bilinear: This approach uses pixel averaging. It is a balance of speed and quality, and produces medium-quality results.
Bicubic: This method is slower but more precise than the first two (and more desirable). Photoshop spends more time examining surrounding pixels before interpolating new ones. The math at work is very complex, so this method will produce smoother results than Nearest Neighbor or Bilinear.
Bicubic Smoother: This method is a refinement of Bicubic. It is specifically designed for upsampling (enlarging images).
Bicubic Sharper: This method is also a refinement of Bicubic. It is useful for downsampling (shrinking images). It does a better job of maintaining sharpness than the other methods.
Photoshop allows you to choose a default interpolation method. This will be used when you invoke a sizing command, such as the Free Transform or Image Size commands (more on both in the pages ahead). Choose the method that best matches your workflow.
Many of your images will probably not be sized to the exact dimensions you need. You have several options at your disposal. To change the size of an image, you can use the Image Size or Canvas Size commands. You can also use the Crop tool or Free Transform command to make an adjustment. You can use these choices individually or in combination to achieve the desired results.
The Image Size command lets you permanently reassign the total pixel count, as well as resolution, for a particular image. You can also use this command to upsample or downsample an image. This is an easy way to size an image to a specific height or width. Let’s put the command into action:
Open the file Ch04_Flower.tif from the Chapter 4 folder.
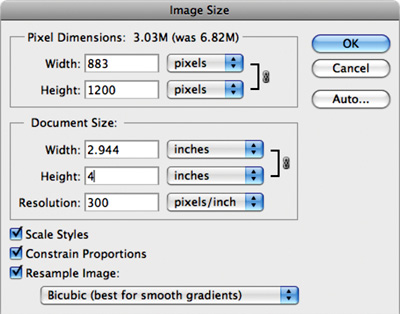
Choose Image > Image Size.
The Image Size dialog box offers several choices. You can choose to manipulate the pixel dimensions of the image (measured in pixels or percent). You can also modify the print size, which is the size of the image when printed. You can modify the print size based on percent, inches, centimeters, millimeters, points, picas, or columns. The most common choices are percent, inches, or centimeters, because most users easily understand these units of measure.
Set the Document Size to measure in inches. Specify a new height of 4 inches.
Be sure to select the Resample Image option if you want to change the pixel dimensions. Choose the method to Resample Image that is most appropriate for your image. Bicubic is the most common method, but you may have special circumstances. See “Choose an Interpolation Method” earlier in this chapter.
Leave the Constrain Proportions box selected, or you will introduce distortion. You generally want to keep the width and height constrained to the same ratio so the image resembles its original appearance.
Click OK.
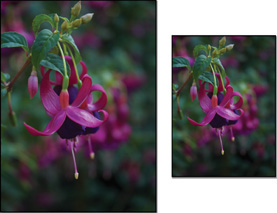
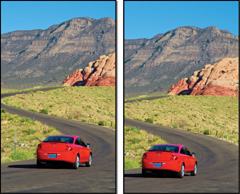
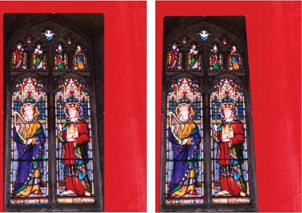
This photo was resized from a height of 6 inches to 4 inches. The resolution of 300 ppi did not change. The image on the right is smaller because it has fewer total pixels.
The canvas size is your work area. When you create a new document, you can specify the size of your canvas. When you scan a photo or import a digital image, the canvas size is set to the edge of the image. You may need to change the canvas size to crop or extend the canvas of your image to work on specific areas of the image. Let’s try it out:
Open the file Ch04_Beach.tif from the Chapter 4 folder.
Choose Image > Canvas Size.
When you launch the Canvas Size command, you’ll see the pixel dimensions of your current canvas. You can specify a new canvas size using a variety of measurements. Pixels is a useful measurement if you’re creating screen graphics, whereas inches or centimeters is easier to understand for print work.
Let’s place a uniform border around the image.

Select the Relative check box. This disregards the numerical values of the current canvas size and allows you to specify a new amount to be added to the existing image.
Set the anchor point for the image to be centered. This will expand the border in all directions around the center of the current image.
Add a quarter-inch border on all sides. Type .25 inches into the Width and Height fields.
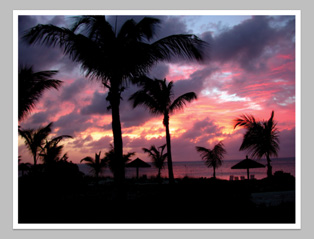
Specify a Canvas extension color. This is the color that Photoshop places around the image when you change the canvas size. You can choose to use the foreground or background colors that are loaded in the toolbox. You can also use white, black, gray, or other, which can be any color you specify. In this case, choose white.
Click OK.
With the Crop tool you can change a viewer’s perception of an image. You can choose to tighten the area of interest of an image, which allows you to deemphasize (or even eliminate) parts of a photo and improve the image by better framing the subject.
Tip: Cropping Keyboard Shortcuts
To toggle the shielded area off, press the forward slash key (/).
To hide the selection border, press Command/Ctrl+H.
You can invoke cropping in two ways. The first method involves making a selection with the Rectangular Marquee tool, and then choosing Image > Crop. While this works fine, it does not offer as much control as using the second method, the Crop tool. Let’s put method two into action:
Open the image Ch04_Riders.tif from the Chapter 4 folder.
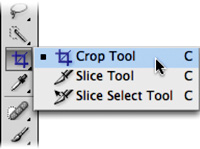
Choose the Crop tool from the Tools panel or press C.
With the Crop tool, make a selection to crop the image. In this case, removing the rider on the far left (who is chopped off) will improve the composition of the image. Additionally, reducing the headroom (space above the riders’ heads) will also improve the image’s appearance.
You can refine the crop selection after it is made. Mouse over an edge of the crop until the pointer changes to a double-headed arrow, then click and drag on the crop selection border to pull the crop tighter or expand it looser. Additionally, you can click a corner of the crop border to expand two sides at once.
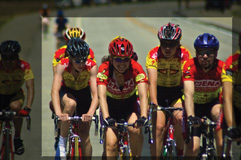
Examine the crop. Make sure you’ve selected the Shield check box in the Options bar. This gives you a better idea of the area to be cropped.
When satisfied with the crop, press Return/Enter or click the Commit button (check mark) in the Options bar. The shielded (darkened) areas will be cropped. To cancel, press the Esc key.
It is possible to crop and resize an image at the same time. I refer to this technique as a power crop, and it is a huge time-saver. Before cropping, you can type the desired size of your final image into the Options bar. When you drag to crop the image, your box will constrain to the proper aspect ratio. This allows you to resize and crop in one step.
Tip: Restoring Hidden Pixels
With Photoshop CS4, you can choose Image > Reveal All to restore all hidden pixels if you’ve used the Hide method for cropping.
Let’s crop an image to a 4-inch by 4-inch square at 200 ppi.
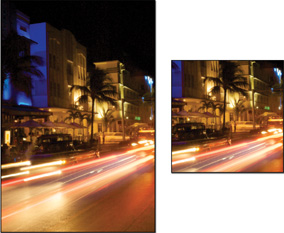
Open the file Ch04_Night_Street.tif.
In the Options bar, type 4 in (as in inches) into both the Width and Height fields.
In the resolution field, type 200 and set it to pixels/inch.
Drag to crop the image. Your crop selection is constrained to the shape you specified in the Options bar.
Click the Commit button or press Return/Enter. When finished cropping, you may want to click Clear to reset the tool’s default settings.
Cropping is very important, but it’s also permanent. When you crop an image, you permanently discard data. Nondestructive editing is a workaround that allows you to crop an image and keep the cropped pixels available for future use. Nondestructive editing provides you with flexibility throughout the design process. Let’s put the technique to the test:
Open the image Ch04_Nondestructive.tif from the Chapter 4 folder.
To crop nondestructively, you must convert the Background into a standard layer. You’ll explore layers in depth in Chapter 8, “Compositing with Layers.” For now, double-click the word Background in the Layers panel. Name the layer Car and click OK.
Select the Crop tool by pressing C.
Mark out an area to crop.
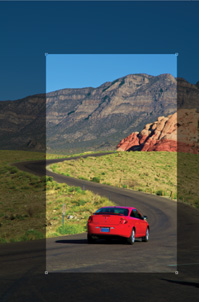
In the Options bar, change the Cropped Area to Hide (Delete is selected by default).

Select the Move tool by pressing V (as in moVe, the letter M is used by the Marquee tool). Drag in the image and reposition it; the original pixels are still available, allowing you to modify the crop in the future.
Because the cropped pixels were hidden (instead of deleted), details were preserved outside the cropped area. This allows for the image to be repositioned within the frame. Be sure to save the image as a PSD file or Layered TIFF to preserve future flexibility.
Some images will have visible distortion, which is often caused by the camera not being square with the subject. If the photographer was higher (or lower) than the image or if the photo was taken at an angle, you will see distortion. In some cases, this distortion is part of the shot composition and is desirable. In others, the distortion can be distracting. Let’s square off an image:
Open the file Ch04_Perspective.tif from the Chapter 4 folder.
Select the Crop tool by pressing C.
Crop around the window in the photo as tight as you can to frame it.
In the Options bar, set the Crop to Delete, not Hide. Then select the Perspective check box.
Click the Shield Color to select a new color. In the Color Picker, select a bright red to make it easier to see the cropped area.
Drag the upper-right and upper-left corners in toward the center. You are trying to line up the crop borders parallel to the edge of the window. The crop selection will no longer look rectangular.
Click the Commit button or press Return/Enter. The resulting image should appear as if the photo was squared and the camera was level.
Sometimes your image will need to be rotated or flipped. Loading your image upside down on the scanner, loading a slide backwards into a slide scanner, or turning the camera on its side when taking a portrait often causes inverted or reverse images. You may also want to make a change to your image for compositional purposes.
The Rotate Canvas command offers several choices. You can choose to rotate the image 180° (half a rotation), 90° clockwise or counterclockwise, or an arbitrary amount (the user types in a number of degrees). Additionally, the entire canvas can be flipped (creating a mirrored image). You can choose to flip the canvas horizontally or vertically:
Open the image Ch04_Rotate.tif from the Chapter 4 folder.
Choose Image > Rotate Canvas 90° CCW (counterclockwise). The image is now properly oriented.
The Free Transform command is another useful way to rotate and size an image. It works best when you have an object located on its own layer or if you have an active selection. You’ll explore selections and layers in much greater detail in future chapters. For now, let’s work with a simple layered image that has already been prepped.
This image has two layers: a background, which is a gradient, and a vector shape layer. A vector layer is a special layer in Photoshop. It can be resized and transformed repeatedly with no degradation in quality. Vector layers use math to describe curves and can be freely manipulated.
If it’s not visible, call up the Layers panel by selecting Windows > Layers.
Select the Vector Shape layer so it is active.
Choose Edit > Free Transform or press Command/Ctrl+T.
You can access several controls for the Free Transform command by right-clicking/Control-clicking. Try the following transformations on the Vector Shape layer. You can press the Esc key to cancel the transformation or Return/Enter to apply it.
Scale: You can scale by dragging a handle. Hold down the Shift key as you drag a corner handle to scale proportionately. Hold down the Option/Alt key to scale in both directions simultaneously. To scale numerically, enter a value in the Options bar.
Rotate: You can choose to rotate a preset amount by selecting Rotate 180°, Rotate 90° CW, or Rotate 90° CCW. To rotate freely by dragging, move your mouse outside the Free Transform box. It will become a curved, two-headed arrow. Hold down the Shift key while rotating to constrain the rotation to 15° increments. Additionally, you can rotate numerically by entering degrees in the rotation box in the Options bar.

Skew: Skewing an image creates a sense of distortion, as if the image were leaning. To skew the image, hold down Command/Ctrl+Shift and drag a side handle (not a corner handle). The cursor will change to a white arrowhead with a small double arrow.
Distort: If you want to distort an image freely, choose Distort. This allows you to move the corners of the image freely (a process also known as corner-pinning). You can also access this command by pressing Command/Ctrl while dragging a corner point.
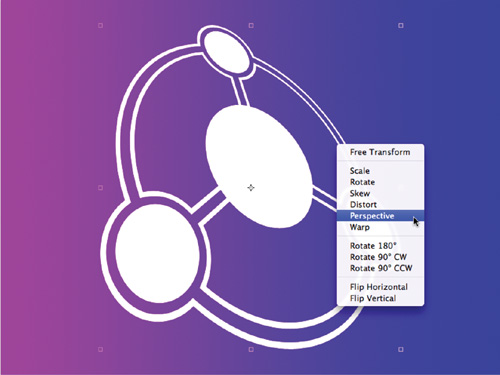
Perspective: Transforming perspective creates the illusion that the image is being viewed from above or from the side. You can access this command by pressing Command+Option+Shift/Ctrl+Alt+Shift or from the context menu. This is a useful command to fix perspective problems or to add perspective effects.
Open the file Ch04_Free_Transform_Additional.psd. Using the Free Transform command, you can rotate, size, and flip the images to create a better layout.
Warp: The Warp command was first introduced in Photoshop CS2. It allows you to distort an image into a number of predefined shapes available in the Options bar (such as Arch, Flag, or Twist). By choosing Custom, several points can be freely dragged to distort the image as desired.
Flip Horizontal and Flip Vertical: These simple commands let you flip an individual layer without flipping the entire canvas.
The Free Transform command has one major benefit over choosing individual transform commands from the Image menu: Free Transform lets you apply transformations in one continuous operation, which reduces quality loss in raster images.
Adobe launched a new technology with Photoshop CS2 called Smart Objects. This powerful command allows you to embed raster or vector data into a layer. The layer can then be transformed indefinitely because the embedded data remains editable and scalable. You can convert one or more layers into a new Smart Object.
Tip: Smarter Smart Objects
When using Photoshop CS4, you can now apply perspective transformations to Smart Objects as well. Simply follow the instruction in the “Free Transform Command” section earlier in this chapter.
A Smart Object is simply one file embedded inside another. This can be very useful because Smart Objects allow greater flexibility than simply applying the Free Transform command to a regular layer. With a Smart Object, you can perform multiple nondestructive transforms with no loss in quality (as long as you don’t exceed the pixel dimensions of the original raster object).
Open the file Ch04_Smart_Object.psd from the Chapter 4 folder.
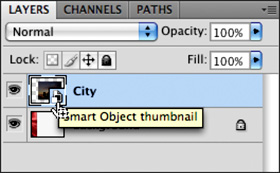
Select the layer City in the Layers panel.
Choose Layer > Smart Objects > Group into New Smart Object.
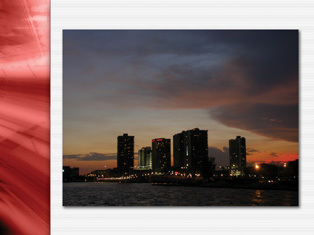
Invoke the Free Transform command and scale down the image to a very small size. Apply the transformation.
Invoke the Free Transform command and scale up the image to its original size. Apply the transformation. Notice that the image remains clear.
When you place a vector object into Photoshop (such as an Adobe Illustrator or EPS file), it will automatically come in as a Smart Object. Additionally, you can choose Layer > Smart Objects > Group into New Smart Object for raster-based layers.