While Photoshop is a great tool for many tasks, most of them center on the sizing, manipulation, and processing of digital images. Even though their contents may vary, all digital images are essentially the same: They are composed of pixels that contain color and luminance information. Photoshop’s powerful features allow you to adjust those pixels to better match your needs.
And while the destination may be the same, the path your digital images take to get inside Photoshop will vary. Some may start out as digital images acquired with a still camera, whereas others may be loaded via a scanner. You might also search online resources to find specialized images. Let’s take a look at the many ways to acquire your digital images.
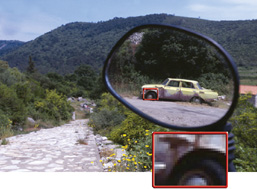
Pixels in detail: When you zoom into an image at 1600% magnification, the pixels are very easy to see. You can open the photo Ch03_Car_in_Mirror.tif from the Chapter 3 folder and use the Zoom tool (Z) to magnify the image. In fact, you can zoom up to 3200%, which makes pixel viewing quite easy.
This book will not teach you how to use your digital camera. Many excellent books on that subject as well as classes are offered. What this book will address is how the pixels are converted, what file format you should choose to shoot your images, and how to transfer them to your computer.
Sensors in a digital camera acquire an image by converting light into pixel data.
Shooting a photo digitally produces a less accurate image than scanning a photo shot on film and scanned with a flatbed scanner using a high spi setting. This is because digital cameras capture data using photosensitive electronic sensors. These sensors record brightness levels on a per-pixel basis. However, the sensors are usually covered with a patterned color filter that has red, green, and blue areas. While the filter attempts to capture all detail that the lens sees, it is unable to due to its design.
The filter used is typically the Bayer filter arrangement, which contains two green pixels, one red pixel, and one blue pixel. The Bayer filter uses more green because the human eye has an increased sensitivity to green. This filter allows the image to record the brightness of a single primary color (red, green, or blue) because digital cameras work in the RGB color space. The RGB values combine using the additive color theory (which was briefly discussed in Chapter 1, “Digital Imaging Fundamentals”) and form an image when viewed from a suitable distance.

The Bayer filter arrangement uses an arrangement of red, green, and blue pixels and is very common in digital cameras. There are more green pixels because the human eye is more sensitive to green information.
Not all the properties of film can be fully imitated by the computer sensors in a digital camera, so the camera must interpolate the color information of neighboring pixels. This averaging produces an anti-aliased image, which can show visible softening. When anti-aliasing is present, hard edges are blended into one another. Sometimes this can be desirable (with low-resolution Internet graphics where you reduce file size by limiting color). Other times, anti-aliasing can produce an undesirable softness when you print an image. Depending on the colors in the original image, a digital camera might only capture as little as one-fourth of the color detail. For example, if you had a desert scene with lots of red detail and little green or blue, the sensor would rely on the red areas of the filter (which only cover a fourth of the sensor face).
Does this mean you should shoot film only? Of course not; I shoot both. But it’s important to shoot for what you need. There are strengths and weakness of both film and digital capture (as well as several stylistic decisions). Ultimately, film captures a high-quality image that can be optically enlarged using the negative. However, digital capture can be more convenient and affordable because you get instant feedback on the images you have just taken, and you eliminate the time-consuming process and costs associated with developing the film.
It is important to shoot at a high pixel count (which can be accomplished by setting the camera to shoot in a high- or best-quality mode). You can always crop or shrink the image for output or display, but you should do your best to avoid enlarging the image. When a digital image is enlarged, it can create unwanted image softness or pixelization (a visible blockiness). Capture as much pixel data as possible to minimize digital upsampling (increasing the resolution of the image).
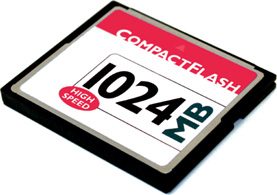
When digital cameras became commercially available, the memory cards used to store pictures were very expensive. Many photographers could not afford multiple or high-capacity cards, so they wanted more images to fit on a single, smaller card. Many users also emailed their pictures to friends and family. Small file sizes enabled consumers who lacked an understanding of digital imaging to attach photos to emails with minimum technical headaches. With these two scenarios in mind, manufacturers turned to an Internet-friendly format, JPEG (Joint Photographic Experts Group). It was a proven technology and one that was familiar to many users.
The JPEG format is extremely common because most hardware and software manufacturers have built support for it into their products. The JPEG format is also extremely efficient at compressing images, and it is a good format for continuous tone images, such as photos. A JPEG file looks for areas where pixel detail is repeated, such as the color white on every key of your computer keyboard. The file then discards repeated information and tells the computer to repeat certain color values or data to re-create the image.
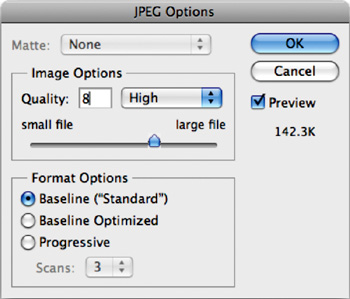
The JPEG Options box is available when you modify a JPEG file with Photoshop. When saving, you can adjust the Quality slider to reduce file size. It is best to leave Quality set to maximum if you will be making future edits to the image: This applies the least compression that could damage the image’s appearance.
While JPEG is a good format for distributing images (due to their compatibility and small file size), it is not great for image acquisition or production. A JPEG file is lossy, meaning that every time you modify it in Photoshop and resave, additional compression is applied to the image. Over subsequent compressions, the image quality can noticeably deteriorate. This is similar to the act of making a photocopy of another photocopy: Additional image deterioration occurs with each processing step. The visible loss in image detail or accuracy is referred to as compression artifacts.
So, if JPEG is so inferior, why do so many people use it? Money and resistance to change are the simple answers. It’s a lot cheaper to shoot JPEG images because you don’t need to buy as many memory cards. Additionally, even many pros have been slow to abandon JPEGs. Learning how to use new technology requires time, something that most people are short of these days.
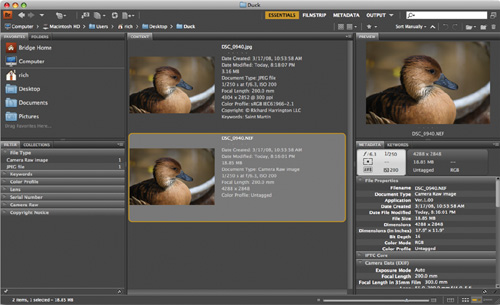
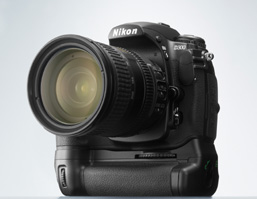
This image was captured as both a raw and a JPEG file when it was shot. The picture was taken with a Nikon D300, which can simultaneously write both files to the memory card when shooting.
Newer digital cameras, generally the pro models, offer newer formats, typically called raw. These raw (or native) formats have several benefits over shooting to JPEG. The images are usually captured at a higher bit rate, which means that the pixels contain more information about the color values in the image. Most raw files have a depth of 10, 12, or even 16 bits per channel instead of the 8 used by JPEG. The raw format also has a greater tonal range; hence, there is a better exposure for shadows and highlights. This extra information makes your work in Photoshop easier because it adds greater flexibility and control in image adjustments and color correction. You should have less work to do in Photoshop as well, since the image captured has more color information than a JPEG would have.
Raw files can be two to six times larger than JPEG files. This extra data is used to hold more image detail, which can reduce, or even eliminate, compression artifacts found in JPEG files. However, that extra data can increase the time it takes for the files to write to the memory card.
Tip: Workaround for Unsupported Cameras
If Photoshop does not support a particular raw format used by your camera, use the software that shipped with the camera. The image can be converted into a 16 bit TIFF image (a high-quality file with no compression), which Photoshop can open.
The raw file captures the unprocessed data from the camera’s image sensor. While your camera may contain settings for sharpness, exposure, or lighting conditions, the raw file stores that info as modifiable information and captures the original (unmodified) data that came through your camera’s sensors. This is very useful because it lets you easily adjust white balance within Photoshop. Each manufacturer treats the format differently, using a proprietary format. Fortunately, Photoshop frequently updates its raw technology to support the newest cameras on the market. To find out if you can access a particular camera format from within Photoshop, visit Adobe’s Web site at www.adobe.com/products/photoshop/cameraraw.html.
Tip: Camera Raw for TIFF and JPEG?
While the Camera Raw interface can be used for JPEG and TIFF files, those images have already had the camera’s processing permanently applied to the images. Shooting raw has many benefits and should be fully explored by reading the documentation that accompanies your camera.
Because the raw data is unprocessed, you must essentially “develop” the image data inside Photoshop. You’ll be presented with several choices when opening a raw image. You can choose to adjust several options related to the image, as well as the lens and lighting conditions. All the adjustments made in the Camera Raw dialog box are nondestructive, meaning the original image is preserved in pristine condition. You can “tweak” the image after shooting it, including being able to easily save those changes and apply them to similar exposures.
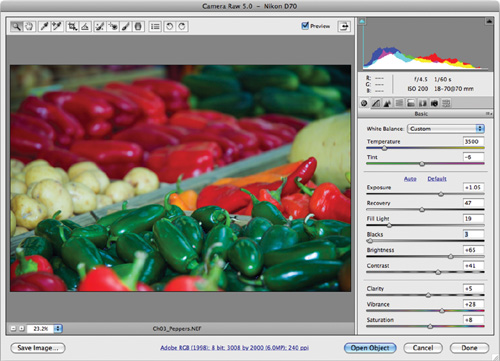
The Adobe Camera Raw dialog box is a versatile environment for “developing” your pictures. The image Ch03_Peppers.NEF is included on the CD. Choose File > Open and navigate to the file in the Chapter 3 folder. In Photoshop CS4, you can even make localized adjustments by painting an area and then using sliders to modify it.
The Camera Raw dialog box has continued to evolve since it was first introduced as a purchased add-on to Photoshop 7. Subsequent versions of Photoshop have updated the user interface. To help you learn about these options, your best bet is to read the many entries in the Adobe Help Center. Fortunately, the Camera Raw dialog box is fairly intuitive, especially once you understand the concepts of adjusting images. After you have completed Chapter 10, “Color Correction and Enhancement,” you should feel much more confident using the options in the Camera Raw dialog box.
Is DNG the New Raw?

In 2004 Adobe released the Digital Negative Specification (DNG) file format. The code and specifications were made publicly available so manufacturers could build in support for the format to their products. The goal was to replace several proprietary raw file formats with a universal format. Despite initial optimism, camera manufacturers have been slow to adopt it (some even refusing). At this point, DNG files are a useful way to archive raw files and attach additional metadata. You can find out more about DNG by visiting Adobe’s Web site at www.adobe.com/products/dng/main.html.
There are two major ways of downloading images from a digital camera. Which connection type you choose will depend on your work environment and budget for additional hardware.
The first method involves plugging the camera directly into the computer. Many cameras ship with a connecting cable (generally USB). The advantage of this approach is that it doesn’t require an extra hardware purchase. The primary disadvantages of this method are that it ties up the camera and it is hard on delicate ports built into the camera. If you break the USB port by constantly plugging and unplugging a camera, it can lead to an expensive service bill. The data port is interconnected with several other systems on the camera; a break at one end can result in problems in other areas. Additionally, if the camera’s battery were to be depleted during image transfer, it can corrupt the memory card.
Tip: Make Backup Copies
You may want to work with a copy of your transferred image, especially if you are just getting started in Photoshop. Many users will duplicate a folder of images and work with those. Others will burn a copy of the original images to a CD or DVD for backup. Preserving an original digital file is a good idea for future use. If you are shooting raw, there is no need to duplicate the raw file. The modifications to the image are stored in a separate sidecar file in the folder with your images.
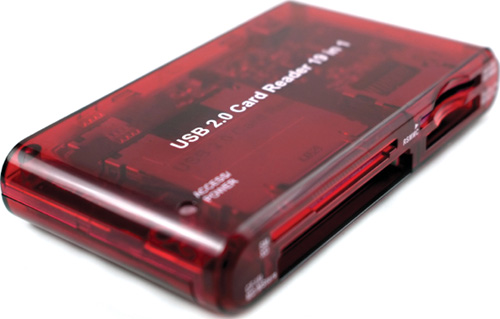
A better option is to purchase a stand-alone memory card reader. There are many options available, so consider these questions and choose wisely:
Do you need only one card format, or do you need to read multiple formats?
Is read-only enough, or do you want to be able to erase and reformat cards while they are in the reader?
How fast do you want your files to transfer? Many card readers are USB 1, which can take a long time to transfer files. Look for USB 2 or FireWire for faster data rates. Laptop users with a card slot can purchase an effective card adapter for fast file transfers without tying up ports.
Note: Transferring Files
The actual transfer of photos is not handled by Photoshop. Rather, you can use Adobe Bridge CS4, which includes a Photo Downloader (File > Get Photos from Camera). If you are not using Bridge, the files are handled natively by your computer’s operating system. Just manually copy them to a folder on your computer.
It may come as a surprise to some of you reading this book, but not all cameras are digital. Shooting on film is still a valid choice. Film offers greater flexibility for low-light situations, and it offers some aesthetic options not afforded by digital capture. Many purists swear that shooting film adds richness in detail and color, as well as introduces subtle nuances like film grain, which cannot be replicated with a digital camera. Additionally, many pictures that you’ll need to work with might only exist on traditional media (such as prints) or as a negative. You’ll need to use a scanner to turn these optical formats into digital formats.
If you work in a computer lab or other work environment, your choice in scanners may have already been made for you. However, it is still important to understand the different types of scanners that are available to consumers.
Note: lpi versus ppi
The general rule for printing is to take your lpi requirement and multiply by two. Round up to the nearest large number and you have your ppi requirements.
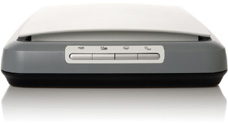
The most common scanner type is a flatbed scanner on which photos are loaded face down on a piece of glass. The scanner then moves a charge-coupled device (CCD) across the image to capture/digitize the image. High-quality scans can greatly increase the amount of data that is captured. So, be sure to look at high-speed scanner-to-computer connection options. For a modern computer, FireWire or USB 2 are the best options.
Don’t get too bogged down with scanner attachments. Unless you only occasionally need them, slide adapters and transparency adapters don’t work as well as a dedicated specialized film scanner. These options often just add to the cost of the scanner.
Be sure to pay close attention to the optical resolution of the scanner: This is the maximum size of the image before using software interpolation to enlarge it. Most users doing intermediate-level work or desktop publishing find a scanner capable of 600 to 1200 spi to be adequate. Remember, samples per inch can translate fairly well into pixels per inch. It is a good idea to have more pixels to start with, and then reduce the size of the image for delivery.
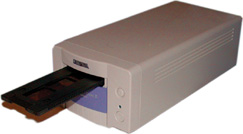
Specialized scanners load in slides or film negatives. These scanners use a tray to hold the material, and then a motor pulls the tray slowly across an optical sensor. This process is relatively slow due to the resolution needed. The scanner must capture a lot of data from a very small surface area to produce a usable image. These scanners are slightly more expensive than flatbed scanners but are essential if you frequently work with slides or negatives.
When top image quality is a must, pros turn to drum scanners. These units are very expensive (starting at $5,000 and going up—significantly). This scanning technology is the oldest. It calls for the image to be mounted on a drum. This drum is then rotated in front of a photomultiplier tube. This tube is much more sensitive than the CCDs used in flatbed scanners. Drum scanners’ primary advantage is resolution, and they should be used when you need to significantly enlarge a scanned image (such as museum archival pieces or for magazine output). Because the machines are expensive and very complex (as well as potentially destructive), users will often send images to a service bureau for drum scanning.
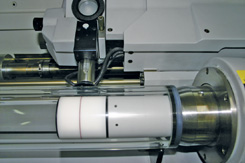
A drum scanner is a highly specialized piece of equipment. These machines are very expensive and are usually found only in high-end service bureau facilities.
People often get confused when determining what settings to scan with. Too little information and the picture goes soft. Too much information and the scanner slows to a crawl. The answer is to know your intended output resolution as well as your device.
For example, if you need to create a 20-inch wide poster that will be printed on a high-quality press requiring 300 ppi, use this calculation:
20 (inches) × 300 (ppi) × 1.25 (pad for flexibility) = 7500 pixels
Do not adjust your scanner’s dpi (or ppi) settings. Rather, crop the image after running a preview scan. You can then adjust the scanner’s resolution by looking at the output size of the scanned file. As you adjust the output file size, the scanning software will automatically determine the appropriate settings for samples per inch. All scanners tell you just how many samples you are about to capture. Looking at these numbers gives you a truer sense of the end result. Total pixel count is much more important than dpi, especially when scanning images of various original sizes.
Tip: Capture More Than You Need
There’s no need to overdo it, but I always recommend capturing two to three times more data then you will need. For example, if you will be outputting a Web graphic at 1024 × 768, you should capture at least 3000 × 2000 pixels to start. Having the extra pixel data will give you more details to work with when zooming in for touch-up. It also allows you to make decisions about cropping and reformatting.
It is safe to say that every scanner model is a little different. Hardware manufacturers must write software that allows the scanner to interface with your computer. When choosing a scanner, be sure it works with your computer’s operating system (always check the box or manufacturer’s Web site carefully).
Before scanning an image, install the software and drivers needed by your scanner. These are usually included on a disc provided by the manufacturer or are offered for download from its Web site. This software runs as an independent program, but Photoshop can open the resulting scans.
Ensure that the scanner is lying flat, or you may get misregistered scans.
Place your photos on the scanner and make sure they are straight. Use the edges to help you maintain parallel edges on your photos.
Run a preview scan first to check image placement and details.
If your scanner allows it, set the white and black points before scanning. This is accomplished by making a preview scan, and then using your scanner’s software to identify a black and a white point in the image. You can then use Photoshop’s color correction tools to adjust the white and black points as well as make additional color changes. Every scanning software program is different, so be sure to read the documentation included with the scanner or on the manufacturer’s Web site.
Scan slightly higher than the quality you need; for example, scan at 300 spi for newsprint, even though you may only deliver it at 170 ppi. The extra pixel information allows you to zoom in for further corrections. It also gives you extra pixels in case you need to crop the image.
Save to formats such as TIFF (Tagged Image File Format, a standard in the print industry). This file format is efficient for storage and supports lossless compression to reduce file size. The Photoshop (PSD) format is great for layered files but is not as efficient for single-layer files. Always save the file using the appropriate file extension for your file type.
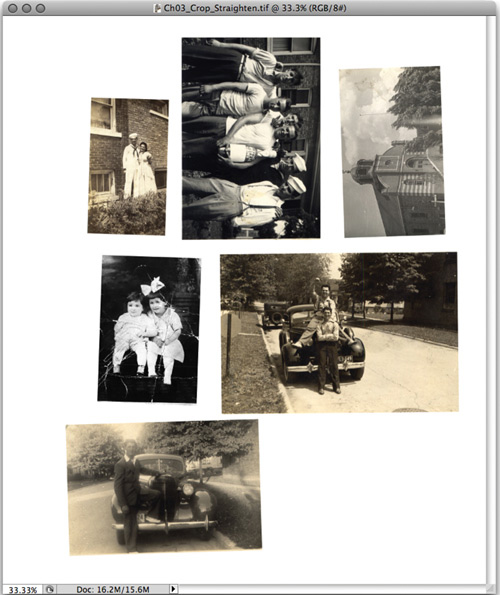
Note: Crooked Scan? Fix It Later with Photoshop
If you get crooked photos, you can use a Photoshop automation command to automatically crop and straighten your images. Simply open the file, and then select File > Automate > Crop and Straighten Photos. You’ll find two Crop and Straighten demo files in the Chapter 3 folder.
Tip: Scanning Previously Printed Items?
If you are scanning an image that has been previously printed in a book or magazine, you may need to descreen it (descreening prevents moiré patterns). Look to see if your scanner offers a hardware-based descreening option.
You will often find image collections available for sale (or those with educational books) on optical discs. This is a great way to distribute images (cheap to manufacture and large-capacity discs that are cross-platform compatible). You’ll want to copy the images to your hard drive before you bring them into Photoshop. This will significantly increase the speed at which you can work on the images (hard drives transfer data faster than optical media drives). Additionally, you will be able to save your work in progress to your hard drive; you can’t save to the CD or DVD.
Professionals find it is often necessary to purchase images to complete their projects. Whether it’s a shot of broccoli for a magazine layout or the New York skyline for the cover of a DVD, stock photo services can help. But finding the right stock photo service is a balancing act. You must consider several factors when making a choice:
Cost: There is a lot of competition out there, and photos are priced accordingly. Some services offer annual subscriptions; others charge per image. Be sure to keep your budget in mind when searching for needed photos.
Resolution: Sites often charge more for high-resolution images. Be sure to know how you’ll use the image. Web site designers will pay less for an image than someone designing an annual report. A Web image is low resolution, whereas the report will be professionally printed and require high-resolution images.
Exclusivity: Does the image need to be yours and yours alone? Or is it OK if the photo is also used in someone else’s project? Images that have their usage rights managed cost significantly more. A rights-managed image has restrictions placed on who can use the image for a certain time period. In contrast, a royalty-free image is purchased once and can be used as many times as the designer desires.
Quality: Expensive doesn’t guarantee better, but it does increase your chances. More expensive sites often have a better selection of images (the best photographers charge more, go figure). If you are on a budget, prepare to spend more time searching for an image. There’s a line often used in the professional creative community: “Good, Fast, Cheap... pick two.” It seems appropriate here as well.
Note: Royalty-free Does Not Equal Free
Do not confuse royalty-free and free. A royalty-free image must still be purchased. This is how the photographer and distributor make money. Royalty-free images can be a big savings because you can eliminate model releases, talent charges, location fees, travel, and many other costs associated with a photo shoot. However, keep in mind that someone had to pay those charges in the first place, and selling their pictures is their livelihood. Remember to pay for what you use. It’s the professionally responsible way, as well as the law.
I’d say, “The best things in life are free,” but that wouldn’t be accurate here. More appropriately, “Why pay twice?” The United States has several federal agencies that document their work and make it available to the public. This work was paid for with tax dollars, and the people of the United States own the work. Fortunately, through the Internet, the U.S. government is willing to share much of it with the world.
I’ve created a portal page on my blog that points to the best government sites. These pages offer print-resolution images that you can use. Nearly every image is copyright free, but you may be required to cite the source. Be sure to look at the terms of use posted on the site. Take the time to fully explore each site; you’ll be surprised by the wealth (and diversity) of available images.
Visit www.rastervector.com/resources/free/free.html.
For more on copyright and fair-use doctrine, visit www.copyright.gov.