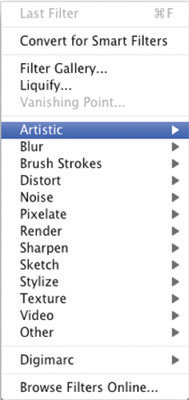
Filters are among Photoshop’s most popular features. These specialized add-ons can be used to boost productivity or add special effects. Photoshop ships with over 100 built-in plug-ins, and there is a rich array of others available from third-party developers. Filters are so popular that you’ll find more tutorials online than you could ever make it through in a lifetime.
Photoshop almost did not ship with filters, because many at Adobe thought they were too “gimmicky.” However, John Knoll, co-creator of Photoshop, managed to “sneak” them in. Those early execs were partially right, though: When used improperly (or too often), filters can be gimmicky. Think of filters like spices: When used properly, they can add to a meal, but if they’re overused, they can ruin it—and no one can live on spices alone.
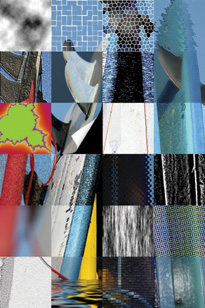
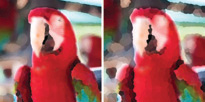
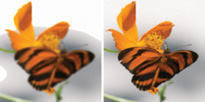
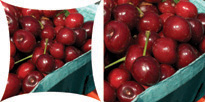
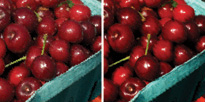
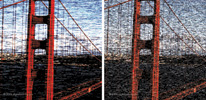
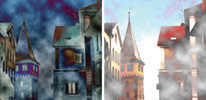
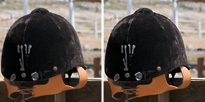
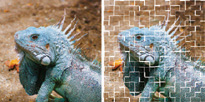
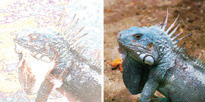
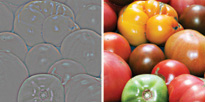
Both built-in and third-party filters were run on this image. You would not normally run as many filters on a single image, but you can see just how diverse filters can be.
The proper use of filters can significantly extend Photoshop’s capabilities. There are filters that perform important image-enhancement tasks for removing grain or damage. Additionally, filters can be used for tasks like blurring and sharpening image details.
Filters allow you to achieve more quickly what otherwise would be time-consuming results; they can even unlock options that could not be done with built-in tools. Filters can often create stylized looks as well as enhance the lighting of a photo.
By definition, a filter must reside in Photoshop’s Plug-ins folder. Besides the bundled filters that are installed with Photoshop, you’ll find a few specialty filters on the Photoshop installer DVD or in the Support area of Adobe’s Web site.
Filters can save time and in fact can even be fun to use. Before you rush in and try out every filter in Photoshop, you need to make sure the image is ready to be processed. Many filters are render intensive; so there’s no reason to spend extra time on pixels you will be throwing away.
Filtering mistakes only draws further attention to them. Most importantly, make sure the image is properly exposed. This can easily be accomplished using a Levels adjustment (Image > Adjustments > Levels). For more on Levels, see Chapter 10, “Color Correction and Enhancement.”
Filtering an image is easiest when you can see all your pixels (otherwise, resampling occurs). For best results, zoom in 100% or choose View > Actual Pixels. You can also double-click on the magnifying glass in the toolbox or press Command+Option+0/Ctrl+Alt+0. The Navigator panel is useful to get a global overview and to move quickly around an image that is zoomed in.
You’ll want to be sure that you are working in RGB mode whenever possible (Image > Mode > RGB). This will ensure that you have the most filters available. Very few filters work in CMYK mode because CMYK conversion is supposed to be the last step in processing an image. Only those filters that are meant for print work have been optimized to work in CMYK mode.
If you have a CMYK image and you need to convert it back to RGB mode for filtering, go ahead. You do not have to worry about color shift when converting from CMYK to RGB. Because CMYK has fewer colors than RGB, no information will be lost.
It’s also important to keep an eye on bit depth when working with filters, or your options with filters will be limited. The vast majority of filters only run on images in the 8-bit mode. In fact, as of Photoshop CS4, only 37 of the built-in Photoshop filters will work in 16-bit mode and only 20 of them work in 32-bit mode.
The filters designed to work at higher bit depths are designed primarily for image enhancement (as opposed to stylization). These filters are targeted for use with digital photography applications. While a 16-bit image can be processed more without showing banding or posterization, you may need to work in 8-bit mode. If you can work in 16-bit mode, do so, but be prepared to lose some functionality with filters and image adjustments.
Because filters are designed for specialty purposes, the interface you use to control a filter will vary. A few filters have no user interface (for example, Average, Despeckle, Facet). If a filter does not have an ellipsis (...) after its name, it has no user interface. These filters are fairly limited and will likely fall off your favorites list.
Most filters, however, will have some form of user interface. Some filters have their own window; others use the Filter Gallery. No matter which interface you use, consider selecting the Preview option. This allows you to see the filter’s changes to your canvas before you actually apply the filter.
Here are a few more tips about using a filter’s interface:
Click in the preview window and drag your view to change the preview area.
Use the + or - button under the preview window to zoom in or out. Additionally, you can zoom into the preview by pressing Command/Ctrl+= and zoom out with Command/Ctrl +-.
Click in the image window to adjust the center point of the preview window. (This may not work in all cases.)
When you’re in a dialog box, fully explore it. Try adjusting all the variable sliders one at a time. If there’s a Load button, try loading presets that shipped with the product.
To see the “before” state, click and hold inside the preview window. When you release, the filter preview is shown again.
Tip: Is There an Interface?
If a filter name is followed by an ellipse (...), it has a dialog box that will open. If not, the filter is as-is and cannot be tweaked before application (but you can still use the Fade command afterwards).
Starting with Photoshop CS, Adobe modified how several filters work. Forty-seven of the built-in filters use the Filter Gallery interface. This larger window allows for the application of multiple filters in one pass.
Many users wonder why only some filters are in the gallery. Adobe placed most of the filters that were meant for artistic or experimental purposes (such as the Sketch filters) into the gallery. Effects that are more surgical (such as the Smart Sharpen filter) have their own windows. The primary benefit of the Filter Gallery is that you can see the results of combination effects. Let’s explore the Filter Gallery interface.
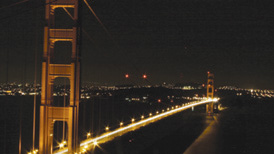
Open the file Ch14_Golden_Gate_Night.psd from the Chapter 14 folder on the CD.
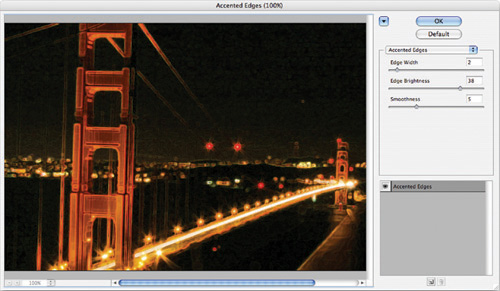
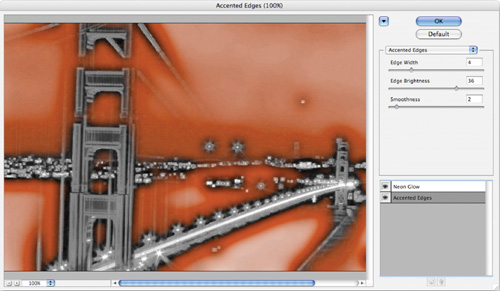
Launch the Filter Gallery by choosing Filter > Filter Gallery.
You are initially presented with a large thumbnail of the effects organized by the filter submenu. You can click the Show/Hide icon (it’s shaped like a triangle) near the upper-right corner to make more room for the image preview.
Click the New Effect Layer icon (it’s shaped like a pad of paper) to add an effect. The added effect will be Accented Edges because it appears first in the list alphabetically. Experiment with the sliders or choose a different effect from the Effects list.
You can hide the filter thumbnails to make more room for image previews by clicking the triangle in the upper-right corner.
You can add additional effects by clicking the New Effect Layer icon again. You can also delete or rearrange the stacking order of the effects. Changing the stacking order often results in new looks.
To temporarily disable an effect layer, just click its visibility icon.
When you’re satisfied, click OK to apply the effect.
If you’d like maximum flexibility, you can choose to apply filters to a Smart Object. Any filter applied to a Smart Object is applied as a Smart Filter. The names of the Smart Filters appear in the Layers panel directly below the Smart Object they have been applied to. Smart Filters can be adjusted, masked, or removed at any time (even after a document has been closed and reopened). This makes the use of Smart Filters essentially nondestructive but can slow down your system if you’re working on high-resolution images.
Note: Creating Smart Objects
You can create Smart Objects by choosing File > Place or by choosing Layer > Smart Objects > Convert to Smart Object. Remember, a Smart Object embeds the original content of the layer inside the Smart Object. This preserves flexibility in editing but also increases the processing time for filters and image commands.
Let’s practice with Smart Filters.
Open the file Ch14_Well.tif from the Chapter 14 folder on the CD.
Choose Filter > Convert For Smart Filters, and click OK. If an item is already a Smart Object, there is no need to convert it.
Choose Filter > Sharpen > Smart Sharpen and adjust the filter as desired.
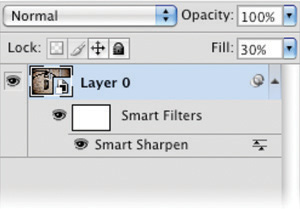
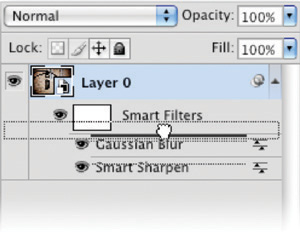
Click OK to apply the filter. The Smart Filter appears below the Smart Filters line in the Layers panel beneath the Smart Object layer.
Let’s modify the Smart Filter’s results. Double-click its name, Smart Sharpen, in the Smart Filter list. Reduce the amount of sharpening for the filter, and then close its dialog box.
Choose Filter > Blur > Gaussian Blur and apply a blur at a high value, such as 15 pixels. Click OK to apply the filter. The filter appears at the top of the Smart Filters list.
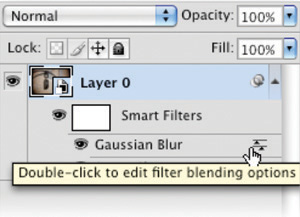
Smart Filters can also use blending modes, which opens up many options. Double-click the Edit Blending Options icon next to the filter in the Layers panel.
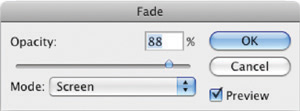
A Blending Options window opens to adjust the filter. Set the filter’s blending mode to Soft Light and adjust the Opacity to 80%.
Click OK to close the Blending Options window and update the Smart Filter.
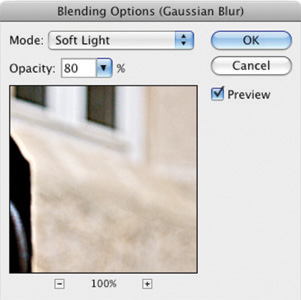
The blended Gaussian Blur filter has nicely intensified to color in the image but has also softened the image a little too much. This can be easily fixed by adjusting the Smart Filters stacking order.
Tip: Smart Filters Only Where You Want Them
Smart Filters automatically have a Layer Mask attached. If you make a selection before applying a Smart Filter, the Layer Mask will hide the filter’s results. If you need to alter the Smart Filter after the fact, you can use standard masking techniques to paint on the Smart Filter mask. The mask applies to all the Smart Filters applied to a layer. If you need to disable the Layer Mask, hold down the Shift key and click on its thumbnail.
Drag the Gaussian Blur Smart Filter so it appears at the top of the Smart Filter list. Remember, Photoshop applies Smart Filters from the bottom up.
Continue to experiment with Smart Filters and add additional effects.
When satisfied, close the photo.
Many people simply “slap” filters on their images and expect great results. This bandage approach does not usually create award-winning results. With a little bit of care, you can achieve significantly better looks.
You spent a lot of time on attaining accurate selections in Chapter 5, “Selection Tools and Techniques” (if you skipped it, reviewing it now will help you get the most out of this chapter). For the best results, you’ll want to accurately select the area to be filtered. Depending on what you want to achieve, filters may be run on the entire image, a small portion of the image, or even a single channel. Also, it’s not a bad idea to test a filter first by running it on a small area.
A hard-edged selection creates a visible border where the filter processed the image. It is absolutely essential to soften your selections. Two techniques work well (and can be combined):
Choose Select > Modify > Smooth to round out hard corners in your selection.
Choose Select > Feather to create a gradual edge. This is similar to the difference between a line drawn by a ballpoint pen and a line drawn by a felt-tip pen.
The Fade command is a little-known secret in Photoshop. It allows you to further modify filters by harnessing the power of blending modes. Use this command to access all 24 blend modes besides Normal. It makes your filter collection 24 times larger.
You must choose the Fade command immediately after the filter is run (even before you deselect the active selection). Let’s try it out.
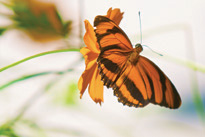
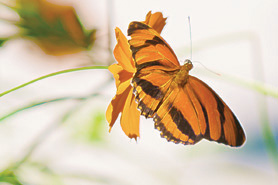
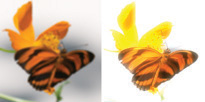
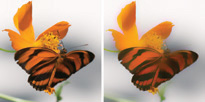
Open the file Ch14_Butterfly.tif from the Chapter 14 folder.
Choose Filter > Stylize > Glowing Edges.
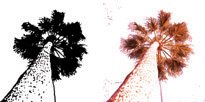
Adjust the sliders as desired until you have an image that looks much like a black velvet painting.

Invoke the Fade command by choosing Edit > Fade <name of filter>. The shortcut is Command/Ctrl+Shift+F. To remember this shortcut, think of it as though you want to command (or control) the shifting (fading) of the filter.
Try different blending modes and Opacity settings to modify the look of the filter.
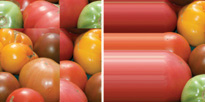
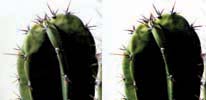
Do you want to know more about filters? Then keep reading. This guide walks you through every standard filter included with Photoshop CS4. Filters are often surprising, so here you can examine them in depth. This guide explores what each filter is for and gives recommendations on their different uses. The filters are listed in the order in which they are presented in the menu. This is for ease of reference when you want to come back and look up a particular filter.
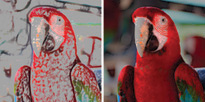
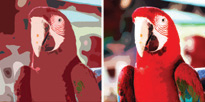
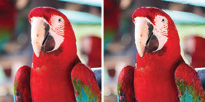
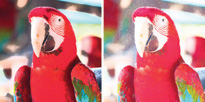
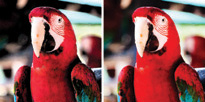
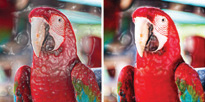
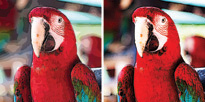
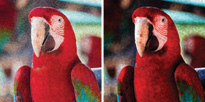
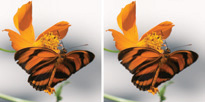
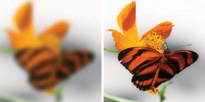
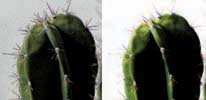
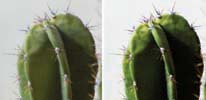
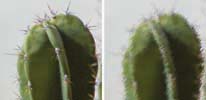
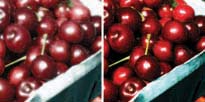
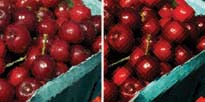
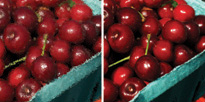
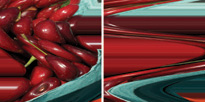
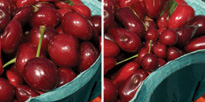
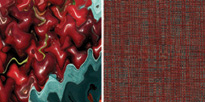
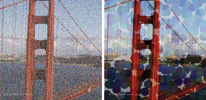
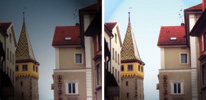
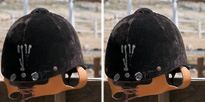
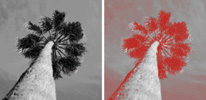
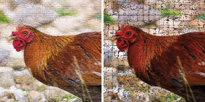
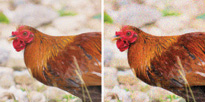
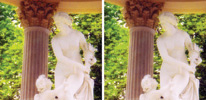
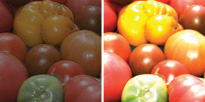
Next to each description you’ll see the filter in action, processing an image. Included are two different outcomes with each filter. The left image is a more “traditional” use of the filter. The right image uses more extreme settings or blending modes to achieve a different look. You’ll find the source images available on the CD. Open the images and experiment with each filter.
The Artistic Filters are direct descendants of the Gallery Effects filter package. These effects were originally sold as a stand-alone product but were bundled with Photoshop when Adobe bought Aldus (original creator of the page layout program PageMaker). These filters are old and their looks are often overused.
Tip: Creative Filter Use
Many filters will produce pleasantly unexpected results when used in situations they weren’t designed for.
The Colored Pencil filter produces a very predictable result. The key to achieving variety depends on the color loaded as your background color, because this becomes the “paper” that shows through. A shorter stroke width combined with a higher pressure setting generally produces the best results. Using white as the background produces a natural look. To further enhance the filter, choose Fade immediately after running it and set the filter to Hard Light mode.
The Cutout effect produces a very pleasing look where the image is simplified to the point that it looks like pieces of colored paper that have been roughly cut out and glued together to form an image. A higher setting of edge simplicity produces a better look.
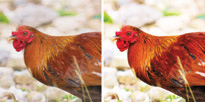
The Dry Brush produces a very traditional paint effect, somewhere between oil and watercolor. The strokes are very defined, and it is possible to introduce a visible texture.
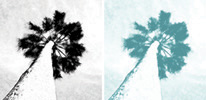
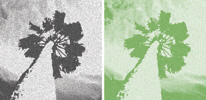
At low values, Film Grain can be used to introduce a fairly realistic grain. This can be employed when mixing computer-generated graphics with material shot on film. At high values, the effect produces a gritty posterization effect. This can be useful for stylizing items for an aggressive, youthful look.
Fresco is a traditional art technique in which earth colors are dissolved in water, and then pressed into fresh plaster. What you get with this filter is a darker image with small swirls. The look can be useful for simple photos but gets too mushy on photos of people or small objects.
The Neon Glow filter uses three colors to produce its results: the foreground, background, and one additional color specified within the filter’s dialog box. This effect can be used to add a variety of glows to an image, as well as colorizing and softening.
Paint Daubs is the most versatile of Photoshop’s Artistic Filters. It comes with six paint styles and 50 brush sizes, which give you a lot of variety. Brush types include simple, light rough, dark rough, wide sharp, wide blurry, and sparkle. If you need a painterly look, choose Paint Daubs.

A palette knife is a thin, flexible blade used by artists to mix paints. The Palette Knife filter reduces detail in an image, giving the effect of a thinly painted canvas. This gives the appearance of the canvas’s texture showing through.
The Plastic Wrap filter is better suited for producing text effects, although most of its results can be generated by Layer Styles. When using it on an image, it simulates the effect of coating the object in shiny plastic. To gain finer control, fade this filter, and then adjust blending and opacity controls.
The Poster Edges filter posterizes an image (removes the number of color steps or gradients). It also finds the edges of the image and draws black lines throughout the image. This filter produces a lot of detail in the resulting image.
Rough Pastels is a pleasant effect that simulates the image being drawn with strokes of colored pastel chalk on a textured background. The chalk appears thick in light areas, and the texture shows through more in darker areas. This filter is very flexible because it lets you load your own textures.

The Smudge Stick filter softens an image using short diagonal strokes. These strokes smudge or smear the dark areas of an image. The light areas lose some detail and become brighter.

The Sponge filter simulates the traditional art technique of painting with a sponge. Images are highly textured with areas of contrasting color. The resulting images will be clearer if you fade the filter.
The Underpainting filter is very similar to Rough Pastels. Its texture controls are where its true power lies. The filter gives the appearance of a softly painted image over a textured background.


You’ll often need to soften an image to help hide noise or to stylize it, and Photoshop offers plenty of choices. Some are more useful than others, so be sure to understand your options. Beyond obvious uses, Motion Blur and Radial Blur can be used as design effects, especially when faded or blended. If you are applying a Blur filter to a layer with transparency, make sure the Preserve Transparency option in the Layers panel is turned off; otherwise, the image will defocus but have crisp edges.
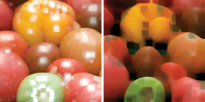
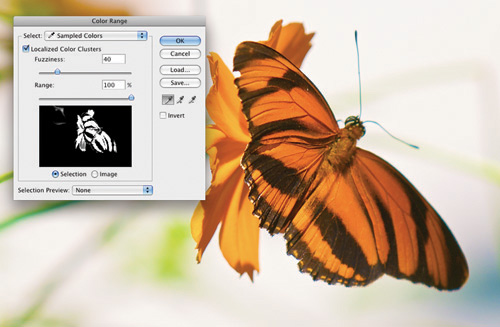
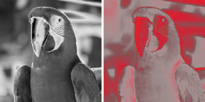
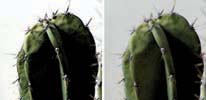
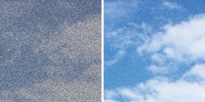
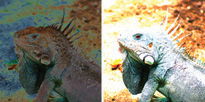
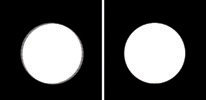
The Average filter was a welcome addition to Photoshop CS. This filter analyzes the color of selected pixels in a selection to determine an average value, and then fills with that color. While that may sound pretty tame, it’s a great way to eliminate noise in a sky or grain in your shadows. This filter works well with the Select Color Range command. If you run it on an entire image, you’ll get the average value of the photo, which is likely gray.
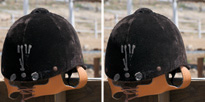
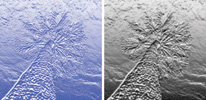
The pixel values of the image on the right were averaged to a single value.
If ever two filters could be replaced (or simply forgotten), these are they. Blur slightly (practically unnoticeably) softens an image. Blur More will do the same about three times more. Both require repeated applications and are inferior to the Gaussian Blur filter.
The Box Blur filter softens an image based on the average color value of neighboring pixels. You can use this filter to create special effects. Try adjusting the size of the area used to calculate the average value for a given pixel. By using a larger radius, you’ll achieve greater blurring.
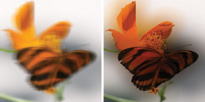
Gaussian Blur is the blur filter you will use most often. The term Gaussian is frequently used to signify normal distribution. This filter is appropriately named because it generates a bell-shaped curve when Photoshop applies a weighted average to the pixels. This filter is very fast and has great controls. It is typically used to defocus an area or an entire image. It can be run on drop shadows or glows to add natural softness. Blurring an image and then fading it opens up a whole new world of stylized color correction.
The Lens Blur filter adds a very needed depth-of-field blur to Photoshop. Before running this filter, create an alpha channel to serve as the depth map. Be sure to check out Chapter 11, “Repairing and Improving Photos,” for more information.
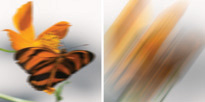
The Motion Blur filter produces a very photorealistic simulation of a delayed exposure. It can be used to simulate motion or to add streaks of light from an image. This filter blurs an equal amount in two directions, which can be set from an angle dial. The intensity settings range from 1 to 999 pixels. This filter also produces very nice results when it is faded.
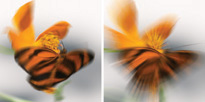
The Radial Blur filter is plagued by a poor interface but can be used to produce nice effects. It is designed to simulate the blur of a zooming or rotating camera. Spin blurs along concentric circles; Zoom blurs along radial lines. Both allow a variable between 1 and 100. Move the center point in the filter dialog box to aim the blur’s center.
The Shape Blur filter allows you to use a specified kernel (or shape) to create the blur. Choose the kernel from a list of custom shape presets, and then adjust the Radius slider to change its size. Additionally, you can experiment by loading different shape libraries by clicking the triangular submenu.
The Smart Blur filter can be thought of as a “selective” blur. The filter allows you to set a tolerance setting (threshold) for finding dissimilar pixels and specify a radius so it knows how far to search. These pixels can then be blurred at a specified amount and quality setting. The filter can blur the entire image (normal mode) or focus on the edges (Edge Only and Overlay). These last two modes often produce unexpected results.

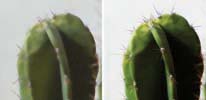
The Surface Blur filter allows you to blur an image while preserving edges. It can be useful for removing noise or graininess. Adjust the Radius option to specify the size of the area sampled for the blur. The Threshold option controls how much the tonal values of neighboring pixels must differ from the center pixel value. Pixels with sufficiently different tonal value (less than the Threshold value) are not blurred.
The Brush Stroke filters should have been named Artistic Filters Part II. They are also leftovers from the Gallery Effects package and are meant to give a painterly or fine arts look. These filters use brush-and-ink stroke effects to produce a variety of looks. They can also be used to add grain and texture to an image.
Use the Accented Edges filter to accentuate the edges of an image. This filter generates a traced edges look. When the edge brightness is set to a low value, the accents resemble black ink. When set to a high value, the accents look like white chalk. This look is very pleasing and has a nice softening effect.
The Angled Strokes filter “repaints” an image using diagonal strokes. You can choose the balance between right and left strokes. The lighter areas of the image are painted in strokes going down to the right, whereas the darker areas are painted going down to the left.
The Crosshatch technique shades an image with two or more sets of parallel lines. This filter preserves the original details of an image but adds texture and roughens the edges. The technique resembles pencil hatching.
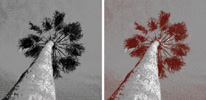
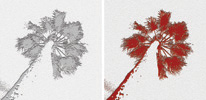
The Dark Strokes filter is a bit unusual in that it appears to “burn” the image. The dark areas of an image are moved closer to black with short, tight strokes. The lighter areas of the image are brushed with long, white strokes. This filter can be used as a “grunge” filter, especially when combined with blend modes and fading.
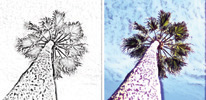
The Ink Outlines filter redraws an image with fine narrow lines. These lines go over the original details, simulating a pen-and-ink style.
The Spatter filter produces rough edges while simulating the effect of a spatter airbrush. When using this effect, be sure to simplify it.
The Sprayed Strokes filter is very similar to Spatter. It produces rough strokes of the dominant colors in the image.
The Distort filters allow you to bend, push, squish, and completely reshape your image. These tools can simulate 3D space and can be quite useful when building backgrounds. Many of these filters are memory intensive, so if your computer is slow, be patient.
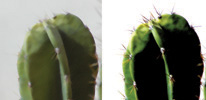
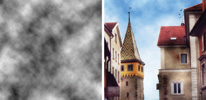
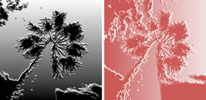
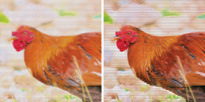
The Diffuse Glow filter acts very much like a diffusion filter applied to a camera lens. It is possible to get a very subtle or dramatic effect. The glow color is driven by your loaded background color; a white or off-white looks best. If you get strange results, choose a different color. The image will be rendered with film grain and white noise with the glow fading from the center of the selection.
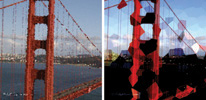
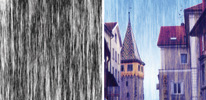
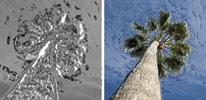
In the two examples of the Displace filter, I’ve used a grayscale file to displace (distort) the source photo. Can this filter do a lot? Yes. But it requires you to build your own displacement maps (grayscale files) for it to work.
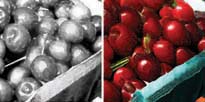
Create or locate a grayscale file to act as a displacement map. Black areas will move pixels to the right, down, or both. White pixels will move the image left, up, or both. And 50% Gray will have no effect. You must save the map as a flattened Photoshop format file.
Choose Filter > Distort > Displace.
Enter the scale for the magnitude of the displacement. You are able to specify the horizontal and vertical displacement separately.
If the map is a different size than your image, specify if the edges should wrap or repeat to fill in empty pixels.
Click OK.
Navigate to and select the displacement map. There is one provided in the Chapter 14 folder called Map.psd. The distortion is applied to the image rather quickly.
So, was it was worth it? Or, maybe it wasn’t worth it since the filter lacks a Preview box and takes a lot of steps. Some users swear by the Displace filter (others just swear at it).
The Glass filter allows you to distort an image so it appears as if it is being viewed through different types of glass. There are some presets to choose from, or you can create your own glass surface as a Photoshop file and apply it. With controls for scaling, distortion, and smoothness settings, quite a bit is possible. This filter can also be used for creating pleasant ripple or haze effects. To create your own map, follow the instructions for the Displace filter.
The Lens Correction filter is designed to fix common lens flaws such as barrel and pincushion distortion. It can also remove vignetting and chromatic aberration.
Barrel distortion. is a defect that causes straight lines to bow out toward the edges.
Pincushion distortion. is the opposite, where straight lines bend inward.
Vignetting. is a defect where edges of an image are darker than the center.
Chromatic aberration. appears as color fringe along the edges of your subject as the camera is attempting to focus on different colors of light in different planes.
You can store settings that match your lens. Additionally, the filter can be used to fix perspective problems caused by vertical or horizontal camera tilt.
The Ocean Ripple filter should have been called Glass Lite. It produces a very similar effect, adding randomly spaced ripples to the image’s surface. The intent of the effect is to make the image appear as if it were underwater. The effect is not very convincing but can be useful as another glass filter.
Think of the Pinch filter more as a “pucker & bloat” filter. It is possible to take a selection and squeeze it in with a positive value (up to 100%). The opposite effect of pushing the image out can be achieved with a negative value (up to -100%). Applying this filter to only a portion of the image adds a nice “pop-up” effect.
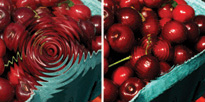
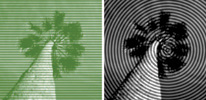
Let me suggest that you give up trying to understand the Polar Coordinates filter. This filter is designed to change an image or selection from its rectangular to polar coordinates, and vice versa, according to a selected option. Technically, it is designed to counteract shooting with curved lenses or mirrors; however, some cool effects can be generated.
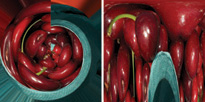
When combined with other filters, the Polar Coordinates filter provides a nice way to “scramble” an image. This can be quite useful in creating backgrounds or patterns. The source image is unrecognizable, but the colors come through nicely.
The Ripple filter adds a pattern similar to ripples on the surface of water. You have three sizes of ripples to choose from, as well as control of the quantity of the ripples. For greater control, use the Wave filter instead.
The Shear filter uses a curve to distort the image. To form a curve, simply drag the line in the filter control box. You can add additional points by clicking on the line and pulling. Click Default to reset the curve to a straight line. You can also specify whether edge pixels wrap or repeat.
The Spherize effect is very similar to the Pinch filter. It simulates a 3D effect by wrapping a selection around a spherical shape. It can distort an image by making it appear to wrap around the outside or inside of a sphere.
The Twirl effect rotates a selection more sharply in the center than at the edges. If you fade this filter immediately after running it, you can get a nice effect. This filter’s only control is specifying an angle that produces the twirl pattern. To produce a more realistic effect, run this filter several times with a lower twirl amount.

The Wave filter is very powerful. You have tremendous control over the shape of waves, quantity, amplitude, and wavelength. The Randomize option is also helpful. This filter produces very realistic wave distortions, and is very useful in generating background patterns. Just push the number of generators way up, and play with the other settings.
The Noise filters are used to remove or add noise. This can be helpful when blending a selection into the surrounding area. Noise filters can create textures or grain. They can also remove problems that cause moiré effects.
The Add Noise filter introduces random noise to the image. It can be grayscale (monochromatic) or multicolored. The Add Noise filter is also useful for reducing banding in gradients. If you have done a lot of retouching, add noise to match the previous grain. You have two distribution methods for adding noise. Uniform distributes noise using random numbers for a subtle effect; Gaussian distributes noise for a speckled effect.
The Despeckle filter combines edge detection with blurring. It is useful for finding speckles in an image and softening them. This produces the effect of removing or limiting noise in an image. There are no sliders to adjust, just keep repeating the filter (Command/Ctrl+F) until the desired result is achieved. A better option is to use the Dust & Scratches filter.

The Dust & Scratches filter provides a more powerful way to remove noise from an image. Dissimilar pixels are modified to achieve a balance between sharpening and hiding defects. You’ll want to try different settings on your image because a wide variety of results are possible. It may be helpful to run the filter on only part of your image at a time.

To use the filter, follow these steps:
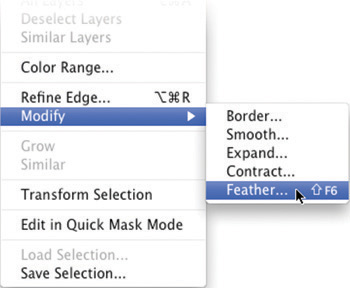
Make a selection or use the entire image. It is a good idea to feather your edges (Select > Modify > Feather) to avoid a visible line when using the filter.
Choose Filter > Noise > Dust & Scratches.
It is a good idea to keep the preview zoomed in to 100% and pan to see the scratches.
Set the Threshold slider to 0. This turns off the value, so that all pixels can be examined. Threshold is used to determine how different pixels must be before they are removed.
Move the Radius slider left or right, or choose a value from 1 to 16 pixels. The Radius determines how far to search for differences among pixels. Overuse of Radius blurs the image; you’ll need to balance how much noise is removed versus when softening occurs.
Gradually increase the Threshold to the highest value that still produces the desired effect.
The Median filter is most useful as a way to eliminate moiré patterns. If your scanner does not have a descreen option, run this filter on your scans. This filter is very sensitive, so only use a low value for image correction. High values can be used to get an interesting softening effect. The filter examines the radius of a pixel selection for pixels of similar brightness. Any nonmatching pixels are discarded and replaced with the median brightness value of the searched pixels.

The Reduce Noise filter can be used to reduce noise, as well as smooth out JPEG artifacts. To use the filter:
Choose Filter > Noise > Reduce Noise.

Zoom in on the preview image to get a better view of noise. Try to view the image at 100%.
Adjust the following options:
Strength: Controls the amount of luminance noise reduction applied to the image’s channels.
Preserve Details: Preserves edges and image details such as hair. Using a value of 100 preserves the most image detail but reduces luminance noise the least. You’ll need to play with the balance of Strength and Preserve Details to fine-tune noise reduction.
Reduce Color Noise: Removes random color. Use a higher value to reduce more color noise.
Sharpen Details: Sharpens the image. Removing noise will reduce image sharpness.
Remove JPEG Artifacts: Removes blocky image artifacts and halos caused by JPEG compression.
If noise is more present in one or two color channels, click the Advanced button to choose individual color channels from the Channel menu. Then use the Strength and Preserve Details controls to reduce noise in the problem channels.
The Pixelate filters can be used to produce a variety of pixel types. They work by clumping similar color values in cells together into new cells. You can use these to process an image into a different look, often slightly stylized. These filters also work well at high pixel sizes for creating background layers.
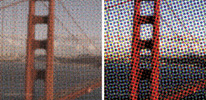
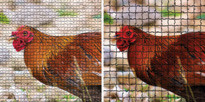
The Color Halftone filter simulates the effect of getting too close to the Sunday comics. An enlarged halftone screen is very visible on each channel. The image is divided into rectangles, and each rectangle then becomes a circle (sized proportionally to the brightness of the rectangle).
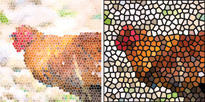
With the Crystallize filter pixels are clumped into polygons with a solid color. This filter can generate a stained glass look at a small cell size or simplify a complex image into a bed of color for use in composite building.
The Facet filter produces a very subtle change to pixels. Don’t be confused when you run it; no dialog box appears. Pixels in the image that are similar are clumped together into blocks of like-colored pixels. This produces a nice painterly effect. It may take several repetitions to notice the effect, so keep pressing Command/Ctrl+F.

Four copies of the image are created, averaged, and then offset from each other when you use the Fragment filter. This filter produces a blur effect that may make you feel dizzy.

Mezzotints are created through a traditional Italian process of engraving copper or steel plates by scraping and burnishing. This produces areas of extreme light and darks. These plates were often used to make prints that would contain random patterns of black-and-white areas or of fully saturated colors. Stick with the longer dot patterns found the Type menu in the dialog box; you may also need to soften the resulting image. This is a nice effect for stylizing images.
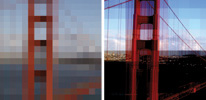
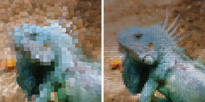
The Mosaic filter clumps pixels into larger pixels (square blocks) to form images. These new pixels are the averaging of the original colors in the selection. Think of this as your classic video game filter.
The Render filters are a mixed bag. Some, like Clouds and Lighting Effects, produce beautiful photorealistic results. Others, like Fibers, are clunky and slow. Spend a little extra time on these, because they can be quite handy.
The Clouds filter is incredibly useful. It generates a soft cloud pattern from random values between the foreground and the background colors. Every time you run this filter you get new results, so if you don’t like the clouds generated, just press Command/Ctrl+F to run the filter again. To create starker cloud patterns, hold down the Option/Alt key when you run the filter and you will get greater contrast.
For retouching work, it can create nice clouds that you add into blown-out skies. Simply load your foreground and background as off-white for the clouds and a blue for the sky. This filter is also the starting point for many background textures.
The Difference Clouds filter is very similar to the Clouds filter, but it blends the new cloud data with the existing data using a difference-blending mode. Running the filter for the first time will invert portions of the image. Applying the filter several times creates a marble-like effect. This filter uses the foreground and background colors.
Fibers can be used to simulate natural fibers. Your foreground and background swatch affect the fibers, but you can always change the color afterward with an image adjustment. You can experiment by clicking the Randomize button.
The Lens Flare filter creates what many see as mistakes. A lens flare is the refraction caused by shining a bright light into the camera lens. You can specify where the flare occurs by clicking the image thumbnail or by moving the crosshair. Many designers use this as an element or for down-and-dirty lighting effects.

Lighting Effects is a diverse filter that lets you simulate 3D lights being added to your shot. You have many choices with this filter, so start with the presets. You can pick from 17 light styles, three light types, and four sets of light properties. All of these can be tweaked and repositioned.
The Sharpen filters are direct opposites of the Blur filters. These filters attempt to focus soft images by increasing the contrast of adjacent pixels. You can attain moderate success with sharpening, but be careful not to oversharpen or you will produce distortion such as grain and pixelization.
The Sharpen and Sharpen More filters offer an all-or-nothing approach and are not very useful. While they add focus to a selection, they have no controls. The Sharpen More filter applies a stronger effect than the Sharpen filter. Skip these and just use Unsharp Mask or, better yet, Smart Sharpen.
Sharpen Edges and Unsharp Mask filters help find areas where significant color changes occur and sharpen them. While it has no controls, the Sharpen Edges filter does a good job. It only affects edges, thus preserving overall image smoothness.
The Unsharp Mask filter is an even better way to go. This filter lets you adjust the contrast of edges by producing a lighter and darker line on each side of the edge. This helps add emphasis to edges and produces a very satisfactory result. You’ll find detailed instructions on using the Unsharp Mask filter in Chapter 11.
The Smart Sharpen filter has superior sharpening controls not available with the Unsharp Mask filter. It allows you to set the sharpening algorithm and control the amount of sharpening that occurs in the shadow and highlight areas. The Smart Sharpen filter is covered in depth in Chapter 11.
The filters in the Sketch category add texture to images. They are useful for creating a hand-drawn look. Most of these filters rely on the foreground and background colors you have chosen. Experiment with different colors for very different looks.
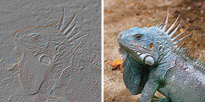
The Bas Relief filter does a great job of transforming the image to appear carved into stone. You also can control the direction of light and its softness value. Dark areas of the image use the foreground color; light colors use the background color.
The Chalk & Charcoal filter creates the look of an artist using chalk and charcoal to form an image. The midtones are turned to gray, the highlights are turned to chalk (in the foreground color), and the dark areas are turned to charcoal (in the background color).
The Charcoal filter redraws an image, creating a smudged, posterized effect. Charcoal is the foreground color; the paper is the background color. This can create a nice, simplified look that works well in video.
The Chrome filter attempts to look like polished chrome. Adobe recommends using a Levels adjustment after running this filter to get a better look. There are much better third-party effects for chrome, and you can experiment with Layer Styles to achieve a metal look as well.
Conté crayons are usually very dark or pure white. The Conté Crayon filter uses the foreground for dark areas and the background for light ones. To replicate the traditional look, use a dark red, brown, or black for the foreground color. This filter can also be used as an optional way to achieve an historical-looking sepia tone.
The Graphic Pen filter uses fine strokes to replicate the original image. The foreground color acts as ink; the background color acts as the paper.
The Halftone Pattern filter is useful for stylizing an image. You can choose dots, circles, or lines. This filter can be used to create a scan line look or a unique twist on pixelization. The foreground and background colors are very important. Be sure to use the Fade command on this filter.
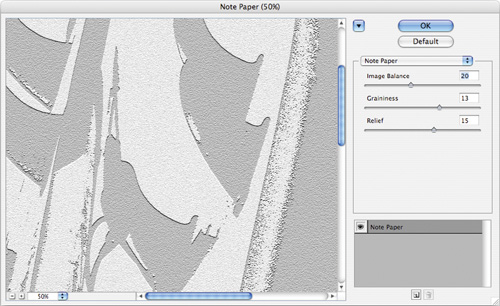
The Note Paper filter creates an image that looks like it is constructed of handmade paper. Its results are marginal but worth the occasional try.
Photocopy does what its name implies: It makes the image look like you made a photocopy on a 1970s copy machine. Large areas of darkness will copy only around their edges. Midtones tend to drop off to pure black or white. This filter is useful for simplifying a photo for use as a design element.
The Plaster filter simulates a molded image made of plaster. The foreground and background colors are used to colorize the image. Dark areas are raised; light areas are recessed.
Reticulation is a developing technique where the controlled shrinking and distorting of film emulsion generates an image that appears clustered in the shadows and grained in the highlights. This is a nice alternative to a duotone effect.
The Stamp filter creates a woodcut or rubber stamp look. It’s a good way to simplify images for use in multilayered compositions. The foreground and background colors are important.

The Stylize filters work by displacing pixels and adding contrast to edges. Use of the Fade command and blending modes will significantly extend the usefulness of these filters.
The Diffuse filter is very subtle and may take a few passes to be noticed. It attempts to diffuse an image to make the selection look less focused. Normal moves pixels randomly. Darken Only replaces light pixels with darker pixels. Lighten Only replaces dark pixels with lighter pixels. Anisotropic shuffles pixels toward the direction of least change in color.

Emboss gives the appearance of a raised or stamped image. You can specify the angle, height, and amount of color. To better preserve color, fade the filter immediately after running it. You can try the Bevel & Emboss Layer Style for greater flexibility.
The Extrude filter creates a 3D texture. You can choose from Blocks or Pyramids, as well as specify the size and depth. This is a nice look for background images; it looks particularly good on simple backgrounds or even solid colors.
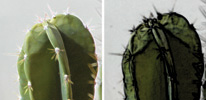
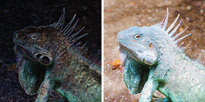
The Find Edges filter creates a very nice, stroked edge effect. Try blending it to create a cel-shaded cartoon look.
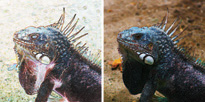
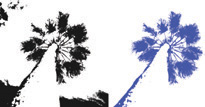
The Glowing Edges filter is an inverse of the Find Edges filter. It also identifies edges but produces an inverted color scheme. This filter looks best when blended via the Fade command.
The Solarize filter blends a negative and a positive image together. Be sure to use the Fade command after running the filter to open it up to more possibilities.
The Tiles filter breaks up the image into tiles. You can specify the size, amount of movement, and what lies beneath.
The Trace Contour filter locates transitions of major brightness areas and thinly outlines them. Each color channel is identified. The effect is designed to simulate contour lines on a map.

The Texture filters give the appearance of depth in an image. They can be used to make an image look like it is on an organic surface. When run on images, they give the image the appearance of being mapped or repainted on additional surfaces.
The Craquelure filter simulates paint on a plaster surface. It creates cracks that follow the image’s contours.
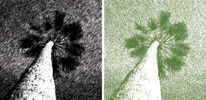
The Grain filter can create regular, soft, sprinkles, clumped, contrasty, enlarged, stippled, horizontal, vertical, or speckle grain. This filter is very useful for stylizing images and backgrounds.
Don’t confuse the Mosaic Tiles filter with the more useful Mosaic filter. This filter is similar to Craquelure but not very useful.
The Patchwork filter can be thought of as an alternate Mosaic filter. It cuts the image into smaller squares filled with the predominant color in that area. The squares have a random depth assigned to them.
The Video filters are designed for professional video work. These two filters are both pretty straightforward but important to video pros. To learn more about Photoshop and video, visit www.PhotoshopforVideo.com.
Video frames in a camera are often recorded between 24 and 30 frames per second. These still images create movement when played back. For smoother motion, adjacent frames are blended together or interlaced.
If you are working with a freeze frame from a video, you may choose to remove interlacing. You can replace the discarded line via interpolation or duplication. Generally speaking, replacing odd or even fields does not matter, but interpolation generates better results than duplication.
Like CMYK color space, video graphics often have a narrower gamut. The NTSC Colors filter adjusts the colors of your Photoshop graphic to match the NTSC standard (used by broadcasters in North America). Unfortunately, this filter hard clips color information that falls outside of the safe color range for the NTSC model. Instead of gently fading these colors, a hard clip is quite visible. If you’re using Photoshop CS2 (or later), be sure to try the Broadcast Saturation action (part of the Video set).
The Other filters did not fit into any of the other categories. So the descriptive term other was put through months of development and testing. You can use these filters to make your own filters, modify masks, or adjust colors. It’s a true grab bag but an important mix.
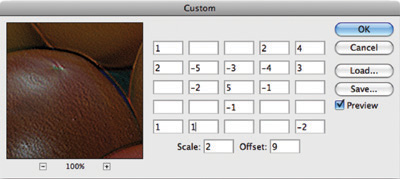
Some users like the Custom filter, but it’s pretty tough to use. Essentially, you are multiplying, adding, and subtracting color information. Look up the instruction in the Help Center, and feel free to explore.
The High Pass filter is used to keep edge details within the specified radius while suppressing the rest of the image. The filter is an anti-Gaussian Blur filter. This works very well as a Smart Filter and can be used as a nondestructive sharpening technique.
The Minimum and Maximum filters are used for modifying masks or alpha channels. The Minimum filter acts as a matte choker. Black is expanded, whereas white is shrunk. The Maximum filter has the opposite effect as a matte spreader; white is expanded, whereas dark is contracted. These filters can also be run as a different pixelization effect and produce a nice mosaic look for an image.