While Photoshop initially had very primitive type tools, its capabilities have grown significantly because many people choose to create and stylize type within Photoshop. This flexibility allows many designers to start (and even finish) designs inside Photoshop.
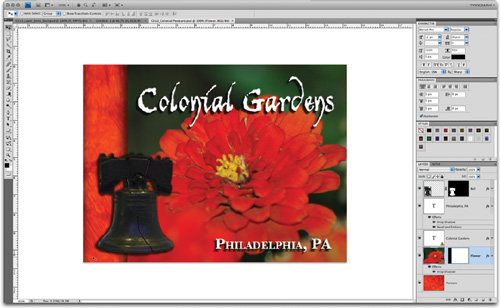
Open the file Ch12_Colonial_Postcard.tif to explore using type in a finished design. In this case Photoshop was used to design a postcard.
For many tasks, like multimedia and Web graphics, Photoshop plays an important role. In fact, if raster graphics are the intended output, Photoshop offers a full suite of typographic controls. Even if you intend to use other tools for text layout, it’s worth spending time learning Photoshop.
The Photoshop text engine is the standard that Adobe uses throughout its software products. Working with type might seem foreign at first, but you’ll find that type is fairly easy once you understand a few key areas of the interface.
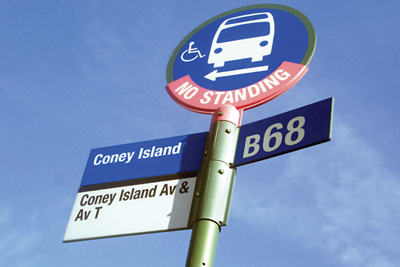
Many people rely on pictures to tell a story, but there’s just no getting around the use of type. Sure, a picture of a bus on a street sign would clue most into realizing they were standing at a bus stop, but you couldn’t stop there. Without accurate use of a few letters and numbers, you’d have little confidence in the route or timing of the service. It is proper use of type that designers must rely on to communicate vital information to audiences. If you can combine this functional purpose with a better sense of style and control, you can improve the professional appearance of your designs.
Font choice can be a very tough decision for you if you are a new designer. You can easily become overwhelmed with the sheer quantity of options. To simplify the process, you need to approach this decision with a triage mentality and consider a few guiding questions:
Readability: Is the font clear to read at the size you are using it? Are all the characters in the line readable? If you look at it quickly and then close your eyes, what do you remember about the text block?
Style: Does the font convey the right emotion for your design? The text on an action movie poster is very different from that advertising the latest romantic comedy. Type is a like wardrobe; picking the right font is essential to the success of the design.

Flexibility: Does the font mix well with others? Does it come in various weights (such as bold, italic, and book) that make it easier to convey significance when using that font?
These are my three guiding principles, but there are other constraints at play as well that require much more analysis. It’s a good idea to formally study typography if you want to work in a design field professionally. At the bare minimum, you can at least read a few books. I strongly recommend The Mac Is Not a Typewriter (Peachpit Press, 2003) by Robin Williams and Stop Stealing Sheep & Find Out How Type Works (Adobe Press, 2002) by Erik Spiekermann and E.M. Ginger. But for now, let’s go over the essentials.
A font has many characteristics, but the presence or lack of serifs is one of the easiest to identify. Serifs are the hooks that distinguish the details of letter shape. Sans serif fonts tend to be more uniform in shape. Choosing which type of font to use will greatly depend on your needs.
Table 12.1 shows the pros and cons of serif versus sans serif fonts.
Table 12.1. Comparison of Serif vs. Sans Serif Fonts
Pros | Cons | |
|---|---|---|
Serif |
|
|
Sans Serif |
|
|
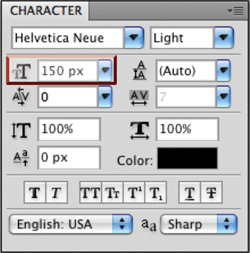
You’ll quickly notice that point size for fonts is a very relative measurement. The apparent size of your text will depend on which font you choose and what resolution your document is set to. Most designers look at the height of a lowercase x when deciding which font to use, because a lowercase x is a very clean letter with a distinct top and bottom. By comparing the x characters, you can quickly compare and contrast fonts. This measurement is combined with ascenders (strokes that go above the top of the x) and descenders (strokes that go below the bottom of the x, or the baseline). These three aspects provide a visual clue to the font’s purposes. Heavily stylized fonts (such as those used for titles or logos) often have greater variety than those intended for a page layout, where the text must take up little space yet remain easy to read.

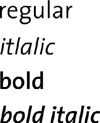
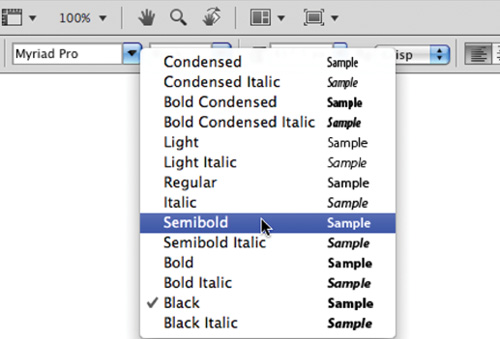
If a font comes in several weights (such as bold, condensed, book, italic), it offers increased flexibility. These different versions of a font are called a font family. When choosing a font to use in a design, pros often look to font families. Some of the best designs use a single font family but mix weights. This allows a consistent look with the added benefit of a consistent style throughout. You’ll find font families listed next to the font name in the Options bar and in the Character panel.
Now that you have a clear understanding of the basics, you can start to use text in Photoshop. Your goal should be to keep your fonts as vector type as much as possible. Type will be created as a vector if you use the Horizontal or Vertical Type tools. Vector type uses curved lines, not pixels, that can be scaled and transformed infinitely without quality loss. This allows you to make last-minute changes, like scaling the headline bigger on your print advertisement when the client requests it, and allows greater flexibility for changes throughout the design process.
Tip: Type Tool Presets
If you have a specific kind of text combo that you use a lot (say Bawdy Bold at 45 points with a tracking value of 50), you can save it. Just enter all your text settings as desired, and then click the drop-down menu in the upper-left corner of the Options bar to add new Tool Presets (just click the pad of paper icon).
Photoshop has two kinds of type tools that use vectors: the Horizontal Type tool and (the much less used) Vertical Type tool.
Let’s try adding some text using the Horizontal Type tool:
Create a new document by pressing Command/Ctrl+N. From the Preset list choose 800 × 600 and click OK.
Press T (for Type) to select the Horizontal Type tool or click the Text icon (a black letter T). You can then press Shift+T to cycle through the four Type tools as needed. As an alternative, you can click and hold on the T in the toolbox to see a flyout list of tools.
Notice that several options related to type are now available in the Options bar. These options are discussed in the following sections. For now, click the color well and specify a color that will contrast with your background.
Click inside your document; a new type layer is added. Type a few words to practice. Good? OK, now you’ll learn what all those newly available options mean. Leave this document open as you experiment with other typographic controls.
When adding text to a document, you have two options that determine how that text behaves. Point Text adds text beginning at the point where you click and continuing from there. Paragraph Text constrains the text to a box and will wrap when it hits the edge. To create a Paragraph Text block, click and drag using the Type tool to define the paragraph area first. Which option you choose will depend on your design needs.
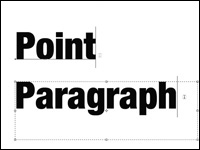
Table 12.2 shows the pros and cons of using Point Text and Paragraph Text.
Table 12.2. Point Text vs. Paragraph Text
Pros | Cons | |
|---|---|---|
Point Text |
|
|
Paragraph Text |
|
|
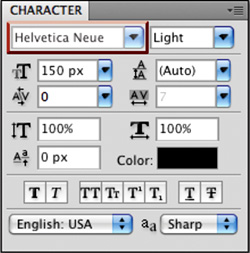
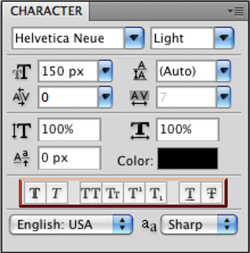
The bulk of your control over type lies in the Character panel. This panel gives you access to options that allow you to control the characters in your text block including basics such as font, size, and weight, as well as important advanced controls like kerning and baseline shift. If you don’t see the Character panel icon in the Options bar, choose Window > Character. There are several controls here—all of them are essential, so let’s take a look at each one.
Note: Number of Fonts
There are no hard and fast rules about how many fonts to use on a page, but here are a few “basics.”
Using a font family (with mixed weights/styles) is best.
Using two fonts is good.
Using three fonts is OK.
Using four fonts (are you sure)?
Using five fonts or more (you’re in trouble)!
Setting the font family simply means picking the font you want to use. Nothing too complex, but navigating hundreds of fonts in your Font Family menu can be time-consuming. Here are a few tips to help you choose a font quickly:
You can click in the Font Family field and just start typing the font name to jump through the list.
If a text layer is active or even just selected, you can click in the Font Family field. Use the up or down arrows to cycle through loaded fonts.
To make selection easy, you can see the fonts in their actual face. Just click the Font Family field to see a font preview.
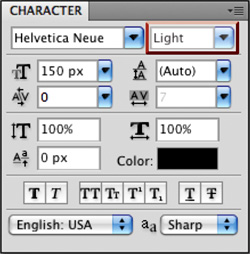
Certain fonts have multiple styles or weights—just look at the Font Style menu, which is to the right of the Font Family menu. Click the triangle to access the drop-down menu and choose variations like bold, italic, and condensed (as long as the font was designed to include them.) This is a much better option than using the Type Enhancements buttons at the bottom of the Character panel. The Type Enhancement buttons simply thicken the character (for faux bold) or skew it (for faux italic). This can produce text that is much harder to read and is generally not very elegant. It is always best to use the true bold or italic versions created by the font’s designer.
Tip: Name That Font
Are you trying to match a particular font for your design? A useful Web site is www.WhatTheFont.com, which offers visual recognition for type. Simply load a JPEG file with a text sample, and it will try to match the font to an extensive database.
Traditionally, type is measured in points. The PostScript standard (which was developed for use by commercial and laser printers) uses 72 points per inch. However, this principle doesn’t hold up very well, because different fonts will have different x-heights.
Note: Finding Fonts
Here are a few of my favorite Web sites that offer free and affordable fonts:
Chank:
Fonthead:
DincType:
Font Bros:
Acid Fonts:
1001 Free Fonts:
Instead of worrying about point size, just use it as a “relative” measurement. Increase the point size to make text appear larger, decrease it to reduce the size of the text. If you need to be more precise, such as designing text for the Web, you can measure text in pixels.
To switch text measurement to pixels:
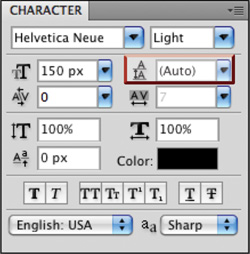
Pronounced “led-ing” as in the metal, not “lead-ing” as in sheep, leading is the space between lines of type. The name comes from when strips of lead were used on a printing press to space out lines of text. Adjust your leading value to improve your text’s readability. Leading works best when you are using Paragraph Text. By default, the leading should be set to Auto, however, adjust as needed to fit text into your design. Just be careful to avoid setting leading too tight; otherwise, your ascenders and descenders will collide, resulting in a negative impact on readability.
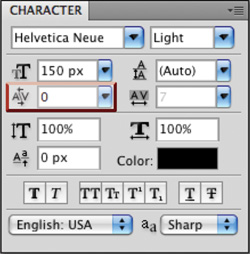
The space between individual letter pairs is called kerning. So what, you say, why bother? Design pros always check their kerning. Adjusting the space between letter pairs produces a better optical flow. Think of each word as existing in a stream; you are trying to balance out the spacing between each letter so the water flows evenly between each letter pair.
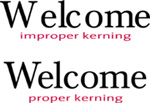
Taking the extra effort to kern letters will produce text that is easy to read. This is especially true as your text block gets bigger. Inexpensive fonts and freeware fonts usually have the most kerning problems because it takes a lot of effort for a fontmaker to set proper kerning for every possible letter combination. Cheap or free fonts are just that—cheap or free and may have kerning issues. While you can adjust kerning using the Character panel, here’s a more “organic” method:
Click between two letters.
Hold down the Option/Alt key and use the left arrow key to tighten the spacing between a character pair, or use the right arrow key to loosen spacing.
Release the Option/Alt key and then use the arrow keys to move to the next pair.
Hold down the Option/Alt key and repeat kerning as desired.

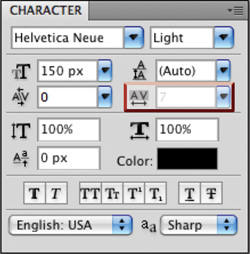
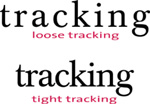
Kerning adjusts the space between pairs of letters, but tracking affects all letters in the text block or the selection. Tracking can be adjusted to fit text into a smaller space, for example, if you must fit a certain number of characters on a line without reducing point size. Conversely, you might choose a loose track to improve readability (especially if you’re using all caps). Tracking, like kerning, is subjective and can be learned best by studying professional examples and looking for inspiration and guidance.
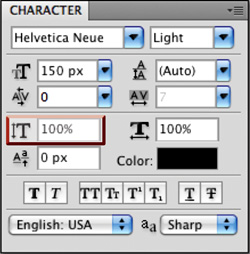
Do you need to make the text a little taller? Perhaps you want to make the text look skinnier, or you are trying to create a stretched look. Well, you can adjust the vertical scale from 0–1000% if you are so inclined. Normally, this causes unintentional fluctuations in font appearance. If you are working on a shared computer, be sure to inspect this option before designing to avoid unintentional scaling.
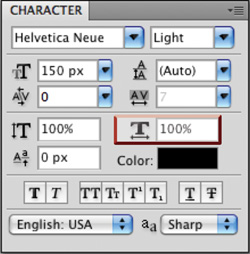
You can use horizontal scale to compress (or expand) the width of text. By scaling down text, you can pack more text on a line. Increasing horizontal scale can make the text appear “fatter.” Normally, this kind of scaling is less desirable than trying to find a font that better matches your design goals. Be sure to check to see if scaling is applied before designing with the Type tool.
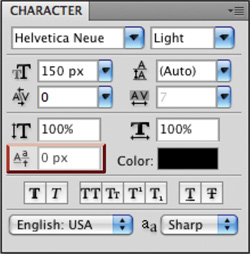
Earlier, baseline was discussed when you learned about x-height. This is the virtual line that the characters sit on. If you need to reposition elements such as quote marks or apostrophes for design purposes, this property is useful.
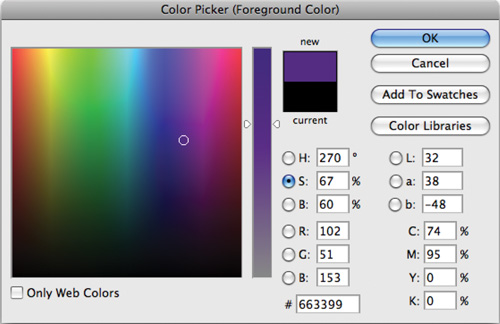
By default, text in Photoshop is black. While black is a very functional color (a third of my wardrobe is black or a shade of black), it won’t always work for your designs. Click the Color Swatch to load the Color Picker window. Click a radio button for the color model you want to work with, and then adjust the Color slider as desired. Click in the Color Field to choose the color you want. If you need to use a Pantone color (or at least a close equivalent), click the Color Libraries button (selecting colors is covered in depth in Chapter 6, “Painting and Drawing Tools”).

Herein lies a collection of treasures as well as several booby traps. Some of the Type Enhancement buttons are truly useful, but others are just plain bad design.
Faux Bold: Faux is French for fake. Do not use a faux bold if a true bold is available within the font style you are using. This button just makes the text thicker and harder to read.
Faux Italic: Same deal here: Skewing the text to the right does not make it italic. Always choose an italic version of the font you are using from the Font Style field.
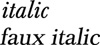
Notice the dramatic differences between choosing italic from the Font Style menu as opposed to choosing the Type Enhancement button.
All Caps: Formats the text in all uppercase letters; just click this button instead of retyping.
Small Caps: Works well for titles and in certain layouts. It replaces all lowercase text with a smaller version of the capital letter.
Subscript: Used for scientific notation and other specialty purposes where a character is reduced in size and lowered below the baseline.

Superscript: Used for specialty purposes such as showing mathematical power. This reduces the character’s size and moves it above the baseline.

Underline: Draws a line below the text. You may choose to manually add a line on another layer for better control.
Strikethrough: Places a line through the characters.
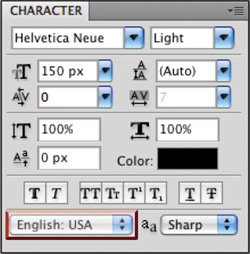
Computers should help make the design process easy, so in this vein, recent versions of Photoshop ship with a built-in spell check. While not every country is represented, you do have obscure options like Nynorsk Norwegian and Turkish.
When designing text at low resolutions, adjusting your Anti-alias settings can improve readability. Anti-aliasing blends the edge pixels of text. This option is most needed when working with complex character shapes. You have five methods to choose from:
None: No anti-aliasing
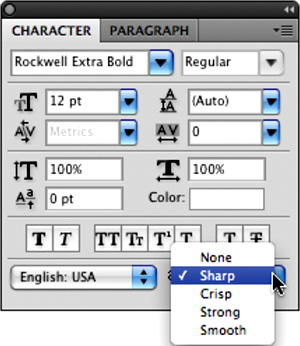
Sharp: Makes text appear its sharpest
Crisp: Makes text appear somewhat sharp
Strong: Makes text appear heavier
Smooth: Makes text appear smoother

Smooth

None
To complete your control over text, you’ll need to visit the Paragraph panel. Even though there are not as many choices as the Character panel, you will still need these controls. The Paragraph panel, as its name implies, works best with Paragraph Text.
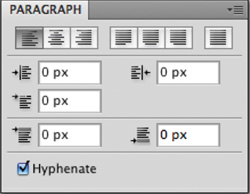
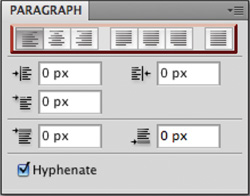
The Alignment buttons attempt to align text left, right, or centered. They also add support for justification, which forces the text to align to both margins through the adjustment of spaces between words.

Use of the Paragraph panel results in the precisely aligned text on this poster.
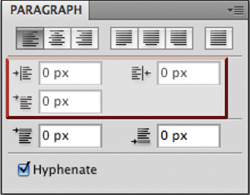
The three Indent fields allow for the indentation of the left or right margins, as well as the first line of text. If you will have multiple lines of text, be sure to use the first line indentation to improve readability.
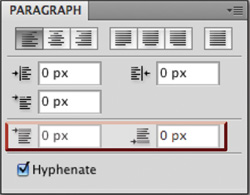
To further improve readability when multiple paragraphs are involved, use the Spacing option. You can specify how much space to add before or after a paragraph (either really works). This is a much better option than adding extra hard returns at the end of a paragraph.
At the bottom of the Paragraph panel is a Hyphenate check box. If enabled, it allows lines to break mid-word. Photoshop uses the selected dictionary from the Language Selection menu in the Paragraph panel. While the Hyphenate option better fills out a text block, it is not always the best for large type. It is more acceptable for a multicolumn layout or body copy. Be sure to try the Adobe Every-line and Single-line Composer options, which you can access from the Paragraph panel submenu.

Adobe Single-line Composer: Determines line breaks on a line-by-line basis. It is the default option, but it can often lead to strange hyphenation or line breaks.
Adobe Every-line Composer: Examines the entire block of text and makes line breaks based on all lines of text. This option can often create a better visual flow and is generally preferable to the Single-line Composer.
If you need to tweak your text a little more, you’re in luck. Photoshop has even more options for typographic effects. The next five options discussed can truly enhance your typographic treatments.
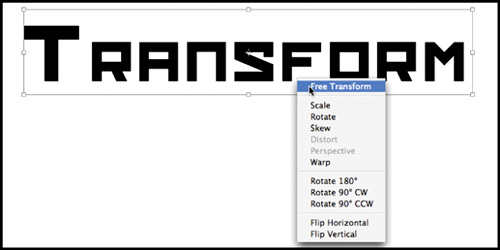
Because the text you’re using is vector-based, it can be sized and modified using the Free Transform command with no loss of quality. The text will “redraw” itself after the command is applied.
The Free Transform command lets you rotate, scale, skew, distort, and add perspective in one continuous operation, which ensures the highest quality of your text. Let’s experiment with this command:
Select your text layer and press Command/Ctrl+T or choose Edit > Free Transform.
Do one or more of the following options:
To scale by dragging, drag a handle.
Press Shift while dragging a corner handle to scale proportionately.
Press the Option/Alt key while dragging a corner handle to scale from the center.
To rotate by dragging, move the pointer outside the bounding border. Notice that the pointer changes to a curved, two-sided arrow. Click and drag.
To distort freely, press Command/Ctrl while dragging a handle.
To skew, press Command/Ctrl+Shift while dragging a handle.
To apply perspective change, press Command+Option+Shift/Ctrl+Alt+Shift while dragging a handle. You may also need to combine this option with Scale to achieve a believable perspective change.
If you forget how to do any of the preceding options, right-click/Ctrl-click a corner of the transform box to display a pop-up list of options.
Click the Commit button (check mark in the Options bar).
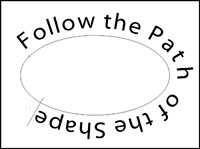
Originally a job for Illustrator, placing text along a vector path allows you to make text follow a curved line or other geometric shape. Starting with Photoshop CS, this ability could be achieved in Photoshop.
Add a path to your document using the Pen tool or Shape tool.
With the Horizontal Type tool selected, move over the path until your cursor changes to a new icon (an I-bar with a curved path).
Click and start typing.
Use the Direct Selection tool to move the margin of the text for repositioning. You can also pull up or down to move the text to the inside or outside of the path.
Adjust the baseline and tracking as needed for improved readability.
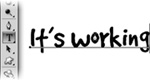
With names like Flag, Fish, and Wave, the Warp Text dialog box doesn’t scream useful. However, a lot of powerful (and useful) distortions are available. These vector distortions allow you to reshape text, which is particularly helpful for advertising-style type effects:
Select an existing text block.
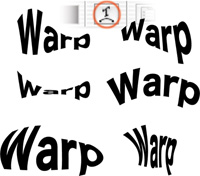
Click the Create warped text button in the Options bar.
Choose a Style for the warp and specify Horizontal or Vertical.
Additionally, experiment with the Bend, Horizontal Distortion, and Vertical Distortion properties.
To modify the text effect after you’ve closed the Warp Text dialog box, simply click the Create warped text button again.
Text often needs a little style, and Layer Styles allows you to add a stroke, shadow, bevel, or even texture to your text. At the bottom of the Layers panel you’ll see a small f inside a circle. This is the easiest way to access Layer Styles. But be sure to show good taste and not go wild with effects. Let’s work with some prebuilt Styles to see the possibilities available to you:
Select or create a text layer.

Select the Styles panel or choose Window > Styles to open the Styles panel.
From the panel’s submenu (the triangle in the right corner) choose Text Effects.
Click a style’s thumbnail to apply the effect; just click another to apply an additional effect.
Note: Simple Design Rules
Limit total number of fonts used.
Use heavier fonts if designing for onscreen display (Web, presentations, or video).
Make sure text is readable. Print it out or at least move a few feet away from the computer screen and take a fresh look.
Be consistent with capitalization and justification.
Do not overuse Layer Styles.
Some of these effects are attractive and useful; many are gaudy (but that is my personal taste). The best approach is to create your own styles. Be sure to see Chapter 13, “Layer Styles,” for more information.
If you want to run a filter on text, Photoshop will rasterize the text. This process converts the text from being vector-based (and scaleable) into pixel data (which cannot be enlarged without visible softening of the edges due to blowing up pixels). When you have a text layer selected and you want to apply a filter, Photoshop will warn you that it will rasterize the type and leave it uneditable. Click OK if you are sure you want to do this. I recommend making a duplicate text layer as a backup (with the visibility icon turned off) before filtering text, or try to create the effect using Layer Styles and warped text instead. Open the file Ch12_Light.psd to see an effect that combines the Radial Blur–Zoom filter with Layer Styles.