
Chapter 9: Continuing with Intelligent Enemies
In the previous chapter, we imported an enemy object (a fearsome chick) and created a first-person controller for the player and the environment that both the player and enemy will traverse. In this chapter, we'll build on that foundation by focusing on the theory and implementation of creating an intelligent enemy. We'll imbue our enemy chick with the ability to have multiple different behaviors and to swap between those behaviors depending on the state of the world.
In this chapter, we will discuss the following:
- How to enable the chick to see the player by using a line of sight and field of view
- How to code a Finite State Machine (FSM): This will become the brain of the chick—ensuring that behaviors are executed and transitions to different states happen at the right time
- How to create individual behavior states, and how these states fit cohesively to produce complex behavior. Each state will encompass a distinct behavior of the chick.
An FSM is one of the more popular data structures for AI programming and is also popular outside of game AI; for example, Unity's Mecanim animation system makes use of an FSM. The popularity of FSMs is in part due to their simplicity and ability to help break down an initial problem into several smaller, more manageable sub-problems. Instead of programming a monolithic class that maintains the chick's behavior, we can split the behavior into separate classes. This separation of states will aid maintenance and debugging issues in the future.
We'll write three separate states for the chick: patrolling, chasing, and attacking. We'll then use an FSM to run the correct behavior at the right time.
Technical requirements
In this chapter, you will start a new project that is not a direct continuation of previous projects. However, as with previous chapters, this chapter assumes that you have not only completed the previous projects but also have a good, basic knowledge of C# scripting generally, though not necessarily in Unity.
The starting project and assets can be found in the book's companion files in the Chapter09/Start folder. You can start here and follow along with this chapter if you do not have your own project already. The completed project is included in the Chapter09/End folder. These folders can be downloaded from the GitHub repo at https://github.com/PacktPublishing/Unity-2020-By-Example.
This chapter uses two assets from the Unity Asset Store, which, along with their author details, can be found at the following links:
- https://assetstore.unity.com/packages/3d/characters/animals/meshtint-free-chick-mega-toon-series-152777
- https://assetstore.unity.com/packages/3d/environments/landscapes/low-poly-simple-nature-pack-162153
Providing the enemy with sight
Let's now start developing the enemy AI by thinking about our functional requirements. The enemies in the scene will begin in patrol mode, wandering the level from place to place, searching for the player. If the player is spotted, the enemy will change from patrolling and begin chasing the player, attempting to move closer to them for an attack. If the enemy reaches within attacking range of the player, the enemy will change from chasing to attacking. If the player outruns the enemy and successfully loses them, the enemy should stop chasing and return to patrolling again, searching for the player as they were doing initially.
To achieve this behavior, we'll need some method of determining whether the chick can see the player as the chick relies on being able to see the player to decide whether it should be patrolling or chasing:
- Create a new script called SightLine to represent the chick's sight:
public class SightLine : MonoBehaviour
{
…
void OnTriggerStay(Collider Other)
{
if (Other.CompareTag(TargetTag))
{
UpdateSight(Other.transform);
}
}
void OnTriggerExit(Collider Other)
{
if (Other.CompareTag(TargetTag))
{
IsTargetInSightLine = false;
}
}
private void UpdateSight(Transform Target)
{
IsTargetInSightLine = HasClearLineofSightToTarget(Target) && TargetInFOV(Target);
if (IsTargetInSightLine)
{
LastKnowSighting = Target.position;
}
}
}
The following points summarize the code sample:
The SightLine class should be attached to any character that requires a visual sightline. Its purpose is to calculate whether a direct line of sight is available between the player and the enemy.
The IsTargetInSightLine variable is a Boolean (true/false), which is updated on a per-frame basis to describe whether the enemy can see the player right now (for this frame). true means that the player is in sight of the enemy, and false means that the player is not visible.
The OnTriggerStay and OnTriggerExit functions are invoked when the player is within a trigger volume surrounding the enemy and when the player leaves this volume, respectively. The OnTriggerStay function is called in every frame that a collider intersects with this collider. As we'll see shortly, a collider can be attached to the enemy character object to represent its view. The size of the collider represents the maximum view distance of this object.
UpdateSight is called at every frame that an object with TargetTag is within this object's trigger collider (we'll configure this collider shortly). The function sets IsTargetInSightLine to true if HasClearLineofSightToTarget and TargetInFOV both return true. If either one of the functions returns false, then IsTargetInSightLine is also set to false. This means that the player is only considered seen if they are both in the specified field of view and there aren't any obstacles obstructing the view. We'll write these functions shortly.
If IsTargetInSightLine is set to true (that is, we can see the target), the LastKnowSighting variable is updated with the position of the target. We'll use this position in our states to move toward the player.
- Next, add the function for checking whether there is a clear line of sight to the player:
public class SightLine : MonoBehaviour
{
public Transform EyePoint;
…
private bool HasClearLineofSightToTarget(Transform Target)
{
RaycastHit Info;
Vector3 DirToTarget= (Target.position - EyePoint. position).normalized;
if (Physics.Raycast(EyePoint.position, DirToTarget, out Info, ThisCollider.radius))
{
if (Info.transform.CompareTag(TargetTag))
{
return true;
}
}
return false;
}
}
The following points summarize the code sample:
The HasClearLineOfSightToTarget function returns true or false to indicate whether there are any obstacles with colliders, such as trees and other props, between this object's eye point and the player. The method does not consider whether the player is within the enemy's field of view. This function is combined with the TargetInFOV method (which we'll see very shortly) to determine whether the object can see the player—that is, it is in their field of view and not obstructed by any obstacles.
A Raycast is used to check whether there is a clear sightline to the player.
It requires a start position, direction, the RaycastHit object, and distance.
You can imagine a Raycast as a line extending from the start position in the direction specified for the distance specified. The first collider this line intersects with is returned in the RaycastHit object.
We use the position of the EyePoint object as the start position of the Raycast.
The direction is a normalized vector that points toward the player (a normalized vector has a length of 1). We use a normalized vector as we only want the direction and don't need the distance between the two objects. It doesn't matter whether the player is 5 or 100 feet away from the player; if they're in the same direction, that is all that matters.
For the distance, we pass the radius of the Sphere Collider that we'll attach to the Toon Chick once the script is complete. The radius of the collider will represent the Toon Chick's maximum view range.
The Physics.Raycast function returns true if an object is hit, and false otherwise. We call the function and use the return value as an argument in an if statement because we only want to process the body of the if statement when the Raycast has hit something.
The Raycast starts at our EyePoint object and extends toward the player until it reaches the outer radius of our Sphere Collider and, in the process, fills RaycastHit with relevant information. The eagle-eyed among you may have noticed the out keyword in front of the Info object we pass into the Physics.Raycast function. If you're not familiar with this keyword, it means that we're passing the object as a reference. Therefore, any changes made to the object in the scope of the Raycast function will reflect in the Info object.
For more information on C# references, see the online documentation at https://docs.microsoft.com/en-us/dotnet/csharp/language-reference/keywords/reference-types.
If Physics.Raycast returns true, the Info.Transform tag is compared to TargetTag. Info.Transform will contain the transform of the first collider hit by the Raycast. This transform could belong to a tree, rock, another chick, or possibly the player. If it is the player, we return true, signifying that there is an unobstructed line of sight toward the target.
Tip
The RaycastHit object has several other fields worth exploring in your own projects. For the complete list, see the online documentation at https://docs.unity3d.com/ScriptReference/RaycastHit.html.
- As mentioned, we need a method to check whether the player is in the field of view; let's add that now:
public class SightLine : MonoBehaviour
{
public float FieldOfView = 45f;
…
private bool TargetInFOV(Transform Target)
{
Vector3 DirToTarget = Target.position - EyePoint. position;
float Angle = Vector3.Angle(EyePoint.forward, DirToTarget);
if (Angle <= FieldOfView)
{
return true;
}
return false;
}
}
The following points summarize the code sample:
The FieldOfView variable is a floating-point value that determines an angular margin on either side of the object's eye point, inside which objects (such as the player) can be seen. The higher this value, the more chance the enemy has of seeing the player.
The TargetInFOV function returns true or false to indicate whether the player is within the enemy's field of view. This function can tell you whether this object would see the player if there was a clear line of sight (it ignores whether the player is hidden behind a wall or another solid object, such as a tree). It takes the position of the enemy eyes, determines a vector to the player, and measures the angle between the forward vector and player. It compares this to the FieldOfView field and returns true if the angle between the object and the target is less than the variable.
Important note
Remember that these code samples are just that: a code sample. For the full code listing, please refer to the book's companion files in the Chapter09/End folder.
- Attach the SightLine script to the Toon Chick object in the scene.
- As the script requires a trigger collider, also attach a Sphere Collider component and enable the Is Trigger field in the Inspector.
- The SightLine script can only see a target if it is within the radius of the collider. Set Radius to 10.
See Figure 9.1 for the Sight Line and Sphere Collider settings:

Figure 9.1 – Enabling the chick to see
- The Eye Point field is, by default, set to None, which represents a null value. The field should refer to a specific location on the enemy character that acts as the eye position—the place from which the character can see. To create this point, add a new child object to the Toon Chick by right-clicking on the object and selecting Create Empty.
- Name the object Eye Point.
- Position the object to the approximate position of the character's eye area, making sure that the forward vector is facing in the same direction, as shown in Figure 9.2:
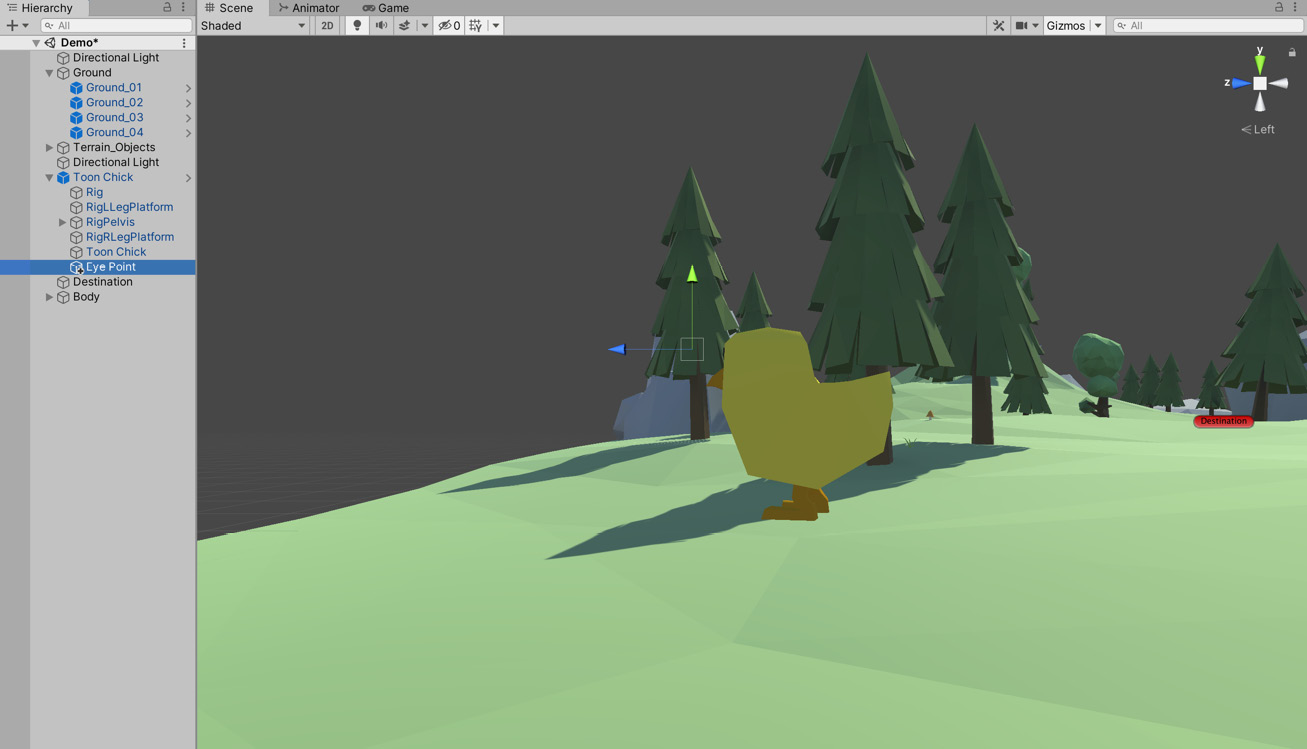
Figure 9.2 – Adding an Eye Point child object
- Drag and drop the Eye Point object from the Hierarchy to the Eye Point field for the Sight Line component in the Inspector. The position of this object will determine whether the enemy can see the player. Having a separate eye point instead of using the character's position allows more control over where the eyes are positioned. Also, the position of the object is based on the pivot point of the mesh and this may not be suitable for our purposes.
- The SightLine script determines the player location by first finding the player object in the scene using the Player tag. Consequently, set the Body object's Tag property to Player. This process is outlined in Chapter 2, Creating a Collection Game:
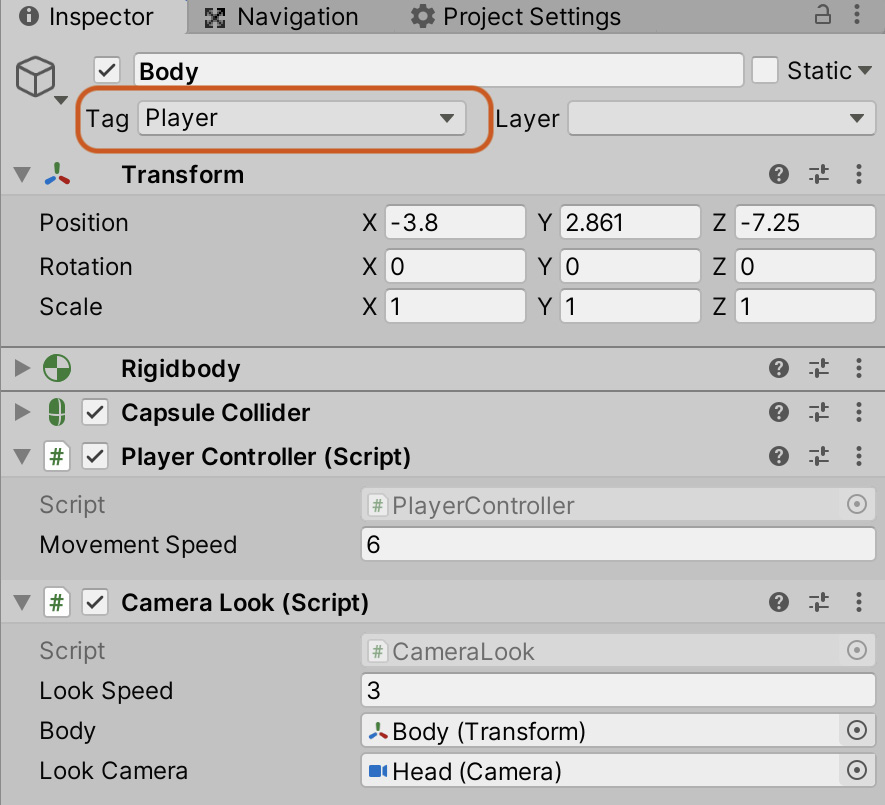
Figure 9.3 – Tagging the player object
That's it for configuring the sightline for the chick. It can now track the player in the environment—although it will be a little while before we can see this in action as we'll need to create the FSM first. Let's jump into that next.
Implementing the FSM
To create the AI for our chick character, we will be using an FSM, in addition to the line of sight code that we already have. An FSM is not a thing or feature of Unity, nor is it a tangible aspect of the C# language. Instead, an FSM is a concept, framework, or design that we can apply in code to achieve specific AI behaviors. It comes from a particular way of thinking about intelligent characters as a combination of states.
We can summarize the non-player character (NPC) for our level as existing within one of three possible states at any one time. These states are as follows:
- Patrol: The chick is following waypoints around the environment.
- Chase: The chick is running after the player.
- Attack: The chick has reached the player and is attacking.
Each of these modes is a state that encompasses unique behavior, with the chick only able to be in one of these states at any one time. The chick cannot, for example, be patrolling and chasing simultaneously or patrolling and attacking, because this wouldn't make sense within the logic of the game.
Important note
There are several alternative methods of AI that we could have used instead of the FSM, such as hierarchical state machines or behavior trees; however, these alternative systems are not covered here.
In addition to the states themselves, there is a rule set or group of connections between the states that determines when one state should transition to another. For example, an NPC should only move from patrolling to chasing if it can see the player and it is not already attacking. Similarly, the NPC should only move from attacking to patrolling if it cannot see the player and it is not already patrolling or chasing. The combination of the states and rules governing their connections form the FSM. Think back to the Animator window in Chapter 7, Creating Artificial Intelligence, which is also an FSM (each animation represents a state, and the arrows represent the transitions between states).
There is no right or wrong way to code an FSM per se. There are merely different ways, some of which are better or worse for particular ends. With this in mind, let's jump in by creating the data structures and classes that our FSM controller will later rely on:
- Create a file called FSMStateType, which will store an enum containing the name of each state:
public enum FSMStateType
{
None,
Patrol,
Chase,
Attack
}
- Each state will be a separate class, so we could write several different implementations that all register the state type of patrol (for example).
Tip
Maintaining an entry in an enum could quickly become unwieldy for larger projects. As an extension, you could look into removing the enum completely and using reflection to determine the states. Reflection is a relatively advanced topic, so the enum will fit our purposes for now if you're just starting your game development journey. For the more adventurous, information on reflection can be found at https://docs.microsoft.com/en-us/dotnet/csharp/programming-guide/concepts/reflection.
- Create a class called IFSMState to store the interface for every state:
public interface IFSMState
{
FSMStateType StateName { get; }
void OnEnter();
void OnExit();
void DoAction();
FSMStateType ShouldTransitionToState();
}
The following points summarize the code sample:
Each state will have a corresponding class that implements this interface. If you're unfamiliar with interfaces, they are a purely abstract class that is not instantiated directly. They define a contract that a class must follow. If each state implements this interface, we know they will all have a public OnEnter, OnExit, DoAction, and ShouldTransitionToState function, as well as a StateName get property.
The StateName get property returns the name for this state from the enum we created previously. This state name is used by our FSM controller class (which we'll write shortly) to differentiate the different states.
The OnEnter function is called at the beginning of a state transition as we transition into a new state. The OnExit function is called during a transition between states as we exit the state to move to a new one. For example, if we are transitioning from the patrol to chase state, OnExit will be called on the patrol state, and then OnEnter is called on the chase state. These functions are used to perform any setup required and revert any temporary changes. We will see clear examples when we write the states.
The DoAction function is where the state's action occurs—that is, setting a navigation destination for patrolling and chasing or attacking the player in the attack state.
ShouldTransitionToState will be queried directly after the call to DoAction. This function will check the condition of the state and either return a different FSMStateType to signify that the FSM controller should transition to that state or return the current state name. If the state returns the current state name, no transition will be performed, and the FSM controller will stay with the current state.
- Before we write the FSM controller, we need one more class. Create a class called EmptyAction:
public class EmptyAction : IFSMState
{
public FSMStateType StateName { get { return FSMStateType.None; } }
public void DoAction() { }
public void OnEnter() { }
public void OnExit() { }
public FSMStateType ShouldTransitionToState()
{
return FSMStateType.None;
}
}
- This class, as the name suggests, is an empty state. We'll use this class shortly when we come to write the FSM controller to remove the need to check for a null state. If a required state can't be found, we'll return an empty state instead.
- We're now ready to create the FSM controller that will run the state actions and control transitions between states. Create a new class called FSM:
public class FSM : MonoBehaviour
{
public FSMStateType StartState = FSMStateType.Patrol;
private IFSMState[] StatePool;
private IFSMState CurrentState;
private readonly IFSMState EmptyAction = new EmptyState();
void Awake()
{
StatePool = GetComponents<IFSMState>();
}
void Start()
{
CurrentState = EmptyAction;
TransitionToState(StartState);
}
}
The following points summarize the code sample:
The object maintains an array of IFSMState called StatePool. This array is initialized in the Awake function by calling GetComponents. The call to GetComponents will retrieve all the scripts attached to the object that implement the IFSMState interface. This way, we can easily add new states to an object by adding them as a component.
The controller stores a reference to CurrentState. The DoAction function and a check whether a transition is required will shortly be performed using this reference.
In the Start function, CurrentState is set equal to EmptyAction, then TransitionToState is called, passing the user-specified StartState.
- Next, add the TransitionToState and GetState function:
public class FSM : MonoBehaviour
{
private void TransitionToState(FSMStateType StateName)
{
CurrentState.OnExit();
CurrentState = GetState(StateName);
CurrentState.OnEnter();
Debug.Log("Transitioned to " + CurrentState. StateName);
}
IFSMState GetState(FSMStateType StateName)
{
foreach (var state in StatePool)
{
if (state.StateName == StateName)
{
return state;
}
}
return EmptyAction;
}
}
The TransitionToState function handles all transitions between states. The method first calls OnExit on CurrentState before retrieving the new desired state by calling GetState (we'll write this function shortly). Then, as CurrentState has been modified and we've transitioned to a new state, the OnEnter function is called on CurrentState. Lastly, a call to Debug.Log prints the transition to the Console window to help us debug the FSM, as shown in Figure 9.4:
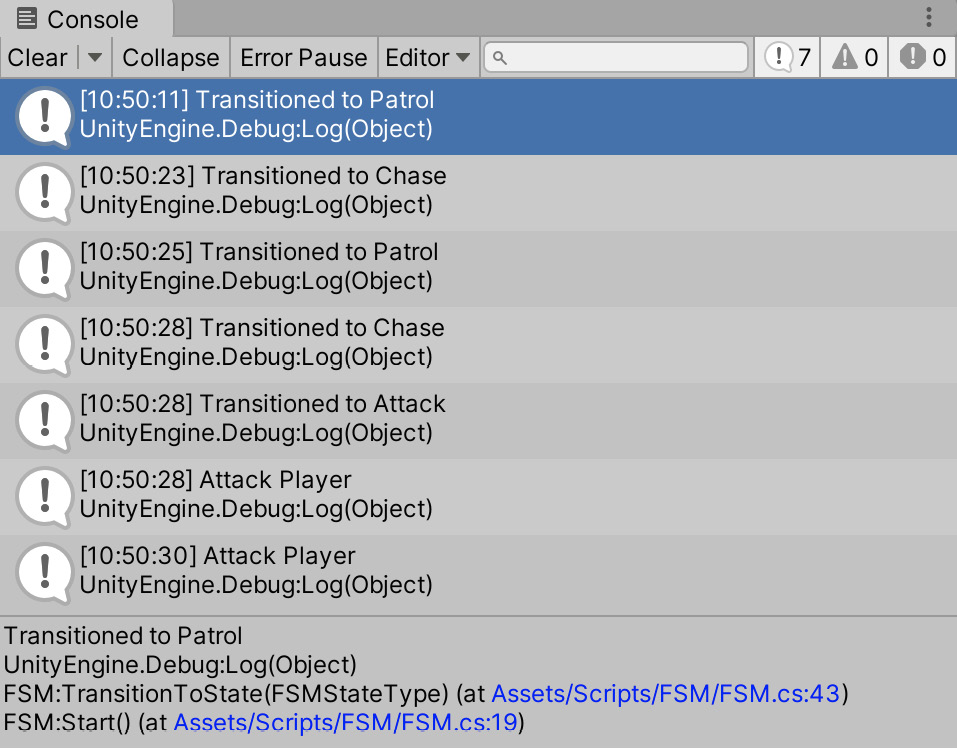
Figure 9.4 – State transitions shown in the Console window
- The only parts left to write are the Update function responsible for running the action of the current state and performing transitions, and the GetState function:
public class FSM : MonoBehaviour
{
…
void Update()
{
CurrentState.DoAction();
FSMStateType TransitionState = CurrentState. ShouldTransitionToState();
if (TransitionState != CurrentState.StateName)
{
TransitionToState(TransitionState);
}
}
}
The Update function runs every frame. It first calls the DoAction function on CurrentState. This call will perform the action associated with the state (for example, moving to a waypoint for the patrol state, or running toward the player for the chase state). Directly after the call to DoAction, the Update function calls ShouldTransitionToState. Each state will implement functionality to decide when and where to transition. We'll look at that in more detail as we write each state. The desired transition state is compared to the current state type. If they are not equal, the FSM attempts to transition to that state using the TransitionToState function we saw previously:
public class FSM : MonoBehaviour
{
…
IFSMState GetState(FSMStateType StateName)
{
foreach (var state in StatePool)
{
if (state.StateName == StateName)
{
return state;
}
}
return EmptyAction;
}
}
The GetState function loops through the array of states attached to the object (stored in StatePool) and checks whether the state type is equal to the desired state type and returns the state if they match. EmptyAction is returned if no match is found. We could have returned null here instead, but then every time we call a function or query CurrentState, we would first have to check whether it is a valid reference.
Important note
By ensuring that the object is never null through the use of an empty object, we are applying the Null Object Pattern.
- Remove the FollowDestination and Animation Controller components from the Toon Chick object. We'll re-implement this functionality using our FSM.
- Attach the FSM script to the Toon Chick object:
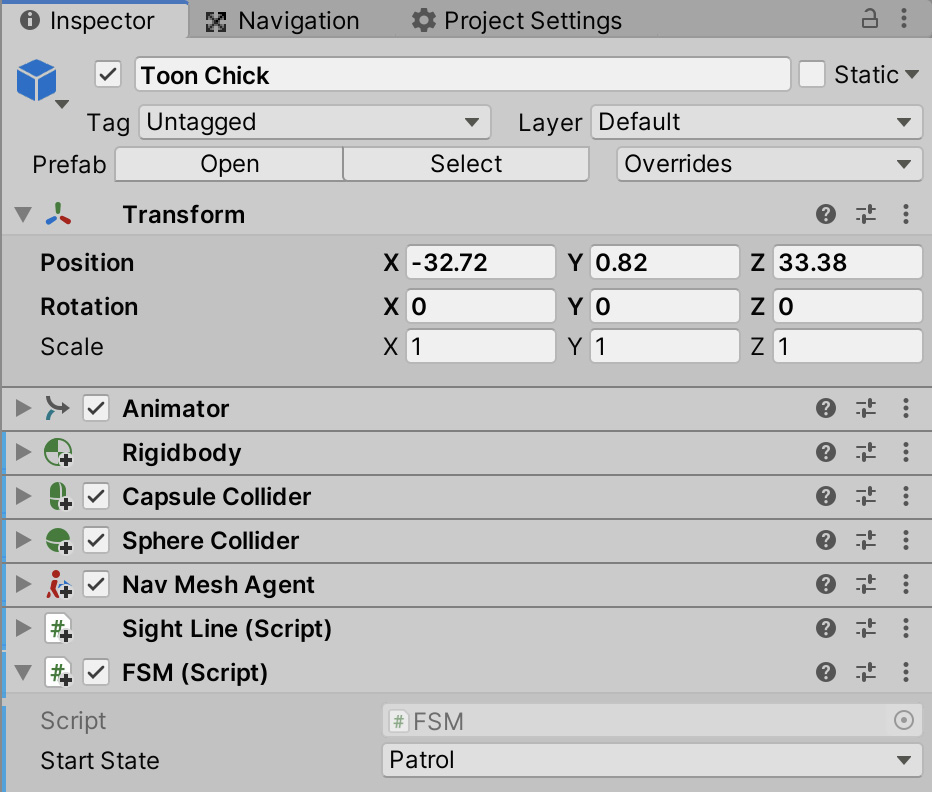
Figure 9.5 – Attaching the AI script to the NPC character
Both the Sight Line and FSM scripts are now attached to the Toon Chick object.
Tip
You can collapse the components by selecting the arrow to the left of their icons. As you can see from Figure 9.5, all the components apart from the Transform and FSM component have been collapsed.
The chick now has an FSM controller! However, if you run the game now, you'll quickly notice that the chick doesn't do anything. This lack of action is due to the absence of any states. We've created a state controller but have no states for it to control! We'll rectify this situation now by creating the first state: the patrol state.
Patrolling the environment
The first of the three states we'll implement is the patrol state. In this state, we want the chick to walk around the environment, following a predefined route. We achieved this in the previous chapter when we configured an animated Destination object that jumped around the environment. We'll reuse that object and the associated movement functionality for the patrol state, making a few tweaks to fit our needs. Previously, the chick followed this object without end, whereas the patrol state requires the NPC to consider whether the player can be seen on its route. If the player is spotted, the hunt should begin, and the current state should change to the chase state.
Each state will be contained in its own class:
- Create a PatrolState script:
public class PatrolState : MonoBehaviour, IFSMState
{
public float MovementSpeed = 1.5f;
public float Acceleration = 2.0f;
public float AngularSpeed = 360.0f;
public string AnimationRunParamName = "Run";
public FSMStateType StateName { get { return FSMStateType.Patrol; } }
private NavMeshAgent ThisAgent;
private Animator ThisAnimator;
private void Awake()
{
ThisAgent = GetComponent<NavMeshAgent>();
ThisSightLine = GetComponent<SightLine>();
ThisAnimator = GetComponent<Animator>();
}
public void OnEnter()
{
ThisAgent.isStopped = false;
ThisAgent.speed = MovementSpeed;
ThisAgent.acceleration = Acceleration;
ThisAgent.angularSpeed = AngularSpeed;
ThisAnimator.SetBool(AnimationRunParamName, false);
}
public void OnExit()
{
ThisAgent.isStopped = true;
}
}
The following points summarize the code sample:
The primary purpose of this state is to use the NavMeshAgent component to move the object along a series of waypoints. The class inherits from MonoBehaviour, so we can attach it to the Toon Chick and benefit from using Unity events (such as the Awake function). The class also implements the IFSMState interface. Implementing this interface and attaching it to an object that also has the FSM script attached (such as our Toon Chick) will add this state to the pool of states for an object.
Important note
The scripts you write must derive from MonoBehaviour (or a class that inherits from it) if you want to attach it to an object and use Awake, Start, Update, and other events that we've made use of in this book. For the full list of functions and events provided by MonoBehaviour, please see the online documentation at https://docs.unity3d.com/ScriptReference/MonoBehaviour.html.
StateName returns a type of Patrol to signify that this is a version of a patrol state. Remember, we could have several different implementations of each state (although not on the same object).
The OnEnter function configures the NavMeshAgent component's speed, acceleration, and angular speed variables. By configuring these variables on a per-state basis, the chick's movement speed can vary depending on its behavior. For example, the chick can move quickly when chasing the player and slower when patrolling. This function also sets the Run parameter to false on the animation component as the chick will be patrolling at walking speed.
The OnExit method stops the NavMeshAgent component so that the state-related movement stops.
- You may have noticed that the class doesn't implement all of the functions of the IFSMState interface and won't compile as a result. We're missing two: DoAction and ShouldTransitionToState. Let's write them now:
public class PatrolState : MonoBehaviour, IFSMState
{
public Transform Destination;
private SightLine ThisSightLine;
public void DoAction()
{
ThisAgent.SetDestination(Destination.position);
}
public FSMStateType ShouldTransitionToState()
{
if (ThisSightLine.IsTargetInSightLine)
{
return FSMStateType.Chase; }
return StateName;
}
}
DoAction calls the SetDestination function on NavMeshAgent. This behavior is the same as we've seen previously in the FollowDestination script.
ShouldTransitionToState uses the SightLine class to determine whether the target (that is, the player) is still within the chick's sightline. If the player lands within the sightline, then the FSMStateType.Chase is returned, informing the FSM class to transition to a chase state—the chase is on!
- Drag and drop the PatrolState script to the Toon Chick character in the scene.
- The patrol state is configured to track a moving object. Luckily, we have one we made earlier: a moving destination was created in the previous chapter using the Animation window to move an object around the scene over time, jumping from one place to another. Drag the Destination object to the Destination field in the Inspector, as shown in Figure 9.6:

Figure 9.6 – Configuring the PatrolState script
As the PatrolState script implements the IFSMState interface, the FSM script will retrieve a reference to the new state when the game begins. The patrol state is the default state for the FSM, so when the game begins, the chick will transition into this state. Once in this state, it will move around the environment, following the Destination object, just as it did in Chapter 7, Creating Artificial Intelligence. While it may not seem like it to the player at the moment, we've come a long way between that chapter and now. Because of the state machine, it's easier to customize the chick's behavior in different situations. It is also easier to maintain our game's code base as each state is separated into a logical unit, with minimal overlap between states. This ease of customization will become apparent soon as we start the creation of the second state: the chase state.
Chasing the player
The chase state is the second of the three in the chick's FSM. In this state, the chick will chase down the player by running directly toward them.
This state can transition to either of the patrol or attack states. As we've seen in the Chasing the player section, the patrol state requests that the FSM enters the chase state if the chick establishes a direct line of sight to the player while patrolling. Conversely, as we'll see in the next section (Attacking the player), if an attacking NPC falls outside the reach of the player (most likely because they are running away), the NPC resorts to chasing again. From the chasing state, it's possible to move to the patrol or attack state, if the inverse conditions are met.
As with the patrol state, the chase state will exist in its own class:
- Create a ChaseState script. We'll start the implementation with the StateName, OnEnter, and OnExit functions:
public class ChaseState : MonoBehaviour, IFSMState
{
public FSMStateType StateName { get { return FSMStateType.Chase; } }
public float MovementSpeed = 2.5f;
public float Acceleration = 3.0f;
public float AngularSpeed = 720.0f;
public float FOV = 60.0f;
public string AnimationRunParamName = "Run";
private readonly float MinChaseDistance = 2.0f;
private NavMeshAgent ThisAgent;
private SightLine SightLine;
private float InitialFOV = 0.0f;
private Animator ThisAnimator;
private void Awake()
{
ThisAgent = GetComponent<NavMeshAgent>();
SightLine = GetComponent<SightLine>();
ThisAnimator = GetComponent<Animator>();
}
public void OnEnter()
{
InitialFOV = SightLine.FieldOfView;
SightLine.FieldOfView = FOV;
ThisAgent.isStopped = false;
ThisAgent.speed = MovementSpeed;
ThisAgent.acceleration = Acceleration;
ThisAgent.angularSpeed = AngularSpeed;
ThisAnimator.SetBool(AnimationRunParamName, true);
}
public void OnExit()
{
SightLine.FieldOfView = InitialFOV;
ThisAgent.isStopped = true;
}
}
The following points summarize the code sample:
In this state, the agent's primary goal is to reduce the distance between itself and the player. To achieve this, it uses the NavMeshAgent component to find a path.
In the OnEnter function, NavMeshAgent is resumed by setting isStopped to false and the speed, acceleration, and angular speed are set to higher values than those found in PatrolState. These settings result in a faster-moving object.
As the object will be getting closer to the player, the FieldOfView field on the SightLine object is also increased to prevent the chick from losing the player while they're standing right in front of them. Before setting the field of view, the original value is stored in the InitialFOV field, then when the state exits, the field of view is reset using this value in the OnExit function. SightLine will be used in the ShouldTransitionToState function that we'll write shortly.
- As the chick will be moving faster in this state, the Run parameter is set to true on the animation component in the OnEnter function to transition the animation state from walking to playing the run animation.
Important note
You can download the complete code listings from the book's GitHub repo at https://github.com/PacktPublishing/Unity-2020-By-Example.
- Finish the class by writing the DoAction and ShouldTransitionToState functions:
public class ChaseState : MonoBehaviour, IFSMState
{
public void DoAction()
{
ThisAgent.SetDestination(SightLine. LastKnowSighting);
}
public FSMStateType ShouldTransitionToState()
{
if (ThisAgent.remainingDistance <= MinChaseDistance)
{
return FSMStateType.Attack;
}
else if(!SightLine.IsTargetInSightLine)
{
return FSMStateType.Patrol;
}
return FSMStateType.Chase;
}
}
The DoAction function looks similar to the method of the same name in the PatrolState class, except this time we're passing in the last known position of the player using the SightLine class. This way, the chick will move toward the player (or at least the last known position of the player).
The ShouldTransitionToState function can return one of three state types:
The Attack state type if the chick gets close enough to the player. MinChaseDistance defines the minimum distance required for this transition.
The Patrol state if the chick loses sight of the player.
The Chase state if neither of the two previously mentioned conditions is met. Returning the Chase state informs FSM that no transition is required.
- Attach the ChaseState script to the Toon Chick object:
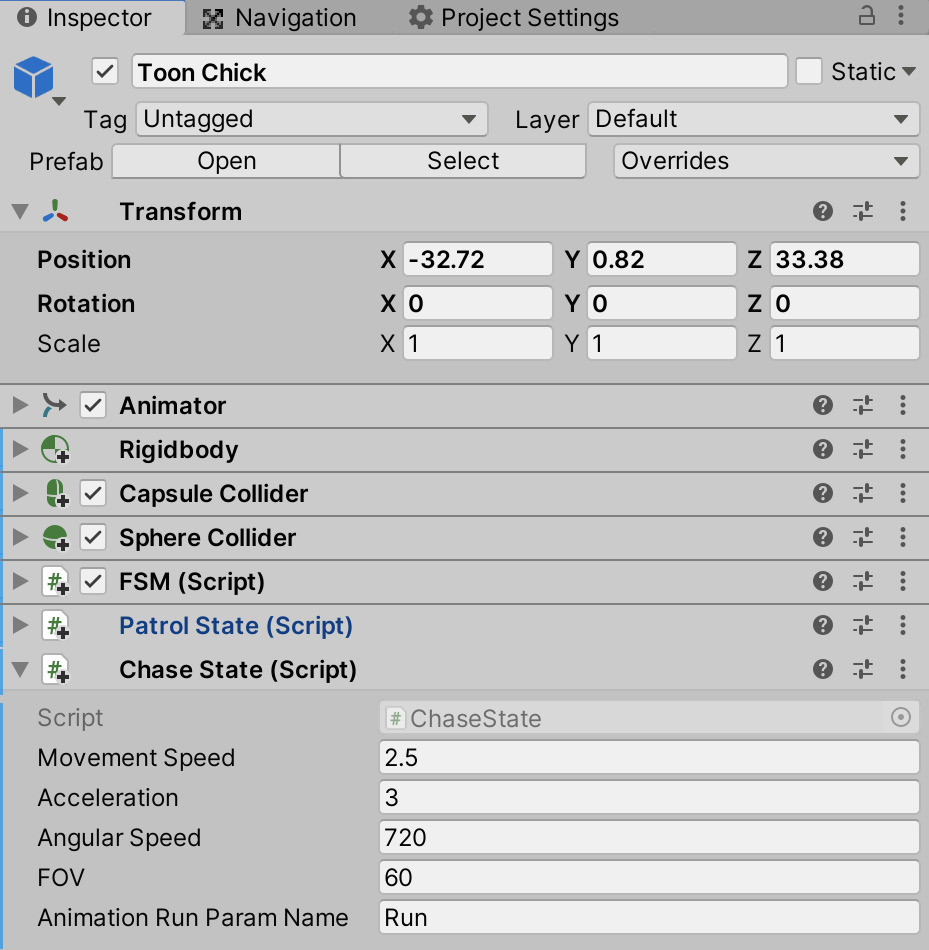
Figure 9.7 – Configuring the ChaseState script
- Test the game to make sure that the chick patrols around the environment and chases after the player when it catches sight of them:
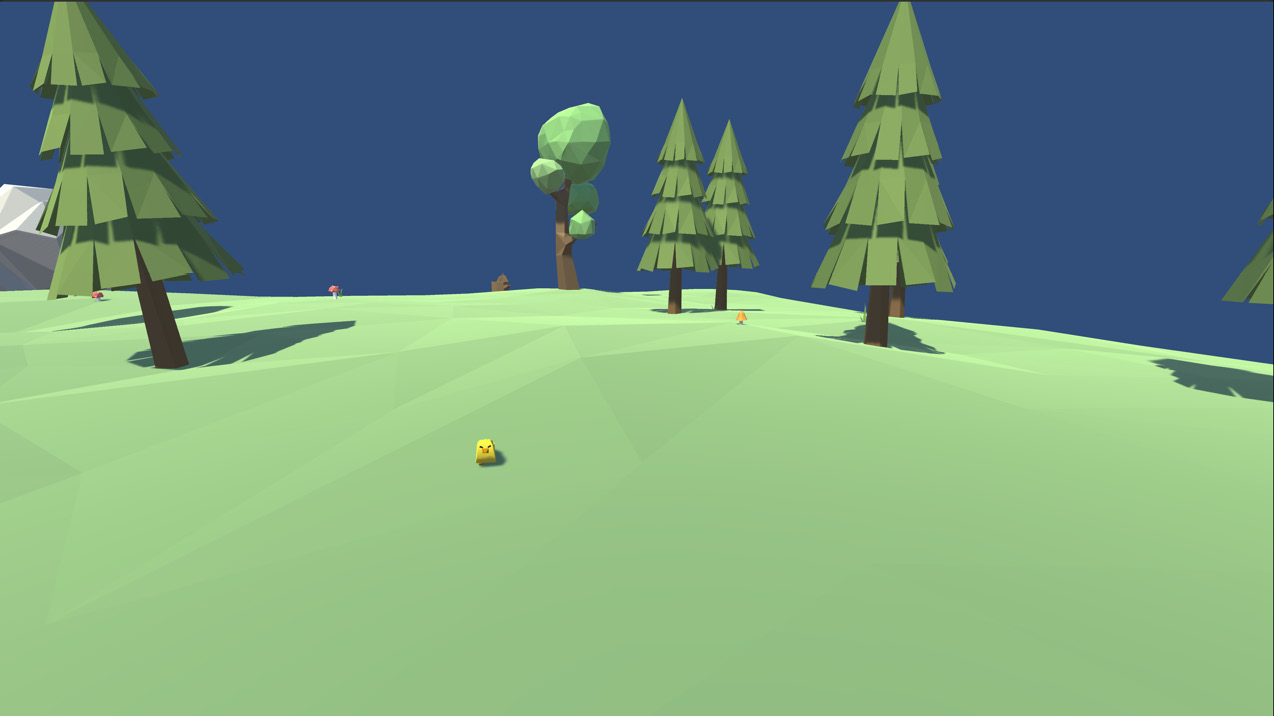
Figure 9.8 – The chick chasing the player
We've now got two behaviors under our belt: the patrol and chase states. Hopefully, it is starting to become apparent how easy it is to modify the chick's behavior by creating self-contained states. Next, we'll create the last state for the chick: the attack state.
Attacking the player
The third and final state for the NPC is the attack state, during which the chick will periodically attack the player (or at least pretend to attack the player, as you'll see shortly).
This state can only be reached from the chase state. During a chase, the chick will check whether they are within attacking distance. If so, the chase state will request that the FSM change from chasing to attacking. If, during an attack, the player retreats, then the chick will change from attacking to chasing.
The attack state will have a related animation, as we alluded to in Chapter 7, Creating Artificial Intelligence, when we created the animations for the chick; however, before we create the custom animations, we'll write the state's implementation.
Implementing the state
As with the previous two states, the attack state is contained in a separate class:
- Create an AttackState class:
public class AttackState : MonoBehaviour, IFSMState
{
public FSMStateType StateName { get { return FSMStateType.Attack; } }
public string AnimationAttackParamName = "Attack";
public float EscapeDistance = 10.0f;
public float MaxAttackDistance = 2.0f;
public string TargetTag = "Player";
public float DelayBetweenAttacks = 2.0f;
private Animator ThisAnimator;
private NavMeshAgent ThisAgent;
private bool IsAttacking = false;
private Transform Target;
private void Awake()
{ ThisAgent = GetComponent<NavMeshAgent>(); ThisAnimator = GetComponent<Animator>();
Target = GameObject. FindGameObjectWithTag(TargetTag).transform;
}
}
The Target variable is initialized by searching all objects for the first object with the specified TargetTag using GameObject.FindGameObjectWithTag. The Body object is the only object with the Player tag. Consequently, the Target field will point to that object's transform. The player becomes the target.
- Add the OnEnter and OnExit functions:
public class AttackState : MonoBehaviour, IFSMState
{
…
public void OnEnter()
{
StartCoroutine(DoAttack());
}
public void OnExit()
{
ThisAgent.isStopped = true;
IsAttacking = false;
StopCoroutine(DoAttack());
}
}
The following points summarize the code sample:
The OnEnter function starts a coroutine by calling StartCoroutine. A coroutine is a function that can break at a specified point, and then execution will continue from this point during the next frame. A typical use for coroutines is building complex behavior that can run over several frames without slowing down gameplay by trying to do too much during a single frame. The delay before returning to the coroutine can also be customized, which we'll take advantage of shortly.
The StartCoroutine function can be passed the name of a function or IEnumerator. In our case, we pass an IEnumerator that is returned from the DoAttack function. We'll discuss IEnumerator shortly when we write the DoAttack function.
The OnExit function stops the NavMeshAgent and the coroutine that was started in the OnEnter function to prevent the chick from moving or attacking once it's exited this state.
Important note
Coroutines do not run on separate threads and can only be started from the main thread.
- Add the DoAction and ShouldTransitionToState functions to the AttackState class:
public class AttackState : MonoBehaviour, IFSMState
{
…
public void DoAction()
{
IsAttacking = Vector3.Distance(Target.position, transform.position) < MaxAttackDistance;
if(!IsAttacking)
{
ThisAgent.isStopped = false;
ThisAgent.SetDestination(Target.position);
}
}
public FSMStateType ShouldTransitionToState()
{
if (Vector3.Distance(Target.position, transform. position) > EscapeDistance)
{
return FSMStateType.Chase;
}
return FSMStateType.Attack;
}
}
The following points summarize the code sample:
The DoAction function sets the IsAttacking variable to true if the target is close. It uses the Vector3.Distance function to retrieve the distance between the target (that is, the player) and this object and compares this value to the MaxAttackDistance variable.
If the player is too far away to attack, the agent is moved toward the player using the NavMeshAgent component.
- In ShouldTransitionToState, the Chase state is returned if the player moves far enough away from this object. Again, Vector3.Distance is used to calculate the distance. If that distance is greater than EscapeDistance, then the Chase state is returned, signifying to FSM that the chick should return to a chase state. Otherwise, the Attack state is returned.
- The last update we need to make to the AttackState class is adding the DoAttack function. We'll do that now:
public class AttackState : MonoBehaviour, IFSMState
{
…
private IEnumerator DoAttack()
{
while(true)
{
if (IsAttacking)
{
Debug.Log("Attack Player");
ThisAnimator. SetTrigger(AnimationAttackParamName);
ThisAgent.isStopped = true;
yield return new WaitForSeconds(DelayBetweenAttacks);
}
yield return null;
}
}
}
The following points summarize the code sample:
The DoAttack function is executed as a coroutine. While the FSM is in the attack state, this function will run. To accomplish this, the function returns an IEnumerator, which is passed to StartCoroutine and StopCoroutine in the OnEnter and OnExit functions, respectively.
An IEnumerator is an interface included in the .NET framework that provides a method of enumerating over a collection. Unity uses them in coroutines to help iterate over chunks of code.
This coroutine runs on a frame-safe infinite loop for as long as the FSM is in the attack state. The yield return null statement will pause the coroutine until the next frame, so at every frame, the contents of the while loop will be processed. This practice allows prolonged behaviors to be executed efficiently over time.
If IsAttacking is true, a message is printed to the Console window for debugging purposes to inform us that an attack has taken place. Then, an animation trigger with the name held in the AnimationAttackParamName field is activated. We will implement this parameter in the animation system soon. After activating the animation trigger, the agent's movement is stopped by setting ThisAgent.isStopped to true. We do this as we want the chick to be stationary when attacking. It then calls yield return, but rather than passing null (which pauses execution until the next frame), we pass a new WaitForSeconds object. This pauses execution by the numbers of seconds specified in DelayBetweenAttacks, preventing the chick from attacking too frequently.
Important note
For more information on coroutines, see the online documentation at https://docs.unity3d.com/Manual/Coroutines.html.
The AnimationAttackParamName trigger is set on the animation system by calling ThisAnimator.SetTrigger. This call will enable a Trigger parameter in our animation system, which we will create shortly.
Important note
Currently, the attack is simulated, and no damage is dealt to the player. If you wish to take this project further and implement this system, you can find detailed steps on creating health and damage logic in Chapter 3, Creating a Space Shooter.
As with the previous states, add the AttackState to the Toon Chick object.
The patrol state has a specific animation associated with it. This animation is not connected to any other state in the object's animation system, so when our state requests the transition to that state, nothing will happen: the chick will continue to play whichever animation it is already playing. We'll fix this next.
Animating the state
In the DoAttack function of the AttackState script, a specific animation trigger parameter called Attack is activated. Currently, this line doesn't do anything; however, when this activation occurs, we want the chick to play an attack animation. To do this, we'll need to create the parameter and create a transition from the existing states to the attack state. We'll start by creating the parameter:
- Select Toon Chick in the Hierarchy.
- Open the Animator panel by selecting Window | Animation | Animator from the Application menu.
- From the Parameters list, select the + button.
- Select Trigger, as shown in Figure 9.9:

Figure 9.9 – Creating a new trigger
A trigger is a Boolean variable that, once set to true, is automatically set to false when used for a transition. For example, in our patrol state, as we attack, we activate the Attack trigger, which will cause the current state to transition to play the attack animation. Once this transition occurs, the Attack trigger is set to false, ready to be activated again when we next attack.
- Name the new parameter Attack to match the name we gave it in the AttackState script.
Now that we have the trigger parameter we require, we can create the transitions for the attack animation. We'll use the Jump W Root animation state to represent the chick attacking.
- In the state panel of the Animator panel, right-click on Any State and select Make Transition.
- Drag the arrow to Jump W Root and left-click to create the transition:
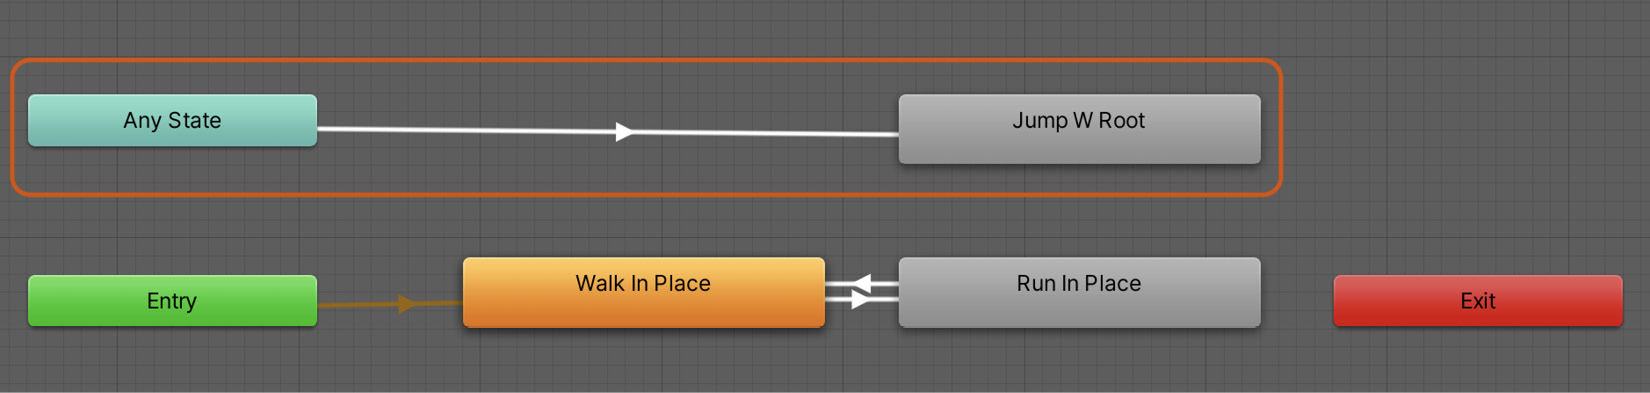
Figure 9.10 – Transitioning from Any State to the attack animation
- Select the newly created arrow to begin editing the transition.
- In the Inspector, untick Has Exit Time and add a new condition based on the Attack parameter. Conditions and their creation were outlined in detail in Chapter 7, Creating Artificial Intelligence:

Figure 9.11 – Transition settings from Any State to the attack state
Now that we can transition into the attack state, we need to create a transition out of the state so that the chick isn't stuck attacking forever:
- Right-click the Jump W Root state and once again select Make Transition.
- Drag the arrow to the Run In Place state and left-click to create the transition.
- Click the new arrow to edit the transition.
- In the Inspector, make sure that Has Exit Time is ticked. We want the attack animation to transition to the run animation when it has completed instead of based on a parameter.
- Set Exit Time to 1 and Transition Duration to 0. These settings will make sure that the complete animation is played, and there is no delay between transitioning to the running animation:
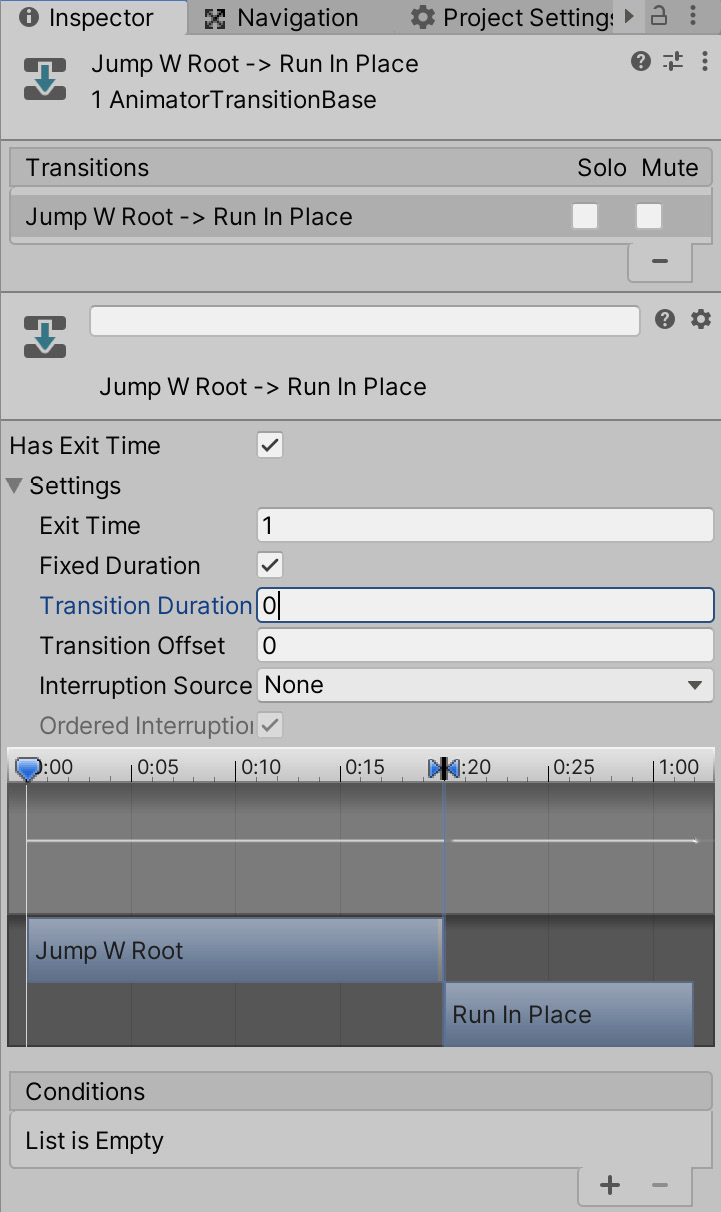
Figure 9.12 – Setting Transition Duration to 0
The Animator window should now look something like this:

Figure 9.13 – The completed animation states
- Test the completed level by pressing Play on the toolbar:
Figure 9.14 – The chick chasing the player
The chick should patrol around the environment until it catches sight of the player; once this happens, it will chase down the player until it is within attack range. Once in range, it will attack the player and play the attack animation (which is actually a jumping animation).
Feel free to experiment with the Destination object's animation, the chick's field of view, the movement speed in the patrol or chase state, or even the number of chicks in the game, as shown in Figure 9.15:
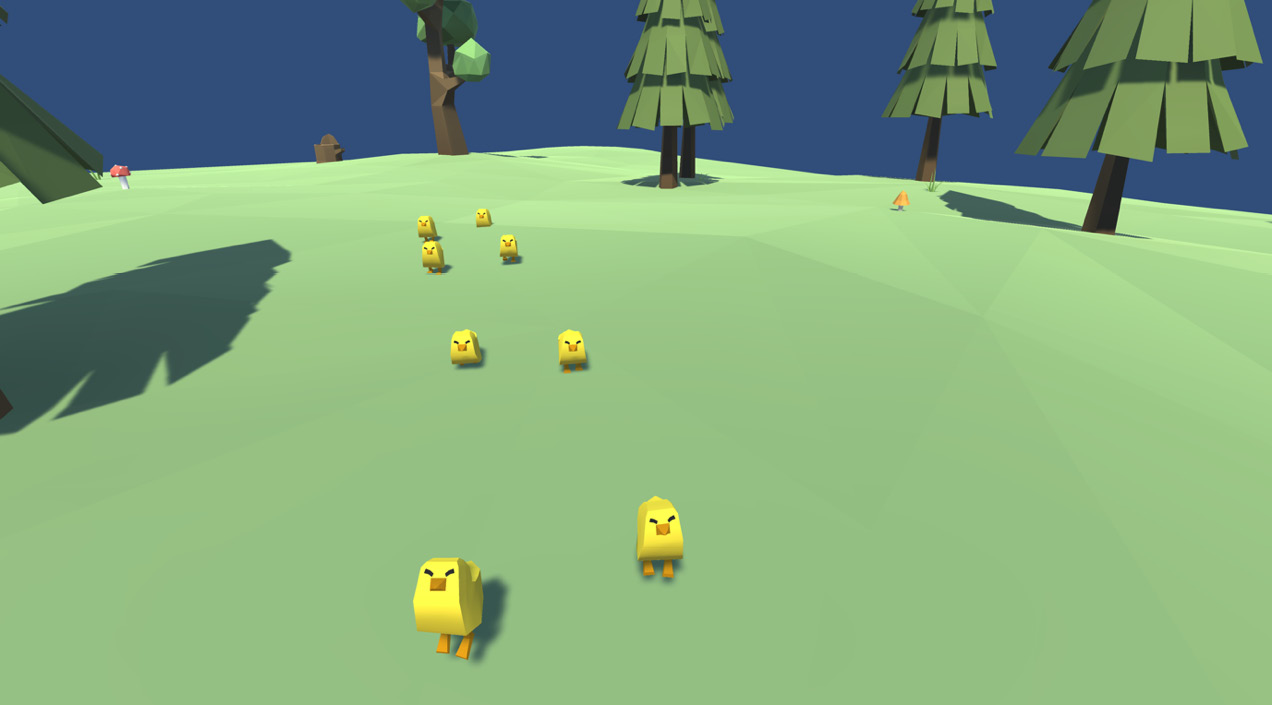
Figure 9.15 – Experimenting with the number of chicks in the game
The army of chicks each have an FSM and make their own decisions about when to transition between states.
Summary
By completing this chapter, you now have a maintainable, extendable system for creating behavior in AI agents. Continue to play around with the FSM, create new states, and combine them in different ways to create complex behavior. You could even revisit previous projects and extend existing functionality using an FSM—for example, the quest-giving NPC in Chapter 6, Continuing the 2D Adventure, could have a movement state and a talking-to-player state. Also, the FSM doesn't just have to be used for AI. For any system that has distinct and separate states, it's worth considering an FSM.
Although the FSM is versatile, it has a somewhat rigid structure. We can calculate what the chick will do every step of the way because we've hardcoded its behavior, which is ideal in many instances but has a few drawbacks. Firstly, there's no opportunity for emergent behavior. Any behavior we want our chick to act out needs to be explicitly programmed. The chick will never ambush the player by hiding behind a tree unless we tell it to, even if it would result in better gameplay. Secondly, as we have to program every behavior manually, this can increase the amount of code we need to write dramatically. As game AI gets ever more sophisticated, alternative methods of creating intelligent entities are being considered. One such approach, called machine learning (ML), enables entities to learn over time, adapting their behavior to fit their environment. You don't need to explicitly program behavior. Instead, the agent will teach itself how to behave over time. We'll explore this in detail in the next chapter as we implement an entity using ml-agents, an ML framework provided by Unity.
Test your knowledge
Q1. AI behaviors can be encoded using...
A. An FSM
B. GameObjects
C. An Animator
D. A Navigation Mesh
Q2. States can be created using a(n)...
A. If statement
B. Switch statement
C. Separate classes
D. All of the above
Q3. One alternative to a state machine is a...
A. Mesh Renderer
B. Behavior tree
C. Static variable
D. Component
Q4. Yield statements are often used to...
A. Pause and terminate coroutines
B. Rewind coroutines
C. Restart coroutines
D. Delete coroutines
Q5. Line of sight determines...
A. Whether one object can be seen by the camera
B. Whether one object can see nothing
C. Whether one object can see another
D. Whether one object can see anything
Further reading
The following resources include more information on the topics discussed in this chapter: