
Chapter 12: Completing the VR Game
This chapter continues from the previous one and completes the VR first-person shooter project by focusing on the underpinning code and functionality for creating gameplay, both in VR and using a keyboard and mouse.
Creating and destroying objects is an expensive process. An Object Pool helps to improve performance by retrieving objects from a fixed pool that was previously instantiated at a suitable time (that is, during the initial run or a loading screen). It also aids memory fragmentation by instantiating the objects together in memory in one go. Memory fragmentation occurs when the heap is broken into unnecessarily small chunks, preventing you from instantiating any new objects even if there is enough free space (just not contiguously). With this in mind, it is a good idea to become familiar with the concept, so in this chapter, we'll create an Object Pool that will store our enemy objects.
As discussed in Chapter 9, Continuing with Intelligent Enemies, a Finite-state Machine (FSM) is one of the more popular data structures for game AI programming (and beyond). The popularity of FSMs is partly due to their simplicity and ability to help break down an initial problem into several smaller, more manageable sub-problems. In this chapter, we'll reuse the core FSM functionality that we previously implemented and extend it by writing custom states.
We've used particles in previous projects to improve the overall visuals. In this chapter, we'll take it one step further, by creating particles that interact with the world around them by colliding with the enemy objects and eventually destroying them.
The Object Pool, FSM, and particle system will create the foundation of our VR gameplay experience, and by completing this chapter, you will not only gain a foundation in these topics but also complete the VR game.
In this chapter, we'll see how to do the following:
- Spawn objects using an Object Pool
- Implement AI using a Finite State machine
- Create a damage system based around particles, including configuring particle collisions with GameObjects
Technical requirements
This chapter assumes that you have not only completed the projects from the previous chapters but also have a good, basic knowledge of C# scripting generally, though not necessarily in Unity.
The starting project and assets can be found in the book's companion files in the Chapter12/Start folder. You can start here and follow along with this chapter if you don't have your own project already. The end project can be found in the Chapter12/End folder.
Spawning objects
This chapter is a continuation of the previous project, so before we add new elements to the game, let's remind ourselves of the progress so far:

Figure 12.1 – The starting project
As you can see from Figure 12.1, we have an atmospheric interior hallway scene with Spot Lights and panels that glow. If we play the game, we'll notice that we can look around using our Oculus Rift VR headset.
In our game, we want enemy droids to spawn at regular intervals at spawn points of our choosing. Once spawned, each enemy will wander the level searching for the player, and then attack. This functionality immediately depends on a spawning system, as enemies need to be generated in the scene at a specific location and at a particular interval. The spawning behavior could be achieved using the paired Instantiate and Destroy functions for creating and removing objects. These functions are slow, however, and should be avoided as much as possible during runtime. It is more efficient to generate a batch of enemies when the level starts up, hide them away, and then recycle the enemies when needed to appear as though they've been instantiated in the scene at the moment they're needed. To do this, we'll need two elements:
- An Object Pool, which will store the collection of pre-generated objects
- A script, which will select from the pool at a specified interval and configure the spawned object
Let's create the Object Pool first.
Creating an Object Pool
As mentioned in the introduction to this chapter, an Object Pool will help improve the performance of our game. In previous chapters, we've relied on the Destroy/Instantiate pairing to destroy and create objects. We'll still require the Instantiate call in our Object Pool, however, we'll control when the objects are created. And we will no longer require any calls to Destroy as the enemies will be kept in memory while the scene is active.
Tip
If you intend to publish your game on devices with restricted memory, having an Object Pool keep the objects around for the entirety of the game may not be suitable for your needs.
We'll store the logic for the Object Pool in a new script:
- Create a new class called ObjectPool in the Scripts folder:
public class ObjectPool : MonoBehaviour
{
public GameObject ObjectPrefab = null;
public int PoolSize = 10;
void Start()
{
GeneratePool();
}
public void GeneratePool()
{
for (int i = 0; i < PoolSize; i++)
{
GameObject Obj = Instantiate(ObjectPrefab, Vector3.zero, Quaternion.identity, transform);
Obj.SetActive(false);
}
}
}
The following points summarize the code sample:
The PoolSize defines how many instances of ObjectPrefab should be spawned at level startup. These will typically be instances of our enemy droids but could apply to any objects suitable for pooling. These instances will be added as child objects and hidden away in the scene until needed.
The GeneratePool function is called once at level startup to create the object pool, and all generated objects are children of the GameObject.
Once an object has been created, it is disabled by calling Obj.SetActive(false). This call disables the object from being drawn, and it also disables any components attached to the object, including scripts. This means that script event functions such as Update will not be invoked, physics is not updated, and collisions do not occur with disabled objects.
- Next, add a Spawn function to the class:
public class ObjectPool : MonoBehaviour
{
…
public Transform Spawn(Transform Parent,
Vector3 Position = new Vector3(),
Quaternion Rotation = new Quaternion(),
Vector3 Scale = new Vector3())
{
if (transform.childCount <= 0) return null;
Transform Child = transform.GetChild(0);
Child.SetParent(Parent);
Child.position = Position;
Child.rotation = Rotation;
Child.localScale = Scale;
Child.gameObject.SetActive(true);
return Child;
}
}
The Spawn function is public, and when called, will select an object from the pool to be added to the scene as an active object. It does this by selecting the first child object, as all pooled objects are added as children. To mark the object as in use, it needs to be added to a different parent Transform, so it is no longer a child of the Object Pool. As such, the Spawn function's only required parameter is a Transform of another object.
Tip
The Spawn function has several optional parameters (Position, Rotation, and Scale). These parameters have been provided with default values in the function declaration. When we call the Spawn function, if we don't pass a custom value in, the fault values will be used.
- We now have the ability to spawn objects; however, we still need some way of returning objects to the pool (or adding new objects to the pool). Create a DeSpawn function to do just that:
public class ObjectPool : MonoBehaviour
{
…
public void DeSpawn(Transform ObjectToDespawn)
{
ObjectToDespawn.gameObject.SetActive(false);
ObjectToDespawn.SetParent(transform);
ObjectToDespawn.position = Vector3.zero;
}
}
Hopefully, there is nothing too surprising in the DeSpawn function. It sets the object to false, adds the object to the pool's transform (so it can be selected for re-use), and resets its position to 0, 0, 0.
This code can be used to pool any GameObject. Although in this project, we'll use it for the enemy droids, you now have the ability to pool any object you wish! To test the Object Pool, and further enhance our game, we'll next create the functionality to spawn the enemies from the pool.
Instantiating objects using the Object Pool
Now we have the Object Pool, we can write a script that will retrieve the enemy objects from the pool and place them in the scene. We'll do this at specified intervals.
Create a new script called SpawnTimer:
public class SpawnTimer : MonoBehaviour
{
public string SpawnPoolTag = "EnemyPool";
public float SpawnInterval = 5f;
private ObjectPool Pool = null;
void Awake()
{
Pool = GameObject.FindWithTag(SpawnPoolTag). GetComponent<ObjectPool>();
}
void Start()
{
InvokeRepeating("Spawn", SpawnInterval, SpawnInterval);
}
public void Spawn()
{
Pool.Spawn(null, transform.position, transform. rotation, Vector3.one);
}
}
The following points summarize the code sample:
The Awake function searches the scene for a pool object with a specified tag, assuming this is the only such pool object, and then caches a reference to it.
The Start function initiates an InvokeRepeating cycle to spawn objects from the pool repeatedly. We pass null in as the first parameter, which represents the Transform component. By passing null here, we remove the object from its parent (that is, the pool) but don't add it as a child to any other object.
To complete the spawn functionality, add the scripts to objects in the scene:
- Create an empty object for the pool and position it outside the main level area.
- Name the new object EnemyPool.
- Attach the ObjectPool component to it.
- In the Inspector, specify a size for the pool. I've used 20.

Figure 12.2 – Creating an Object Pool
- Leave the Object Prefab field empty for now. We'll create the enemy object prefab in the next section.
Next, let's make a couple of spawn points:
- Create a new Tag called EnemyPool. For step-by-step instructions on how to create tags, see Chapter 2, Creating a Collection Game.
- Create an empty object in the scene.
- Name the object SpawnPoint.
- Position the new object at 8, 0.25, -4.5 to hide the spawn location in an alcove:
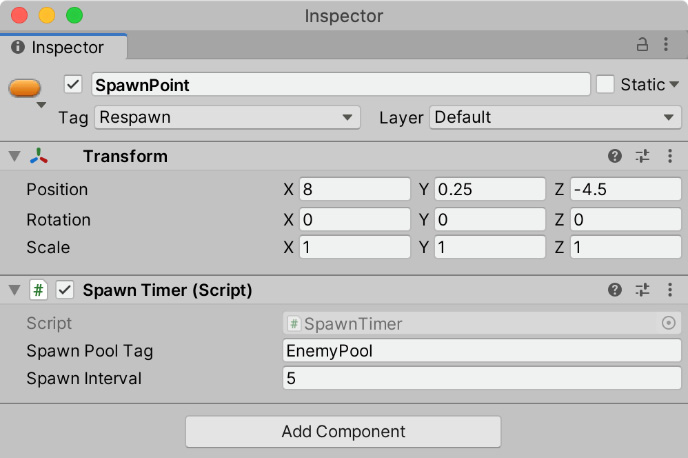
Figure 12.3 – Creating our first spawn location
- Attach the SpawnTimer script to it.
- Set Spawn Pool Tag to the recently created EnemyPool, as shown in Figure 12.3.
- Set Spawn Interval to 10. This value means a new enemy will be spawned every 10 seconds:
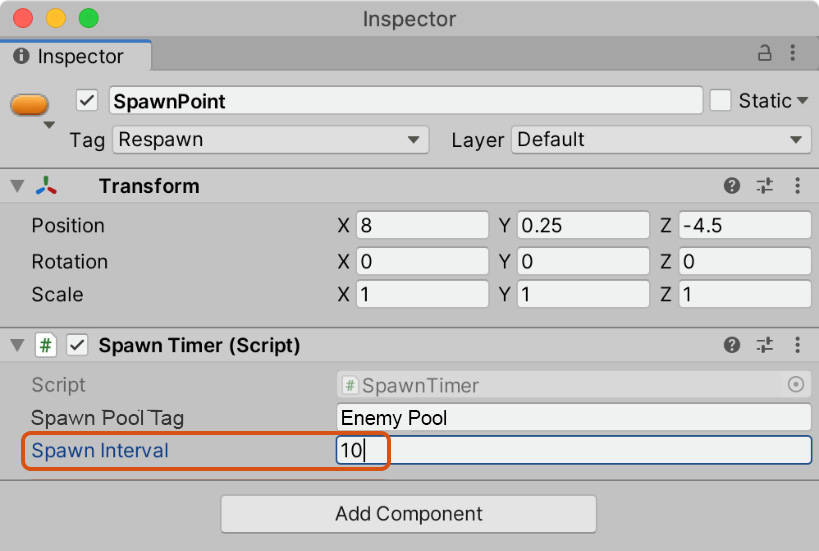
Figure 12.4 – Setting Spawn Interval
- Tag your Object Pool with the EnemyPool tag, to ensure the spawner finds the pool:

Figure 12.5 – Ensuring the Object Pool has the EnemyPool tag
- Duplicate the SpawnPoints object to create an additional spawn location.
- Position the duplicated object at 15, 0.25, 5 to hide the SpawnPoint in a different alcove:
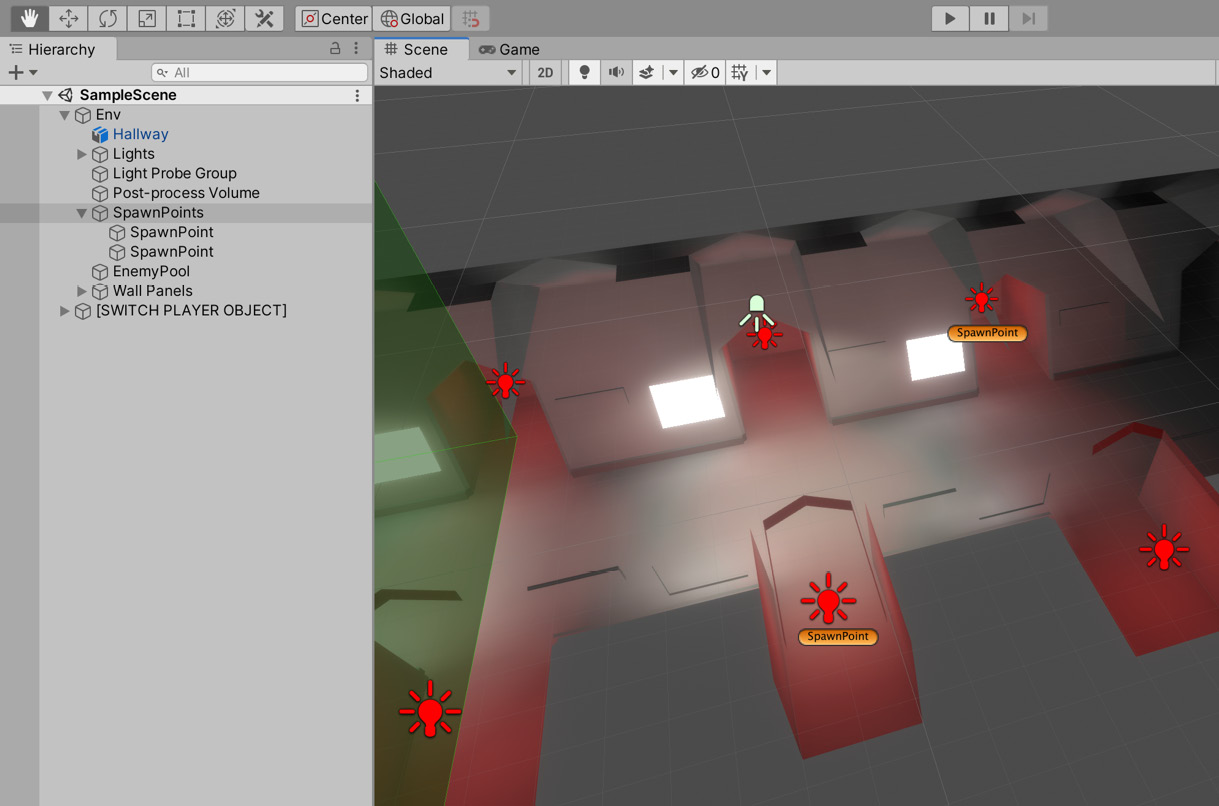
Figure 12.6 – Adding an additional spawn point
Great! Now we have the Object Pool and the functionality to spawn objects from the pool; however, we still have the following problem: we have no enemy to spawn yet. So, we'll create that next.
Creating the enemy
With the Object Pool and spawning functionality in place, it's time to create the enemy prefabs that we will spawn into the scene. We'll do this in three steps:
- Creating the initial Prefab, including the visuals and physics
- Implementing navigation in our scene by generating a NavMesh
- Adding attack and chase behavioral states using an FSM
In Chapter 9, Continuing with Intelligent Enemies, we saw how to create enemy AI using an FSM. We'll reuse that functionality here by importing the scripts from the previous project and then extending them by writing our own custom attack and chase state classes.
We'll start by creating the enemy Prefab. By creating the Enemy as a Prefab, we can instantiate as many copies of it as we want during runtime.
Creating the enemy Prefab
The droid will be constructed in the scene, and a Prefab will be created from it. We'll then edit this Prefab using the Prefab Editor to add behavioral states and navigation components:
- Drag and drop the BlastBot mesh from the Assets/Meshes folder into the scene. The enemy droid mesh will form part of a more complex object:

Figure 12.7 – Dragging the droid mesh to the scene
- Create an empty object, named Enemy.
- In the Hierarchy panel, drag BlastBot to the newly created Enemy object to make it a child object:
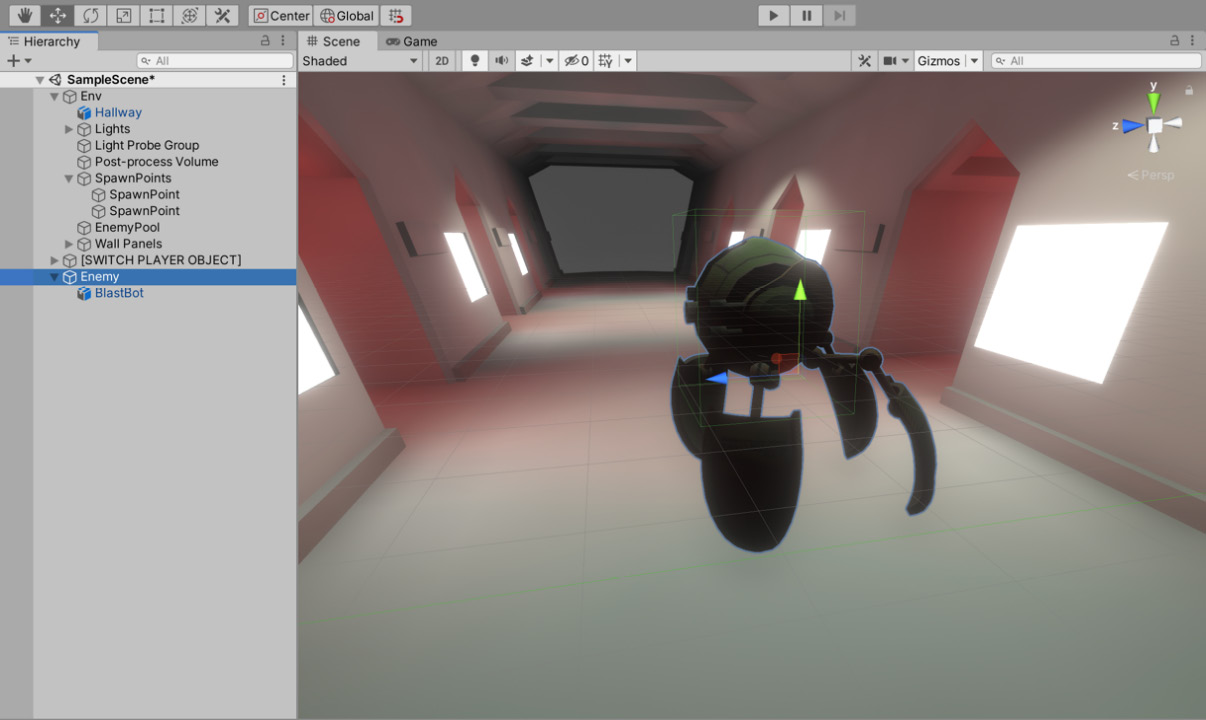
Figure 12.8 – Configuring the droid object Hierarchy
- Ensure the empty parent has a blue forward axis representing the direction in which the enemy is looking, as shown in Figure 12.8.
Next, we'll configure the object's collision and physics data:
- Add a Rigidbody component to the Enemy object.
- Then, add a Box Collider component.
- Adjust the Center and Size fields of the Box Collider component, so it roughly approximates the mesh, as shown in Figure 12.9:
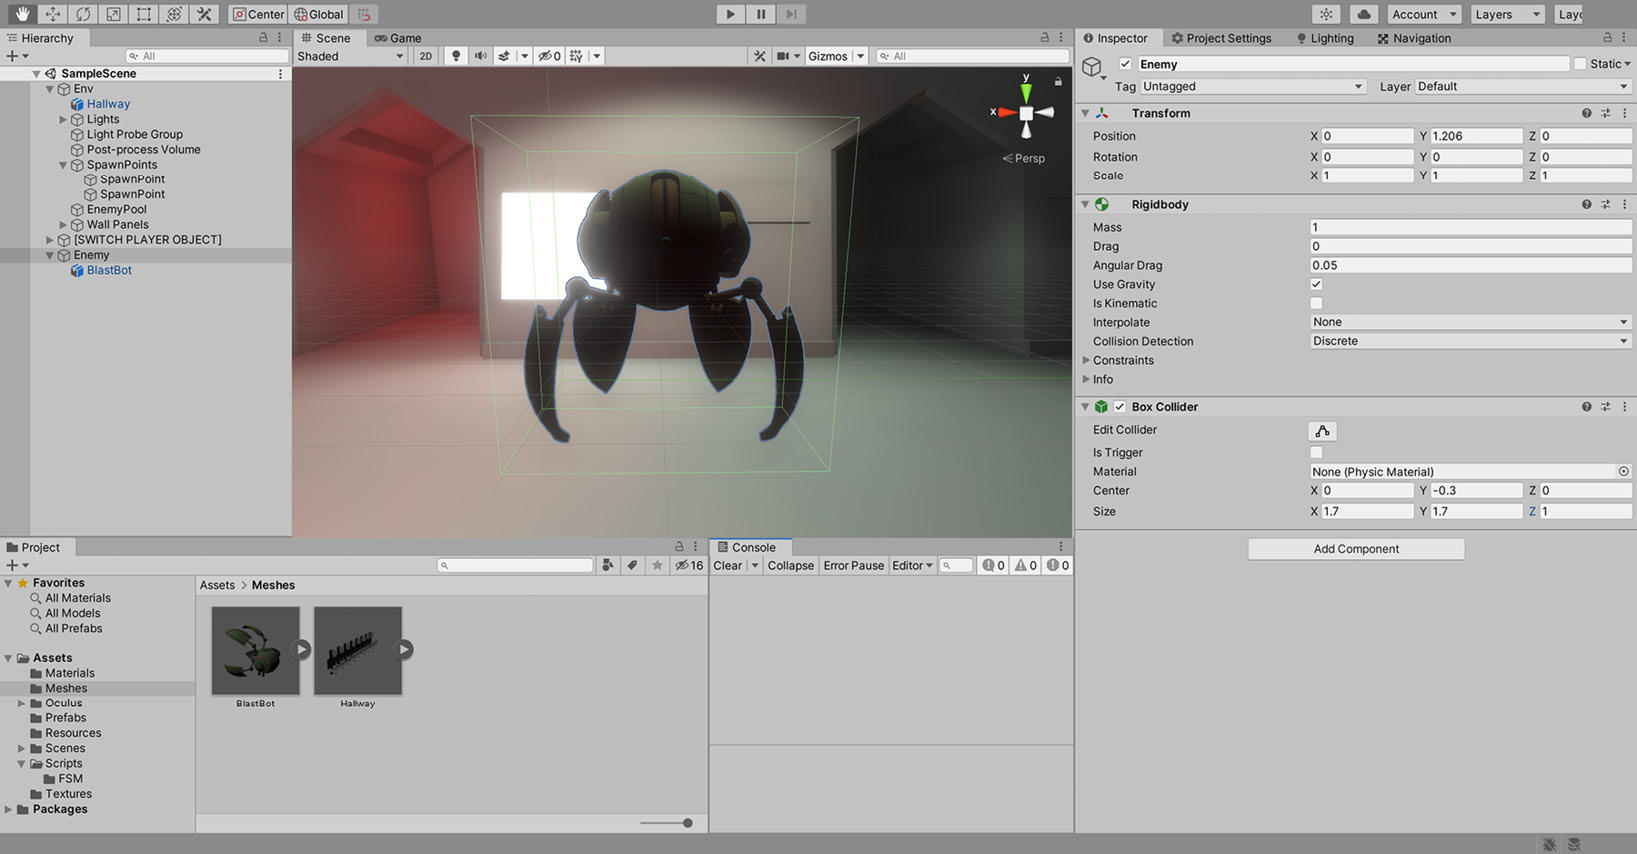
Figure 12.9 – Adjusting the Box Collider
- Ensure the Rigidbody is marked as Is Kinematic.
Let's create a Prefab from the Enemy object now, and we can always amend it later once we add navigation and AI:
- Drag and drop the parent Enemy object from the Hierarchy panel to the Assets/Prefabs folder in the Project panel:
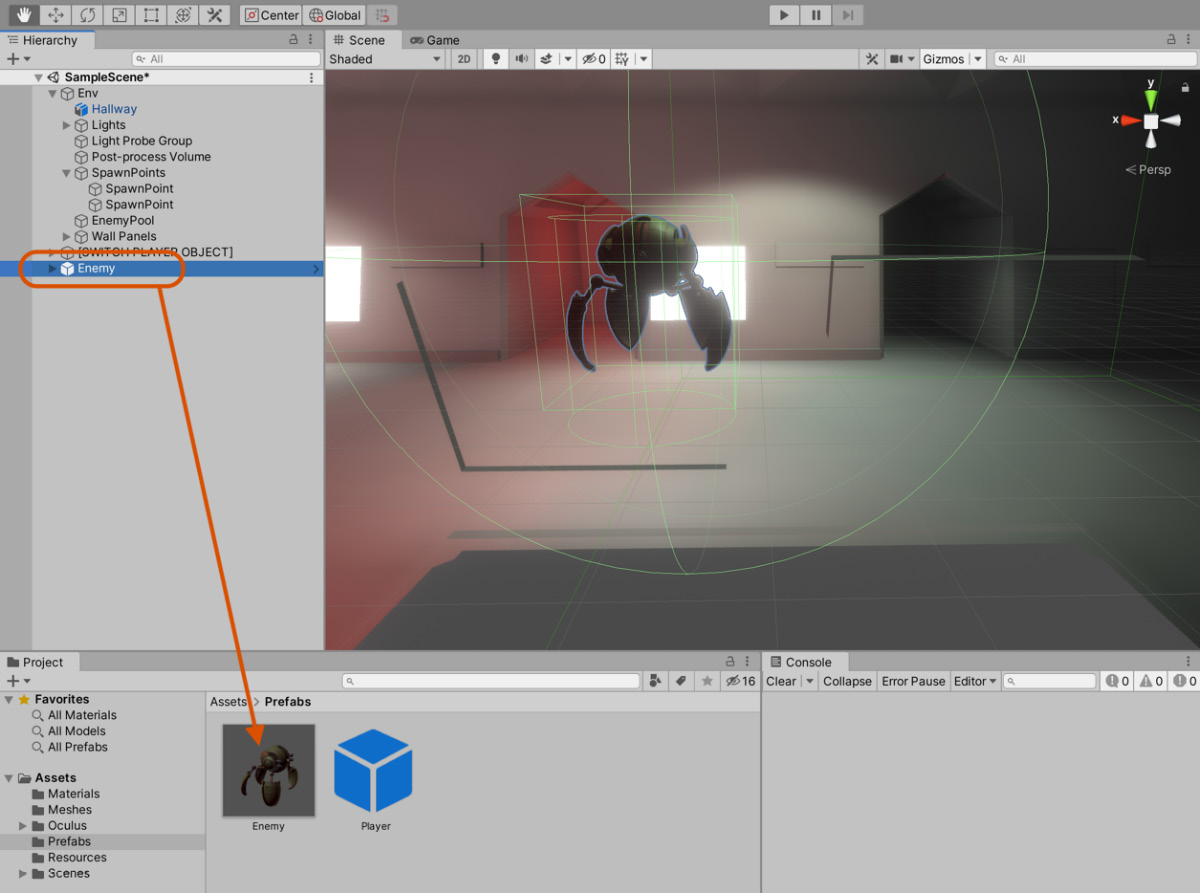
Figure 12.10 – Creating a Prefab from the Enemy object
- As we now have the Enemy prefab, as shown in Figure 12.10, we can add the Prefab to the Object Pool. Select the EnemyPool object in the hierarchy.
- Drag the newly created Prefab to the Object Prefab field:

Figure 12.11 – Adding the Enemy object to the pool
The Enemy prefab will now be spawned 20 times by the Object Pool when the scene starts. However, the player won't see enemies as they will be instantly disabled (see the Creating an Object Pool section for more information). With the Prefab created, let's move on to implementing navigation so our enemy can move from its initial spawn point to where the player stands.
Implementing navigation
The droid will need to navigate around the scene intelligently, avoiding obstacles. To achieve this, a NavMesh can be generated for the environment:
- First, ensure all environment meshes are marked as Navigation Static from the Inspector:

Figure 12.12 – Enabling Navigation Static for Static Environment Meshes
- Open the Navigation window by choosing Window | AI | Navigation from the application menu:
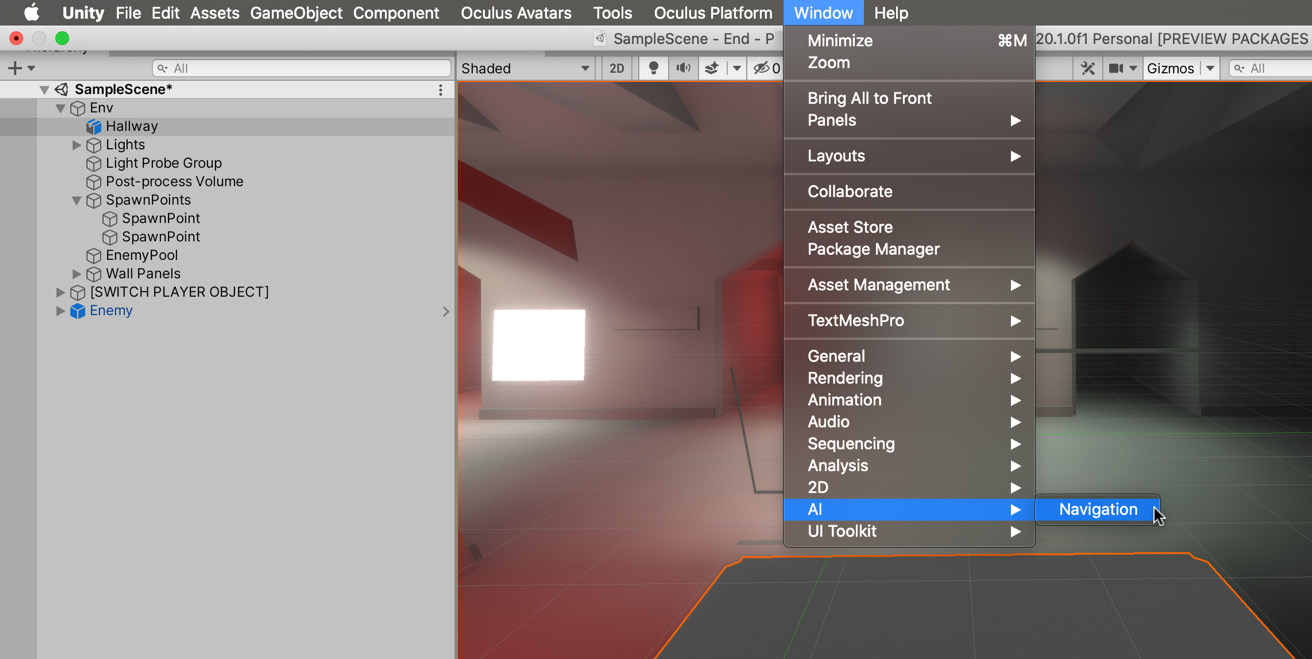
Figure 12.13 – Opening the Navigation window
- Open the Bake tab.
- Set Agent Radius to 0.27.
- Set Agent Height to 1.46, as shown in Figure 12.14:
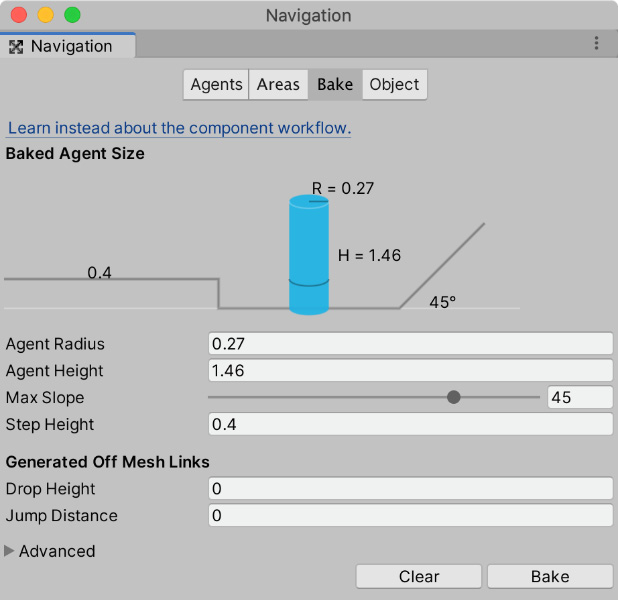
Figure 12.14: Agent size settings
Agent Radius is the average radius of an agent. This setting defines how close an agent can get to the walls in our corridor. Agent Height is the average height of an agent. This doesn't have a huge effect on our game, as long as the enemies can fit in the corridor.
Tip
For detailed information on navigation meshes, see Chapter 8, Creating Artificial Intelligence.
- Click the Bake button to generate a mesh representing the walkable area of the floor. The blue region illustrates the complete surface area inside which an enemy droid can walk:

Figure 12.15 – Generating a traversable mesh
- Now add a Nav Mesh Agent to the Enemy object.
- Select the Enemy object in the Project panel.
- Choose Component | Navigation | Nav Mesh Agent from the Application menu. The Nav Mesh Agent component will traverse the previously created NavMesh. We will control the component in our behavioral states that we write in the next section.
- Once added, set Agent Radius and Agent Height to match the droid mesh, as shown in Figure 12.16:

Figure 12.16 – Configuring Nav Mesh Agent
Great. We've now set up the environment to enable the enemy to move around. Next, we'll write the behavioral states that will take advantage of our navigation mesh.
Adding behavior states
In this section, we'll define the code to work with the Enemy prefab. We'll take advantage of the FSM we wrote in Chapter 9, Continuing with Intelligent Enemies, and extend its functionality by writing custom states. The enemy, once spawned in the level, will enter a chase state, causing it to move toward the player's location using the navigation mesh we generated in the last section. On reaching the player, the enemy will move to an attack state and cause damage to the player unless dispatched.
Start by importing the FSM from Chapter 10:
- Create a folder called FSM in the Assets/Scripts folder.
- Drag the following files to the newly created folder:
Chapter10/End/Assets/Scripts/FSM/FSM.cs
Chapter10/End/Assets/Scripts/FSM/IFSMState.cs
Chapter10/End/Assets/Scripts/FSM/FSMStateType.cs
Chapter10/End/Assets/Scripts/FSM/EmptyState.cs
Tip
If you're feeling adventurous, you could export the files as a Unity package and import them into this project instead of dragging and dropping.

Figure 12.17 – Importing the FSM scripts
Now we have the base classes we need, we can build on them to create the states for our AI. We'll start with the attack state. In this state, the enemy will rotate to face the player and attack by shooting projectiles using a particle system:
- Create a new file called AttackState in the Assets/Scripts/FSM folder:
public class AttackState : MonoBehaviour, IFSMState
{
public FSMStateType StateName { get { return FSMStateType.Attack; } }
public ParticleSystem WeaponPS = null;
private Transform ThisPlayer = null;
public void OnEnter()
{
WeaponPS.Play();
}
public void OnExit()
{
WeaponPS.Stop();
}
}
The following points summarize the code sample:
The state inherits from IFSMState and implements the OnEnter and OnExit functions. These functions are called when we transition to a state (OnEnter) and when we leave the state (OnExit). Therefore we should perform any setup and cleanup code here.
OnEnter plays a particle system. This particle system will damage the player (as well as providing the visuals for the enemy's projectiles). The WeaponPS variable refers to a particle system component, which will be a gun for the enemy droid.
OnExit stops the particle system from playing.
- The IFMState interface requires that we also implement a DoAction and ShouldTransitionToState function. Let's add them now:
public class AttackState : MonoBehaviour, IFSMState
{
…
public void DoAction()
{
Vector3 Dir = (ThisPlayer.position - transform. position).normalized;
Dir.y = 0;
transform.rotation = Quaternion.LookRotation(Dir, Vector3.up);
}
public FSMStateType ShouldTransitionToState()
{
return FSMStateType.Attack;
}
}
The following points summarize the code sample:
The DoAction function is called every frame. In this function, we rotate the enemy to face the player.
ShouldTransitionToState is also called every frame. It is used to determine when the enemy should transition to a new state. Once the enemy is in the attack state, we don't want them to leave it. To prevent a state transition, we return the ID for this state.
With the attack state complete, we only need to write the chase state to complete the AI for our enemy. In the chase state, the droid will move toward the player, and once it is within a certain distance, it will then transition to the attack state to start attacking the player.
- Create a script called ChaseState:
public class ChaseState : MonoBehaviour, IFSMState
{
public FSMStateType StateName { get { return FSMStateType.Chase; } }
public float MinChaseDistance = 2.0f;
private Transform Player = null;
private NavMeshAgent ThisAgent = null;
void Awake()
{
Player = GameObject.FindWithTag("Player"). GetComponent<Transform>();
ThisAgent = GetComponent<NavMeshAgent>();
}
}
The following points summarize the code sample:
As with the attack state, ChaseState inherits from IFSMState. Using a standard interface means our FSM class will interact with both of these new states without requiring any modification.
MinChaseDistance defines how close the enemy needs to get to the player before they transition to the attack state (we'll see the code that handles this case shortly).
A reference to the player's Transform is retrieved in the Awake function. This reference will be used as a target by NavMeshAgent. It will traverse the environment using the navigation mesh we generated in the previous section to reach the player.
- Add OnEnter and OnExit functions:
public class ChaseState : MonoBehaviour, IFSMState
{
…
public void OnEnter()
{
ThisAgent.isStopped = false;
}
public void OnExit()
{
ThisAgent.isStopped = true;
}
}
The following points summarize the code sample:
As with AttackState, the OnEnter and OnExit functions are called when we enter and exit the state, for example, when we transition from one state to another.
When we enter the state, we set the isStopped variable to false on the NavMeshAgent component. This ensures that once a target has been set, the enemy will move toward the player.
When we leave the state, we set isStopped to true to prevent any further movement.
- Lastly, we need to add the DoAction and ShouldTransitionToState functions:
public class ChaseState : MonoBehaviour, IFSMState
{
…
public void DoAction()
{
ThisAgent.SetDestination(Player.position);
}
public FSMStateType ShouldTransitionToState()
{
float DistancetoDest = Vector3. Distance(transform.position, Player.position);
if (DistancetoDest <= MinChaseDistance)
{
return FSMStateType.Attack;
}
return FSMStateType.Chase;
}
}
The following points summarize the code sample:
In the DoAction function, we set the destination to equal the position of the player. As the player in our game cannot move, we don't necessarily need to set this every frame. However, if in future, you were to add player movement, this would be necessary.
We want the enemy to transition to the attack state when they get close to the player, so in the ShouldTransitionToState function, we perform a distance check between the enemy and the player. If the player is close, we return the ID for the attack state, which informs the FSM to transition to that state. See the FSM.Update function, which details how this works.
Next, add the scripts to the Enemy object:
- Select the Enemy prefab in the Project panel.
- Attach the FSM script and set Start State to Chase, as shown in Figure 12.18.
- Attach the Chase State script.
- Attach the Attack State script:
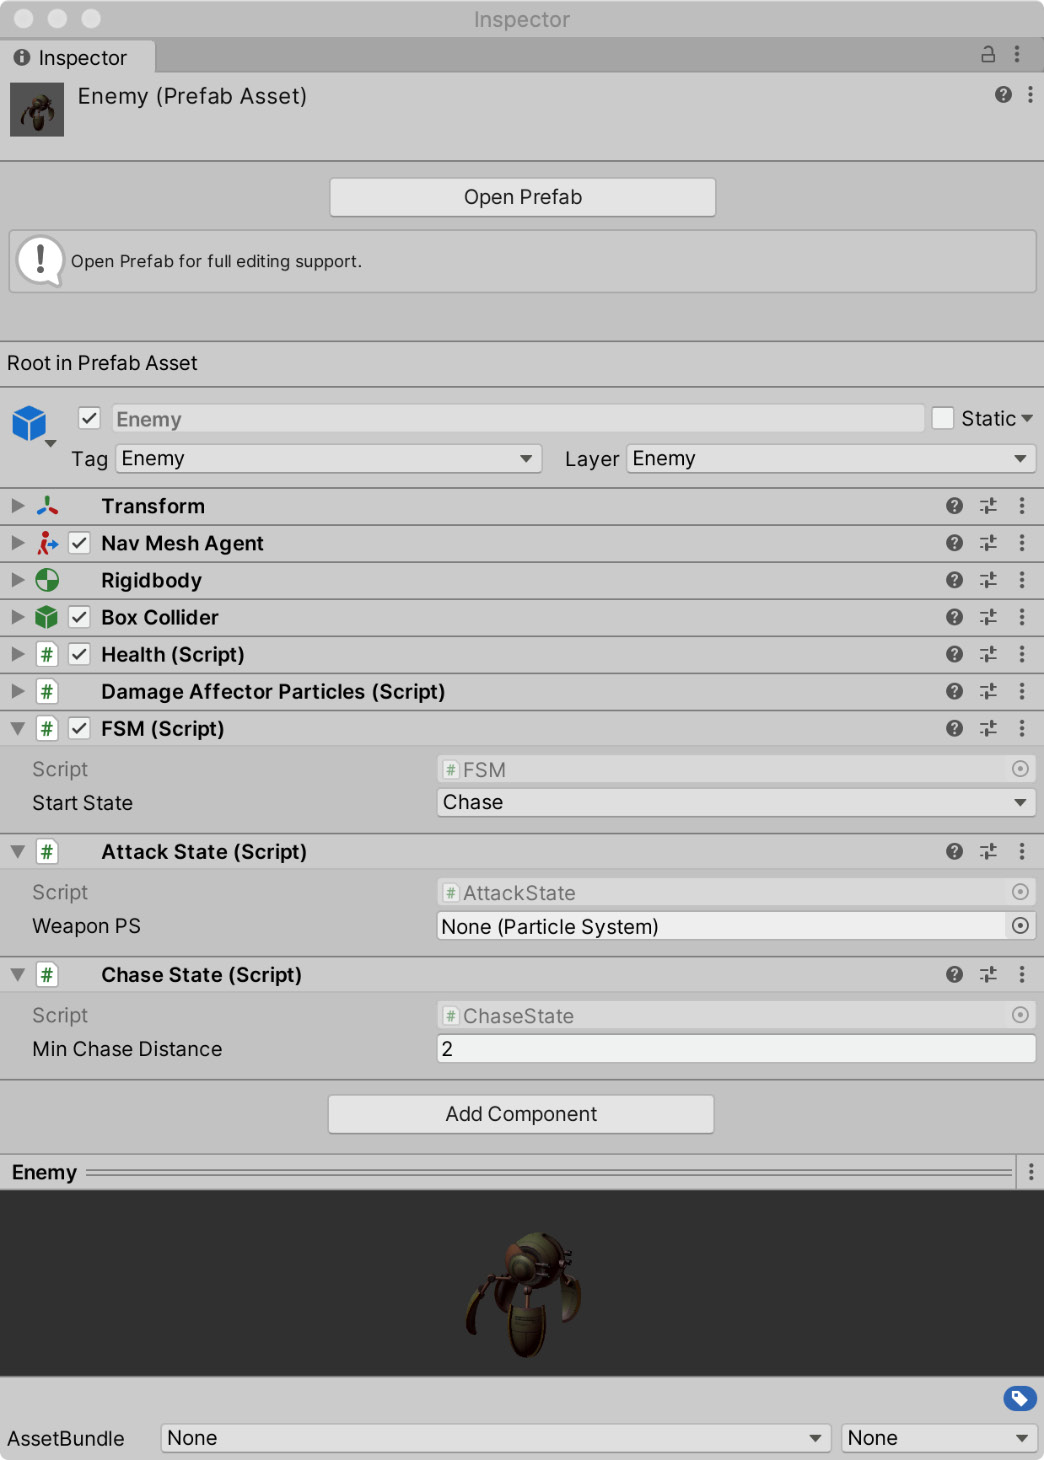
Figure 12.18 – Adding the FSM scripts to the enemy
- Set Min Chase Distance to 2.
That's it for the FSM for now. We still need to configure the Weapon PS field, but we can't do that yet. This field accepts a particle system that will act as the enemy's weapon; however, we haven't created the particle system yet. Let's work on that next.
Implementing a damage system
In this section, we will create the damage system for our game. Assuming that it will take more than one hit to destroy an enemy, we need to create a way to track health. We then need a way to reduce health – a weapons system. In previous chapters, we've created projectile Prefabs that would damage an enemy on collision. In this chapter, we'll do things slightly differently. By taking advantage of collidable particle effects, we'll create a visually appealing projectile system. Let's start by implementing the health system.
Adding enemy health
The enemy objects and the player must be able to take damage when hit by weapons. Therefore, both the player and the enemies require a way to track their current health. To accomplish this, we'll create one script that we can reuse for both entities:
- In the Assets/Scripts folder, create a new Health script:
public class Health : MonoBehaviour
{
public UnityEvent OnHealthChanged;
public string SpawnPoolTag = string.Empty;
public float HealthPoints
{
get { return _HealthPoints; }
set
{
_HealthPoints = value;
OnHealthChanged?.Invoke();
if (_HealthPoints <= 0f) { Die(); }
}
}
[SerializeField] private float _HealthPoints = 100f;
private ObjectPool Pool = null;
}
The following points summarize the code:
The HealthPoints property is used to change object health, and potentially to notify other objects and processes about the event.
The Pool variable allows the Health component to link with the Object Pool so that, if the object is dying, it can be returned to the Object Pool rather than being removed entirely from the scene.
The question mark in the OnHealthChanged?.Invoke() statement signifies that the event should only be invoked if it is not null, and works the same as the following:
if(OnHealthChanged != null)
{ OnHealthChanged.Invoke();
}
- Initialize the Pool variable in the Awake function:
public class Health : MonoBehaviour
{
…
void Awake()
{
if (SpawnPoolTag.Length > 0)
{
Pool = GameObject.FindWithTag(SpawnPoolTag). GetComponent<ObjectPool>();
}
}
}
There's nothing new here. We simply find an object in the scene with the specified tag, and then retrieve the ObjectPool component attached to that object.
- Add a Die and Update function:
public class Health : MonoBehaviour
{
…
private void Die()
{
if (Pool != null)
{
Pool.DeSpawn(transform);
HealthPoints = 100f;
}
}
void Update()
{
if (Input.GetKeyDown(KeyCode.Space))
{
HealthPoints = 0;
}
}
}
The following points summarize the code sample:
The Update function features test code that reduces health points to 0 on a spacebar press.
When the spacebar is pressed, it calls the Die function. This function doesn't destroy the object but returns it to a pool and resets HealthPoints to 100. Setting the health to the maximum may look like a weird thing to do when the object dies, but remember it's being added to a pool, and there's a strong chance it will be re-added to the scene, and when it is, we need it to be at full health.
You can now update the Enemy prefab by adding the Health script:
- Select the Enemy prefab in the Assets/Prefabs folder.
- In the Inspector, add the Health script:

Figure 12.19 – Adding the Health script to the Enemy prefab
Excellent! Our enemy is ready. It can't attack yet, but neither can the player. In the next section, we'll create attack and damage mechanics that work for both the player and enemy at the same time.
Attacking using particles
Enemies should attack the player, and the player should attack the enemies. Both depend on the concept of attacking and taking damage. This section will use particle systems for inflicting damage, and we'll create a script to take damage. First, let's create a player weapon by generating a new particle system. In VR, this object can be made a child of the hand controllers; each hand can have one weapon. In standard first-person mode, the particle system will be a single-fire weapon:
- Create a new particle system in the scene by choosing GameObject | Effects | Particle System:

Figure 12.20 – Creating a weapon particle system
Once added to the scene, we'll need to tweak several settings to make it look like a plasma beam or a laser cannon. Expand the Shape and Emission settings from the Object Inspector to reveal those particle system properties.
- Change Start Speed to 5 and Start Lifetime to 0.5 to affect the projectiles' speed and range.
- Under the Shape heading, change Shape to Cone and set Radius to 0.04 to narrow the profile's trajectory.
- Under the Emission heading, adjust Rate over Time to 3.5. Higher values will produce a beam, and lower values will produce bolts or balls instead:
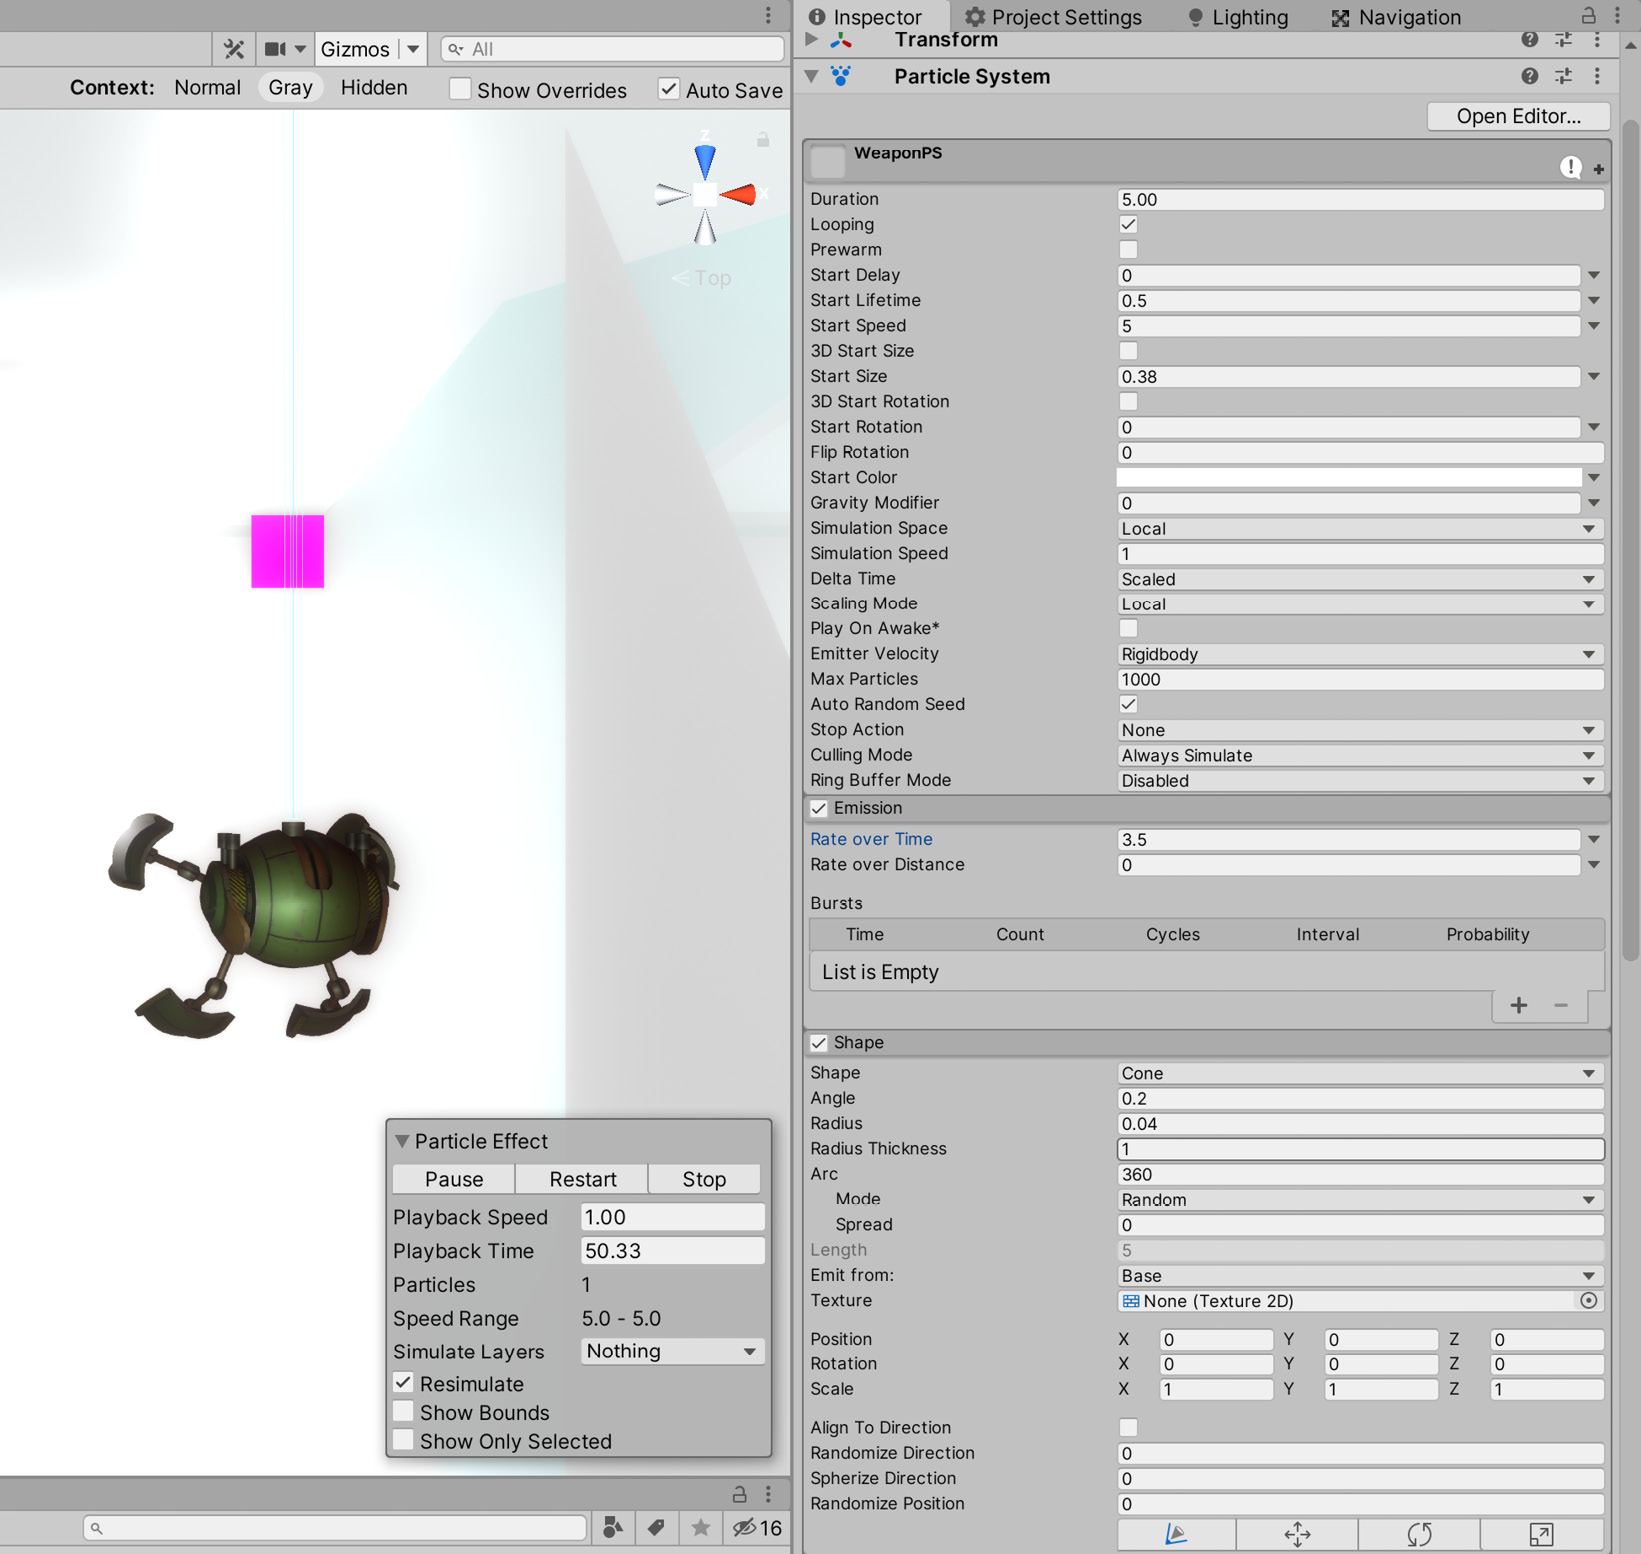
Figure 12.21 – Adjusting the shape and rate of the particle system
- Now let's change the particle appearance using the Renderer section. Click the Material field and pick a style for the particles, as shown in Figure 10.22:
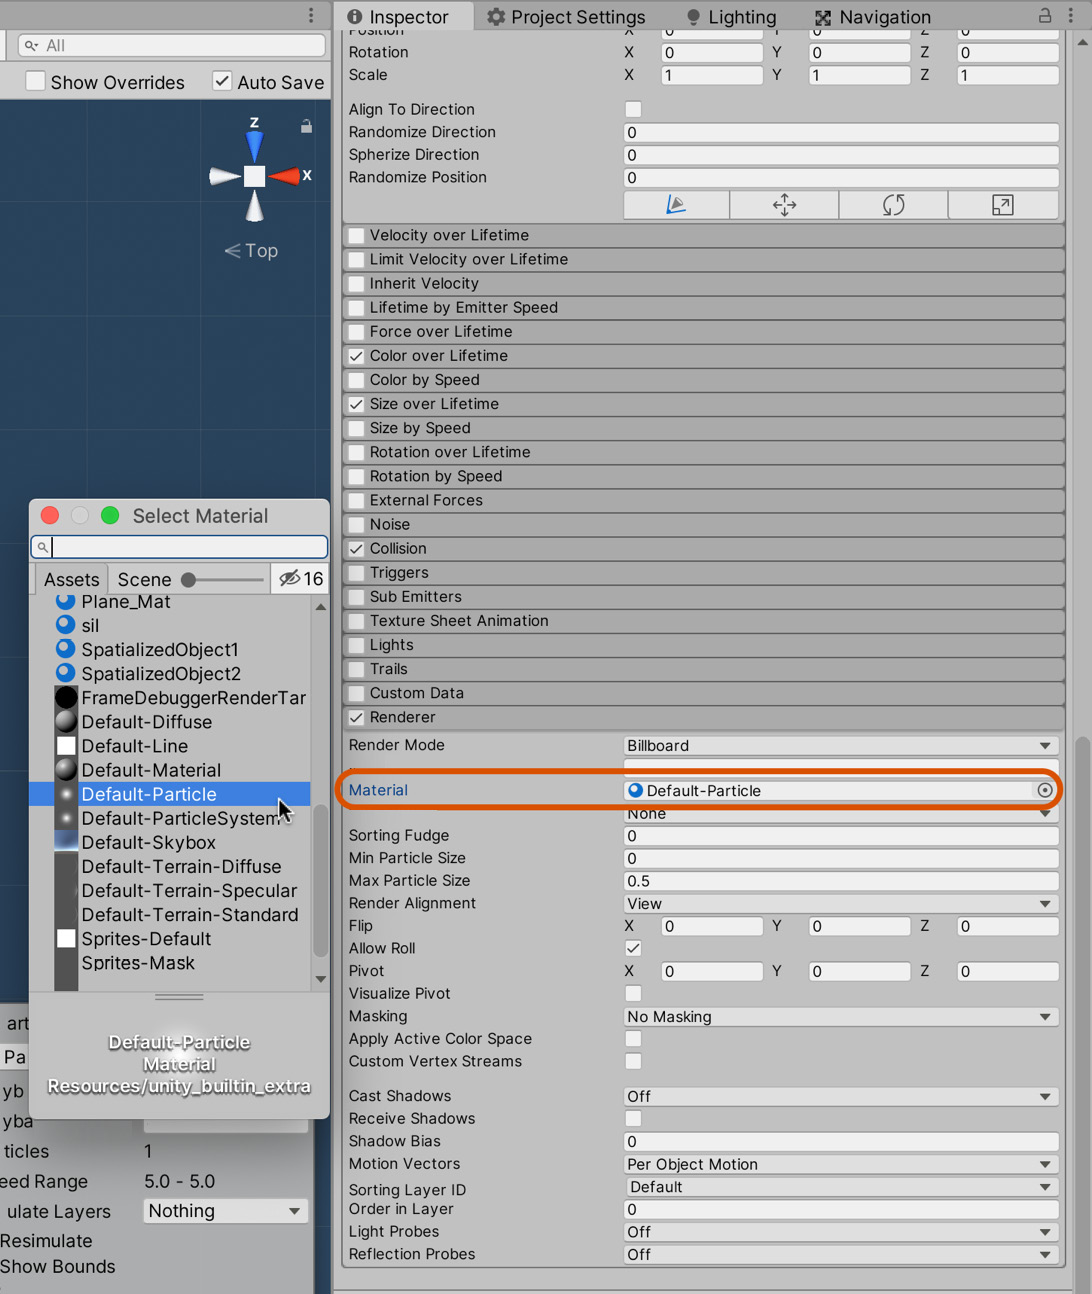
Figure 12.22 – Controlling particle appearance
Next, we'll add collision data to the particles so they can collide with other objects, such as enemies, allowing enemies to respond and take damage from a collision.
To do this, do the following:
- Expand and enable the Collision group.
- Enable the Send Collision Messages option.
- Set the collision Type to World. This ensures an OnParticleCollision event is invoked when an object collides with the particles:
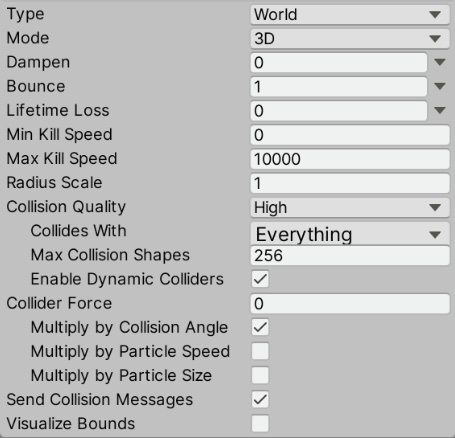
Figure 12.23 – Adding particle collisions
Now we need only two scripts: one for firing the player weapon, and another that causes an object to take damage when hit by ammo.
Create a new script called Weapon.cs:
public class Weapon : MonoBehaviour
{
private ParticleSystem PS;
void Awake ()
{
PS = GetComponent<ParticleSystem>();
}
void Update ()
{
if(Input.GetButtonDown("Fire1") || OVRInput. GetDown(OVRInput.Button.One))
{
PS.Play();
}
else if (Input.GetButtonUp("Fire1") || OVRInput. GetUp(OVRInput.Button.One))
{
PS.Stop();
} }
}
The PS variable references the attached particle system to be started or stopped when a trigger is pressed. The OVRInput class is used to detect when a button is pressed on the Touch controllers. This means the code can be linked both to desktop PC input and VR controller input.
Lastly, we need to add our particle system to the player and bots:
- Attach the Weapon script to the particle system object.
- Create a Prefab by dragging the newly created particle system to the Assets/Prefabs folder.
- Drag the Prefab to LeftHandAnchor and RightHandAnchor (they are children of OVRPlayerController, which we created in the previous chapter):
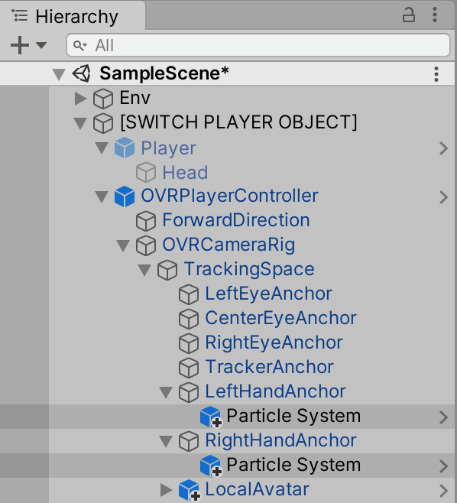
Figure 12.24 – Adding weapons to the player
- Drag the Prefab to the Enemy object to enable the enemy to fire projectiles as well:
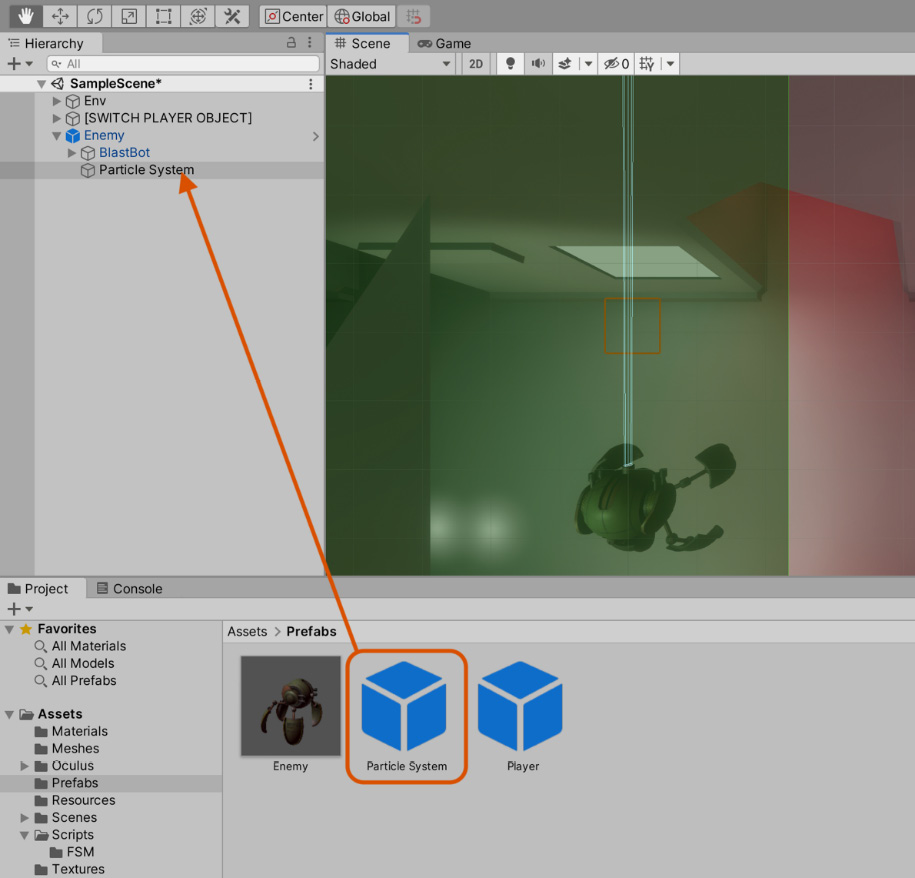
Figure 12.25 – Adding weapons to the enemy
Now both the enemy and player have the ability to attack using the same Prefab. In the future, we could create Prefab variants to differentiate a player and enemy attack, but the current setup is perfect for our modest needs. In the next and final section, we'll add the ability to take damage from our weapon system.
Damaging the enemy
We've seen several health/damage systems in the book so far. Still, this one will be slightly different, as rather than responding to a collision from a GameObject, we need to listen for collisions with our particle system.
- Create a new script called DamageAffectorParticles:
public class DamageAffectorParticles : MonoBehaviour
{
public string TagDamage = "Enemy";
public float DamageAmount = 2f;
private Health ThisHealth = null;
void Awake()
{
ThisHealth = GetComponent<Health>();
}
void OnParticleCollision(GameObject other)
{
if (other.CompareTag(TagDamage))
{
ThisHealth.HealthPoints -= DamageAmount;
}
}
}
There's not much new here, other than we're implementing a special function called OnParticleCollision. As the name suggests, it is invoked whenever this object collides with a particle that has collisions enabled. This script will respond to damage from a particle system and apply it to the Health script we wrote previously.
- Attach the script to the Enemy object.
- Set the Tag Damage field to Player to enable the player's projectile system to damage the enemy.
- Set Damage Amount to 10:
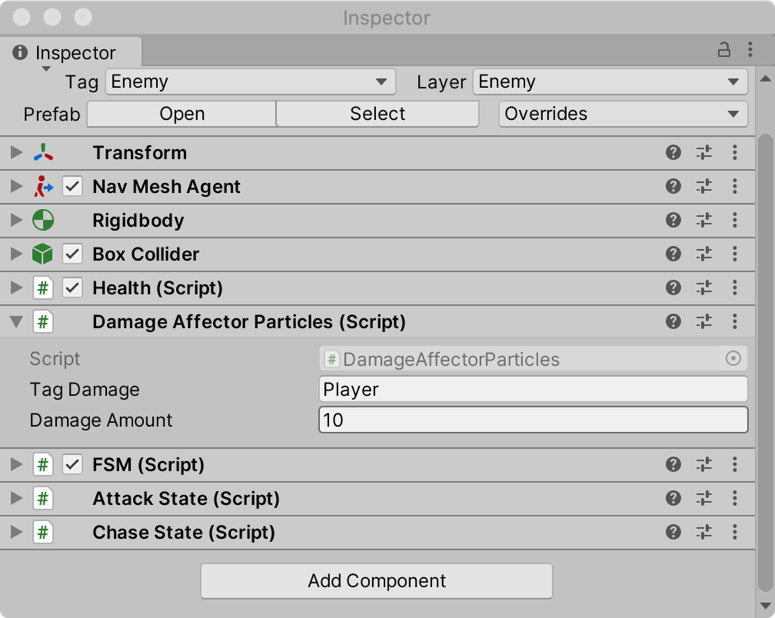
Figure 12.26 – Damage script attached to the Enemy object
- On the Attack State component, drag the newly created particle system to the Weapon PS field:

Figure 12.27 – Assigning the particle system to the Attack State
Now the player can shoot, damage, and destroy the enemies, which will continuously spawn using an Object Pool:

Figure 12.28 – Completed VR game
Congratulations! You completed the VR game. We now have a game that works with a VR headset, allows you to look around, and prevents movement. You can shoot oncoming enemies, which spawn into the level, using the Touch controllers. The damage system uses a collision-based particle system. In reaching this far, you've not only seen how to build a VR game, but also a few neat optimization tricks, including Object Pools and reusing scripts for multiple objects.
Summary
Great work! You've completed the chapter and the VR game, and in doing so have learned how to create a VR project, calibrate lighting to create a specific mood, add post-processing effects to enhance the visuals, spawn objects using an Object Pool, and create dynamic AI using the FSM we wrote in a previous chapter.
Using an Object Pool in your projects will enable you to improve performance and prevent memory fragmentation by instantiating the objects together in memory. In this chapter, we focused on spawning enemies using the pool. But any object can be spawned, including particles, reusable UI objects, and so on.
By extending the FSM we wrote in Chapter 9: Continuing with Intelligent Enemies with the addition of custom Attack and Chase states, you've seen how easy it will be to add dynamic AI to any future project. Separating the logic for the state machine and the states gives us the ability to add custom behavior without modifying the core state machine.
By experimenting and iteratively improving the code found in this chapter, you can create a solid foundation for any VR game. In the next chapter, we'll move away from VR but still stay in the world of Extended Reality by creating an Augmented Reality game. We'll also look at creating our first Universal Render Pipeline project, and what that means for Augmented Reality. See you there!
Test your knowledge
Q1. Particle Systems do not support object collisions.
A. False
B. True
Q2. FSM stands for…
A. Finite State Machine
B. Full Static Method
C. Fast Linear Mode
D. Fetch Sort Master
Q3. Oculus Rift is supported on Mac computers.
A. True
B. False
Q4. OVRInput is primarily used to…
A. Read input from Oculus Touch controllers
B. Read the orientation of the HMD
C. Read the player position in the tracking space
D. Reset the player position
Further reading
The following resources include more information on VR: