
Chapter 13: Creating an Augmented Reality Game Using AR Foundation
This chapter starts a new Extended Reality (XR) project. In the previous two chapters, you worked on creating a virtual reality project. In this chapter, we'll start work on an Augmented Reality (AR) game where you can tap and place virtual objects in the real world using either an Android or iOS device. We'll create the game using Unity's new Universal Render Pipeline (URP).
The project creation process is similar to past projects, with a small twist. We will be using a completely new rendering pipeline. One of the reasons we will use URP for this project is that as Unity moves to URP, you will want to know how to set up AR using URP. The flow of previous projects doesn't change much in URP, but there are notable differences with AR. This chapter can also be completed without using URP; just skip the Implementing AR in URP section.
With most projects, there's no getting away from project setup, and AR is no exception. We will need to install various plugins and packages, and these plugins can differ depending on your target device. Fortunately, once the device-specific setup is complete, we can write code that will work for Android and iOS using AR Foundation, which provides a cross-platform implementation for AR.
Unity provides several premade components that we will add to the scene to enable AR. By the end of this chapter, you will have created a basic AR project without having to write a single line of code.
In this chapter, we will cover the following topics:
- Creating a new URP project
- Installing the necessary plugins and packages to get up and running with AR
- Configuring player settings to ensure the project runs on Android and iOS
- Creating our first AR scene, including importing the necessary AR objects
- Creating a turtle prefab that we will display in AR
- Testing the project on an iOS or Android device
- Implementing AR features specific to the URP
Technical requirements
This chapter assumes that you have not only completed the projects from the previous chapters but also have a good, basic knowledge of C# scripting generally, though not necessarily in Unity.
The completed project is included in the Chapter13/End folder.
This chapter uses an asset from the Unity Asset Store, which, along with the author details, can be found at https://assetstore.unity.com/packages/3d/characters/creatures/rpg-monster-duo-pbr-polyart-157762.
To run the project in this book, you require an iOS 11 or greater device, or an Android 7.0 device (or later). These are the minimum OS versions required to support AR. Due to the ever-evolving nature of AR, we recommend you follow along using Unity 2020.1, as this version has been confirmed to work with the project.
Introducing the project
Before we proceed with the implementation details, we should briefly define a couple of terms that we touched on in the introduction, that is, AR (and AR Foundation) and the Universal Render Pipeline.
We won't go into too much detail about AR as you're most likely aware of it, even if you haven't used it yourself. Using AR, we can superimpose data (in our case, it will be GameObjects) onto the world around us.
Tip
For a sneak peek of what our AR project will look like by the end of the chapter, see Figure 13.34.
Occasionally AR can be confused with virtual reality, and they both fall under the umbrella of Extended Reality. However, where virtual reality creates an entirely new reality for the player to be immersed in, AR is used to extend, or take advantage of, the real world inhabited by the player.
AR has received a lot of attention in the tech world in the last few years (Pokémon GO, Apple's WWDC, Microsoft's conference, and so on). Unity has taken notice, and in 2019 released AR Foundation – an easy way to create multi-platform AR apps within Unity and the first time AR has been officially supported. AR Foundation is a set of classes and APIs created by Unity that enables us to develop cross-platform AR games. It provides the ability to track a device's position and orientation, detect horizontal and vertical planes, and track a face or image, among other things.
Tip
For more information on the features provided by AR Foundation, see https://docs.unity3d.com/Packages/[email protected]/manual/index.html.
The URP is a complete refresh of Unity's built-in render pipeline. It contains several tools to help you easily create optimized graphics on a wide range of mobile, desktop, and game consoles. URP provides control over how Unity renders a frame by writing C# code.
Tip
For more information on the URP, see https://docs.unity3d.com/Packages/[email protected]/manual/index.html.
We'll take advantage of some of what the URP has to offer in the next chapter, when we look at post-processing. In this chapter, you will learn how to create a URP project and configure settings specific to AR. On that note, it's time to get started developing in AR by creating a URP project.
Getting started with AR
In this section, we will create a new URP project and perform the necessary steps to prepare our project for AR. These steps include the following:
- Creating the URP project. We've created many projects in this book, but they have mostly used the 2D or 3D template. The project in the book is based on the URP template.
- Installing the plugins necessary for AR. Luckily for us, as you'll see shortly, there is a streamlined approach to adding the AR libraries.
- Once the plugins have been installed, we need to make a few changes to the player settings so we can successfully deploy to mobile devices.
- Lastly, we will import the packages required for AR. There is a common foundation package and packages specific to iOS and Android.
That's a lot of ground to cover, even before we start adding our own custom functionality. However, once you have an understanding of the process, you'll be up and running in your projects in no time.
Let's jump in by creating the project.
Creating a URP project
As touched on previously, we'll be using a different template for the AR project. As the URP has been described in detail in Introducing the project, we can jump right into the implementation:
- Open Unity Hub.
- Select the Projects tab on the left, as shown in Figure 13.1:
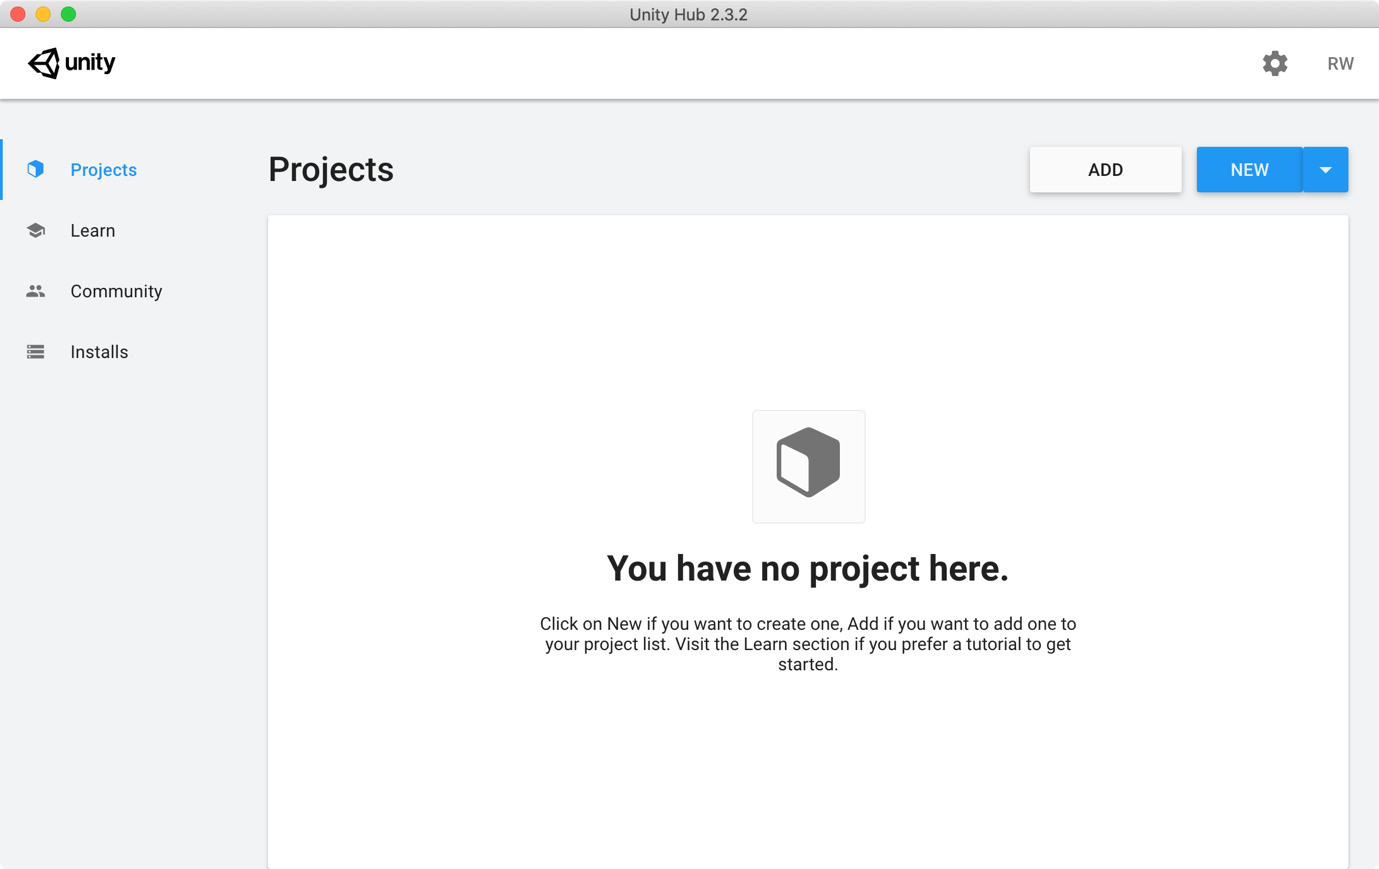
Figure 13.1 – Unity Hub Projects tab
- Click the blue NEW button to open the project creation wizard.
- This is where the flow differs from previous projects. Instead of selecting the 2D or 3D template, select the Universal Render Pipeline template. The template selection is shown in Figure 13.2.
- Name the project AR and set a suitable location:
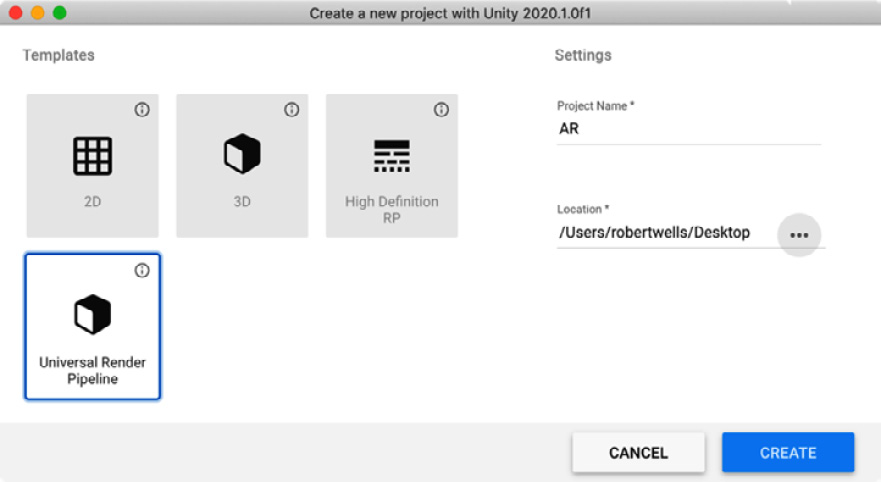
Figure 13.2 – Project creation wizard
- Click CREATE to create the project based on the URP template.
As with all previously created projects, this will create the project and open the Unity Editor. There is one noticeable difference, however. With newly created 2D or 3D projects, you're typically greeted by an empty scene (save a camera and lighting); however, with the URP template, you'll be greeted with a pretty sample scene, showing off some of the features of the URP. A sample scene is shown in Figure 13.3:
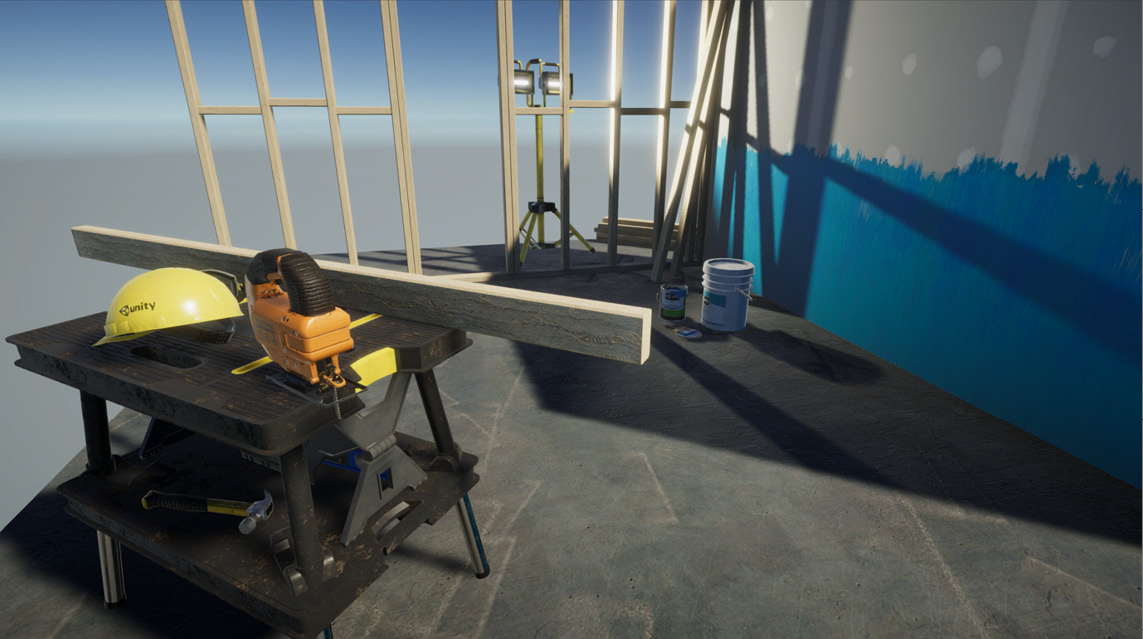
Figure 13.3 – Project creation wizard
Feel free to play around with the sample scene before moving onto the next step: installing the libraries required for AR.
Installing AR libraries
With the project created, we need to make a few changes to get it ready for AR. One of the necessary precursors to developing in Unity AR is installing the required plugins. Luckily, Unity provides a graphical interface to do just that:
- Open the Project Settings pane by selecting Edit | Project Settings… from the Application menu.
- Select XR Plugin Management from the list on the left-hand side:

Figure 13.4 – Installing XR Plugin Management
- Click the Install XR Plugin Management button. After a few moments, the screen will update to show the options in Figure 13.5:
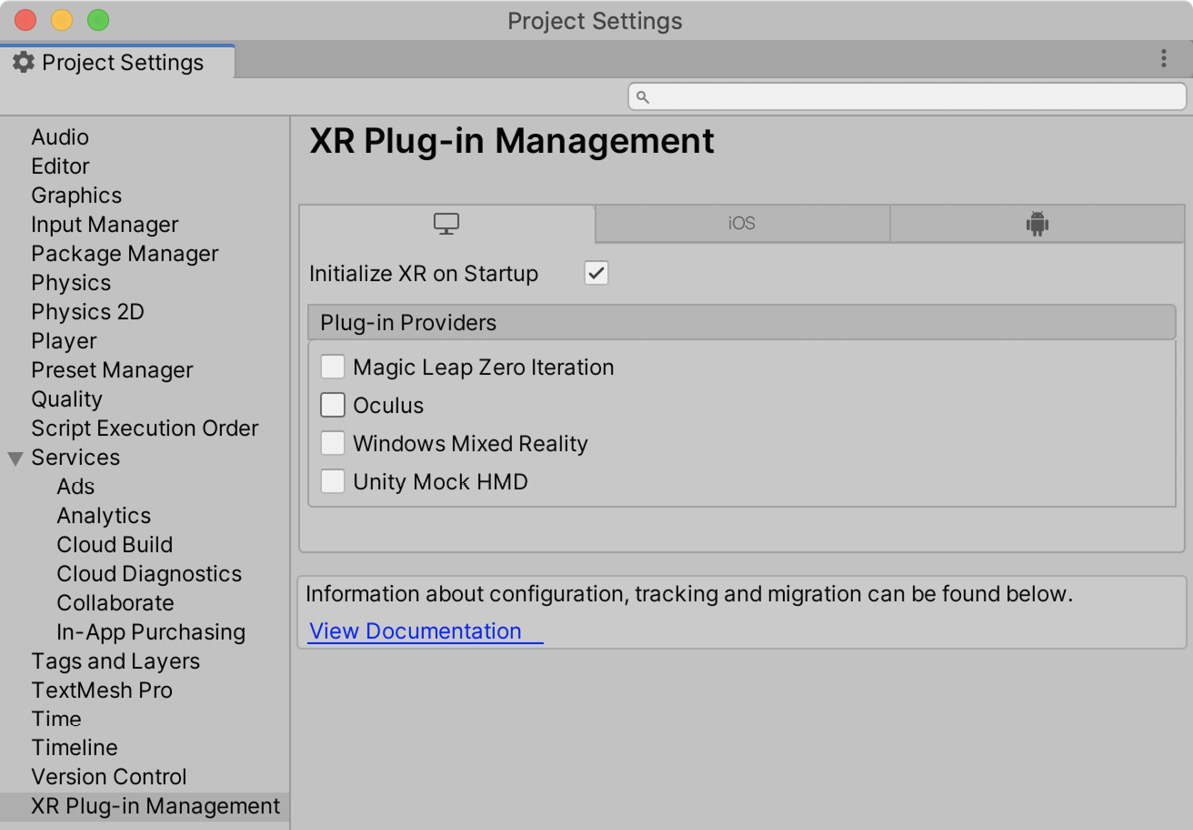
Figure 13.5 – Project Settings with XR Plugin Management installed
- If you'll be deploying to an iOS device, select the iOS tab and tick the checkbox next to ARKit to install the AR library required for iOS devices:
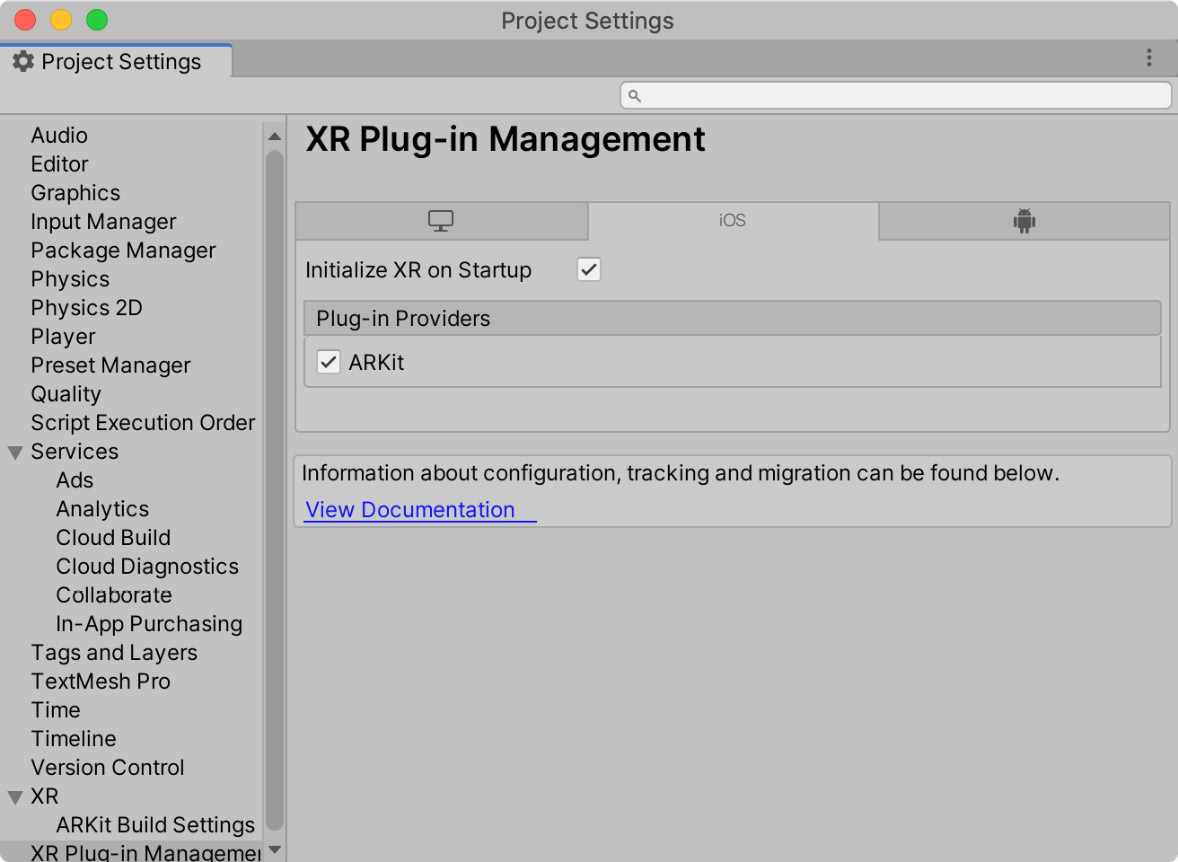
Figure 13.6 – Installing ARKit
- If you'll be deploying to an Android device, select the Android tab and tick ARCore to install the library required for Android development:
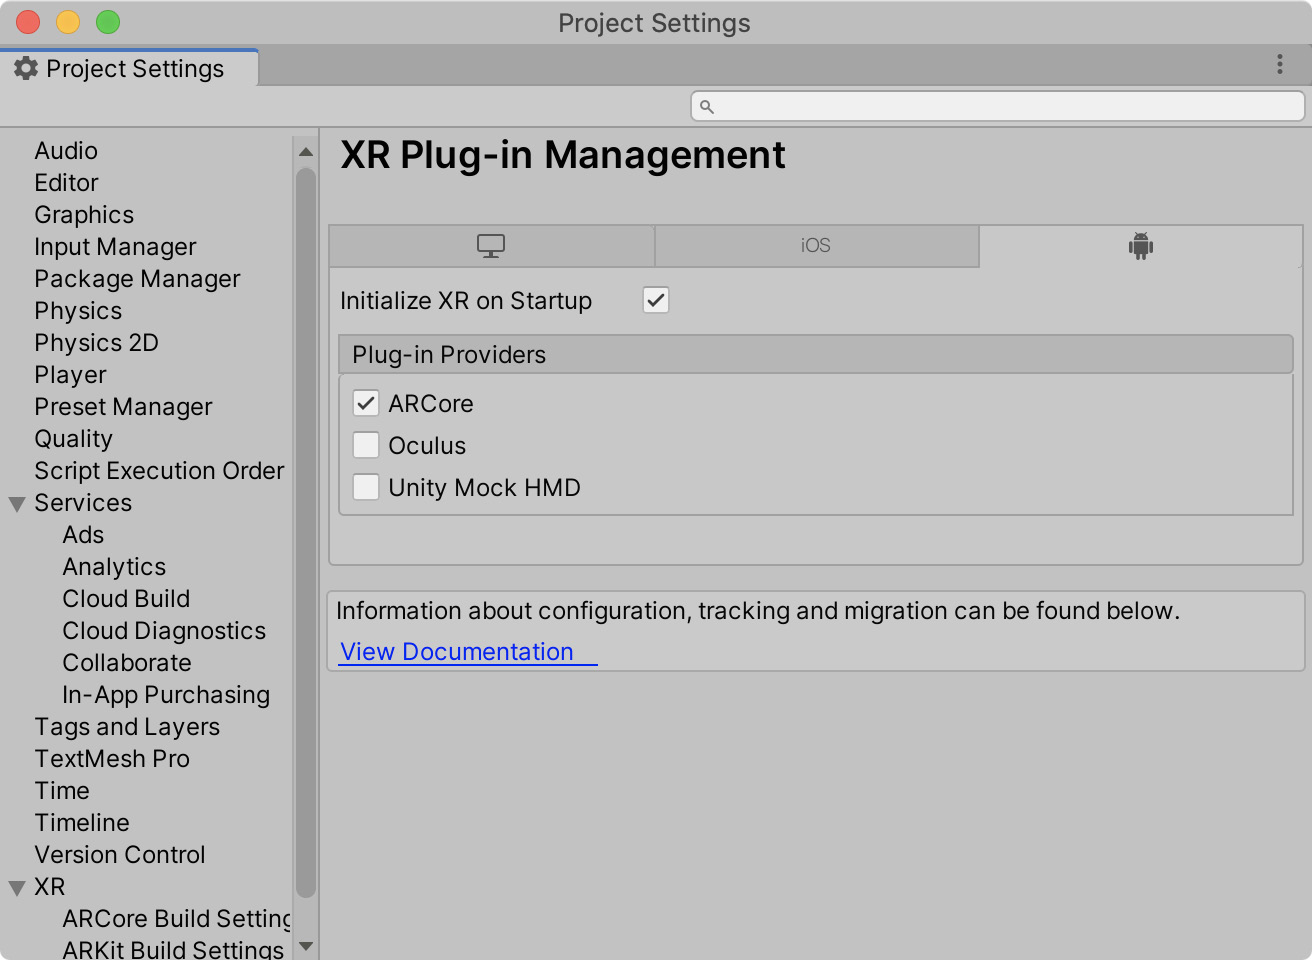
Figure 13.7 – Installing ARCore
And that's all the plugins we require (although we will install additional packages shortly).
Tip
If you don't see either the iOS or Android tab, make sure you have the necessary modules installed. You can check installed modules in Unity Hub on the Installs tab.
With the plugins installed, we can move on to configuring the necessary device-specific settings. Both iOS and Android require specific settings to be adjusted so that AR will run on their platforms. We'll go through each OS separately, so whichever device you have, you'll soon be able to test the AR game.
Configuring player settings
There are a couple of tweaks to the settings that need to be made to ensure that our AR game runs smoothly. The settings are device-specific; therefore, you only need to follow along with the section specific to your OS of choice. We'll start with the iOS-specific settings before moving on to Android.
Updating iOS settings
There are only a couple of small changes required for iOS:
- Open Project Settings.
- Select the Player tab.
- Click the iOS tab.
- Under the Other Settings heading, enable Requires ARKit support. Note that it also fills in the value for Camera Usage Description. It can't be blank as we'll be using the camera:
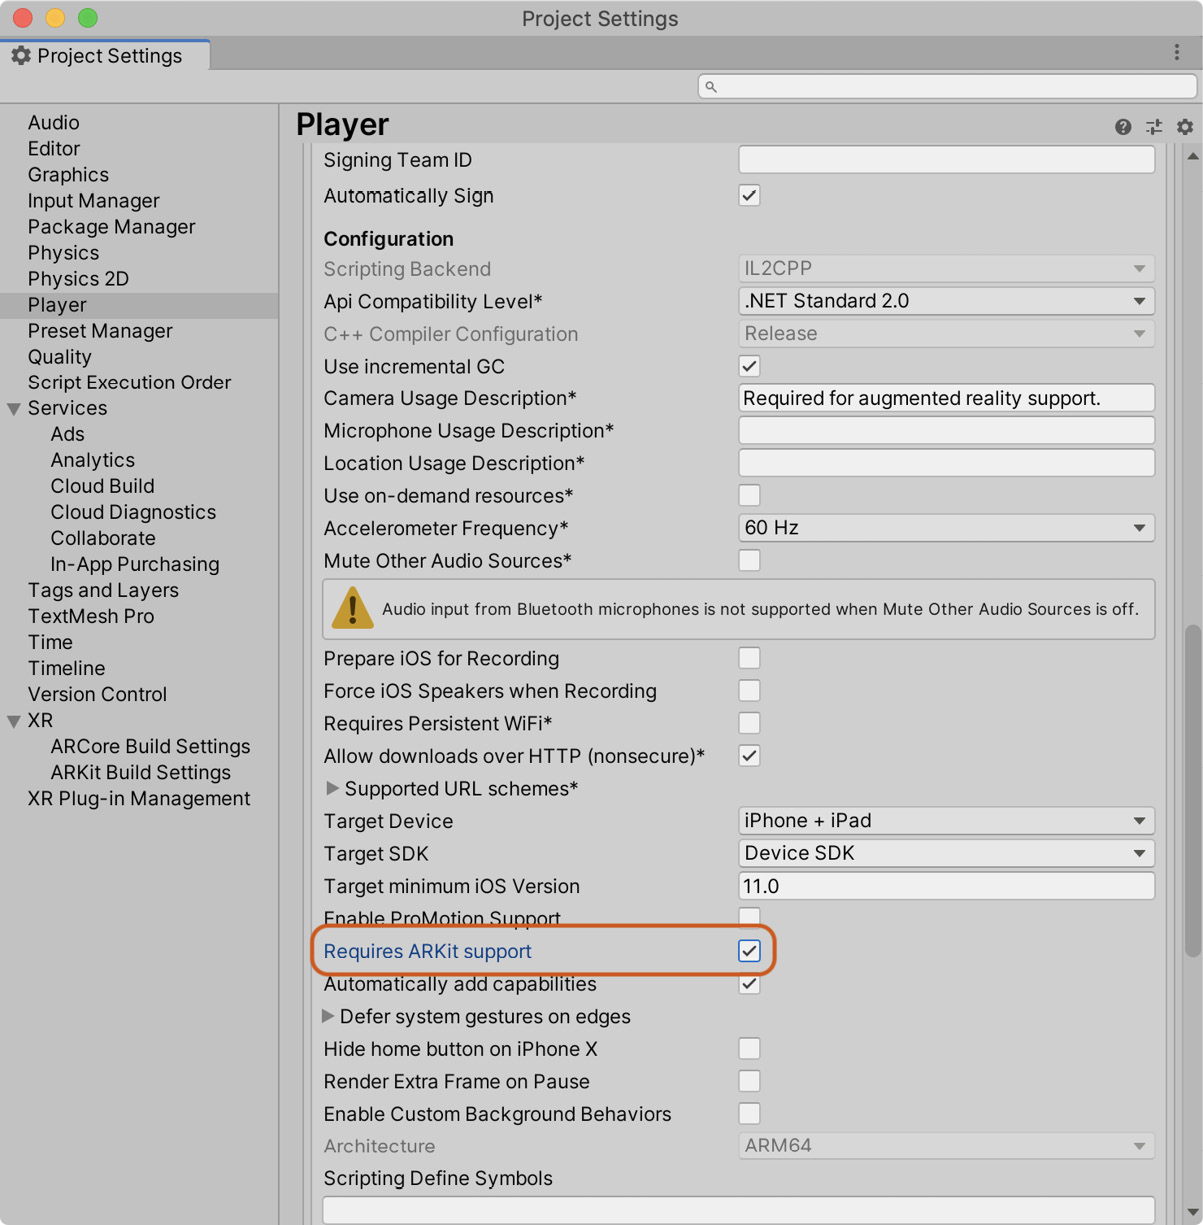
Figure 13.8 – Requires ARKit support
- It may provide a warning that iOS 11 or newer is required, as that is the first OS to include ARKit. Ensure that Target minimum iOS Version is set to 11.
Important note
As well as having iOS 11 as the minimum OS version, ARKit also only supports ARM64 processors. Although, it is likely that Apple will release an Apple Silicon version in the near future.
Updating Android settings
To configure the player settings for Android, do the following:
- Open Project Settings.
- Select the Android tab.
- Set Minimum API Level to Android 7.0 or later.
- Disable Multithreaded Rendering as it's not supported by ARCore:
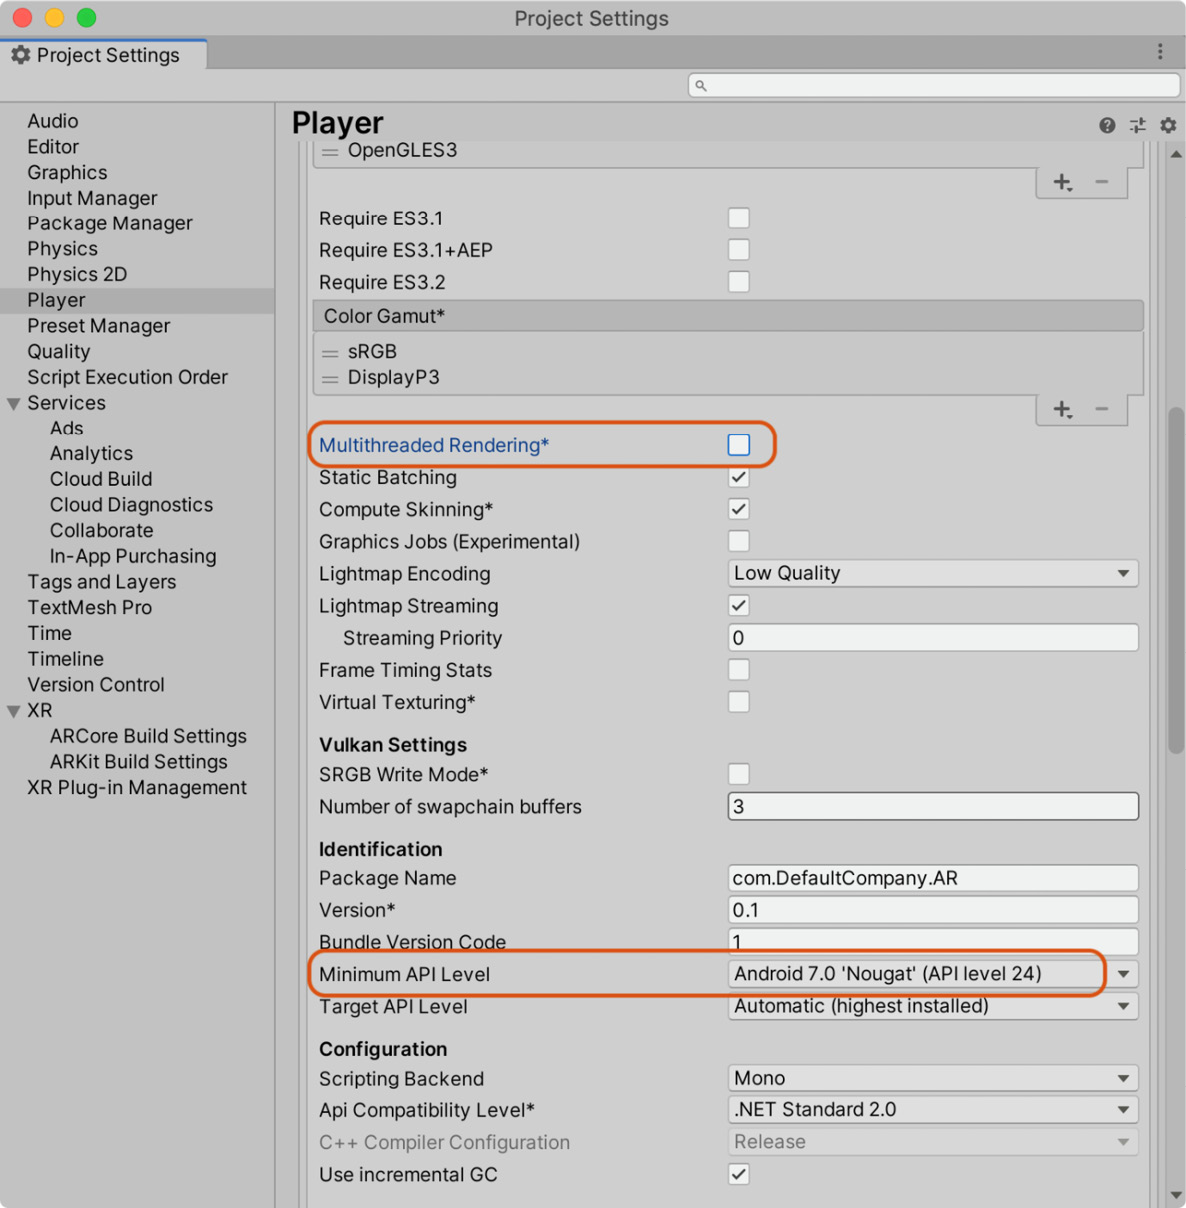
Figure 13.9 – Setting Minimum API Level
- Under Graphics APIs, remove the Vulkan option as it doesn't support ARCore:
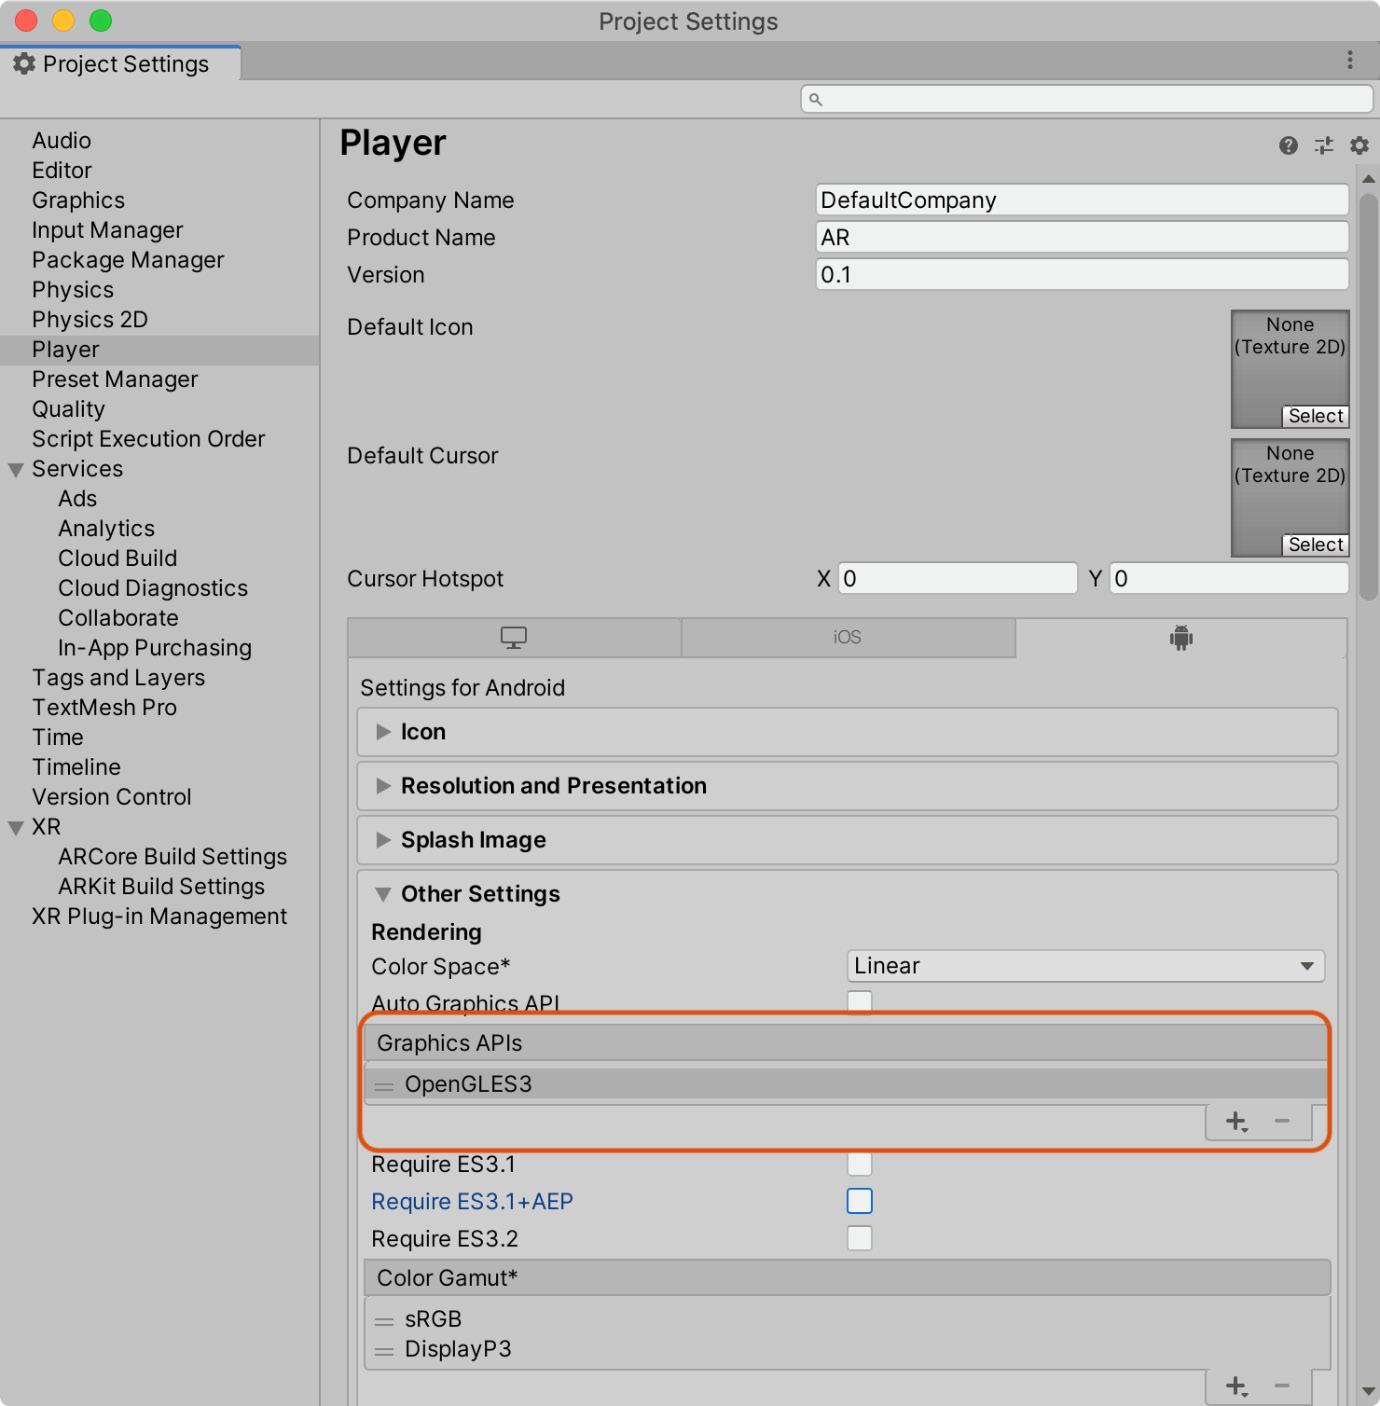
Figure 13.10 – Removing support for Vulkan
That's it for the project settings, and there's only one more step before our project setup is complete: we need to install the AR Foundation package.
Importing the required packages
The AR Foundation package allows us to develop multi-platform AR games. It hides the complexity of writing OS-specific code, and this project will be able to be run on iOS or Android. Sounds good to me! Let's install it now:
- Select Window | Package Manager from the Application menu.
- Change the scope to the Unity Registry by selecting Packages | Unity Registry:
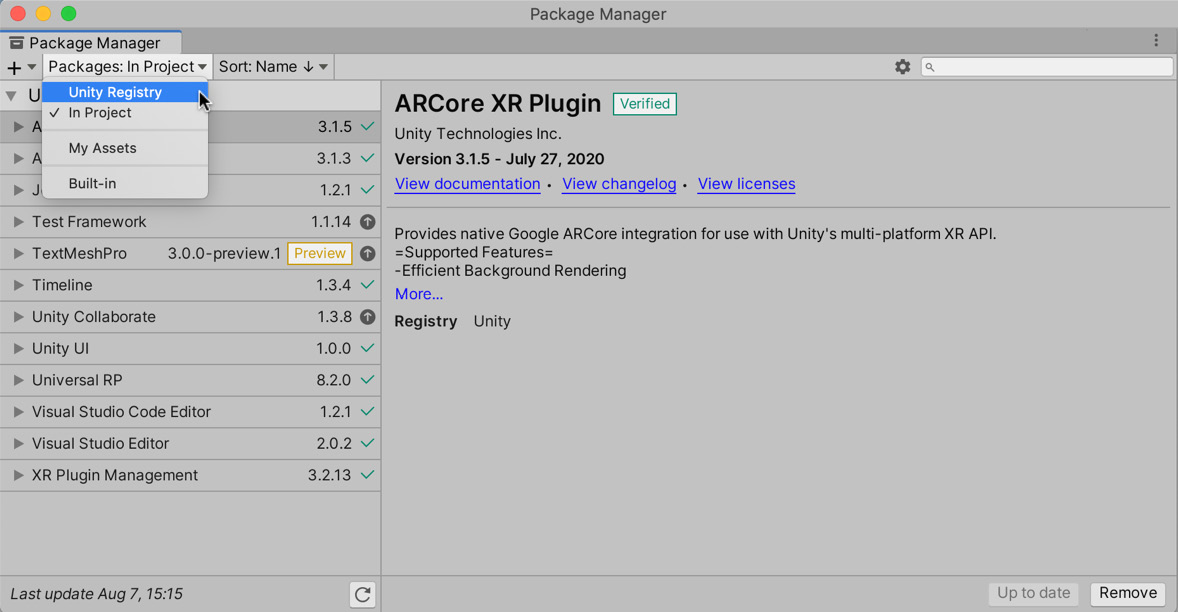
Figure 13.11 – Showing packages in the Unity Registry
- Install the AR Foundation package:
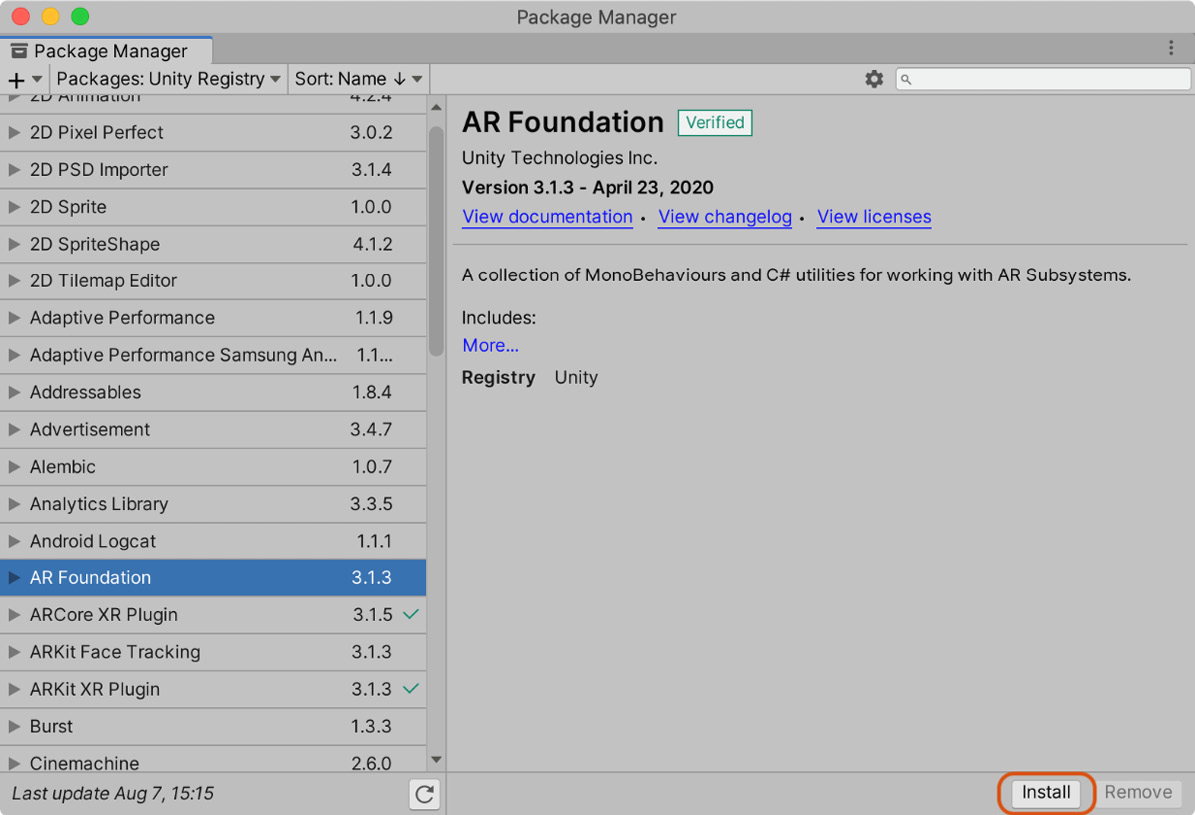
Figure 13.12 – Installing the AR Foundation package
This will install all of the necessary components to develop multi-platform AR games.
Tip
You can check whether the import was successful by right-clicking in the Scene Hierarchy and checking whether you have an XR option.
We'll be using one other package in our project. Although, it's not directly related to AR; instead, it provides a monster asset we can place in the world:
- Navigate to https://assetstore.unity.com/packages/3d/characters/creatures/rpg-monster-duo-pbr-polyart-157762.
- Select Add to My Assets. This will add the package to your asset collection.
- Back in Unity's Package Manager, once again change the package scope, this time to My Assets:
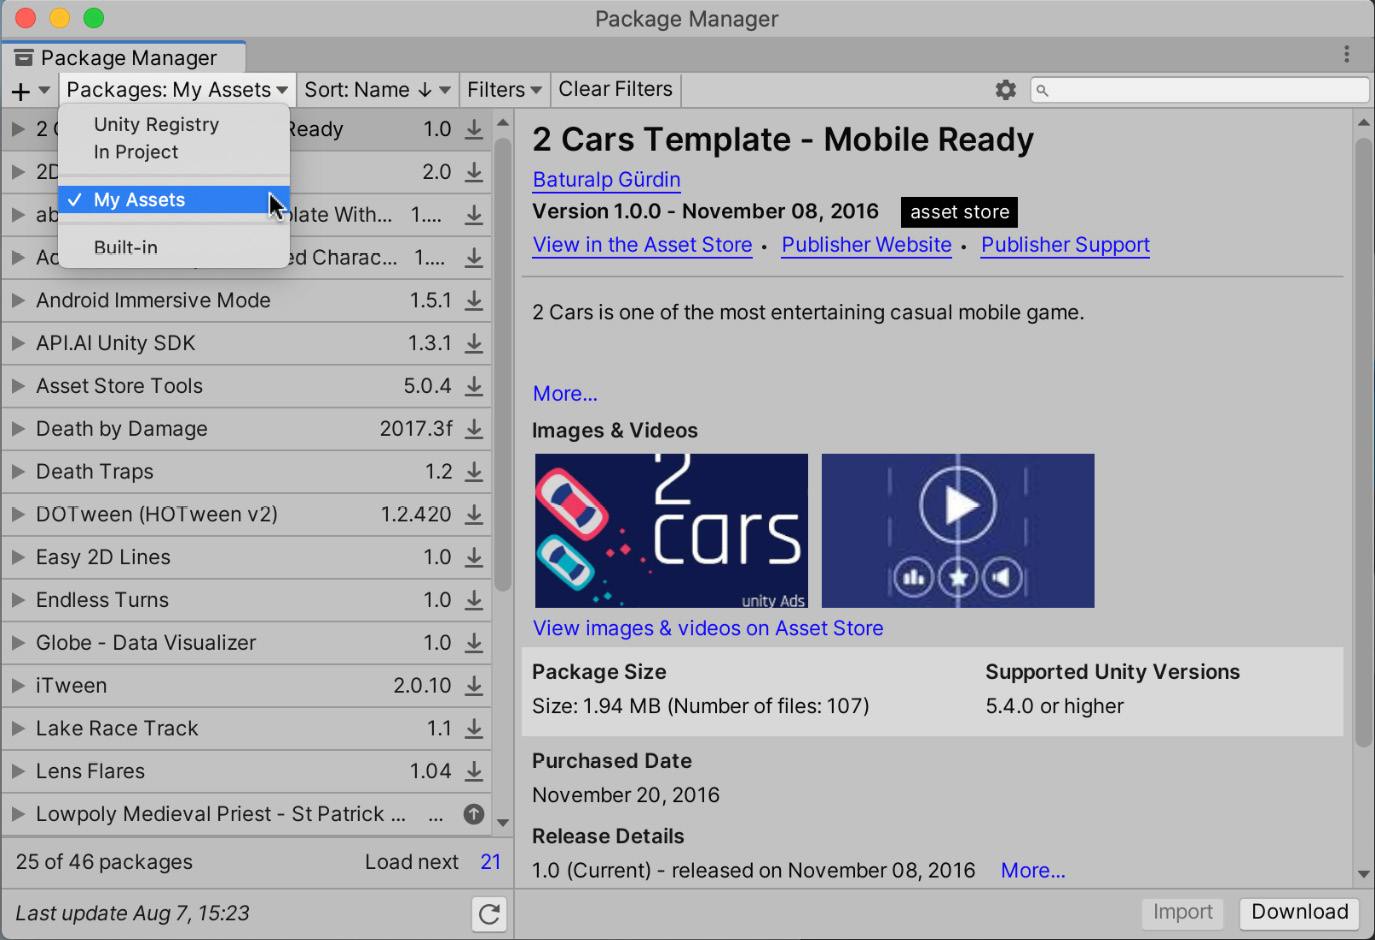
Figure 13.13 – The My Assets package scope
- Import the RPG Monster Duo PBR Polyart package:
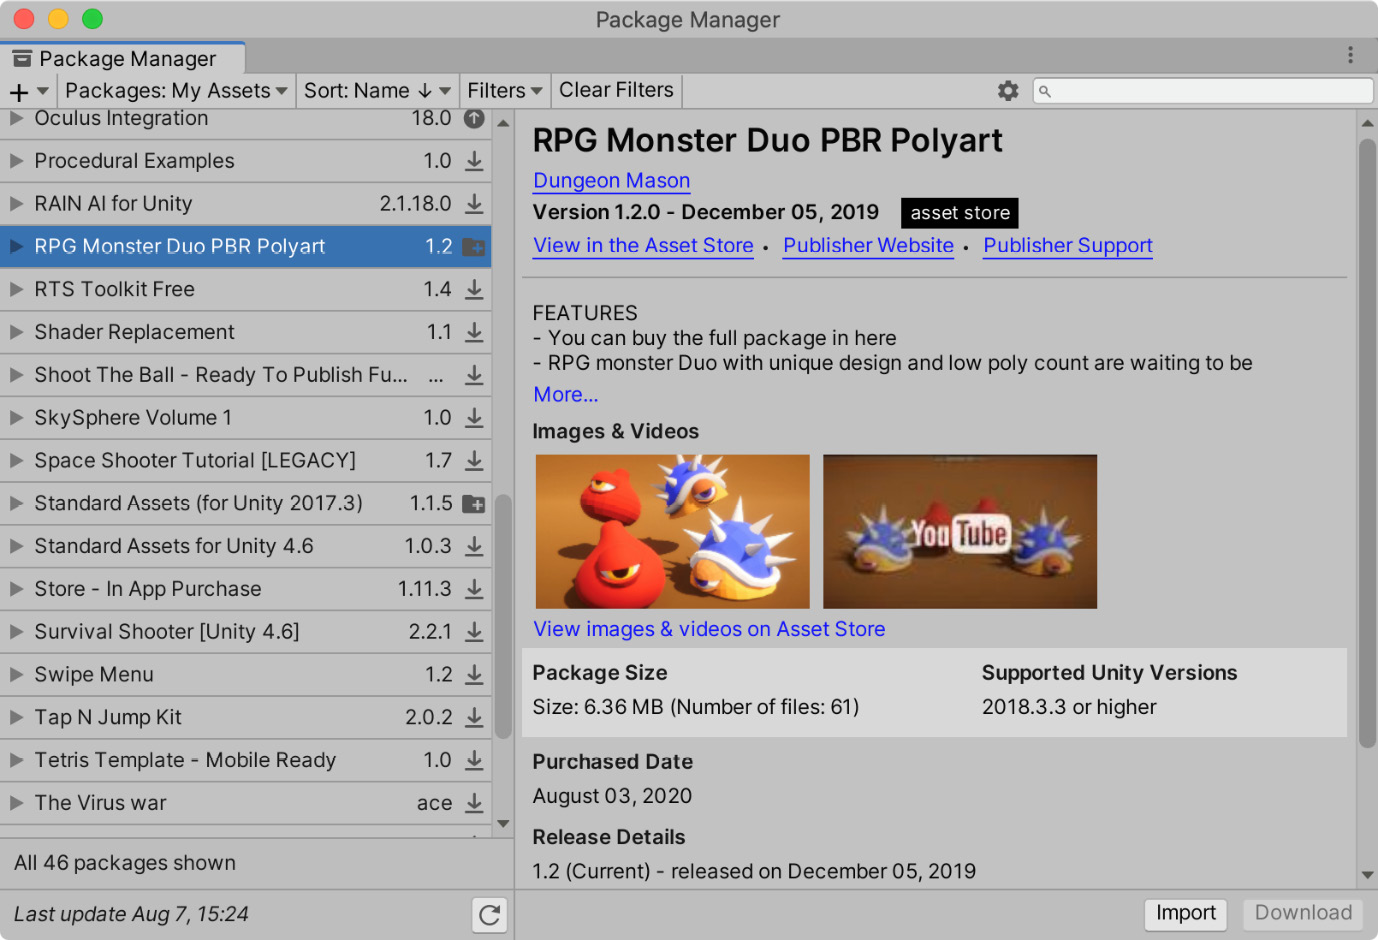
Figure 13.14 – Importing the Monster package
We now have everything we need to start developing our AR project. While the setup may seem involved, it is actually a quick way to get up and running with AR, especially considering it will work for iOS and Android. In the next section, we'll add the objects required by an AR scene.
Creating an AR scene
In this section, we'll add an AR Session and AR Session Origin object to a new scene. The AR Session component is necessary for any AR scene as it enables the AR experience, so let's start with that:
- Create a new scene by selecting File | New Scene from the Application menu.
- Save the new scene by pressing Ctrl + S or selecting File | Save from the Application menu and name it as ARScene. You should save the scene regularly to ensure you don't lose progress.
- Once the scene is saved, select GameObject | XR | AR Session from the Application menu. You can also access this menu by right-clicking in the Hierarchy panel. We won't be interacting with the session object, but it provides the setup we need to work with AR:

Figure 13.15 – Adding an AR Session object
An AR Session is an integral part of an AR scene. It controls the life cycle of the AR experience by enabling it on startup and disabling AR if the component is disabled. There is only one session per game, so even if you have multiple AR Session objects in a scene, they will talk to the same session. Ideally, you should not just have one AR Session in a scene to prevent conflicts.
Tip
If the Attempt Update option on the AR Session object is checked, the game will try to install the required AR software on the device. This option is enabled by default.
Next, we'll add the AR Session Origin object. This object gives us a way to query the physical world around us and change the scale of the virtual world.
- Select GameObject | XR | AR Session Origin from the Application menu:
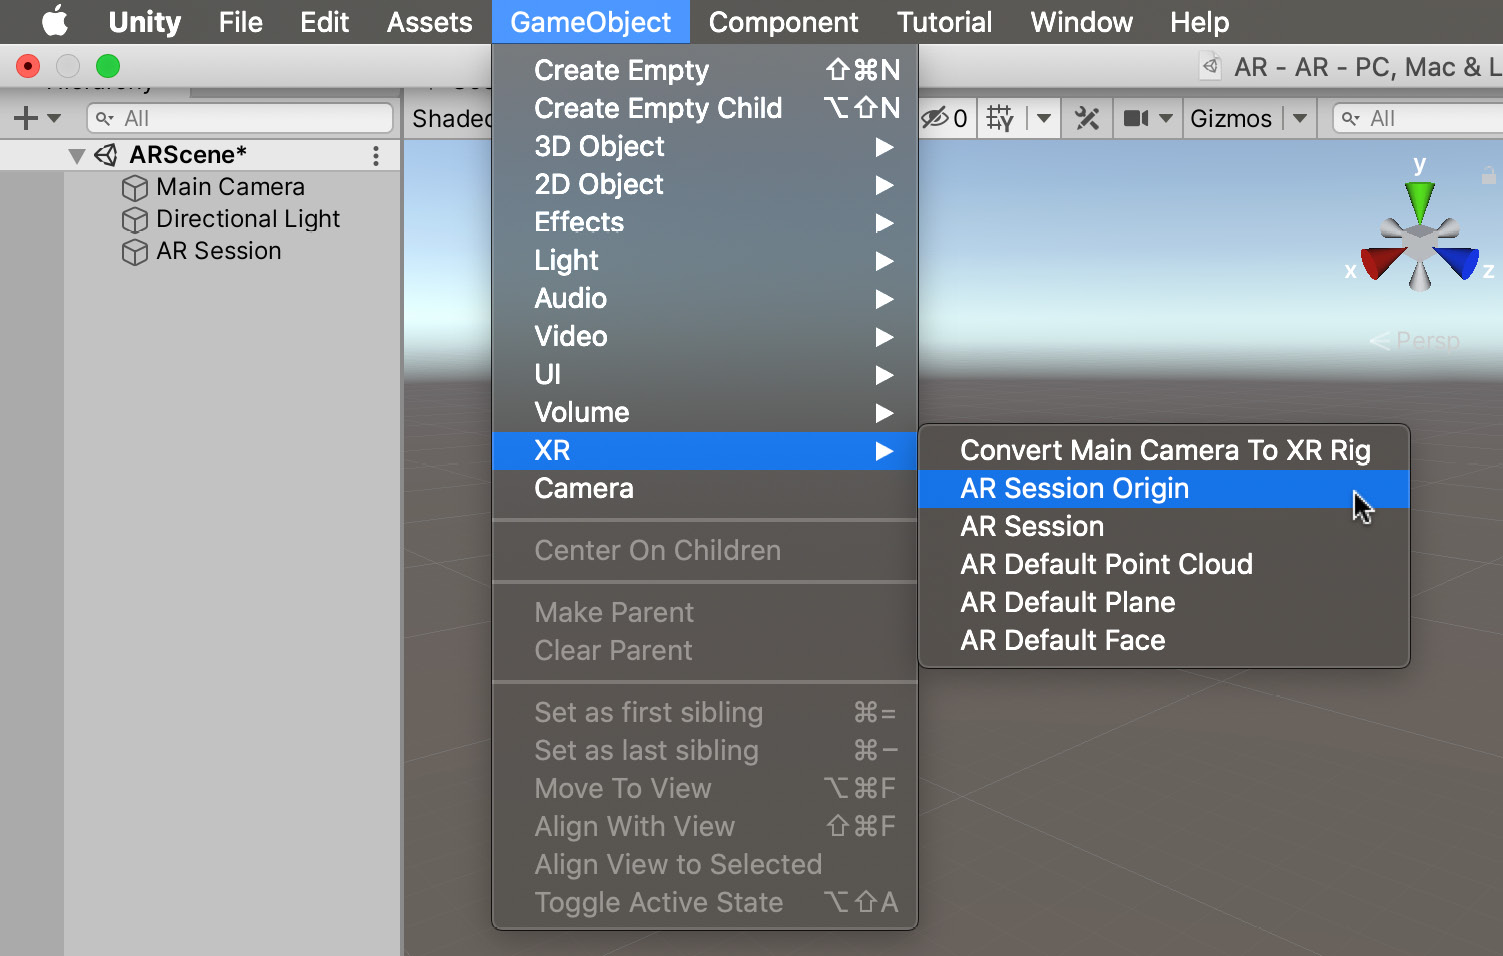
Figure 13.16 – Adding an AR Session Origin object
- The AR Session Origin object includes its own camera so delete the Main Camera object. This is the default camera added to the scene automatically.
- Select the AR Camera object in the Hierarchy panel (it's a child of the AR Session Origin object) and set its tag to MainCamera. It's good practice to have one camera in the scene set as the main camera:

Figure 13.17 – Adding an AR Session Origin object
The AR Session Origin object will transform features, such as the surfaces onto which we'll be spawning the turtle, from session space into Unity space with the correct position, orientation, and scale. The session space is relative to the device's coordinate system, whereas Unity space is what we've been working in up to this point. Once the positional data has been transformed into Unity space, we can easily compare and place objects without performing any manual conversion from device space to Unity space.
Tip
You can scale AR objects by adjusting the scale of the AR Session Origin object. Larger values will make AR content appear smaller, and vice versa. For example, by setting the scale to 0.5, the turtle will appear twice its current size.
With those two objects created, our scene is ready for AR. Simple!
Tip
If you find the icons for AR objects in the Scene view distracting, you can turn them off by opening the Gizmos menu at the top of the Scene view.
In the next section, we'll create the Prefab that will be spawned in the real world (well, the AR world anyway). We'll take advantage of the Monster package we imported earlier and perform a few tweaks to update it for URP.
Placing an object in the world
In our AR game, we'll spawn an object in the world whenever we tap the screen. This section will create the object to spawn a friendly (albeit spiky) turtle:
- Drag TurtleShellPBR from the Assets/RPG Monster Duo PBR Polyart/Prefabs folder into the Hierarchy (or directly to the Scene panel) to add the Prefab to the current scene:
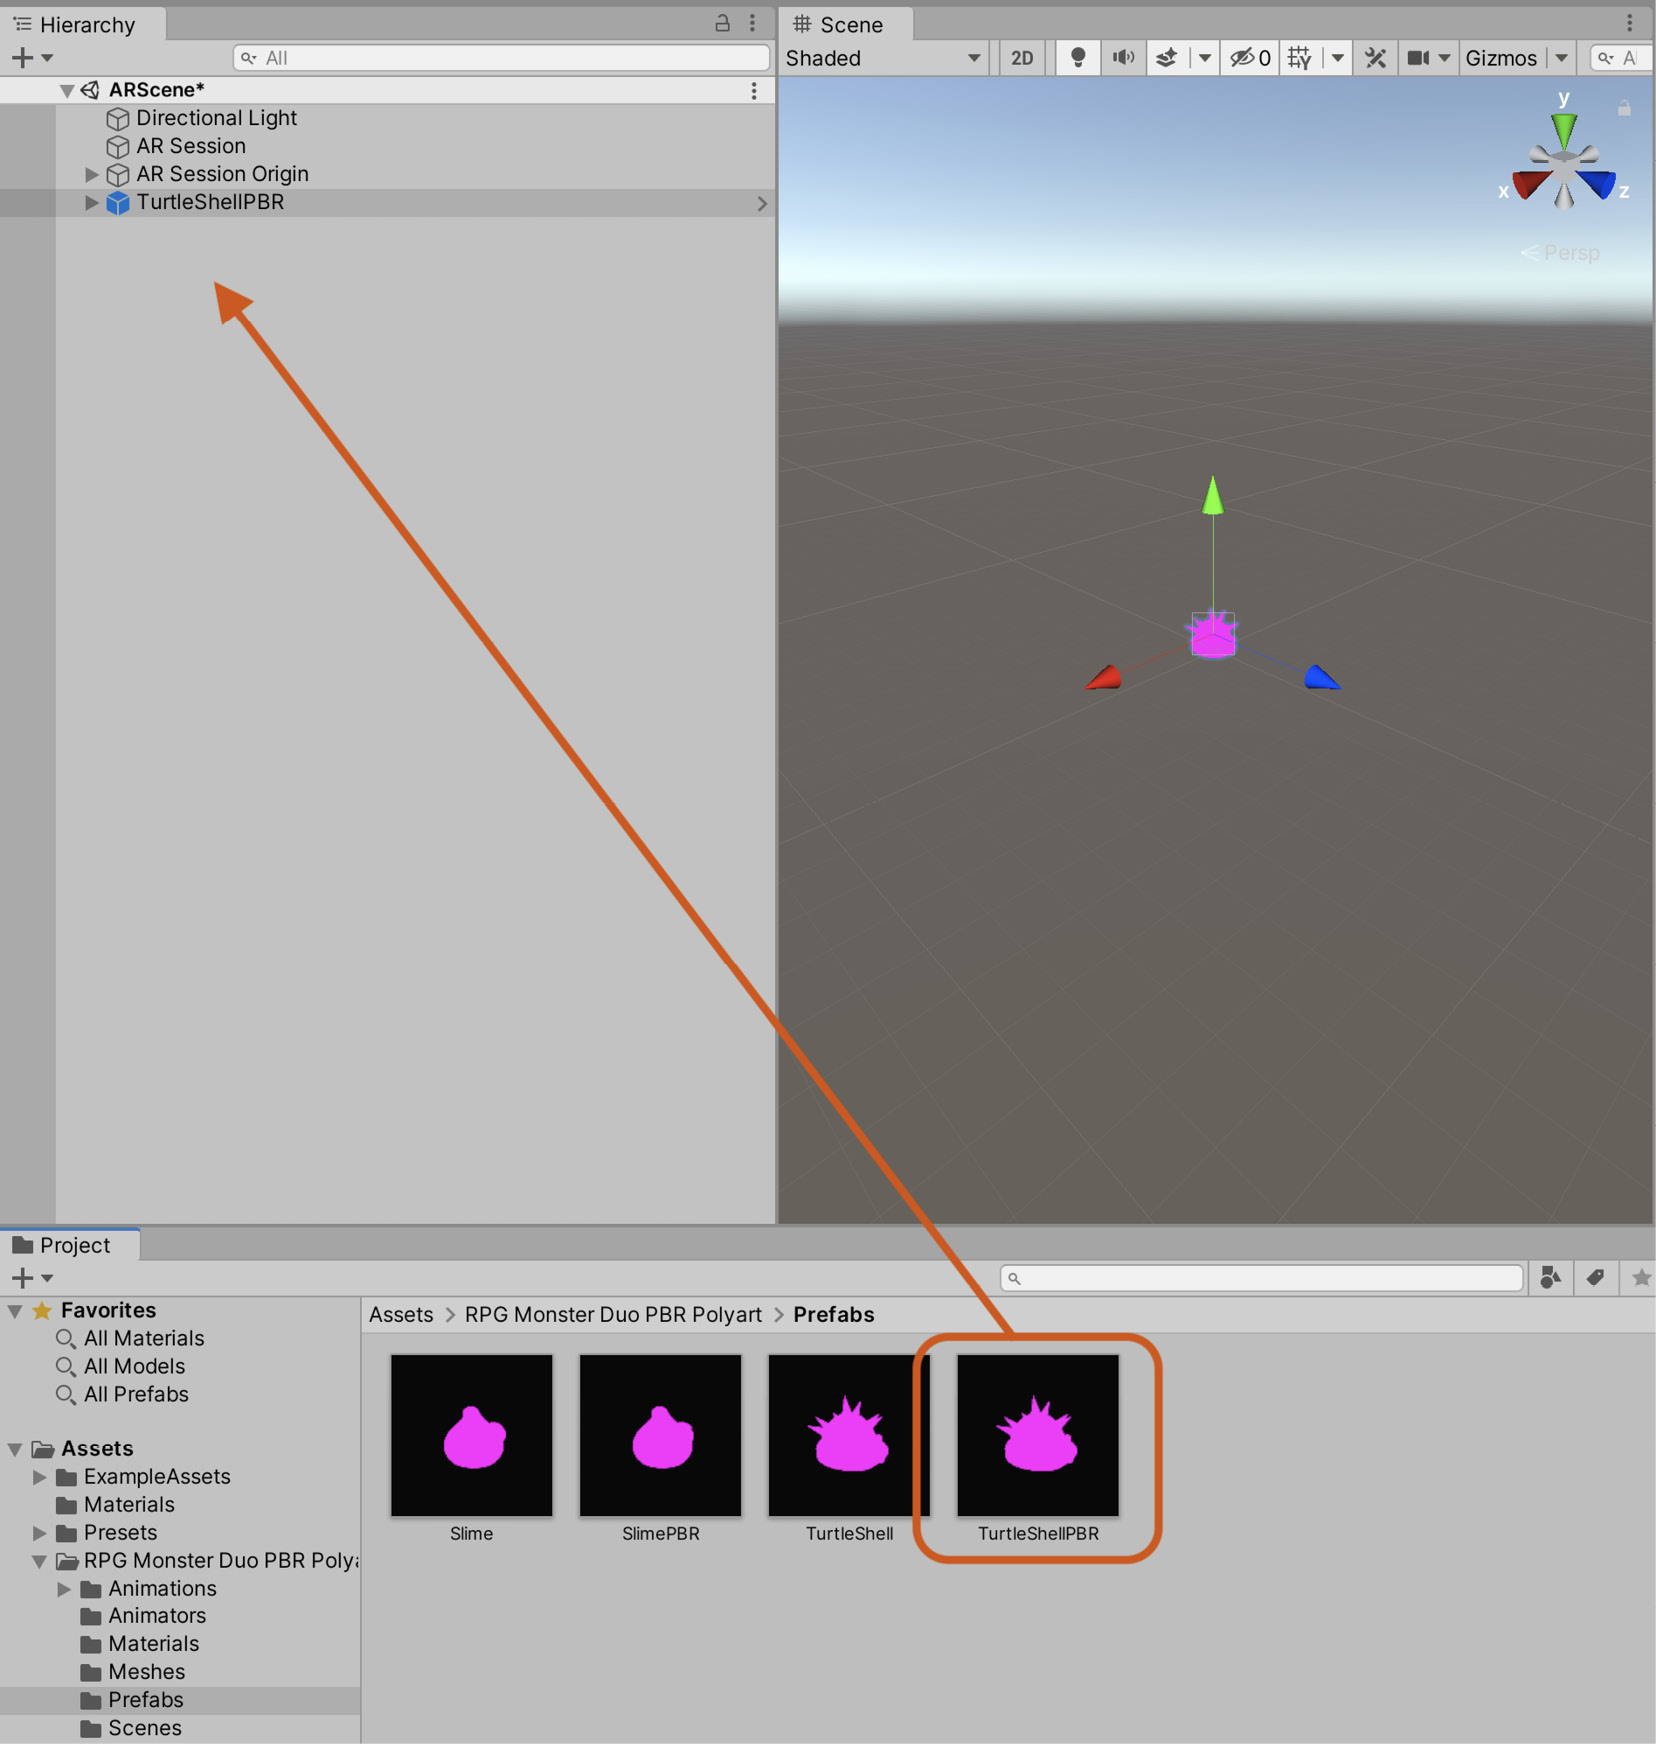
Figure 13.18 – Adding the turtle Prefab to the scene
- Position it at point 0, 0, 0.
- Scale the turtle to 0.1, 0.1, 0.1 so it doesn't take over your living room.
- Rename it Turtle.
You'll quickly notice that it doesn't look quite right on account of it being completely pink. This shade of pink may be familiar to you if you've ever used a broken shader (or broken one yourself – I know I have!) or have forgotten to apply a material to a mesh. In this case, the issue is down to the material not being compliant with the URP. Luckily, we can fix this easily:
- In the Project panel, select the TurtleShellPDR material in the Assets/ RPG Monster Duo PBR Polyart/Materials folder. This is the material associated with the turtle mesh.
- In the Application menu, select Edit | Render Pipeline | Universal Render Pipeline | Update Selected Materials to UniversalRP Materials:
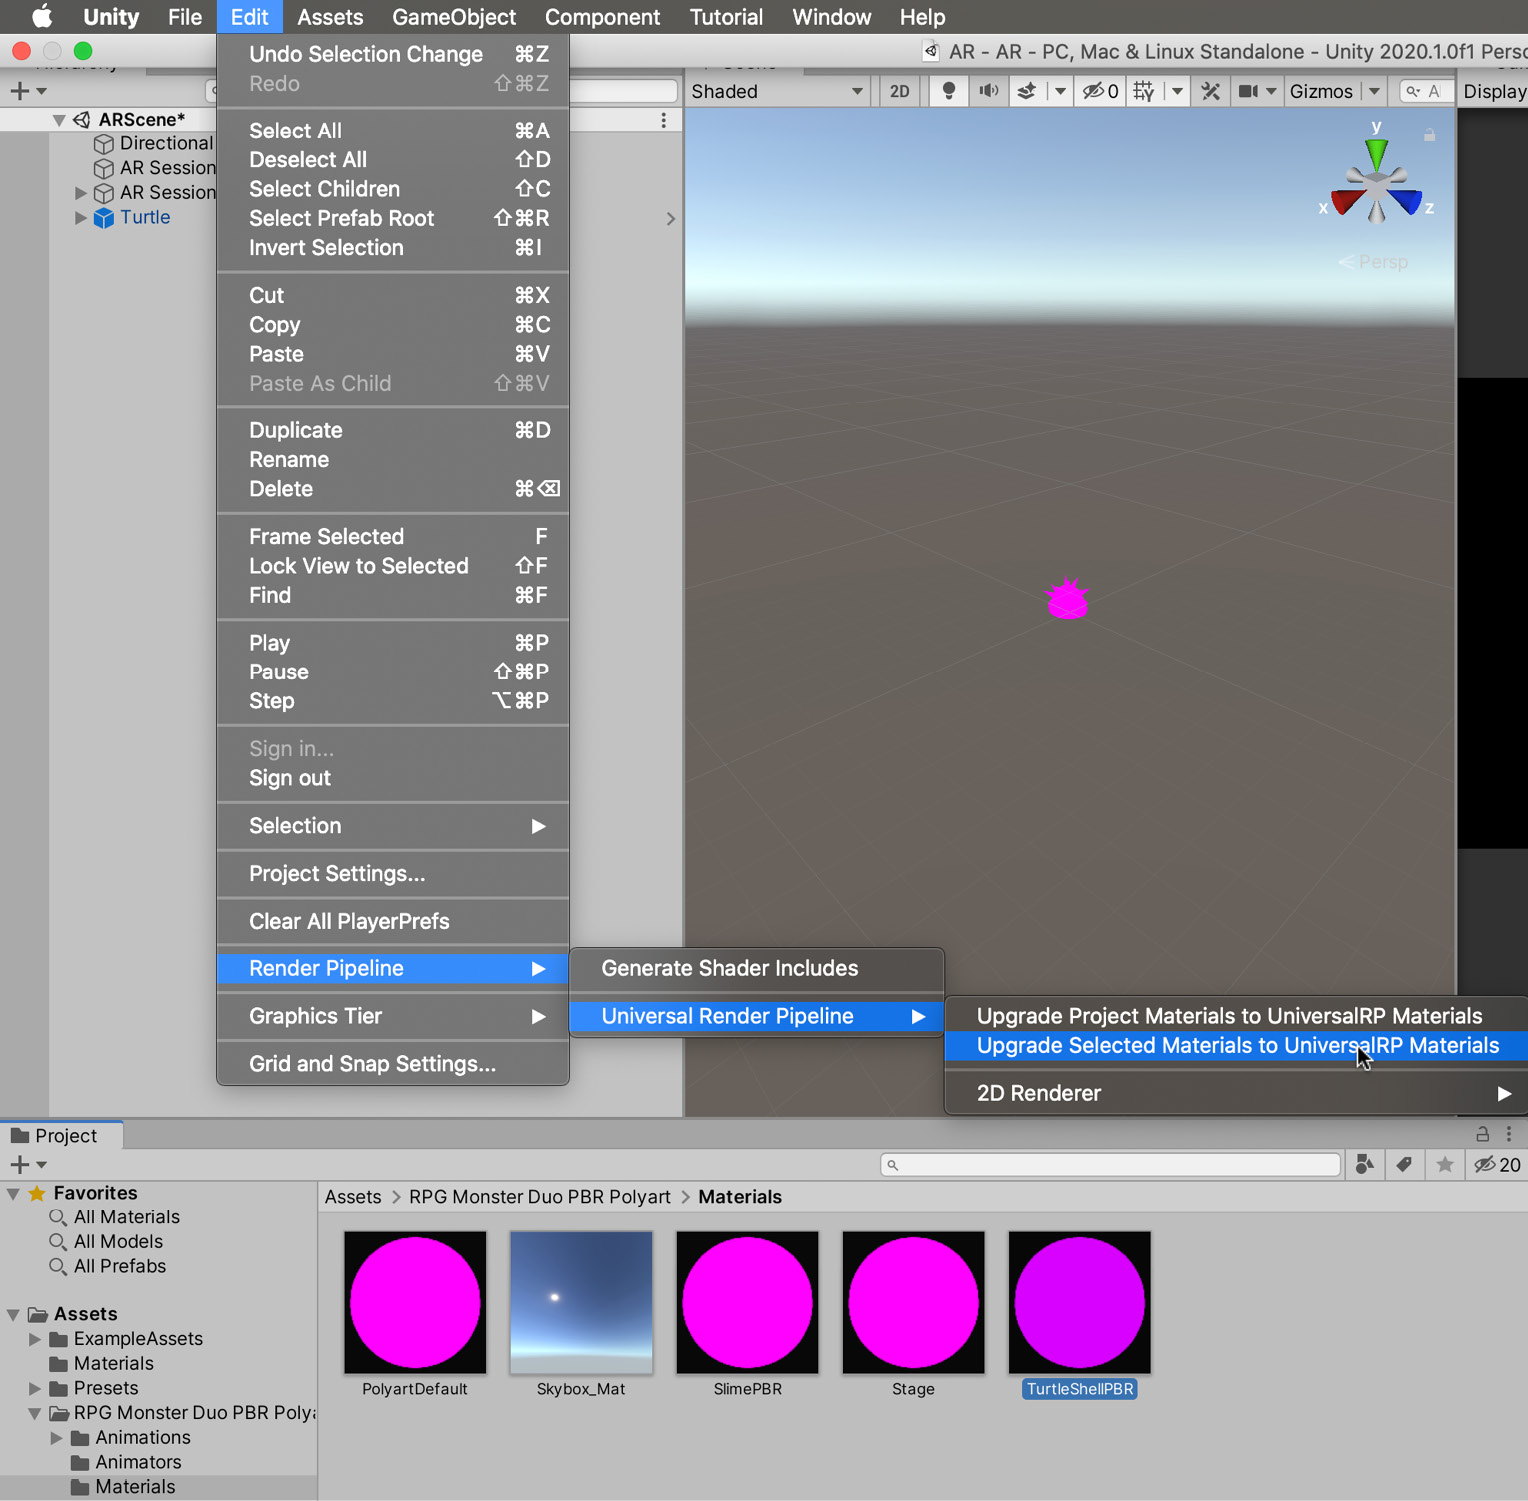
Figure 13.19 – Updating a material for use with the URP
- In the menu that appears, select Proceed:
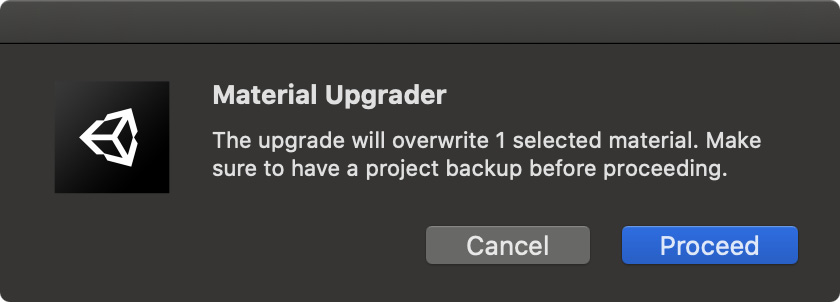
Figure 13.20 – Material Upgrader dialog
This will update the material, so it is compliant with the URP.
Tip
You can upgrade all materials in the project at the same time by selecting Edit | Render Pipeline | Universal Render Pipeline | Update Project Materials to UniversalRP Materials from the Application menu.
Now it looks correct, we can create a Prefab of the turtle:
- Select the Turtle object in the Hierarchy panel.
- Create a Prefab by dragging the Turtle object from the Hierarchy to the Assets/Prefabs folder. Create the folder if it doesn't exist:
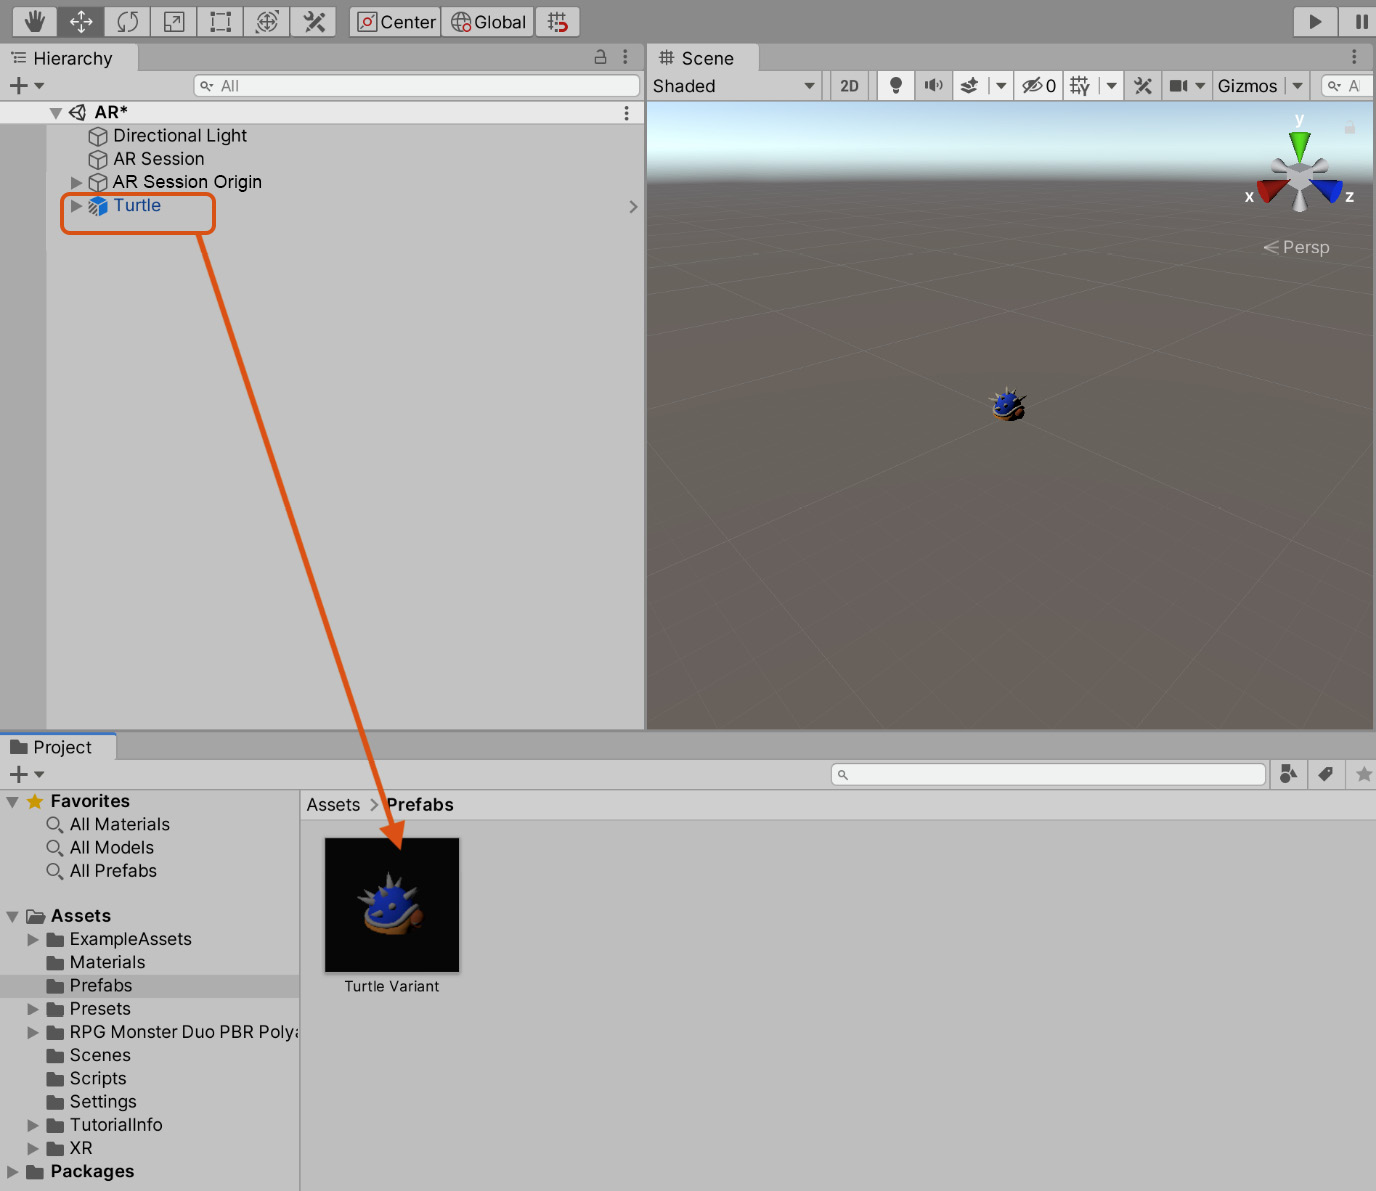
Figure 13.21 – Creating a Prefab variant of the turtle
- If a window appears asking whether you want to create an Original Prefab or Prefab Variant, select Prefab Variant. We create a Prefab variant because we don't want to modify the original Prefab, but instead, we want to create a version that will work in our AR project. By creating a variant, we still have access to the unmodified original Prefab if we need it. For more information on Prefab variants, see Chapter 10, Evolving AI Using ML Agents.
Tip
If objects appear too large or small in your AR game, rather than scaling each object individually, you can scale the AR world by scaling the AR Origins object.
With the turtle sitting happily in the scene and a Prefab created so we can spawn it when required, we can move on to testing our current project.
Testing on devices
Before we go any further, I think now is an excellent time to test whether we can display the turtle in AR using a real device. To do that, we will need to build and deploy the project. As you would imagine, the exact steps differ based on your chosen platform; however, before we get into platform-specific settings, we need to change a few platform-agnostic settings:
- On the Application menu, select File | Build Settings.
- In the window that appears, select Add Open Scenes to add our newly created scene:
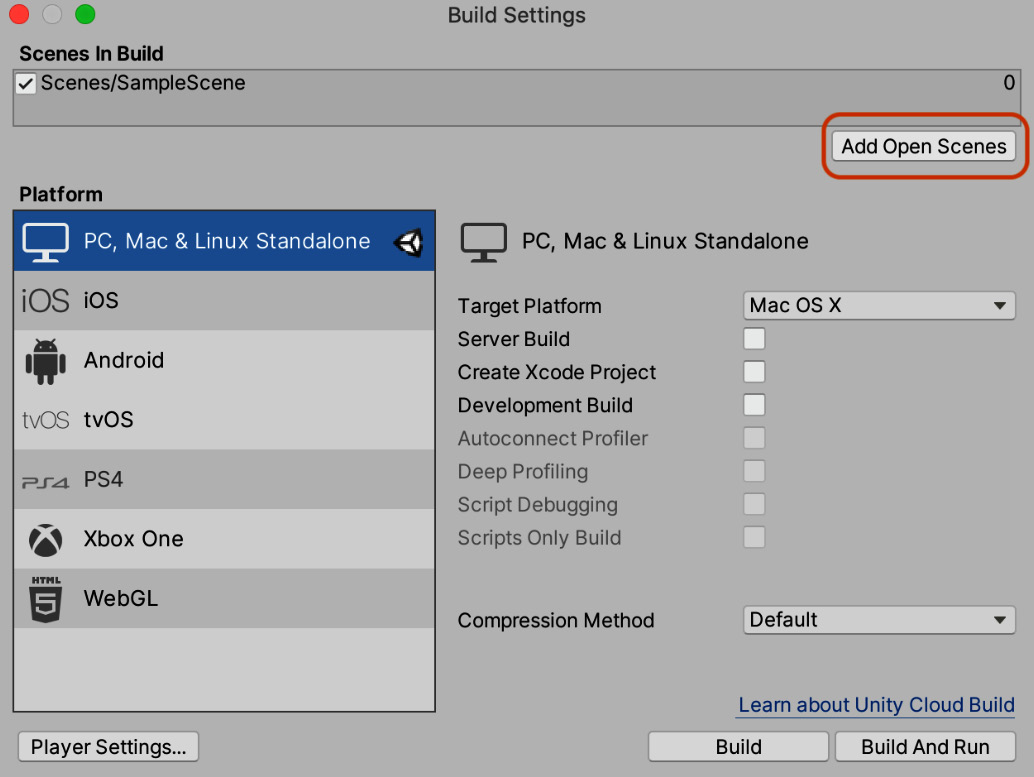
Figure 13.22 – Adding the current scene to the build list
- Delete Scenes/SampleScene from the scene list.
It's at this point the settings branch depending on your platform. We'll first look at testing on Android before moving on to iOS.
Testing on Android
To test on an Android device, do the following:
- Under Platform, select Android.
- Select Switch Platform:
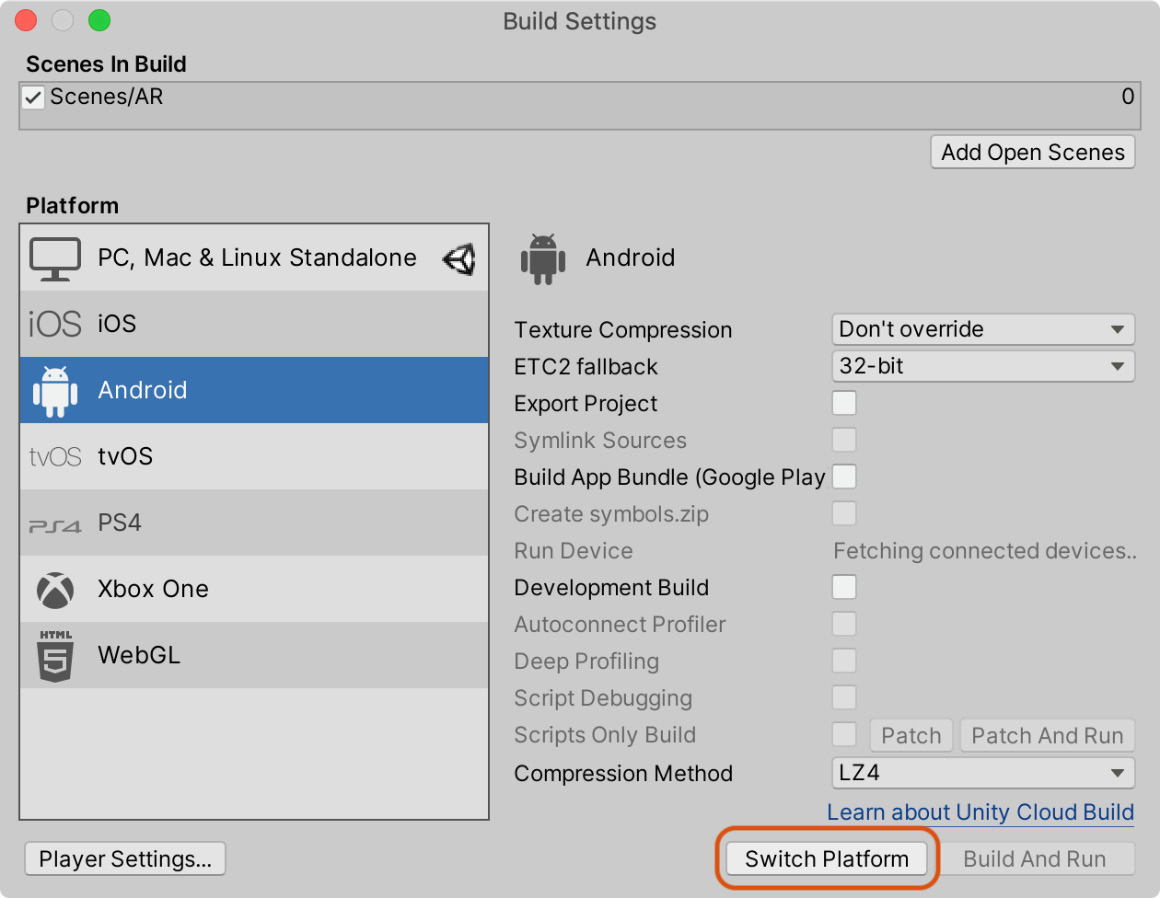
Figure 13.23 – Switching to Android
Unity will perform a number of steps, including re-importing assets, and then your project will be ready to test on your device:
- Plug in your Android device.
- Select the device under the Run Device option.
- Click the Build And Run button. This will save an APK to your computer and deploy the app to the device specified under the Run Device heading:
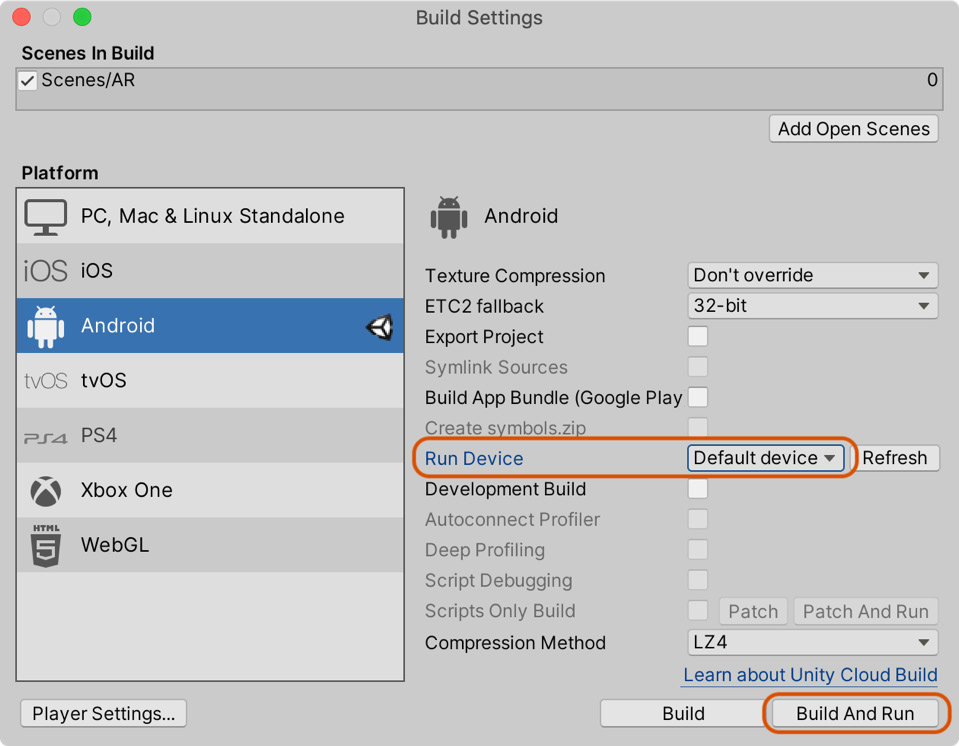
Figure 13.24 – Choosing a Run Device
Next, we'll look at testing on an iOS device.
Testing on iOS
Testing on an iOS device is slightly more involved than its Android counterpart, but will become second nature fairly quickly:
- On the Application menu, select File | Build Settings.
- Under Platform , select iOS.
- Select Switch Platform:
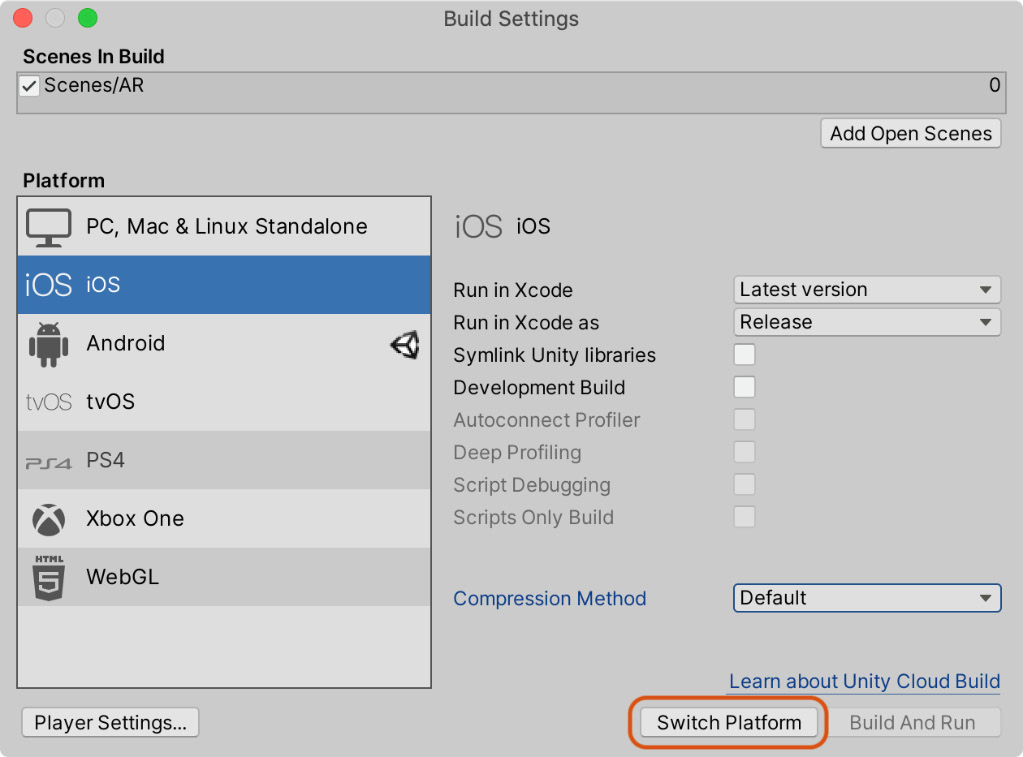
Figure 13.25 – Switching the platform to iOS
- Wait for the platform switch to complete and then select the Build button and choose a location to save the build output.
- Once the build process completes, you'll have an Xcode project. Open the Xcode project by double-clicking Unity-iPhone.xcodeproj in the root folder of the generated project:
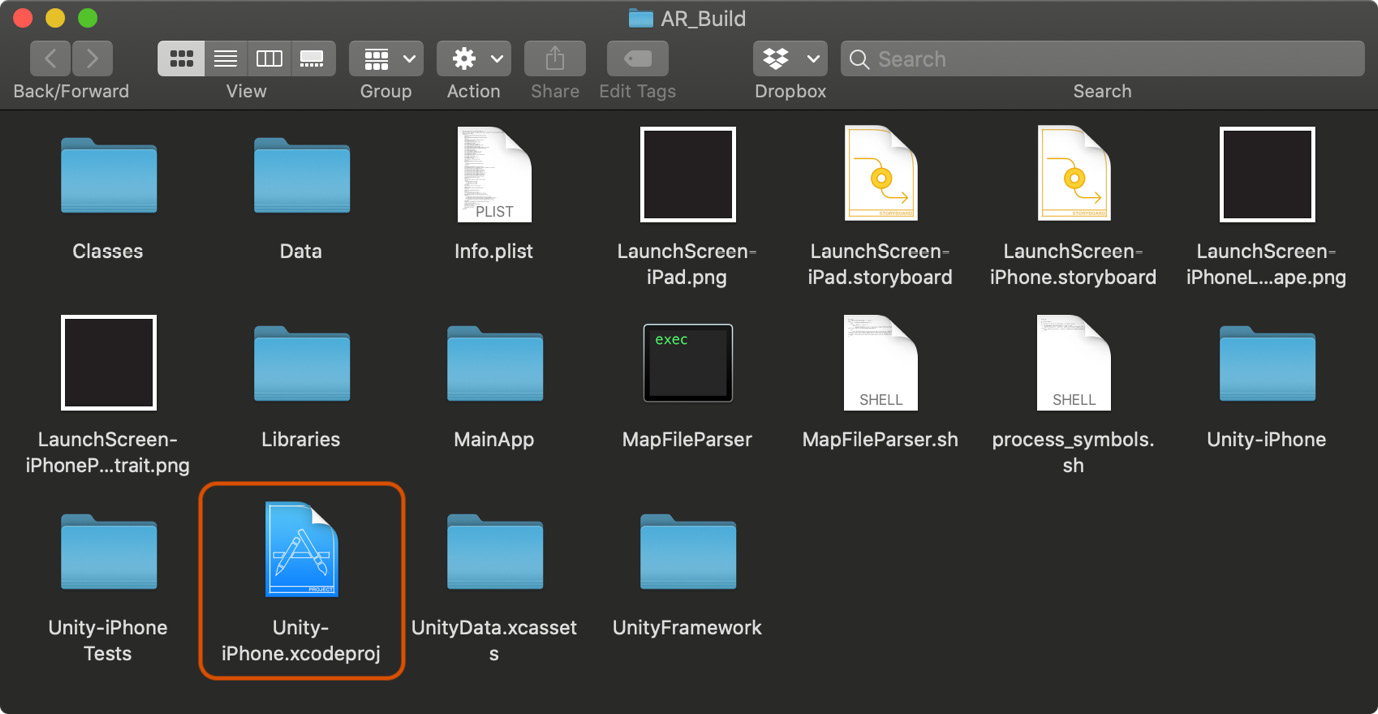
Figure 13.26 – The generated Xcode project
This will open the project in Xcode. There are a few more steps required before you can run the game on your device. In brief, you will need to do the following:
- Enroll in the Apple Developer program at https://developer.apple.com/programs/.
- Create an iOS development certificate.
- Add your device as a test device.
- Create a provisioning profile, which is required to test on a real device.
Luckily, Xcode can take care of most of this for you by enabling the Automatically managing signing option.
Detailed steps for configuring the Xcode project are beyond the scope of this book, however, Unity provides step-by-step instructions here: https://learn.unity.com/tutorial/building-for-mobile#.
Important note
To run the project on an iOS device, you need Xcode. Xcode is an IDE used to develop Mac and iOS apps. If you don't have Xcode installed, you can find it for free on the Mac App Store.
Whether you're using Android or iOS, once you have successfully deployed the app to a device, you may be disappointed with what you see. Running the game at this stage may greet you with a black screen, and nothing more. Lucky we tested it early! This is to do with the URP and is easy enough to fix, as you'll see in the next section. You may have been lucky, and the AR project works as expected, however, I would still recommend following the next section as it has useful information on how to implement AR using the URP.
Implementing AR in the URP
In the last section, we compiled and deployed the project to a device with disappointing results. When the game ran, we were greeted with a black screen. This is a common issue when using the URP and AR, and to resolve it, we first need to create a new rendering asset:
- In the Project panel, navigate to the Settings folder.
- Right-click and select Create | Rendering | Universal Pipeline | Pipeline Asset (Forward Renderer):
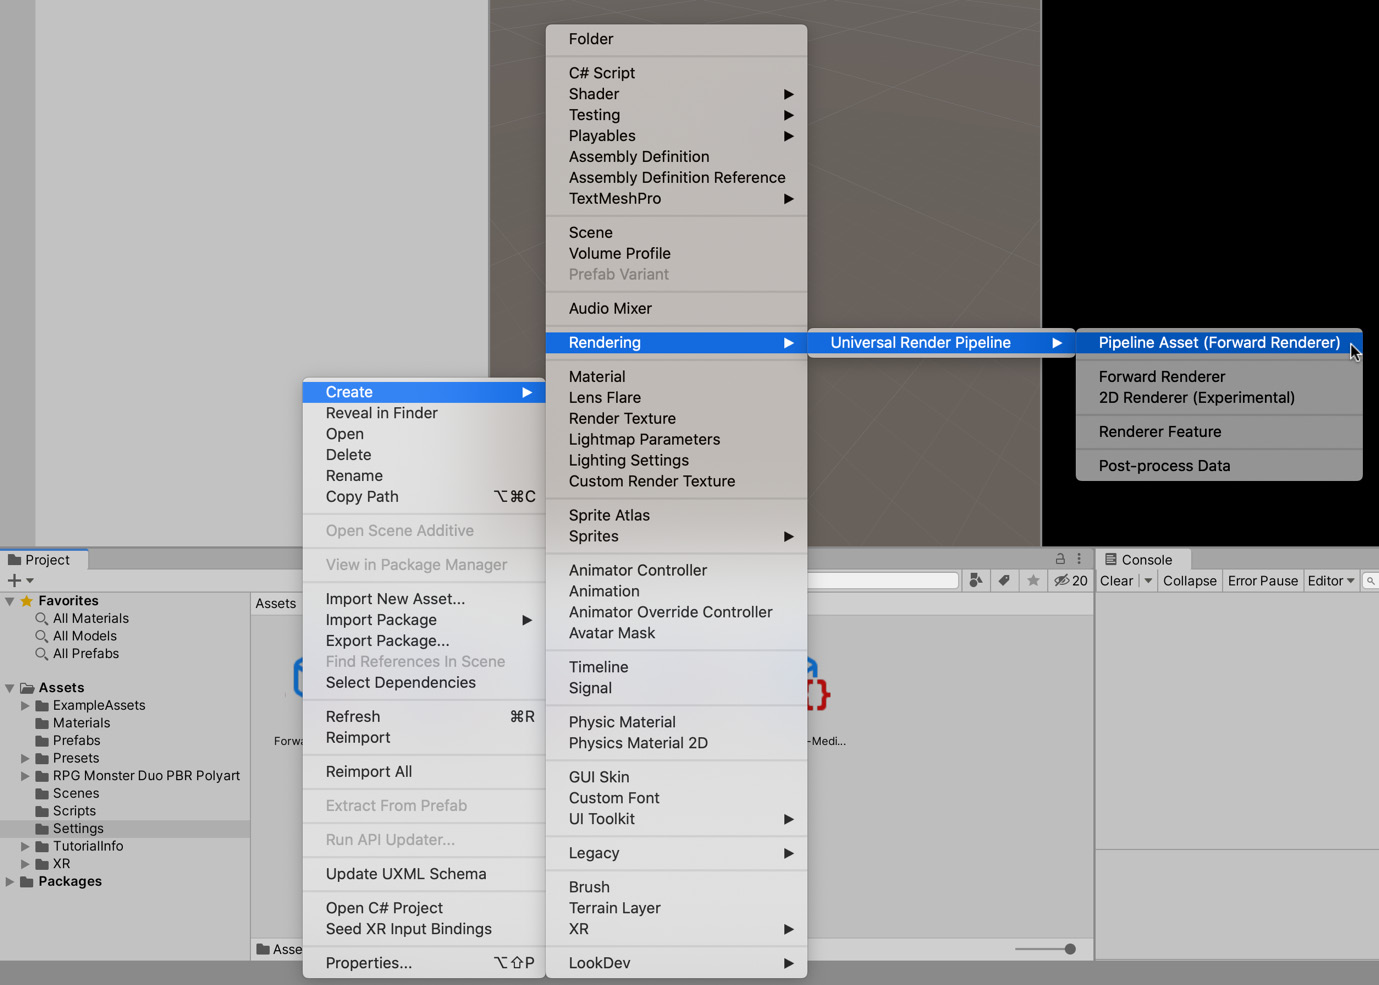
Figure 13.27 – Creating a URP asset
- Name the new asset ARRenderer.
That will create two files for us: ARRenderer and ARRenderer_Renderer. By clicking on each asset in turn, we can view the configurable options in the Inspector:
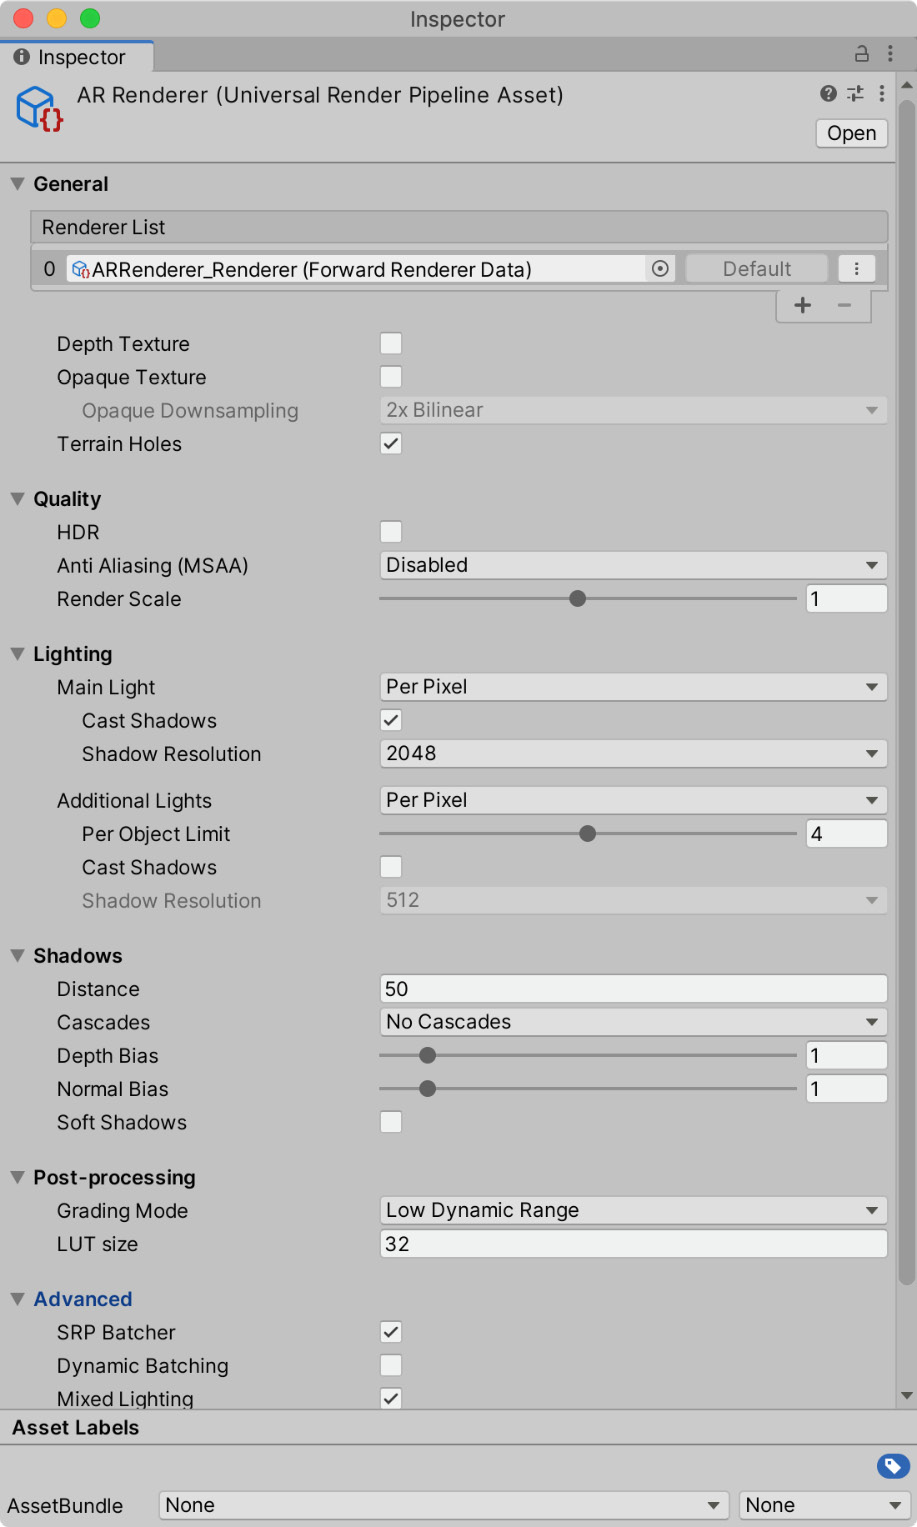
Figure 13.28 – AR Renderer settings
Many of the options are self-explanatory and it's beyond the scope of this book to explain them in depth. For more information on these settings, see https://docs.unity3d.com/Packages/[email protected]/manual/universalrp-asset.html.
Next, let's take a look at the ARRenderer_Renderer file:
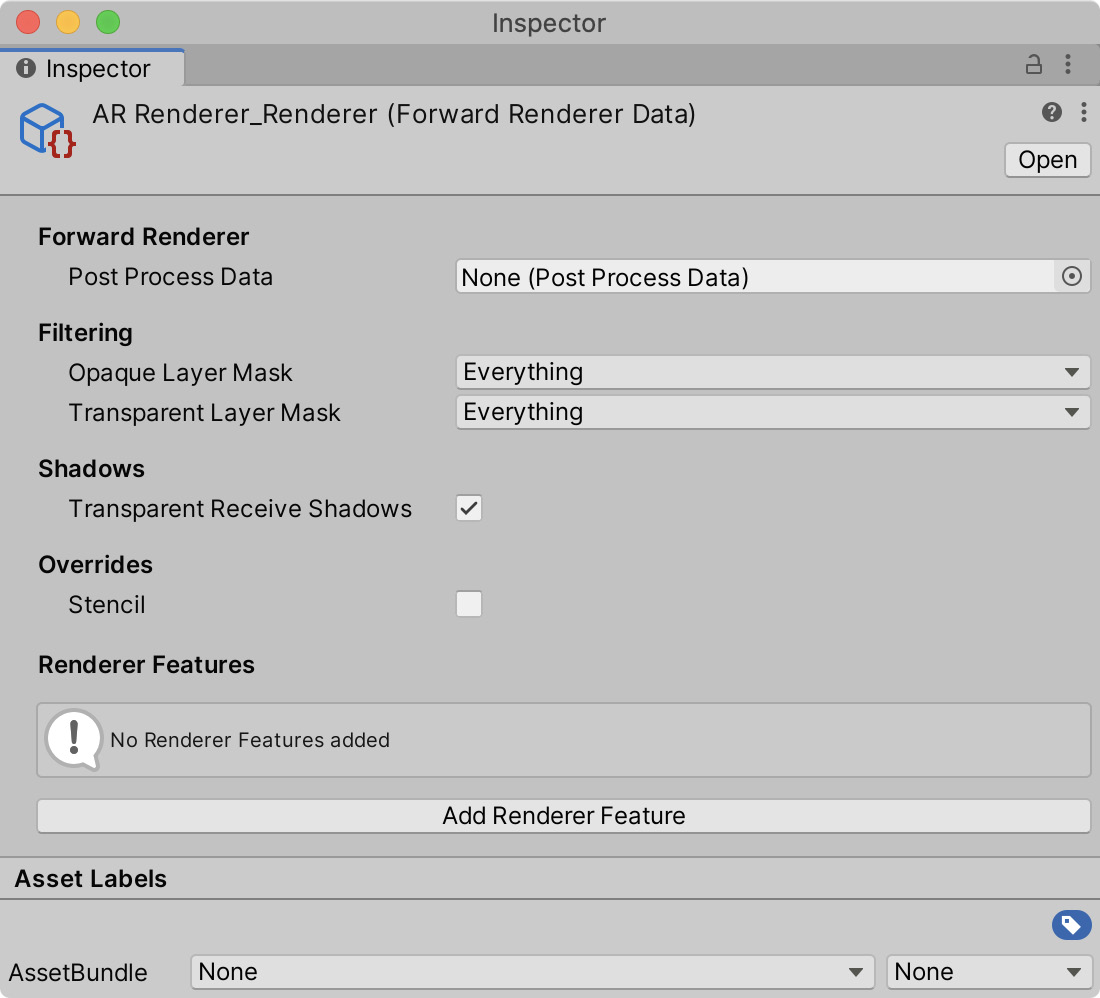
Figure 13.29 – AR Renderer
Near the bottom of the settings, you'll notice the heading Renderer Features. It's here that we'll add a specific feature to correctly display the AR background:
- Select ARRenderer_Renderer.
- In the Inspector, select the Add Renderer Feature button.
- Select AR Background Renderer Feature in the menu that appears:
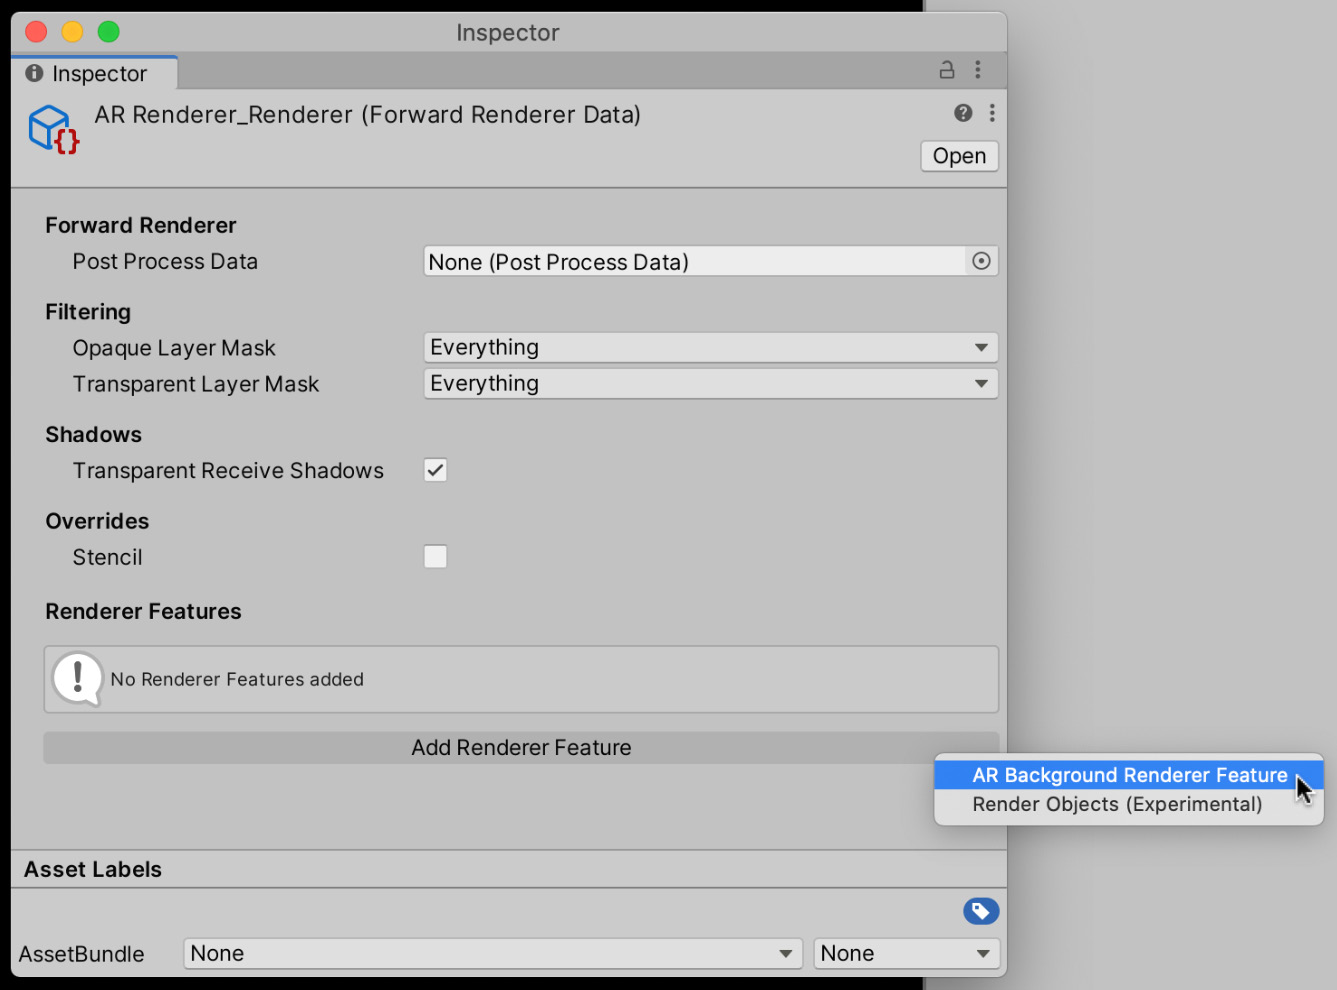
Figure 13.30 – Adding a renderer feature
This feature enables displaying the background in a URP AR application for any project using these settings.
Important note
If you don't see an option to add AR Background Renderer Feature, then please update your AR Foundation package using the Package Manager. It is only available from the AR Foundation package version 3.0.1 or above.
Now we need to configure the project to use our new custom renderer settings:
- Open Project Settings (Edit | Project Settings… in the Application menu).
- Click on the Graphics tab.
- Under the Scriptable Renderer Pipeline Settings heading, select our ARRenderer settings:
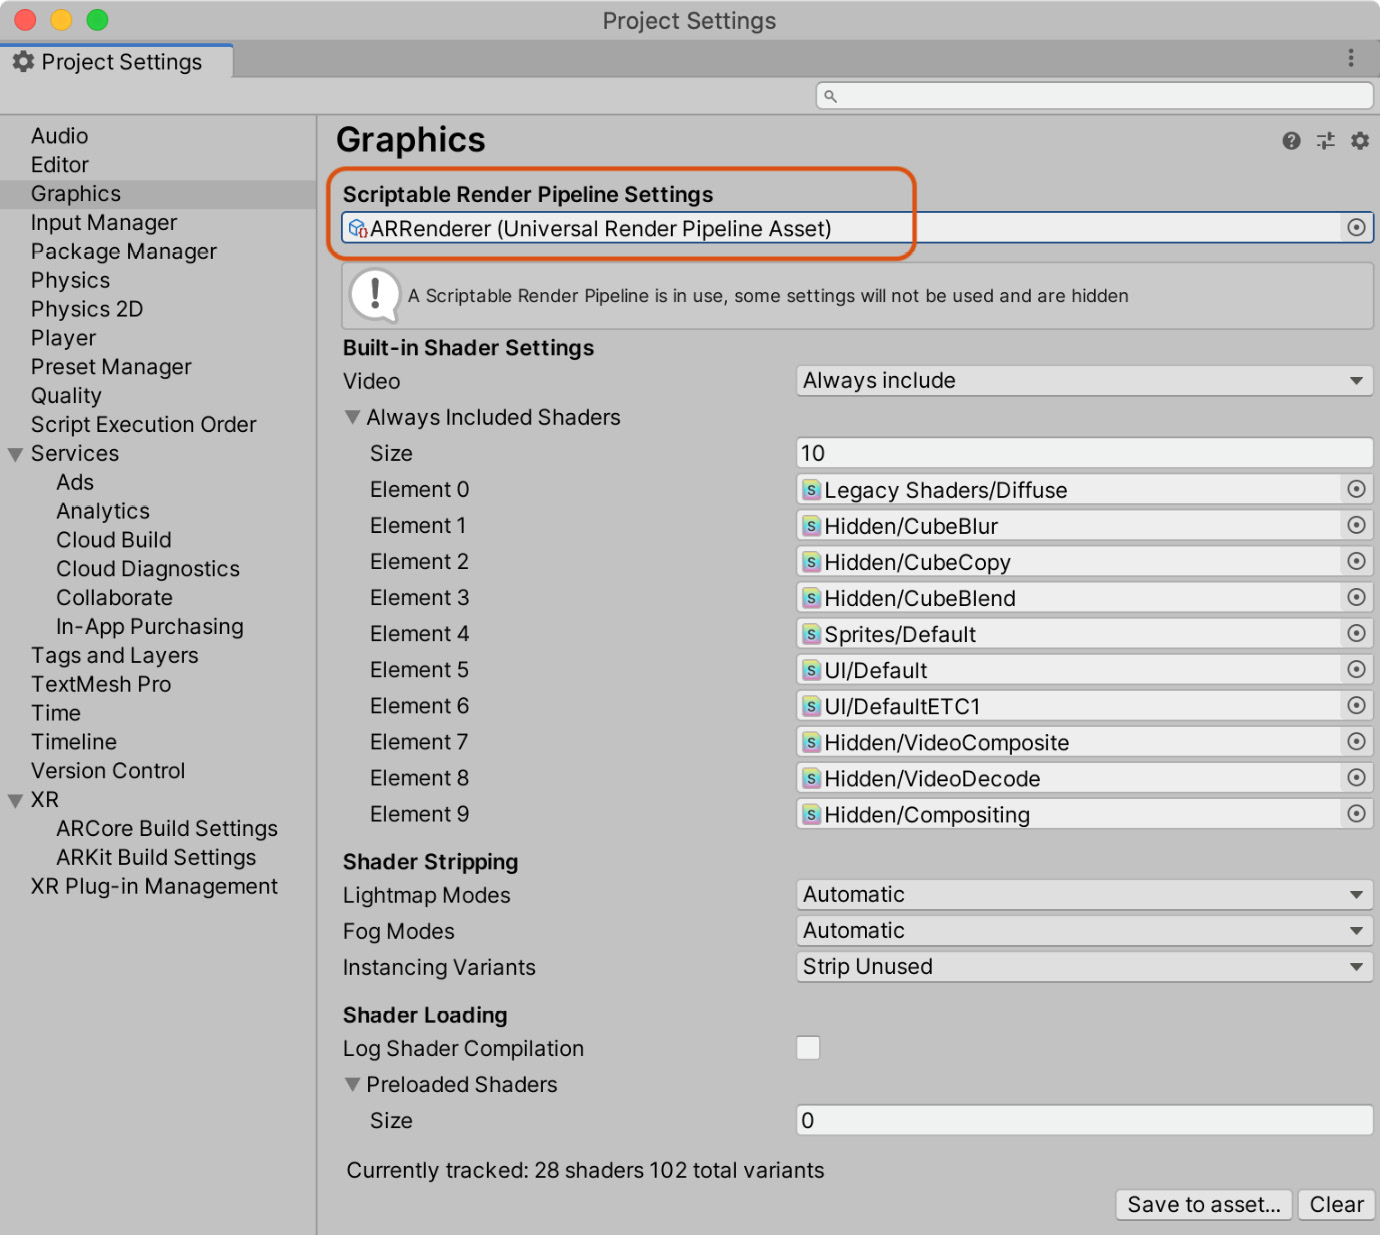
Figure 13.31 – Setting the URP settings
- Select the Quality settings tab on the left-hand side:
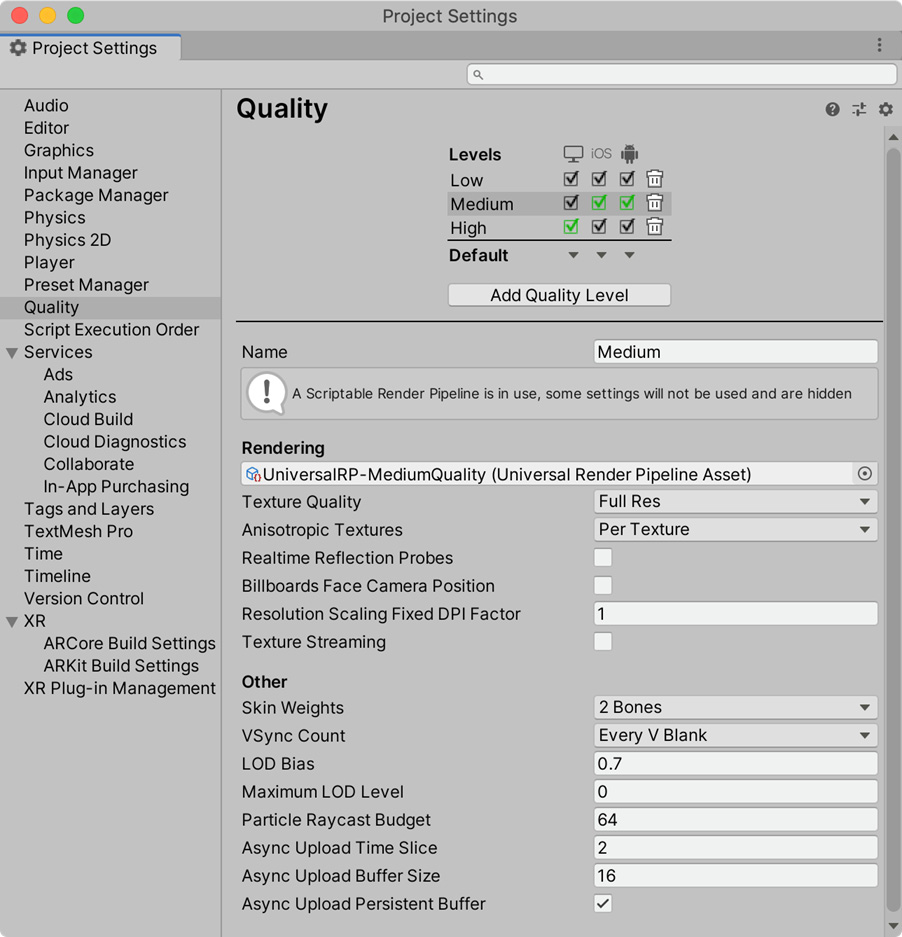
Figure 13.32 – Quality settings
It's here you can edit render settings for specific platforms.
- Select the Medium quality setting, as shown in Figure 13.33. This is the default quality setting for mobile devices as represented by the green checkboxes.
- Replace the renderer with our ARRenderer:
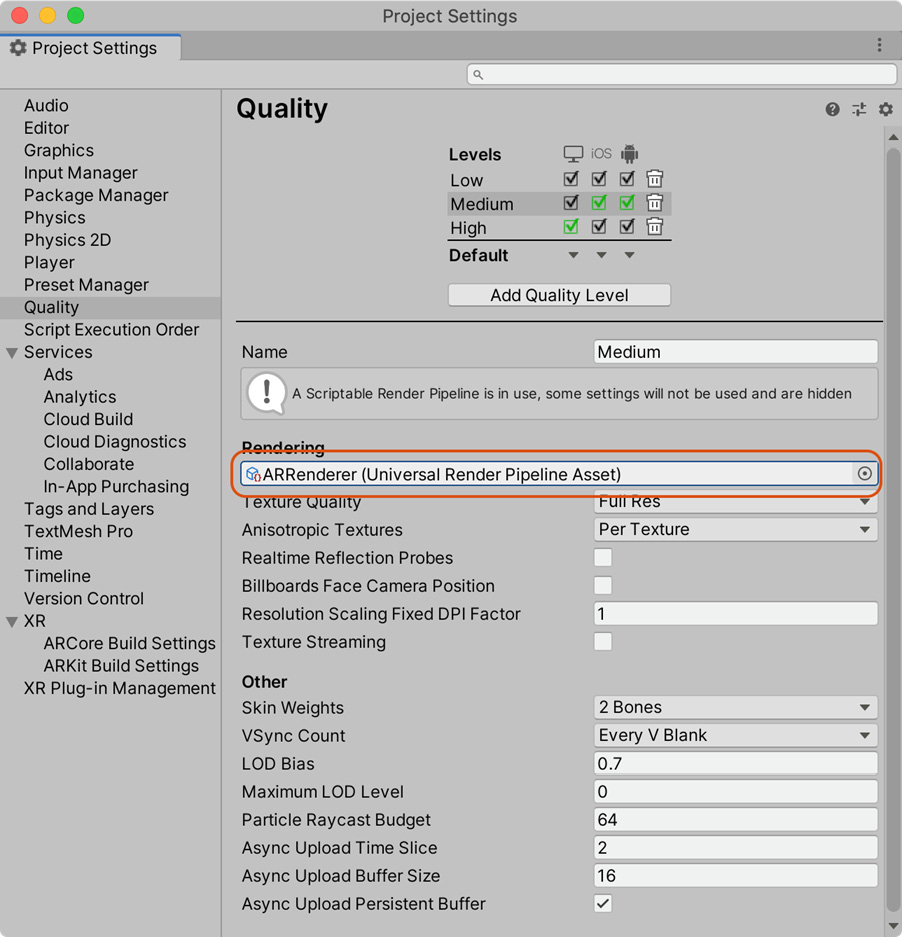
Figure 13.33 – Replacing the renderer
With that done, you should be able to successfully deploy your game to your device.
Important note
You can set different render settings on a per camera basis by selecting a camera and configuring the Renderer option under the Rendering heading.
If you build and deploy the project to your device, it should ask for your permission to use the camera and you should see the following:
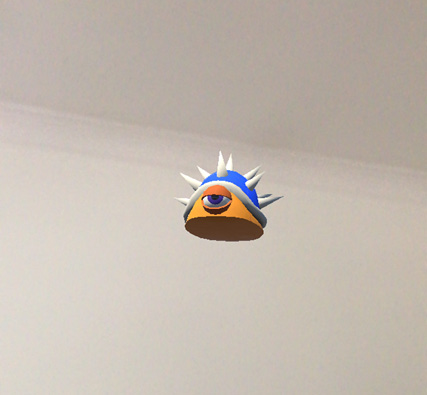
Figure 13.34 – The turtle in AR
The turtle will most likely be floating in space as its initial position is determined by where your phone was in space when the game started. You may also notice that the turtle flies around the room as you move your phone. This is not ideal and something that we'll fix in the next chapter, when we look at plane detection.
Summary
Congratulations! You've created a cross-platform AR project without writing a single line of code. In this chapter, you've learned how to quickly create a new project, add the necessary packages, and create a new AR scene. By performing these steps, you now know how to get up and running in AR efficiently. You know which packages to install for which device, and you know how to create your first AR scene. On top of that, you've created a URP project, and updated the AR project to take advantage of this new render pipeline.
In the next chapter, we'll extend these concepts further as we look at detecting planes in the real world so we can place the turtle on flat surfaces (such as the floor or a table), and we'll also take advantage of the URP by adding postprocessing to our scene.
Test your knowledge
Q1. To develop AR games in Unity, you should install:
A. ARCore
B. ARKit
C. AR Foundation
D. All of the above
Q2. The minimum iOS version that supports ARKit is:
B. 13
C. 9
D. 10
Q3. The AR Session component:
A. Has an AR camera
B. Controls the life cycle of an AR session
C. Isn't required in an AR scene
D. Should be added to every AR object in a scene
Q4. URP stands for:
A. Unity Render Pipeline
B. Unity's Really Pretty
C. Universal Reality Pipeline
D. Universal Render Pipeline
Q5. To run AR on devices using the URP, you should add an:
A. AR Session
B. AR Session Origin
C. AR Background Renderer Feature
D. All of the above
Further reading
For more information on AR in Unity, see the following links: