
Chapter 11: Entering Virtual Reality
In this chapter and the next, we'll create a first-person Virtual Reality (VR) game. The game will be targeted specifically at the Oculus Rift S hardware, and it's worth declaring this from the outset, as many other VR platforms exist as well. Although development methodologies do differ from device to device, the main principles of VR development within Unity are sufficiently similar that these chapters will still be helpful to any VR development on any of the hardware available today.
The lighting in a game can have a significant impact on the mood of the game. In previous chapters, we've briefly touched on how to configure basic lighting in a game. In this chapter, we'll take a deeper look into some of the techniques and tools game developers can use to create a visually appealing game.
As well as the lighting, we'll also add post-processing effects to enhance the visuals further. Post-processing effects are filters and adjustments applied to the pixels of the scene camera to stylize or improve the aesthetics of the rendered frame. By applying this knowledge in your own projects, you can create stunning-looking games with minimal effort.
Once we've looked at the lighting and post-processing effects, we'll move onto preparing the project for VR. This will involve installing the necessary packages. Luckily, as we'll soon discover, Unity provides a useful plugin management tool for this purpose.
We will build on many of the development techniques seen so far, as well as implementing new features specific to VR.
This chapter explores the following topics:
- Using Spot Lights, Light Probes, and emissive materials to create an atmospheric sci-fi level
- Creating your own Unity packages by exporting assets from previous projects
- Using the post-processing stack to enhance the look of each rendered frame
- Installing everything we need to get set up with VR
- Configuring VR input using touch controllers
Technical requirements
This chapter assumes that you have not only completed the projects from the previous chapters but also have a good, basic knowledge of C# scripting generally, though not necessarily in Unity.
The assets used in this project can be found in the book companion files in the Chapter11/ Assets_To_Import folder. The end project can be found in the Chapter11/End folder.
You will also require a VR device (we use the Oculus Rift S), and a computer that meets the minimum requirements for that device. The minimum requirements for Oculus devices can be found here: https://support.oculus.com/248749509016567/.
Preparing the project
In this game, the player will be a stationary character that can look around and shoot in any direction but cannot move around. The player will be standing in a sci-fi interior, and enemy bots will spawn into the level at random intervals. The bots will initially wander around searching for the player and, upon finding them, will run toward them, eventually attacking them. The player will be armed with plasma cannons on each hand and will have the ability to attack oncoming enemies to avoid being injured with the primary objective of seeing how long they can survive!
To create this project, we will begin by creating the core functionality for a standard first-person mode, and then migrate that to VR. To get started, do the following:
- Create a new 3D project. See Chapter 1, Exploring the Fundamentals of Unity, for detailed instructions.
- Drag the Meshes and Textures folders from the Chapter11/Assets_To_Import folder (included in the GitHub repo) to the Project panel. The Meshes folder includes two meshes. One mesh represents the complete sci-fi environment, and the other, a mesh for the enemy bot:

Figure 11.1 – Importing game assets
When working with different mesh assets, especially when reusing assets made by others, you'll often find they're made at different sizes and scales. To fix this, we can adjust the Scale Factor of each mesh.
- Select the Hallway mesh asset from the Project panel.
- In the Inspector, assign a new Scale Factor value of 2 on the Model tab.
- Click Apply:

Figure 11.2 – Setting the Hallway mesh Scale Factor
- Select the BlastBot mesh asset in the Project panel.
- As the bot is slightly too big for our needs, we'll reduce the scale factor. In the Inspector, assign a new Scale Factor value of 0.4 on the Model tab.
- Click Apply:

Figure 11.3 – Setting the BlastBot mesh Scale Factor
With the meshes scaled correctly, we can construct the level for our game:
- Create a new scene.
- Drag the Hallway mesh from the Project panel to the Scene view.
- Position the mesh at position 0, 0, 0. This will move the mesh's pivot point to that position:
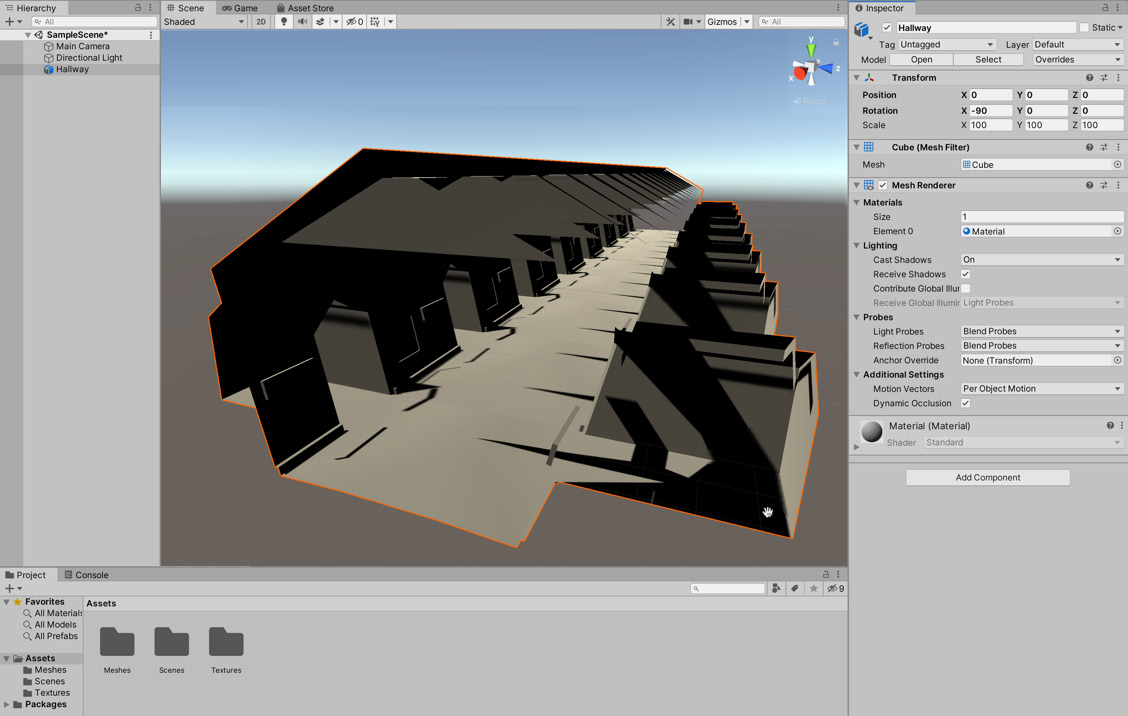
Figure 11.4 – Adding the Environment mesh to the scene
- Mark the object as static by ticking the Static checkbox in the Inspector. By marking the object as static, we're informing Unity that this object will not move. Consequently, Unity can perform several optimizations. The one we're most interested in at the moment is the ability to pre-bake lighting. Unity will calculate the lighting effects and store them in a lightmap. This reduces the performance cost at runtime as the effect of illumination on static objects has already been calculated:

Figure 11.5 – Marking the environment as static
Now that the assets have been imported, we can improve the look and feel of the game drastically by spending some time configuring the lighting. For this reason, we'll create the lighting for the scene before we enable VR.
Creating scene lighting
Lighting is fundamental in creating a specific mood in your scene, and here we'll create an atmospheric, dystopian sci-fi interior. This kind of environment typically relies on high levels of contrast between lighting, contrasting dark colors with vibrant non-natural lighting colors, such as green, blue, and red.
In this section, we'll remove the lighting that Unity automatically adds to a new scene. We'll then add the base lighting, which, as the name suggests, will be the base of our lighting system, which we will then build on by adding emissive wall panels and Light Probes.
Removing existing lighting
When you create a new scene in Unity, it will automatically add two common objects for you: a Camera and a Directional Light. By adding these two objects, you are able to get up and running as quickly as possible. However, there are times when this default setup may need some tweaking, and this is one of those times. As we'll be creating our own lighting system, we can do away with the defaults provided by Unity:
- Delete the Directional Light lighting object in the Hierarchy panel. This object is created by default in any new scene, but we don't need it.
- Access the lighting window by selecting Window | Rendering | Lighting from the application menu:

Figure 11.6 – Accessing the lighting settings
- On the Environment tab, remove the daytime skybox from the Skybox Material field by choosing None via the texture selector:

Figure 11.7 – Accessing the lighting settings
- In the Environment Lighting group, set Ambient Source to Color.
- Set Ambient Color to black. These settings remove all ambient lighting from the scene. This includes lighting that that pre-illuminates objects before scene lighting takes effect:

Figure 11.8 – Accessing the Lighting settings
Now with the Unity default lighting removed, we can configure our own custom lighting. By configuring lighting from the ground up and not relying on the default lighting setup, you'll gain a better understanding of how to implement lighting solutions in your own games. This information will prove valuable to ensure that your games have a distinctive look. This is arguably even more critical in a VR game, where the player enters the world like never before. We'll start our custom lighting setup with the base lighting. This lighting is the foundation on top of which our other lighting systems will provide an additive effect.
Adding base lighting
The base lighting should provide the player with the visibility they require to play the game comfortably. It should also help set the mood for the game, but we'll be adding extras such as emissive wall panels and Light Probes that will help with setting the mood. Let's start by adding a new light:
- Choose GameObject | Light | Spotlight from the Application menu.
- Position the newly created object close to the ceiling toward the front of the level, at position 41, 3.7, 0:

Figure 11.9 – Adding a Spotlight to the scene
- Set Color to 199, 236, 199:

Figure 11.10 – Creating the level's ambience
- Set Spot Angle to 120.
- Set Intensity to 4.6:
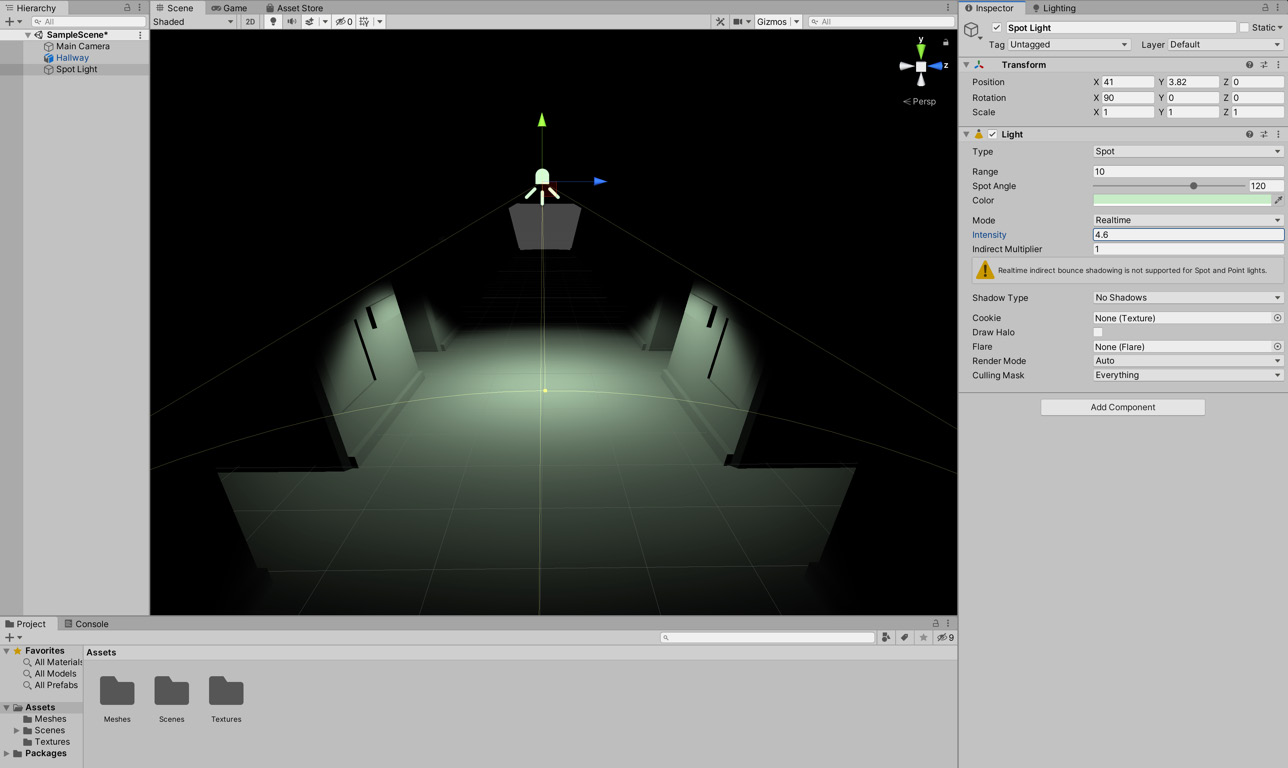
Figure 11.11 – Setting the scene's base lighting
- Duplicate the corridor mesh itself and position it at -48, 0, 0 for a further stretch of the level. By duplicating the mesh, a significant area of the corridor will disappear into the darkness beyond the reach of the lighting:

Figure 11.12 – Duplicating the corridor object
- Duplicate the Spot Light object several times and position the duplicates along the length of the corridor.

Figure 11.13 – Duplicating scene lights
That's looking perfect so far – atmospheric but with enough visibility. For more of an atmospheric feel, we'll add wall panels that glow.
Creating emissive wall panels
Emissive lighting lets you use a material and its maps as a light source, which can be emitted from a mesh. We can add emissive lighting to wall panels in our level and they will glow, reinforcing our sci-fi theme. Start by creating a material:
- From the Project Panel, right-click and choose Create | Material to create a new material asset:

Figure 11.14 – Creating a new Material
- Select the material and, in the Inspector, enable the Emission checkbox. Enabling Emission on this material means it will act as a source of light:
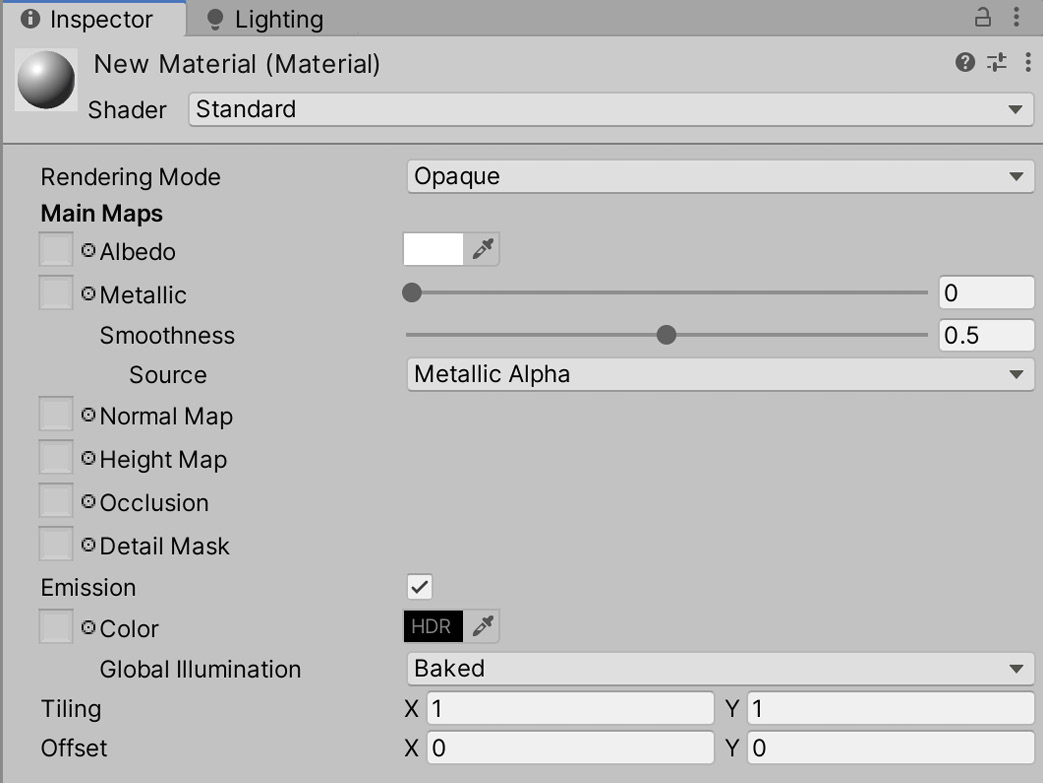
Figure 11.15 – Enabling Emission on a material
- Click the Emission color swatch and, from the color selector, specify both a color and Intensity for the emission, as shown in Figure 11.16. This will be the color and intensity of the emissive light when assigned as a material to a mesh:
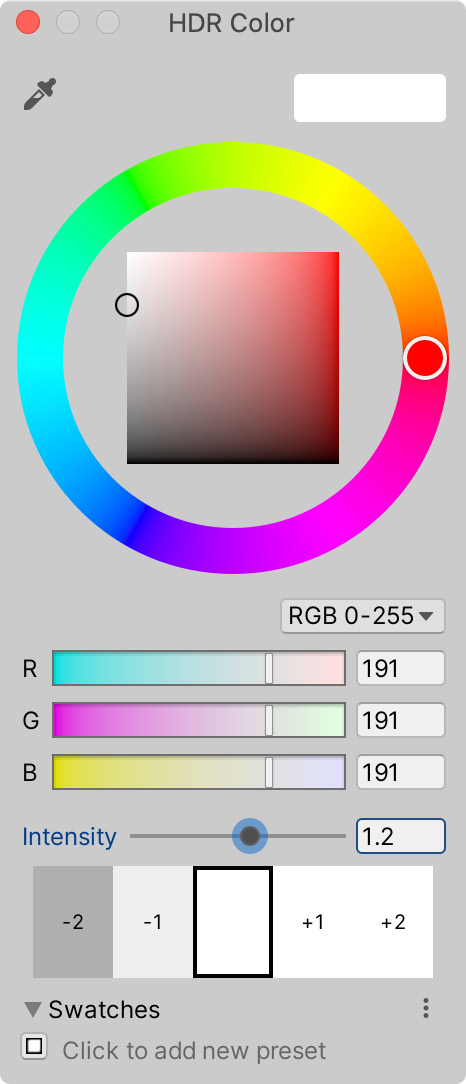
Figure 11.16 – Choosing the color emission for the material
Great! You've just created an emissive material. Now let's assign it to a mesh to illuminate the scene:
- Create a Quad object by selecting GameObject | 3D Object | Quad from the Application menu.
- Resize and position the newly spawned quad to fit inside any of the rectangular wall sockets in the environment, as shown in Figure 11.17:

Figure 11.17 – Placing the quad in the level
- Assign the emissive material by dragging it from the Project panel to Element 0 of the Materials list in the Inspector, as shown in Figure 11.17.
- Mark the quad as Static in the Inspector, and let the lighting rebuild to see the results.
Tip
If the lighting doesn't automatically rebuild, you can start the process manually by opening the lighting window (Window | Rendering | Lighting) and clicking on Generate Lighting.
- Duplicate the quad several times, adding a duplicate into each vacant wall socket in the environment:

Figure 11.18 – Filling every recess in the corridor
- Add a red-colored point light in each recessed alcove. The presence of an off-screen red light adds ambiance and an other-worldly feel:

Figure 11.19 – Adding red point lights
Very eerie! However, it may be a little bit dark for the player (depending on their preference). To fix this, and complete our lighting system, we'll add Light Probes to the scene.
Adding Light Probes
Light Probes are useful for adding indirect illumination to real-time (dynamic) objects, such as the player character and enemies. Light Probes refer to a connected network of empty-style objects. Each object (a node) records the average color and intensity of neighboring lights in the scene within a specified radius. These values are stored in each node and are blended onto moving objects:
- Create a new Light Probe Group by choosing GameObject | Light | Light Probe Group from the Application menu:

Figure 11.20 – Creating a Light Probe Group
- Move the Light Probe Group to the center of the scene, as shown in Figure 11.21. You will see a network of yellow spheres neatly arranged in a grid pattern. Each sphere represents a node (Probe) in the group, and it records the color and intensity of light in the surrounding areas:

Figure 11.21 – Positioning the Light Probes
The idea is to add or duplicate more probes within the network, and to position them strategically around the level in areas where the light changes significantly, in either color or intensity, or both. The probe network should capture the distribution of light in the scene. To get started with this, do the following:
- Select Light Probe Group in the Hierarchy panel.
- On the Light Probe Group component in the Inspector, click the Edit Light Probes button. When activated, you can select, duplicate, and move around individual probes within the group:

Figure 11.22 – Editing Probes within the group
- Select a probe, click the Duplicate Selected button, and then move the duplicate to a new location in the scene, capturing the surrounding light.
- Duplicate another and move that further along still.
- Try keeping the probes regularly spaced, as shown in Figure 11.23:
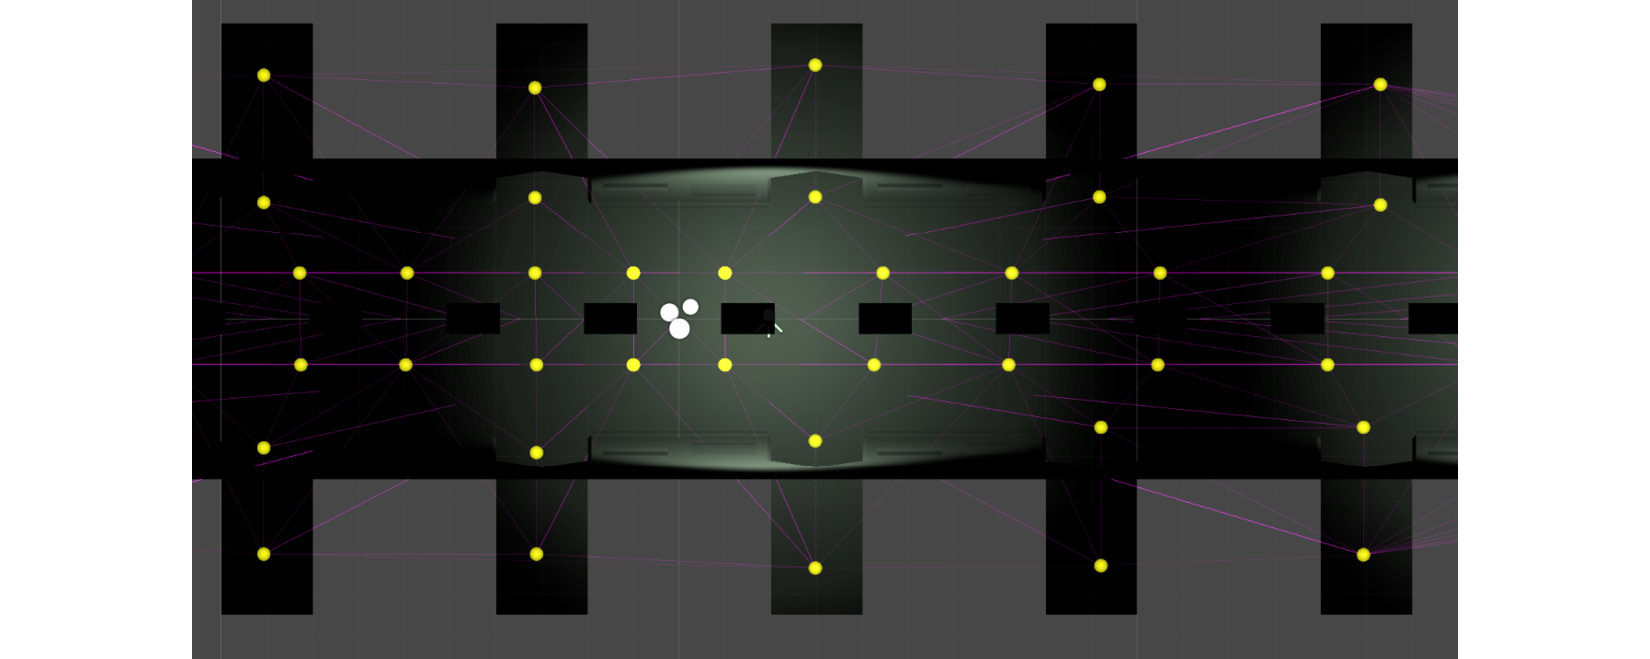
Figure 11.23 – Spacing Light Probes
Excellent, we've now completed the lighting for the environment: we've added spot and point lights, emissive lights, and Light Probes. These components are working to ensure objects are illuminated correctly. Things are looking good!
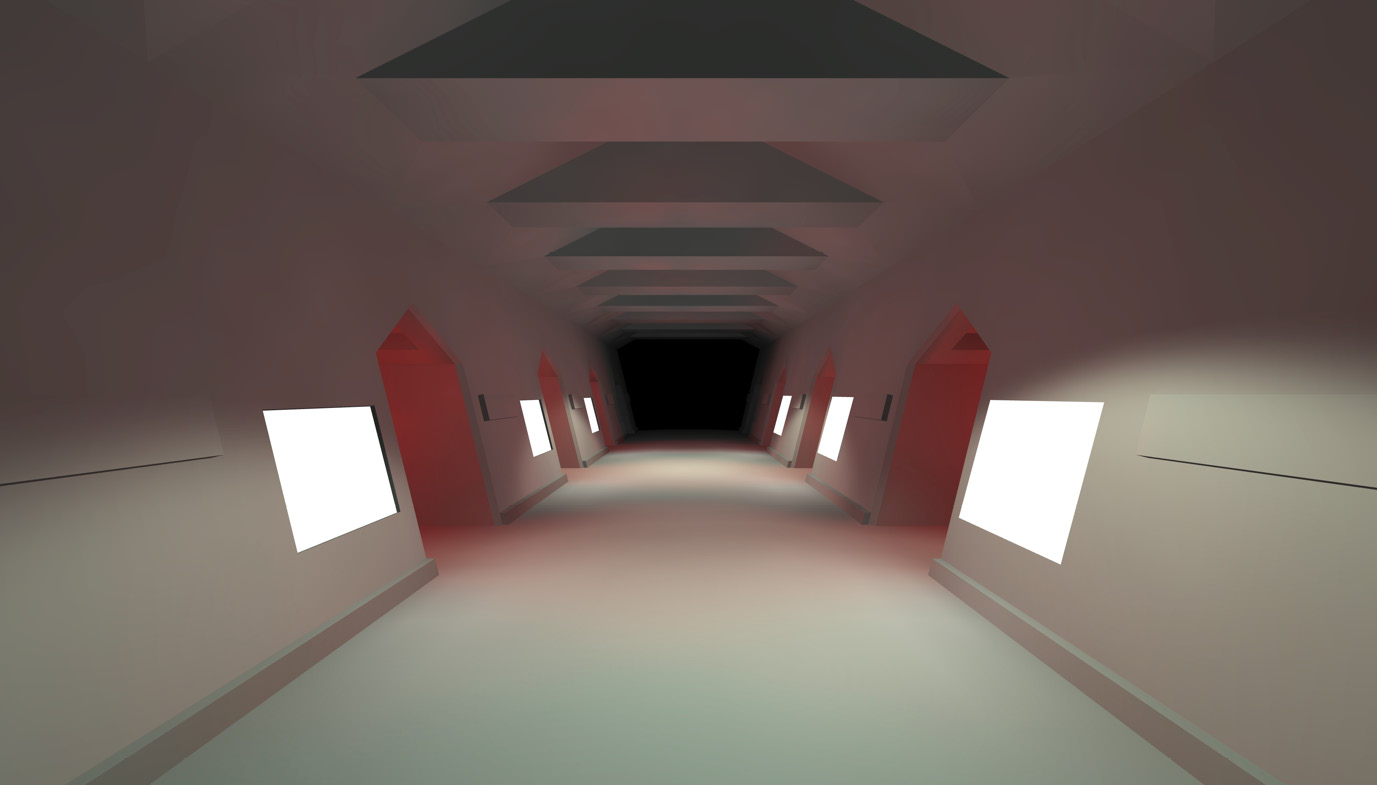
Figure 11.24 – Complete lighting
And that's it for lighting. We covered a lot in this section, including the following:
- How to remove the default scene lighting
- Using Spot Lights to add localized visibility, with some parts of the level being better illuminated than others
- Creating glowing wall panels using emissive lighting
- Adding indirect illumination using Light Probes
This is a solid foundation in Unity lighting that can be applied to any of your projects moving forward, not just VR.
With lighting complete, there's one last thing we should look at before adding VR support, and that is Unity's new post-processing stack. Becoming comfortable with implementing effects using the post-processing stack will help lend your game a unique visual appearance.
Introducing the post-processing stack
In this section, we'll add these post-processing camera effects to enhance the appeal of the scene. As mentioned in earlier chapters, post-processing effects are filters and adjustments applied to the pixels of the scene camera to stylize or improve the aesthetics of the rendered frame.
Important note
Unity 2018 and above ships with version 2 of the post-processing stack for adding volume-based post-processing effects to your project.
To use the post-processing stack, we need to perform the following steps:
- Install the stack. We'll be using the Package Manager for this, and the process should hold few surprises at this point.
- Create a post-processing volume. This volume will define the area in which we want the processing to occur.
- Configure the camera by adding the required post-processing effects.
- Enable the effects by linking the volume and the effects we added to the camera.
Unsurprisingly, we'll start by installing the post-processing stack, which provides the functionality we need to enhance our game's visuals.
Importing the post-processing stack
The post-processing stack is a Unity package that combines a set of effects into a single post-processing pipeline. There are numerous benefits to this, but one for you as a developer is that once you know how to apply one effect using this pipeline, you'll easily be able to add any of the other available effects.
To add the newest version of the post-processing stack, do the following:
- Select Window | Package Manager from the Application menu.
- From the Packages list, click All to filter the list and view all available or installed packages:

Figure 11.25 – Showing all packages
- Select the Post Processing package.
- Once selected, click the Install button to add the package to your project. If the package has already been added, you may have the option of updating to the latest version by clicking the Update button:

Figure 11.26 – Installing the Post Processing package
After installation, the complete post-processing functionality has been added to your project. This workflow depends on two main concepts or steps. First, we need to mark out volumes in the level that, when entered by the camera, will cause effects to be applied to it. Second, we must specify which cameras are to be affected by the volumes. We'll start by creating the volumes.
Creating a post-processing volume
Let's start by creating a single post-processing volume in the level:
- Choose GameObject | 3D Object | Post-Process Volume from the Application menu. This option adds a new GameObject, complete with a trigger box and post-processing settings.
- After creating a post-processing object, you'll need to position and resize it. The idea is to enclose the area inside which camera effects should occur. For our game, we'll enclose the complete level, as we'll make only one set of effects that should always apply. Use the Box Collider component fields for Size to resize the bounding volume, as shown in Figure 11.27:
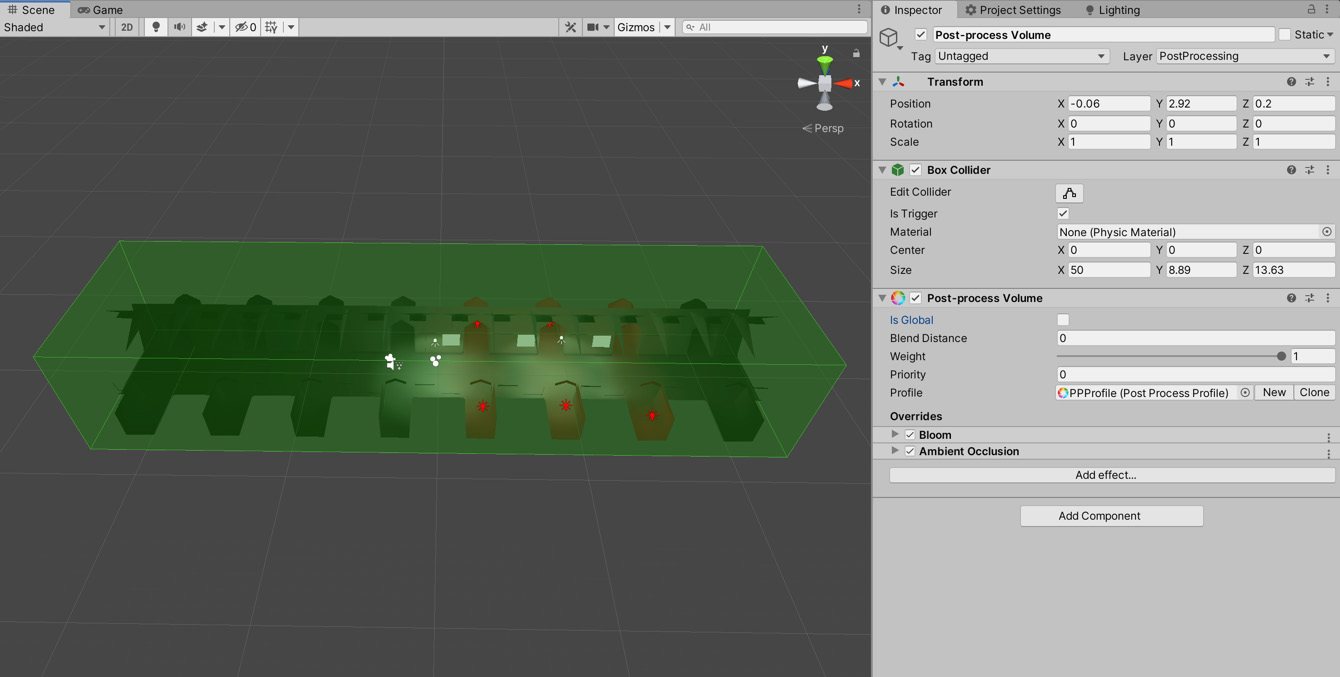
Figure 11.27 – Adjusting the size of the volume to enclose the level
Now we have a volume that encompasses our tunnel. This is called a local volume as the effects are only applied in a specific area of the game.
Important note
The post-processing stack introduces the concept of global and local volumes, and each volume can be given a priority and a specific set of effects. You can take advantage of this in your games by creating a global volume that will apply specific effects, and then creating local volumes, as we have done with our sci-fi tunnel, that provide additional effects or override the global effects for when the player is in that area.
Next, we'll configure our camera to respond to the post-processing volume we've just created.
Configuring the camera
To test the effects, we'll need a camera. As mentioned earlier, every new scene automatically includes a camera object. However, rather than using the default static camera, we'll use the first-person controller we created in Chapter 8, Creating Artificial Intelligence.
Important note
We'll shortly be replacing this character controller with a VR version.
To do this, we'll need to first export the package from the previous project before importing the package into our new project. These steps will come in handy whenever you want to share objects and all associated data between your projects.
To export the character controller, do the following:
- Open the project from Chapter 10, located in the Chapter10/End folder:

Figure 11.28 – The ML-Agents project
- In the Assets/Prefabs folder, right-click on the Player prefab.
- In the context menu that appears, select the Export Package… option:
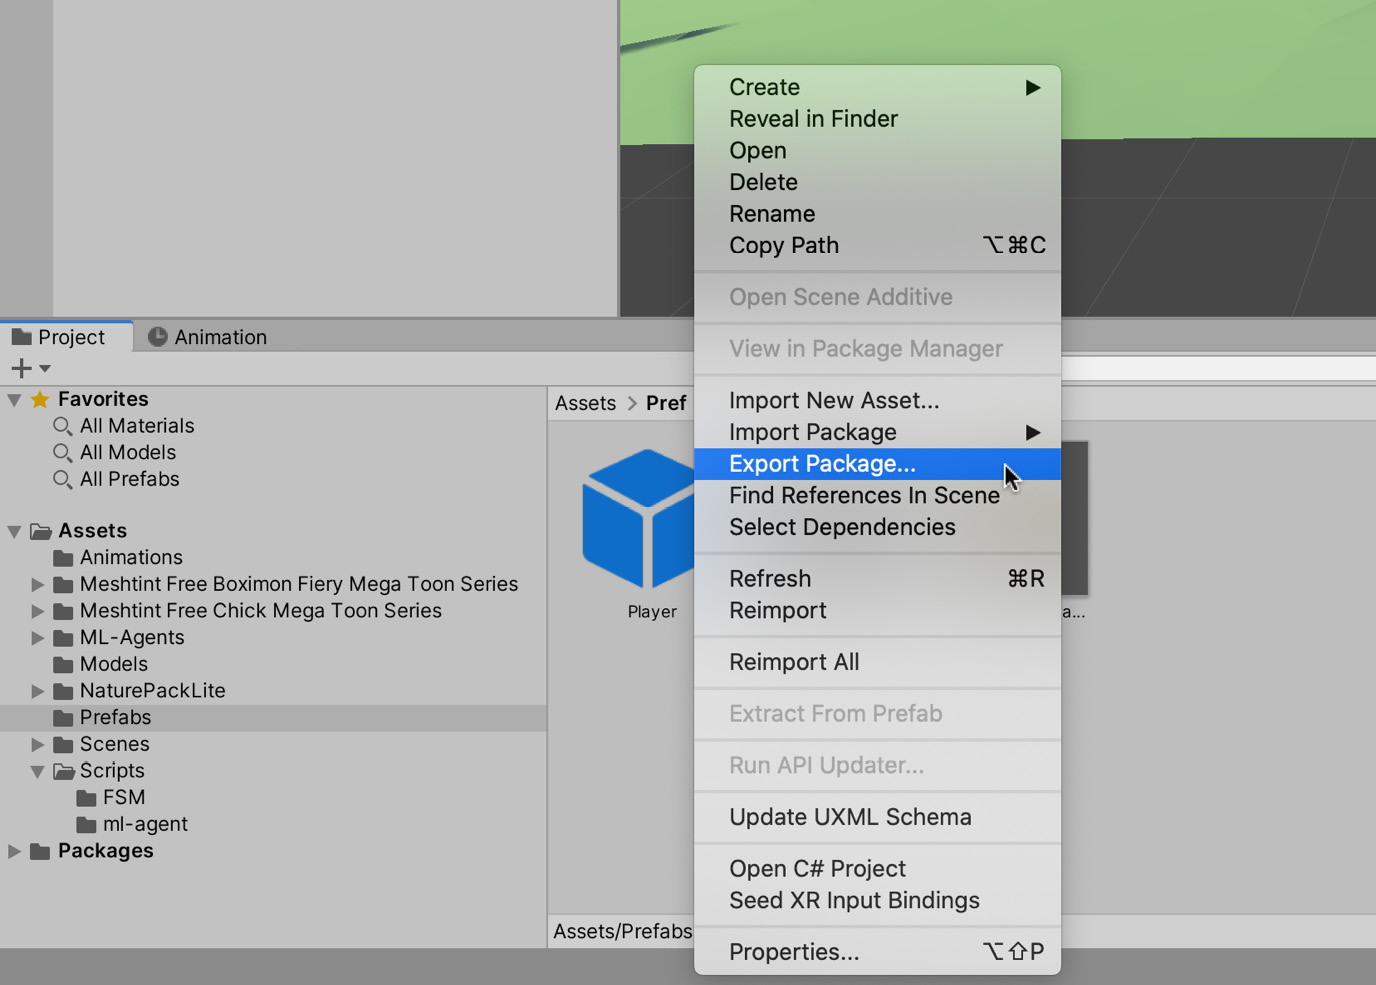
Figure 11.29 – Exporting the Player prefab
- Untick all assets so that only the prefab and the CameraLook and PlayerController scripts are selected, as shown in Figure 11.30:

Figure 11.30 – Select only the relevant scripts
- Select the Export... button.
- Save the package somewhere you can easily locate it. I named the package player_controller:
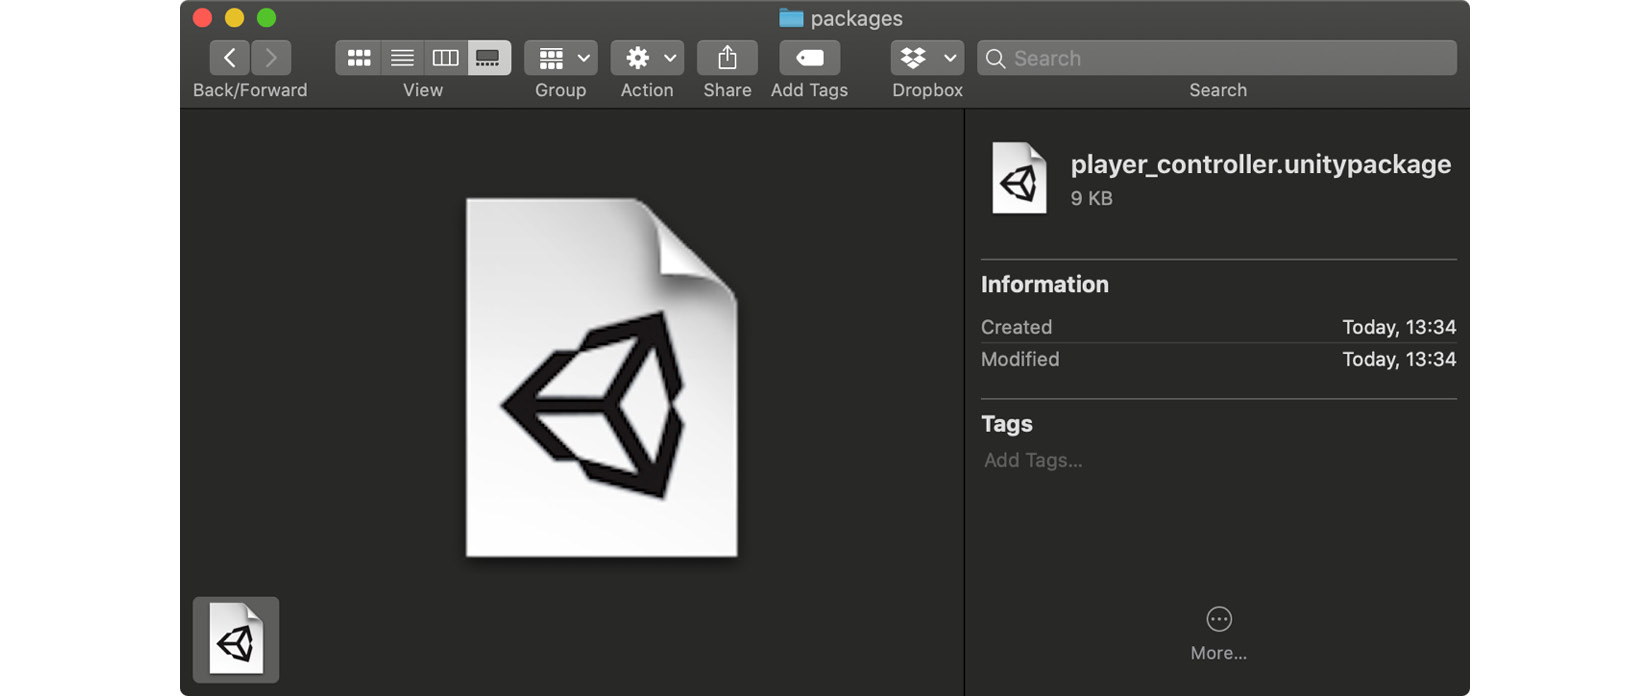
Figure 11.31 – The generated Unity package
This creates a unitypackage file, which contains all the data we need to use the character controller.
- Close the Unity project.
Now we have the Unity package, we can import it into our current project:
- If you closed the VR project, re-open it.
- Double-click on the recently created player_controller package. This will open the Import Unity Package window:
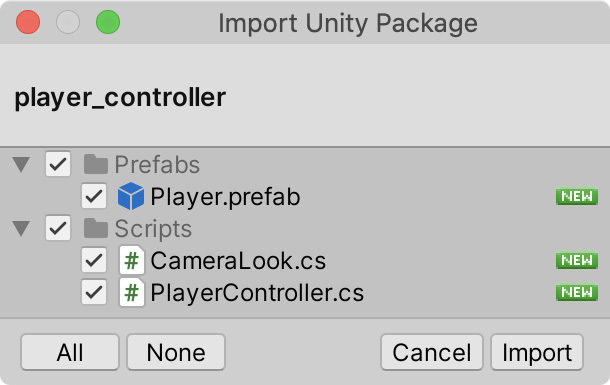
Figure 11.32 – The generated Unity package
- Select Import to add the assets to our current project.
Important note
You may notice when you import the package that the assets are placed at the same location as they were when they were exported. This is something to consider when creating your folder structure if you will be exporting packages.
- This will add the Player prefab to the Assets/Prefabs folder (the folder will be created if it didn't already exist). Drag this prefab to the scene and position it at -3.8, 1, 0:
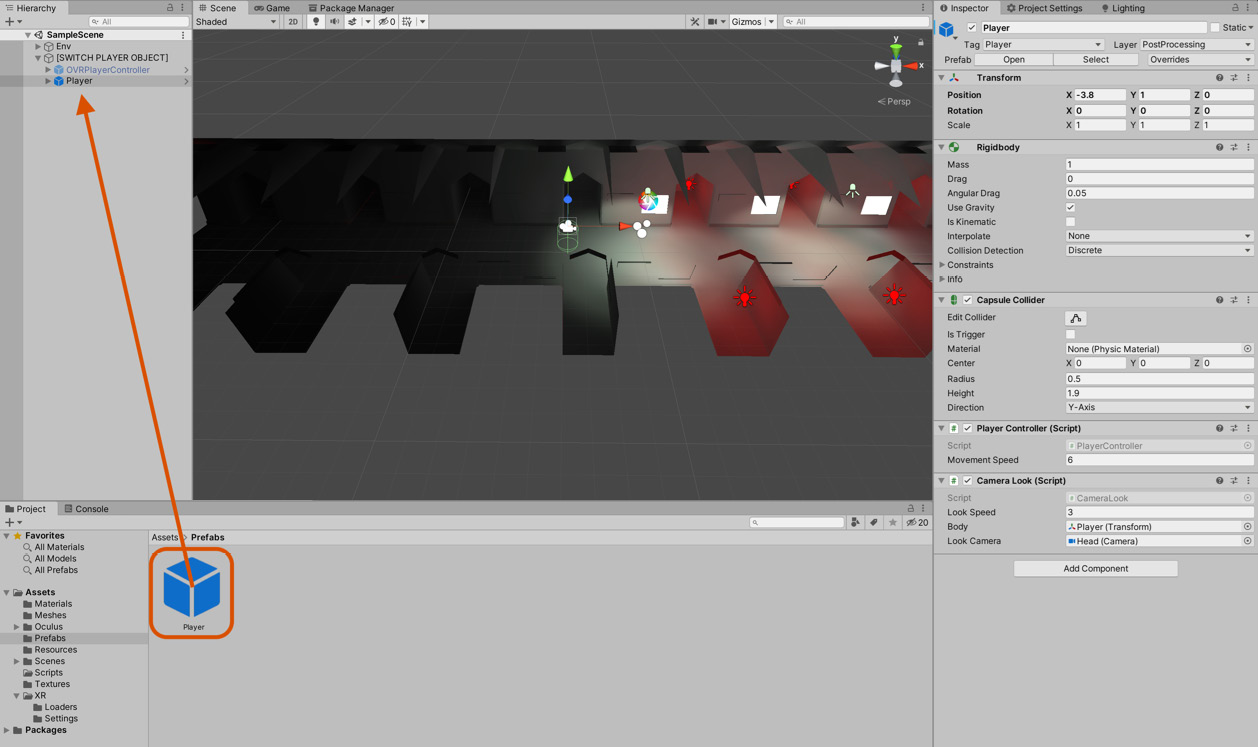
Figure 11.33 – Importing the Player prefab
With the package imported and added to our scene, we are ready to configure the camera:
- As this asset includes its own camera, we can delete the default scene camera. Select the Main Camera object in the hierarchy and delete it.
- In the hierarchy, expand the Player object and select the Head child object. This object contains the camera component.
- Add a Post-process Layer component by selecting Component | Rendering | Post-process Layer from the application menu:

Figure 11.34 – Adding a Post-process Layer to the selected camera
- In the Inspector, on the newly added Post-process Layer component, set the Layer attribute to PostProcessing:

Figure 11.35 – Selecting the volume Layer
We've now added a post-process volume to the scene and a post-process layer to the camera. Next, we need to associate specific post-processing effects with the volume, which will be rendered to the camera when it enters the volume.
Enabling post-processing effects
We've laid the groundwork for using post-processing effects but have not yet selected and configured the effects we would like to apply. This will change now as we go through the last steps required to add post-processing effects to our project.
To select which effects we would like to use, we first need to associate a Post-processing Profile with the volume:
- Create a profile by right-clicking inside the Project panel and selecting Create | Post-processing Profile from the context menu:

Figure 11.36 – Creating a Post-processing Profile
- Select the newly created Post-Processing Profile asset.
- From the Inspector, click the Add Effect button. You can add as many effects as desired, but each effect carries a performance implication. Consequently, you should add as few effects as needed while retaining your artistic vision.
- Add two effects: Bloom and Ambient Occlusion. Bloom blurs and intensifies highlights, adding a dreamy or whimsical feel. Ambient Occlusion adds shadows to areas where adjacent geometry meets, such as the walls and floor or the walls and the ceiling:
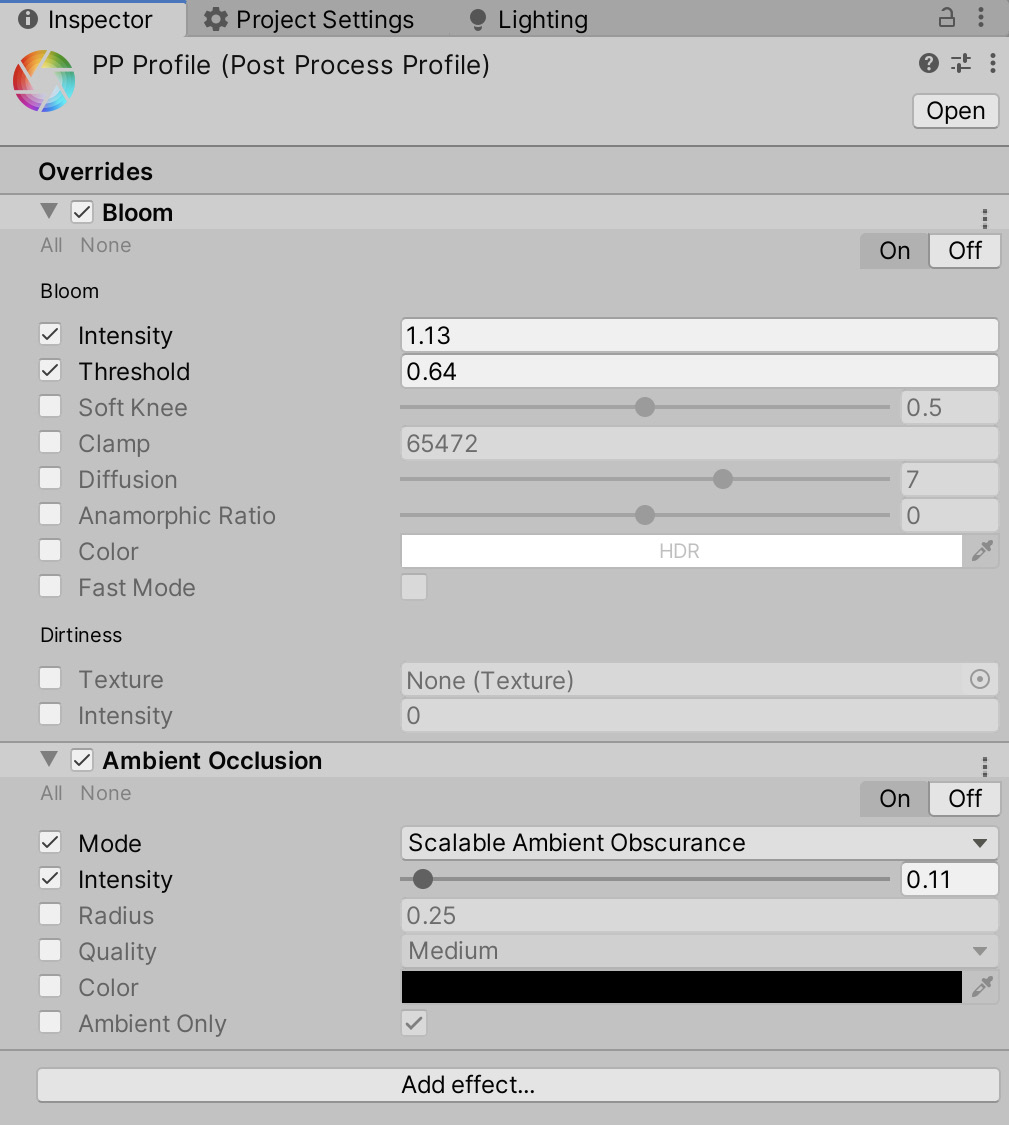
Figure 11.37 – Adding post-processing effects
- Select Post-process Volume in the Hierarchy and drag and drop the Post Process Profile into the Post-process Volume component in the Profile field. This associates the profile with the volume:

Figure 11.38 – Associating a profile with a volume
Finally, ensuring the first-person camera is inside the volume, you should immediately see the result in the Game tab. Excellent work. Our scene is looking great, with both lighting and post-processing combined:
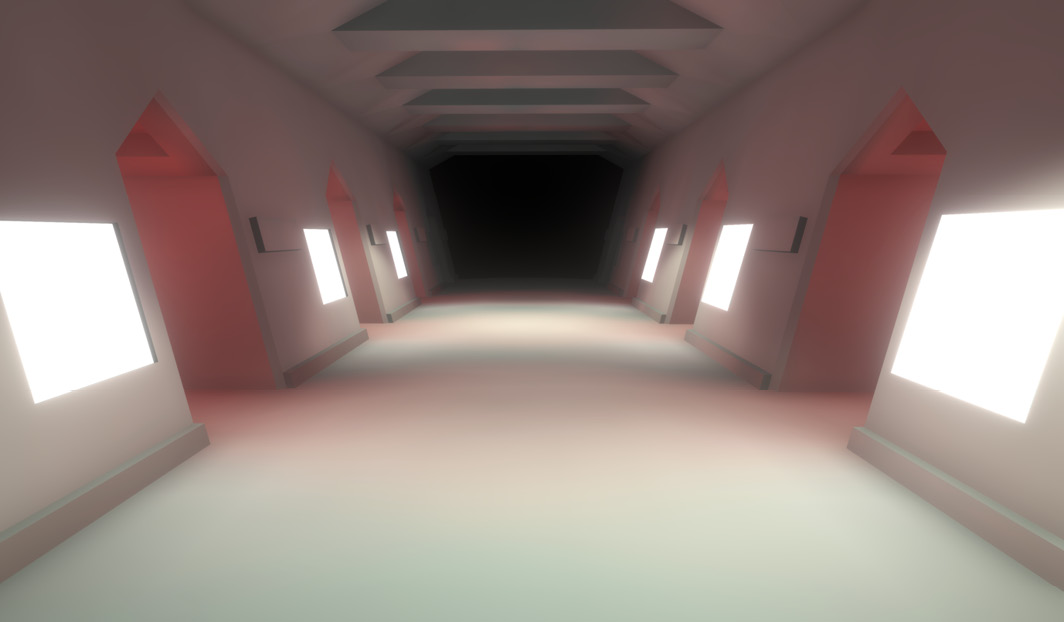
Figure 11.39 – Previewing post-processing effects
We covered a lot in this section, including the following:
- Importing the post-processing package, which includes everything we need to use the processing stack.
- Creating a post-processing volume that encompasses the level and applies the effects to the camera when it is within the volume.
- Importing a player character asset from a previous project.
- Configuring the camera by adding a post-processing layer so that it works with the volume we created previously.
- And then, finally, we brought it all together and enabled post-processing in our project by creating a profile and associating it with the volume.
That's it for the lighting and post-processing effects. It's now time to prepare the project for VR!
Preparing for VR
In this chapter so far, we've been preparing the foundations for a scene, ready to add core functionality and gameplay. To recap, our game will be a first-person VR shooter, in which waves of enemy droids will spawn into the level, move toward the player, and then attack on approach. The player must dispatch all enemies and see how long they can survive the level. We still have the gameplay to implement, and whenever creating VR content, I like to make the project compatible with both VR and a standard first-person controller, both to help debugging and to aid testing without a headset.
But, before moving forward with development, let's prepare for VR development generally. This section uses the Oculus Rift S device, although the development workflow is similar for Oculus Go and Oculus Quest. To get started, you'll need to connect and install your Oculus Rift device. Instructions for doing this can be found online at https://support.oculus.com/1225089714318112/.
With the Oculus hardware connected, back in Unity, do the following:
- Navigate to the Project Settings window by choosing Edit | Project Settings from the Application menu.
- Select the XR Plugin Management tab. XR stands for extended reality and is an all-encompassing term that describes technology that blends the virtual and physical world in some way. For our purposes, it enables us to use VR, and in a later chapter, AR (Augmented Reality):

Figure 11.40 – XR Plugin Management
- Click the Install XR Plugin Management button. This will install the packages required to manage the XR packages included in our project:

Figure 11.41 – XR Plugin Management
- Once installed, it will display a list of supported XR providers. Near the top of the list, you'll find a checkbox for Oculus. Select that now and it will install the required packages to support Oculus VR:

Figure 11.42 – Enabling Oculus support
Selecting the Oculus checkbox will automatically install the Oculus XR Plug-in Package. You can confirm this by checking in the Package Manager.
You can test whether this configuration has found your device simply by clicking play on the toolbar. The orientation of the Head Mounted Display (HMD) will automatically control the scene camera, so you'll be able to look around in VR. If this doesn't work, ensure the Oculus Device is connected and installed and can play VR content normally.
Tip
If you don't have a VR device, you can still test the application by selecting the Unity Mock HMD, as shown in Figure 11.42. For more information on how to set up testing without a device, take a look at https://docs.unity3d.com/Packages/[email protected]/manual/index.html.
If all you wanted to do was look around in VR wearing the HMD, then you'd be done already! Unity makes it that easy to get up and running in VR. However, we're missing interactivity. To achieve more complex behaviors with Oculus Rift S, we'll import additional Asset Packages made freely available to us on the Asset Store from Oculus Technologies:
- Navigate to the Unity Asset Store at https://assetstore.unity.com.
- Search for and add the Oculus Integration package to your asset collection, which contains the basic libraries needed to create Oculus-compatible content quickly:
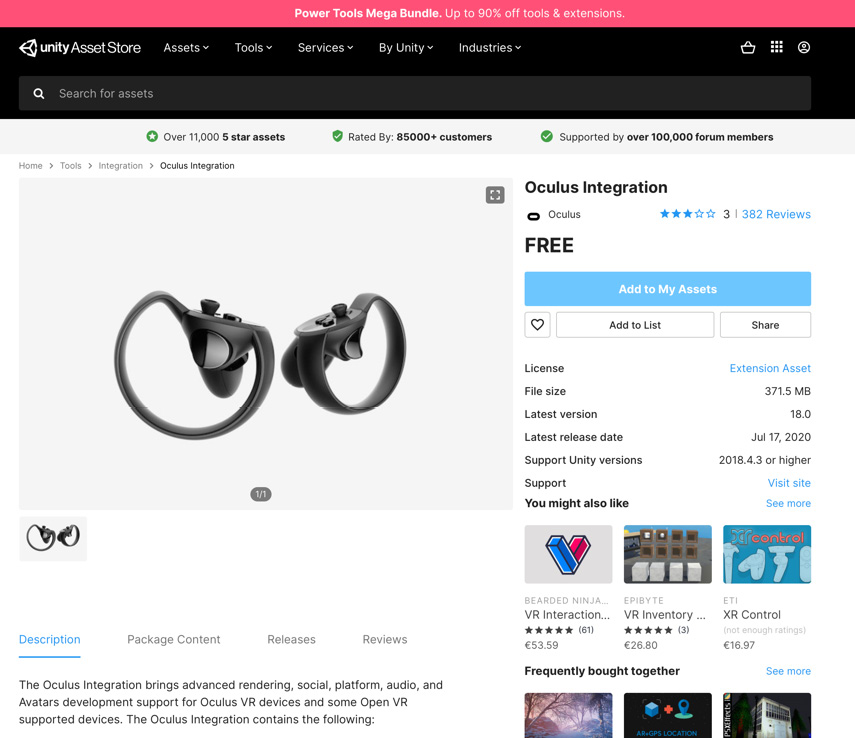
Figure 11.43 – Importing Oculus Integration
- Back in Unity, open the Package Manager window and import the newly added package:

Figure 11.44 – Importing the Oculus Integration package
Once imported, you'll see a range of folders added to the Project panel in the Oculus folder. Many of these were previously separate asset packages but have since been integrated into one for ease of use:

Figure 11.45 – Reviewing the Oculus Integration package
Critically important is the Oculus/VR/Prefabs folder, which contains an Oculus player character called OVRPlayerController. This controller works much like FPSController but has VR-specific functionality. Let's add this to the scene now:
- Drag and drop the OVRPlayerController prefab into the scene
- Position it in the hallway, at -3.71, 0.95, 0. This is where the player will stand as they face the oncoming enemies:
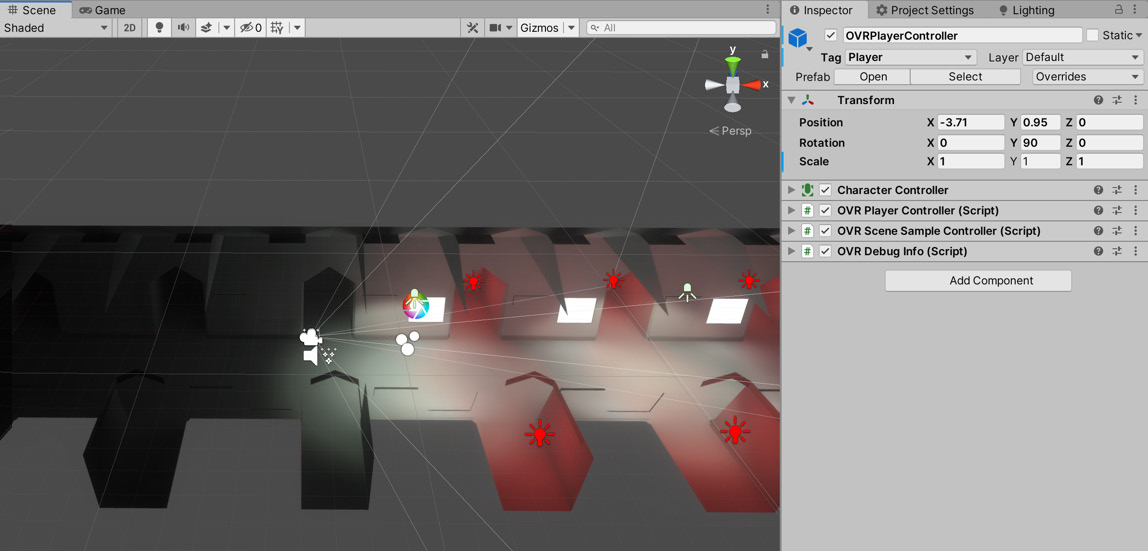
Figure 11.46 – Adding the OVRPlayerController prefab
After adding OVRPlayerController, new cameras will be added to the scene, one for the left and one for the right eye. Your post-processing effects won't work with these cameras by default. To make them work, do the following:
- Add a Post-process Layer component to CenterEyeAnchor, which is part of the OVRPlayerController hierarchy of objects, as shown in Figure 11.47:
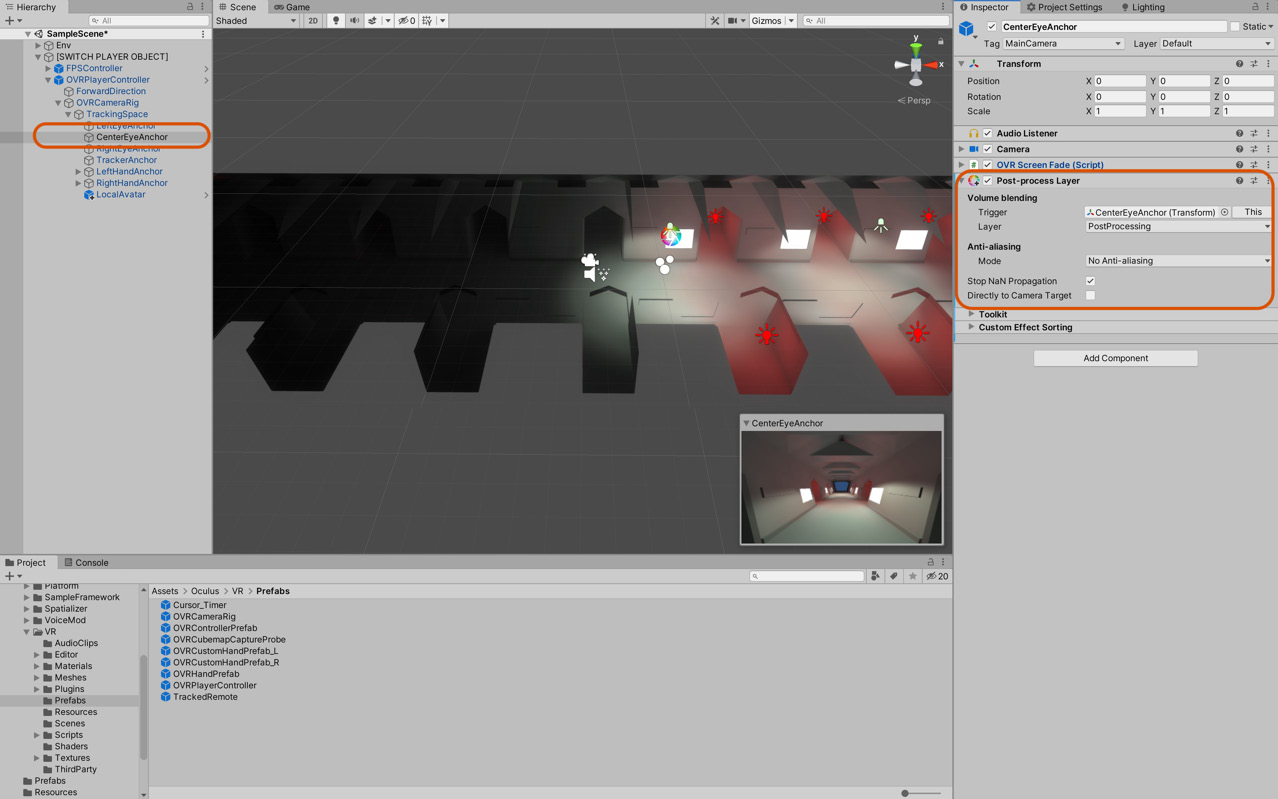
Figure 11.47 – Configuring post-processing effects for the VR camera
We'll next give the player character some hands using the Oculus Avatar prefab, which integrates directly into the player controller and works using input from the Oculus Touch controllers. This asset provides a mesh representation of the location and the status of the hands, as understood from player input within the tracking space (the play area).
- Find the LocalAvatar prefab in the Oculus/Avatar/Content/Prefabs folder.
- Drag and drop this prefab onto the TrackingSpace object in the Hierarchy panel. The TrackingSpace object is a child object of the OVRPlayerController GameObject:

Figure 11.48 – Adding a local avatar to the OVRPlayerController tracking space
Excellent. We're now up and running with Oculus VR, ready to implement core functionality for the first-person shooter game, and we'll do precisely that in the next chapter.
Summary
Great work. So far, we've imported all project assets, configured those assets, set up the environment, and calibrated the lighting.
Using several Spot Lights to create interior lighting, as well as emissive materials applied to wall panels to make them glow, we created an atmospheric interior scene. The lighting was further enhanced by the addition of several Light Probes scattered throughout the scene. These Light Probes will come into their own as we add more dynamic objects to the project.
As well as the lighting, we implemented the post-processing stack. As we learned, these post-processing effects are filters and adjustments applied to the pixels of the scene camera and involved several steps to set up, including importing the post-processing package, creating a volume that encompasses the level, configuring the camera by adding a post-processing layer, and creating a post-processing profile and adding the desired effects to that profile.
This knowledge can be used in any of your future projects to add a certain level of visual flair or polish that can make a huge difference.
We then moved onto preparing the project for VR, which involved installing the necessary packages and setting up input using touch controllers. This preparation is essential for the next chapter, where we'll continue this project by adding enemies and a projectile system controlled using VR.
Test your knowledge
Q1. XR stands for...
A. Extended Reality
B. Extensible Realism
C. X-Rated
D. Expansive Reality
Q2. Light Probes are useful for…
A. Adding indirect illumination to moving objects
B. Light-mapping non-UV objects
C. Unwrapping UV sets
D. Adding soft shadows on static objects
Q3. Emissive lighting can…
A. Break easily
B. Cast light from mesh surfaces via materials
C. Hide static objects
D. Customize the Object Inspector
Q4. The post-processing stack version 2 includes…
A. Terrain tools
B. Particle systems
C. Multiple effects in a single post-processing pipeline
Further reading
The following resources include more information on VR: