
To configure a generic rig you need to follow these steps:
- Import your animated asset into Unity the same way as in the Importing skeletal animations recipe.
- Select the asset and choose the Rig tab in the Inspector. Then select the Generic option in the Animation Tab drop-down menu. If you are using the provided example Unity Project, select the Generic.fbx file in the Chapter 01 Working with animationsRecipe 02 Configuring generic and humanoid rigsRigs directory.
- Choose the Create From This Model option from the Avatar Definition drop-down menu.
- Leave the Root Node option set to None.
- Leave the Optimize Game Objects option unchecked.
- Click on the Apply button to complete the configuration.
Humanoid rig configuration has a lot more options:
- First, import your skinned humanoid model to Unity the same way as in the Importing skeletal animations recipe.
- Select the asset and choose the Rig tab in the Inspector. Then select the Humanoid option in the Animation Tab drop-down menu. If you are using the provided example Unity Project, select the Humanoid.fbx file in the Chapter 01 Working with animationsRecipe 02 Configuring generic and humanoid rigsRigs directory.
- Choose the Create From This Model option from the Avatar Definition drop-down menu.
- Leave the Optimize Game Objects option unchecked.
- Click on the Apply button.
- You should see a Configure button with a tick icon near to it.

- The tick icon shows that Unity was able to automatically recognize the rig hierarchy as a humanoid. If Unity fails to recognize it, automatically a cross will be displayed instead of the tick. If you are using the provided example, you can observe it when you try to set the rig to Humanoid for the Generic.fbx file.
Some quadruped characters can be mistaken by Unity for humanoids. You can find a Quadruped.fbx file in the provided example Unity project. Theoretically, you can set its rig to Humanoid, and Unity will recognize it as valid. This, however, is a mistake—all quadruped characters' rigs should be set to Generic. Setting them as humanoids can cause problems later.
- Click on the Configure button to enter the Avatar Configuration Inspector. A new scene will be opened. You should be able to see your model in the scene and bone mapping section in the Inspector tab.

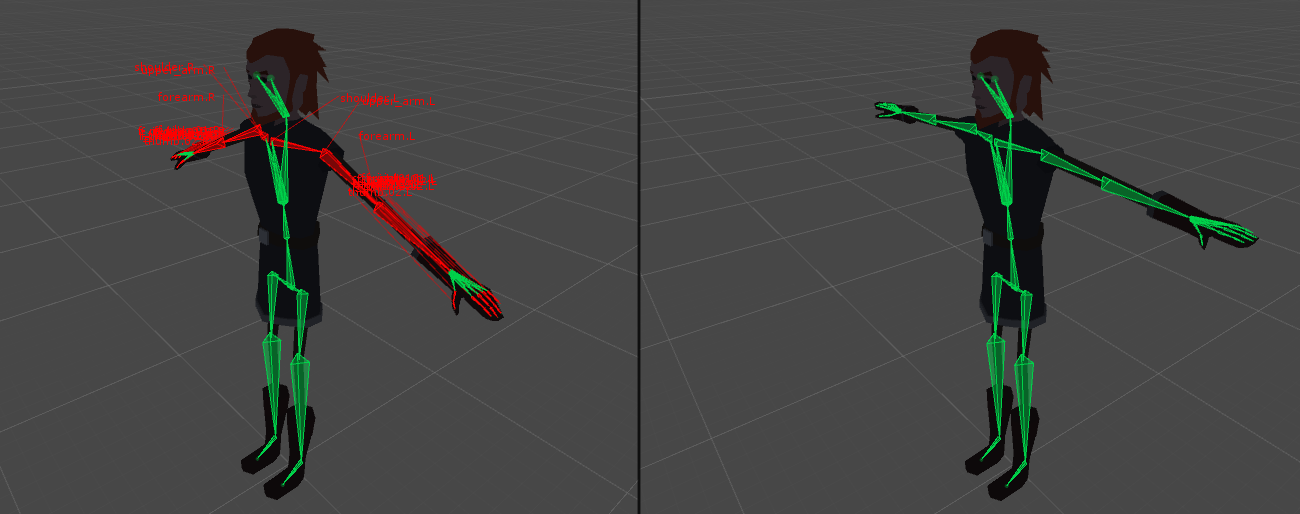
- Make sure you are in the Mapping section (1). All recognized and assigned bones are shown as green body parts on the displayed dummy character. If a required bone is missing or is not assigned, it will show up as red. You can navigate between the Body, Head, Left Hand, and Right Hand sections by clicking on a corresponding button (2). All bones are displayed in a list (3) for each section. Required bones are marked with circle icons and optional bones are marked with dotted circle icons.
- You can change the bone assignment by dragging a bone from the Hierarchy tab and dropping it onto a corresponding bone slot in the Inspector tab. Unity will occasionally miss a bone or two (especially fingers); thus, you should always check the bone assignment manually.
- If your character is not in a T-POSE (is modeled in an A-POSE for instance), a Character is not in T-POSE message will be displayed in the scene view and the character's bones will show up in red. Unity needs the character in a T-POSE for proper humanoid avatar configuration. You can enforce that pose by choosing the Pose |Enforce T-POSE option, found below the bones mapping list.
- Click on the Apply button and then the Done button to finish configuration.