
Chapter 3. Content Pipeline
Getting your existing scenes and content into UE4 is likely one of the first things you want to do after the Editor is running. It might also be your first major roadblock, especially if you’re looking to convert large, existing ray-traced visualization scenes over to UE4. By understanding what you need to do to prepare your content for UE4, you can save a huge amount of time by doing it the “Unreal way” the first time and get the quality and performance you and your clients expect from Unreal Engine 4.
Content Pipeline Overview
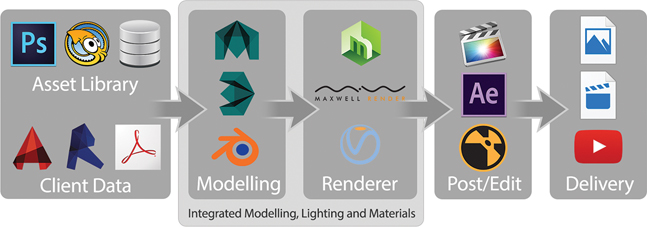
You’re probably used to working in a 3D application with an integrated modeler, material system, and renderer. After your data is in your 3D application, you can render your scene with a push of a button. You apply materials and lighting, create animations, and build your stories using the tools in your chosen 3D application. You might prepare textures and other data in external applications, but you do most of your day-to-day work in the 3D application of your choosing.
After your image or animation is rendered, you then load your image(s) into a post-editing application to add effects and titles, edit footage, and add audio. When it’s complete, a final version is rendered to a video or image file and shared with your audience or client (see Figure 3.1).
UE4 is a standalone application and doesn’t integrate directly into any 3D application. Instead, you use 2D and 3D applications to produce 3D models and textures that you must export to an exchange format (FBX, TGA, and so on) and import into UE4 (see Figure 3.2).
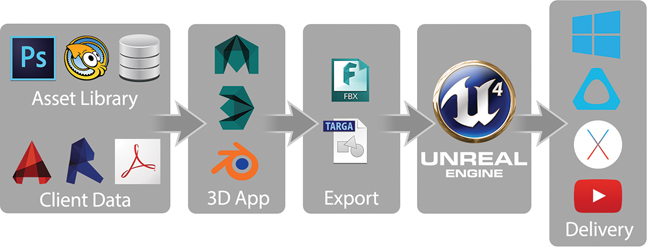
After import into UE4, you build your worlds within the UE4 Editor: adding lighting, materials, and interactivity. There is no Render button; the Viewport renders everything in real time, producing final-quality images including post-processing effects like motion blur, depth of field, and color grading.
To add interactivity, you use Blueprints, C++, and Unreal Motion Graphics (UMG) to create user interfaces and other onscreen titling. Sequencer allows you to create Hollywood-quality cinematics using a non-linear editor, physically based cameras, and camera rigs.
After the project is complete, you can deliver your application on any number of platforms: Mac, Windows, VR, mobile, and so on. You can also render high-quality stills and animations.
Content Preparation
Take extra care when preparing content for use in UE4. Proper naming conventions, Lightmap UV coordinates, collision, LODs, and more are required to ensure a smooth, fast workflow, high performance, and quality rendering. Because there’s so much more to do to prepare your scenes, automation and consistency are essential for keeping production nimble, keeping your project stable and performant, and keeping production costs down.
The UE4 workflow uses a lot more artist time than raytracing. Why? Remember those insanely fast render times (.016–.033 seconds per frame discussed in Chapter 1) One of the best ways of making things render faster is to do the processing work ahead of time and store it in various ways. Baking in lighting, recording details using normal maps, or even the lowly act of assigning UVW coordinates all free up processing resources.
The upside is that your downtime during the UE4 workflow is almost zero. Exporting, importing, and processing data in UE4 is very fast. The only processes that take extended periods of time are typically threaded and can run in parallel with the Editor, allowing you to continue working in-Editor while you bake lighting or compile the project to run on a different platform.
Note
Several of the most time-consuming and processor-intensive calculations can not only be done in parallel with the Editor, but can also be distributed over a network. You can easily use your existing workstations or render farm to provide massive boosts to Lightmass rendering, content cooking, compiling, and more.
You’ll also not be spending huge portions of your day waiting for renders. The Viewports in Max and Maya are notoriously terrible for conveying what the lit, rendered scene will look like, often failing to even show materials and textures properly. This forces you to render your scene to preview each of your changes, taking minutes, sometimes hours to get a good idea of how your final image will look.
UE4 is also fast at loading content. The Content Browser opens assets and previews them in real time, and the various editors open quickly even with complex content. Massive levels save and open in seconds, not minutes. The result is an interactive workflow that means you can do more in less time, and if you follow some simple guidelines, a lot of the work will be taken care of for you through automation and other magic.
3D Scene Setup
You should always conform your content to the standards and conventions presented by UE4. Most of these are technical in nature, many are stylistic, but all have good reasoning behind them.
You must start by organizing your source art files (your Max, Maya, and Photoshop files). Organization is the name of the game and taking the time now to get it right is important.
Changing names, scale, vertex count, pivot points, and so on are all very easy to do in Digital Content Creation (DCC) apps—just click, rename, move, and scale. These apps were made to modify Meshes and bitmaps and are good at it, and you’re probably good at using them to do that. Doing these things is much more involved (if they are even possible) after you have your content into UE4.
Units
Unreal Engine 4 uses centimeters as the default scene unit. Ideally, always set your applications to work in a 1 unit == 1 cm unit scale. However, for a lot of visualization, this is not as easy as it seems. We are often beholden to source data limitations or other workflow imperatives that prevent us from easily doing that conversion.
A few ways exist to alleviate this issue. The FBX exporter enables you to apply a scale to Meshes while exporting, and UE4 offers an import scale (and rotation) setting for Meshes. These options might or might not work depending on your content and isn’t recommended if you can help it. Instead, try to find a way to rescale your content prior to export.
Max also offers the option to set Display Units. This option does nothing to the data or scene. It is simply a conversion from the scene unit scale to the visual elements in the UI. This lets you keep your content in centimeters and continue to work with familiar units.
Statistics
Getting accurate statistics is essential for optimizing your content. The most important ones are Triangle and Vertex counts. Note that I said triangle not poly or faces or any other terminology. UE4 breaks down all geometry to triangles defined by vertices for rendering, so anything else is unimportant for our needs.
Backface Cull and Normals
Backface Cull is a rendering optimization where triangles aren’t rendered if they are facing away from the camera. This can also be known as two-sided or double-sided rendering.
Many 3D applications have two-sided rendering enabled by default, showing both sides of objects. This can give you an incorrect view of the geometry because UE4 culls back-facing triangles by default. You can set individual materials and material instances in UE4 to be two-sided, but it’s not an efficient fix and isn’t intended to fix bad content, but is a feature to render specific surfaces such as foliage.
You should turn off two-sided rendering in your 3D applications to ensure you are looking at the same model that you will see in UE4. Fix any face and vertex normal issues in your 3D application before exporting to UE4.
Preparing Geometry for UE4
Unreal Engine 4 refers to 3D Objects as either Static Meshes or Skeletal Meshes. A single Mesh can have Smoothing Groups, multiple materials, and vertex colors. Meshes can be rigid (Static Meshes) or deforming (Skeletal Meshes). You export each Mesh as an FBX file from your 3D application, and then import it into your UE4 Project.
Note
You will use Static Meshes exclusively in this book to build your scenes. Static Meshes, despite the name, are not incapable of moving or being moved in your applications. The “static” parts of a Static Mesh are the vertexes. Static Meshes cannot deform based on bones. That’s what a Skeletal Mesh is for.
Architecture and Prop Meshes
I think of my Static Mesh assets in two broad categories: Architecture and Props. Each follows similar rules but both have considerations that can make dealing with each much easier.
Architecture
Architecture Meshes are objects that are unique and are placed in a specific location, such as walls and floors, terrain, roads, and so on. Typically, only one copy of these objects is in your scene, and they need to be in a specific location.
You will usually keep a 1:1 relationship between the objects in your source art, your Content folder, and your UE4 Level. (For example, you’ll have one SM_Wall01 in each in the exact same place.)
You export these objects in place, import them, and place them into the scene at 0,0,0 (or another defined origin point). Keeping your UE4 content in sync with your scene using this method is easy because you can import or reimport Meshes or entire scenes without needing to reposition them.
Props
Prop Meshes are repeating or reusable Static Meshes that you place in or on your Architecture within your Level. An example is plates on a table. You could have a unique Static Mesh asset for each one in your scene or, because they are all exactly the same, you can reference a single asset and move it into position in the Viewport. The table would also be a Prop and could also be moved about easily.
Having multiple Props reference a single asset reduces memory overhead and makes updating and iterating on content easy.
Naming
Like all digital projects, developing and sticking to a solid naming convention for your projects is an important task for anybody developing with UE4. Projects end up with thousands of individual assets and they all have the extension of .uasset. Naming your objects in your 3D application is easy and fast—but this isn’t quite the case in UE4.
You will undoubtedly come up with your own standards and system to accommodate your specific data pipelines, but it helps to be on the same page as the rest of the Unreal Engine 4 community as you will likely use and share content with them.
Basics
Don’t use spaces or special/Unicode characters when naming anything (Meshes, files, variables, and so on). Sometimes you can get away with breaking these rules, but it makes things tough later when you encounter a system that won’t accept the space or special character.
UE4 Naming Convention
A basic naming scheme for Unreal content has been used over the last 15 years by Epic Games and developers using Unreal Engine. It follows the basic convention of
Prefix_AssetName_Suffix
If you looked through any of the content included with UE4, you have already seen this convention.
Note
The Engine and Editor do not enforce any rules upon naming conventions. You are free to name content whatever you like.
Prefix
The Prefix is a short one- or two-letter code that identifies the type of content the asset is. Common examples are M_ for Materials and SM_ for Static Meshes. You can see that it’s usually a simple acronym or abbreviation, but sometimes conflicts or tradition require others like SK_ for Skeletal Meshes. (A complete list is available on the companion website at www.TomShannon3D.com/unreal4Viz)
AssetName
BaseName describes the object in a simple, understandable manner. WoodFloor, Stone, Concrete, Asphalt, and Leather are all great examples.
Suffix
A few classes of assets have some subtle variations that are important to note in the name. The most common example is Texture assets. Although they all share the same T_ prefix, different kinds of textures are intended for specific uses in the Engine such as normal maps and roughness maps. Using a suffix helps describe these differences while keeping all the Texture objects grouped neatly.
Examples
You could find the examples shown in Table 3.1 in any common UE4 project.
Asset Name |
Note |
T_Flooring_OakBig_D |
Base Color (diffuse) Texture of big, oak flooring |
T_Flooring_OakBig_N |
Normal map Texture of big, oak flooring |
MI_Flooring_OakBig |
Material Instance using the big, oak flooring Textures |
M_Flooring_MasterMaterial |
The Material that the big, oak flooring Material Instance is parented to |
SM_Floor_1stFloor |
Static Mesh with the MI_Flooring_OakBig Material Instance is applied to |
There are dozens of content types and variations in UE4, each with a different possible naming scheme. You can go to www.TomShannon3D.com/UnrealForViz for a direct link to a community-driven list of all the suggested prefixes and suffixes.
Although this list is exhaustive, none of these naming rules are enforced in anyway. What’s most important is consistency. Develop a system and stick to it.
UV Mapping
UV mapping is a challenge for all 3D artists and even more so for visualization. Most visualization rendering can make do with some very poor UVW mapping, and sometimes none. UE4 simply cannot.
UVW coordinates are used for a litany of features and effects; from the obvious such as applying texturing to surfaces to the less obvious but equally important things such as Lightmap coordinates.
All of your 3D assets will need quality, consistent UVW coordinates. For simple geometry, this can be as easy as applying a UVW Map modifier to your geometry; more complicated geometry will be a more involved, manual process. Don’t fear; most of the time you can get good results easily. Just keep an eye on your UV coordinates when you are working with UE4. If you have rendering issues that are difficult to diagnose, check your UV coordinates.
Real-World Scale
Many 3D applications can use a real-world scale UV coordinate system, where the texture is scaled in the material, rather than the UV coordinates. Although this is completely possible to accomplish in UE4, it’s not the best option.
If your scenes are already mapped to real-world scale, you should scale your UV coordinates using a modifier (Scale UVW in Max) or manually scale the UV verticies in a UV Editor.
World-Projection Mapping
A common “cheat” for visualization is to use world-projected textures (textures projected along the XYZ world coordinates) to cover complex, static models quickly with tiling textures. This method doesn’t require well-authored UV coordinates for good results. UE4 has methods for doing this and I rely on them heavily in my own projects.
It’s important to note that if you are planning to use pre-calculated lighting with Lightmass, you still need to provide good, explicit Lightmap UV coordinates, even when using world-projection mapping. This is because the Lightmass stores the lighting information in texture maps that need unique UC space to render correctly.
Tiling Versus Unique Coordinates
Most visualizations make extensive use of tiling textures. In truth, the texture does not tile; rather the UV coordinates are set or being modified by the material to allow tiling. A tiled UVW coordinate set allows UV faces to overlap and for vertices to go outside the 0–1 UV space. By the nature of UV coordinates, going outside the 0–1 range results in tiling. Essentially, 0.2, 1.2, and 2.2 all sample the same pixel.
Unique UV coordinates are defined by having no coordinates outside 0–1 and each face occupies a unique area in the UV map space without overlaps. This is useful when you are “baking” information into the texture map, because each pixel can correspond to a specific location on the surface of the model (see Figure 3.3).
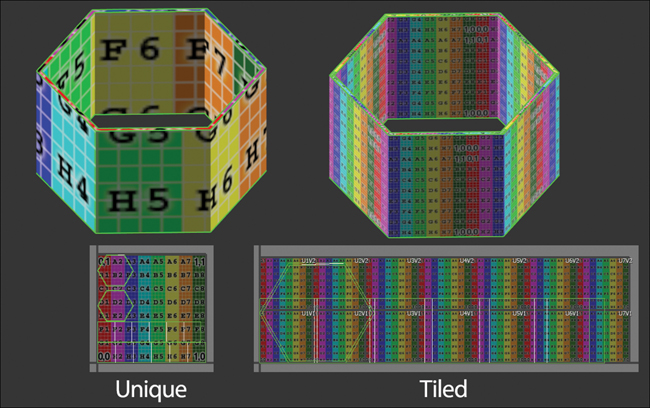
Common examples of baking data into textures are normal maps generated from high-polygon models using reprojection or, in UE4, using Lightmass to record lighting and Global Illumination (GI) information into texture maps called Lightmaps.
Multiple UV Channels
Unreal Engine 4 supports and even encourages and requires multiple UV channels to allow texture blending and other Engine-level features such as baked lighting with Lightmass.
3D applications can often have trouble visualizing multiple UV channels in the Viewport, and the workflow is typically clunky and often left unused in favor of using larger, more detailed textures. This isn’t an option; massive textures can consume huge amounts of VRAM and make scenes bog down.
Instead, make use of multiple UV channels and layered UV coordinates in your materials to add detail to large objects.
Note
UE4 uses a base 0 for UV coordinates. Many applications use a base 1. In other words, if your application (Max, I’m looking at you!) uses 1 for the base UV channel, UE4 will import that as coordinate index 0.
Lightmap Coordinates
Making Lightmap UV coordinates can seem like an onerous task. Have no fear: Lightmap coordinates are easy to author and are simply a second set of UV coordinates that enforce a few rules:
![]() If your project uses dynamic lighting exclusively, you probably don’t need to worry about Lightmapping coordinates at all!
If your project uses dynamic lighting exclusively, you probably don’t need to worry about Lightmapping coordinates at all!
![]() Coordinates need to be unique and not overlap or tile. If faces overlap, Lightmass can’t decide what face’s lighting information to record into the pixel, creating terrible-looking errors.
Coordinates need to be unique and not overlap or tile. If faces overlap, Lightmass can’t decide what face’s lighting information to record into the pixel, creating terrible-looking errors.
![]() A space must exist between UV charts (groups of attached faces in the UV Editor). This is called padding and ensures that pixels from one triangle don’t bleed into adjacent triangles.
A space must exist between UV charts (groups of attached faces in the UV Editor). This is called padding and ensures that pixels from one triangle don’t bleed into adjacent triangles.
![]() The last major rule is twofold: Avoid splitting your Lightmap UVs across smooth faces because this can cause an unsightly seam and split your coordinates along Smoothing Group boundaries to avoid light bleeding across Smoothing Groups.
The last major rule is twofold: Avoid splitting your Lightmap UVs across smooth faces because this can cause an unsightly seam and split your coordinates along Smoothing Group boundaries to avoid light bleeding across Smoothing Groups.
Note
Sometimes, you will have no choice but to place a UV seam on a smooth face. Do your best to author it facing away from where the viewer will most likely be (the back or the bottom of the object are common choices).
Auto Generate Lightmap UVs
The Auto Generate Lightmap UVs import option is one of the biggest timesavers for preparing models for lighting with Lightmass. I can’t recommend it enough. It generates high-quality Lightmap coordinates quickly on import (or after) and is artist-tweakable for optimal results (see Figure 3.4).
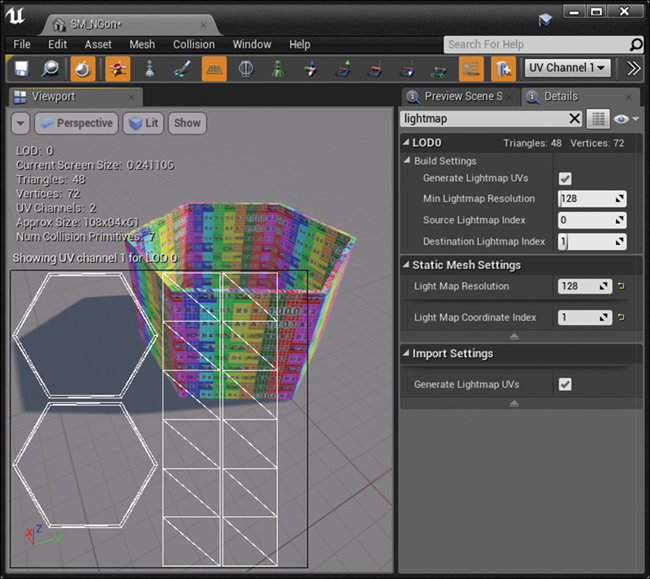
Figure 3.4 Autogenerated UV coordinates with Lightmap UV coordinates overlaid (note the efficiency versus Figure 3.2)
In a broad sense, the Auto Generate Lightmap UVs system is simply a repack and normalization operation that takes a source channel and packs the existing UV charts into the 0–1 UV space as efficiently as possible. It also adds the correct amount of pixel padding between the charts based on the intended Lightmap resolution as set by the Source Lightmap Index. (Lower resolution Lightmaps have larger pixels requiring larger spaces between charts; higher resolution inversely has smaller pixels requiring smaller spaces.)
This only requires that the coordinates in your base UV channel follow the rules about being split along Smoothing Groups and don’t have stretching. They can be any scale, be overlapped, and more, if they are cleanly mapped to begin with.
Tip
You can often Lightmap geometry easily by applying a simple box mapping or using UV tools within your application to perform quick-and-dirty mapping to the object(s) before export (splitting by Smoothing Groups or by face angle, for example). Combined with world-projection mapping, your UV mapping workflow can be fast and easily automated.
Level of Detail (LOD)
UE4 has fantastic LOD support. LOD is the process of switching out 3D models with lower-detail versions as they recede into the distance and become smaller on-screen.
If you are developing content for mobile or VR, LOD and model optimization are incredibly important. Even if you’re running on high-end hardware, consider creating LOD models for your high-polygon props. For Meshes like vehicles, people, trees, and other vegetation that are used hundreds of times each in a large scene, having efficient LOD models will mean you can keep more assets on-screen, creating a more detailed simulation.
UE4 fully supports LOD chains from applications that support exporting these to FBX. That means you can author your LODs in your favorite 3D package and import them all at once into UE4. You can also manually import LODs by exporting several FBX files and importing them from the Editor.
Automatic LOD Creation
UE4 supports creating LODs directly in the Editor. Much like Lightmap generation, these LODs are specifically created by and for UE4 and can produce great-looking LODs with almost no artist intervention needed.
To generate LOD Meshes in the Editor, simply assign an LOD Group in either the Static Mesh Editor or by assigning an LOD Group at import. I recommend taking a look at it for your higher-density Meshes, especially if you are targeting mobile or VR platforms.
Several third-party plugins, such as Simplygon (https://www.simplygon.com) and InstaLOD (http://www.instalod.io/), can further automate the entire LOD generation process and have more powerful reduction abilities than UE4’s built-in solution.
If you regularly deal with heavily tessellated Meshes, I recommend considering integrating these plugins into your UE4 pipeline, because they are far more robust than the optimization systems in most 3D applications, and the time saved using automatic LOD generation can be significant, not to mention the obvious performance benefits of reducing the total number of vertices being transformed and rendered each frame.
Collision
Collision is a complex subject in UE4. Interactive actors collide and simulate physics using a combination of per-polygon and low-resolution proxy geometry (for speed) and various settings to determine what they collide with and what they can pass through (for example, a rocket being blocked by a shield your character can pass through).
Fortunately, because most visualization does not require complex physics interactions between warring factions, you can use a simplified approach to collision preparation.
Architecture Mesh Collision
For large, unique architecture you can simply use per-polygon (complex) collision. Walls, floors, roads, terrains, sidewalks, and so on can use this easily without incurring a huge performance penalty. Keep in mind that the denser the Mesh the more expensive this operation is, so use good judgment, and break apart larger Meshes to avoid performance issues.
Prop Mesh Collision
For smaller or more detailed Meshes, per-polygon collision is too memory and performance intensive. You should instead use a low-resolution Collision Proxy Mesh or Simple collision.
You might opt to generate your own, low-polygon proxy Collision Meshes1 in a 3D package, or in the UE4 Editor using manually placed primitives (boxes, spheres, capsules). You should also take a look at the automatic collision generation options the Editor provides.
Convex Decomposition (Auto Convex Collision)
UE4 also offers a great automatic collision generation system in the Editor called Convex Decomposition. This feature uses a fancy voxelization system that breaks down polygon objects into 3D grids to create good quality collision primitives. It even works on complicated Meshes, and I highly recommend it for reducing the polygon count on your props.
Do not confuse convex decomposition with the option to automatically generate collision during the import process. That system is a legacy system from UE3 and is unusable for most visualization purposes because it doesn’t handle large, irregular, or elongated shapes well.
Convex Decomposition is not enabled on import because it can be very slow for large Meshes or Meshes with lots of triangles. For these, you should author a traditional collision shell in your 3D application and import it with your model.
You can find more information about generating collisions in the official documentation and at www.TomShannon3d.com/UnrealForViz.
Pivot Point
UE4 imports pivots differently than you expect. UE4 lets you choose between two options for your pivot points on import via the Transform Vertex to Absolute option in the Static Mesh importer. You can either have the pivot set where it is in your 3D application (by setting Transform Vertex to Absolute to false) or you can force the pivot point to be imported at the scene’s 0,0,0 origin, ignoring the defined pivot point completely (by setting Transform Vertex to Absolute to true).
You might wonder why in the world you would want to override your object’s pivot point, but doing can be a huge time saver. By using a common pivot point, you can place all Architecture Meshes in your scene easily and reliably by putting them into the Level and setting the position to 0,0,0; they will all line up perfectly.
This works because you don’t typically move your Architecture Meshes around, so where they rotate and scale from is irrelevant. What’s important is their accurate position in 3D space.
Prop Meshes are the opposite. As you place props in your scenes, the pivot point is essential for moving, rotating, and scaling them into place.
To get the pivot point in UE4 to match your 3D application, you have a couple options. You can model all your props at 0,0,0, or move them each as you export. Newer versions of UE4 (4.13 and up) allow you to override the default import behavior and use the Meshes’ authored pivot point as well. This is usually the best bet to ensure your pivot points match.
FBX Mesh Pipeline
After preparing your geometry assets, you need to export them to FBX. This format has a long, history that eventually led to its being one of the most common interchange formats available for 3D data.
UE4 uses FBX extensively for both Mesh and animation data so knowing what Unreal Engine 4 expects from your exported geometry is important.
Export Settings
Be sure to select Smoothing Groups and Tangents and Binormals and to Triangulate your Mesh in your export options, if available (see Figure 3.5). These options ensure that your Mesh is triangulated and shaded exactly the same way in both your 3D package and UE4.
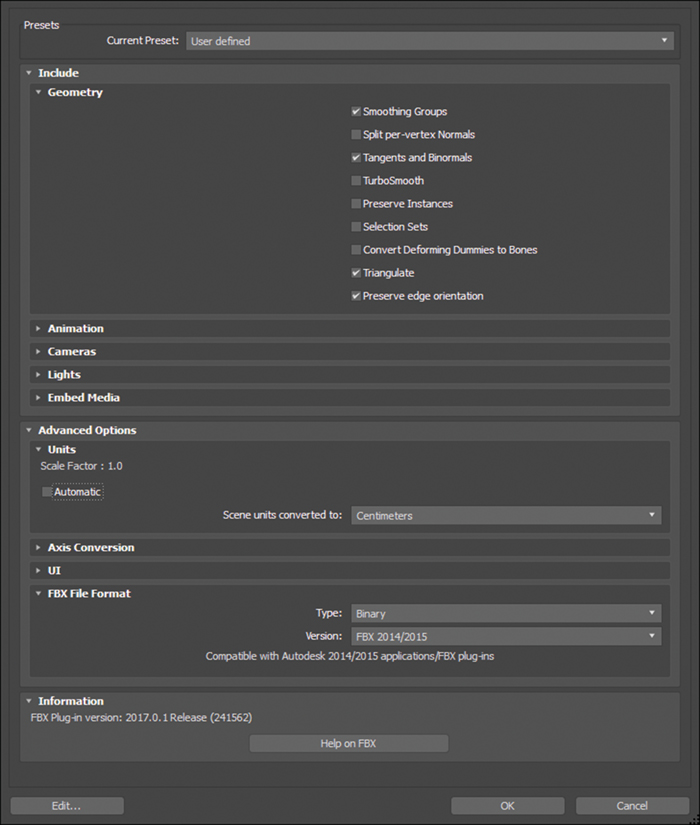
If your scene is in a scale other than centimeters, you can easily rescale all of your assets as you export by explicitly setting Scene units to converted to: to Centimeters.
Exporting Multiple Meshes
You can employ several workflows to export multiple Meshes. Each has drawbacks and advantages.
Single FBX File
You can include multiple Meshes in a single FBX file. When you import into UE4, you are offered an option to combine those Meshes into a single Mesh or to import those Meshes as individual Meshes.
I’m not a huge fan of this method. Several issues can make this workflow clunky and sometimes unstable.
A common issue is that you need to export the exact same set of Meshes each time you update any single one. This task is very hard to maintain, and failing to so can cause crashes and other issues.
Scene Import
Later versions of UE4 have additional workflows to help alleviate the aforementioned issue. Scene Import takes a single FBX file, imports all the Meshes, and places them into a Level. This promising feature can also import cameras, lights, and animation; however, it needs to mature some to become a solid workflow.
Keep an eye on this feature as the engine improves over time. Try to apply it to your data. It could make exchanging data between your 3D application and UE4 much easier.
Multiple FBX Files
Exporting multiple FBX files is my favorite option. Although most 3D applications don’t natively support exporting in this manner, several scripts and tools are available that enable you to batch the export process. You can find a selection of these scripts at www.TomShannon3D.com/UnrealForViz.
UE4 can quickly import entire folder structures of FBX files. With this workflow, if you need to update a single asset or a group of assets, you can easily and reliably replace their FBX files and reimport into UE4. This fine-grained approach gives you a great deal of control, and it is the least risky and least technically complicated of the options.
Reimporting
An easy iterative workflow is to simply overwrite your existing, exported FBX with the updated geometry. This allows you to select the file in the Content Browser and reimport it, updating the asset in UE4.
Auto Reimport
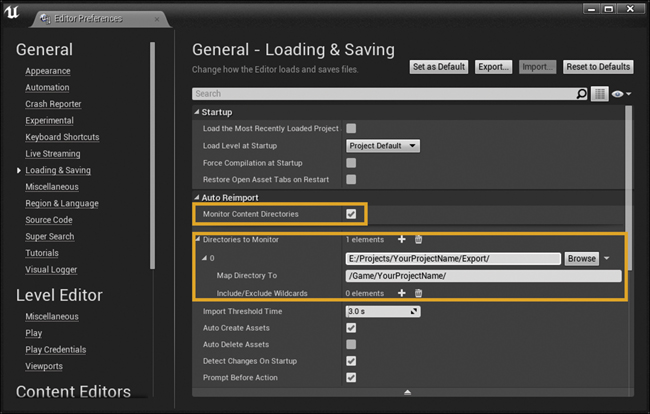
I frequently use the auto reimport feature in UE4. It enables you to define a directory and, any time you update or create a new, importable file, the Editor detects the change and automatically updates existing assets or imports and creates new ones.
To enable this feature, open Editor Preferences, and define a folder to watch and a corresponding folder in your Content folder (see Figure 3.6).
Note
By default, the Auto Import feature is enabled for the Content folder. Although this is easy to understand and use, I don’t recommend putting your source files here. Never modify the Content folder outside the Editor—UE4 does not like this and it can cause project corruption.
Where to Put Your FBX Files
Typically, you do not need to maintain your exported FBX files, and can be considered temporary. You can save them wherever is most convenient for you. Being consistent is important so you can use reimporting features.
Texture and Material Workflow
Just like any time you move from one rendering software to another, you must face the requirement to re-author your materials to take advantage of the new renderer’s features, and UE4 is no different.
UE4 allows you to import materials with your Meshes, but the options for import are limited and require your source Materials to be authored in a very specific manner.
This is not to say that importing materials into UE4 is not worth your time—it can be a huge time saver for prototyping and assigning well-authored UE4 Materials. Don’t spend too much time working on your materials in your 3D application, however. A simple diffuse map or color will suffice (and is about all that will come in!).
Textures
UE4 imposes some strict rules and limits on textures. Some rules are strictly enforced and cause textures to fail to import; others might simply degrade quality or performance in your project.
Most of the rules are technical limitations imposed upon Unreal Engine 4 by the hardware and software UE4 runs on. The Graphical Processing Units (GPU) on graphics cards are specific about how textures are stored, accessed, and rendered, and UE4 is beholden to these limitations.
Supported Formats
UE4 supports a range of image formats:
![]() .bmp
.bmp
![]() .float
.float
![]() .pcx
.pcx
![]() .png
.png
![]() .psd
.psd
![]() .tga
.tga
![]() .jpg
.jpg
![]() .exr
.exr
![]() .dds
.dds
![]() .hdr
.hdr
The most commonly used are BMP, TGA, and PNG.
TGA files are the game-industry standard for 8-bit images. This is due to the explicit control artists have over the content of the image on a per-channel basis. UE4 accepts 24-bit (RGB) and 32-bit (RGBA) TGA files.2
PNG files are most widely used for UI elements because they use a pre-multiplied alpha that lets them blend properly. This alpha, however, isn’t typically suitable for other textures.
I recommend using TGA or BMP for all textures being used in materials.
Mip-Maps
Mip-Maps are reduced resolution versions of textures that are pre-calculated and stored as part of the texture. These allow the GPU to use the smaller texture sizes as objects get farther away from the camera. This avoids aliasing and can help performance.
Resolution
All textures should be scaled to a power-of-two resolution, such as 64, 128, 256, 512, 1024, and so on. With a maximum dimension of 8192 x 8192, higher resolution textures require source code modification and might not be supported on all video cards.
Textures can be non-square, but should still be a power of two on each dimension; for example, 128 x 1024 is fine.
You can import textures that are non-power of two, but they will not produce Mip-Maps, which introduces various visual artifacts in the project. You should almost always take the time to scale your textures to an appropriate size before importing.
Alpha Channels
You can include alpha channels in many of the formats; however, be aware that alpha channels double the memory footprint of your texture, so include them only if they are being used.
Another option is to include an alpha channel as a separate texture. This can help when you need to share alpha info between different textures or want to have a lower resolution alpha map than the other channels.
Compression
UE4 uses hardware-level texture compression. In most cases, this is a DDS format with some significant block compression artifacts, so having quality source images is very important (that is, avoid using compressed source images).
You can override compression on a per-texture basis, but you should only do this as required. Uncompressed textures can be up to eight times the size in memory.
Multiple Materials
UE4 fully supports multiple materials on a single Mesh. In your 3D application simply assign materials to your individual faces and use the usual FBX workflow. The only caveat is that each material increases the rendering overhead for that Actor. For actors that are used infrequently, such as architecture or buildings, this is fine. Author assets that get used liberally in scenes (vehicles, vegetation, props, and so on) to have as few materials as possible because not doing so will quickly present a performance issue in your project.
Importing to the Content Library
Importing content is a much less technical and involved process than preparing and exporting your assets. A few options are of particular interest if you’re working with visualization data.
Initiating Imports
You have a few simple ways to initiate an import:
![]() Drag-and-drop assets from your file browser into the Content Browser. You can drag multiple files, even entire directories into the Content Browser to import.
Drag-and-drop assets from your file browser into the Content Browser. You can drag multiple files, even entire directories into the Content Browser to import.
![]() Right-click in the Content Browser and select Import.
Right-click in the Content Browser and select Import.
![]() Use the prominent Import button in the Content Browser.
Use the prominent Import button in the Content Browser.
![]() Auto import assets by defining a folder to watch and a destination directory in your project.
Auto import assets by defining a folder to watch and a destination directory in your project.
Depending on what type of file you are importing, UE4 presents you with a different set of import options.
Mesh Import Options
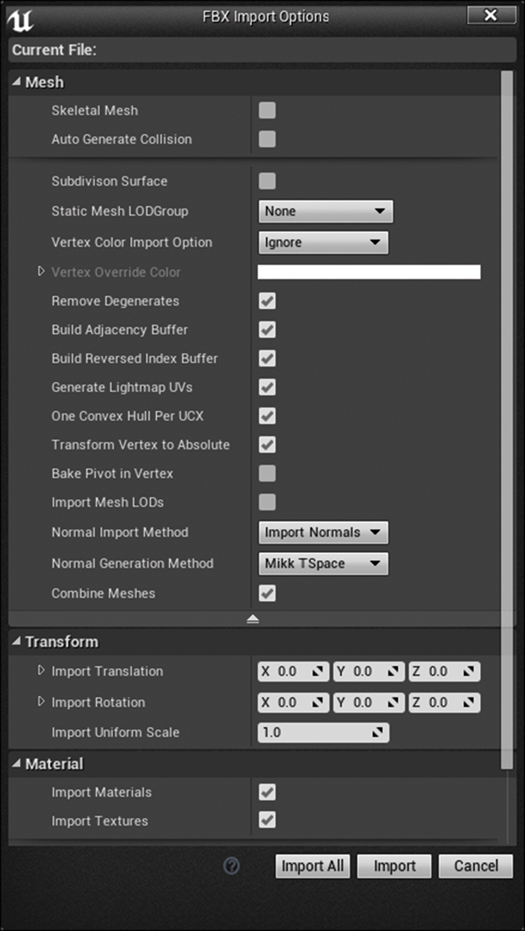
The options you choose will vary slightly depending on your specific needs, but the following will serve you well most of the time (see Figure 3.7).
Auto Generate Collision
I do not recommend using the Auto Generate Collision option for most Meshes. This is a legacy system and produces bad results for content that isn’t specifically authored for it.
You should make your own collision (either in your 3D application or in the Editor by placing Primitives), rely on per-polygon collision (slow on high-poly Meshes), or use the Convex Decomposition Collision generation in the Editor.
Generate Lightmap UVs
I recommend using the Generate Lightmap UVs option and forgoing creating your own Lightmap channel. Rather, you should focus on making your base UV channel clean and allowing the Editor to work its magic on your content.
Import Materials and Textures
Usually, I leave Import Materials and Textures on because having a head start on creating and assigning materials and getting the various textures that have been applied to be imported is very convenient and offers a good starting point for building and assigning materials later.
If you’re not careful, however, this option can cause a huge mess. To avoid this, you should ensure your materials are well-assigned in your 3D application before exporting. You can also use the Material Instance assignment system to create Material Instances rather than Materials. This is fantastic for those with established UE4 workflows and Material systems, but can be too complex for beginners.
Transform Vertex to Absolute
When the Transform Vertex to Absolute option is true, UE4 will replace the authored pivot point with one at the scene’s 0,0,0. If false, the Mesh will use the authored pivot point. As mentioned in the earlier section “Preparing Geometry for UE4,” this setting can be a huge time saver for placing and maintaining your Architecture Meshes.
Texture Options
When you import textures, you aren’t presented with import options; however, you should ensure that your textures have the proper flags set. This can have a dramatic effect on the performance and visual fidelity of your projects.
After importing, open the Texture Editor by double-clicking a Texture asset in the Content Browser. The following settings are of the most importance:
![]() Texture Group: Most of your textures can simply be left in the World Group. Normal Maps, HDR Images, UI Images, and other specialty textures like LUTs and vector maps should be set to their appropriate groups. This sets many internal flags to ensure these textures are read and display correctly.
Texture Group: Most of your textures can simply be left in the World Group. Normal Maps, HDR Images, UI Images, and other specialty textures like LUTs and vector maps should be set to their appropriate groups. This sets many internal flags to ensure these textures are read and display correctly.
![]() Compression Settings: Setting the Texture Group will often correctly set the Compression Settings; often it won’t. Most textures use the Default setting. Normal maps should always use the normal map setting. UI textures should be set to the User Interface setting to allow proper alpha blending and scaling.
Compression Settings: Setting the Texture Group will often correctly set the Compression Settings; often it won’t. Most textures use the Default setting. Normal maps should always use the normal map setting. UI textures should be set to the User Interface setting to allow proper alpha blending and scaling.
![]() sRGB: The sRGB flag should be true for almost all textures that contain color information. This tells the rendering engine to gamma adjust this texture to display accurately in the scene (UE4 uses a linear rendering pipeline and requires textures to be gamma corrected to match the linear colorspace). Textures used as masks or other “data” maps like normal maps and vector maps should be set to false to ensure the data is read accurately without having a gamma curve applied to it.
sRGB: The sRGB flag should be true for almost all textures that contain color information. This tells the rendering engine to gamma adjust this texture to display accurately in the scene (UE4 uses a linear rendering pipeline and requires textures to be gamma corrected to match the linear colorspace). Textures used as masks or other “data” maps like normal maps and vector maps should be set to false to ensure the data is read accurately without having a gamma curve applied to it.
Camera Workflow
You are an expert at creating amazing visualization animations with sweeping, smooth camera animations highlighting each aspect of the project. You have spent years honing your craft and have developed tools and techniques that set you apart from the competition.
UE4 offers an amazing cinematics and animation system with Sequencer, but learning an entirely new system can be daunting and unnecessary. UE4 offers a robust suite of tools to import and export cameras to and from your application and the Editor, allowing you to iterate easily using familiar tools.
Simply select your Camera object in your 3D application and export it as an FBX. You might need to bake out the animation if your camera is attached to a spline or uses any other non-standard transforms (being attached to other objects, using Look-at controllers or modifiers, or being part of a rig, for example).
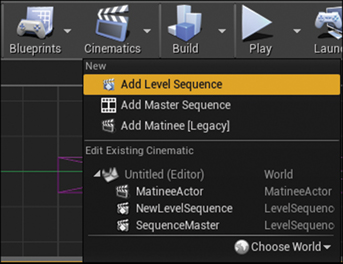
In UE4, create a new Level sequence by clicking the Cinematic button of the Editor toolbar and selecting Add Level Sequence and select a location to save the Sequence asset (see Figure 3.8).
After the new sequence opens in Sequencer, right-click the dynamically spawned Camera Actor in the Sequencer window and select Import.
Your animation is brought in and applied to the camera. I have experienced some inconsistencies with camera types other than the application defaults such as rotated pivot points or incorrect positioning. You might have to rework your cameras or convert them to standard types to fully utilize this feature.
You can also export the camera’s animation from Sequencer back to an FBX file and import into your 3D application or even a post-editing suite like Nuke to complete a shot rendered in UE4.
Summary
Preparing your content for exporting and importing into UE4 is the largest hurdle many will face. However, spending the time to prepare your content for UE4 will pay big dividends as you reconstruct your data in the UE4 Editor. Even massive datasets can be smoothly brought into UE4 and into your scenes when you set yourself up for success.
1. Low-polygon primitives exported with your Meshes that follow a specific naming convention. For more information, see the Static Mesh documentation at https://docs.unrealengine.com/latest/INT/Engine/Content/FBX/StaticMeshes/index.html#collision.
2. Image formats can be confusing. A 32-bit TGA file consists of four 8-bit channels (RGBA), rather than a 32-bit image format like HDR or EXR that represents 32 bits per channel.