
Chapter 4. Lighting and Rendering
One of the most compelling features of UE4 is the amazing visual quality it can achieve. By leveraging physically based rendering (PBR), UE4 achieves staggering realism. Surfaces react to light and shadow in amazingly realistic ways. The Material Editor uses a visual graphing system that empowers you to bring complex, dynamic, physically based Materials to life while Material Instances and Functions let you reuse your Materials and modify them in real time. You might never want to go back to your old renderer again.
Understanding Unreal Engine’s Physically Based Rendering (PBR)
In the last decade, computer graphics have seen a renaissance of quality and fidelity. This is in large part due to the development of physically based rendering (PBR). PBR replaces traditional Phong/Blinn specular shading with a more accurate representation of how actual surfaces react to light based on surface parameters such as roughness (see Figure 4.1).
Unreal Engine 4’s renderer takes the PBR technology created for Hollywood blockbusters and presents a powerful, artist-friendly, easy-to-learn material and lighting system, combining physically based materials, lights, and reflections as a unified system to create nearly ray-traced quality images in real time.
Those who have been using physically based renderers such as Maxwell should be able to grasp the concepts in UE4s renderer very quickly. To others, this change is a bit confusing at first, but after you see how good the materials and lighting look, how straightforward they are to set up, and how remarkably well they hold up in almost all lighting conditions, you’ll have a hard time going back to your old, specular-based materials.
Base Color
The Base Color simply defines the color of the material with all the shadows and highlights taken out (UE4 assumes it will fill in that lighting information).
These values are almost never fully black or fully white. Charcoal and Fresh Asphalt are around .02 (on a scale of intensity from 0 to 1), whereas Fresh Snow should be around .81, with Fresh Concrete and Sand somewhere in the middle at .51 and .36, respectively.
Roughness
UE4 almost completely abandons the Specular channel. Although you can still access the specular value, its use is only for special cases where the PBR system doesn’t quite hold up.
Instead, you use a single, grayscale or float value to determine both the brightness and tightness of the specular reflections: Roughness (see Figure 4.2). You can drive the Roughness either through a single value or by using a texture. In Figure 4.2, note that only the Roughness values have been modified. Notice how the specular highlights and reflections are both blurred as roughness increases.
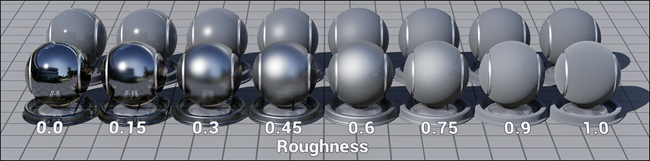
In the real world, the rougher a surface is, the more diffuse or blurred the reflected light is. This is because of microscopic imperfections on the surface. These imperfections scatter the light that hits them whereas smooth surfaces without these imperfections don’t scatter the reflections, resulting in a sharp, mirror-like reflection.
Note
You might be tempted to reduce a material’s specular value to remove highlights, but don’t! Make your material rougher instead.
Metallic
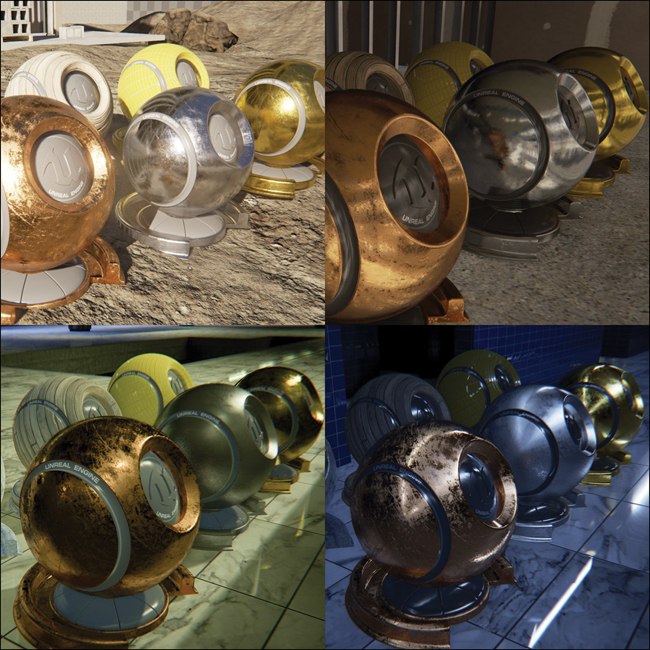
The Metallic input sets how much like metal your material is (see Figure 4.3). This is a grayscale or scalar1 input (0.0–1.0); however, almost all surfaces will either be at or near 0 or at or near 1. Only a few cases ever have a Metallic value that’s between 0 and 1; for example, cases such as lightly dirtied metal, fancy pottery glazes, and so on, or when you are using a mask to define areas that are metallic or not.

Getting the Most from PBR
PBR requires good input data. Tons of resources are now available for downloading very good-quality PBR textures complete with Roughness, Normal, and other PBR maps.
Tools such as Substance Bitmap 2 Material (B2M) can help you prepare your existing Diffuse textures for PBR rendering.
You can also generate these maps manually in Photoshop or other image-editing software, but tools such as Substance, Quixel Suite, or Substance B2M can generate far better-looking map sets much faster.
These tools use image processing techniques to generate Normal, Roughness, and Base Color maps by analyzing the shapes and lighting in the source images.
Put Detail into Roughness
A Roughness Texture map is your key to the best PBR materials possible. Look around. The variations in roughness tell you everything you need to know about a surface and everything has some variation. This is where the scratches and dirt and blemishes of your materials should live.
Keep Base Color Maps Simple
Keep your Base Color map simple. It should contain no lighting or shadow information, only the color information. Let the renderer fill in the shading and lighting.
Lights in UE4
Lighting in Unreal Engine 4 is a lot like lighting in any other 3D package. You place spot, directional, sky, and point lights, and control brightness, falloff, and color. How they differ is in the strict limitations placed on you by UE4 to balance quality and features with performance.
Note
UE4 does not have a built-in dynamic GI lighting solution. The ONLY production-ready global illumination system in UE4 is Lightmass, which relies on pre-calculated light and shadow maps and is calculated offline in the Editor.
Light Propagation Volumes
UE4 does offer limited real-time GI in the form of Light Propagation Volumes, an experimental feature that you can enable through the project’s settings. As it’s experimental, it’s not exactly production ready and lacks support, but many have used it to stunning effect.
NVIDIA VXGI
NVIDIA also offers a GI solution for UE4 called VXGI. This requires you to download and build a custom build of the engine as modified by NVIDIA, which is outside the scope of this book. This solution can provide very high-quality results, but is not directly supported by Epic Games.
Lighting in a ray-tracing engine is slow, but typically very dynamic. You can easily move sunlight around, modulating the color to simulate a sun setting. Flawless GI fills each nook, corner, and crevice with rich light and shadow. The price you pay is time. Even a simple scene with a few basic primitives takes several seconds to render. Most real-world scenes take minutes to hours. To achieve real-time frame rates, we only have a fraction of a second to render the frame.
By restricting what lights can and can’t do, massive performance benefits have been realized. These restrictions can be difficult to cope with at first, but by knowing what to expect and what you can and can’t do, you can avoid some costly blunders.
Understanding Light Mobility
Each Light and Mesh Actor you place into your Level has a Mobility parameter. The three mobility modes of lights in UE4 are Moveable, Stationary, and Static. Each state has specific capabilities and limitations that you must carefully consider when lighting your scenes.
Moveable Lights
As its name implies, if you want a Light or Mesh you can move, you’ll want a moveable one. Use Moveable Lights cautiously. Although UE4 can render hundreds of unshadowed, Moveable Lights at a time, they are one of the most performance-intensive effects to render in UE4, especially if they are casting shadows.
Shadows
Moveable Lights can directly light and cast shadows onto and from Moveable and Static Meshes. This is hugely important. If your scene geometry needs to be dynamic—for instance, with lots of moving people or cars or moving or changing scene geometry—you will need to rely on Moveable Lights.
Shadowing is expensive2 for Dynamic Lights, so use it sparingly. The larger a light’s radius, the more expensive it is to render and the more Actors it will need to generate shadows for.
Dynamic shadows are low resolution and are generally very crisp edged. You cannot easily get soft attenuated shadow edges as you would with pre-calculated static shadows (see Figure 4.4).

Figure 4.4 Moveable Light Shadows on both Moveable and Static Objects with a dynamic shadow (also with no GI contribution)
Global Illumination
Lights that move do not contribute to global illumination (GI). Some third-party plugins and integrations can achieve this, but the use and integration of those is beyond the scope of this book.
Specular Reflections
Moveable Lights contribute direct specular reflections onto surfaces. This gives them a nice-looking highlight on PBR surfaces and can help your materials really pop.
Stationary Lights
The middle child of the UE4 lighting family, Stationary Lights use both the Static and Dynamic lighting paths together to create a light that cannot move, but that can cast dynamic shadows and modulate their color and intensity at runtime. They can contribute to GI, but changing the intensity of the light only affects the direct lighting term, not the static GI lighting stored in Lightmaps.
Stationary Lights are useful for statically lit scenes because they can add detail and allow dynamic Actors to cast dynamic shadows; however, you must use them carefully to avoid causing some severe performance penalties.
Shadows
Shadows from and on Static Meshes are baked into Shadow maps by Lightmass, but the direct lighting and shadows from and on Moveable objects is calculated dynamically (see Figure 4.5).

Figure 4.5 Stationary Light shadowing the Static Mesh on the left with a static Shadow map, and dynamic shadows shadowing the Dynamic Mesh on the right
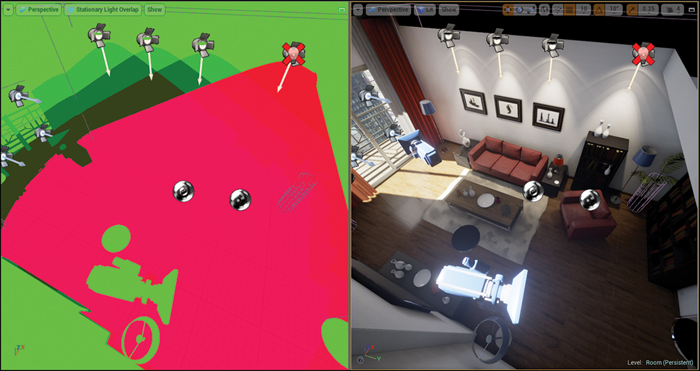
Although Stationary Lights can provide the best of both worlds, there is a serious limitation to this magic. Each statically lit Mesh can only be influenced by four Stationary Lights at a time.
If more than four Stationary Lights affect a single Mesh, additional Stationary Lights will revert to Moveable Lights with dynamic shadows and have an extreme performance penalty.
To help avoid this situation, UE4 alerts you with both descriptive icons in the Editor Viewport and warnings when you build your lighting.
You can preview stationary Lightmap Overlaps by choosing the appropriate view mode in the Editor. In Figure 4.6, the four Spot Light Actors are all set to Stationary as is the Directional Light sunlight coming in from the window. The additional Spot Light cannot be rendered as a Stationary Light and will instead be rendered as more expensive Moveable Light.
Global Illumination
Stationary Lights can contribute to GI, but if you change the color or intensity of the Light, the GI will not change with it. You can control the amount of GI using the GI Contribution value in the Light Actor’s properties.
Specular and Reflections
Because the Stationary Lights direct lighting component is rendered dynamically, it can contribute a specular highlight to surfaces like a Moveable Light does.
Tip
Stationary Lights make the perfect sunlight in your statically lit visualizations.
Static Lights
Static Lights, as the name suggests, are completely static. They cannot move or change in real time at all. All of their lighting and shadow information is baked into textures. Static Lights are used exclusively by the Lightmass GI system.
Note
Static Lights are used extensively in architectural visualization, where lighting quality is more important than flexibility. You can have a basically unlimited number of Static Lights in your scenes because the static lighting path has a fixed rendering cost after Lightmass has baked the lighting information into Lightmaps.
Shadows
Static Lights use Lightmass to render Lightmaps, textures that contain lighting and shadowing information. Because of this, Static Lights cannot directly light or shadow dynamic objects (see Figure 4.7).

Figure 4.7 Static Light Shadowing a Static Mesh with a baked Lightmap (left); no shadow on the Dynamic Mesh on the right
You can adjust the softness of Static shadows by changing the Light Source Radius property of the Light Actor. You won’t see the effect until you render the lighting in Lightmass.
Global Illumination
You also won’t see any GI effects until you build your lighting with Lightmass. Static Lights also store their direct illumination and their GI information in Lightmaps.
Specular and Reflections
Static Lights do not cast specular highlights. They are, however, very well-supported by the Reflection Capture system that uses pre-captured HDR cube maps to apply specular reflections to the PBR materials.
Real-Time Reflections
Reflections have long been one of the most sought after and difficult to achieve visual effects for real-time graphics. Hundreds of techniques and tricks have been used to try to mimic the look and quality of ray-traced reflections.
Reflections are essential for a PBR system to function. Without scene reflections, materials lose depth and are forced to rely on direct specular highlights to show surface information. This leads to the plastic, shiny look we’ve all come to associate with computer graphics.
Reflections are something that ray-tracing is great at, but incredibly slow at, especially when you start blurring those reflections. How does UE4 manage it? Mostly by faking it.
The two main reflections in a UE4 scene are static cube maps generated by Reflection Capture Actors and a screen-space reflection Post Process Effect. Both are automatically applied to materials and modulated appropriately. This helps with authoring materials and lighting scenes because you won’t have to customize materials specifically for scenes as you might have had to do with previous game engines or other renderers.
Reflection Probes
UE4 uses reflection probes, called Reflection Capture Actors, manually placed around the scene to create most surface reflections. These probes take a high dynamic range (HDR) cube map of their surroundings and apply it to any material that enters their radius.
They also contribute to ambient lighting on both Dynamic and Static Meshes, making them essential for high-quality lighting.
Reflection Capture Actors cannot be updated in any way at runtime.
Post Process Reflections
Screen Space Reflection (SSR) is an amazing post-process technique that uses the G-Buffer information to reconstruct reflections from the already rendered, 2D scene. This has some serious limitations such as causing dithering noise and the inability to display information that is off-screen, but it does provide sharp, dynamic reflections that look fantastic most of the time and have a relatively low rendering cost. However, at higher resolutions such as in 4K displays and VR, SSR can become a performance issue. If you are having performance issues, this is a good option to try turning off first.
Post-Processing
Unreal Engine 4 relies heavily on post processing for everything from anti-aliasing to reflections to ambient occlusion to motion blur.
With traditionally rendered visualizations, you typically apply these effects to your rendered frames in a video editing or effects package such as After Effects or Nuke.
In UE4, you apply Post Process Effects in real time by defining them either in a scene Actor called a Post Process Volume or with the Post Process settings in a Camera Actor. These settings can have a dramatic effect on the scene’s look and quality and are essential for making your visualizations look as good as possible (see Figures 4.8 and 4.9).
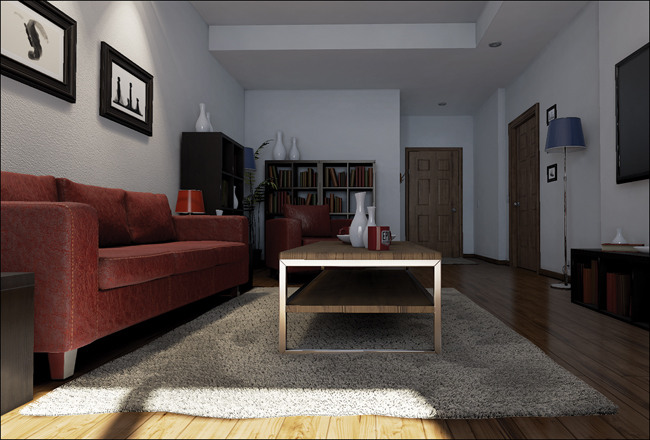

Figure 4.9 UE4 scene with heavy post processing (bloom, ambient occlusion, screen-space reflections, and anti-aliasing)
These settings can inherit from and override each other using a priority system and can blend seamlessly from one to another.
Post Process Effects in UE4 are screen-space, meaning they only exist in the pixels being rendered onscreen. They cannot produce effects or react to anything that isn’t being directly rendered.
Anti-Aliasing
Anti-aliasing is one of the slowest rendering operations. Most renderers use a form of super or multi-sampling (rendering a single pixel at a higher resolution to resolve the average color more accurately, smoothing out edge aliasing). This method is simply too slow for real time because each pixel rendered decreases the frame rate.
Unreal Engine 4 uses a custom-built temporal anti-aliasing (TAA) system that produces almost perfectly anti-aliased images at the cost of some image sharpness and some possible ghosting artifacts in motion3. TAA samples multiple rendered frames in succession and compares them to create an average.
A less effective FXAA screen-space anti-aliasing effect is also available that while better than no anti-aliasing is usually too rough to be used in visualization.
The softness of TAA, when used in conjunction with other Post Process Effects can help give your image a filmic, realistic look and gives the highest overall quality (see Figure 4.10).

Bloom, Glare, and Lens Flares
Because most displays can’t display luminance over 1, Bloom was developed to allow over-bright pixels to be bloom or glare to help increase the apparent dynamic range of the image. Bloom is effective because it simulates the effect camera lenses and our eyes exhibit when exposed to very bright light.
Lens flares simulate the interlens reflections that are captured when cameras are exposed to high-contrast lighting conditions.
UE4 renders the scene using a linear workflow and uses that information to determine luminance to create high-quality specular blooms and lens flares. These effects if used sparingly can help accentuate the HDR lighting in your scene and elevate the quality of your visualizations.
Eye Adaptation (Auto Exposure)
A common effect used in film and games is to adjust exposure as cameras enter and leave dim and brightly lit areas. This creates a dramatic bloom of light and is typically tricky to pull off in a traditionally rendered visualization (see Figure 4.11).
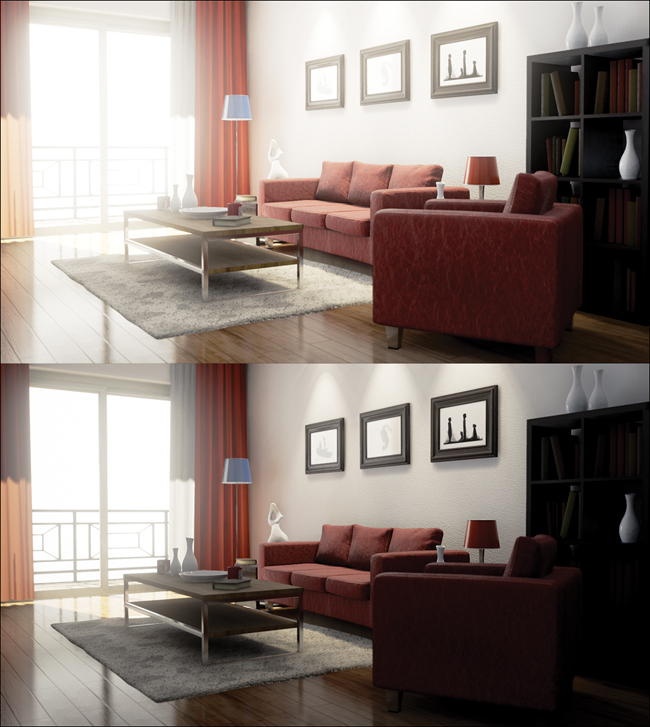
Figure 4.11 Creating dramatic effects by allowing the camera to overexpose as lighting intensity changes
UE4 features high-dynamic range rendering, allowing both dark and very bright areas to exist within a single scene. As the player moves from indoors to outdoors, his view will adjust brightness smoothly, simulating the human eye and/or cameras using auto exposure.
Depth of Field
DOF (depth of field) is another effect that’s extremely time consuming to render with most ray-tracing renderers, but can be achieved in real-time with UE4 (see Figure 4.12).
A few different types of DOF exist in UE4: Gaussian, Bokeh, and Circle.
Gaussian
Gaussian DOF is fast, but has a lot of artifacts. It is blurry, unrealistic, and not physically accurate.
Bokeh
Bokeh is also blurry and inaccurate, but looks better thanks to the inclusion of a Bokeh (aperture mask) shape for high-contrast pixels. Each Bokeh shape is a particle being rendered for each pixel that’s brighter than the threshold; as such, this effect can get very expensive to render.
Circle
Circle DOF is a relatively new feature and that Sequencer and cinematic cameras leverage heavily to achieve physically accurate depth of field based on camera aperture and field of view.
This effect is fast and gives your images a realistic, filmic look. You can use it in almost all of your visualizations with a minimal rendering cost.
Film Effects
Film and video both have a lot of interpixel noise and other lens effects such as vignette and chromatic aberration. UE4 offers a wide range of filmic post-process adjustments and effects to help you achieve a photorealistic or stylized look with almost no performance hit.
Motion Blur
Motion Blur is another effect that is traditionally very expensive in ray-tracing. Interpolating an object across time and space is inherently slow. Once again post processing comes into play. UE4 renders a velocity G-Buffer that allows it to apply a very high-quality but very fast motion blur to the entire scene as well as moving objects (see Figure 4.13).

Screen Space Ambient Occlusion (SSAO)
Screen space ambient occlusion is one of the most important graphical techniques available for video game engines and one that almost all 3D game engines use. SSAO is created using the depth and world normal G-Buffers to determine where edges and objects are close, rendering an AO map and compositing it in real-time each frame.
In scenes with dynamic lighting, SSAO provides an enormous visual boost. Objects gain contact shadows helping them read as connected to the surfaces they sit on and it increases the depth of shadowed areas immensely. Although SSAO is no substitute for ray-traced or pre-calculated AO, it’s a huge improvement.
Screen Space Reflections
By transforming and distorting the rendered image based on G-Buffer information such as World Normal and Depth, UE4 can produce a fake, but good looking and fast-to-render reflection.
Screen-space reflections help complement the Reflection Capture Actors by providing dynamic, high-detail reflections (see Figure 4.14). This helps to ground objects and provide the most accurate looking and dynamic reflections possible.
Figure 4.14 Sharp screen-space reflections work in harmony with captured cube map reflections from Reflection Capture Actors
Like all other screen-space effects, these reflections cannot render anything off-screen. This can create some transition artifacts and other strange effects as you move through a scene. Whether to use them is an artistic choice.
Screen Percentage
Although UE4 doesn’t offer multi- or super-sampling anti-aliasing4, it does, kind of. UE4 has a very high-quality image scaler and the capability to render at any resolution, independent of the screen.
Screen Percentage controls how many pixels are being rendered for each pixel onscreen. For example, 100% is a 1:1 ratio; 80% indicates an 80% reduction in rendered pixels; and 140% is a 40% increase. You can use this setting in two ways: To reduce the resolution of the image to allow more graphically intense scenes to run on slower machines or to increase the resolution past the screen resolution, allowing the scaler to return a very crisp image. By combining Screen Percentage with TAA you can get amazingly clear image quality, approaching ray-traced quality.
As you increase the project’s resolution, Screen-space effects become increasingly slow to use. Users on high-resolution monitors will be more acutely impacted by this setting.
Post Process Materials
UE4 exposes the G-Buffers it uses to render and composite its final image to the Material Editor. UE4 allows you to create custom Post Process Effects that extend the rendering capabilities of UE4 using the same Material Editor and Material Instancing system used in the rest of the Engine.
These can range from the simple, such as creating your own vignette system, to the complex, such as writing your own cell-shading and outlining effects (see Figure 4.15). The sky is your limit thanks to the flexibility of the Material Editor.
Although they are called Post Process Effects, they actually happen while you’re running the project, not after. They are rendered at the end of each frame, while the next frame is beginning to render. They run in real time, reacting to a dynamically changing scene and point of view.
Post Process Effects can make your scene look like an art student’s first photo-editing assignment with gaudy blooms, vignette, and lens flares dominating the view. If used wisely, they can also give it the most filmic, realistic look possible.
Summary
UE4 has one of the most robust rendering systems available. The realism and ease of use is simply unmatched and the quality speaks for itself. Most of the systems are based on techniques and systems you’ve been using for years, making them familiar and easy to understand.
PBR introduces a whole new way of looking at and defining material surfaces that are artist friendly and look great. Combined with an arsenal of lighting tricks and tools, you can achieve near-ray-traced images in real-time.
1. Scalar values are just material shader language for floating point numbers.
2. The term “expensive” is often used to describe the performance penalty of an effect. Each frame is often thought of as having a specific “budget” and each light, polygon, and shadow has a cost against that budget.
3. Ghosting most often happens with high-frequency or noisy areas that change from frame to frame. Avoiding noise in your scenes helps hide this artifact.
4. UE4 offers a Forward Rendering pipeline that allows the use of MSAA while trading many of the benefits of a deferred rendering pipeline like Dynamic Lighting.