
Chapter 14. Architectural Lighting
Developing clean, accurate, realistic lighting is essential for creating visualizations. The interplay of lights, shadows, reflections, and materials brings worlds to life, creating depth and telling stories. In this chapter, you learn how to set up great-looking Global Illumination (GI) lighting using Lightmass.
Getting the Most from UE4’s Lighting
UE4’s Lighting and Materials systems are tightly intertwined. You must work between them to achieve your final result. This chapter demonstrates how to light an interior scene using UE4.
Unreal’s high dynamic range rendering pipeline combines with effects like auto-exposure and bloom to create a realistic, warm, and dynamic lighting environment. Getting your lighting right using these techniques can be tricky, but using some baseline settings you should be able to get great results quickly.
In this chapter you learn how to adjust Level and Static Mesh properties and settings to achieve great lighting with reasonable lighting build times.
The chapter also shows how to use post-processing effects like vignette, color grading, and depth of field to create a more photorealistic image (see Figure 14.1).

Finally, you learn how to place Reflection Capture Actors into the Level to improve lighting and help mirrors look more accurate.
Materials and Lighting
Like all Global Illumination (GI) rendering, lighting in UE4 is affected directly by Materials and vice versa. Materials tint and attenuate bounced light, and light reflects off surfaces informing us about its surface properties.
Because of this, you cannot separate the two completely. This chapter and the next are intended to cover both topics individually; however, to get the best results you’ll use the techniques from both chapters in parallel.
Static Lighting with Lightmass
UE4 has made a big splash in architectural visualization industry, thanks to its impressive visuals. One of the ways UE4 manages to render such incredibly well-lit scenes so quickly is by pre-computing the lighting using a GI renderer called Lightmass.
Lightmass calculates the light hitting the surface of each Static Mesh in your scene using a photon-based, Global Illumination solver like Mental Ray. It then records this data to several Textures, called Lightmaps and Shadowmaps. This process is referred to as building your Static Lighting. Upon completing the lighting render, the Textures are automatically imported and applied.
As the name suggests, you cannot move or modify objects lit with Static Lighting or the lights used after you build them. If you add, remove, move, or otherwise modify the Static Lights or Static Meshes in your scene, you will break the lighting and must rebuild it.
Note that you can add lights to an already-built lighting scene. Although you will need to build your lighting again to see the GI contribution of these newly placed lights, the existing static lighting will remain. This can be helpful as you add more and more lights to your scene.
Lightmaps and Shadowmaps are stored in a special BuildData UMAP Level file (the custom file format UE4 stores Levels as) alongside your saved Level. This file and your project will grow significantly as you add more Assets because each one increases the memory overhead of the Lighting Textures.
Adjusting the Sun and Sky Lights
In the previous chapter, you placed a Directional Light Actor, a Sky Light Actor, and an Atmospheric Fog Actor. These three Actors provide the base for building a lighting solution, but they need some adjustments to work with Static Lighting.
Sun Light
The Directional Light will act as your sun light, providing intense, direct light that contributes greatly to the GI solution.
The three main light types or classes in UE4 are Point, Spot, and Directional. Point and Spot lights radiate from a single point in space. They are great to use for nearby lights like lamps, fixtures, and spot lights. They are not great for the sun, which from our perspective here on Earth radiates light in parallel. For this, you need a light that simulates the light coming from a single direction instead. Enter the Directional Light Actor class.
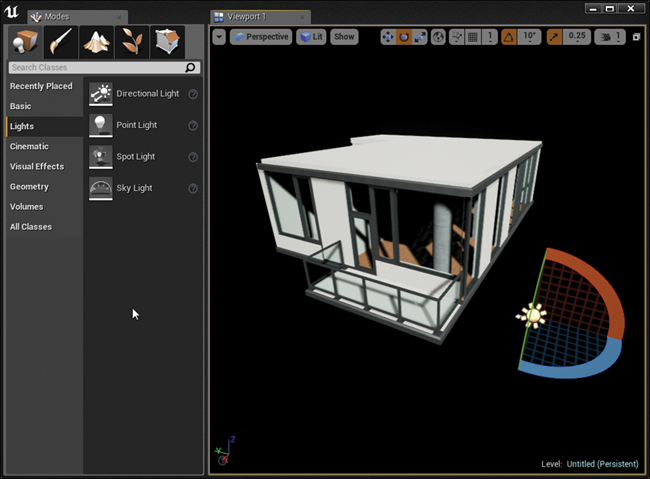
Like most Actors, you can easily place lights into your scene by dragging and dropping them from the Class Browser into the Viewport.
You can place the light anywhere in your scene because it does not radiate from that point; only the rotation is important. I put mine where I can easily find it again.
Find a pleasing or realistic rotation for your light. The dynamic shadows act as a preview and give you a good idea where the static shadows will land (see Figure 14.2). Take a look around as you do this. UE4’s dynamic shadows provide a good approximation where the baked shadows will land in your scene.
The Details Panel shows the various options available for the selected light (see Figure 14.3). You need to adjust several settings to get the best quality and performance from this Light Actor.
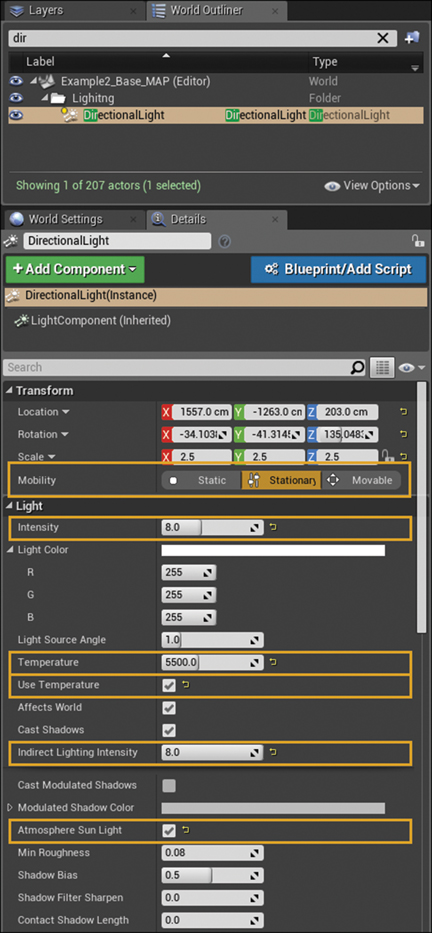
Mobility
The first and most important setting to modify is the Mobility. For this light, you need to use a Stationary Light. This is like a Static Light (it cannot move), but doesn’t record its direct lighting in a Texture; rather, it calculates the direct lighting dynamically. That means you can change the brightness and color after building the lighting.
Note that changing the Intensity does not affect the GI lighting because that is baked into Static Textures.
Intensity
To get a bright sunlight effect, use an Intensity value of 8–10. This ensures the sun is the brightest light in your scene.
Indirect Lighting Intensity
Because the intensity of Stationary Lights can be changed, you need to tell Lightmass how bright you want it to calculate this light as. For this you can use the Indirect Lighting Intensity setting to adjust how bright the GI from this light is. Set this somewhere between 1.0 and the Intensity you set for your light.
Temperature
Check the Use Temperature checkbox and set a Temperature of around 5000–5500. This provides a slightly yellow sun that’s still significantly “whiter” than a typical incandescent light that has a value of 2700–3500.
Atmosphere Sun Light
Ensure the Atmosphere Sun Light option is selected to let it work in conjunction with the Atmosphere Fog Actor to generate a physically correct lit sky that will provide the environment color for the scene. If you don’t see it at first, this setting can be hidden in the light’s Advanced Options.
UE4 features an atmospheric light scattering fog system that simulates earth’s atmosphere. This is driven using an Atmospheric Fog Actor and the Directional Light Actor. Just drop an Environmental Fog Actor into your scene. If your Directional Light Actor has Atmosphere Fog Light enabled, it will orient a sun disk and set the sky colors based on the sun’s position, creating a simple but effective skybox.
Sky Light
To simulate the ambient light from the atmosphere, UE4 uses a Sky Light Actor. This special light can either capture the existing scene as a Cubemap to use for indirect lighting, or you can provide it an HDR Texture.
In this example, let’s just capture the scene.
Place this light somewhere in your scene where you can find it easily. You will also want to ensure it is not enclosed within any geometry so it can capture the unoccluded sky. The Sky Light Actor has some settings to tweak to get optimal results (see Figure 14.4).
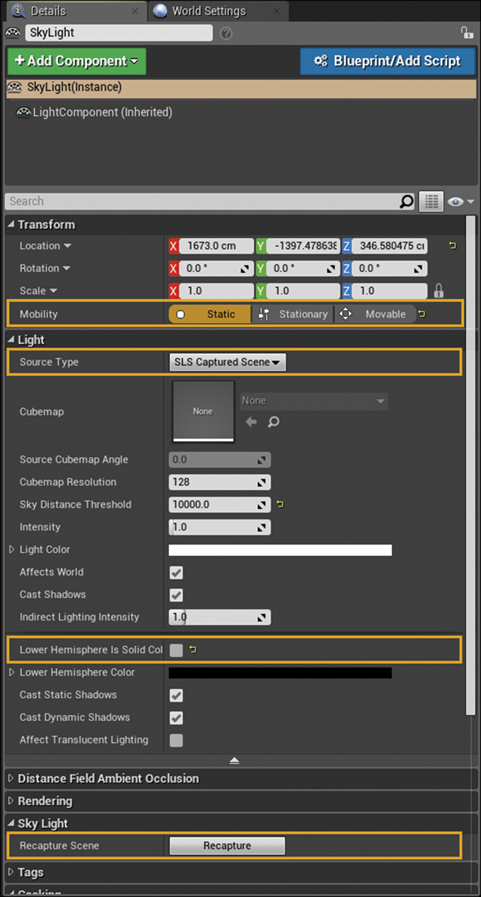
Mobility
The Sky Light is set to Static for this scene. You can also choose to use Stationary for this scene but you will trade a certain level of quality and detail in your indirect sky lighting with the ability to dynamically change the Intensity, Source Cubemap Angle, and Cubemap Texture properties dynamically without breaking lighting.
Setting Mobility to Static bakes all the indirect sky lighting into the Lightmaps and Shadowmaps generated by Lightmass, avoiding some of the inaccuracies that the stationary pipeline can introduce, such as light leaking or inaccurate lighting.
Source Type
You can select between an imported HDR Cubemap or a Cubemap of the scene taken by the Sky Light Actor in the Editor. In this case, use the scene as your lighting by setting Source Type to SLS Captured Scene.
Lower Hemisphere Is Solid Color
The Lower Hemisphere Is a Solid Color setting is a bit of a personal preference. Setting it to true replaces the bottom half of the captured Cubemap with a single, solid color. This can limit the amount of light entering a space, so I prefer to leave it set to false for interior scenes where getting as much light into the scene as possible is important.
Recapture Scene
If you make lighting or scene changes, the Sky Light won’t dynamically update the Cubemap it’s using to light the scene. You must manually tell it to recapture its Cubemap using the Recapture Scene button.
Building Lighting
Now that the scene has some rudimentary lighting, you can build the lighting for the first time.
To build lighting, click the Build button in the Editor’s toolbar. You can click on the arrow next to it to see the settings. The most important is the Lighting Build Quality setting. This lets you quickly go from a fast preview build to a great looking but slow-to-render production quality build (see Figure 14.5).
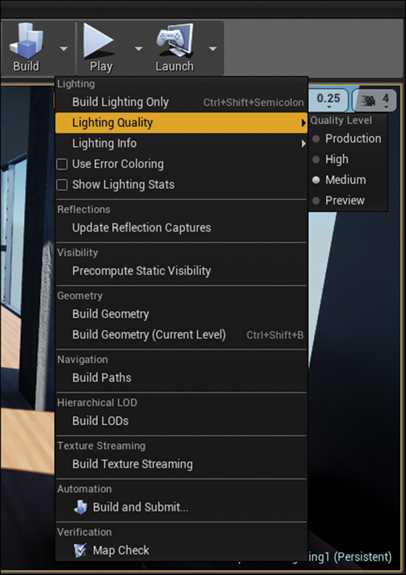
Lightmass offers several presets for lighting quality from preview up to production. Production lighting builds can take orders of magnitude more time than preview builds, but lower quality builds can introduce artifacts and inconsistencies that can be hard to distinguish from actual issues with geometry or lighting.
Note
To improve build times when lighting your scenes, you can hide Actors, leaving only the Architecture and Fixtures. This decreases the time needed to build the lighting significantly, letting you iterate faster. To do so, select the Actors you don’t want to light and set the Visibility property in the Details Panel to false.
To unhide them again, you must find the Actors listed in the World Outliner because they won’t be visible in the Viewport anymore.
Alternatively, you can select the Static Meshes you want to avoid calculating lighting for and set their Mobility to Moveable.
Either way, you should use groups, layers, or folders to organize your scene to make toggling these properties easier.
Figure 14.6 shows a comparison between preview and production lighting builds. You can see that accuracy is greatly reduced with the preview build, but the lighting time was significantly reduced.
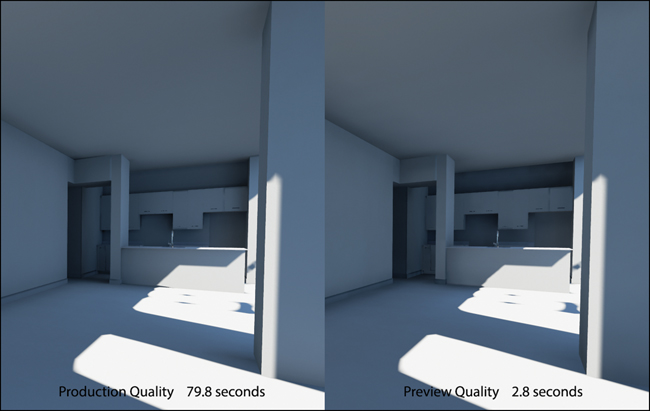
As you can see, even using production quality, the lighting still isn’t very good. Shadows are undefined, blocky, and low-res, and errors exist on the baseboards and in dark areas. By making a few adjustments, you can have this scene looking a lot better in short order.
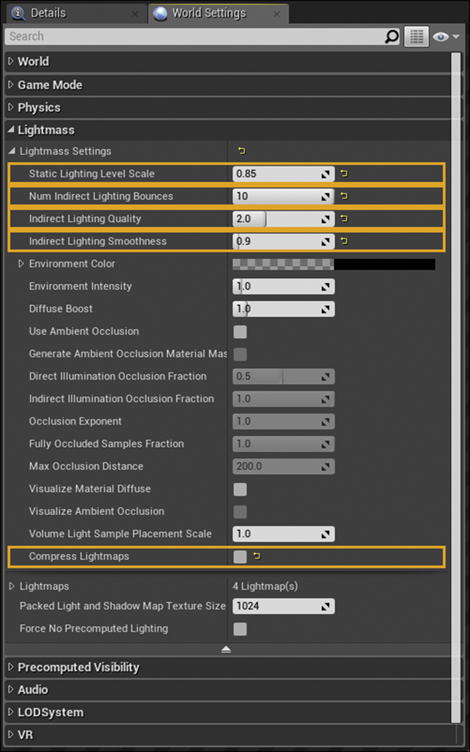
Lightmass Settings for Architecture Visualizations
The first stop for getting things looking better is to pump up the Lightmass settings. Architecture Visualizations prioritize image quality over render time, and in UE4 this is no different. You increase lighting build times, but end up with a much better-looking scene.
The settings for Lightmass are stored on a per-Level basis and can be modified in the World properties options. The Lightmass panel offers a lot of settings (see Figure 14.7). Thankfully, UE4’s defaults are very good for most circumstances. Each setting has a dramatic effect on build times, so always starting small and working your way up is a good idea.
Note
If you have researched Lightmass online, there’s a good chance you’ve seen some complex .ini file adjustments and other tweaks to get Lightmass to produce clean lighting solutions for architecture visualizations.
These adjustments have largely become unnecessary in later versions of the Engine (and, possibly detrimental to your image quality and certainly your build times). Epic Games has done extensive work to improve Lightmass for visualization and you should only need to adjust the settings exposed in the World Settings.
Static Lighting Level Scale
The Static Lighting Level Scale setting controls the density of the photons in the scene. Smaller numbers mean tighter photons with more detail. This can increase build times significantly. You can leave this setting at the default of 1.0 or reduce it slightly. Any lower than 0.8 increases build times, and noise can become visible.
Num Indirect Lighting Bounces
The Num Indirect Lighting Bounces clamps the number of times a photon can bounce off surfaces in the scene before extinguishing. A setting of 10 provides very good results, allowing the photons to get into the darkest areas of your scene. Increase this setting if you have splotches in your darker areas.
Indirect Lighting Quality
The Indirect Lighting Quality setting has the largest effect on build times and overall quality. It increases the amount of sampling done to smooth out the GI solution. Very high settings produce very smooth GI. Leaving this setting in the 1–4 range is a good idea; only go higher if you are experiencing noisy GI.
Indirect Lighting Smoothness
Use the Indirect Lighting Smoothness setting to control how soft or sharp your indirect GI lighting is. Lower numbers make for sharper, but noisier indirect shadows, whereas higher numbers make for softer shadows. Lower this setting slightly if you want that sharpness, but don’t go too much lower than .75 or you will have to increase the overall quality of your solution to remove the noisy artifacts.
Compress Lightmaps
The most important setting for architecture visualizations is Compress Lightmaps, which disables Texture compression on the Lightmass Textures. As you can see in Figure 14.8, the compression can introduce banding and blocking artifacts. This is acceptable in many games that don’t rely on clean lighting, but not for architecture visualizations, where the lighting and surface fidelity are the highest priority.
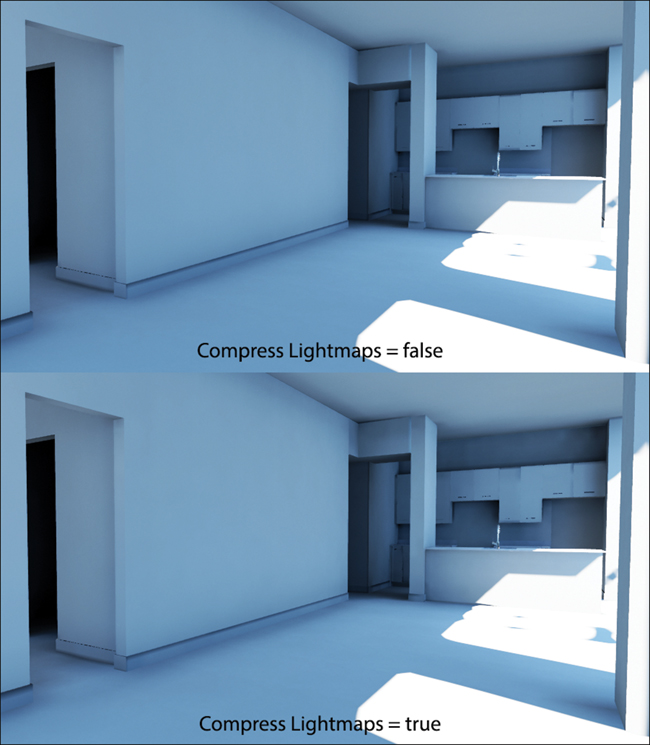
Figure 14.8 Compress Lightmaps comparison (with increased contrast to enhance artifacts) showing artifacts on the cabinets, door frames, and on smooth surfaces like the wall on the left
You should not adjust any other settings until you have disabled this setting. The noise it introduces will make your lighting unsuitable for architecture visualizations and no amount of tweaking can eliminate it.
Using uncompressed Lightmaps comes at the cost of memory. Uncompressed Lightmaps take up significantly more disk space than compressed Lightmaps. They also use more video memory when running in-game.
If your Level is very large (a stadium or an entire building) or you are targeting lower-end hardware (laptops, mobile devices, and so on), you might want to use the Compressed Lightmaps setting to allow these Levels to load into RAM.
Lightmap UV Density Adjustments
Getting your Lightmaps to be a high enough resolution is important for getting smooth, detailed lighting. However, too high a resolution can cripple your scene with long build times and massive memory footprints.
Finding the balance can be challenging, but here’s one way to set Lightmap resolution in UE4:
1. Enable the Lightmap Density visualization by choosing View Mode > Optimization Viewmodes > Lightmap Density (see Figure 14.9).
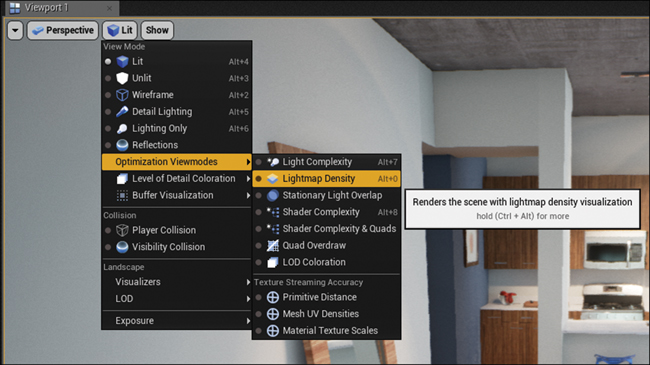
When you first enter this mode, you will see something like Figure 14.10—lots of grids of varying sizes and colors with no lighting information. What you’re looking at is a visualization of the Lightmap pixels on each object in the scene. This helps you adjust the resolution quickly and interactively.
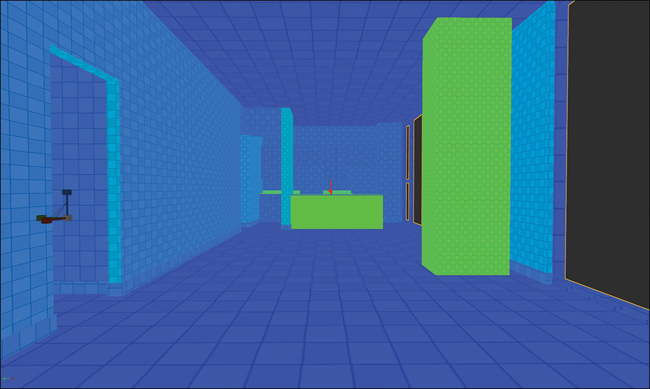
Figure 14.10 Lightmap Density visualization showing far too low-resolution that doesn’t allow for very detailed shadows and lighting
Blue indicates that the Lightmap resolution is too low and red indicates that it’s set too high. You should aim for green to orange on all your surfaces for the best quality with reasonable build times.
2. To adjust individual Mesh Actors in the Level, select each Mesh in the scene one by one and adjust the Overridden Light Map Res setting in the Details Panel.
After they’re adjusted, the Lightmaps should be much more even in density and higher resolution, as shown in Figure 14.11.
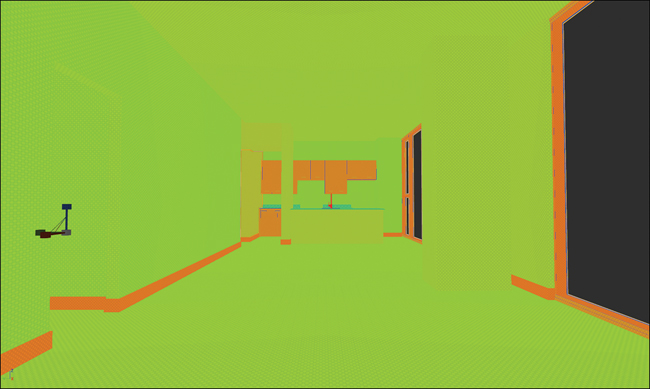
You do not need to set the resolution to a power of two (64, 128, and so on), but you should not go too big. Resolutions more than 1024 are supported but should be used sparingly. The higher the resolution, the longer the build time, the larger the Level on disk, and the more memory it takes up. Keeping it as low as you can without unacceptable artifacts is best.
Adjusting the Lightmap resolution on Props is different, so you adjust them at the Asset Level. This ensures that each one in your Level will have the proper resolution because the changes you make to the source Asset will be reflected by any scene Objects that reference those Assets.
Be aware that any changes to the Static Lighting settings for the Mesh Asset will break lighting in any Level that has the Asset referenced.
You can also adjust the density of Props on a per-Object basis in your Level using the Overridden Light Map Res property in the Details Panel. I sometimes give my Props (especially if they have a lot of detail or organic shapes) a higher relative density than Architecture Meshes, as shown in Figure 14.12, which makes them appear to be rather reddish in color.
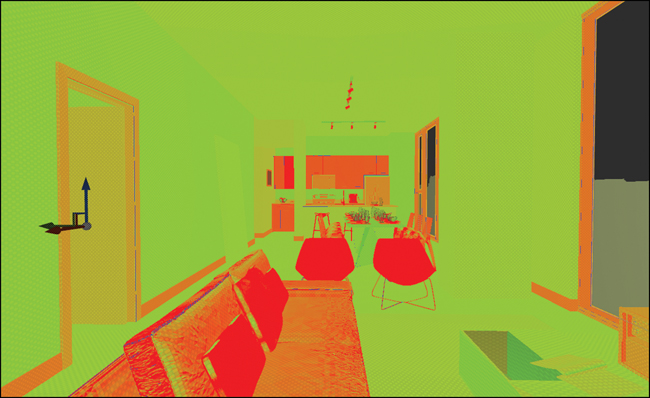
Figure 14.12 Final Lightmap density showing higher density on the more organic Props such as the sofa and the chairs
Be careful; repeated Props can quickly generate a lot of high-resolution Texture data.
Rebuild and Save
Now is a great time to rebuild your lighting. You’ll notice right away that with the increased density of your Lightmaps, your build times have gone up significantly. Your overall quality should have also gone up significantly with more detailed shadows and indirect light.
This is also a good time to save your work.
Placing Interior Lighting
Now that you have the sun and sky lighting in the scene, you can start placing some lights inside to help brighten up some of the dark corners.
Spot Lights
Point and Spot Lights share many of the same settings as lights in ray-traced renderers, and you should feel right at home (see Figure 14.13.) There are only a few differences to keep in mind.

Mobility
I recommend using Static Lights almost exclusively for interior lighting. Although Stationary and Dynamic Lights offer some advantages, they add complexity and significant performance cost to your scenes.
Intensity
Try to remember that your interior lights should be much less bright than your sun light. Even the brightest interior light doesn’t seem to cast much light in a sunlit room.
Getting the lighting brightness right is an art. It is affected by the number of lights in an area, the brightness of the sunlight, and even the color of the materials it’s reflecting off of. Brightness has a dramatic effect on the final look of your lights.
You need to iterate and adjust your lights to find a suitable balance for your scene and tastes.
Temperature
In this example, I used the temperature setting for my lights. This gives them realistic color based on the brightness of the light. I used a warmer tone for the interior lights, which lets them contrast with the sun and sky.
Attenuation
Limiting the distance a light’s direct lighting can travel is used for both performance and artistic reasons. Limiting the attenuation of a light limits the number of Meshes it affects in the world. This is critical for performance—especially for dynamically shadowed lights. In Lightmass, a limited attenuation radius will affect fewer Meshes, making the lighting build faster; but as the light and shadow data is baked into textures, there’s no real-time benefit.
IES Files
UE4 supports IES (Illuminating Engineering Society) Light Profiles for Spot and Point Lights. You can import IES files and apply them to lights to achieve interesting lighting patterns (as seen in Figure 14.13). You can find IES profiles around the Internet from real-world lighting manufacturers and vendors, or even from the Unreal marketplace.
Auto Exposure
Turning off Auto Exposure temporarily can be a big help when setting up the lighting in your scene. The default Auto Exposure is very aggressive and can get very bright or very dark easily.
Locking the exposure using the View Mode menu in the Viewport ensures the lighting brightness does not adjust as you move from light to dark areas, and more easily allows you to balance your lighting.
Placing Light Portals
Light Portals are special Actors that help Lightmass focus photons toward openings that have a lot of light coming in. This improves build times and lighting quality.
Place these Actors on your windows and other openings and loosely adjust the box to fit. You don’t need to be terribly exacting; it’s just a helper for the photons and doesn’t need to be precise.
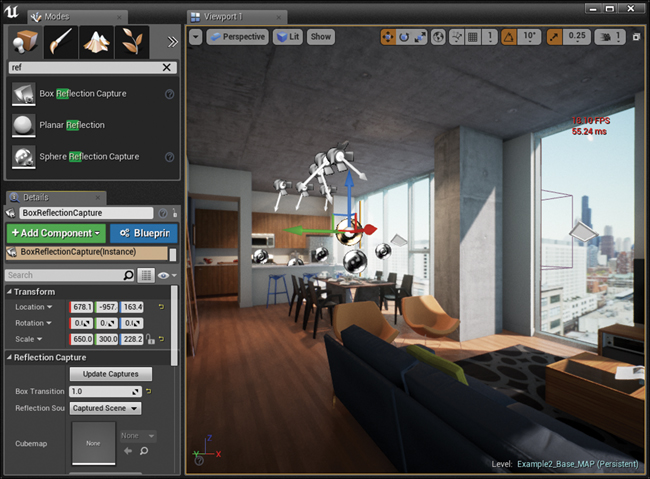
Using Reflection Probes
Reflections are integral to PBR. UE4 uses Reflection Capture Actors to capture Static Cubemaps of the scene and automatically applies them to the Materials within their influence.
Although you can get away without placing these around your Level, you do achieve much higher quality with them.
The two types of Reflection probes are Sphere and Cube. Simply put, for square-shaped areas, use the Box Reflection Capture Actor. For all other areas, use the Sphere. As you can see from Figure 14.14, a mixture of both kinds is useful to fine-tune the reflections in the scene.
Size
Sphere Reflection Actors use a radius of influence to determine what pixels they will affect. Typically, smaller radius Reflection Actors have priority over larger ones. This lets you “nest” smaller reflection Actors within larger ones, letting you add detailed reflections to areas that might need it.
Box Reflection Capture Actors expose a 3D Scale value. You should adjust the Scale of the box until the corners of the box shown in the Viewport fits as closely to the corners of your room as possible.
Performance
In addition to the memory overhead of the captured Cubemaps, Reflection Capture Actors automatically apply their reflections to any pixels that are rendered within them. For this reason, overlapping reflection captures can cause a performance impact. You should avoid having too many overlapping.
It’s also worth noting that Box Reflection Capture Actors have a higher performance impact than the Sphere Reflection Capture Actors.
Post-Process Volume
The final piece to the lighting puzzle is to apply post-processing effects such as vignette, bloom, motion blur, and depth of field to the image to give it a filmic, realistic look.
When you create a new Level in UE4, default post processing settings are applied to the scene automatically. These settings are a good start, but you’ll almost always want to adjust them in each of your scenes to match its unique lighting and to achieve the look and feel you are after.
To access these settings, you need to add a special class of Actor to your scene: the Post-Process Volume.
Volume Actors
A Volume is a special type of Actor class in UE4 that can tell if other Actors are within its bounds. Post-Process Volumes use this ability to blend between different post-process setups as the player’s camera enters and leaves each volume.
You can adjust Volumes by setting their Brush settings. You can define the shape of the volume, as well as the size. You can also scale, rotate, and move them like any other Actor.
Placing the Post-Process Volume
You’ll find a list of the different types of Volume classes available in the Modes Panel under Volumes (see Figure 14.15). Simply drag and drop the Post-Process Volume into the Viewport. You can place it anywhere in the scene—just be sure it’s easily selectable.
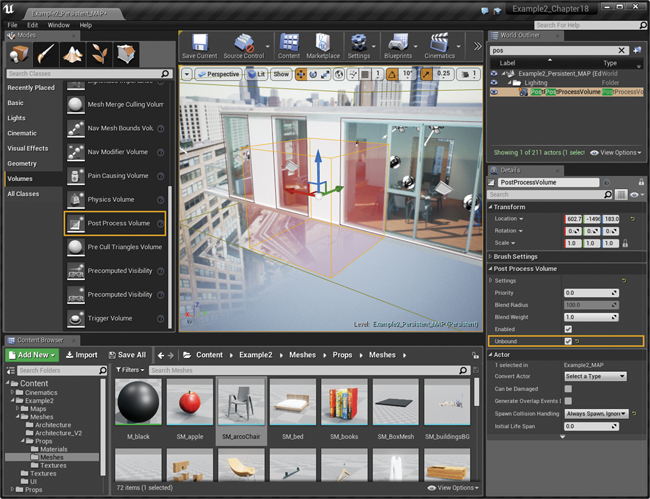
Post-Process Volume Setup
The Post-Process Volume has a lot of settings and allows you to refine your image to a significant degree. While many settings—such as color adjustments and effects like bloom—are almost entirely up to your personal tastes and styles, others have a direct impact on performance and image quality.
To access the settings, simply select the Post-Process Volume in the Level and look in the Details Panel.
The following are the settings you will be adjusting most often, and the ones adjusted for this example.
Unbound
You can set up your Post-Process Volume to skip the bounds check and apply its settings level-wide by enabling the Unbound option. This is much easier than setting the volume to encompass the entire Level.
Priority
You can have Post-Process Volumes that overlap each other. To determine which one’s settings will be used, use the Priority option. Volumes with a higher Priority will override volumes of lower priority.
It’s important to note that only properties that have been manually overridden (by selecting the checkbox to the left of the property in the Details Panel for the overlapping volume) will be applied. This is a great way to adjust only a single property without having to ensure all the other settings match.
Blend Radius
This is a world-space radius around the Volume that interpolates between two volume’s settings. As the player’s camera moves in and out of the volume, the settings will smoothly blend from one to another. Volumes set to Unbound have this option grayed out.
White Balance
There are a lot of settings for Color Correction in UE4, but you should probably start with the White Balance. This defaults to 6500, which is a very pure, blue white that’s not terribly common in the real world. This can give your scenes an overly cool tone and make it difficult to get the right balance between warm light and cool shadows. You can set this somewhere between 5000 and 6000 for a warmer tone in your scene and higher for a cooler look.
Saturation and Contrast
The Saturation, Contrast, Crush Highlights, and Crush Shadow settings work together to help control the image balance. You are probably familiar with Contrast and Saturation, but maybe not the Crush settings. These simply clip the black and white points, giving a greater apparent contrast.
The default settings are often too contrasted, making shadowed areas very dark. This is a very filmic look, but it can be too dark for arch-viz where it might be preferable to have very dark areas.
These settings are very sensitive, so small adjustments go a long way.
Vignette, Noise, and Fringe
Use these effects to simulate camera lens effects.
Vignette adds a dark gradient to the edges of your image, which can allow you to increase the overall brightness of the image—the only fully bright pixels are in the very center of the screen.
Fringe simulates the chromatic aberration effect of light passing through a camera’s lens, separating the colors closer to the edges of the image.
Grain adds animated noise to the image. Grain Intensity controls the Noise Texture overlay’s opacity while Grain Jitter controls how much the grain displaces the image. Use these sparingly as they can become overbearing quickly.
Color Grading (LUT)
The Color Grading system in UE4 uses a special texture called a Color Lookup Table (LUT) to modify the scene’s color. The LUT is generated by applying color grading to a baseline image in your compositing or image editing application.
UE4 reads the difference between the baseline image and the modified LUT and applies that delta to the scene. This is a great way to bring your existing color correction pipeline into UE4. You can find more information about LUTs and some LUT files for download on the companion website for this book at www.TomShannon3D.com/UnrealForViz
Bloom and Lens Flares
Some of the most common post-process effects in both games and traditionally rendered content, Bloom and Lens flares help to simulate over-bright areas by simulating camera lenses and the human eye.
The default Bloom and Lens Flare settings in UE4 are a little aggressive and can decrease the contrast and clarity of scenes if used too much. Decreasing the Intensity or increasing the Threshold are good ways of reducing the overall amount of Bloom and Lens Flare in the scene.
You can also adjust the size of the effects. Larger sizes will have a more significant impact on performance.
I will often disable Lens Flares in scenes completely or turn them down so far as to only occur with extremely bright pixels.
Auto Exposure
Because UE4 renders scenes using an HDR lighting environment, you can have very different lighting brightness levels from one area of your map to the next. For this reason, UE4 has a sophisticated auto-exposure system.
This system can help create dynamic, engaging lighting interactions as your player moves from one area to another and sees the exposure adjust in response, much like the human eye or a camera with auto-exposure. It can also make setting up your lighting quite challenging.
I recommend setting up your lighting with Auto-Exposure disabled, then enabling it as-needed for your scene. You can disable this effect either through the Exposure Settings in the View Mode dropdown in the Viewport, or by setting the Min and Max Brightness parameters in the Post-Process Volume to 1.0. You can then use the Exposure Bias to manually set the exposure of the camera.
After your lighting is set up, begin to play with Min and Max Brightness to allow the camera’s exposure to adjust. To allow the camera to overexpose, brightening dark areas, set the Min Brightness to a value below 1.0. To allow the camera’s exposure to be reduced when in bright areas, increase the Max Brightness above 1.0.
Ambient Occlusion
Although we are not using Screen Space Ambient Occlusion (SSAO) in the example, it’s a very important effect and used widely in all sorts of visualizations and games. If you are generating scenes with dynamic lighting or a lot of Dynamic Actors, you will likely want to enable this because it dramatically increases the scene’s depth and lighting quality.
Global Illumination
This controls the intensity and color of the Lightmaps generated by Lightmass. You can use this to quickly modify your baked lighting. This does not control any kind of real-time GI in UE4.
Depth of Field (DOF)
UE4 exposes several methods for creating Depth of Field effects. For visualization, the Circle DOF is easily the best. This is a physically accurate effect that simulates actual lens aperture blurring characteristics and creates a very subtle, realistic effect. It’s also fairly performant compared to other effects. Like many post-processing effects, however, it can be come expensive at higher resolutions. I don’t recommend it at all for VR.
To increase the blurring effect, reduce the Aperture F-Stop parameter’s value. Lower settings will produce more blurring (see Figure 14.16). It’s important to note that this is a realistic effect, so you might not notice the effect until you get very close to an object.

For an interior scene, you will want to ensure your Focal Distance is set to around 300–500 (3 to 5 meters) and the Aperture F-Stop is fairly large at 4–8.
Motion Blur
UE4 employs a high-quality motion blur system that generates a velocity map each frame and uses it to blur the scene accordingly. The default settings are typically very good for most scenes; however, if you’re running at higher frame rates or want a cleaner presentation, you might consider turning this off or down by reducing the Max parameter.
Screen Space Reflections
Screen Space Reflections provide you with detailed, dynamic reflections based on the rendered image. These are essential for achieving the highest quality, but you’ll want to increase the Quality and Max Roughness settings. Set the Quality to 100 and the Max Roughness between .6 and 1.0. Higher values are more expensive to render, but can look more accurate. Go as low as you can while still maintaining the look of your scene.
Anti-Aliasing
UE4 offers several Anti-Aliasing (AA) methods. For most visualization, the Temporal AA (TAA) system in UE4 produces superior results and has very little performance overhead.
The following example scene shows the result of enabling the Ambient Occlusion, Vignette, Grain, and Depth of Field settings. Each improves the look of the image, adding the imperfections and other effects one expects to see from a photograph.
As you can see, the settings in the post-process volume have a dramatic effect on the look of the scene. Even the subtle settings used here significantly changes the look and feel of the scene (see Figures 14.17 and 14.18).

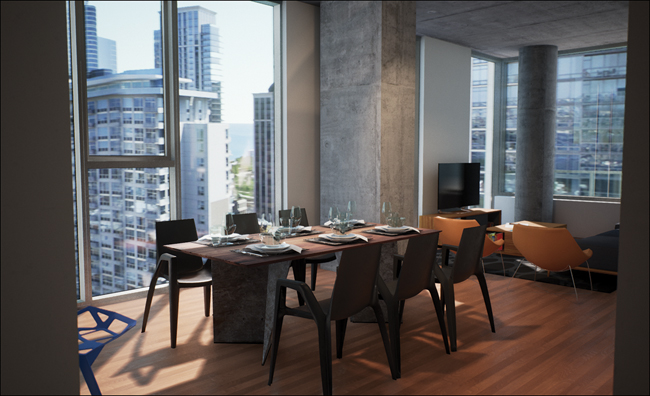
Figure 14.18 Scene with post-process adjustments showing the noticeable change in Contrast, White Balance, and Saturation
Summary
Lighting in UE4 has many components that all work together to make a whole. Although these concepts were presented in the order you might encounter them, as you learn and iterate on your scene, you will move among their settings because adjusting one influences another.
This interaction between light, color, and Materials is familiar to visualization artists and is where technology diverges into artistry. Through practice you will learn to understand your instrument and begin to craft warm lighting effortlessly in UE4.