
Chapter 16. Creating Cinematics with Sequencer
Interactivity and exploration are the hallmarks of interactive visualizations in UE4. However, UE4 is also extremely capable of creating pre-rendered, static animations that rival the quality of raytraced renderings. And it can do so in a fraction of the time. Using Sequencer, Unreal Engine 4’s innovative animation tool, you can combine your interactive worlds with keyframed Camera and Actor animations to create stunning animations.
Getting Started with Sequencer
The Sequencer Editor is a cinematic editing tool within UE4 that allows you to edit Sequences.
Sequences are Assets you can place into Levels as Actors that contain keyframed animation Tracks. Sequencer takes a lot of inspiration from tools like After Effects, Final Cut, and other video editing and compositing applications. This helps make for an easy learning curve for many visualization artists who are already adept at video editing tools like these.
Sequencer replaces the previous cinematic editing tool in UE4, Matinee. Matinee still exists alongside Sequencer, but it’s depreciated, and in comparison to Sequencer is a very limited tool.
Master Sequence
Unlike most Assets that you either import or create in the Content Browser, you create Sequences in the Level using the Cinematics dropdown menu (see Figure 16.1).

You are given the option to create a Master Sequence, a single Level Sequence, or a legacy Matinee Sequence. A Master Sequence is basically a wizard that creates a Sequence with several sub-sequences (see Figure 16.2). The wizard also creates the various Sequence Assets and saves them to a specific location in your Content directory.

Figure 16.2 Master Sequence wizard settings showing that I have only modified the Default Duration and set it to 10 seconds from the default of 5
You can also start with a single Level Sequence if you only need to create something simple. You can include individual Sequences in other Sequences at any time as well.
You can accept the standard settings for most projects unless you need to follow a naming scheme or other standard. The only setting I changed here is the Default Duration, which I set to 10 seconds.
When you create a Master Sequence, a Sequencer window appears showing all the track Sequences laid out in a row (see Figure 16.3).

Figure 16.3 Master Sequence Editor, in which you can move and edit Shots as in a non-linear video editing program
For anybody familiar with non-linear editing applications, you will feel right at home. You can move Shots and add, remove, and easily change the duration of each track, making Shots Track Editor behave like Adobe Premiere: fast, streamlined, but lacking in fine control.
To get that control, double-click any of the Sequences to open that shot in the Sequence Editor (see Figure 16.4). Although this is the same Sequencer Editor, it looks different and it serves a different purpose. By exposing the Camera Cuts and Camera Actor Tracks, this editor is much more akin to Adobe After Effects: It’s a keyframe-driven animation and effects interface.

Figure 16.4 A single shot opened for editing in the Sequence Editor, showing how the editor changes to look more like a keyframed effects package like After Effects
Dynamic Cameras
In each of these shot Sequences, a CineCameraActor is spawned dynamically in the Sequence and destroyed when the Sequence is finished. This feature is really powerful, and it means you don’t have to have a single Camera Actor placed in your Level because they are created and destroyed on the fly in Sequencer.
These cameras act like any other Camera Actor and displays the lens settings, depth of field, and focus settings as well as all the post-processing effects available, letting you configure each camera exactly as you need it (see Figure 16.5).

Notice the Details Panel and the Add Keyframe button that appears just to the left of each of the animation-related properties. Like with most windows in UE4, you can dock Sequencer in the UE4 window to help fight clutter.
Animating the Camera
Getting your camera to move and change over time is the next obvious step, but getting that to happen easily might not be so obvious.
Setting Keyframes
You have a couple ways to set keyframes in Sequencer. You can turn on Auto-Key, creating a keyframe each time you modify a property or move, rotate, or scale an Actor. This can quickly get messy.
You can also manually set keyframes. You can do this in either the Sequencer interface or in the properties and Viewports directly. When the Sequencer is up, animation-related properties in Actors show an Add Keyframe button (refer to Figure 16.5), letting you easily add a keyframe when you need it.
A third way is a little of each of the preceding options. You can automatically set keyframes, but restrict them to only the properties to which you have already added keyframes to (see Figure 16.6). I typically use this option because it combines the ease of use of auto-keyframing without the worry of accidentally adding keyframes to tracks you don’t intend to animate.

Figure 16.6 Setting the Auto-Keyframe settings to only add keyframes to already-animated tracks and properties
Piloting the Camera
Now that you can set some keyframes, let’s get the camera into position.
To view through the camera, select the camera icon to the right of the camera you want to animate. This sets the Viewport to pilot the camera, letting you fly the Actor around the scene, attaching it to your view.
Camera icons appear in many areas of the Sequencer interface and it can be a bit confusing (refer to Figure 16.6). You’ll notice that the Camera Cuts track also has a camera icon. Clicking it lets you see the view from the perspective of the Sequence, including any camera cuts you author.
You’ll typically want to move between these views as you work, adjusting the Camera’s keyframes, and seeing the result in-context with other cuts.
When piloting a camera, you see through the lens of the camera and move it about the scene using the standard Perspective Viewport controls. You can adjust the camera’s keyframes in the Orthographic views or by adjusting the Camera Actor’s properties in the Details panel.
Track and Camera Naming
You might notice that the name of the track in Sequencer differs from the label in the timeline’s preview. This is a bit confusing, because these can be named independently (You may, for instance, use the same Camera Actor for several different tracks in several different Sequences). The name in the preview thumbnail is the name of the Actor in the world. You can rename your Cine Camera Actor using the Details panel to update the name in the timeline.
The name in the left panel is the track name. You can double-click this name to rename the track.
Transitions
The only transition UE4 offers is a Fade track. No cross-dissolve or other transition effects are available. This is mainly due to performance considerations. Doing a cross-dissolve requires the scene to be rendered twice and both scenes composited on top of each other during the dissolve. Although some scenes could manage this, most would struggle to render so much information.
Editing the Shots
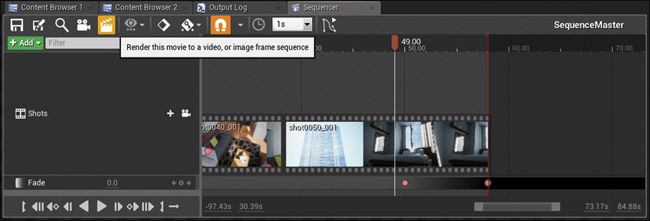
To return to the Master Sequence, select the title in the upper-right of the Sequencer window (see Figure 16.7).
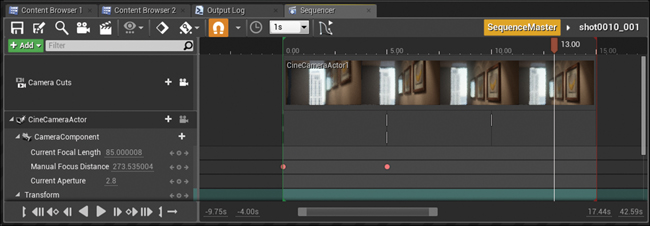
Figure 16.7 Completed shot with the SequenceMaster track highlighted in the upper-right of the Sequencer window
You will see that the preview of your shot has been updated with the view from your shot. You can use this as a guide to help when adjusting your in- and outpoints in the Sequence. To see better, zoom on the timeline using the range slider on the bottom of the Sequencer window.
Continue the editing steps for your remaining shots. Edit the shot, then return to the Master Sequence to see it in context, modify it, and iterate until you are happy with all the shots in the Sequence.
Saving
Remember to save regularly. Sequences are saved as UASSET files in your Project’s Content directory.
You don’t need to save the Level that the Sequence is in after you have placed the Sequence Actor for the first time. This Actor acts as a reference to your Master Sequence, lets the Sequence data initialize when the Level loads, and allows Blueprints to access it easily by referencing the Actor.
Collaborating
Because the shots are stored as individual UASSET packages, several team members can work on the same Sequence at the same time. Also, lighting, props, and other set dressing can continue while the animations are being developed in parallel. This saves time and lets you produce drafts earlier in the production pipeline.
Rendering to Video
After your Sequence is perfected, it’s time to get it to disk. This is where the speed of UE4 is astounding. Entire animations can be delivered (not just rendered, but up on YouTube) in the time it takes for a single frame to render in a standard ray-traced renderer like Mental Ray or V-Ray.
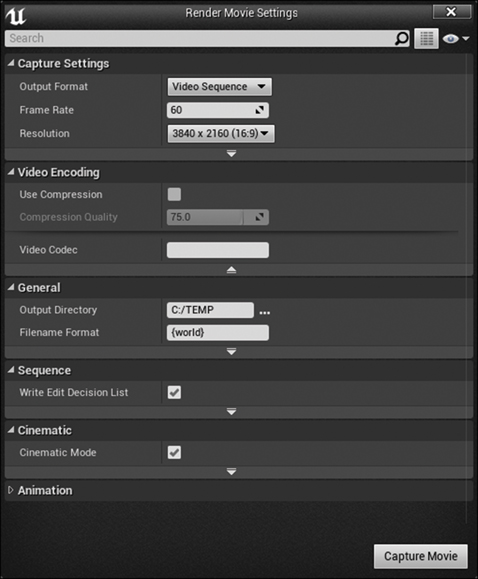
With your Sequence open, click the Render to Video button (see Figure 16.8) in the Sequencer toolbar. The Render Movie Settings dialog opens (see Figure 16.9). Here, you can set a wide array of rendering and export options. From bumper frames to pre-roll to burn-ins, UE4 exposes professional-level tools for video editors and compositors.
Render Movie Settings
As you can see, I have it set to render at 4K resolution at 60 frames per second (see Figure 16.9). This creates silky-smooth, razor-sharp animations that are truly eye catching. These files are huge at more than 100GB per minute of uncompressed footage.
I am rendering directly to AVI (Video Sequence), but if your studio has a more extensive post-production pipeline that relies on linear color, you can also render out the HDR image buffers individually using the Custom outputs option.
You can also chose to compress your AVI to save space (not recommended) or export to individual frames in common formats like BMP and EXR.
Rendering Process
When UE4 begins rendering, it spawns a small rendering window and begins writing to disk (see Figure 16.10). The render window is located in the upper left of the window, and the Editor is in the background. Notice the Capturing video notice in the lower right. Also, note the high disk write usage—the faster, the better.
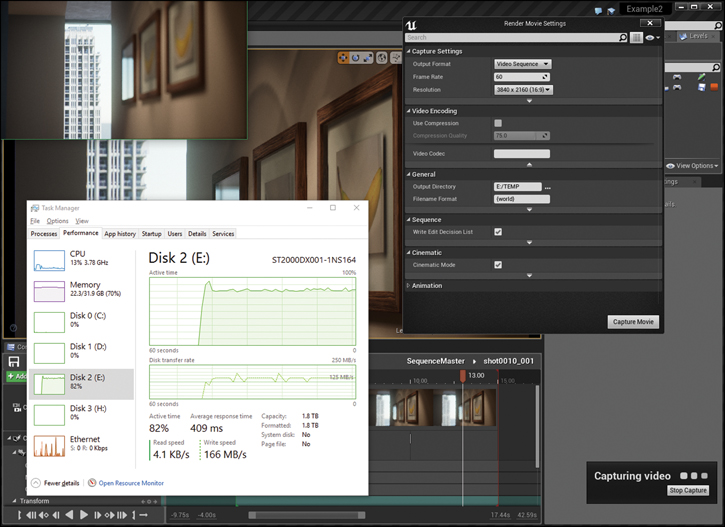
At this point, the rendering is being limited not by the visuals being generated but by the speed of the hard drive it is being written to. I can’t stress that enough. The act of writing the frame to disk takes longer than rendering the frame.
Write to the disk that provides the fastest, most consistent performance. Be sure to test. I was surprised to learn that my SSHD is significantly faster in the long haul than my typically very fast SSD that I had assumed to be the better choice. Drives with better sustained write performance will pay huge benefits.
After your animation is complete, process it just like you would any other video file. It may go straight to the Web or be included in a larger video, just like your standard visualization videos.
Summary
The ability to adapt to the client’s needs at a moment’s notice is just one more reason so many visualization studios are turning to UE4, not just to generate interactive content, but to deliver stunning pre-rendered content as well.
This 90-second Sequence took about 10 minutes to render—at 4K resolution at 60 frames per second. It takes more time compressing, copying, and uploading most video files produced using UE4 than it takes to render them.
With the powerful features of Sequencer, the ability to see exactly what will be in your camera frame at all times, and the physically correct Cine Camera model, you can begin producing video content in UE4 that meets and sometimes exceeds the quality from traditional renderers.