
Chapter 17. Preparing the Level for Interactivity
Building upon your simple Pawn, Game Mode, and Player Controller from the first example project will allow you to easily add exploration to your Level. However, you must set up your Level with collision, a Player Start, and other settings before the Player will be able to successfully navigate the Level.
Setting Up Your Level
To set up your Level for Interactivity, you’ll want to get your Level and Player Controller set up to use a mouse cursor and touch-style input. You’ll also enable the mouse interaction events, which allows you to highlight and click Actors in the game world at runtime.
Of course, you’ll want to open your Level before continuing. You might want to save out a new version of your Level as I have, so that you can return to an unmodified version of your Level easily.
Adding the Player Start Actor
As covered in Chapter 9, every UE4 Level needs a Player Start Actor. This simple Actor tells UE4 where to place the Player in the Level when the game begins.
Drag and drop a Player Start Actor from the Modes palette into the Level near where you want the Player to enter the world each time (see Figure 17.1).
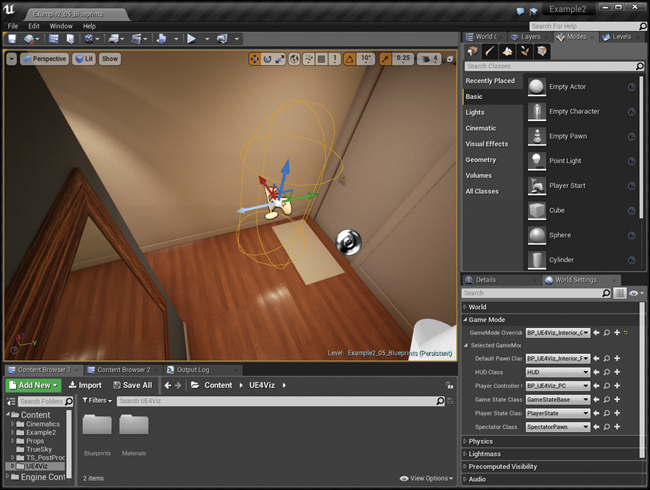
You should also rotate the Player Start Actor to face the direction you would like the player to begin. The blue arrow in the middle of the Player Start Actor indicates the Player Start Actor’s forward vector.
Adding Collision
You can now test your application by clicking the Play in Editor button. There’s a really good chance, however, that you will find yourself falling through the air below your Level when you do. This would likely be due to missing collision information.
Collision detection is serious business in interactive games and simulations. Knowing when one Actor collides with another Actor or has entered an area is essential for creating living worlds.
In UE4, you can use the Player Collision View Mode as shown in Figure 17.2 to preview what Actors have collision. In the Viewport, select the ViewMode button and select Player Collison from the dropdown list. To return to your regular view, set the Viewmode dropdown back to Lit.
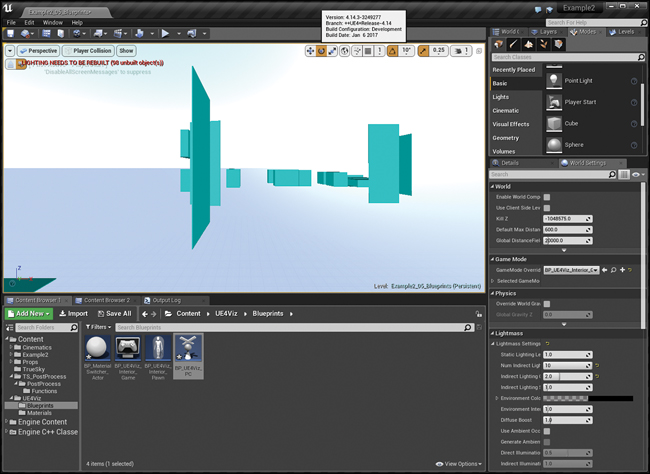
As you can see (or, more accurately cannot see) in the figure, there are no floors or walls, but some of the prop and door Meshes have collision already. These are represented by the flat-shaded versions of their collision primitives.
Collision in UE4 can be complicated and hard to understand at first glance. Fortunately, visualizations tend to be more simple, static affairs with few dynamic Actors (compared to a game with tens or hundreds of characters onscreen and in the game world at once), so you get to avoid some of the complexities that can make setting up collision so challenging.
Complex Versus Simple Collision
Games tend to rely on simplified version of models to perform collision calculations on. This is because these calculations are costly and get more and more costly the more polygons and information there is to process.
UE4 uses collision primitives—simple shapes like boxes, spheres, and capsule shapes—that can be authored in-Engine or by using low-polygon shapes made in a 3D application to use as simple collision. This allows orders of magnitude more polygons to be used graphically, whereas the physics engine uses an optimized version of the scene to do its calculations.
UE4 can also do per-polygon collision as needed. This is often used cosmetically in games to add precise effects graphically such as damage on walls or vehicles that happens in the exact spot of the apparent hit, while the actual physics collision uses the simplified Mesh for speed.
Because visualization scenes can be relatively simple with few interacting elements, you can often use per-poly or complex collision (as it’s known in UE4) in place of the simple collision, enabling you to skip the time and effort of creating custom collision geometry.
Walls and Floors
The main things you want your players to not walk through in a simulation are the walls and floors. Because these Meshes are geometrically simple and awkwardly shaped, we can safely set these to use per-polygon collision.
To do so, open the Static Mesh Asset in the Static Mesh Editor. In the Static Mesh Settings rollout in the Details tab, set the Collision Complexity to Use Complex Collision as Simple and ensure the Collision Preset is set to BlockAll (see Figure 17.3).
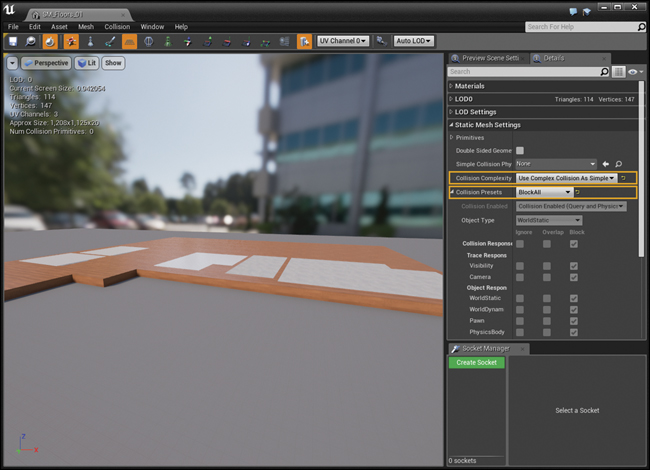
You can override the Collision Preset on a per-Actor basis using the Details panel; however, you cannot change the Collision Complexity property. You can only do that in the Static Mesh Editor interface or in the property matrix.
Bulk Editing with the Property Matrix
You must set up collision complexity for each Mesh you want your player to collide with. This could take a very long time if you had to open every Asset one by one.
Fortunately, UE4 has a Bulk Edit function.
Select all the Meshes you want to enable collision on in the Content Browser. Right-click one of the Asset icons to open the context menu. Under Asset actions, select Bulk Edit via Property Matrix (see Figure 17.4).
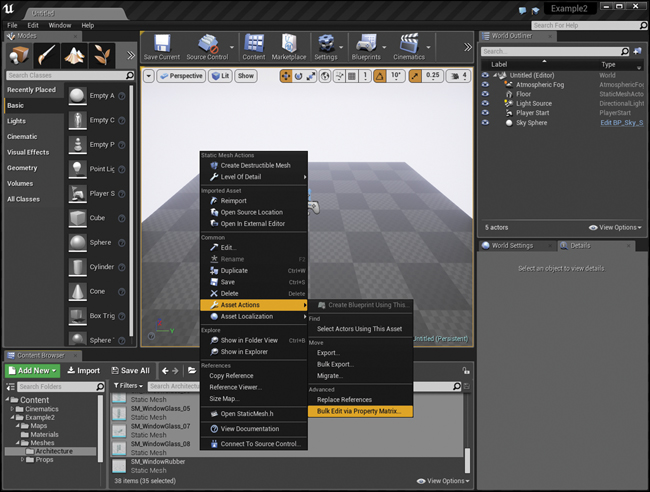
Figure 17.4 Selecting multiple Assets in the Content Browser and editing them at the same time with the property matrix
The property matrix shows all common properties in a modified Details Panel. From here, you can set the Collision Complexity for all of your Meshes in a single go (see Figure 17.5). You can also display properties as columns in the list on the left so you can visually compare Assets and modify individual Assets like a spreadsheet.
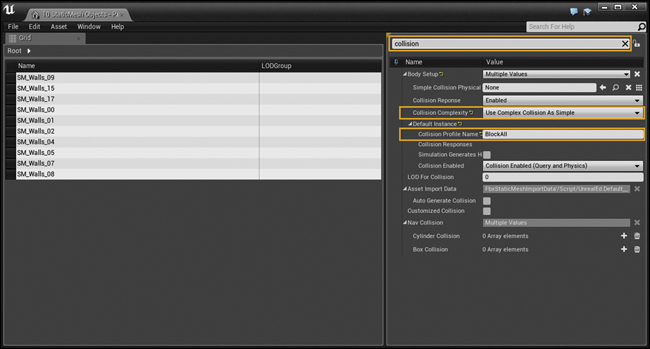
Figure 17.5 Using the property matrix to set the Collision Complexity of all the walls and floors at once
Sometimes, properties have differing names in different interfaces. The Collision Preset is one of those. To modify this property using the property matrix, look for the property named Collision Profile Name. Filtering the properties for collision helps to narrow down the list. To set the Collision Preset, type in BlockAll into the Collision Profile Name property text field.
When you are done editing your Assets, be sure to save so the changes are written to disk.
Visualizing Collision
After you set up your collision, check out your collision environment by setting the Perspective Viewport to the Player Collision View mode (see Figure 17.6). This lets you see the collision environment, which is the physics engine UE4 uses to calculate collisions.
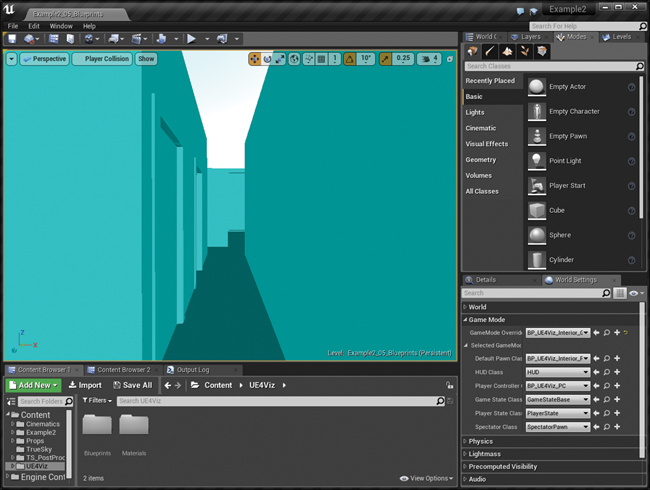
Figure 17.6 Player Collision View mode showing the per-polygon collision of the walls and floors being successfully turned on
Setting Prop Collision
Setting collision on Props is a little trickier. I personally prefer to turn off collision on most Props in my simulations, allowing the Player to freely move through and over most obstacles. I prefer to only have waist-high objects or taller stop my player. This allows a greater feeling of mobility in smaller spaces and makes navigation much easier for novice Players.
In Figure 17.7, you can see that most of the smaller Props still have collision on, potentially making it difficult for the Player to navigate this space.
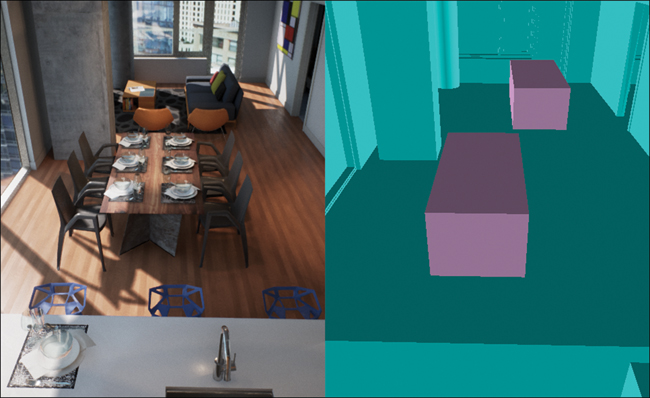
Figure 17.7 The final Collision setup showing that only the walls, floors, windows, and large furniture have player collision enabled, allowing the Player more freedom to move around the space
To enable the Props to still have collision (important for interactions, including mouse interactions like clicking), change the Collision Preset in the Static Mesh Editor (or the Collision Profile Name in the property matrix) to Ignore Only Pawn. This allows the Static Mesh to react to all other physics events, but won’t impede the Player’s movement. You can also set this property on a per-actor basis via the Details Panel.
Now you should be able to click Play and walk around your Level without fear of plummeting forever through the void. Walls and floors should feel solid, and the Level should be easy to navigate.
If you find yourself getting stuck or falling, you’ll need to look at the collision setup in your Level.
Enabling the Mouse Cursor
Because you want this to be a mouse-driven application, you want to see the cursor. Open the Player Controller and look for the Mouse Interface group of the class’s default properties (see Figure 17.8). Enable Show Mouse Cursor, Enable Click Events, and Enable Mouse Over Events, which allow 3D Actors in the scene to interact with the mouse cursor.

Figure 17.8 Setting up the Player Controller to use Mouse Cursor, Mouse Click, and Mouse Over events and adjusting Input Yaw and Pitch to compensate for the inverted turning feeling
If you test now, you’ll notice that you can only rotate the camera when the mouse button is being held down. Releasing the button displays the cursor and releases rotation control.
You also might notice that the axis of rotation feels “off.” The camera turns right when you expect it to turn left or up when you want to look down.
This is because of how Players expect to control the camera. When the Player doesn’t need to hold down a button to rotate, it usually feels more natural for the horizontal axis to follow the direction of the mouse. Right turns right, left turns left.
However, when the user clicks and drags to turn, it feels more natural for this action to act more like a touchscreen, anchoring the cursor to the point in 3D space and rotating the camera as if the user were using a trackball. This means dragging right on the mouse should turn the view left while dragging down should pitch the camera up.
You can adjust for this change in Player expectation via the Input Yaw and Input Pitch Scale values in the Player Controller (refer to Figure 17.8). The reason that the Yaw (Horizontal turning) is faster is due to human perception and what “feels” right. Having symmetrical axis speeds “feels” wrong.
It’s worth mentioning that a camera’s interactivity is all really up to personal preferences. Age, experience with different kinds of technologies, and even people’s favorite game will inform them how an interactive camera should behave. Listening to your Players about this and adapting to their needs in each project is important.
Creating Post-Process Outlines
To make it clear what Actor is highlighted, I want to use an outline similar to what’s used in the Editor. This effect is unavailable at runtime because it uses a completely different rendering system than the main Viewport.
Instead, you can use a post-process Material to draw outlines. I have (predictably) merged my own Marketplace content into this project, instanced the Material, and modified it to fit my needs (see Figure 17.9).
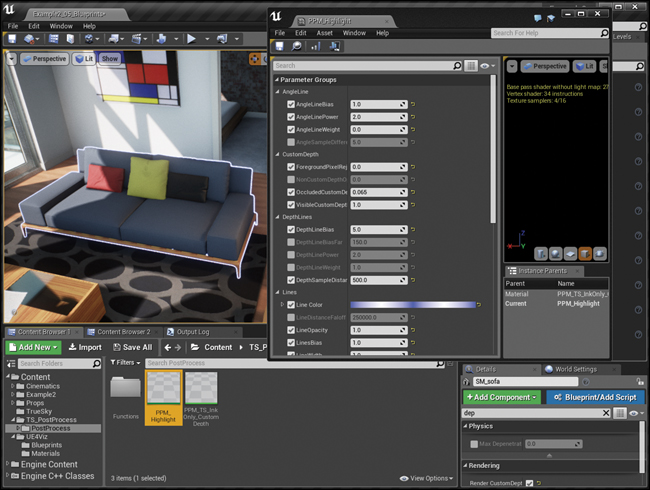
Figure 17.9 Testing the Post-Process Material by enabling the Render Custom Depth property on the couch Static Mesh Actor
To assign a post-process Material, you must do so in your Post-Process Volume under Blendables array.
Add an entry to the array, set it to an Asset Reference, and either select the post-process Material from the list or drag and drop it from the Content Browser into the property in the Details Panel.
This Material uses the Custom Depth buffer to define what Objects are highlighted and what Objects are not. You set Custom Depth on a per-Actor basis in the Levels Editor (refer to Figure 17.9).
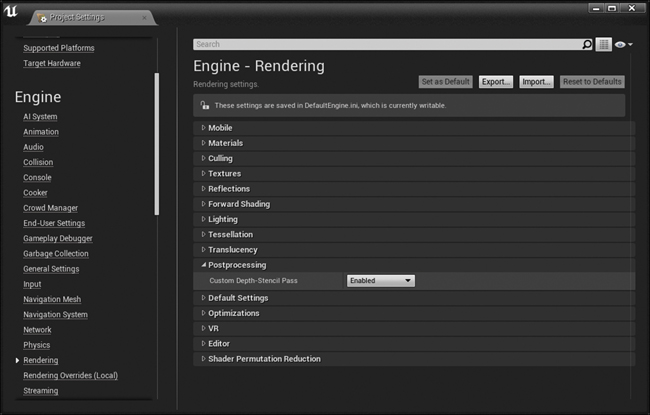
You might need to enable this effect in your Project Settings under the Rendering section (see Figure 17.10).
Summary
Getting your data set up to allow Player interaction is an important process and will ensure a great Player experience. Setting collision ensures the Player can walk through the world without fear of falling or without clipping through geometry, ruining the immersive experience.
Enabling the mouse cursor opens many Player interaction possibilities, including developing an interface in UMG and interacting with in-game Meshes using input events.
Your project is now ready for you to begin programming interactivity using Blueprints.