
Chapter 11. Project Setup
Now that you have a firm understanding of how to use UE4 to create a simple scene, you can dive into a real-life example. Interior visualizations are important to architects, marketing, designers, and potential buyers, and they are one of the most common types of visualizations being made in UE4. In this part of the book you will gain knowledge and explore using Lightmass to generate high-quality global illumination (GI) lighting, building and rendering a cinematic walkthrough using Sequencer. You then dive into learning how to use Blueprints to create dynamic interactions.
Project Scope and Requirements
In this example, imagine you have been provided a 3D model of an architectural interior (see Figure 11.1) and have agreed to produce an interactive visualization that allows the Player to freely explore the space from a first-person walking perspective. The Player should be able to modify specific materials using a simple, mouse-driven user interface. The client has also requested an architectural animation to be developed using Sequencer and recorded to video for offline playback and editing.

The first step is to prepare the 3D model for import to UE4, including proper materials, UV coordinates, and Lightmap coordinates and focusing on making clean geometry that imports in-place and is easy to update and iterate on. I’ll also show you how to harness UE4’s automatic Lightmap coordinate generation to save time and improve the quality of your scenes.
After importing the model to UE4, it’s time to begin the iterative process of applying Materials and placing lights, reflection probes, lighting portals, and post-process volumes to get great-looking results quickly.
After the scene is satisfactory, the next step is to create the animated walkthrough using Sequencer. You’ll learn how to create compelling animations easily and how to get them to play and stop using Player input.
Next comes merging the Pawn developed in the Chapter 9 into the new project, and setting up the scene to allow the Player to walk through the scene by enabling collision and setting up the proper Actors and world settings.
The final step is to create Material and Geometry-switching systems that use Blueprints and UMG to add the final layer of polish and make the application ready to be packaged and delivered to the client.
Note
Don’t forget—you can download this project and all the associated source files from www.TomShannon3D.com/UnrealForViz and follow along.
Here are the requirements for this project:
![]() Develop an interior architectural visualization application using client-provided 3D models.
Develop an interior architectural visualization application using client-provided 3D models.
![]() Use Lightmass to create high-quality GI lighting and aim for photorealism.
Use Lightmass to create high-quality GI lighting and aim for photorealism.
![]() Create pre-defined architectural animation using Sequencer using multiple camera angles and transitions.
Create pre-defined architectural animation using Sequencer using multiple camera angles and transitions.
![]() Merge the Pawn from Chapter 9 and prepare the scene to allow the Player to move about the space.
Merge the Pawn from Chapter 9 and prepare the scene to allow the Player to move about the space.
![]() Develop a UMG- based UI that allows the Player to switch to different versions of the scene.
Develop a UMG- based UI that allows the Player to switch to different versions of the scene.
![]() Develop a mouse-driven, Material-switching Blueprint.
Develop a mouse-driven, Material-switching Blueprint.
![]() Package the project for delivery.
Package the project for delivery.
Setting Up the Project
This section covers creating a blank project from the Epic Launcher and migrating the Player Controller, Game Mode, and Pawn to the new project along with the needed configuration files.
This migration lets you build upon the systems you built in Chapter 9 and focus on preparing your source 3D and 2D data for UE4.
Creating the Project
Using the Epic Launcher, start the version of the Engine you want to use and select the New Project tab when the Project Browser appears.
This time, you won’t be including the Starter Content, so uncheck that option, but do leave the Target Hardware settings at Maximum Quality.
The project is named Example2. Put it next to the previous project, Example1.
Note
The only way to open the Editor is by opening a project. You can also create a new project from within the Editor by choosing File > New Project.
Migrating from Another Project
You will often want to take the Assets, Blueprints, and other work you’ve done in previous projects and copy them over to new projects.
UE4 relies on the concept of Assets referencing other Assets. For example, Materials might reference several Textures. Each Material, in turn, will be referenced by Meshes it’s applied to, and even Material Instances that are derived from it.
Because of this, you must be careful when manually copying content between projects so that they retain these references and the correct folder structure; otherwise, the references will not be maintained, potentially causing loading errors, bugs, or even crashes in your target project.
The most reliable way of copying content from one project to another is to use the Editor’s Content Migration feature. Migration ensures that all Assets referenced by the Assets you want to copy are copied over into the target project.
To migrate your content from one project to another, open the source project (the project with the files you want to copy) in the Editor. In this case, that would be the Example1 project.
After it’s open, select the Assets you want to copy in the Content Browser. You can select single Assets, Levels, or entire folders. In this case, select the Pawn, PC, and Game Mode Assets (see Figure 11.2). Right-click and select Asset Actions > Migrate.

A summary opens of the files that will be copied over to the new project. Review it and make sure you have everything you need—and nothing you’re not expecting (see Figure 11.3).

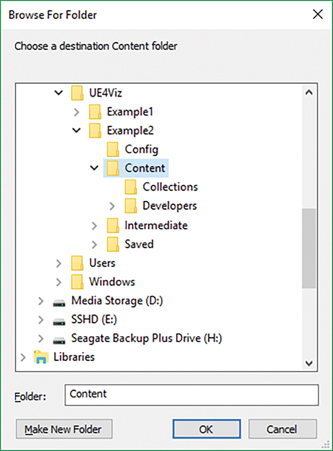
Upon confirming the summary, a screen appears asking you for the new Content directory within the new project. Navigate to the new project’s Content folder and click OK (see Figure 11.4).
UE4 copies the files over and reports on the success. You should immediately see the copied content in the Content directory of the new project.
Don’t Forget the Input
A good deal of work went into the input settings of the first project, and getting those into a new project is easy to do. In fact, the PC and Pawn would fail to compile at this point because they reference the input bindings created for Example1.
These settings are stored in the Project’s Config folder. These files are not governed by the Content Browser and are not copied over when you use the Content Migration tool, so you must move them manually.
To do so, locate the DefaultInput.ini file in the source project’s Config directory (Example1 Config) and copy it to the target project’s Config directory (Example2Config).
Copying, Renaming, and Moving Assets
Upon opening the Example2 project, notice an Example1 folder containing the Pawn, PC, and Game Mode.
You want to move these to a new folder that is project-independent and easy to find, and now is a good time to get rid of that Example1 folder in the Content Browser. You’re on Example2 now!
Always perform moving, copying, renaming, or any other file operations within the Content folder using the Content Browser. This ensures that references to moved or renamed assets are maintained. If required, a redirector is created. These are small 1-2kb files that act as a pointer to the correct location of the asset.
Follow these steps:
1. Create a new folder in your Content directory called UE4Viz and within that folder another called Blueprints. I’ve chosen this folder to contain reusable code that I might bring from project to project without my needing to rename or copy anything.
2. Drag the Pawn, PC, and Game Mode Assets onto the Blueprints folder you just created. UE4 asks whether you want to move or copy the Assets. Select Move.
3. Right-Click on the Example1 folder and select Fix Up Redirectors in Folder.
4. Delete the old Content1 Folder by right-clicking on it from the Content Browser and selecting Delete.
5. Select Save All from the Content Browser’s toolbar to ensure all your changes are saved to disk.
Applying Project Settings
A few rendering options can help optimize the Engine for use in architecture visualizations. These scenes are typically much less intense than a video game scene, which lets you pump up some of the settings and still maintain a stable frame rate.
Open the Project Settings dialog from the Edit menu and navigate to the Rendering button in the left column (see Figure 11.5). Modify the settings as shown in the figure and described in the following list.

![]() Disable Texture Streaming: This setting is designed to enable large game worlds in constrained memory on consoles and older PC hardware. It can cause lightmapping errors when you use Architectural Meshes and high-resolution Lightmaps. Disabling Texture Streaming forces all the textures used in the Level to be loaded into RAM at once. Use this setting with some level of caution. Texture streaming is an important optimization for complex scenes, and disabling it can cause performance issues.
Disable Texture Streaming: This setting is designed to enable large game worlds in constrained memory on consoles and older PC hardware. It can cause lightmapping errors when you use Architectural Meshes and high-resolution Lightmaps. Disabling Texture Streaming forces all the textures used in the Level to be loaded into RAM at once. Use this setting with some level of caution. Texture streaming is an important optimization for complex scenes, and disabling it can cause performance issues.
![]() Set Reflection Capture Resolution: To get the highest quality reflections, you can increase the resolution of the Reflection Capture Actors you place in your scenes.
Set Reflection Capture Resolution: To get the highest quality reflections, you can increase the resolution of the Reflection Capture Actors you place in your scenes.
Be careful turning this up too far: It can eat up a lot of memory if you have a lot of high-resolution reflection captures. I don’t recommend going past 512 for this setting unless you have only one or two reflection captures in each of your Levels.
![]() Turn on Support Global Clip Plane for Planar Reflections: Mirrors and reflections are a staple of visualizations, and UE4 has support for mirror-style Planar Reflections. This is a very expensive setting, and you should enable it only if you absolutely need it. Even when reflections aren’t being rendered on-screen, they have a significant impact on rendering performance project-wide.
Turn on Support Global Clip Plane for Planar Reflections: Mirrors and reflections are a staple of visualizations, and UE4 has support for mirror-style Planar Reflections. This is a very expensive setting, and you should enable it only if you absolutely need it. Even when reflections aren’t being rendered on-screen, they have a significant impact on rendering performance project-wide.
You can mitigate this impact using the Details Panel to disable a lot of heavier features like some of the Post-process settings such as Screen-space Ambient Occlusion and Reflections. You can even limit the Actors that are visible or the distance the reflected scene will render.
![]() Turn off Separate Translucency: Separate Translucency is a performance enhancement for games with lots of Alpha transparency effects such as sparks and explosions. These effects can be very expensive to apply effects like Depth of Field to, so these effects are rendered separately and ignored by the post-process pipeline. You don’t want or need that because you want your translucent surfaces to behave as realistically as possible.
Turn off Separate Translucency: Separate Translucency is a performance enhancement for games with lots of Alpha transparency effects such as sparks and explosions. These effects can be very expensive to apply effects like Depth of Field to, so these effects are rendered separately and ignored by the post-process pipeline. You don’t want or need that because you want your translucent surfaces to behave as realistically as possible.
This setting has no effect on Masked-type materials so things like vegetation will not typically be affected.
![]() Turn off Ambient Occlusion and Ambient Occlusion Static Fraction: These options refer to the Screen-space Ambient Occlusion (SSAO) post-process effect. SSAO is a great way to add detail to dynamically lit scenes and objects. Because your scene is almost entirely static and you are using high-quality Lightmass settings, you can disable this setting for a significant performance boost, especially at higher resolutions.
Turn off Ambient Occlusion and Ambient Occlusion Static Fraction: These options refer to the Screen-space Ambient Occlusion (SSAO) post-process effect. SSAO is a great way to add detail to dynamically lit scenes and objects. Because your scene is almost entirely static and you are using high-quality Lightmass settings, you can disable this setting for a significant performance boost, especially at higher resolutions.
These settings only affect the SSAO effect and does not affect AO calculated by Lightmass. Static Fraction controls how much the SSAO effect blends with baked Lightmaps and also has a performance overhead that can be alleviated by turning off the effect.
Project settings are written automatically to the project’s DefaultEngine.ini file and there’s no need to save before closing the Preferences window. However, because we changed settings such as Planar Reflections, you will need to restart the Editor so that these settings can be initialized. Upon reopening the Editor, you might experience a recompile of the shaders that can take a while, but should happen only once.
Summary
Your project is now ready to roll. Enabling some of UE4’s advanced rendering features and turning off some unneeded ones improves image quality and avoids issues with Texture streaming, SSAO, and translucent materials.
You’ve also learned how to use UE4’s Content Migration feature to move your work from one project to another, ensuring you don’t have to reinvent the wheel for each project. Input settings have also been copied over using .ini files.
You’re now ready to start learning how to light your world, apply Materials, and use Blueprints and Unreal Motion Graphics (UMG) to allow the Player to make interactive changes.