
Chapter 9. Printing
Fortunately, Visio has plenty of options to help you get the perfect printed output. In this chapter, you explore several scenarios and the locations of the settings and options for getting the right printout.
The paperless office is a noble goal, but we are tactile creatures. Sometimes there’s no substitute for a paper in one hand and a red pen in the other!
In addition to correcting and reviewing, there are plenty of other reasons for printing. Maybe you need handouts or large-format posters for your next meeting, or plans for builders and installers in the field. Maybe your audience doesn’t have Visio or even the free Visio Viewer installed. Perhaps you don’t want people to manipulate your work or “borrow” its contents. Or if you don’t have the option to publish your diagrams to the web or SharePoint site, then printed output might be the best way to share your ideas.
Printing Basics
One-page documents using built-in templates generally print just fine on typical office printers. Visio’s built-in templates are configured to match standard office paper: the U.S. Units templates for letter-sized paper and the Metric Units templates for A4.
Printing from the Backstage Area
To start printing, the first place to go is the Backstage area. Let’s look at the basic options behind File, Print.
![]() LET ME TRY IT
LET ME TRY IT
Exploring Basic Print Options
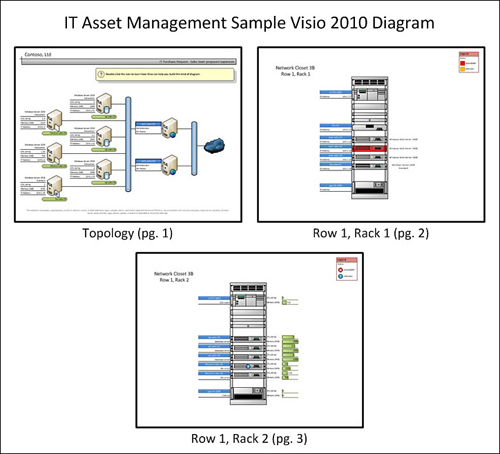
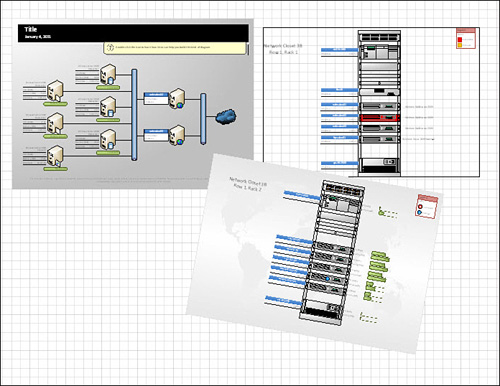
- Start a new drawing from Sample Diagrams. Choose the IT Asset Management sample. This drawing has three pages; a logical network diagram, and two physical rack layouts, which are scaled drawings. Figure 9.1 shows an overview of all three pages.
Figure 9.1. The three pages of the IT Asset Management drawing.
- To explore the print options for this document, click File, Print. You see the Backstage Print screen with three options—Quick Print, Print, and Print Preview—as shown in Figure 9.2.
Figure 9.2. Print options in the Backstage area.
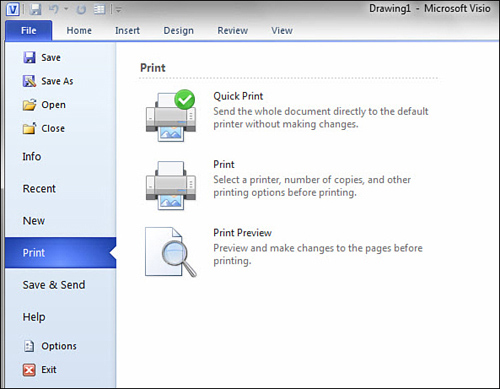
- The top button, Quick Print, prints to your default printer without asking questions. No dialogs, no choices, just print. If you want to test printing from Visio, go ahead and click it. If you’re a paper-saver, skip this step.
I rarely use this button because I like to review what I’m about to print. I’ve had too many experiences of sending what I thought was a small print job to the printer, only to end up with a whole stack of wasted paper.
Another caveat: The Quick Print caption says that it sends the whole document to the default printer, but my experience is that it sends only the current page to the printer.
- Click the Print button to open a standard Print dialog, as shown in Figure 9.3. It contains options for choosing a printer, along with which pages and how many copies to print.
Figure 9.3. Visio’s Print dialog.
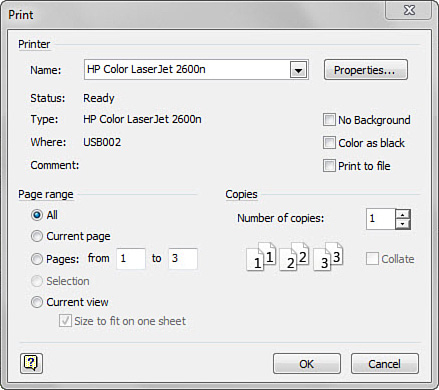
Note that you can choose Current View under Page Range to print exactly what is shown in the current drawing window. This is a Visio user favorite, which was missing from earlier versions of Visio. Just zoom in on a detail that you want to print and use this option. No more Print Screen key!
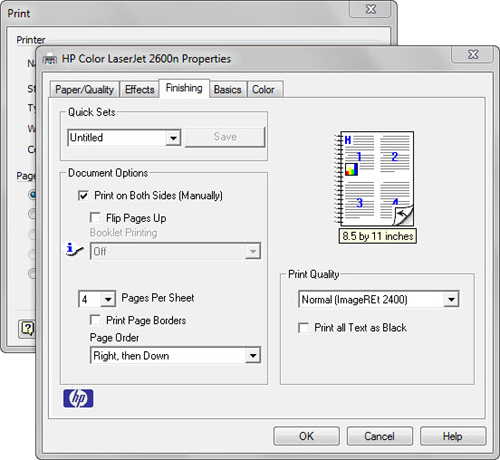
- Click the Properties button in the Print dialog. You see options for your printer. The dialog that appears varies from printer to printer and contains printer-specific features and options.
I frequently visit Printer Properties to print multiple pages on a sheet of paper and to specify duplex printing. Because most of the printing I do is “rough draft” printing, I like to save paper. Figure 9.4 shows the settings for my HP printer.
Figure 9.4. Specifying four pages per sheet and duplex printing for an HP LaserJet 2600n printer.
- Return to File, Print by cancelling the dialogs, and click Print Preview. You see the Print Preview view of your document, as shown in Figure 9.5.
Figure 9.5. Print Preview for the IT Asset Management sample drawing.
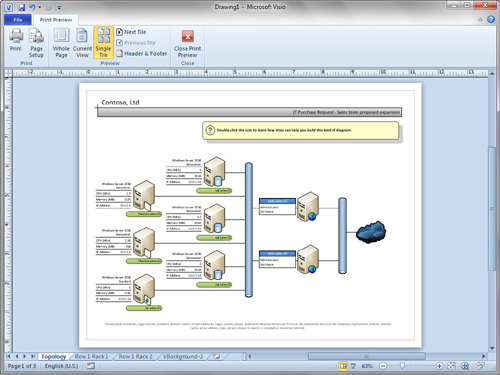
Print Preview looks like a normal drawing window, but there are some key differences:
a. The Ribbon has only one tab: Print Preview.
b. You can access all pages via tabs, but you can’t make edits or select shapes.
c. The mouse cursor is a magnifying glass that enables you to toggle between fit-to-page and 100% zoom levels by clicking.
d. Stencils and other task panes are hidden.
e. The grid is hidden (unless you’ve chosen to print the grid via Page Setup, Print Setup, Print gridlines).
- Save this drawing as Ch09 Printing IT Assets.vsd so that you can use it in future exercises.
Print Preview
For your sample drawing, Print Preview looks pretty much as it does in the drawing window. Because all three pages are landscape oriented, on standard office page sizes, this is expected.
Print Preview’s usefulness is more apparent when you have drawings that are tiled across several sheets of paper, have odd page sizes, or have multiple pages with mixed orientations.
Show Me: Media 9.1—Exploring Print Preview
![]()
Access this video file through your registered Web Edition at my.safaribooksonline.com/9780132182683/media.
So let’s experiment and make the sample’s Print Preview more interesting.
Exploring Print Preview
- Continue using the file Ch09 Printing IT Assets.vsd that you created earlier.
- Go to File, Print Preview.
- Note that Print Preview has a Print button, which is the same as the one you see in the Backstage area.
- Print Preview also has a Page Setup button, seen in previous chapters, that lets you configure many different page settings. This is the same Page Setup that you access by right-clicking page tabs or access from the Design tab.
- Say you want to blow up a drawing to make a poster, but you don’t have a large-format printer. You can magnify the printed size of the current page, and tile it across several sheets of printer paper. You don’t have to alter the drawing at all!
a. Click Page Setup and find the Print Zoom section of the Print Setup tab.
b. Set the page to Fit to 3 Sheets Across by 3 Sheets Down. Note how the preview area on the right gives you an idea of how the page will print.
c. Click OK to return to the Print Preview window. Notice the dashed lines dividing the page into nine sections. These are page tiles and indicate that this drawing will print across nine sheets of paper. Each page tile represents one piece of printer paper. After you print, you can trim the pages and tape them together.
- Experiment with the Whole Page and Single Tile buttons.
In Whole Page view, notice the red rectangles that appear around page tiles when you move the mouse cursor. When you see a red rectangle, clicking zooms in to show just a page tile up close. Clicking a second time zooms out again. You can check individual page tiles to see whether important information falls near the edge of the tile and might get lost when you cut and paste the sheets together.
- Experiment with the Next Tile and Previous Tile buttons. They cycle through all the page tiles for your document and show you what will come out of the printer.
The IT Asset Management document has 3 pages plus one background page. Because of the modified Fit To settings for the first page, it now prints on 11 sheets. The background page doesn’t print, and Next Tile stops short of the background page.
Note also that Fit to 3 × 3 affected only the first page in the document. The other two pages will still print on one sheet of paper each.
- Click the big, red Close Print Preview button to return to the normal Visio environment.
- Go to page 2 of the document—Row 1, Rack 1.
- Change the orientation of the drawing to Portrait. On the Design tab, click the Orientation button and choose Portrait. The drawing page becomes vertically oriented and some of the shapes fall outside the page border. You can reposition the shapes so that they are on the paper and centered if you like.
- Return to Print Preview. As you flip through the page tiles, see how page 2 is now oriented to landscape? The Orientation button handles the rotation of both the Visio page and printer paper.
If you change a page’s orientation using the Page Setup dialog, you need to make changes on the Print Setup and Page Setup tabs; otherwise, the printer and page settings won’t agree.
I always start with Print Preview because I like to resize drawings to odd page sizes. If you anticipate creating complex documents that have multiple pages with different sizes, scales, or orientations, you should always start with Print Preview before you print.
You can speed up the process by adding Print Preview to the Quick Access Toolbar.
![]() LET ME TRY IT
LET ME TRY IT
Adding Print Preview to the Quick Access Toolbar
- Click the Customize Quick Access Toolbar drop-down arrow in the top-left corner of Visio’s main window.
- Select Print Preview from the list. You should now see the Print Preview icon—a sheet of paper with a magnifying glass.
Now you don’t have to go to File, Print every time you want to print or check how your document will print.
The only remaining reason to go to the Backstage area is for Quick Print (which isn’t very quick if you have to go the Backstage area). If you use Quick Print frequently, you can add it to the Quick Access Toolbar too. It is one of the standard items in the drop-down list; located immediately above Print Preview.
Experimenting with Printing Without Wasting Trees
Whether you are learning the ins and outs of Visio’s complex printing features or configuring a complicated document for output, wouldn’t it be great to test printing without wasting paper?
You’ve just seen how easily a 3-page document can turn into 11 pages of output. Clearly, Visio’s print options are numerous, and the potential to mess up print jobs for complex documents is there.
Luckily, in addition to Print Preview, you have another way to protect the forests. You can print to a file instead of to an actual printer. When you print to a file, you create a PDF or XPS (Microsoft XML Paper Specification) file. This file contains a sheet-by-sheet picture of your print job, which you can view in the appropriate viewer, and decide whether or not to print.
Show Me: Media 9.2—Testing Print Settings by Printing to PDF or XPS Files
![]()
Access this video file through your registered Web Edition at my.safaribooksonline.com/9780132182683/media.
![]() LET ME TRY IT
LET ME TRY IT
Testing Print Settings by Printing to File
- Continue using the file Ch09 Printing IT Assets.vsd that you created earlier.
- Go to File, Print and then click Print. Alternatively, if you added Print Preview to the Quick Access Toolbar, click it and then click Print on the Ribbon.
- Choose a PDF or XPS printer instead of a physical printer. In the Name drop-down of the Print dialog, choose Microsoft XPS Document Writer, as shown in Figure 9.6.
Figure 9.6. Choosing a print-to-file printer driver. Note the other “virtual printers” in the list: pdfFactory, Send To OneNote 2010, and Snagit 9 (a screen-capturing utility).
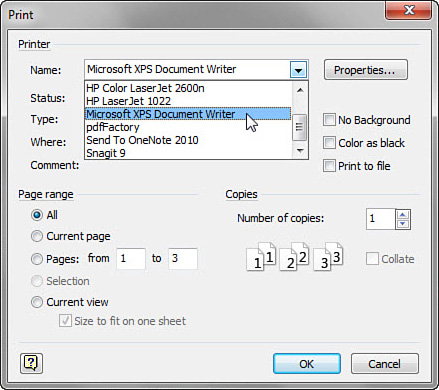
Note that Office 2010 and Visio 2010 install the Microsoft XPS Document Writer and XPS Viewer by default. You might not have these utilities if your IT department has decided not to install them.
- Click OK. You are prompted to choose a location and name for the XPS file that is about to be created. Choose an easy-to-remember location, such as your desktop; enter a name; and then click Save. A new XPS file is created.
- Using Explorer, browse to the location of the saved XPS file and then double-click the file. It opens in the XPS Viewer, and you can examine each sheet of paper that your print settings create.
You can use this XPS file to check that your Visio document will print as expected then print from Visio, or you can print directly from the XPS Viewer itself.
Printing to files is a great way to learn how to print with Visio because you are able to double-check complex jobs. You can also create print jobs when you are working away from your printer.
If you like working like this, consider making the Microsoft XPS Document Writer your system’s default printer so that you don’t have to choose it in the Print dialog every time. Be aware that setting the default printer affects all your applications, not just Visio, so you might not want to do it. However, the change is easy to do and easy to undo, so it’s worth exploring.
Setting the Default Printer (Windows 7)
- Click the Windows Start button in the lower-left corner of your screen.
- Select Devices and Printers in the menu. The Devices and Printers window appears.
- Expand the Printers and Faxes area and locate the Microsoft XPS Document Writer item.
- Right click the icon and select Set as Default Printer, as shown in Figure 9.7.
Figure 9.7. Setting the default printer to the XPS Document Writer.
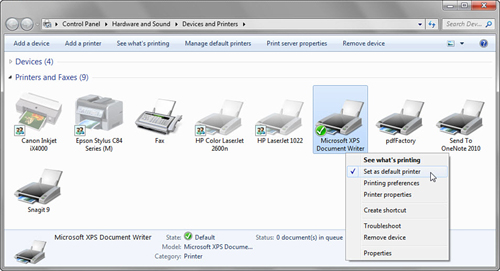
The XPS Document Writer is now your default printer. If you choose Quick Print now, the XPS Document Writer is used, so you won’t burn any paper without a chance to stop. When you click Print, the XPS Writer is already selected in the printer list, saving you that step each time.
To restore your normal default printer, just follow the steps in the last exercise, except right-click on the physical printer to set it as default.
Understanding Printing
By now, you’ve noticed that several independent factors influence your printed output. If you understand them, you will have an easier time solving printing problems and properly printing your diagrams.
Keeping Print Variables in Mind
First, notice the vocabulary. The words printer, paper, and sheet are used for the physical output. The words drawing and page are used for the virtual canvas inside Visio.
You also need to keep the following variables in mind for each page in your document. They can be adjusted in numerous ways, offering rich and complicated printing possibilities:
• Printer paper size
• Drawing page size
• Printer paper orientation (Landscape or Portrait)
• Drawing page orientation (Landscape or Portrait)
• Print zoom settings (Adjust to % or Fit to X by Y sheets)
The Page Setup dialog, which is accessible from many places in Visio, enables you to control these settings. Paper and print zoom settings are set on the Print Setup tab, and the Page Size tab controls page configuration.
On the Ribbon, the Design tab also has the Page Setup group, which enables you to set orientation and size. These controls differ from the Page Setup dialog in that they set the size and orientation for both printer paper and the page at the same time. This capability is a great convenience but can be confusing if you are accustomed to setting paper and page settings independently via Page Setup.
Tell Me More: Media 9.3—Don’t Resize Shapes, Configure Printer Settings!
![]()
Access this audio file through your registered Web Edition at my.safaribooksonline.com/9780132182683/media.
Looking at a Complicated Print Job from a Simple Document
The IT Asset Management sample drawing is a fairly simple document with three pages (see Figure 9.1), all of which are oriented horizontally and have typical page and paper sizes.
By playing with paper and page sizes and orientations, you can create a complicated set of printings, such as the example shown in Figure 9.8, without altering the shapes in the drawing.
Figure 9.8. After manipulating printer and page settings, the IT Asset Management sample’s three pages printed on six sheets of paper with various sizes and orientations.
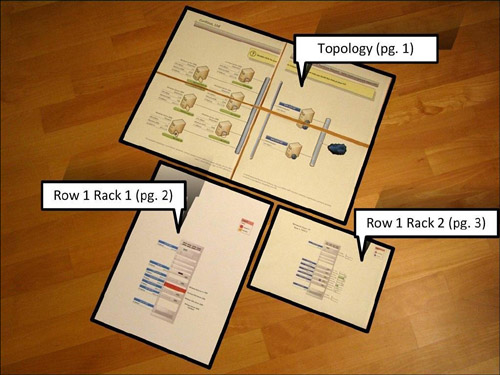
Let’s go over each page shown in Figure 9.8, look at the paper and page settings, and point out interesting features for each case.
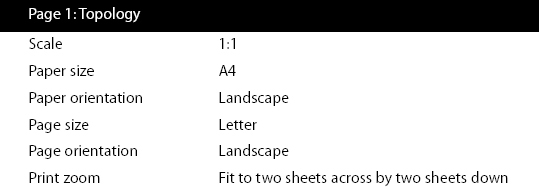
Page 1 is enlarged and spread across four sheets of paper. Because I am an American living in Germany, I still like to work with U.S. Units templates, but I print on metric-sized paper. Notice in the preceding table that the page is Letter-sized, but the paper size is A4. A4 is a metric size that is very close to Letter (see the note at the end of this section for more information on paper sizes around the world).
I used the Print Zoom setting to spread it across four sheets of paper. With some scissors, tape, and a bit of patience, I can piece together a large rendition of the Topology page.
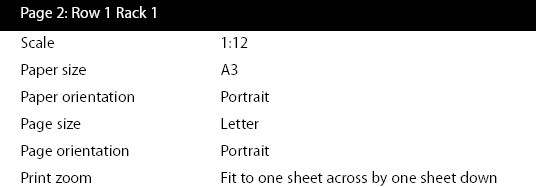
For page 2, I changed settings for both page and printer paper. First, I set the page orientation to Portrait but left the page size as Letter. I then set the paper size to A3, Portrait. A3 paper is twice the size as normal office paper and similar to US Tabloid size paper.
It’s important to note that the printer paper is much bigger than the page size. The Fit to 1 Sheet Across by 1 Sheet Down print zoom setting effectively magnifies the output, doing its best to fit the page contents to the paper.
If your printer has several trays that can hold different-sized paper, you might be able to send the whole document to one printer in one step. For this example, however, I had to print each page separately. Page 1 and page 3 went to my normal laser printer, but page 2 was sent to my large-format inkjet.
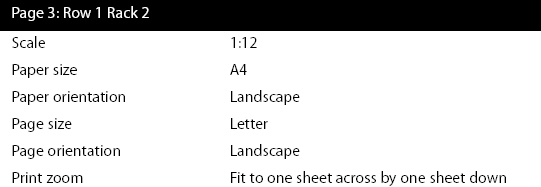
The last page has pretty much an unchanged setup, except that the page size is Letter and the printer paper is A4. Although these are nearly the same size, Print Zoom still plays a small role.
If I use Adjust to 100% instead of Fit to 1 Sheet Across by 1 Sheet Down, I get two pages, one of which is blank. The Fit To setting squeezes the fatter Letter-sized page onto the skinnier A4 paper, with a slight reduction in size to make it work. Using 100% tells Visio that you don’t want any resizing to happen in the printout, and the slight mismatch between A4 and Letter results in page tiling.
Another option is to change the drawing page size to A4, too. Because no details of this drawing are against the edge of the page, this is a harmless modification. Matching page size and paper size simplifies things and reduces confusion.
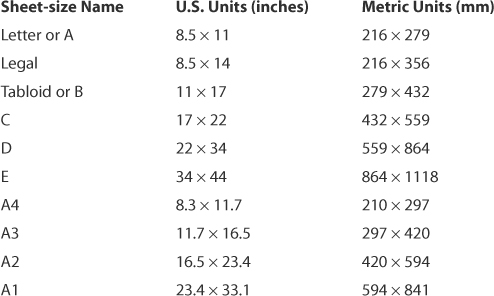
The standard paper size in the United States is called Letter and is 8.5 × 11 inches. In the rest of the world, A4 is common, measuring 210 × 297 millimeters.
To put the most common paper sizes in perspective, U.S. Letter is 0.2 inches (6 mm) wider than A4 paper, but 0.7 inches (18 mm) shorter.
If your company has offices across the globe, it may be helpful to know about the paper sizes that your overseas colleagues use.
Headers and Footers and Print Margins
Print Preview is the place to edit and see headers and footers. Just click the Header & Footer button on the Print Preview Ribbon. The information and fields that you can add to headers and footers are discussed in Chapter 3, “Organizing and Annotating Diagrams.”
Inside the Header & Footer dialog, you see two Margin fields for controlling the distance of the header and footer from the top and bottom of the page, respectively. These settings are independent of the print margins. Although it is nice to have headers and footers as out of the way as possible, make sure that you don’t get too close to the edges of the paper; otherwise, they get cut off by the printer.
You can set print margins via the Page Setup dialog. Just go to the Print Setup tab and then click Setup. The Print Setup dialog appears and contains left, right, top, and bottom print margin fields. The default values are 0.25 in. or 6.28 mm. Your actual printer might have different capabilities. Visio does its best to understand the specified printer’s capabilities and not let you set smaller values than the printer can handle. In Print Preview, you see a border around the page that represents the print margins. This is a helpful guide when checking header and footer margins and checking whether details of your drawing are likely to be cut off by the printer.
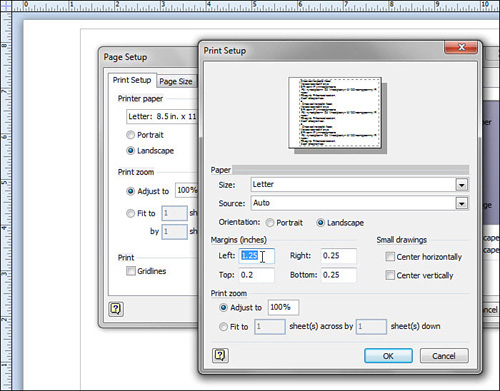
The print margins are also visible in the drawing window if page breaks are turned on. Go to View, Show and check the Page Breaks box. Figure 9.9 shows print margins in the drawing window, as well as the settings in the Print Setup dialog.
Figure 9.9. Going wild with print margins in the Print Setup dialog.
If you are printing drawings that are tiled across multiple sheets of paper, you actually want your print margin values to be a bit larger than your printer’s limit so that you get some overlap from tile to tile. Having this overlap makes it easier to trim each sheet and paste them together.
Printing Scenarios
Visio’s print, print zoom, and page settings offer innumerable combinations for getting drawings onto paper. Examining all the variations is mind-numbing and could possibly prevent you from reaching the next chapter.
Instead, let’s look at a few scenarios and discuss what it takes to get the proper output for each of them.
Printing Part of a Diagram
While you work, you zoom in and out, and pan around to get a better view of specific parts of your drawing. You can print any view of your diagram—exactly what is showing in the drawing window, and you can have it fill up an entire sheet of paper so your output is as easy to see as possible.
![]() LET ME TRY IT
LET ME TRY IT
Printing the Current View
- Start with any Visio drawing.
- Zoom and pan to a particular detail that you would like to print.
- Go to Print Preview and then click Current View. You should see roughly what was shown in the drawing window before you entered Print Preview.
- Click Print. The Print dialog appears.
- In the Page Range section, be sure to check Current View.
- You can send the output to a printer or just test by printing to the Microsoft XPS Document Writer.
When you print the current view, only a single page of the document is printed, on a single sheet of printer paper. Also, Visio automatically chooses a landscape or portrait orientation based on the shape of the current drawing window.
Selectively Printing Elements in a Drawing
You’ve seen how you can print the current view, but there are a few other granular options for printing subsets of a Visio drawing.
Printing Specific Pages
The Print dialog’s Page Range section enables you to print the current page or a range of pages by specifying starting and ending page numbers. However, you can’t print disjointed ranges of pages like you can in Word.
Printing Background Pages
Normally, background pages don’t explicitly print on separate sheets; they accompany the foreground pages to which they are assigned. However, you can print a background page by selecting its page tab in the drawing window and then selecting Current Page in the Page Range section of the Print dialog.
Printing Selected Shapes
You can print just the shapes that are selected in the active drawing window. To do this, choose Selection from the Print dialog’s Page Range section.
Oddly, this option doesn’t work if you go through Print Preview; Selection is disabled via this route. You have to use the Backstage area and go to the Print dialog via File, Print, Print.
Printing Shapes by Layer
In Chapter 3, “Organizing and Annotating Diagrams,” we discussed assigning shapes to layers and setting various attributes for those layers. One layer property is Print, which you can check or uncheck via Home, Editing, Layers, Layer Properties.
Layers that have their Print property deselected do not print, which is useful for simplifying drawings, focusing on specific details, or hiding sensitive data.
You can also show and hide shapes of a layer using the Visible layer property. It is important to note, however, that invisible layers still print unless their Print attribute is unchecked. This can lead to unwanted surprises, so be sure to check Print Preview first.
Printing Gridlines
If you like to see the grid while you work, you can turn it on via View, Show, Grid. You can also see gridlines in your printed output. On the Print Setup tab of the Page Setup dialog, notice the Gridlines check box in the bottom-left corner. Check this option to make the grid print.
Printed gridlines are great if you plan to pencil in some details on your hard copy. They also help you estimate the sizes of objects in scaled drawings, as well as align things horizontally and vertically.
Saving Ink by Not Printing Backgrounds
Fancy backgrounds and themes add flair to your drawings but use up a lot of printer toner. You can ease the load on your printer when printing drafts by turning off background page printing.
The Print dialog has a No Background check box in the top-right corner. Check this option to omit background pages from your print job.
Printing Tiled Drawings
You’ve learned how to enlarge printed output by tiling a single page across several sheets of paper.
If you create flowcharts and other connected diagrams using the AutoSize feature, you have a sort of flipped situation. As your diagram grows, your drawing is tiled across several drawing pages, and will print on several sheets of paper by default.
When you print such a diagram, you may choose to accept the defaults and piece the tiled sheets of paper together, or you might want to shrink the whole diagram to print on one sheet of paper.
![]() LET ME TRY IT
LET ME TRY IT
Printing Drawings with Multiple Page Tiles
- Start a new diagram using Network, Basic Network Diagram template.
- Drop a Server shape in the middle of the page.
- Use AutoConnect to join two more servers to the first: one to the right and one below.
- Drag the server on the right to the edge of the page until AutoSize inserts a new page tile. (AutoSize is on by default for the Basic Network Diagram template.)
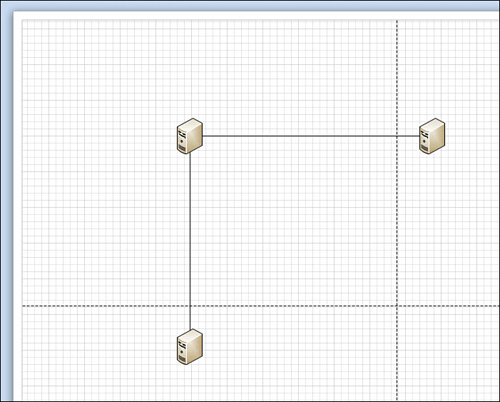
- Similarly, drag the bottom server down until AutoSize adds another page tile beneath the original. Figure 9.10 illustrates how the diagram looks. Note that your drawing now spans four page tiles.
Figure 9.10. A simple network diagram, spread across four page tiles. Dashed lines indicate where the tiles fall, and the printed pages overlap.
- Go to Print Preview.
- Click the Whole Page button. You see dashed page-break lines that indicate your drawing will print on four sheets. Move the mouse cursor across the page and notice the four red highlight rectangles that appear. Click any tile to zoom in on it. Click Whole Page to zoom back out. If you print this drawing, your output will be tiled across four sheets of paper, as expected.
- Click the Page Setup button. In the Print Zoom section, set the output to Fit to 1 Sheet Across by 1 Sheet Down and then click OK. Back in the Print Preview window, notice that the page-break lines are now gone. Your four-page diagram is reduced to print on just one sheet of paper.
- Click Page Setup again. In the Print Zoom section, select Adjust to 100% and then click OK. The page-break lines reappear, and your drawing again is set to print across four sheets of paper.
AutoSize enables you to work freely, expanding the drawing surface for you automatically as you draw. You don’t need to worry about the size of the drawing surface or the size of your shapes because you can enlarge or reduce at print time instead.
Understanding How AutoSize Affects Printing and Backgrounds
You should be aware of a few things about AutoSize, however, especially if you add backgrounds and titles to your drawings.
• Visio expands the titles and backgrounds to fit the entire drawing page surface, but sometimes there are problems like the one shown in Figure 9.11.
Figure 9.11. The tiled drawing modified to span two horizontal pages but only one vertical page. The page breaks and drawing grid are obscured by the background, and the World background shape has trouble with the wide aspect.
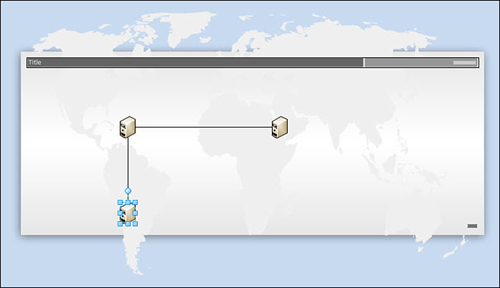
• Backgrounds obscure page breaks and the grid.
• Page breaks are obscured by backgrounds in Print Preview as well, but you can use the Single Tile, Next Tile, and Previous Tile buttons when you aren’t sure how the drawing will be tiled.
• Shapes on or near page breaks are printed on multiple sheets, as shown in Figure 9.12. Because you need to trim away the blank margins on some of the sheet, Visio prints with extra overlap so that you can be less precise in your cutting.
Figure 9.12. Viewing tiled output in the XPS Viewer. Notice that shapes near page breaks are printed doubly to make trimming and assembling the separate sheets easier. Because most printers can’t print to the very edge of the paper, some of the detail near the edges won’t print at all, so the overlap isn’t as extreme as it appears.
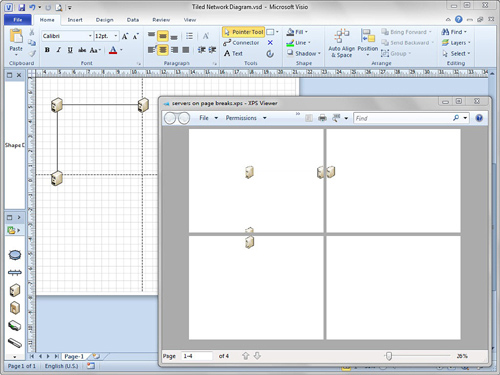
• Page tiles are smaller than the chosen printer paper size in order to account for margins and page-tiling overlap. In Figure 9.12, you see page breaks for a drawing that is tiled across letter-sized paper (8.5 × 11 inches), but the tiles themselves are smaller because Visio takes the print margins into account. In fact, if you have more than three tiles in any direction, the inner tiles are smaller than the outer tiles because they have overlap on both sides.
Printing Complex, Mixed-Orientation Drawings
You may have a complex drawing with multiple pages, different scales, different page orientations, different sizes, and different background pages. I often see Visio files that represent a “project” of drawings. They typically include the following:
• A title page explaining the purpose, conventions, and symbols of the drawing. These are usually unscaled, with landscape orientation.
• A few pages of floor plan layouts showing equipment locations, wiring paths, lighting, and other technical details. These are usually scaled, with landscape orientation.
• Several pages of detailed drawings showing elevation views of rack-mounted equipment and other gadgetry. These scaled drawings usually have portrait orientation.
• All pages in the drawing that require a common frame, title, title block, and company logo. These details are often on a single background page shared by the rest of the document.
Visio can handle printing such a document, but you should take extra care to inspect each page in Print Preview and double-check your Page Setup settings.
Because the file represents a project of drawings, you usually want to print each page on the same size sheet of paper. So check the Print Setup, Printer Paper setting in the Page Setup dialog for each page in the document. (If your printer has multiple paper trays, you may be able to send mixed-size pages to the same printer.)
If you have mixed landscape and portrait page orientations across pages, be sure that the Print Setup and Page Size settings for orientation agree for each page. The Page Setup dialog has preview areas for both of these tabs that make it obvious when orientations differ, and you receive a last-chance warning just before printing if orientations don’t match.
After you’ve verified that the printer paper is the same for all pages and orientations match, you can decide how to print each page to that paper. If all your pages have the same size, you don’t need to worry about this. Otherwise, turn your attention to the Print Zoom setting and choose Adjust to 100% (or other zoom) or tile the drawing using Fit to X Sheets Across by Y Sheets Down.
Printing Any Size Drawing on Any Size Paper
A friend of mine who works at Microsoft is a big fan of Visio and occasionally writes about it in his blog: Saveen Reddy’s blog. (http://blogs.msdn.com/b/saveenr/) He uses Visio as a tool for quickly getting his thoughts and ideas diagrammed and regularly brings the printouts to team meetings for discussion and brainstorming.
Interestingly, he never worries about the page size of his Visio drawings at all. He freely drags, drops, connects, and tweaks shapes all over the place and then resizes the page to fit the content, using one of the following methods:
- Turning on AutoSize from the Design tab. Visio automatically adds and removes full page tiles as the diagram grows or shrinks.
- Clicking the Size drop-down on the Design tab and choosing Fit to Drawing at the bottom of the list. The page contracts or expands to tightly enclose all details.
- Manually resizing the page by holding Ctrl while dragging an edge of the page, which you learned about in Chapter 2, “Working Around the Diagram.”
As you can easily guess, his page sizes rarely match any existing printer paper size. Because Saveen understands how printing works in Visio, however, this isn’t a problem.
When it’s time to print, he uses only the Print Setup tab in the Page Setup dialog. There, he chooses a paper size that matches his target printer and sets the Print Zoom to Fit to 1 Page Across by 1 Page Down. He can send his output to a normal office laser printer for personal use or to a large-format plotter to create a poster for his next meeting.
Figures 9.13, 9.14, and 9.15 illustrate this process for a very tall drawing.
Figure 9.13. The Energy Sources diagram has been rearranged to a very tall format and doesn’t fit on the page any more.

Figure 9.14. A quick visit to the Design tab and click of Size, Fit to Drawing expands the page to tightly enclose the content.
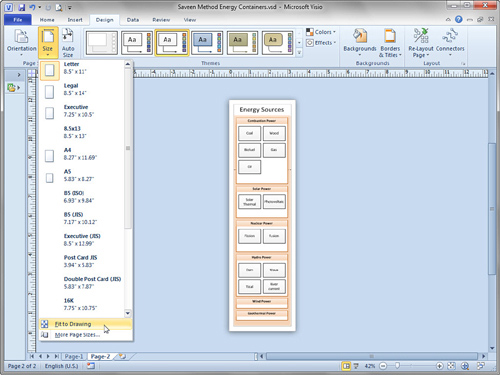
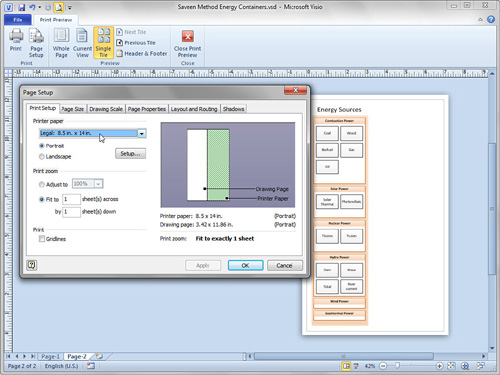
Figure 9.15. In Print Preview, the Page Setup dialog is used to print the page to legal-sized paper. Print Zoom is set to 1 Sheet Across by 1 Sheet Down, and Visio scales the drawing to fit the paper.
I call this method of working the “Saveen method,” but you might call it the “Don’t worry about page size” method. If the actual, physical size of your printed document isn’t important, and you don’t have style requirements or corporate standards for page sizes, borders, and title blocks, this is a great way to work.
Printing Multiple Drawings on a Single Sheet
When you have photos developed or professionally printed, you receive a proof sheet with thumbnail images of every photo in the batch. You might want to do something similar with Visio.
You’ve seen that you can tile one page across several sheets of paper. But how do you print several pages on one sheet of paper?
Although there is no explicit feature for doing this, there are several strategies for getting it done:
- Use your printer’s features to print multiple pages per sheet.
- Copy and paste each page to a new document.
- Export or copy each page as an image or metafile and then import or paste into a new document.
Using Printer Features
Not all printers have the same features, but many have the option to print multiple pages on one sheet of paper. For example, my HP LaserJet 2600 lets me print 1, 2, 4, 6, 9, or 16 pages per sheet. To do this, I go to the Print dialog, click Properties, click the Finishing tab, and then choose a number from the Pages Per Sheet drop-down list.
Pasting Multiple Pages on a Single Page
You can copy each page and then paste it into another document. Although this sounds simple enough, many problems can surface:
• To fit several pages onto one page, you need to resize each page’s contents after pasting. SmartShape behavior can actually get in the way of mass resizing, and create quite a mess.
• Connectors might reroute, causing more mess.
• Individual pages can have different theme effects, theme colors, backgrounds, and titles. Pasting all to the same page forces them to share the same combination, which might not be what you want.
• Pages might have different scales. A single page can have only one scale, so scale-related conflicts might arise.
• Resizing an entire page’s elements doesn’t resize font sizes. When you reduce the size of a pasted drawing, the shapes shrink, but the text doesn’t.
Using an Export Format
The most flexible way to create a proof sheet is to convert each page into a metafile and then import each object into a blank drawing. Since metafiles are “dumb graphics,” you can freely resize each one without encountering the problems described previously.
Show Me: Media 9.4—Creating a “Proof Sheet” for a Multi-page Document
![]()
Access this video file through your registered Web Edition at my.safaribooksonline.com/9780132182683/media.
![]() LET ME TRY IT
LET ME TRY IT
Printing Multiple Pages on One Sheet of Paper Using Copy and Paste
- Start a new drawing from the IT Asset Management sample.
- Start a new, blank drawing.
- Tile the two drawing windows so that you can see both at the same time. Go to View, Window, Arrange All to do this.
- Go to the first page in the IT Asset Management sample. Make sure that no shapes are selected.
- Right-click a blank area on the page and select Copy. This copies all the page’s graphics plus any background-page details to the Clipboard.
- In the blank drawing, right-click the page and choose Paste Special. The Paste Special dialog appears.
- Choose Picture (Enhanced Metafile) from the list and then click OK. The copied page is pasted as a single vector-graphic object that you can freely resize. You won’t have any of the resizing problems that you might have found if you had pasted the data as Visio objects.
- Repeat steps 4 through 7 for each page in the IT Asset Management drawing until you have three objects in the new drawing.
- The page shapes are likely too big for the drawing page and need to be reduced. Press Ctrl+A to select all the shapes and then drag a corner handle of the selection to reduce the size of all three page shapes at the same time.
- Neatly rearrange the shapes on the page so that each page shape is clearly visible, as shown in Figure 9.16.
Figure 9.16. The three IT Asset Management pages copied and then pasted as metafiles in a blank drawing. Note the different backgrounds and titles. Page 3 is rotated, just because you can!
- Print to a printer or file as desired.
Another way to achieve the same result is to export each page to a file, using the Save As dialog and choosing the file type Enhanced Metafile (*.emf).
Although this is more labor-intensive, you may have other uses for the exported graphics such as maintaining a time snapshot for your drawing, or using the graphics in other documents.
Printing Scaled Drawings at Reduced Size
Scaled drawings are often designed to be printed out on large-format paper, such as C-, D-, E-, A3-, A2-, or A1-sized sheets. These drawings can be very detailed and are used on construction sites; the larger size makes them easier to use in this environment.
You still might need to print them out in the office on regular, office-sized paper. You can do this by using the Print Zoom settings in the Page Setup dialog. The Adjust to % or Fit to X Sheets Across by Y Sheets Down settings make it a snap to print a large-format drawing page onto a small sheet of paper.
When you reduce a scaled drawing, it is important to note that scale notations on the drawing are no longer accurate. Better yet, use a physical scale symbol that visually shows the scale of the drawing.
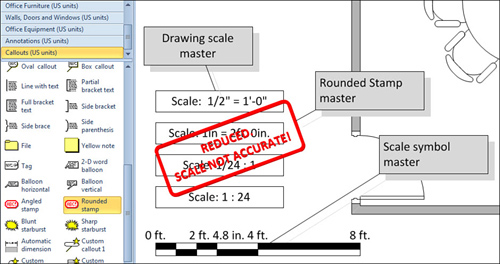
The More Shapes, Visio Extras, Annotations stencil has two scale-indicating shapes that you can use in your scaled drawings. Figure 9.17 shows the Drawing Scale and the Scale Symbol shapes in action.
Figure 9.17. The Drawing Scale shape numerically notes the scale of the drawing in several styles. The Scale Symbol shape visually illustrates it. Both automatically pick up the scale of the drawing page.
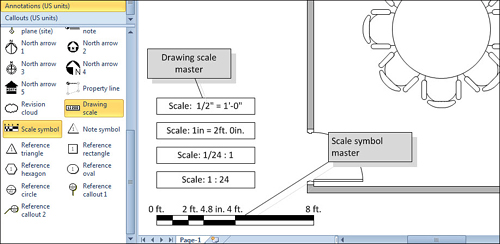
In Figure 9.17, four variations of the Drawing Scale shape are shown. You can choose the text that is displayed by right-clicking the shape. Because the scale information is numerical, it is inaccurate if you reduce the drawing at print time.
A better choice is the Scale Symbol. Because it physically illustrates the drawing scale, it is still accurate in reduced printouts.
If you have used the Drawing Scale shape and want to indicate that the scale information is wrong, consider using another shape from the Annotations stencil. The Rounded Stamp and Angled Stamp masters, as shown in Figure 9.18, are great for making eye-catching notes.
Figure 9.18. The Rounded Stamp shape makes an eye-catching indication that the scale numbers aren’t accurate for reduced-to-print output.
Printing High-Quality Materials
You’ve worked all night and created a perfect, beautifully formatted Visio diagram that has lots of color, good-looking themes, gradient fills, and transparency. Your company’s leaders are so impressed that they want to use your diagram for a brochure and poster at the next trade show. What do you do to get a good result?
There are a number of issues that can stand in the way of getting great output, suitable for distribution to the public. Among these are
• Your print shop or service bureau might not have Visio and isn’t able to read your VSD file. Because Visio evolved as an office app, it doesn’t have the print-production pedigree that applications such as Adobe Illustrator or Adobe Photoshop have.
• Some printers have trouble printing gradient fills and transparency from Visio.
• PDF exports can experience similar problems with gradients and transparency.
I’ve used Visio to create shiny business cards, posters, and brochures, and I’ve run into all these problems. The solution I use is simple and crude but effective: export your file as a high-resolution bitmap image.
Visio is a vector-based graphics program, and vectors print smoothly, using the full resolution of the printer. Bitmaps are collections of dots that get uglier as you blow them up, so exporting to an image seems to go against the whole purpose of using vectors in the first place.
The secret is to export an image that has the same resolution as the target printer. Since the printer can’t print any better than that anyway, the bitmap will print well.
![]() LET ME TRY IT
LET ME TRY IT
Exporting a High-Resolution Bitmap Image
- Start with any sample document from File, New, Sample Diagrams, or open a document that you’ve created.
- Go to the page that you want to print. Exporting to an image works for only one page at a time.
- Make sure that no shapes are selected if you want the whole page to be exported. If you want to export just a portion of the diagram, select the shapes you want.
- Click File, Save As. The Save As dialog appears.
- Choose a location for the file and give it a name, such as High-Res-Visio-Export.bmp.
- In the Save As Type drop-down, select Windows Bitmap (*.bmp, *.dib) and then click Save. The BMP Output Options screen appears.
- In the Resolution section of the dialog, select Custom and enter the resolution of your target printer. You can check your printer’s documentation or call your print shop and ask for a sufficient resolution. In Figure 9.19, 600 × 600 dots, or pixels/inch, has been entered.
Figure 9.19. Exporting a page as a bitmap image. Note the custom resolution is set to a respectably high 600 × 600 dpi (dots per inch).
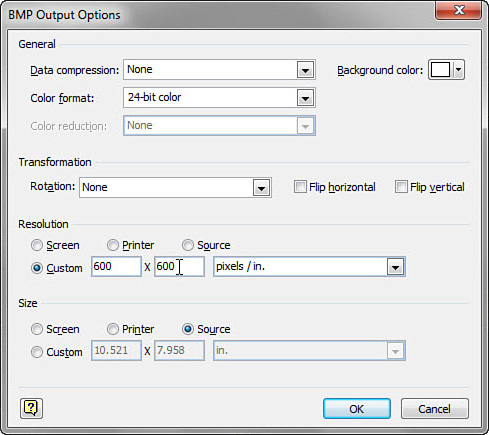
- Click OK to save your export. A very large BMP file is created in the location you specified. You can now send this file to the printer and be assured of high-quality printed output.
Summary
In this chapter, you learned the ins and outs of Visio printing. Most importantly, you saw that the size of the drawing page is independent from the size of the paper in the printer. Any size drawing page can be reduced or enlarged to fit onto any size sheet of paper and even tiled across multiple sheets. There is no need to modify shapes in a drawing to serve printing purposes.
You also saw a handful of practical scenarios that demonstrated specific printer settings and learned how to selectively print pages, selected shapes, background pages, shapes on layers, and gridlines.