Chapter 8. vSphere Installation
This chapter covers the following subjects:
• Deploy vCenter Server Components
• Configure Single Sign-On (SSO)
• Initial vSphere Configuration
This chapter contains information related to VMware 2V0-21.20 exam objectives 1.1, 1.2, 1.8, 4.1.1, 4.1.2, 4.3, 4.3.1, 4.3.2, 4.3.3, 4.4, 4.6, 4.12, 4.15, 4.16, 7.9, 7.10, 7.11, 7.11.1, 7.11.2
This chapter covers the procedures for installing and configuring a vSphere 7.0 environment.
“Do I Know This Already?” Quiz
The “Do I Know This Already?” quiz allows you to assess whether you should study this entire chapter or move quickly to the “Exam Preparation Tasks” section. Regardless, the authors recommend that you read the entire chapter at least once. Table 8-1 outlines the major headings in this chapter and the corresponding “Do I Know This Already?” quiz questions. You can find the answers in Appendix A, “Answers to the ‘Do I Know This Already?’ Quizzes and Review Questions.”
Table 8-1 “Do I Know This Already?” Foundation Topics Section-to-Question Mapping
1. You are preparing to deploy vSphere 7.0. Which of the following is a prerequisite for installing ESXi interactively?
a. Download the ESX Installer ISO
b. Download the ESX Installer OVF
c. Download the GUI Installer for Windows or Mac.
d. Download the ESXi MSI.
2. You are preparing to do a scripted installation of ESXi 7.0. Where is the location of the default installation script?
a. /etc/vmware/weasel/ks.py
b. /etc/vmware/weasel/ks.cfg
c. /etc/vmware//ks.cfg
d. /etc/vmware/ks.py
3. You are preparing to install vCenter Server 7.0 using a deployment command. To perform a pre-deployment check, which command should you use?
a. vcsa-deploy-precheck path-to-JSON-file
b. vcsa-deploy install --precheck path-to-JSON-file
c. vcsa-deploy install --verify-only path-to-JSON-file
d. vcsa-deploy precheck path-to-JSON-file
4. You are installing vSphere 7.0 and want to document the location of certificates. Where are the ESXi certificates stored?
a. Locally on the ESXi hosts
b. In the VECS
c. In the vCenter Server database.
d. In the VMCA
5. You are adding a OpenLDAP authentication source for your recently deployed vCenter Server. Which of the following is Not a requirement.
a. All users have an objectClass of inetOrgPerson
b. All groups have an objectClass of groupOfUniqueNames
c. All groups have a group membership attribute of uniqueMember
d. All users must be members of the OpenLDAP group
6. You are deploying a new vSphere environment and need to control which users can manage certificates. Which vCenter Server Single Sign On domain group membership should you manipulate?
a. DCAdmins
b. SolutionUsers
c. CAAdmins
d. SystemConfiguration_Administrators
7. You are adding an Active Directory (Integrated Windows Authentication) identity source and want to ensure future machine name changes do not cause issues. Which settings should you use?
a. Select Use Service Principle Name (SPN) and provide a UPN
b. Select Use Machine Account and provide a UPN
c. Select Use Service Principle Name (SPN) and provide a Base DN for Users
d. Select Use Machine Account and provide a Base DN for Users
8. You are deploying vCenter Server in a secured network with no Internet access. What do you need to install to download updates?
a. Update Manager Download Service
b. Update Manager Proxy Service
c. Lifecycle Manager Download Service
d. Lifecycle Manager Proxy Service
9. You are implementing vCenter HA. How will you connect the nodes to vCenter HA network?
a. Connect NIC 1 on the Active and Passive nodes and NIC 0 to the vCenter HA network. Do not connect the Witness node to the vCenter HA network.
b. Connect NIC 1 on the Active and Passive nodes and NIC 0 on the Witness Nodes to the vCenter HA network.
c. Connect NIC 0 on the Active, Passive and Witness Nodes to the vCenter HA network.
d. Connect NIC 1 on the Active, Passive and Witness Nodes to the vCenter HA network.
10. You are installing new ESXi hosts and want to configure boot options. Which of the following kernelopt options are deprecated in ESXi 7.0?
a. autoCreateDumpFile
b. autoPartitionCreateUSBCoreDumpPartition
c. skipPartitioningSsds
d. autoPartitionOnlyOnceAndSkipSsd
Foundation Topics
Install ESXi hosts
To begin your vSphere deployment, you should install and configure at least one ESXi host using the information in this section. Optionally, you can apply the information here to install and configure additional ESXi hosts. In many cases, administrators choose to deploy the first ESXi host, then deploy vCenter Server, and use vCenter Server along with other tools, such as host profiles, to facilitate the deployment and configuration of the remaining ESXi hosts.
You have several choices for installing ESXi, such as using the interactive wizard, using scripts, and using Auto Deploy. These choices are covered in this section. Using host profiles to configure ESXi hosts after installation is covered in a separate section later in this chapter.
Install ESXi Interactively
You can use the following procedure to install ESXi interactively, which is very useful in small environments with fewer than five ESXi hosts.
![]()
Preparation:
Step 1. Verify all of the target machine hardware is supported and meets minimum requirements
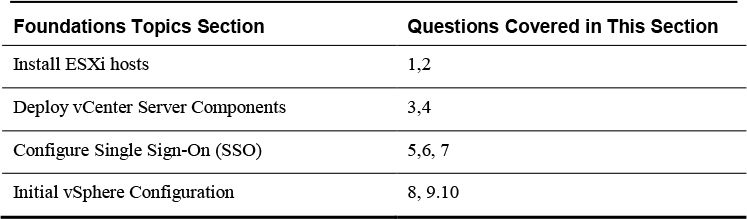
Step 2. Gather and record the information that will be required during the installation as shown in table 8-2
Step 3. Verify that the server hardware clock is set to UTC. This setting is in the system BIOS.
Step 4. Download the ESXi Installer ISO and prepare the hardware system to boot from it.
Procedure:
Step 1. Start the machine so that it boots from the ESXi Installer
Step 2. On the Select a Disk page, select the drive on which to install ESXi and press Enter.
Step 3. Select the keyboard type for the host.
Step 4. Enter a password to be used by the root account.
Step 5. When prompted, remove the bootable media and press Enter to reboot the host.
Table 8-2 Required Information for ESXi Installation
The default behavior is to configure the ESXi management network using DHCP. You can override the default behavior and use static IP settings for the management network after the installation is completed. If your host is not yet assigned an IP address or if you wish to change it, you can use the following procedure to select the appropriate network adapter, configure the VLAN, and configure the IP configuration for the host’s management network interface.
Procedure:
Step 1. Logon to the Direct Console User Interface (DCUI), which appears on the host’s monitor
Step 2. If needed, use the DCUI to change the network adapter used for management
a. Select Configure Management Network and press Enter.
b. Select Network Adapters and press Enter.
c. Select a network adapter and press Enter.
Step 3. If needed, use the DCUI to change the VLAN used for management
a. Select Configure Management Network and press Enter.
b. Select VLAN and press Enter.
c. Enter the appropriate VLAN ID number for your network connection.
Step 4. If needed, use the DCUI to change the IP configuration used for management
a. Select Configure Management Network and press Enter.
b. Select IP Configuration and press Enter.
c. Select Set static IP address and network configuration.
d. Enter the IP address, subnet mask, and default gateway and press Enter.
You can use the DCUI to configure DNS following this procedure.
Step 1. Select Configure Management Network and press Enter.
Step 2. Select DNS Configuration and press Enter.
Step 3. Select Use the following DNS server addresses and hostname.
Step 4. Enter the primary server, an alternative server (optional), and the host name.
After ESXi is installed and the management network is configured, you can manage the host and make other configuration changes using the vSphere Host Client.
Scripted ESXi Installation
Installation scripts provide an efficient way to deploy multiple hosts and/or to deploy hosts remotely.
The installation script includes the settings for installing ESXi. The script can be applied to all of the hosts that need to have the same configuration. Only supported commands can be used in the installation script. This can be modified for settings which need to be unique for each host. The installation script location can be one of the following:
• FTP server
• HTTP/HTTPS server
• NFS server
• USB flash drive
• CD-ROM drive
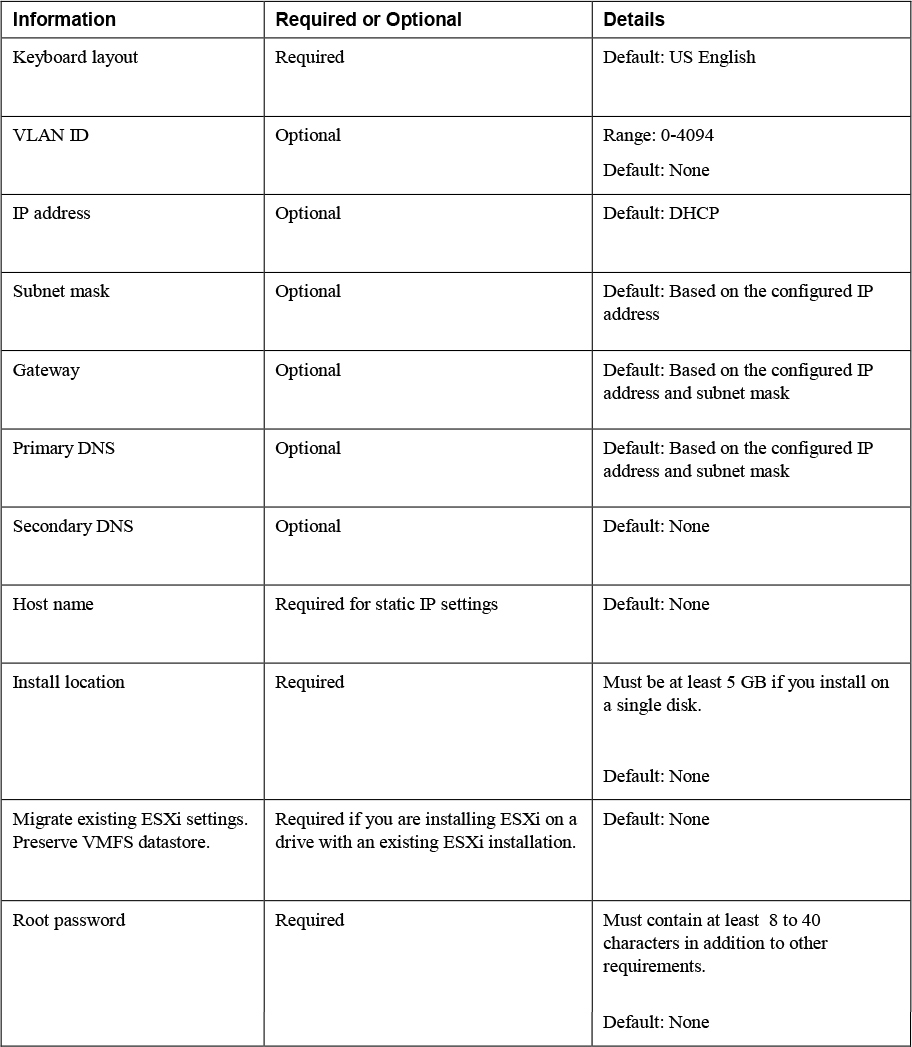
To start the installation script, you can enter boot options at the ESXi installer boot command line. At boot time you can press Shift+O in the boot loader (see Figure 8-1) to specify boot options and access the kickstart file. If you are installing using PXE boot, options can be passed through the kernelopts line of the boot.cfg file. The location of the installation script is defined by setting the ks=filepath option, where filepath is where the kickstart file is located. If ks=filepath is not included in the script, the text installer runs.
Figure 8-1 ESXi Installer
Procedure:
Step 1. Start the host.
Step 2. When the Loading ESXi installer window appears (see Figure 8-1), press Shift+O to define the options.
Step 3. At the runweasel command prompt, enter ks= along with the path to the installation script and the command line options. For example, you could enter the following options to boot the host from a script named ks-script-01 residing on the server 192.168.1010.10 and to set the host’s IP address to 192.168.100.101
ks=http://192.168.100.10/kickstart/ks-script-01.cfg nameserver=192.168.1.100 ip=192.168.100.101 netmask=255.255.255.0 gateway=192.168.100.101
To successfully perform a scripted installation, you may need to enter boot options to access the script file. Table 8-3 shows some of these options.
Table 8-3 Boot Options for ESXi Scripted Installation


There is a default installation script included with the ESXi Installer. This can be used to install ESXi to the first disk that is detected. The default ks.cfg installation script is in the initial RAM disk at /etc/vmware/weasel/ks.cfg. The location of the default ks.cfg file can be defined with the ks=file://etc/vmware/weasel/ks.cfg boot option. When using the ks.cfg script for the install, the default root password is myp@ssw0rd. The installation script on the installation media can’t be modified. After the ESXi host has been installed, the Host Client or the vSphere Web Client logged into the vCenter Server that manages the ESXi host can be used to change any of the default settings.
Example 8-1 shows the contents of the default script.
Example 8-1
#
# Sample scripted installation file
#
# Accept the VMware End User License Agreement
vmaccepteula
# Set the root password for the DCUI and Tech Support Mode
rootpw myp@ssw0rd
# Install on the first local disk available on machine
install --firstdisk --overwritevmfs
# Set the network to DHCP on the first network adapter
network --bootproto=dhcp --device=vmnic0
# A sample post-install script
%post --interpreter=python --ignorefailure=true
import time
stampFile = open('/finished.stamp',
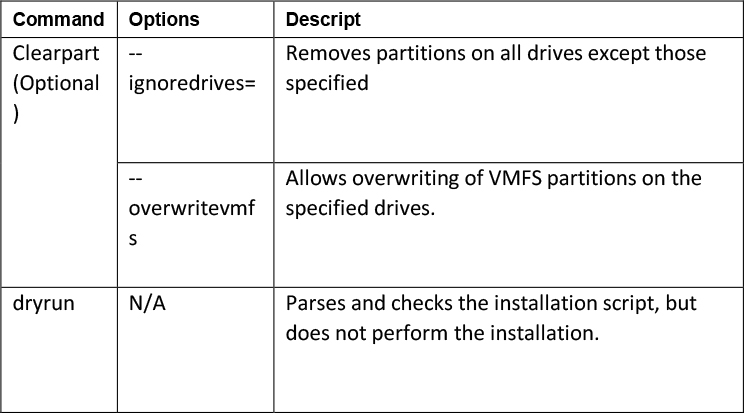
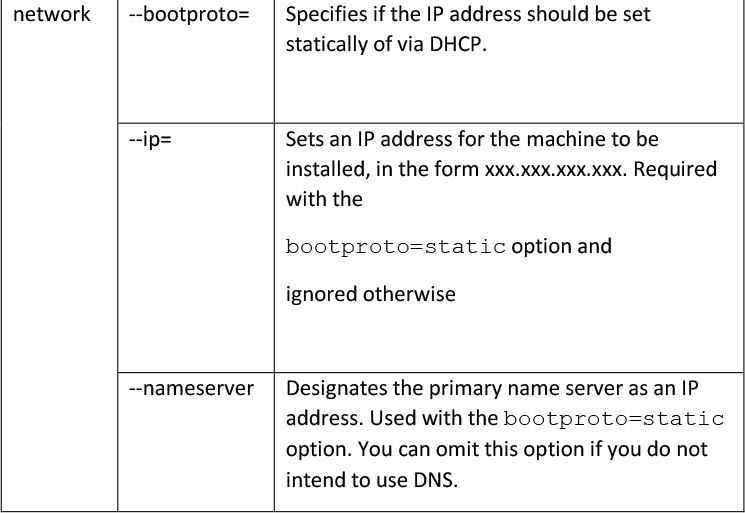
In the default script, you can see it sets the root password to myp@ssw0rd, installs on the first disk, overwites any existing VMFS datastore, and sets the network interface to use DHCP. When creating your own script, you can specify many options, a few are shown in Table 8-4.
Table 8-4 Sample Options for ESXi Installation Script.

Auto Deploy
vSphere Auto Deploy provides the functionality to install ESXi on hundreds of physical hosts. Large environments can be deployed and managed efficiently by experienced administrators utilizing Auto Deploy. Hosts utilize network booting to boot from a central Auto Deploy server. Hosts can be configured with a host profile of a reference host, if desired. This host profile could be created to prompt for input. After the hosts boot and are configured, they are then managed by vCenter Server like other ESXi hosts. Auto Deploy can also be configured for stateless caching or stateful installations.
With stateless caching, which is the default setting, Auto Deploy does not store ESXi configuration or state data within the host. Instead, Auto Deploy uses image profiles and host profiles to maintain the host configuration. During subsequent boots, the host must connect to the Auto Deploy server to retrieve its configuration.
With stateful installs, Auto Deploy is used to boot the host but the installation and configuration is written to a local disk. On subsequent boots, the host boots from the local disk where this host configuration is stored.
Auto Deploy can be configured and managed using a graphical user interface (GUI) in vSphere 6.5 and later. The PowerCLI method is still available, but the GUI provides an easier-to-use option. For the Auto Deploy GUI to be visible in the vSphere Web Client, both the Image Builder and Auto Deploy services must be running when you’re logging in to vCenter Server. The Image Builder feature in the GUI enables you to download ESXi images from the VMware public repository or to upload ZIP files containing ESXi images or drivers. You can customize the images by adding or removing components and optionally export images to ISO or ZIP for use elsewhere. You can compare two images to see how their contents differ.
You can use the Deployed Hosts tab to view hosts that are provisioned with Auto Deploy and to perform tests and remediations.
The architecture for Auto Deploy includes many components as described in Table 8-5 and illustrated in Figure 8-2.
Table 8-5 Auto Deploy Components

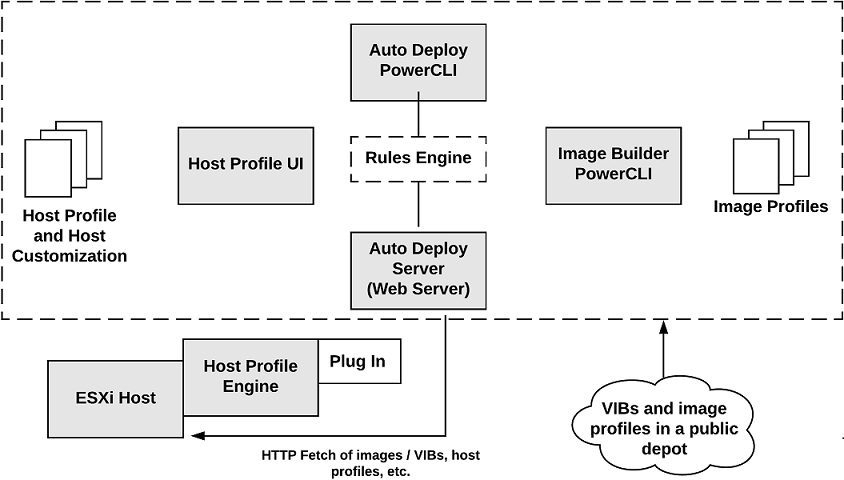
Figure 8-2 Auto Deploy Architecture
You control the behavior of the vSphere Auto Deploy server by using rules. The rules engine checks the rule set for matching host patterns to decide which items (image profile, host profile, vCenter Server location, or script object) to use to provision each host. Rules can assign image profiles and host profiles to a set of hosts. A rule can identify target hosts by boot MAC address, SMBIOS information, BIOS UUID, Vendor, Model, or fixed DHCP IP address. You can create rules by using the vSphere Web Client or vSphere Auto Deploy cmdlets in a PowerCLI.
For example, to create a new deployment rule named Rule-01 that places all hosts in a folder named Auto-deployed Hosts, you can use the following command.
New-DeployRule -Name Rule-01 -Item “Auto-deployed Hosts” -allhosts
If you wish to modify the rule so that it only applies to a set of hosts in a specific IP range, you can do so using the Set-DeployRule cmdlet.
Set-DeployRule -DeployRule Rule-01 -Pattern “ipv4=192.168.100.101-192.168.100.112”
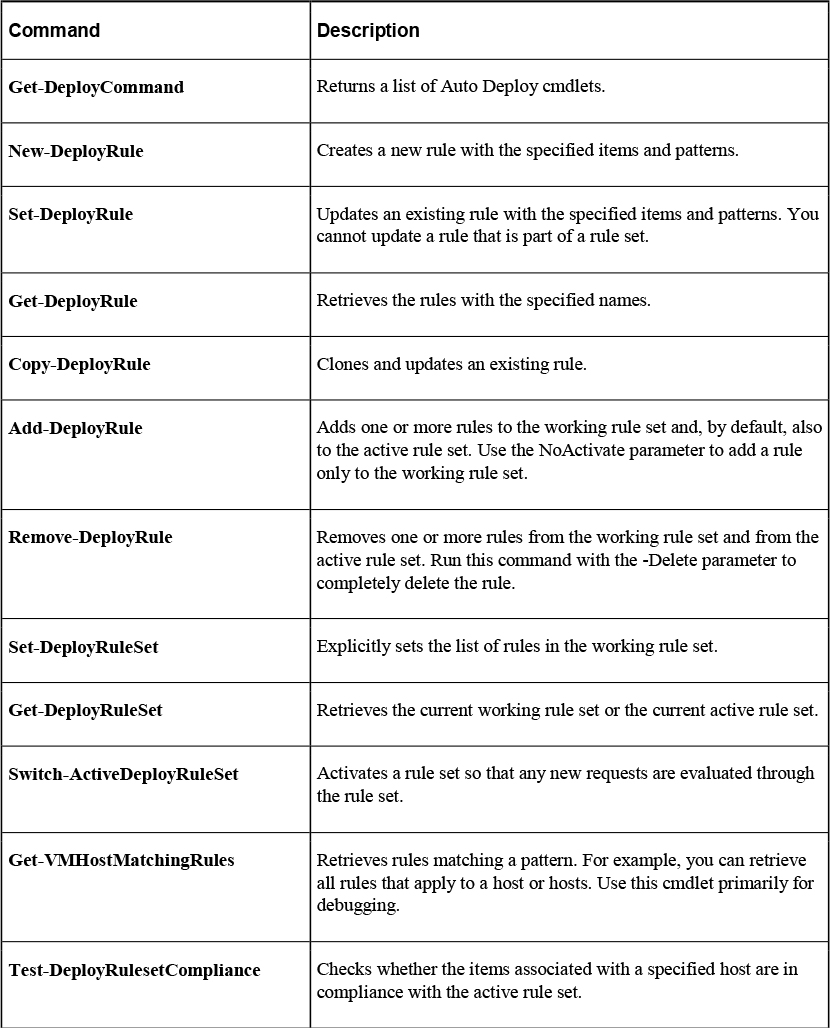
Table 8-6 describes some of common AutoDeploy PowerCLI cmdlets.
Table 8-6 Sample of AutoDeploy PowerCLI cmdlets.

![]()
The first time a host boots using Auto Deploy, the following sequence of events occurs.
1. The host starts a PXE boot sequence. The DHCP Server assigns an IP address and redirects the host to the TFTP server.
2. The host downloads and executes the iPXE file and applies the associated configuration file.
3. The host makes an HTTP boot request to the vSphere Auto Deploy server. The HTTP request includes hardware and network information.
4. The vSphere Auto Deploy server performs these tasks:
• Queries the rules engine.
• Streams data from the image profile and the host profile.
5. The host boots using the image profile. If the vSphere Auto Deploy server provided a host profile, the host profile is applied to the host.
6. vSphere Auto Deploy adds the host to the proper location in the vCenter Server system.
7. If the host is part of a DRS cluster, virtual machines from other hosts might be migrated to the host.
Note
If the host profile requires the user to specify certain information, such as a static IP address, the host is placed in maintenance mode when the host is added to the vCenter Server system. You must reapply the host profile and update the host customization to have the host exit maintenance mode.
Deploy vCenter Server Components
VMware vCenter 7.0 is only available as a pre-built Linux-based virtual appliance. It is no longer available to be installed on Windows systems.
vCenter Server Database
As of vCenter 7.0, there is only one database that can be used: an included version of the VMware specific distribution of PostgreSQL for vSphere and vCloud.
Note
The vCenter installation program allows migration from a Windows-based vCenter server to the vCenter appliance, as with prior versions and includes migrating from Oracle or MSSQL to PostgresSQL.
Platform Services Controller (PSC)
In vSphere 6.x, the Platform Services Controller (PSC) was a component that could be deployed externally from vCenter Server. Beginning with vSphere 7.0, the services that PSC provided in vSphere 6.x, such as SSO, VMCA and License Service, are consolidated into vCenter Server. These services cannot be deployed as a separate virtual appliance. Since the services are now part of vCenter, they are no longer listed as part of the PSC. For example, in vSphere 7.0, the vSphere Authentication publication replaces the Platform Services Controller Administration publication.
vCenter Server Appliance
As of vSphere 7.0, the vCenter Server is only available as a pre-built virtual appliance. This appliance consists of:
• Photon OS 3.0
• vSphere Authentication Services
• PostgreSQL
• VMware vSphere Lifecycle Manager Extension
• VMware vCenter Lifecycle Manager
vCenter version 7.0 deploys with VM hardware version 10, supporting up to 64 virtual CPUs per VM. The deployment wizard allows you to determine the resource allocation of the virtual appliance based on the size of your environment.
To prepare for a vCenter Server Appliance deployment, you should download the vCenter Server Appliance installer ISO file and mount it to a virtual machine or physical machine from which you want to perform the deployment. To use the vCenter Server Appliance GUI (or CLI) installer, you can use a machine that is running a supported version of Windows, Linux, or Mac operating system, as shown in Table 8-7
Table 8-7 Requirements for GUI / CLI installers

Using the GUI or CLI Installers, you can:
• Deploy and upgrade the vCenter Server Appliance.
• Converge prior vCenter installations with external Platform Services Controller(s) to the current vCenter Server version.
• Restore a vCenter Server Appliance from a file-based backup.
Deploy VCSA Using the GUI Installer
You can use the GUI installer to deploy a vCenter Server Appliance. To perform a GUI based deployment, you download the vCenter Server Appliance installer on a network client machine, run the deployment wizard from the client machine, and provide the required information.
Note
vCenter 7 incorporates all services that were part of the Platform Services Controller to a single vCenter VM.
Using the GUI Installer involves two stages. In the first stage, you navigate through the installation wizard, choose the deployment type, provide the appliance settings, and deploy the OVA. Alternatively, you could use the vSphere Web Client or the vSphere Host Client to deploy the OVA.
In the second stage using the GUI Installer, you use a wizard to configure the appliance time synchronization, configure vCenter Single Sign-On (SSO), and start the services in the newly deployed appliance. Alternatively, you can use a web browser to access the appliance’s VMware Appliance Management Interface (VAMI) at https://FQDN:5480. If you use the alternative approach in the first stage, then you must use it in the second stage. To use the GUI Installer to deploy the VCSA, you can follow these steps.
![]()
Step 1. In the vCenter Server Appliance installer, navigate to the appropriate subdirectory in the vcsa-ui-installer directory and run the installer executable file.
a. For Windows OS, use the win32 subdirectory the installer.exe file.
b. For Linux OS, use the lin64 subdirectory and the installer file.
c. For Mac OS, use the mac subdirectory and the Installer.app file.
Step 2. On the Home page, click Install.
Step 3. On the next page, click Next.
Step 4. Read and accept the license agreement and click Next.
Step 5. Connect to the target server, where you want to deploy the appliance. You have two choices.
a. Provide the FQDN (or IP address) and credentials for the target ESXi host and provide the appropriate certificate.
b. Provide the FQDN (or IP address) and credentials for the target vCenter Server (that is managing the hosts on which this new vCenter Server will be deployed), provide the appropriate certificate, and specify the appropriate location in the vSphere Inventory.
Step 6. On the next page, set the appliance’s name and root user password, following these rules.
a. The appliance name must not contain a percent sign (%), backslash (), or forward slash (/) and must be no more than 80 characters in length.
b. The password must contain only lower ASCII characters without spaces, at least eight characters, a number, uppercase and lowercase letters, and a special character, for example, an exclamation mark (!), hash key (#), at sign (@), or brackets (()).
Step 7. Select the deployment size. Choose Tiny, Small, Medium, Large, X-Large as explained in Chapter 1.
Step 8. Select the storage size for the appliance as explained in Chapter 1.
Step 9. Select an available datastore. (Enable Thin Disk Mode will allow the vCenter VM virtual disks to be thin provisioned. NFS datastores are thin provisioned by default).
Step 10. On the Configure Network settings page, setup the network settings, such as virtual switch port group, IP configuration, and communication ports.
Step 11. On the Ready to complete page, select Finish.
Step 12. Wait for the OVA to deploy, then click Continue to proceed with Stage 2.
Step 13. In Stage 2, click Next on the Introduction page.
Step 14. For time configuration, choose an option.
a. Synchronize time with the ESXi host.
b. Synchronize time with NTP Servers
Step 15. Optionally, enable SSH connections into the appliance.
Step 16. Create a new SSO domain or join an existing domain.
a. Create new: enter domain (such as vsphere.local), set the SSO Administrator ([email protected] by default) account password, provide a SSO site name, and confirm the password.
b. Join an existing SSO domain: enter the PSC FQDN containing the SSO Server, provide the HTTPS port that PSC will use, provide the target SSO domain name (such as vsphere.local), and enter the SSO Administrator account password.
Step 17. Optionally, choose the option to join the VMware Customer Experience Improvement Program (CEIP)
Step 18. On the Ready to complete page, click Finish and OK.
CLI Deployment
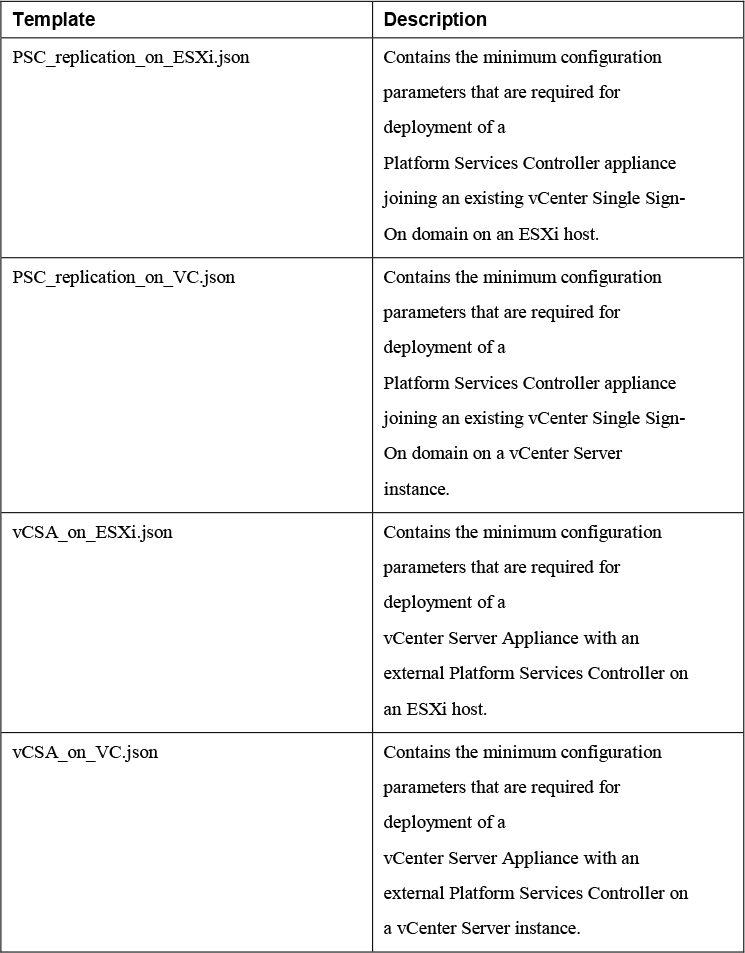
You can use the CLI installer to perform a silent deployment of a VCSA appliance. The CLI deployment process includes downloading the installer, preparing a JSON configuration file with the deployment information, and running the deployment command. The VCSA Installer contains JSON templates for all deployment types. This enables you to deploy an appliance with minimum effort by copying the appropriate JSON template, changing a few values, and using it with the CLI Installer. The steps are:
Step 1. In the vCenter Server Appliance installer, navigate to one of the following directories:
a. If you are running Windows: /vcsa-cli-installer/win32
b. If you are running Linux: /vcsa-cli-installer/lin64
c. If you are running MacOS: /vcsa-cli-installer/mac
Step 2. Copy the templates from the install subfolder to your desktop.
Step 3. Use a text editor to modify the JSON template for your use case. Modify the default parameter values with your appropriate values and add additional parameters as necessary. For example, to use an IPv4 DHCP assignment, in the network subsection of the template, change the value of the mode parameter to dhcp and remove the default configuration parameters that are used for a static assignment, as shown here.
“network”: {
“ip_family”: “ipv4”,
 “mode”: “dhcp”
},
Step 4. Save the file in UTF-8 format.
Table 8-8 shows some of the available JSON templates.
Table 8-8 JSON Templates Sample.
Note
When using the CLI Installer, you must strictly use only ASCII characters for the command line and JSON configuration file values, including usernames and passwords.
Prior to running the deployment command, you can run the pre-deployment check using this command.
vcsa-deploy install --verify-only path-to-JSON-file
When ready, you can run the deploy command.
vcsa-deploy install --accept-eula --acknowledge-ceip optional_arguments path-to-JSON-file
Post Installation
After installing vCenter Server, you should be able to access the vSphere Client.at
https://vcenter_server_ip_address_or_fqdn/ui and the vSphere Web Client at https://vcenter_server_ip_address_or_fqdn/vsphere-client.
The VMware Enhanced Authentication Plug-in provides Integrated Windows Authentication and Windows-based smart card functionality. In the vSphere 6.5 release, the VMware Enhanced Authentication Plug-in replaced the Client Integration Plug-in.
To install the VMware Enhance Authentication Plug-in you can use the following procedure. If you install the plug-in from an Internet Explorer browser, you must first disable Protected Mode and enable pop-up windows on your Web browser.
Step 1. In a Web browser, open the vSphere Web Client.
Step 2. At the bottom of the vSphere Web Client login page, click Download Enhanced Authentication Plug-in.
Step 3. Save the plug-in to your computer and run the executable.
Step 4. Follow the wizard for both the VMware Enhanced Authentication Plug-in and the VMware Plug-in Service which are run in succession.
Step 5. When the installations are complete, refresh the browser.
Step 6. On the External Protocol Request dialog box, click Launch Application
Configure/Manage VMware Certificate Authority (VMCA)
The VMware Certificate Authority (VMCA), which runs in the vCenter Server Appliance, is responsible for issuing certificates for VMware solution users, certificates for machines running required services, and certificates for ESXi hosts. The VMware End Point Certificate Service (VECS) is a local repository for certificates and private keys. VECS is a mandatory component that will be used when VMCA is not signing certificates. The VECS includes a set of keystores including machine SSL certificates, trusted roots, CRLs, and solution users (machine, vpxd, vpx-extension, vSphere-webclient). VECS does not store ESXi Certificates. ESXi certificates are stored locally on the ESXi hosts in the /etc/vmware/ssl directory. Table 8-9 describes the stores included in VECS.
Table 8-9 VECS stores.

With VMCA, you can deal with certificates in three different manners. You can let VMCA operate in a default manner, where it uses a self-signed root certificate, issues certificates to the vSphere components, and serves as the certificate authority (CA) to vSphere. You can configure VMCA to operate as a subordinate CA on behalf of the enterprise’s CA and to use a subordinate CA signing certificate. You can bypass VMCA and use only 3rd party certificates, which you will need to store in the VECS, except for ESXi hosts certificates. When necessary, you can use vecs-cli commands to explicitly manage certificates and keys.
Note
The VMCA in vSphere 7.x does NOT support the use of CRLs nor does it have the concept of certificate revocation. If you suspect one certificate was compromised, you should remove it and consider replacing all certificates.
Using VMCA in the default manner, where it acts as the CA for vSphere, no real configuration is required, other than to configure web browsers to trust VMCA. The VMCA can handle all certificate management in vSphere environments, where historically the administrator has elected not to replace certificates. During an upgrade to vSphere 6.0, all self-signed certificates are replaced with certificates signed by VMCA.
Using VMCA in a subordinate CA manner requires you to replace the VMCA root certificate with a certificate signed by a third party CA, making the VMCA certificate an intermediate certificate of the CA. To use VMCA in the subordinate CA manner, follow this procedure.
![]()
Step 1. Launch the vSphere 6.0 Certificate Manger.
Step 2. Select Option 2, which is to replace the VMCA root certificate with a custom signing certificate and replace all certificates.
Step 3. When prompted provide the password for the SSO domain administrator account.
Step 4. Select Option 1, to generate a Certificate Signing Request (CSR) and key. When prompted, provide a directory to save the CSR and key.
Step 5. Provide the CSR (root_signing_cert.csr) to you CA to generate the subordinate signing certificate.
Step 6. Use a text editor to copy content of intermediate CA certificates and the root CA certificate into a single file (root_signing_chain.cer).
Step 7. In the Certificate Manger, select Option 1, to continue to the step to import custom certificates.
Step 8. Import the root signing certificate (root_sigining_chain.cer) and root signing key (root_signing_cert.key).
Step 9. When prompted, provide a value for each item, such as country, name, and organization.
Step 10. After completing these steps, the VMCA root certificate is replaced with a custom signing certificate.
For more details on this procedure see VMware KB 2112016.
Configure Single Sign-On (SSO)
In addition to deploying one or more VCSAs and creating a vCenter Single Sign-on (SSO) domain in a new vSphere environment, you need to configure SSO. Configuring SSO includes adding and editing SSO identity sources, configuring SSO users, and configuring SSO policies.
SSO and Identity Sources Overview
To access vCenter Server, users must login using SSO domain user accounts or user accounts from identity sources registered in SSO. The acceptable identity sources are Active Directory (Integrated Windows Authentication), Active Directory as a LDAP Server, Open LDAP and Local OS.
The Local OS identity source is available immediately following the installation of SSO. Local operating system users are local to the operating system where the vCenter Single Sign-On server is running. The local operating system identity source exists only in basic vCenter Single Sign-On server deployments and is not available in deployments with multiple vCenter Single Sign-On instances. Only one local operating system identity source is allowed.
The SSO domain is also available immediately as an identity source. This domain was called vsphere.local in vSphere 5.5, but in vSphere 6.x and higher, you may assign the SSO domain name during installation.
Add/Edit/Remove SSO Identity Sources
You can use the vSphere Client to add SSO identity sources using the following procedure
Step 1. Log in with the vSphere Client to the vCenter Server using [email protected] or another member of the SSO Administrators group.
Step 2. Navigate to Home > Administration > Single Sign On > Configuration
Step 3. Click Identity Sources and click Add Identity Source
Step 4. Select one of the following available identity sources and enter the appropriate settings
• Active Directory (Integrated Windows Authentication)
• Active Directory over LDAP
• OpenLDAP
• Local operating system of SSO server.
Step 5. Click Add.
To remove an SSO identity source, you can use the vSphere Web Client to select the identity source on the Identity Sources tab at Administrator > Single Sign-On > Configuration and click the Delete Identity Source icon. When prompted, click Yes to confirm.
You can configure a default domain for SSO. The default SSO domain allows users to authenticate without identifying a domain name. Users from other identity sources must identify the domain name during authentication. To configure a default domain using the vSphere Client, you can use these steps.
Step 1. Navigate to Home > Administration > Single Sign On > Configuration
Step 2. Click Identity Sources and click Add Identity Source
Step 3. Select an identity source and click Set as Default.
How to Add an Active Directory Identity Source
To permit Active Directory authentication in vSphere, add one or more Active Directory domains as identity sources in SSO. In scenarios, where the SSO server is a member of an Active Directory domain, that domain may be added as Active Directory (Integrated Windows Authentication) identity source. You can add other Active Directory domains to SSO as Active Directory LDAP Server identity sources.
As a requirement to add an integrated Active Directory identity source, you need to ensure the server where SSO is installed is in the domain. The vCenter Server appliance can be added to the domain using the following procedure.
Step 1. Logon to the vSphere Web Client using the SSO domain administrator account, such as [email protected].
Step 2. In the left pane, select Administration > System Configuration > Nodes.
Step 3. Select the appropriate node and click the Manage tab.
Step 4. Select Active Directory and click Join.
Step 5. Enter the Active Directory details such as Domain, Organizational Unit, User Name, and Password.
Step 6. Click OK.
Step 7. Right-click the node and select Reboot.
After the appliance reboots, you add it as an Active Directory (Integrated Windows Authentication) identity source
When adding an Active Directory (Integrated Windows Authentication) identity source, provide the following information
• Domain Name: FDQN of the domain
• Use Machine Account: Select this option to use the local machine account as the Server Principal Name (SPN). Do not use this option if you plan to rename the machine.
• Use Service Principal Name (SPN): Select this option, instead of Use Machine Account, if you prefer to specify a unique SPN, instead of using the machine name as the SPN. If you choose this option, then you mast also provide the SPN, UPN, and password as follows.
• Service Principal Name (SPN): If you selected the Use Service Principal Name option, then provide a unique name that includes the domain name, such as STS/domain.com.
• User Principal Name (UPN): If you selected the Use Service Principal Name option, then provide a user name that can authenticate to the Active Directory domain.
• Password: If you selected the Use Service Principal Name option, then provide a password that is associated with the UPN.
Note
The user account must have read access to the OUs containing users and group. If the user account does not have sufficient permission or is locked or disabled, then authentications and searches in the Active Directory domain fail
When adding an Active Directory over LDAP identity source, provide the following information
![]()
• Name: Logical name for the identify source
• Base DN for users: Base Distinguished Name for users.
• Base DN for groups: Base Distinguished Name for groups.
• Domain Name: FDQN of the domain
• Domain Alias: The Domain’s NetBIOS name.
• Username: User name in the domain that has at least read access to the specified user and group base DNs.
• Password: Password that is associated with the user name.
• Connect to: Domain controller which to connect.
• Primary Server URL: The primary domain controller’s URLin the form of ldap://hostname:port, or ldaps://hostname:port.
• Secondary Server URL: The secondary domain controller’s URLin the form of ldap://hostname:port, or ldaps://hostname:port.
• SSL certificate: When using LDAPS in the URL parameters, specify the certificate.
You can add additional user accounts from other Identity Sources to the SSO Administrators group. To add additional user accounts from other Identity Sources to the Administrators group in the SSO domain, you can follow these steps:
Step 1. Login to vSphere Web Client with the SSO domain administrator account.
Step 2. Select Administration > Users / Groups
Step 3. Select the Group tab > Administrators > Add Member icon from the Group Members section
Step 4. Select the additional Identity Source from the Domain drop down menu.
Step 5. Select the account you would like to add
Step 6. Click OK
How to Add an LDAP Authentication Source
To use OpenLDAP for authentication, one or more LDAP authentication sources have to be added in vCenter. In order to utilize OpenLDAP for authentication, the following requirements must be met.
• OpenLDAP schema is RFC4519 compliant
• All users have an objectClass of inetOrgPerson
• All groups have an objectClass of groupOfUniqueNames
• All groups have a group membership attribute of uniqueMember
• All users and group objects have entryUUID configured
When configuring OpenLDAP, the following information needs to be provided.
• Name: Logical name for the identify source
• Base DN for users: Base Distinguished Name for users.
• Base DN for groups: Base Distinguished Name for groups.
• Domain Name: FDQN of the domain
• Domain Alias: The domain name in capital letters is added if no alias is defined
• Username: User name in the domain that has at least read access to the specified user and group base DNs.
• Password: Password that is associated with the user name.
• Primary Server URL: The primary server’s URLin the form of ldap://hostname:port, or ldaps://hostname:port.
• Secondary Server URL: The secondary server’s URLin the form of ldap://hostname:port, or ldaps://hostname:port.
• SSL certificate: When using LDAPS in the URL parameters, specify the certificate.
Enable/Disable Single Sign-On (SSO) Users
To manage SSO users, you could use the vSphere Client. For example, to add a SSO user, follow these steps.
Step 1. Logon to the vCenter Server connected using [email protected] or another user in the SSO Administrators group.
Step 2. Navigate to Home > Administration > Single Sign-On > Users and Groups
Step 3. Select the Users tab and click Add User.
Step 4. Provide the User Name and Password. Optionally provide values for the other fields.
Step 5. Click OK.
In a similar manner, you can create an SSO group by selecting Users tab in Step 3 and providing details in Step 4. You can also use the Groups tab to select a group and use the Add Member icon (in the details section) to add users to the group. When adding a user to a group, use the Domain dropdown to select the SSO domain or another identity source and select a user account from the provided list.
To disable or enable an SSO user account, select the user account in Users and Groups, click the ellipsis icon, and click Disable or Enable.
The SSO domain (vsphere.local in vSphere 5.5, but may be named differently in vSphere 6.0) provides several pre-defined groups. You can add users from Active Directory domains or other identity sources to these pre-defined groups. Some SSO privileges are determined solely by the membership of these groups. For example, a user who is a member of the CAAdmins group can manage VMCA and a user who is a member of the LicenseService.Administrators group can manage licenses.
The SSO domain contains many pre-defined groups, including the following:
• Users: Contains all users in the SSO domain
• DCAdmins: Members can perform Domain Controller Administrator actions on the VMware Directory Service.
• SolutionUsers: Each solution user authenticates individually to vCenter Single Sign-On with a certificate. By default, VMCA provisions solution users with certificates. Do not add members to this group explicitly.
• CAAdmins: Members have administrator privileges for VMCA. Adding members to these groups is not usually recommended, but a user must be a member of this group to perform most certificate management operations, such as using the certool command.
• SystemConfiguration.BashShellAdministrators: Members can enable and disable access to the BASH Shell.
• SystemConfiguration.Administrators: Members can view and manage the system configuration and perform tasks such as restarting services.
• LicenseSevice.Administrators: Members have full write access to all licensing related data and can add, remove, assign, and un-assign serial keys for all product assets registered in licensing service.
• Administrators: Members can perform SSO administration tasks for the VMware Directory Service (vmdir)
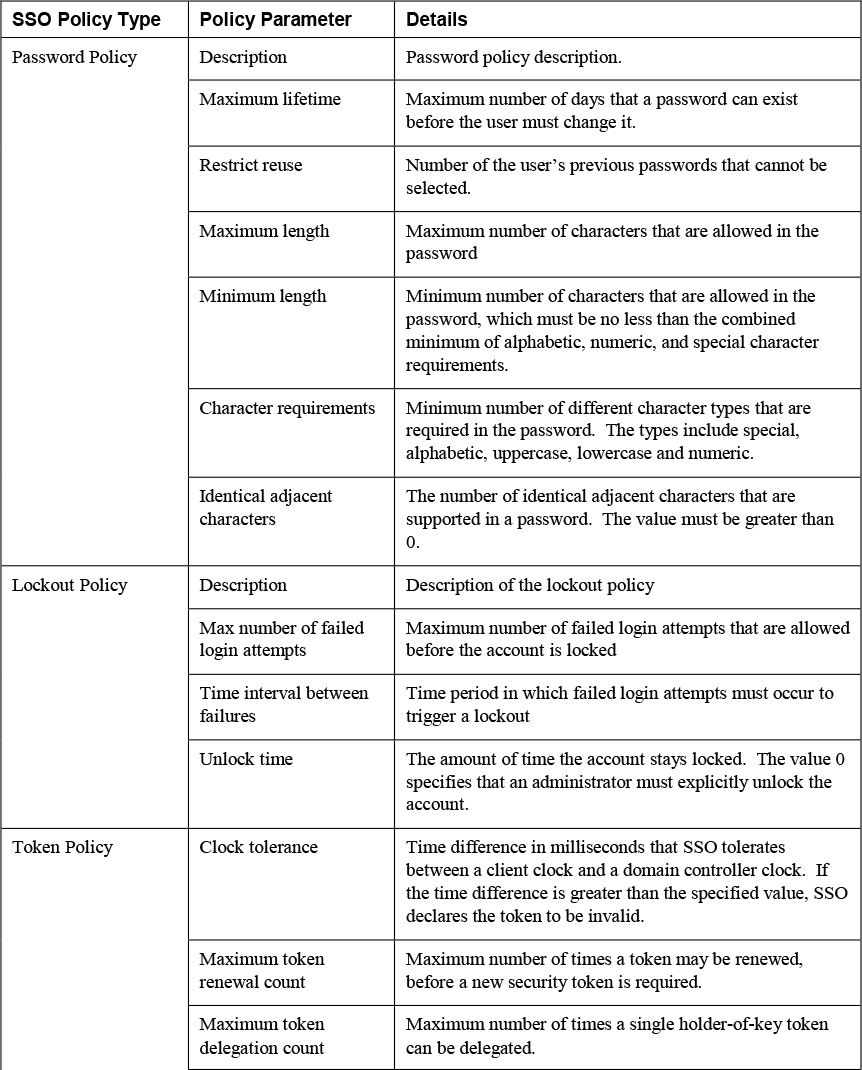
Configure SSO Policies
SSO provides policies that enforce security rules in the environment. You can configure SSO password policies, SSO lockout policies, and SSO token policies. To configure these policies, you can use the vSphere Client to select Administration > Single Sign-On > Configuration, then select Password Policy, Lockout Policy, or Token Policy and click Edit. For each set of policies, set the appropriate password policy parameters as described in Table 8-10.
Table 8-10 SSO Policies and Parameters

Configure Identity Federation
When added to an identity provider, the vSphere Client will redirect a user’s login attempt to that provider’s login page. Corporate credentials (including multifactor authentication) can then be used to log in. After authentication, the identify provider redirects the user back to the vSphere Client via a cryptographic token used for authorization.
Identity Federation utilizes OAUTH2 and OIDC protocols for information exchange. Identity Federation replaces traditional Active Directory, Integrated Windows Authentication, and LDAP/LDAPS authentication for vCenter. vSphere Single Sign-on is not replaced, however, to allow additional administration or emergency access.
![]()
Active Directory Federation Services requirements:
• AD FS for Windows Server 2016 R2 or higher is deployed
• AD FS is connected to Active Directory
• Application Group for vCenter is created in AD FS for configuration. (https://kb.vmware.com/s/article/78029)
• AD FS server certificate signed by Certificate Authority.
• If self-signed certificates are used, the root CA certificate has to be imported to the vCenter JRE truststore.
vSphere requirements:
• vSphere 7.0
• Communication possible between the vCenter server and AD FS endpoint, authorization, token, logout, JWKS, and other advertised endpoints
• VcIdentityProviders.Manage privilege in vCenter to create, update, or delete a vCenter Server Identity Provider required for federated authentication. If a user should be limited to view the Identity Provider configuration and not change it, use the VcIdentityProviders.Read privilege.
Procedure to enable Identity Federation:
Step 1. In the vSphere Client, navigate to Home > Administration > Configuration > Single Sign On
Step 2. Select the Identity Provider tab
Step 3. Click the “i” next to “Change identity provider”
Step 4. Copy the URIs in the pop-up (these will be needed to configure the AD FS server)
Step 5. Close the pop-up
Step 6. Create an OpenID Connect configuration in the AD FS and configure it for the vCenter Server.
a. A shared secret and identifying information must be established between the identity provider and vCenter. An OpenID Connect configuration is created in AD FS, which is known as an Application Group: a Server application and a Web API. These components define the information that vCenter uses to trust and communicate with the AD FS server. To create the AD FS Application Group, the 2 Redirect URIs from step 5 are used. It is then important to copy or record the following information:
i. Client identifier
ii. Shared Secret
iii. OpenID address of the AD FS server
Step 7. Go back to the Identity Provider tab
Step 8. Click Change identity provider
Step 9. Select Microsoft ADFS
Step 10. Click Next
Step 11. Enter the following information:
a. Client identifier
b. Shared Secret
c. OpenID Address of the AD FS Server
Step 12. Click Next
Step 13. Enter the user and group information for Active Directory over LDAP to then search for users and groups.
Step 14. Click Next
Step 15. Review the configuration information and click Finish
Step 16. Go to Home > Administration
Step 17. Click on Users and Groups under Single Sign On
Step 18. Click the Groups tab
Step 17. Click Administrators (group) and click Add Members
Step 18. From the drop-down, select Microsoft ADFS
Step 19. In the text box under the drop-down menu, enter vcenter and wait for the drop-down to show a selection.
Step 20. Select vCenter Admins and then add it to the group.
Step 21. Click Save
Step 22. Log into vCenter with an AD user to verify functionality
Initial vSphere Configuration
This section covers other vSphere settings, components, and features that are typically configured in conjunction with a new vSphere deployment.
vSphere Client Implementation
The vSphere Client is HTML5 based and uses the “Clarity” style user interface. You will use this as your primary GUI. The vSphere Client is a service that is installed automatically as you install vCenter Server.
VMware vSphere Lifecycle Manager Implementation
In vSphere 7.0, vSphere Lifecycle Manager replaces VMware Update Manager from prior versions. Lifecycle Manager adds onto the functionality of Update Manger to include features and capabilities for ESXi lifecycle management at the cluster level. Lifecycle Manager operates as a service which runs on the vCenter Server. This service is available via the vSphere Client. immediately after the vCenter Server deployment. So, no special steps are required to install vSphere Lifecyle Manager, unless you need to install the optional module VMware vSphere Update Manager Download Service (UMDS),
In scenarios where vCenter Server is installed in a secured network with no Internet access, you can install UMDS and use it to download updates. You can use UMDS to export the updates to a portable media drive that you then present to vSphere Lifecycle Manager. Or, if network connectivity exists between the vCenter Server and UMDS, you can automate the export process by leveraging the Web server on the UMDS machine.
See Update Manager Download Service in Chapter 13, “Manage vSphere and vCenter Server” for more details.
Configure the vCenter Server Inventory
You can use the following procedures to create an inventory hierarchy that includes data centers, folders, clusters, and resource pools.
To create a data center, you can use the following procedure
Step 1. Logon to the vSphere Client as a user with the Datacenter.Create datacenter privilege
Step 2. Right-click the vCenter Server in the inventory.
Step 3. Select New Datacenter.
Step 4. Provide a name for the data center and click OK.
To create a folder, you can use the following procedure.
Step 1. In the vSphere Client, right-click the appropriate parent object (a data center or another folder).
Step 2. Select New Folder.
• If the parent object is a folder, then new folder type is automatically set to match the parent
• Otherwise, specify the folder type as Host and Cluster folder, Storage folder, or VM and Template folder.
Step 3. Provide a name for the folder and click OK.
To add an ESXi host, you must address the following prerequisites.
• Ensure the appropriate data center and (optionally) folder objects are created in the vCenter Server inventory
• Obtain the root account credentials for the host.
• Verify the host and vCenter Server can communicate via port 902 or a custom port.
• Verify that any NFS mounts on the host are active.
• For a host with more than 512 LUNs and 2,048 paths, verify the vCenter Server instance is set to support a large or an x-large environment.
Then can use the following procedure.
Step 1. Logon to the vSphere Client as a user with the Host.Inventory.Add standalone host privilege
Step 2. Right-click the data center or folder in the inventory.
Step 3. Select Add Host.
Step 4. Provide the host’s FQDN (or IP address) and credentials
Step 5. Provide licensing information (use a new or existing license)
Step 6. Optionally, set the lockdown mode, remote access, and virtual machine folder information and continue navigating to the final wizard page.
Step 7. click OK
Implement vCenter HA
![]()
You can use the following procedure to configure vCenter HA.
Step 1. In the vSphere Client, select the vCenter Server in the inventory pane.
Step 2. Select Configure > Select vCenter HA > Set Up vCenter HA.
Step 3. If your vCenter server is managed by another vCenter server in a different SSO domain, do the following steps.
• Click Management vCenter Server credentials. Provide the FQDN and Single Sign-On credentials and click Next.
• You may see a Certificate warning displayed. Review the SHA1 thumbprint and select Yes to continue.
Step 4. In the Resource settings section, first select the vCenter HA network for the active node from the drop-down menu.
Step 5. Click on the checkbox if you want to automatically create clones for Passive and Witness nodes.
Step 6. For the Passive node, click Edit.
• Provide details for the passive node virtual machine, such as name, compute resource, datastore
• Select the Management (NIC 0) and vCenter HA (NIC 1) networks.
• Complete the settings and click Finish.
Step 7. For the Witness node, click Edit.
• Provide details for the passive node virtual machine, such as name, compute resource, datastore
• Select the vCenter HA (NIC 1) networks.
• Complete the settings and click Finish.
Step 8. Click Next.
Step 9. In the IP settings section, provide the IP address details.
Step 10. Click Finish.
Configure ESXi Using Host Profiles
Host Profile Overview
During the implementation of vSphere, you can use Host Profiles to efficiently deploy a standard configuration to a set of ESXi hots. To do so, you could configure a single ESXi host, create a host profile from that host, then apply the profile to other recently deployed hosts. This process reduces the time required to configure ESXi hosts and minimizes the risk of misconfigured hosts. The host profile contains all the networking, storage, security, and other host-level settings. The host from which the profile is created is known as the reference host. You can attach a host profile to individual hosts, a cluster, or all the hosts and clusters managed by a vCenter Sever. Applying a Host Profile. After attaching the profile, you can check compliance of the associated hosts and remediate as necessary.
You can use this procedure to create a host profile from a reference host.
Step 1. Navigate to the Host Profiles main view and click Extract Host Profile.
Step 2. Select the host that acts as the reference host and click Next.
Step 3. Enter the name and description for the new profile and click Next.
Step 4. Review the summary information for the new profile and click Finish.
You can use this procedure to attach a profile to ESXi hosts and clusters.
Step 1. From the Host Profiles main view, select the host profile to be applied to the host or cluster.
Step 2. Click Attach/Detach a host profile to hosts and clusters.
Step 3. Select the host or cluster from the expanded list and click Attach.
Step 4. Optionally, click Attach All to attach all listed hosts and clusters to the profile.
Step 5. If you enable Skip Host Customization you will not need to customize hosts during this process.
Step 6. Click Next.
Step 7. Optionally, you can update or change the user input parameters for the Host Profiles policies by customizing the host.
Step 8. Click Finish to complete attaching the host or cluster to the profile.
You can use this procedure to remediate an ESXi host.
Step 1. Navigate to Host Profiles main view.
Step 2. Right-click the host profile and select Remediate.
Step 3. Select the host or hosts you want to remediate with the host profile.
Step 4. Optionally, enter the host customizations to specify host properties or browse to import a host customization file.
Step 5. Click Pre-check Remediation to check if the selected hosts are ready for remediation.
Step 6. Select the checkbox to reboot the host if it is required in order to complete the remediation process. If you wish to manually reboot the host after the process, do not select the checkbox.
Step 7. Review the tasks that are necessary to remediate the Host Profile and click Finish.
Edit Host Profiles
To edit a host profile, you can use this procedure
Step 1. Navigate to Host Profiles main view.
Step 2. Select the host profile that you want to edit and click the Configure tab.
Step 3. Click Edit Host Profile.
Step 4. Optionally, click the Name and description tab to change the profile name and description.
Step 5. In the Edit host profile page expand each category to view or edit a specific policy or setting.
Step 6. View All host profile configurations or only Favorites configurations.
Step 7. Optionally, in the search field, filter the configuration names and values you want to view. For example, enter SNMP. All configurations that relate to SNMP are displayed.
Step 8. Optionally, customize the hosts. Make any changes to the available configuration values for this profile and click Save
Apply Permissions to ESXi Hosts Using Host Profiles
You can use host profiles to apply ESXi host permissions to be used when users access the host directly. To configure the host profile with the appropriate permissions, you can use the vSphere Client (not the vSphere Web Client) and follow this procedure.
Step 1. Select View > Management > Host Profiles.
Step 2. Select an existing profile and click Edit Profile.
Step 3. In the profile tree, locate and expand Security configuration.
Step 4. Right click on the Permission rules folder and click Add Profile.
Step 5. Expand Permissions rules and select Permission.
Step 6. On the Configuration Details tab, click the Configure permission drop down menu and select Require a Permission Rule.
Step 7. Enter the name of a user or group. Use the format domain
ame, where domain is the domain name and name is the user or group name.
Step 8. If a group name is used, select the Name refers to a group of users checkbox.
Step 9. Enter the assigned role name, which is case sensitive. This can the name of a built-in role on the host or a custom role that you created on the host. For system roles, use the non-localized role name, such as Admin for the Administrator role or ReadOnly for the Read-only role.
Step 10. Optionally, select Propagate permission.
Step 11. Click OK.
After configuring the host profile, you can use it to apply the permissions to new or existing ESXi hosts.
VMware Tools
Ideally, you should install VMware Tools in all your virtual machines. When deploying a new vSphere Environment, you should install VMware Tools in any virtual machines that you deployed as part of the virtual infrastructure and management. For example, if you use virtual machines to run Active Directory domain controllers, DNS servers, or DHCP servers, consider installing VMware Tools.
VMware Tools is a suite of utilities that you install in the operating system of a virtual machine. VMware Tools enhances the performance and management of the virtual machine. You can use the following procedure to install VMware Tools in a virtual machine using the VMware Host Client. This procedure is useful for installing VMware Tools in a DNS, Active Directory domain controller, database server, or other virtual machine that you may deploy prior to deploying vCenter Server.
Step 1. Click Virtual Machines in the VMware Host Client inventory.
Step 2. Select a powered-on virtual machine from the list. (The virtual machine must be powered on to install VMware Tools)_
Step 3. Open a console to the virtual machine and log with administrator or root privileges.
Step 4. Click Actions, select Guest OS from the drop-down menu, and select Install VMware Tools.
Step 5. Use the guest OS to complete the installation.
Advanced ESXi Host Options
ESXi Advanced System Settings
You can use the VMware Host Client or the vSphere Client to set advanced attributes on ESXi hosts. You should change the advanced options only when you get specific instructions from VMware technical support or a knowledge base article.
To change a host’s advanced settings using the VMware Host Client, you can navigate to Manage > System > Advanced Settings. To change a host’s advanced settings using the vSphere Client, you can select the host and navigate to Configure > System > Advanced System Settings.
ESXi Kernel options
Disk partitioning in ESXi 7.0 boot devices has changed. These changes include the following:
• Larger system boot partition
• Larger boot banks
• Coredump, tools, and scratch has been consolidated to a single VMFS-L based ESX-OSData volume
• Coredumps default to a file in the ESX-OSData volume
Boot options have to be issued at time of boot, either by defining the kernelopt in the ESXi boot.cfg file, or by manually entering them after entering Shift-O in the ESXi boot loader.
Table 8-11 lists these boot options:
Table 8-11 ESXi 7.0 Kernel Options.

Note
The following kernel boot options have been deprecated and are no longer supported in ESXi 7.0:
• --no-auto-partition
• autoPartitionCreateUSBCoreDumpPartition
• autoPartitionDiskDumpPartitionSize
Summary
You completed reading this chapter on vSphere installation and configuration. You can use the remain sections in the chapter to prepare for associated exam questions.
Exam Preparation Tasks
Review All the Key Topics
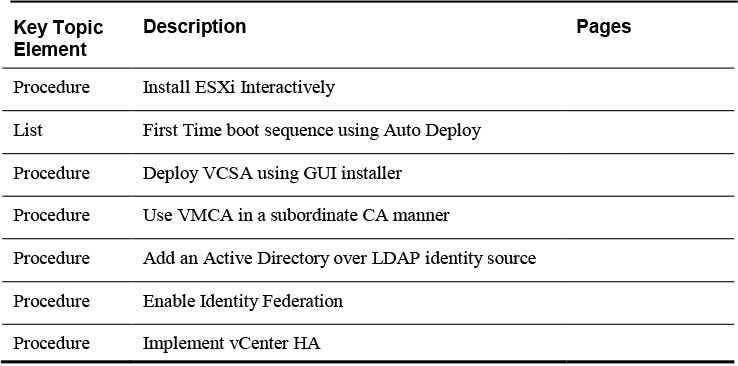
Table 8-12 provides a reference to each of the key topics identified in this chapter. Take a few moments to review each of these specific items.
Table 8-12 Key Topics
Complete the Tables and Lists from Memory
Print a copy of Appendix B, “Memory Tables,” (found on the CD), or at least the section for this chapter, and complete the tables and lists from memory. Appendix C, “Memory Tables Answer Key,” also on the CD, includes completed tables and lists to check your work.
Definitions of Key Terms
Define the following key terms from this chapter and check your answers in the glossary.
VMware Enhanced Authentication Plug-in
VMware Certificate Authority (VMCA)
Answer Review Questions
The answers to the Review Questions can be found in Appendix A.
1. You are using the GUI Installer for vCenter Server 7.0. Which of the following statements is true?
a. In the first stage, choose the deployment type. In the second state, you navigate through the installation wizard.
b. In the first stage, provide the appliance settings. In the second state, you navigate through the installation wizard.
c. In the first stage, choose the deployment type. In the second state, you deploy the OVA.
d. In the first stage, provide the appliance settings. In the second state, you configure SSO
2. You are adding an Active Directory over LDAP identity source. Which setting must you provide?
a. UPN
b. SPN
c. Use Machine Account
d. Base DN for users
3. You are implementing a new vSphere environment and want to install services for updating the ESXi hosts. What should you do?
a. Deploy a VMware Update Manager appliance
b. Deploy a vSphere Life Cycle Manager appliance
c. Deploy vCenter Server with an embedded Update Manager
d. Nothing. The software service is included in vCenter Server
4. You are implementing Auto Deploy and want to control its behavior with rules. Which of the following is not a means by which a rule can identify target hosts?
a. MAC address
b. Model
c. Serial Number
d. BIOS UUID
5. You are using host profiles to deploy a standard configuration to ESXi hosts. Which of the following provides the proper order of operation?
a. Click attach host profile, click pre-check remediation, click remediate.
b. Click attach host profile, click remediate, click pre-check remediation, click Finish
c. Click attach host profile, click pre-check remediation, click remediate.
d. Click pre-check remediation, click remediate, click attach host profile, click Finish