Chapter 7
Virtual Machines
Virtual machines (VMs) are central to any vSphere design. After all, isn't that why we try so hard to optimize all the other pieces of the puzzle? Many organizations spend considerable time and resources ensuring that the network, servers, and storage are suitably redundant, efficient, and capacious. However, often the design of the VMs is paid lip service. You can gain tremendous benefits by giving a little thought to how the VMs are designed and configured.
This chapter will explore what makes up each VM, to help you understand how to take advantage of the different options and realize the impact of these decisions on the rest of your vSphere design. The guest operating system (OS) within the VM can also affect overall performance, along with how each instance is deployed and managed. Interesting techniques exist to minimize the management required and improve standardization in an environment. Finally, we'll look at various strategies you can use to mitigate the effects of host failures on VMs.
VM design is a balancing act between ensuring that each VM has the resources and performance characteristics it needs, and preventing waste. If a VM is overprovisioned in some way, it's unlikely to benefit and will eventually penalize the VMs around it.
Specifically, this chapter looks at the following:
- Hardware components, options, and resource allocation for each VM, with emphasis on the network and storage
- How the guest OS and applications affect VMs
- Using clones and templates to more efficiently deploy VMs
- How to protect the VM's availability
- Understanding VM interrelationships with VMware's Infrastructure Navigator tool
Components of a Virtual Machine
A VM is a construct of virtual hardware, presented to the guest OS. The guest sees the hardware as if it were a regular physical computer. For all intents and purposes, the guest OS is unaware that it's potentially sharing the hardware with other VMs.
VMware presents very generic hardware to the guest, allowing the greatest compatibility for the widest range of OSes. Most modern OSes can detect and run on a vSphere VM without the installation of extra drivers. When you're creating a new VM, if the OS is listed in the wizard as a supported guest OS, then you can change the base hardware to be more appropriate. Different hardware options are available for some items, and VMware provides OS-specific drivers where appropriate. VMware has additional optimized drivers that can improve on the more generic ones found in the OSes.
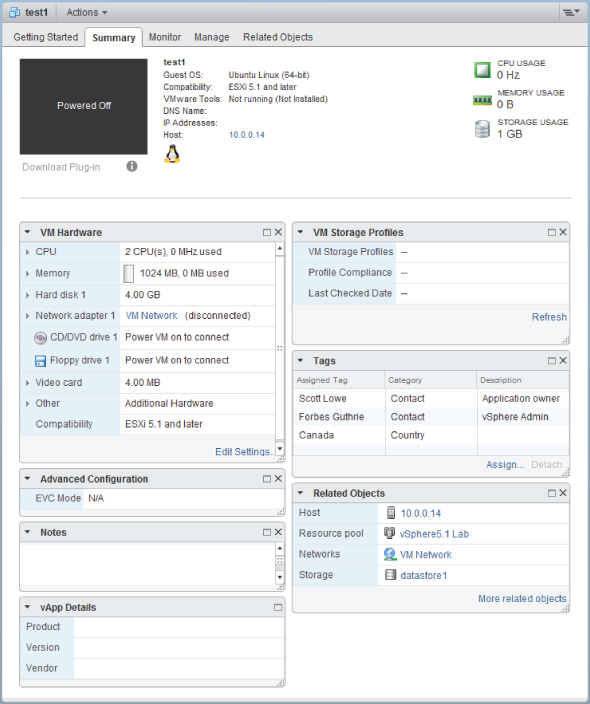
vSphere 5.0's new Web Client GUI interface exposed the ability to create and reconfigure VMs. The 5.1 version of the Web Client added additional VM functionality, particularly in the new Manage tab where Alarms, Tags, Permissions, Storage Profiles, Scheduled Tasks, and vServices can be set. The Summary tab in the new Web Client has also been redesigned (see Figure 7.1). Although the Windows-only client remains and is fully supported with vSphere 5, from 5.1 all new functionality is being added only to the Web Client. For example, the ability to create VMs compatible with vSphere 5.1 and above (VM hardware version 9) can only be completed in the Web Client.
Figure 7.1 VM Summary tab in the vSphere 5.1 Web Client
Base Virtual Machine Hardware
As a base, all vSphere 5 VMs are created with the following hardware, regardless of the OS chosen, the underlying hardware, or any options you select in the New Virtual Machine wizard:
- Phoenix BIOS or EFI-based firmware
- Intel 440BX-based motherboard
- Intel PCI IDE controller
- IDE CD-ROM drive
- IDE floppy drive
- SVGA video adapter
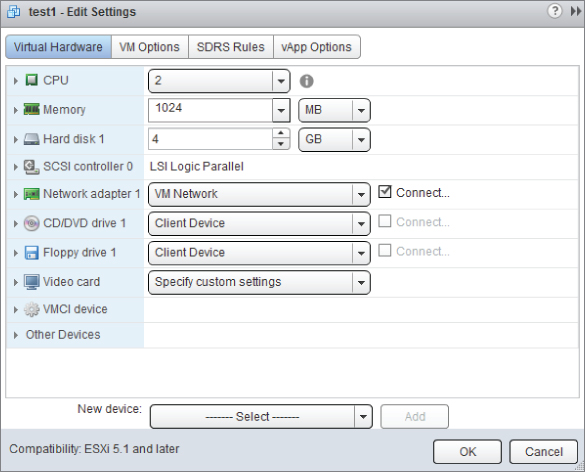
In addition, CPUs and RAM are always added. However, they're limited to the underlying hardware: you can't allocate more CPUs or memory than the physical host has installed. The number of CPUs and the amount of RAM are allocated by default based on the guest chosen; you can manually adjust them later in the creation wizard. Other hardware options are available, either during the VM's initial creation or as additions later as shown in Figure 7.2.
Figure 7.2 Adding devices : to a VM

Hardware Versions
As VMware's hypervisors have evolved, so has the VM hardware shell that is presented to guests. The hardware versioning basically determines what functionality the hypervisor should expose to the VM. In vSphere 5.0 the native hardware is version 8, and in 5.1 this goes up to version 9.
Although vSphere 5.0 can happily run versions 4, 7, and 8 VMs alongside each other, older vSphere ESXi hosts can't run VM hardware meant for newer hosts. It's relatively straightforward to upgrade VMs from one version, but you should ensure that the VMware Tools are upgraded first so drivers capable of understanding the new hardware are in place. After you've upgraded the tools, power off the VM; then you can upgrade the hardware to the latest version. vSphere 5, in particular 5.1, has relaxed the hard requirement to upgrade tools first, before the virtual hardware. As long as a recent version (tools from vSphere 4 or 5) is installed, then upgrading to the hardware compatibility version that comes native in 5.1 should be successful. However, upgrading hardware always requires a shutdown, so this is a great opportunity to play things safe and upgrade the VMware Tools.
vSphere 5.0 can create hardware version 4 VMs, which was the default for VI3 (ESX/ESXi 3.x), and hardware version 7, which was the default in vSphere 4, in addition to its native version 8. The ability to create older versions of VM hardware aids backward compatibility when you have a mixed environment containing legacy hosts, common during an upgrade. Also, VMs from third-party software vendors tend to come in older versions, such as 4 or 7 packaging, to maintain the greatest compatibility possible for customers.
vSphere 5.1 has taken a new approach to VM hardware and has changed the terminology. VMware wanted to reduce the upgrade burden and the perception that upgrading virtual hardware was a necessity after each host upgrade. This particularly helps software vendors that produce prepackaged appliances, which don't necessarily need to take advantage of later features. The new monikers for each hardware version are listed in Table 7.1.
Table 7.1 VM hardware compatibility
| vSphere 5.1 Compatibility Description | Hardware Version |
| ESXi 5.1 and later | 9 |
| ESXi 5.0 and later | 8 |
| ESX/ESXi 4.x and later | 7 |
| ESX/ESXi 3.x and later | 4 |
Although VMs can be upgraded, downgrading them is considerably trickier. One approach is to snapshot each VM before you upgrade it. Doing so provides a temporary roll-back point; however, it isn't feasible to keep these snapshots long-term, and reverting changes to get back to a previous hardware version also destroys any changed data. Snapshots can only be used to guard against problems during the upgrade itself.
VMware Converter is a tool primarily aimed at virtualizing physical machines in a process most commonly known as P2Ving (physical to virtual). However, Converter can also be used to downgrade to earlier versions. It's a freely downloadable tool, and it works seamlessly with vCenter.
During a host upgrade project, all the emphasis is placed on the hosts. Often the VMs are missed, because upgrading isn't a definitive requirement, and this is the one step that in a multihost, shared-storage environment actually needs VM downtime. Upgrading the VMs not only brings proper host/VM compatibility but also introduces a number of improved features. Some recent hardware benefits include access to larger hardware maximums, new storage devices and new network-card options, hot-plug support for CPUs and memory, passthrough to Peripheral Component Interconnect (PCI) devices, access to hardware-accelerated 3D graphics cards, and virtual CPU performance counters. An upgrade project should not only feature upgrading the VMs but also take advantage of the devices.
The best time to upgrade the VMs is when all the hosts in a cluster have been upgraded. If some VMs are upgraded before all the hosts are, then this can affect vMotion choices, distributed resource scheduling (DRS), high availability (HA), and distributed power management (DPM) effectiveness.
It's important to remember to convert the templates to a VM and upgrade them at this time as well, to ensure that all new VMs are deployed at the latest version. Be careful if you maintain one set of templates for several clusters and sites, because you'll need to keep two versions until all the hosts are upgraded.
Virtual Machine Maximums
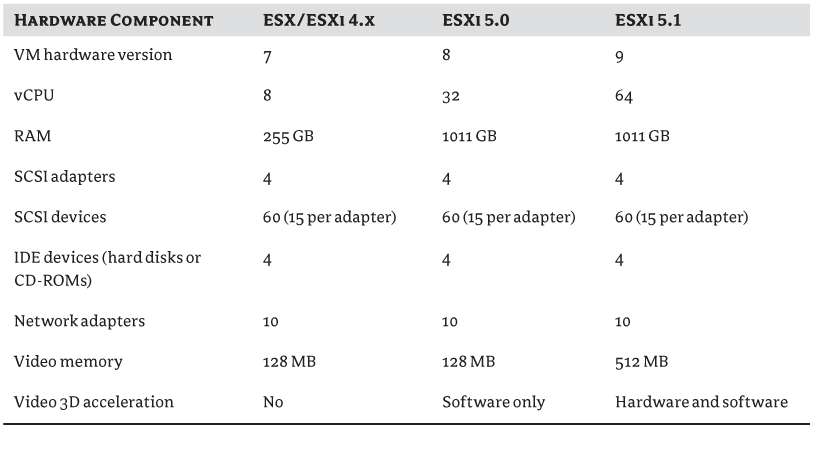
The VM hardware version dictates the features available to, and the scalability of, a VM. Ultimately, you can only add hardware to a VM if it's available on the host: for example, you can't add more virtual CPUs (vCPUs) to a single VM than there are logical processors in the host server. Table 7.2 shows the maximum amount of each hardware component that you can add to a VM at each of the recent versions.
Hardware Choices
Once a VM has been created, you can alter the default hardware. The following sections discuss each element and the options available to customize the VM. Figure 7.3 shows the basic VM hardware choices available.
Figure 7.3 Virtual machine hardware
CPU
Each VM is created with the minimum number of vCPUs that the selected guest OS can support (usually 1, but you'll notice, for example, if you create a nested ESXi VM that the creation wizard will automatically select 2). The number of vCPUs can be increased up to 64 in vSphere 5.1 (32 in vSphere 5.0), or the maximum number of logical processors that the server hardware contains, whichever is lower. Many other vCPU options exist and can be configured via the drop-down menu. These extra settings and their impact on the VM's design are discussed later in the chapter in the section “Virtual Machine CPU Design.”
Table 7.2 Virtual machine hardware maximums
Memory
In a parallel to a VM's CPUs, a base minimum RAM is allocated to a VM according to the recognized guest OS's preconfigured safe minimum. Again, more can be added, up to the amount fitted to the physical server or the vSphere 5 1TB limit (1011 GB to be exact). If the compatibility level on the VM (that is, the VM hardware level) has been set to 4.x or later, then this is limited to 255 GB. VM compatibility of ESXi 3.x or later reduces this to just below 64 GB. The advanced memory options configurable are discussed in the section “Virtual Machine Memory Design” later in this chapter.
Disks
In a VM's settings, the primary disk option is to increase its size via a spinner control and drop-down menu. Despite the presence of the spinner, you can't decrease the size of a disk once the VM has been started. During the VM's creation, and when adding new disks, options are available to select an existing disk instead of a newly forged one. Additionally, instead of creating standard Virtual Machine Disk Format (VMDK) disks, you can create raw device mapping (RDM) files that map directly to a storage area network (SAN) logical unit number (LUN). These options and more will be discussed in further depth in the section “Virtual Machine Storage Design” later in this chapter. It's worth noting at this stage, though, that each VM is limited to 4 IDE disks and potentially a total of 60 SCSI disks.
SCSI Controllers
When a SCSI hard disk is attached to a VM, a new SCSI controller is also added. Each SCSI adapter can have 15 disks connected to it, and you can add up to 4 SCSI controllers.
A VM can select from four different types of SCSI controller, which we'll discuss later in the section “Virtual Machine Storage Design.” They're added automatically to best suit the guest OS; you have to manually change them if you have different needs.
Network Adapter
The VM network adapter settings allow you to change several hardware options; but from a VM design perspective, they let you select different adapter types and manually set MAC addresses. Both of these options are discussed later, in the “Virtual Machine Network Design” section. The base configuration merely allows you to select the designated port group (subnet) and whether the adapter is in a connected or disconnected state. You can add up to 10 network cards to a VM, each with its own individual settings.
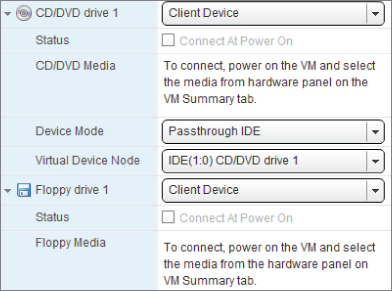
CD/DVD Drive
The CD/DVD drive allows you to connect the VM to your client workstation's local drive (using the Passthrough IDE mode), the host's optical drive (with the Emulate IDE mode), or an ISO image on a datastore. Figure 7.4 displays the typical options available.
If you're attaching a host USB optical drive, then it must be attached as a SCSI device that doesn't support hot adding or removing as an IDE drive does. Remember that attaching a host CD/DVD drive to a VM should only be a temporary action to install software or copy data into the guest. If possible, disconnect the drive after it has served its purpose: leaving it connected will prevent vMotions, which in turn will affect automated operations such as DRS balancing.
Figure 7.4 CD/DVD drive hardware options
Floppy Drive
The floppy drive is treated very similarly to an optical drive, although the settings also let you create new .flp images. You can have a maximum of two floppy drives per VM. Floppies can be either image files or drives connected to the client computer. Physical floppy drives on the host can't be passed through to a VM.
Video Card
You can't add a video card to or remove it from a VM; it comes as standard. Figure 7.5 shows how you can adjust the number of displays from one up to a maximum of four, allocate more video memory, and enable 3D support.
Figure 7.5 Video card : hardware options
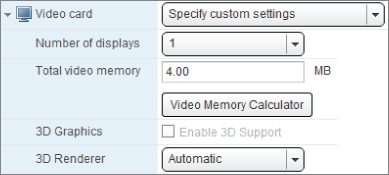
The default memory is 4 MB, which is enough for one screen with a resolution of 1176 × 885. Increase the memory if you need more screens or a higher resolution. This setting is most important for virtual desktop infrastructure (VDI) designs.
vSphere 5.0 included support for a software emulation of a 3D graphics card in VMs. This, in combination with the Windows Display Driver Model (WDDM) guest driver, is capable of driving Windows' Aero-style GUI elements. Basic support for OpenGL 2.0 features is available; depending on the specific applications and use cases, this may be sufficient to provide users with appropriate 3D capabilities. vSphere 5.0 is also capable of supporting PCI passthrough, so it's theoretically possible to install a card in the server, pass it directly through to a single VM, install the necessary drivers in the guest, and provide hardware 3D graphics support this way. However, the one-to-one mapping of card to VM means this solution isn't scalable for a VDI environment and is unlikely to be useful in anything more than edge-case scenarios.
vSphere 5.1 introduced support in desktops for one-to-many hardware graphics. Certain NVIDIA multi-GB video cards can be presented through to VM, allowing you to allocate a slice of the video card's memory to each VM.
VMCI Device
VM Communication Interface (VMCI) was a communication method that could be used between VMs on a single host or between a VM and the host itself. VMCI was introduced in vSphere 4. It aimed to minimize the overhead associated with traditional networking stacks. Because it didn't use the guest or VMkernel networking stack, it had relatively high performance compared to TCP/IP sockets.
Applications needed to be written specifically to use VMCI sockets, and drivers were included in the Windows and Linux versions of VMware Tools.
VMCI guest-to-guest support has since been retired with vSphere 5.1. It can still be enabled in 5.0, but in the 5.1 GUI even this option has been disabled. It remains available on VMs already configured for VMCI, but it can no longer be enabled on 5.1 hosts.
Additional Devices
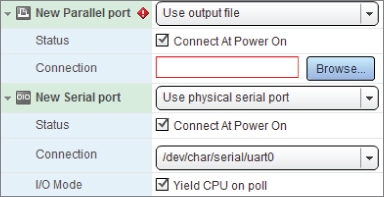
A number of additional devices can be added to a VM, even though they don't come as standard. Figure 7.2 showed the full listing. Augmenting the devices already discussed, the following ancillaries are also available:
Figure 7.6 Serial port : hardware options
vSphere 4.1 was the first release to encompass USB support into the VMs. The initial USB implementation relied on USB devices attached to the ESX/ESXi hosts. vSphere 5.0 brought support for client-connected devices and USB 3.0.
- The EHCI+UHCI controller is the standard USB 1.1/2.0 device controller and is available to VMs from hardware version 7 and above.
- The xHCI controller is a new USB 3.0 controller that needs at least VM hardware version 8. Using this controller requires that an xHCI driver be installed in the guest OS; currently only Linux drivers exist. Windows 8 and Server 2012 are likely to include suitable drivers on their release.
Removing or Disabling Unused Hardware
Each VM should be presented with only the hardware it requires. Like other vSphere resourcing, a VM should have what it needs but not waste host resources on what the VM doesn't require.
VM hardware that isn't needed can be removed, disconnected from the host hardware, disabled in the VM's BIOS, or even disabled in the guest OS. Typically, floppy and CD drives, USB controllers, LPT and COM ports, and unused NICs and storage controllers are likely candidates.
A guest floppy drive is rarely used in a VM. The only common use case is the presentation of driver FLP files during OS installations. You should be safe removing this device from your VMs.
Excess hardware unnecessarily uses interrupt resources. OSes poll devices on a regular basis, which requires CPU cycles to monitor. Other devices reserve memory that could be used by other VMs. Even excessive vCPUs use more interrupts than uniprocessor VMs. You can tweak the number of timer interrupts in Linux VMs; however, most modern Linux kernels use a tickless timer, which varies the timer interrupt rate to reduce the number of wake-ups (introduced in the mainline 2.6.21 kernel). Older Linux VMs may benefit from a reduction in their timer interrupt settings.
You can disconnect optical drives and COM and LPT ports from the VM, or at least connect them to files instead of physical devices, when they aren't being used. Again, COM and LPT port are rarely used, so you should consider removing them from a VM altogether.
Some hardware can also restrict other features. For example, FT won't work while serial or parallel ports are connected or while CDs, floppies, USB passthrough devices, Fibre Channel N-Port ID virtualization (NPIV) ports, or any hot-plug features are enabled. If you don't need the hardware, disable or disconnect it. If you'll never need it, remove it.
Later in the chapter, in the section for “Clones, Templates, and vApps,” we discuss how removing unnecessary hardware and right-sizing the images with a minimal approach is a great practice to encompass. Eliminating unnecessary resources from each VM at the time of its inception will significantly reduce overhead across the future infrastructure.
Virtual Machine Options
In addition to the configurable hardware options, there are more option choices for each VM. The VM options tab in the vSphere Web Client is split into the following drop-down sections.
General Options
The General Options displayed in Figure 7.7 provide basic information about the VM such as its name, the location of its configuration file (the .vmx file), and which guest OS it's configured for. The location of the VM's working directory is by default alongside the configuration file. In versions of vSphere prior to 5.0, the working directory stored all of its disks' snapshot files. This is no longer the case, because each disk's snapshot is now stored alongside the parent disk, but the working directory still contains several other volatile files such as the VM's suspend file and swap file by default. You may wish to change the working directory for a VM's design, so you can dictate where these variable files reside.
Figure 7.7 General options
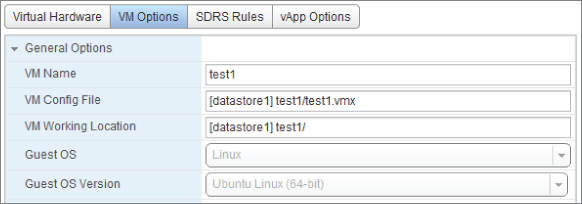
The guest OS and version are set when the VM is created. Many of the default choices about the hardware and its setting are derived from this setting. If you run the guest OS through an in-place upgrade, remember to power off the VM and change this setting accordingly. This won't change the preconfigured hardware, but it ensures that any extra hardware added afterward will default to the most appropriate choice.
Remote Console Options
Two remote console settings can be configured, as shown in Figure 7.8. The first check box ensures that the console is locked when no users remain connected. The second option allows you to limit the number of remote consoles with an enabling check box and then set the number of users.
Figure 7.8 Remote Console Options
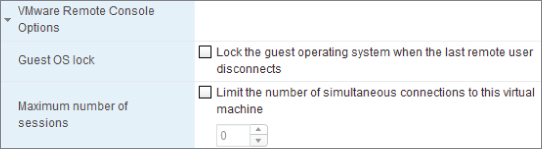
Both options are disabled by default, but enabling them is a sensible security measure if access to the guest OS, the data within, or the guest's ability to act as a springboard to other targets is of a particular concern. Remember, even without these settings, a user still must explicitly have at least VM User permissions on the VM, or an object hierarchically above it, to access the console.
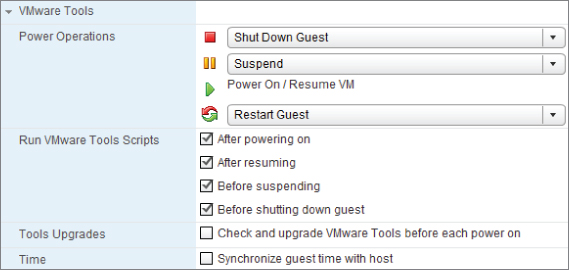
VMware Tools
The various tool settings shown in Figure 7.9 determine how the power buttons should react and allow scripts to run inside the guest OS. Usually the default options are suitable. If the guest is supported and has VMware Tools installed, then the power option defaults resolve to “soft” operations.
Figure 7.9 VMware Tools options
Power Management
Power management corresponds to how the VM reacts when the guest OS is put in standby. You can leave the VM turned on (with the Wake-On-LAN option) or suspend the VM. This design decision is determined by balancing how long you're willing to wait for the VM to wake up, against saving host resources by suspending it.
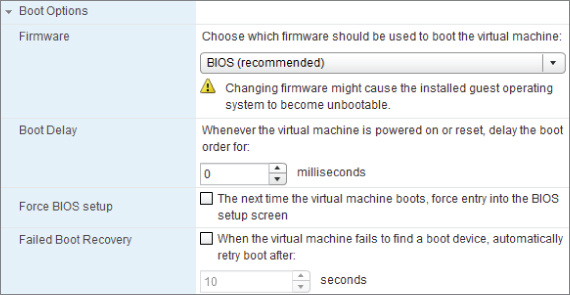
Boot Options
The Boot Options shown in Figure 7.10 give you control over the BIOS delay and let you access the boot order. These are normally changed only for a specific event; but for VM design, they can be important if you wish to disable options in the BIOS. vSphere 4.1 added the ability to automatically reboot the VM if no boot device is found. vSphere 5.0 brought the option to use an EFI firmware interface in VMs. This is defined when the VM is created based on best fit for the guest OS. Once the guest OS is installed, switching between the two will usually result in an unbootable OS.
Figure 7.10 Boot Options
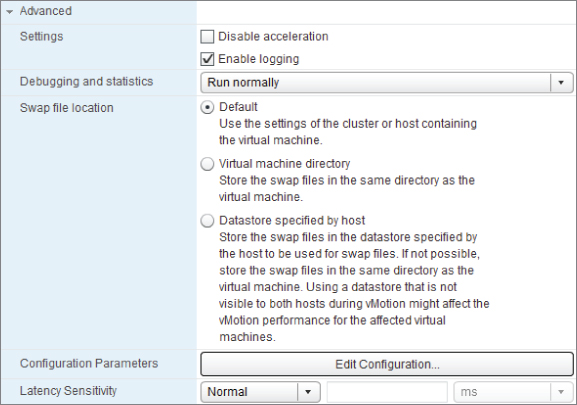
Advanced
On the VM Options tab, you can change a number of advanced options shown in Figure 7.11.
Figure 7.11 Advanced options
SDRS Rules
A VM's settings dialog has a third tab, SDRS Rules, which permits the addition, editing, and deletion of Storage DRS rules. Storage DRS was discussed extensively in Chapter 6, “Storage,” but in summary it allows rules to affect how a VM's disks should react when they're stored in a datastore cluster. When Storage DRS is enabled, it can recommend or automatically move a VM's disk to balance capacity and/or performance across the datastores. The SDRS rules dictate the affinity of VMDK disks and VMs in the datastore clusters.
vApp Options
The vApp options let you set or change virtual appliance settings such as product descriptions, IP allocations, and Open VM Format (OVF) environmentals. It's unlikely that you'll need to modify these unless you plan to distribute a VM as a virtual appliance. If the options here aren't sufficient for your packaging needs, VMware Studio is a freely downloadable tool that is designed specifically to package vApps.
vServices
A VM's vServices options show which appliance applications have been registered in vCenter. Administrators wouldn't typically set these themselves, but they can be delivered as part of an application or a vApp package. For example, vSphere Update Manager (VUM) registers itself with the vServices tool, alerting users to problems with the VUM service centrally from within vCenter. An application needs to register itself via a vCenter extension to be monitored this way. vServices can be useful not only in monitoring, but also in basic troubleshooting and checking on service dependencies.
Naming Virtual Machines
A VM's name is chosen during its creation or deployment from a template and sets the default moniker for its location folder and files. This name is transparent to the guest, but matching it to the VM's hostname avoids confusion. If the VM name is changed, the VM retains the original naming against its files on the datastore. However, migrating to another host via cold migration or Storage vMotion renames these files (although not during a regular vMotion). This helps ensure consistency; otherwise, troubleshooting issues can become more complicated if the names no longer match.
It's always advisable to avoid spaces and special characters in a VM's name. This is also beneficial because it makes working with the VM at the command line or with scripts much easier. Additionally, keeping all the letters lowercase makes for a more palatable keyboard experience.
VMware Tools
The VMware Tools are a software package that you should install in each VM. The tools include optimized drivers, a tools service, a tools control panel applet, and a specialized memory driver. These tools improve the VM's performance and aid management. They facilitate the VM heartbeat, which hosts use to tell that the VM is responding. They can also enable time synchronization between the host and the VM, which we'll examine later in the chapter. You can use the tools to quiesce the file system, copy and paste operations to the console, and send shutdown commands.
All versions of VMware Tools included since vSphere 4.0 are supported in VMs running on vSphere 5. Upgrading the tools to the latest version isn't mandatory, but it's advisable because newer versions will include support for more recent versions of the VM hardware level. A new feature of the VMware Tools packaged in vSphere 5.1 is that once installed, subsequent updates to Windows guests (Vista and later) shouldn't require a reboot in the majority of cases. The VMware Tools update process can be run without causing disruption.
Your VM design should include the installation of the VMware Tools, because they provide important functionality. Every supported guest OS has a set of tools available.
Notes, Custom Attributes, and Tagging
vCenter has always provided a way to store user-generated metadata about VMs. The notes field was the primary mechanism for VM object descriptions. It was an open text area to record anything useful about the VM in free-form. Some third-party tools like backup applications had a nasty habit of hijacking this field and overwriting it with their own content. Better data structures could be created by using vCenter custom attributes, which allowed multiple entries per VM and a descriptive name for each field. However, custom attributes were never particularly discoverable, so even once they had been created by one user, other users need to know about their existence and manually reveal the columns to see the stored attributes.
vCenter 5.1 introduces the concept of tagging for a wide variety of object levels. Nowhere are they more useful than at the VM level. vCenter tags are similar to custom attributes but infinitely more visible and searchable, and they make grouping VMs a breeze. Tags are so analogous to the custom attributes of yore that the upgrade process offers to convert them automatically. The basic premise remains: you create a category label that will be available to all instances of that object, and then you tag individual objects with a corresponding entry. The categories can be defined as allowing a single tag or multiple tags per object. For example, if you create a category titled Country, then each object can have only one tag associated with that category—that is, the VM can reside in only one country at a time. Alternatively, a category called Applications to record which applications are installed on each VM needs to allow multiple tags, because several applications may be installed on one VM.
Sizing Virtual Machines
Appropriate sizing is an important part of the overall VM design, because you need to give special consideration to each of the components we've just reviewed. As your vSphere environment grows, the initial sizing of VMs will become increasingly important. If you provide insufficient resources to users from the outset, this can leave a bad impression. Those first impressions of a virtualized alternative to the status quo can often be hard to overcome. However, wasteful allocation can grow to become a serious drain on your resources.
We already discussed disabling or removing unneeded hardware, but remember that there are real benefits to pruning your VMs. As a general rule, it's easier to add more hardware, capacity, or performance than it is to take it away. Often, resources can be hot-added to VMs, and OSes can normally cope with new hardware being presented. But removing hardware can be difficult—it nearly always requires at least a reboot, and often a complete rebuild is needed.
One of the difficulties with keeping VMs small is the attitude of software vendors and users. First, vendors regularly quote application requirements based on the minimum physical server available. Even though the application may be very small and have minimal CPU, memory, and disk requirements, the vendor will quote the latest quad-core CPU with 8 GB RAM and 146 GB mirrored disks. The other common error is that a physical server is always bought with the intention that initial scaling must provide all the performance and capacity the server will need for its entire lifetime. That's at least 3 years, and more normally 5 years. This doesn't take into account the dynamic growth that is possible with the abstracted vSphere layer that sits under each VM.
To best control VM sizing, you should start with sensible initial standards. A hardware tiering scheme is often helpful. For example, create a set size of VMs for small, medium, and large requirements, where each has a list of predefined hardware pieces. As each VM request comes through, fit the applications requirement to one of these standards. Always try to avoid pressure to unnecessarily bump up to the next level if you think it isn't warranted, but remain flexible enough to add extra resources as required. Chargeback, or information-only showback schemes, can be employed internally to help curb excessive business unit demands on new VMs.
To identify existing over- or under-provisioned VMs, several monitoring and capacity-management tools are available, such as VMware's own vCenter Operations Manager. Workloads change over time, applications are upgraded, and user bases fluctuate, so it's important to periodically seek out VMs that are starved or gluttonous. The hypervisor's primary purpose is to balance resources among VMs. If VMs aren't sized appropriately, resource-management techniques such as DRS initial placement, non-uniform memory architecture (NUMA) memory locality, Storage DRS disk-size balancing, and vCPU/vRAM shares won't be as effective or efficient.
Remember, one of the primary reasons for virtualization is to recoup the overprovisioning associated with nonvirtualized hardware. Don't just provide the same hardware in a VM that's present in the physical server you hope to replace. Design your vSphere servers and VMs to fit your purpose, so that all the workloads can function as required. Wasted resources in one VM will eventually hurt other VMs.
Virtual Machine CPU Design
Since vSphere 5.1, a VM can have from 1 to 64 vCPUs. The most vCPUs that can be allocated to a VM depends first on the number of logical cores the physical hardware has. This includes not only the number of filled CPU sockets, but also cores and HyperThreading (HT) cores enabled. Second, the VM hardware version, or compatibility, affects how many vCPUs can be allocated. Hardware version 9 (ESXi 5.1 and later) allows up to 64, but version 8 (ESXi 5.0 and later) VMs can only have up to 32, and version 7 (ESX/ESXi 4.x and later) up to 8. Last, current vSphere licensing limits a VM's vCPUs to 8, unless the host has an Enterprise Plus license, which allows the full amount to be allocated.
Converting a VM from a single vCPU to multiple vCPUs requires that the guest OS be able to handle more than one CPU—this is known as a symmetric multiprocessor (SMP). Some older OSes may not be ready for this; for example, an old P2Ved Linux VM may need its kernel recompiled for SMP. Some OSes can convert their kernels to SMP but have difficulty dropping back to uniprocessor hardware; for example, Windows 2000 can drop back to a single CPU without issue, but converting a Windows 2003 VM requires manual intervention. Adding a second vCPU to a VM therefore shouldn't be taken lightly.
Generally, it's considered prudent to start all VMs with one vCPU until you have a clearly identified reason to provide more. You should check that the applications in the VM can take advantage of the extra vCPUs and can use multiple threads sufficiently before adding them. Too many vCPUs only penalizes the hosts, often without benefiting the applications on the VM. If a VM can't take advantage of the extra vCPUs, it can have a detrimental effect on other VMs' performance. Additionally, vSphere's fault tolerance (FT) feature only works with single-CPU VMs, so any design considering FT should have only one vCPU for the VM to be protected.
Adding extra vCPUs to your VMs has an impact not just on the VMs themselves but also on other VMs on the same host, and even on other cluster members. More vCPUs change the reporting metrics, the HA slot size for all VMs in the cluster, and the ratio of vCPUs in a cluster. If there is any CPU pressure on the host, wasted non-used vCPUs will compromise the performance of all the host's VMs. vCPU allocation is a fine balance between an individual VM's requirement for performance versus the needs of the rest of the host/cluster.
In Chapter 4, “Server Hardware,” we discussed NUMA. However, it's worth considering how multiple vCPUs can impact NUMA hosts specifically. VMs with more vCPUs than there are cores in a host's NUMA node can see performance issues on NUMA-enabled systems. The VM is forced to use memory from a remote memory node, which in turn increases latency. vSphere can recognize this and has additional algorithms that improve the vCPU and memory allocation, known as Wide VM NUMA, for those relatively large VMs. If you're running VMs that fit this profile, then you may see benefit from ensuring that your hosts are running at least vSphere 4.1.
Virtual NUMA (vNUMA) was introduced in vSphere 5.0. It reveals the underlying host NUMA topology to guest OSes that are NUMA-aware. This means the guests can schedule themselves in the most efficient way for the underlying hardware. vNUMA is by default only enabled on VMs that have more than eight vCPUs. The vNUMA settings are configured when it's first powered-on, so avoid moving a vNUMA VM to a host with a different physical NUMA topology. This is another good reason to keep clusters hardware consistent.
Figure 7.12 shows the layout for the CPU section of a VM's settings. Each of the settings are discussed in the following sections.
Figure 7.12 vCPU settings
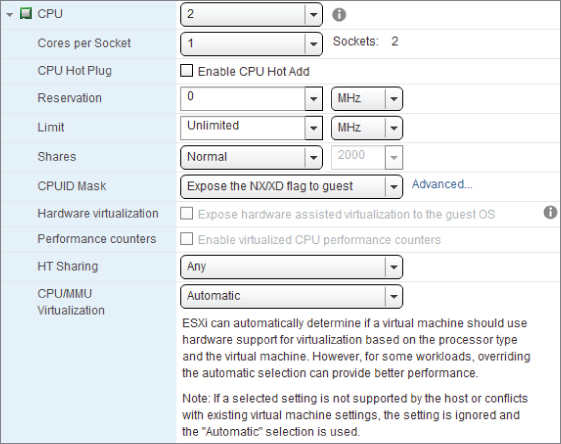
Cores per Socket
The Cores per Socket setting allows you to allocate vCPUs to VMs as virtual cores instead of sockets. This doesn't affect the VM from a host perspective, but purely determines how the guest OS interprets its virtual hardware. As far as the hypervisor and its resource allocation are concerned, allocating one socket with two cores is the same as two sockets each with one core. The benefit is realized in guest OSes where there is a restriction on the number of sockets to which they can allocate resources. For example, Windows 2008 standard edition will only use the first four sockets, but it can take advantage of more cores. Unless there is a good reason to change the default of 1 core per socket, you should scale the vCPUs with the virtual socket value. vNUMA calculations in the guest OS can be detrimentally affected by dividing up virtual sockets among virtual cores. This could lead to a less efficient vNUMA load placement.
CPU Hot Plug
The CPU hot-plugging feature is visible only if the guest OS set in the general options is recognized as capable of supporting it. CPUs can be hot-added or removed, whereas memory can only be hot-added. VMware Tools must be installed to use this feature; and despite the fact that you can hot-plug these devices, the VM must initially be turned off to enable the feature. So, you must plan ahead to have it dynamically available. If this is something you'll use, you must consider and test the guest OS, kernel SMP support, applications, and so on, because support depends on several guest factors.
When using CPU hot plugging, VM hardware should be at least version 8 (compatible with ESXi 5.0 and later), the first version to allow hot-adding with multicore VMs. Enabling hot plugging adds a small amount of guest resource overhead, prevents the use of vNUMA, and temporarily disconnects any USB passthrough devices when you make a change. For these reasons, hot plugging probably isn't something you want to enable wholesale; reserve it for particularly dynamic VMs that can't afford the downtime associated with adding CPUs.
Resources
Each VM has a number of resource attributes you can use to fine-tune its resource allocation against other VMs.
The CPU resources panel allows you to set shares, a reservation, and a limit for the VM, as shown in Figure 7.12. You can set these resource-allocation options for the VM, at the resource pool level in a DRS cluster, or both. If the resources are set at both, they're first carved up at the resource pool level; then the individual VM settings apply in the resource pool.
Generally, the vSphere hypervisor provides excellent scheduling. And normally, if hosts are sufficiently resourced, you can leave the default settings as they are. If you wish to control which VMs receive more priority or resources, it's fairer, more effective, and less prone to error to allocate these at a resource pool level.
The next chapter looks carefully at resource pool design, and we'll leave some of the discussion until then. However, because resources can be allocated here at the VM level, you need to understand the impact of doing so. A design should try implementing any scheduling at the resource pool level whenever possible.
CPU Shares
You can set CPU shares to a low (500 per vCPU), normal (1000), high (2000), or custom level. Shares only take effect during periods of contention, so as long as the host has enough resources to meet all the demand, the shares are never used. This allows all the resources to be used when a VM needs them, if they're available, and prevents the waste associated with limits.
But shares depend entirely on what all the other VMs on the host are set to. CPU resources aren't guaranteed with them, and their effective allocations will change as other VMs are added, change, or disappear.
The CPU shares set on a VM will impact the CPU allocation on all the other VMs on the host if there aren't enough CPU cycles to meet demand. Be careful of multi-vCPU VMs, because they receive shares in proportion to the number of vCPUs. Think of a VM that has four vCPUs. It's considered a more important application and so is given shares at the high level; this means it ends up with eight times the shares of a normal, single-vCPU VM.
CPU Reservation
The CPU reservation is set to zero by default. If you increase this value, it guarantees that amount of CPU cycles regardless of any shares set. They're reserved as soon as you power on the VM and can then affect the ability of other VMs to reserve CPU resources.
The VM can use more or less than the reservation set. If it isn't being used by the VM that's reserving it, other VMs can use the idle resources, at least until the reserving VM requires them. The reservation prevents other VMs from draining resources, to a certain point. However, the more you reserve for one VM, the less is available to be reserved by others. Excessive CPU reservations also negatively impact HA slot sizes. Although setting a reservation may prevent problems in one VM, it negatively affects the VMs around it.
CPU Limit
A CPU limit prevents a VM from using too many resources. The goal is to reduce VM performance! Think seriously before you set a limit anywhere, because doing so is rarely justified and is almost never a good idea.
A limit always restricts the VM, even when there is no contention. It's always applied. You can set a limit if a VM regularly runs out of control and impacts other VMs negatively. The textbook reason to impose limits is to prepare users for degraded performance as more VMs are added to a host. This creates a level of end-user consistency and cripples those VMs artificially. Frankly, that's a waste of resources. Generally, if you think you need limits, use shares and reservations instead.
Additional CPU Settings
In addition to the base CPU settings and resource controls available for a VM, a number of advanced CPU options are available.
CPUID Mask
vMotion compatibility is discussed in Chapter 4 and is normally configured at a cluster level, but a VM can change its CPU mask on an individual basis as shown in Figure 7.12. This allows you to hide certain CPU features from the VM and let it vMotion across noncompatible hosts.
The only VMware-supported mask is the NX/XD execute bit, but clicking the Advanced link lets you mask more flags. This can be useful in a test or lab environment where support is less important and where you may have an eclectic mix of old hardware.
Generally, it's easier to enable Enhanced vMotion Compatibility (EVC) across the entire cluster, as we'll discuss in the next chapter.
Hardware Virtualization
In ESXi 5.1, you can expose full CPU virtualization down to the guest by selecting the virtualized hardware virtualization (VHV) check box. This allows hypervisors to run as nested guests. This is very useful in test and lab environments where you need to run several ESXi hypervisors but are limited by physical hardware. It also permits the morally questionable practice of testing non-VMware hypervisors.
CPU Performance Counters
New to vSphere 5.1, and therefore requiring hardware version 9, is the ability to enable virtual CPU performance counters inside guest OSes. Unfortunately, these additional counters can't be enabled if the host is in an EVC cluster, so this may preclude the use of EVC and even force you to split the cluster if the hosts are sufficiently different. These counters are likely to be used by software developers only during debugging.
HT Sharing and Scheduling Affinity
The HT Sharing resource option sets individual HT modes for a VM. Ordinarily, the vSphere hypervisor deals with HT very well with its optimized CPU scheduler. However, some software recommends that HT be disabled, because it can conflict with its own CPU multiprocessing techniques. This setting allows you to keep HT enabled on the hosts but change it for a particular VM if you wish.
Normally this option is set to Any, which lets the VM's vCPU share cores with its other vCPUs or another VM's vCPUs. The second mode is None, which means the vCPU doesn't share the core with anything, and the hyperthread is stopped while the vCPU is using it. Finally, if you choose Internal and the VM has two vCPUs, the core is only shared with itself; otherwise, any other number of vCPUs will revert to no sharing. You can set this option regardless of whether the VM is turned on or off.
You can set the scheduling affinity to fix which cores are used. Setting the CPU affinity doesn't isolate and dedicate a physical CPU to a VM; it only restricts the movement of that particular VM. This is only used if you determine that a VM's workload has significant inter-vCPU communications, such as graphics intensive applications. You should avoid this unless necessary, because it creates a limitation on vMotion and degrades the host's ability to balance other workloads as efficiently; it's normally better to use other CPU resource settings.
These settings aren't visible if the VM is in a DRS cluster set to Fully Automatic or if the host doesn't have the hardware to support it.
CPU/MMU Virtualization
Hardware virtualization offload support is automatically handled for VMs, but you can individually configure it for special use cases. More details on CPU and MMU hardware assisted virtualization can be found in Chapter 4.
Virtual Machine Memory Design
In vSphere 5, you can apportion RAM to a VM in multiples of 4 MB, with a minimum of 4 MB (VMs using EFI firmware must have a minimum of 96 MB to power-on) and maximum of 1011 GB (assuming the host has that much to give a single VM). Although 4 MB seems like a ridiculously small amount to give a VM, it's occasionally found when administrators want to prevent vSphere users from turning on their VMs. vSphere can allocate such large amounts of memory that a VM's RAM tends to be limited only by the physical host. Figure 7.13 shows the memory settings available for each VM.
Figure 7.13 Memory hardware options
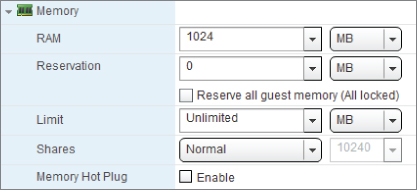
The advanced memory techniques discussed in Chapter 4 mean the VM always sees the amount of memory you've allocated it, even though it may not physically have access to that much RAM. This can be because the host is reclaiming idle pages, sharing pages with other VMs (TPS), compressing them, swapping to host cache (SSD) if available, or adhering to memory limits that have been set. In extreme cases, the VM's memory may not even be from physical RAM but is being forcibly swapped to disk by the hypervisor. We covered this in much more depth in Chapter 4.
A VM's memory allocation has an effect if you don't assign it at the right level. Not enough memory, and the VM may be forced to swap with its own paging file, even if the host has ample amounts. Too much memory, and too much overhead is reserved, preventing other VMs from reserving it. Each VM should be allocated just a little more than the average memory usage, to allow for small spikes.
VMs running on NUMA-enabled hosts can be affected if they have more memory allocated to them than the lowest configured NUMA node. Memory is split across NUMA nodes depending on physical placement in the server. If you're running very large memory VMs on a NUMA host, you should check that the RAM is set properly in the DIMM slots, so VMs aren't forced to use nonlocal memory.
Resources
Similar to CPU options, memory can be allocated at the VM and resource pool levels. Where possible, designs should aim to set these at the resource pool level. Memory shares, reservations, and limits operate like their CPU counterparts but differ in a few crucial ways. We'll look at how they differ next.
Memory Shares
Memory shares work just like CPU shares and are used only during memory contention. They entitle a VM to a certain slice of memory, in line with the other VMs' shares, subject to any reservations and limits set. To prevent wastage in VMs that have a high proportion of shares but unused memory, an idle tax is factored in to the calculations. This reclaims more memory from VMs that aren't using their allocated share. Memory shares shouldn't be changed unnecessarily, but they're preferable to reservations and limits.
Memory Reservations
A memory reservation is different from a CPU reservation because it's selfish and doesn't release idle resources back to other VMs the same way. Until a VM uses the memory, others can use the reserved memory; but as soon as it's used, it's not released until the VM is powered off. It's never reclaimed. Unfortunately, Windows addresses all of its memory when it boots up, so the entire memory reservation is held. Linux only touches the memory when it needs to, thus minimizing the impact.
Like a CPU reservation, a memory reservation may have a positive effect on the VM but can negatively affect its surroundings by reducing available memory and changing HA slot sizes.
Memory Limits
Just like CPU limits, memory limits are generally a bad idea. Memory limits are probably even worse, and they're easily avoided because you can set a VM's memory level far more effectively by reducing its RAM allocation.
When a VM boots up and applications start, they make memory-management decisions based on the amount of RAM they think they have. Setting a memory limit doesn't change this behavior: the VM still believes it has the full allocation, which it's likely to try to use. With a limit set, every request over the limit is forced into VM swap, seriously degrading performance. However, if you reduce the RAM setting, the guest is far less likely to swap as much, because it knows where the limit really is. Avoid memory limits if possible.
Additional Memory Settings
A number of advanced memory options are also available, depending on the VM's guest OS and the underlying physical hardware.
Memory Hot Plug
This feature is visible only if the guest OS set in the general options is recognized as capable of supporting it. CPUs can be hot-plugged or removed, but memory can only be hot-added. VMware Tools must be installed to use this feature; although you can hot-plug these devices, the VM must initially be turned off to enable the feature. So, you must plan ahead to have it dynamically available. Similar to CPU hot plugging, enabling memory hot plugging consumes additional resource overhead, so don't enable it on a VM unless you're likely to use it.
NUMA Memory Affinity
NUMA memory affinity settings are available only if the host supports them and isn't a member of a fully automatic DRS cluster. The settings, shown in Figure 7.13, allow you to select the NUMA node affinity. This forces the VM to use memory from certain nodes and not others. Because this is host-specific, the affinity settings are cleared when the VM moves to another host; and memory affinity only works effectively if you also specify the CPU affinity.
Applying specific NUMA CPU and memory settings can be useful if you have a very static environment with a smaller number of VMs. VMs with large, memory-intensive workloads can benefit from static NUMA mappings, but ordinarily such fine-grained adjustments aren't required.
Virtual Machine Storage Design
One of the crucial design factors for VMs is its storage. vSphere provides a great deal of flexibility for storing VM data, and that gives rise to numerous decisions. Chapter 6 details vSphere storage design and how ESXi hosts connect, but each VM has various storage options determining how its disks are presented. Figure 7.14 shows how these options are laid out in the vSphere 5.1 Web Client.
Figure 7.14 Disk options
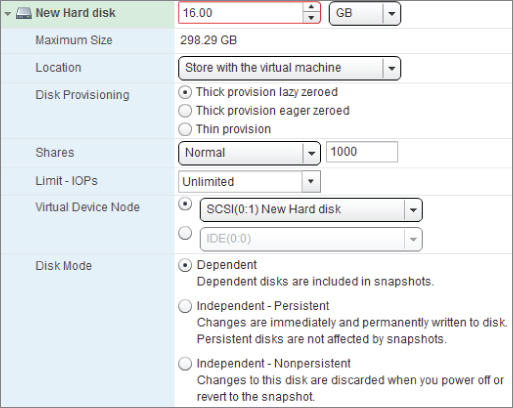
Disks
Although this isn't necessarily vSphere specific, you should consider the number and size of disks to present to each VM. The disks that are presented to VMs have several layers of abstraction. A physical server or workstation with one or more disks inside, and perhaps hardware or software RAID, usually sees one large disk, which it splits into partitions to use. However, VMs are much freer to split their storage to exactly what is needed.
With this freedom, VMs are normally divided into several smaller disks with a single partition on each. These disks are easily grown (assuming spare space exists in the datastores), but contiguous partitions make growing all but the last one on the disk more difficult. For that reason, it's advisable to create VMs with only one partition per disk.
The ease with which you can add disks of any size gives rise to more options when splitting up OS space. On Windows guests, it's common practice to split off the OS C drive and have separate disks for user data, program files, logs, swapfiles, and so on. For example, a Windows SQL VM may have a separate disk for the OS, the databases, the SQL logs, the swapfile, and a backup drive. A Linux VM can have separate disks for each slice of its file system, so a typical setup may have individual disks for /, /boot, /usr, /opt, /home, /etc, /tmp, /var, /var/log, and so on; the list can be endless to suit your requirements.
Another advantage of splitting out each piece of file system is the granularity it gives you to select different performance profiles for different areas. The underlying storage from which the disks are carved can be on different RAID sets, with different disk speeds and different spindle counts, all providing different levels of performance. So for example, a database server can run its OS off an inexpensive RAID 6–based disk; its swap can sit on a fast but vulnerable RAID 0–based disk; and the transaction log and DB files can be on a high-performing, redundant but costly RAID 10–based disk.
This physical separation of logical components also allows you to split off areas of a VM that you want to treat differently. For example, you may want to avoid using SAN replication on certain transient data like swap space. Or you may wish to provide greater protection to some data on the underlying storage. Backups can be simplified by avoiding entire disks that don't ordinarily need to be backed up.
Each VM can have a total of 60 VMDK disks attached to it, each of which can be close to 2 TB, giving you the sort of scalability to quench even the most insatiable of capacity appetites. However, one of the advantages of virtual disks is the ability to make them smaller than usual. On a physical standalone server, you may as well use all of the disk capacity from the outset. With VMs, you should start the disks small and grow them as required. For each VM, you should consider the size of the OS, the applications, the user data in combination with the number of users, the swap, the logs and spooling data, with some room for growth.
Disk Types
vSphere VMDK disks come in three different types:
The different types are best seen when you add a new disk to a VM. You're given the option of which type of disk format you'd like, as shown in Figure 7.14.
When you create a new VM or add a new disk, the default format is thick provision lazy zeroed. If the underlying storage isn't a VMFS volume but a Network File System (NFS) datastore, then the VMDK type can be dictated by the NAS device, and the disks are thin provisioned. If the NAS device has support for the appropriate VAAI primitive, then it may be able offer thick-provisioned disks. See Chapter 6 for details about the VAAI primitives.
Fault tolerance requires thick provision eager zeroed disks, and Microsoft clustering needs it for its quorum and shared disks. You can't simply switch between formats; but when you Storage vMotion a VM from one datastore to another, you're given the choice of what the destination format should be. This gives you a straightforward method to convert your disks to the format you need.
Disk Shares and IOPS Limits
A VM can set shares on a per-disk basis, as shown in Figure 7.14. This VM disk share is only apportioned across a host, not at a resource pool level, and it allows for a very rudimentary level of control. As a share, it applies only during I/O contention.
A feature known as Storage I/O Control (SIOC), introduced in vSphere 4.1, lets shares apply at the datastore level after certain latency thresholds are met. At the VM level, you can enforce IOPS levels on VMs, again shown in Figure 7.14, and prevent one VM from heavily affecting others.
Disk Modes
Regular VM disks are created as VMDK files. You can create these disk files on either block-based datastores or NFS exports. There are three disk modes to select from, as you saw earlier in Figure 7.14.
Dependent
The default disk mode, the one in which all disks are initially created as, is dependent mode (some older documentation refers to this as snapshot or normal mode). Unsurprisingly, the discernible differentiator is that dependent mode VMDK disks can use the snapshot feature.
vSphere VMDK snapshots aren't like SAN snapshots; they aren't copies, but change deltas. It's just a point in time, where the disk I/O is redirected to another disk file. You can then choose to either incorporate those changes back into the main disk (committing) or discard the changes to revert to the original snapshot (deleting). The most important thing to remember from a design point of view is that they're only intended for short-term use. If you want to keep whole copies of VMs at particular times, use vSphere cloning or a suitable backup solution.
Thick-provisioned disks (the default on block-based datastores) without snapshots are static-sized files. However, as soon as you take a snapshot, the static file remains, and new changes are written out to new space. This means that when a snapshot is taken, you can unexpectedly fill your datastore without provisioning any new VMs. Creating snapshots also places restrictions on the VM, such as no longer being able to Storage vMotion the VM.
Finally, as each snapshot is taken, it creates a chain of deltas. As the number of delta files increases, the chaining becomes more complicated and more prone to issues. A break in the chain at any point can lead to data loss. The snapshots can also have an associated performance overhead, so if eking out every ounce of disk I/O is important, you should avoid leaving snapshots in place.
Don't plan to keep your snapshots too long. They're good for short-term use, such as when you're patching or testing changes. Thankfully, the snapshot algorithms keep getting better. vSphere 4.0 came with a much-improved way of dealing with snapshots, making them considerably more reliable. More patches were included in 4.1, reducing the space required to commit snapshots. vSphere 5 now stores snapshot delta files in the same directory as the parent disk, instead of the home folder where previous versions kept them. This ensures that the delta disks can expect the same performance characteristics as the parent, whereas previously the home directory might have had different underlying storage. The best advice is to keep your hosts at the latest version.
Independent Persistent
Independent persistent disks operate like regular hard drives. All changes are immediate, and there is no potential performance degradation as is associated with snapshot mode. However, with the lack of snapshot functionality, certain vSphere features are unavailable, such as VMware Data Protection (VDP), and lots of third-party backup tools.
Independent Nonpersistent
Independent nonpersistent disks differ in that all changes are lost when the VM is powered off (but not when it's rebooted). This returns the disk to its original state, losing all subsequent changes. This disk mode is useful for environments where you want to keep a consistent running image. A good example use case of nonpersistent disks is a kiosk-style terminal, a teaching lab, or a VM used to create ThinApp packages, where you want to return to exactly the same configuration on a regular basis.
SCSI Controllers
vSphere supports four types of SCSI controller:
Depending on the guest you select, the default used is either the BusLogic or the LSI Logic controller, unless it's a Windows XP VM. Windows XP guests don't have the necessary drivers for these SCSI controllers and default to using IDE disks. Each VM can have up to 4 different controllers and up to 15 devices per controller.
Adding more SCSI controllers is also an effective way to distribute storage processing in a VM and can significantly increase storage I/O. For VMs that need the best storage throughput, such as a critical database server, reserve the first SCSI controller for the OS and swap disks, and add up to the maximum of three PVSCSI controllers to spread additional high I/O disks. One can be used for DB disks, one for log disks, and another for TempDB disks. This will marginally increase the guest's CPU but is usually a small price to pay for the gains in storage throughput.
SCSI Bus Sharing
The SCSI bus-sharing policy is set for each controller. By default, it's set to None, meaning that only that particular VM can lock the disk file. However, if guest clustering software running on multiple VMs needs concurrent access to the disk, you can set this to Virtual for cluster in a box (CIB) or Physical for cluster across boxes (CAB).
RDMs
RDM disks are an alternative to normal VMDK disks. RDMs are small mapping files to raw LUNs. They allow the ESX hosts to address the LUN as if it was a VMDK, but this means the VM can have direct access to the entire LUN.
The RDM file contains all the metadata required to manage and proxy the disk access, instructing the VMkernel where to send disk instructions. VMware recommends that you use RDMs only when justified, because the preferred disk format is regular VMDK virtual disks.
Two types of RDM exist—virtual and physical—and your use case will dictate which one is appropriate. Note that both types of RDM support vMotion, despite a common perception that this is available only on virtual RDMs.
Virtual Compatibility Mode RDM
Virtual RDMs act just like regular VMDK files. They virtualize the mapped device so that they appear to the guest OS to be disks from a VMDK datastore. This allows the use of snapshots; and because the RDMs hide the underlying hardware, the LUN is potentially more portable when moving to new SAN equipment. Virtual RDMs are used for CAB-style Microsoft clustering. CIB can also use virtual RDMs, but VMware recommends using VMFS-based VMDKs unless you're likely to reconfigure them to a CAB cluster eventually.
Physical Compatibility Mode RDM
Physical RDMs have almost complete direct access to the SCSI device, which gives you control at much lower levels. However, this means you can't use the snapshot feature. Physical RDM mode is useful for SAN management agents that require access to hardware-specific commands. Physical RDMs are also used for physical to virtual (n+1) Microsoft clustering.
RDM Usage
RDMs are used for a variety of reasons:
RDMs have several drawbacks. They're inherently less manageable, and they lack the portability that makes regular VMDK disk files the default choice. They also require the entire LUN to be dedicated to only one VM disk. This can cause serious scalability issues, because each host can have a maximum of only 256 LUNs. This may sound like a lot, but if they're being used by VMs with several disks, this ceiling can have an effect. Heavy RDM use also has other problems scaling, because the workload on the storage team grows when they have to create and manage that many more LUNs.
RDMs shouldn't be anyone's first choice, but they're indispensible in certain circumstances. They're a useful tool that you can call on in your design if necessary; but try to avoid them if possible, because they're limiting.
Storage vMotion
Storage vMotion is an interesting capability from a design perspective. It allows for zero-downtime datastore migrations. But you should note a couple of things while creating solutions around it. First, Storage vMotion requires at least a Standard level license; this isn't available for Essential and Essential Plus customers.
Second, you should be aware of the impact of Storage vMotion migrations. They're disk-intensive operations. The VM has to continue to read and write to the array while it's reading from the source and writing to the destination. Both source and destination are likely to have other VM traffic I/O, which can be affected by the Storage vMotion. So, if you're using Storage vMotion to migrate a large amount of data, although there may be no downtime, it can have a significant effect on overall SAN performance.
The Storage vMotion can up large chunks of space on the source datastore if the VMs being moved have very large disks or are very disk intensive. Make sure you have sufficient room; otherwise, the datastore will quickly fill and cause issues for all the VMs sharing the datastore.
VAAI offloading capabilities, which we discussed in the last chapter, can reduce this impact significantly if used in conjunction with a compatible storage array.
Moving VMs between VMFS-5 volumes that have been upgraded from VMFS-3 with different block sizes will suffer from degraded transfer performance. Consider rebuilding your upgraded datastores if there isn't a consistent block size.
Cross-Host vMotion
vSphere 5.1 introduces a new feature to the regular migration wizard: Cross-Host vMotion. Essentially, a vMotion and a Storage vMotion are combined in one operation. However, this feature doesn't require the usual Storage vMotion prerequisite of both hosts being able to see the same shared storage. A VM located on a host's local disks can be Cross-Host vMotioned to another host's local disks or between any 2 hosts that don't see the same datastores.
Clearly, the advantage of shared storage is that the vMotion is quick; a Cross-Host vMotion requires that the entire VM be copied across the wire, which takes considerably longer. However, in circumstances where shared storage isn't available or two hosts can't have the same shared storage presented to them, this is a valuable feature that prevents the VM outage normally associated with a cold migration.
Cross-Host vMotions will complete significantly faster if both source and destination VMFS volumes have a 1 MB block size. If there isn't any shared storage to enable a Storage vMotion to take place, the disks are transferred over the vMotion network (although snapshots are transferred over the Management network). Therefore multiple vMotion vmknics will speed the VM's movement as the traffic is load balanced across all available connections.
VM Storage Profile
The storage profile feature is explained in depth in Chapter 6 and is evident in a VM's configuration. When a VM is created, if any storage profiles exist in the datacenter that is selected as a target, you can choose one. The VM's summary page, shown in Figure 7.1, details the storage profile compliance details. See Chapter 6 for further details.
Virtual Machine Network Design
vNICs are the network adapters presented to VMs. Note that they're different from VMNICs, which is the name hosts give to physical network adapters and vmknics which are VMkernel interfaces.
Ordinarily, each VM has only one vNIC. Unlike a physical server, you gain no benefit such as increased bandwidth or additional redundancy by adding a second vNIC. Figure 7.15 shows a VM's vNIC options.
Figure 7.15 Disk provisioning types
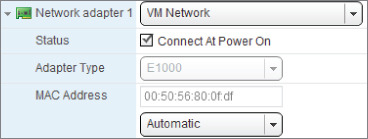
There are a couple of reasons you might add a second vNIC. For example, you may wish to bridge two networks. Take care not to create the network loops that vSwitches help avoid. Firewall-appliance VMs need a second vNIC to bridge both sides of the DMZ. Also, you may want your VM to access more than one subnet, because in your environment different types of data are segregated onto separate VLANs—for example, if all backup agent traffic is forced onto its own subnet. Software-clustering solutions often require access to an extra heartbeat link, and a second vNIC makes it convenient to access this.
vNIC Drivers
Each VM can select from four different vNIC adapter types. Normally, a VM is deployed with one network adapter, and the type is automatically selected depending on the VM's hardware version, the host's version, and the guest OS. However, you can change this choice—for example, if the VM's hardware is upgraded after the VM has been built. It's often a great way to take advantage of new features or more optimized drivers.
Flexible
Flexible is the default vNIC type for 32-bit guests used for VMs that were originally deployed on ESX 3.0 hosts. It will function as a vlance adapter if VMware Tools aren't installed but as a VMXNET device if the VMware Tools are detected:
E1000
An E1000 vNIC emulates an Intel E1000 network adapter. It's primarily the default for 64-bit guests.
VMXNET 2 (Enhanced)
VMXNET 2 (Enhanced) is an upgrade to the first paravirtualized driver for ESX hosts. It includes support for performance features such as jumbo frames and certain hardware offloading.
Again, like the VMXNET vNIC, it requires the VMware Tools to be installed, because there is no physical hardware equivalent. VMXNET 2 has been available since version 3.5, but the set of supported guest OSes is limited.
VMXNET 3
VMXNET 3 is the latest paravirtualized driver, introduced with vSphere 4.0. It was completely rewritten and didn't come from the VMXNET lineage. It supports lots of new performance features to improve network scalability and makes the most of IPv6 and newer 10GbE network cards.
This vNIC is supported only on VMs with hardware version 7 or later, and guests must have the VMware Tools installed. Check compatibility with your guest OS, because support for VMXNET 3 is the most limited.
DirectPath I/O
DirectPath I/O isn't a vNIC adapter in the traditional sense, but it uses PCI passthrough, allowing a VM to bypass the hypervisor network stack and giving it direct access to the physical NIC hardware. DirectPath I/O may provide a minor increase in throughput over vNICs, but arguably it's most useful because it can reduce the CPU load for network-intensive VMs.
However, the use of DirectPath I/O as a feature has a number of restrictions that severely limit its suitability in most circumstances:
- Can't vMotion (therefore limiting features such as DRS)
- Locks the physical NIC to that particular VM; no other VM can use it as an uplink
- No snapshots
- No suspend/resume
- No FT
- No NIOC
- No memory overcommit
- Can't use with VMsafe tools (vShield Endpoint solutions)
With vSphere 5.0, Cisco's UCS platform isn't restricted by the first four limitations listed, but it still can't use FT, NIOC, memory overcommit, or VMsafe.
SR-IOV
Support for single root I/O virtualization (SR-IOV) was added to vSphere in version 5.1. SR-IOV is analogous to DirectPath I/O but crucially allows multiple VMs to address the same PCI card. It has similarly restrictive impacts on the VMs and additional requirements over and above those for DirectPath I/O. Chapter 4 described SR-IOV in greater depth.
Table 7.3 describes the features available in each version of the vNICs in vSphere 5.
Table 7.3 vNIC features
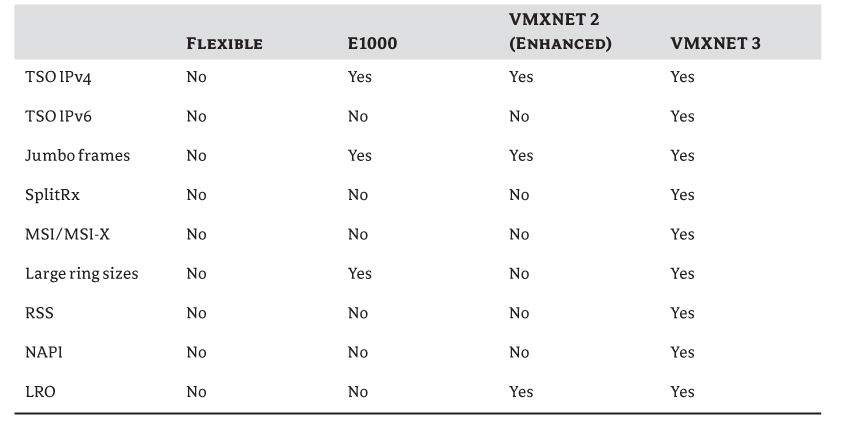
vNIC Driver Performance
The VMXNET 3 driver is the best performance choice if the VM is at hardware version 7 or later and the guest OS is able to support it. If you can't use a VMXNET 3 driver, the next best-performing driver is the Enhanced VMXNET, as long the VMware Tools are installed.
From the remaining vNICs, VMXNET performs best. The E1000 then sits between the VMXNET driver and the lowest-performing vNIC, the aging vlance card.
vNIC Interrupt Coalescing
All ESXi vNICs queue network interrupts to reduce the CPU load. These very short burst periods can introduce very small latency to network links, but are limited to never exceed 4 ms. In extremely latency sensitive workloads, for example VOIP servers, you may want to change the settings or disable this feature to minimize the impact. Only vmxnet3 vNICs allow interrupt coalescing to be disabled or statically configured.
MAC Addresses
vSphere automatically sets a VM's MAC address. Ordinarily, the MAC address that's created doesn't need to be altered. However, you may want to change it in the following circumstances:
- There are more than 256 vNICs on a physical host, because conflicts with the automatically generated MAC addresses can occur.
- vNICs on different hosts but the same subnet are allocated identical MAC addresses.
- You need to set a fixed VM MAC address to prevent the address from changing, for example for software licensing reasons.
After a VM's MAC address is created, the MAC address will change only if the VM is turned off and then moved. However, some software installed in VMs ties its licensing to a MAC address, so in this case it's recommended that you set a static address.
You can see where the MAC address is set in the VM configuration settings shown in Figure 7.15. vSphere 5.0 and older doesn't support arbitrary MAC addresses: the allowable range is 00:50:56:00:00:00 to 00:50:56:3F:FF:FF. VMs built with ESXi 5.1 and later compatibility (hardware version 9) allow all 48 bits of the MAC address to be controlled. The limitation of using VMware's own OUI allocation isn't enforced anymore. Despite this, unless you are designing very large virtual environments where you are concerned about running out of addresses (with VMware's OUI you get 64,000 addresses per vCenter instance) or conflicts across multiple vCenters, then you are best advised to stay within VMware's own recommended range.
VLAN Tagging
Although vSphere's VLAN tagging options aren't strictly a consideration for a VM's networking design, they're worth mentioning briefly to help you understand how an 802.1q driver can be installed in a VM. Each VM's vNIC connects to one port group on a host. Each port group can use one of three types of VLAN tagging:
Guest Software
vSphere can host a huge variety of guest OSes. Any x86-based OS will install in a VM, but only certain OSes are supported by VMware. Any supported guest OS has a VMware Tools package that can be installed. The list is always being updated, and you can find the latest version at www.vmware.com/pdf/GuestOS_guide.pdf.
Generally speaking, all modern versions of Microsoft Windows and Linux distributions from Red Hat, SUSE, Debian, Ubuntu, and FreeBSD or Solaris are supported. Even some versions of older legacy OSes like Microsoft DOS, IBM OS/2 Warp, and Novell Netware are supported. Those not on the list should still work, albeit without support. However, without a compatible version of VMware Tools, you may have to contend with driver issues.
Selecting an OS
vSphere demands 64-bit hardware to run on. But it can virtualize both 32-bit and 64-bit OSes very well. So, which version of the guest OS should you install in a VM? As a general rule, you can treat this decision much the same as if you were installing your OS on the bare metal. 64-bit OSes can address more memory and often perform better even with 32-bit applications.
Because VMs are so portable, it's easy to have OSes around much longer than they used to be. In most enterprises with physical server installs, the hardware is normally replaced at least every five years. If it hasn't been upgraded in that long, it's common to use this as an excuse to rebuild the server and update to the latest OS and application versions. However, infrastructure in vSphere is now abstracted from the hardware, so you may see OSes that are much older. Often, virtualization is used to remove old hardware, and very old OS installs aren't unheard of. It makes sense to install the latest version of any OS when you're deploying, and that should include the 64-bit choice.
Even though 64-bit hardware has been mainstream for many years, there are still some issues with driver support. This was always the one consideration against deploying 64-bit OSes. But with VMware's tight list of hardware and available drivers, this isn't an issue for vSphere VMs unless you need to pass through some legacy hardware. With OS vendors keen for users to migrate to 64-bit as soon as possible, there are no additional licensing costs, so little prevents you from using 64-bit from the outset.
There are some exceptions, however. One example is 16-bit Windows applications that need to be hosted but won't run on a 64-bit OS. Also, if you P2V an existing computer with a 32-bit OS, you're left with no choice.
One other OS option that can be worth considering, if you need a Linux-based guest, is JeOS (pronounced “juice”). JeOS stands for Just enough OS and is the term for specially customized OSes that are fine-tuned for virtualized platforms. Without the need for extra drivers, these OSes can taper their kernels to make them smaller and more efficient. This is possible due to the modular Linux kernel; both Ubuntu and SUSE have their own JeOS-based offerings. These are used as the base of many virtual appliances. VMware has entered into a licensing agreement with SUSE to use its OS as base for some products that can benefit from a JeOS base.
Guest OS and Application Licensing
OS and application licensing varies between vendors for virtualization platforms. You should look carefully at your options with each vendor. Some vendors base their licensing on the physical hardware the VM is running on at any one time. Confusion can reign, because this may be physical CPU sockets or physical cores, with or without HyperThreading.
Some vendors base their licensing on the VM's hardware, so it may be tied to the number of vCPUs or the VM's RAM. Ordinarily, vCPUs are presented as individual physical sockets, but an advanced VM setting allows them to appear as cores.
Some vendors license on the number of instances on site. Different rules may govern development/staging/test copies of software, and this is of particular interest because these tend to be more prevalent in virtualized environments. Applications can still use hardware dongles, either serial, parallel, or USB based, which have their own support challenges and can impact the VM's mobility within the cluster.
Just understanding Microsoft's licensing rules can be complicated, particularly because they change so regularly. Of particular note is the server licensing, which is based on physical hardware and largely ignores the ability to migrate VMs between hosts. This may change soon, as Microsoft adapts its own hypervisor's capabilities so it can migrate VMs as freely as VMware's hypervisor. Currently, a standard 2008 edition license covers one VM while it's on one host. As soon as the VM migrates to another host, another license is required. An Enterprise edition licenses four VMs. In a large cluster of hosts, you can expect your licensing to become rather costly. For this reason, many opt to use the Datacenter license, which allows unlimited copies per host. You need one 2008 Datacenter license per host, and all the VMs are covered. With the downgrade rights, this license also covers your 2003 instances.
Another Microsoft-specific licensing issue is the activation scheme used in nonvolume license agreement contracts. These VMs can trigger a need to reactivate the licensing if the hardware changes significantly. In these cases, it's always advisable to remove non-essential hardware, install the VMware Tools, and upgrade the VM hardware if required, before activating.
One last special licensing issue worth discussing is that of physical hardware–based licenses. Some vendors, notoriously Oracle, base their licensing on the number of physical CPUs on the host, regardless of the number of vCPUs allocated to the VM. In highly dense hardware, which is commonplace in vSphere hosts, a license for a four-way server may be required even if the VM has access to only one vCPU. Add an eight-way host server to the DRS-enabled cluster, and your licensing costs double, even though the VM remains with one vCPU. These kind of draconian licensing terms create situations where some companies have to physically remove CPUs from servers and isolate VMs on standalone hosts, just to ensure licensing compliance.
vSphere has the ability to create Host-Affinity rules, one of which is known as a must rule. This rule is designed specifically for strict licensing terms, and the following chapter explains how you can use it to lock VMs to a particular host. You'll need to check whether this technique is regarded as sufficient by your vendor to satisfy its licensing terms.
Disk Alignment
As disk volumes are laid out on physical storage, it's important that the partitions line up with the RAID chunks. Unaligned partitions mean that write operations are more likely to span several chunks, increasing latency and reducing throughput for those writes as well as subsequent reads. Disk alignment can be an issue for both VMFS datastores and guest partitions, as we mentioned in Chapter 6 when discussing VMFS volumes. Having both unaligned only exacerbates the issue, affecting I/O performance even more. However, as long as VMFS volumes are created with the vSphere client, they will be aligned properly. If a VMFS-5 volume was upgraded from an original VMFS-3 datastore (as opposed to a natively created one) and the VMFS-3 datastore was unaligned, then the resulting VMFS-5 datastore will remain unaligned. Deleting and re-creating this as a native VMFS-5 will ensure that it's aligned correctly.
When you're designing VMs, it's important to understand the impact of unaligned guest partitions and how to create partitions to avoid this potential performance drain. Aligned disks save I/O by reducing the number of times a stripe is crossed and minimize the metadata operations required.
Two settings are fixed when the disks are first initialized by their OS:
Linux users can use their disk-partitioning tool of choice, fdisk being the most popular, to correctly align the partitions. In Windows, use diskpart.exe (or diskpar.exe on Windows 2000) to create aligned partitions, and select the appropriate cluster size when formatting the partition.
The easiest way to handle this is to ensure that your template partitions are correctly aligned. That way, you don't need to worry about them in the future. Remember that if you create properly aligned small dummy disks in a Windows 7 or 2008 template, they will have 64 KB offsets even after you expand them beyond 4 GB. This isn't likely to be significant for performance per se, but it can cause inconsistencies across your environment.
If you already have a collection of existing VMs with misaligned disks, various third-party tools are available to perform alignment while preserving the data contained on the virtual disk. However, they all involve some downtime, so the recommendation is to concentrate your efforts on the most I/O-intensive disks. Also, be aware that many P2V solutions, including VMware's own Converter product prior to version 5.0, don't correctly align the disks they create.
An ongoing debate exists about the usefulness of aligning system boot disks. VMware published a white paper several years ago stating that you shouldn't attempt to align boot disks. The company has subsequently withdrawn that advice, but many regard aligning boot disks as unnecessary. Properly aligning a boot disk does take extra effort, because you need to create the partition in a surrogate guest. System boot disks don't normally generate much disk I/O, as long as you split the data off onto its own disk. However, you should certainly try to generate aligned boot disks for your templates.
Defragmentation
File fragmentation in VMs is a hotly debated topic. VMware has produced papers to suggest that fragmentation on VMFS volumes isn't a concern due to the relatively small number of files; the small size of I/O requests compared to the large blocks, which keeps most requests in the same block; and a sub-block allocator technique that reduces disk wastage and encourages file coalescing.
However, many regard defragmentation as an essential performance tune-up for some guest OSes, most notably Windows. Power users have long advocated a regular cycle of defrag jobs to prevent a gradual slowdown. Research continues on the effectiveness of defragging VMs, although this is often sponsored and run by software vendors that sell products associated with its remediation.
Several issues stand against defragmentation of VM disks, particularly those on SAN storage. Storage arrays use several controller methods to optimize I/O to the disks, and the performance impact of fragmented I/O across disks often isn't clear. Most controllers have memory caches to collate I/O before writing it to the disk and read-caching algorithms to grab the files in preparation for their being requested.
If guest OSes are defragged, thin-provisioned storage can lose its effectiveness as it writes blocks to new areas of the virtual disk. This causes the thinly provisioned disks to inflate. In the same way, linked clones in View and vCloud environments, and snapshotted VMs, will grow. If you use any VADP-enabled backup tools that use change block tracking (CBT), backup jobs will balloon after a defrag is run. Replicated storage, such as SRM VMs, will see a sharp increase in WAN data usage after a defrag is run because the moved blocks are interpreted as changes which need replicating. Some deduplication gains can also be lost every time a defragging job is run, and these gains aren't recovered until the deduplication is run again (deduping on primary storage is usually scheduled and not run in-line). Most storage vendors say that defragmenting file systems only increases disk I/O, works against their controllers' smarts, and does nothing to improve performance.
You may decide that you need to defragment some of your VMs. Generally speaking, third-party defraggers work better than the OS built-in ones, and some are starting to become more VMware aware. It's important that if you decide to run these jobs, they're offset and don't run simultaneously (which can put a large amount of I/O pressure on the storage). Defragmenting your templates before using them to deploy VMs may have the most potential benefit without causing an excessive strain. If you're contemplating guest defragmentation, you should run it on the most disk-performance-critical VMs.
Optimizing the Guest for the Hypervisor
Each guest has the opportunity to be optimized for running in a VM. This allows the guest OS and guest applications to run more efficiently and potentially faster, and it can reduce the load on the hosts, the network, and the storage.
Cutting the Fat
Basically, anything that's installed or running in a VM that isn't essential is a waste of host resources. When you multiply all those extraneous cycles by the number of VMs, even small inefficiencies can have an impact on overall performance.
CPU and Memory
You can do several things to reduce the CPU and memory load from VMs. First, optimize your antivirus software. Install the core virus-scanning engine in your VMs, and avoid the antispyware, firewall, and IDS extras that often come prebundled. You can switch to a host-based product that uses VMware's vShield Endpoint to protect the VMs without needing an agent installed in every guest. Also, follow the recommended exclusion lists for the OS and applications in the guest. This should reduce the overhead caused by files that unnecessarily burden a scanning engine. Reducing the CPU and memory allocation to VMs also reduces the memory overhead associated with each VM on the host and in the cluster.
Screensavers are waste of resources in a VM and should always be disabled, including pre-login screensavers. On Linux servers that don't need GUIs running, think about setting the default init level to not start an X Windows session—normally, run level 3.
As we already discussed, consider paravirtualized network and storage adapter drivers, because they can reduce CPU overhead.
Filter through all the running services, and disable anything from starting that isn't required. Look carefully at the default installed software and strip out anything not required. Also, examine the running processes in top or Task Manager to find unnecessary items.
Don't enable hot-plugging for the VM's CPUs or memory unless you're likely to use the feature, because hot-plugging reserves the resources in the guest OS for the maximum possible configuration. This will use additional CPU and can degrade the effectiveness of vNUMA calculations.
Disk
Optimizing the disk can mean two things in this context. First, and probably most important, you need to reduce storage I/O wherever possible. Avoid anything that's very disk I/O intensive if it isn't needed. It's also important to avoid too many I/O-intensive jobs happening at once. VDI deployments can suffer from boot storms, where all the desktops start up at the same time and the SAN load is overwhelming. These sorts of issues can also happen if scheduled tasks are set to run at the same time—for example, backups, antivirus scans, cron, scheduled tasks scripts or defrag utilities. If these are all set via the same policy or deployed from the same image, then they may all try to run at once. You need to figure out a way to offset the regular tasks so they don't thrash the storage simultaneously.
Second, you can optimize the disk-capacity requirements. Any software you can uninstall will reduce the amount of disk space needed. Store the install sets centrally, to avoid having copies on every VM. Enable circular logging and limit cache sizes, to avoid unnecessary build-up. Clear temporary folders regularly, and use disk-analysis tools to determine where space is being used.
Network
Network load is rarely a bottleneck for VMs; however, for particularly network-demanding loads, it may be possible to save bandwidth. DRS clusters have a function known as affinity rules. We'll discuss these in more detail later, but affinity rules tell DRS to try to keep certain VMs together on one host. There are a few reasons why you may want to keep VMs together, but a primary one is that doing so avoids sending the inter-VM network traffic out onto the LAN if the VMs are on the same port group. Two or more VMs involved in a multiserver application will send most of their traffic between themselves. Having all the VMs on one host can make most of that traffic happen locally.
Time Settings
VMs can't match a physical machine's ability to keep time. VMs need to time-share a host's hardware and can be interrupted by being suspended and snapshotted, which wouldn't affect regular computers. Two main options exist to keep a VM's time correctly synchronized. You can use the native guest tools, such as NTP in Linux guests or W32Time in Windows VMs; or you can use the VMware Tools' time synchronization. The VMware Tools have the advantage of knowing that VMs must catch up occasionally and be prepared for the clock to be off significantly. Also, the VMware Tools don't need networking to be configured in the guest because they work directly on the host.
Native NTP and W32Time generally work well in VMs and are usually turned on by default. VMware recommends that you use only one method of time sync; and because the native tools are normally running from the outset, this is how many VMs are configured. Additionally, some OSes and application software need to access the native time service, and sometimes they act as time sources themselves. Just be sure you don't set the VM to sync to its own hardware clock. For the most accurate timekeeping possible, VMware recommends using the guest OS's native tools.
Different versions of Linux and Windows have had different approaches to time synchronization. Two KB articles cover the best practices for each, and you should consult them to ensure that your design incorporates this advice for the OSes you plan to deploy:
- Timekeeping best practices for Linux guests: http://kb.vmware.com/kb/1006427
- Timekeeping best practices for Windows, including NTP: http://kb.vmware.com/kb/1318
Clones, Templates, and vApps
Throughout this chapter, we've offered a great deal of specific advice on how to customize and tweak each VM. However, it's likely that in your environment, many of the VMs you plan to build will have very similar requirements. If this is the case, you can use a standard build. Doing so enables you to roll out new VMs much more rapidly.
Along with creating VMs more expediently, standardized builds automate many of the steps involved. You can also allocate specific permissions to users to control new VM deployments.
Standardizing is an important design tool. It simplifies decisions regarding how a large deployment of VMs should be created and configured. Perhaps more important, you're likely to have tens of VMs for every host and maybe hundreds of VMs per vCenter. The payback from a well-designed VM standard build in ongoing management and administration can be very worthwhile. Shaving 5 GB of disk space, reducing the default RAM by 256 MB, or halving the standard vCPUs from two to one can have a massive impact on your overall hardware needs. But being too stingy can mean hundreds of servers or desktops that continually hit performance and capacity problems.
Clones
A straightforward method of deploying a new VM without building it from scratch is to clone an existing VM. VM clones are exact copies: the configuration and the disks are duplicated. The only difference is that cloning forces a new VM name for the copy.
Clones are useful for creating quick point-in-time copies as backups. Unlike snapshots, which should be kept only for the short term, can affect performance, and require babysitting, cloning is a wonderful tool to grab a quick backup of the entire machine.
Having an exact copy can be a great way to replicate a production setup, which you can isolate and test. By cloning several VMs in an application setup, you can test changes on exactly the same setup and be confident that upgrades will go smoothly.
Be careful when you make clones, because having exact duplicates on the same network usually creates problems. Being identical, a clone has the same guest hostname and IP address as the original. Bringing a clone up on the network at the same time as the original can therefore create IP and name conflicts. You should ensure that the primary is turned off or disconnected from the network, that the clone is isolated, or that the clone is reconfigured while offline to change its hostname and IP address. Be mindful of tiered applications, because clones can cause inconsistencies on other connected servers if copies are brought online at different times.
You can make clones while a VM is turned on or off. A hot clone produces a VM that is crash consistent, so it's always desirable to turn off the VM first. However, if the VM to be cloned is critical, and an outage isn't possible, hot-cloning can still grab an image. Just be sure to test that it hasn't corrupted the OS, applications, or important data. Certain OSes and applications are more robust than others—for example, a database server is more likely to have problems recovering from a hot clone than a fairly static application server.
Another useful cloning facility is vCenter's ability to create a scheduled task to make a clone. If a VM is changing regularly or is particularly critical, vCenter can automate the process of cloning on a regular basis. This shouldn't replace any normal backup procedures you follow but can be useful to augment them as an extra safety net.
Finally, your SAN vendor may have tools for cloning VMs quickly on the storage. This allows for faster cloning, which takes the load off the host and can automate the provisioning of large VM cloning that is often seen in virtual desktop cases. These tools may be useful to consider not just for desktops but also when you need to roll out several VMs at once, such as when you're deploying new branch offices with a standard set of server services.
Templates
A template is a master copy VM that is specifically set aside to produce new VMs. A template is a special type of VM that can't be turned on or changed and is only visible in the VMs and Templates view in vCenter. This protection helps to keep a clean and standard image from which other VMs can be created.
VM templates streamline the process of creating new VMs. New VMs are available in minutes instead of after several hours; and often the burden of VM creation can be passed on to other members of the team, allowing greater flexibility and timely deployments.
Any VM can be converted or cloned into a template. However, because templates should be as immaculate as possible, it's advisable to build them from scratch so they're fit for their intended purpose.
Consider building a library of templates for your different OS and application needs. But don't expect to create a template for every scenario. Only include applications in templates if you expect to deploy a reasonable number of them and if their installation or customization is particularly onerous. Remember that it takes time to build up each template and that each one has a maintenance overhead associated with it. Even very large enterprises are likely to have only about a dozen templates, covering all the standard OSes and some of the larger applications.
Templates allow you to set permissions on how users can create new VMs, which again helps to control the types of VMs, the number of VMs, and what hardware can be allocated. For example, you may let only certain users deploy particular templates, limiting their OS or hardware choices. Template- and VM-creation permissions can also help curb the VM sprawl that is regularly seen when new vSphere servers appear.
You should consider how the use of templates will fit into your existing OS and application provisioning. If you have an automated process or set methodology for building physical servers and workstations, you can utilize those tools for building the base of your templates. This can lead to an even higher level of standardization and may reduce duplication between teams. However, be mindful that physical build tools often incorporate lots of drivers and specific details to deal with the abundance of hardware they may encounter. One of the advantages of vSphere VMs is its hardware abstraction, which means many of these features to deal with hardware and drivers aren't required.
Templates should be regularly updated. Applying OS and application patches and new antivirus definitions and policies minimizes the post-deployment steps and helps to reduce bandwidth. Rather than patch every new VM, why not patch one template? This means a regular cycle of patching should occur. To update or change a template, convert it into a VM, make the changes, and convert it back.
You should also think about how you'll push out new templates and template updates to multiple sites, if this is a requirement. Although hosts can use a common set of templates, those templates need to be stored on accessible storage. Normally, each site has its own shared storage; so if you're updating your templates regularly, you have two choices. You can either touch every template across every site with the same patches and updates, or you can keep one master set of templates that you update, and replicate these everywhere else. If you already possess some sort of SAN replication technology that only copies delta blocks, you can use it to minimize the bandwidth required to push out all templates again.
Guest Customization
A guest customization wizard automatically starts when you deploy a VM from a template. It asks all the questions required to customize the image and saves you from having to manually configure each piece in the guest. You can also use guest customization after cloning a VM, to make the clone safe to bring online alongside the original.
You can store a number of guest customizations, specific to each template or OS, which contain the majority of the answers needed in the wizard. Each of these guest customization specifications can be managed separately in the vSphere Client. Generally, one specification per OS is sufficient, because it's the license key that will separate them.
The source guest must have VMware Tools already installed and must match the correct OS that is specified in the VM's resources settings. The customization searches for the OS on the first disk, which must be SCSI-based. It won't work if it can't find the OS files it expects. It basically mounts the virtual disk after deployment and makes the changes it needs directly on the guest's file system. Only certain Windows and Linux guest OSes are supported, so check the latest VMware documentation to ensure that your guests can be customized with this tool.
Sysprep
Sysprep is Microsoft's systems preparation tool, which you can use to make Windows images and generalize them. Doing so clears the settings that make each Windows installation unique and creates new hostnames, SIDs, and driver caches.
vCenter can take advantage of these tools during a guest customization if the tools are copied onto the vCenter server. Different versions of sysprep exist for different Windows OSes, so one must be uploaded for each version you expect to deploy. With Windows 2008/Windows 7 and beyond, you no longer need to install external sysprep tools. Normally, when you use sysprep with a disk-imaging system, you need to prepare images, seal them, create answer files, and so on. However, the guest customization process automates these steps and prompts the user during the template wizard.
Preparing a Template
When you're creating a VM to make into a template, start with a fresh image. Create the VM based on the correct OS, and then configure the hardware components and advanced options to suit the template. Follow the advice from throughout this chapter and think about the purpose of the VMs being deployed from this template. Try to pick what you consider the minimum hardware requirements.
You don't want to initially overprovision, or you'll waste valuable hardware resources for every VM that doesn't use them. But be realistic about the minimum OS and application requirements for the template, particularly memory and disk space. Underprovisioning will lead to extra work when every image has to be changed after you deploy it. Always try to use a single CPU, unless the template is specifically for an application that will always require more than one. Remember that newer OSes require different minimum levels: just because you could get away with 256 MB of memory and a 10 GB hard drive for a Windows XP VM, that doesn't mean a base Windows 2008 template should be the same.
For very large environments, consider a set of hardware tiered templates for the most common OSes. This not only saves you from having to change the hardware setup on each of these VMs after they're built but also helps to standardize the result.
Remember to go through each template and remove or at least disable the hardware that isn't required. Items such as floppy drives and serial and parallel ports are rarely needed and place a tax on the host hardware for every VM deployed. This is also a great opportunity to take advantage of enhanced hardware options such as VMXNET 3 and PVSCSI adapters.
When you're installing the OS and the applications, try to make the image as clean as possible. Make sure it's built from scratch, explicitly for its purpose. Follow the disk-alignment advice from earlier in the chapter to make sure all disks are aligned from the outset. Include all the tools that need to be installed on every VM, such as antivirus software, admin tools, and company templates. Apply OS or application customizations that are individual to your organization, such as specifying wallpaper, creating specific directories, changing drive letters, making registry settings, and modifying profiles.
Avoid including anything that won't be needed. For example, try to avoid the temptation to copy all the application-install files locally, because they will be duplicated every time. Keep one copy centrally. Disabling hibernation on Windows guests removes the very large hiberfile.sys file; this feature won't be used. Actively strip out software and stop services that the VMs don't need. Many of the basic premises that you follow when creating a standard workstation image for corporate desktops also apply here.
After the VM is built and the OS and applications are installed, be sure you patch the OS with all the latest updates and install VMware Tools. Shut down the VM, and make any final hardware changes. You may want to think about setting the network adapter to a port group with no external access or to a clean subnet. Then, you can deploy each VM, patch it, and apply its antivirus definition update before attaching it to the corporate network.
Virtual Appliances
Virtual appliance is a generic term for VMs that were built specifically for a particular use case. These are built by third-party software vendors, have stripped down JeOS guest OSes, and are usually patched and maintained as single entity (treating the OS and application[s] together).
Using virtual appliances offers significant advantages. Primarily, they simplify the deployment of applications for end users. A virtual appliance can usually be deployed and configured in less than 30 minutes. Software vendors like the format too: it reduces the initial support calls associated with users installing applications, and the suggested virtual hardware configuration is more likely to be adhered to if it's plugged into the appliance from the outset. Patching and updates can be controlled via the ISV. The OS has a much smaller footprint, with only the necessary tools included, so there should be fewer patches; and the software vendor can test all patches and updates for compatibility before making them available.
Giving the ISV such control over the design and maintenance of its VMs has lead to criticism in some cases. Often the VM's OSes aren't as minimal as they could be; when the release of OS patches falls far behind that of the OS vendors, then vSphere administrators are left with the dilemma of leaving known security vulnerabilities to stay compatible with the appliance's vendor, or potentially breaking the application (and almost certainly the support).
OVF Standard
VMs can also be distributed in a standard format package known as Open VM Format (OVF). This is a template format created by the Distributed Management Task Force (DMTF) standards group to allow an interchangeable VM, which can be used by software companies to distribute VMs. The vSphere Client can import and export OVF files (or OVA files, which are tarball archives of OVF files encapsulated in one file).
OVF files tend to be used by software vendors to distribute hypervisor-agnostic VMs. These VM appliances normally include tuned OSes and applications that are easy for customers to deploy and easy for software companies to support.
One of the current limitations of the 1.0 standard is the lack of definition for virtual disks. OVF files can include disks in several formats, so non-VMware disk files need to be imported via VMware Converter first.
vApps
vApps are vSphere containers for one or more VMs that allow those VMs to be treated as a single entity. vApps are usually third-party virtual appliances that have the additional vSphere wrapping already included, to take advantage of some of the extra functionality available such as creating service dependencies. You can add vApp features to your own VMs.
vApps can be powered on, powered off, and cloned in one action. You can import entire vApps, which collectively run an application or service, in much the same way that OVF files are distributed for single VM applications. vApps are a potentially useful packaging technique, although they have been slow to amass large adoption.
Virtual Machine Availability
When you're designing VMs to provide greater uptime, remember the difference between VM-level clustering, OS-level clustering, and application-level clustering. They all provide alternative types of failover, but each is aimed at protecting different parts of the stack.
Host-level clustering ensures that the VM is turned on and recovers it if it unexpectedly powers off for any reason (for example, if a host fails). Guest OS-level clustering checks that the OS is up and responding. Common techniques include checking network pings or the VMware Tools' heartbeat. Application clustering monitors application services to ensure that certain software is responding to requests as it should.
vSphere offers a multitude of high-availability options to protect your VMs from unexpected failures. In addition to the built-in solutions, several third-party VM failover and clustering methods exist. Table 7.4 shows how each option protects against the different types of failures.
Table 7.4 VM availability options
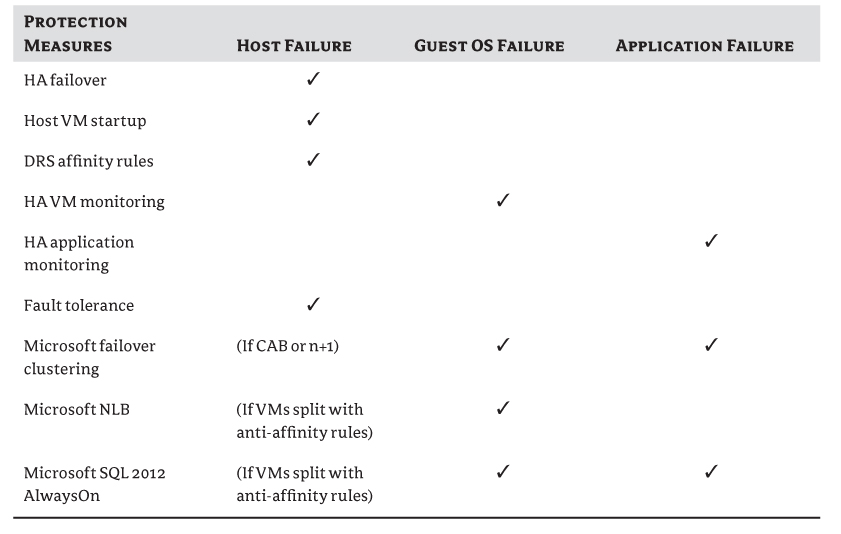
vSphere VM Availability
Most high-availability approaches included in vSphere are functions of DRS and HA clusters, and as such we'll discuss them in much greater length in Chapter 8, “Datacenter Design.” Because they will affect your VM guest planning, we'll briefly explain each tool's use and how it can provide a more resilient base for your VMs:
- It must be on shared storage that's visible to hosts in the HA cluster.
- Only single vCPUs can be protected.
- vSphere Enterprise or Enterprise Plus licensing is required.
- You can't use physical RDMs.
- No snapshots are allowed.
- You can't use Storage vMotion.
- You can't use NPIV.
- VMs with EFI firmware are not allowed.
- FT converts all disks to eager-zeroed thick format.
- You can't use hot-plugging devices.
- No USB devices, 3D video devices, sound devices, serial ports, or parallel ports are allowed.
- No physical or remote CD/floppy devices are allowed.
- Only some guest OSes are supported (see http://kb.vmware.com/kb/1008027).
- FT sets the VM's memory reservation equal to its RAM setting to prevent ballooning or swapping.
Figure 7.16 VM Startup: /Shutdown
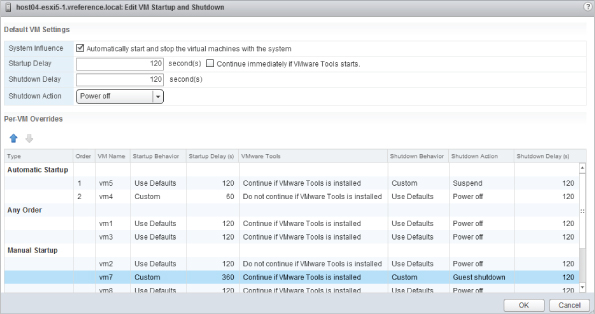
Figure 7.17 VM monitoring
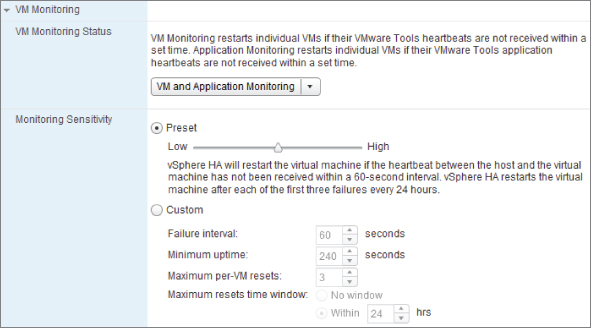
Third-Party VM Clustering
In addition to the host, DRS, and HA tools providing higher availability for VMs, you can use several in-guest clustering techniques. Guest OSes often have built-in clustering features, and many more third-party solutions are available. In this chapter we'll look at the two most common methods used, both for Microsoft OSes: failover clustering and NLB.
Microsoft Clustering
Microsoft Clustering Service (MSCS), or Failover Clustering as it's now known, is a widely used clustering technique for Microsoft servers. It's relatively complicated to configure, particularly in the VMware world. Many alternative options are now available to provide high-availability, but MSCS is so heavily ingrained as a solution that it's still a popular choice.
Microsoft clustering is available on Windows 2003 and 2008 in their Enterprise and Datacenter editions, and Windows 2012 from the Standard edition upwards. It supports 8 nodes on 2003, 16 nodes on 2008 and up to 64 nodes in 2012; but at the time of writing, support for 2012 Failover Clustering had yet to be announced by VMware.The clustering is limited to only 2 nodes in vSphere 5.0. although vSphere 5.1 has raised the supported limit to 5 nodes. Windows 2000 MSCS VMs were supported in vSphere 4.0 but not in version 4.1, so before upgrading hosts to a newer version you must upgrade the guest OSes.
You can configure MSCS in vSphere three ways:
MSCS Limitations
MSCS has the following design limitations when run on vSphere:
- Windows 2000 VMs are no longer supported from vSphere 4.1 onward; only 2003 SP2 and 2008 R2 are supported.
- DRS/HA cluster compatibility requires at least vSphere 4.1.
- Only five node clusters are possible (only two nodes in vSphere 5.0).
- You must use at least VM hardware version 7.
- Shared disks need to be the thick provision eager zeroed type. See Figure 7.14 for the check box to enable this setting when creating disks in the client.
- Only Fibre Channel SANs are supported. iSCSI, Fibre Channel over Ethernet (FCoE), and NFS shared storage aren't supported.
- There is no support for vMotion, FT VMs, NPIV, and round-robin multipathing.
Disk Types
Table 7.5 shows the different disk types that are supported for each configuration:
Table 7.5 Microsoft clustering disk options (items in bold show VMware's recommended option)
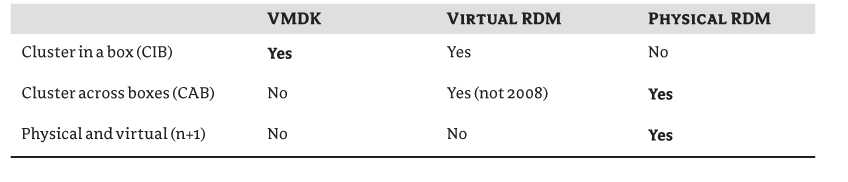
SCSI Controller Settings
SCSI controller settings create the most common design misunderstanding for MSCS VMs. There are two different settings, which sound very similar:
- Disk types (selected when you add a new disk): VMDK, virtual RDM (virtual compatibility mode), or physical RDM (physical compatibility mode)
- SCSI bus-sharing setting: virtual sharing policy or physical sharing policy (or none)
These settings are distinct. Just because you choose a virtual RDM doesn't mean the SCSI controller should necessarily be set to Virtual.
The SCSI bus-sharing setting is often missed, because you don't manually add the second controller (you can't). You need to go back to the settings after you've added the first shared disk. There are settings here:
- None: disks that aren't shared between VMs. This is used for disks that aren't shared in the cluster, such as the VM's boot disks. This is why shared disks must be on a second SCSI controller.
- Virtual: only for CIB shared disks.
- Physical: for CAB and n+1 shared disks.
Design for an HA/DRS Cluster
Since vSphere 4.1, MSCS can be members of HA and DRS clusters. However, to make sure the HA or DRS clustering functions don't interfere with MSCS, you need to apply special settings:
Figure 7.18 MSCS VMs using VM/Host DRS groups in an HA cluster
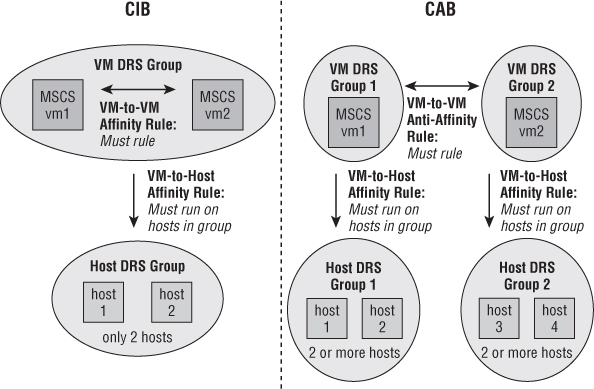
Microsoft NLB
Microsoft Network Load Balancing (NLB) is an IP-based clustering technique included in Windows 2000 Advanced Server, 2003, and 2008. All the hosts receive the requests, and a special network-driver algorithm decides which host should respond while all other hosts drop the request. An NLB cluster can support up to 32 nodes.
The NLB servers exchange a heartbeat to detect failures, and they redistribute requests to servers that continue to operate. NLB has two modes:
VMware recommends that you use multicast mode whenever possible, because you don't need to make any changes on the hosts, and no broadcast port flooding will occur.
In a DRS cluster, be sure to set anti-affinity rules to try to protect NLB VMs against host failures.
Microsoft Application Clustering
Many of Microsoft's latest core applications have their own built-in application clustering techniques. Two of the most common (and useful) are Exchange 2010 database availability groups (DAGs) and SQL 2012's new AlwaysOn Availability Groups. Both ultimately depend on Windows Failover Clustering, but because they don't rely on a quorum disk like classic failover clustering, they aren't constrained by the same restrictions. The file synchronization happens at the application layer. DAG and AlwaysOn VMs can be treated like any other VM now.
Remember that these VMs are normally very large in size compared to other application servers, very visible to users if they drop offline, and normally considered business-critical these days. You'll probably want to treat them with kid gloves and protect their resources to avoid any form of contention.
Both Exchange DAGs and SQL AlwaysOn VMs are very sensitive to the slightest drops on their network heartbeat. These VMs often have large amounts of memory allocated to them, and they're greedy and keep that memory active. Whereas most VMs drop only one or two pings during a vMotion stun, these large VMs can drop for longer. This is particularly the case if you don't have access to 10GbE networking. To prevent vMotions from causing false positives and initiating an application failover, some advanced settings are available to extend the timeouts.
vCenter Infrastructure Navigator
VMware introduced Infrastructure Navigator as part of the version 5 release of the vCenter Operations Manager suite. It's included as a part of the Enterprise and Enterprise Plus licenses. It fully integrates with the vCenter Web Client in vSphere 5 and adds detail to the VMs' summary page and creates a Navigator-specific tab for each VM. The Navigator tool can be used at many object levels in vCenter, but at its heart it's a tool to examine VM interdependencies. Because it uses the VMs' VMware Tools to gather the required information, no additional agents are needed. Figure 7.19 shows the complex relationship diagrammed between VMs and some of the dependency information that can be garnered from it.
Figure 7.19 Infrastructure Navigator : displaying the interdependencies between VMs
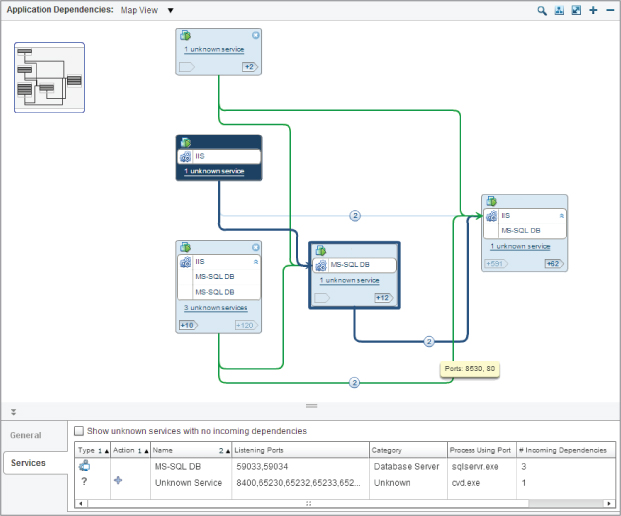
Infrastructure Navigator automatically discovers in near real-time the relationships between VMs. It identifies services running in the VMs and matches them to a known list of common applications. It can map out all the incoming and outgoing traffic paths between VMs and even shows the ports that the services are using. Infrastructure Navigator also matches all the interdependent VMs to other vCenter objects so it can identify when key infrastructure pieces are running on common or disparate hosts, subnets, or LUNs. The VM awareness is mapped and also displayed as tables, allowing you to sort and search for key applications, services, and ports.
The ability of Infrastructure Navigator to map out complex application schematics in an ever-changing environment can be a boon for application architects and IS managers. You can use it to help troubleshoot application issues, plan changes or upgrades, and understand the impact of interlinked objects. It's particularly useful in SRM deployments because it can identify how applications are mapped to SRM protection groups, to ensure that all the VM components required for a business service are part of the recovery plan. Infrastructure Navigator can also assist in making sure application start-up dependencies are addressed properly and that cluster affinity and anti-affinity rules are correctly set. Although Infrastructure Navigator isn't part of your VM design per se, in large complicated environments it's becoming an indispensible tool to manage and design your meta-VM landscape.
Summary
VM design is a seminal topic that all too frequently doesn't receive the sort of attention it should during a vSphere design. Its importance can't be stressed too heavily. A strong VM design looks carefully at each VM component, analyzing what can benefit the environment and what is superfluous.
Good VM design makes use of the underlying hardware, identifying the needs of the VMs, and understands how to create a successful model. Undoubtedly the biggest common mistake is treating VMs like physical machines, undervaluing the gains you can make in customizing them and overprovisioning the hardware. Most physical hardware is more than sufficient for most purposes, so there is little benefit in stripping out hardware and software and changing the base system configurations that are offered. However, in vSphere, despite the defaults that give you workable VMs, when you hope to densely pack the host with tens of VMs, that extra 10 or 20 percent of performance can mean significantly more VMs.
VM storage is of particular note, because this is often where performance bottlenecks occur. CPU and memory are also critical because they lay claim to the server hardware and dictate how many VMs you can squeeze onto each, and how much additional capacity you have for growth and redundancy. Overprovisioning some VMs will only have a detrimental effect on the other VMs.
In addition to the VM's hardware, its guest OS, applications, and running processes are ripe for trimming. As we discussed regarding host hardware in Chapter 4, you may be able to scale VMs out instead of upward, avoiding very large VMs.
All these constituent parts can be melded into a small selection of templates. Templates give you the power to effectively enforce your discretionary work in a scalable fashion. It wouldn't be feasible to maintain this level of thoroughness for every VM, but templates provide the mechanism to create this initial consistency.
As you've seen, various options exist to protect your VMs. The next chapter looks at how vCenter design and cluster techniques can make the most of these VM designs, to effectively and efficiently spread resources across hosts, maintain high availability, and organize hosts and VMs.