Chapter 6. Vector Build Methods
As you approach a design that needs to be built in vector form, you must have your rules of creative engagement thoroughly defined. This means knowing what specific type of build method will work best for your design so that your final art will be both precise and professional.
In chapter 5, we covered two shape surveillance techniques: The Clockwork Method (TCM) and Prime Point Placement (PPP). In this chapter, we'll leverage both techniques as we build art using another technique I have developed: the point-by-point method. As mentioned in chapter 5, TCM gets your points in the right neighborhood, and PPP gets them to the right address. The point-by-point method builds the actual structure.
In this chapter, you'll also learn another construction technique: the shape-building method. The shape-building method does just what it advertises: It builds shapes (with points conveniently already in place) using familiar Illustrator tools.
For the majority of the vector artwork that you'll build, you'll need to use both the point-by-point method and the shape-building method. They work together like an artistic tag team in building vector shapes. How do you know when to use which method? It depends on the shape that you need to create.
• You'll use the point-by-point method to create any shapes that are free-flowing and organic. Any form that has a lot of curvature to it that requires complex Bézier curves will utilize this method (FIGURE 6.1).
• You'll use the shape-building method to create any shapes that are more geometric or iconic in nature. Simple forms that can be built using 90-degree angles or that contain circular or square shapes are ideal for the shape-building method (FIGURE 6.2).
By the way, when you're drawing out your concepts and your design requires a circular shape, or another type of basic geometric form, don't worry about getting it perfect in your refined sketch. You can use the shape-building method to get that job done quickly later on.
Before you begin to build in vector form, do your best to determine what parts will require a point-by-point method and what parts will require the shape-building method in order to create them. The more you utilize both of these build methods to create your vector art, the easier it will be to determine which one to use.
Like wine, your ability to discern what method to use and when to use it improves with age.
FIGURE 6.1 This design was almost entirely built using the point-by-point method. Only the bottom circular shapes utilized the shape-building method.
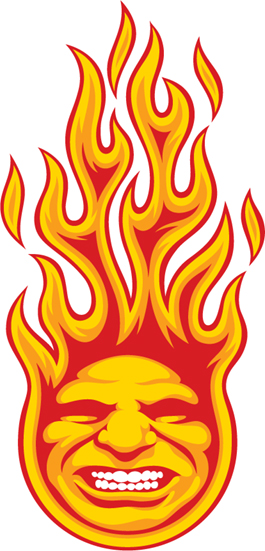
FIGURE 6.2 This icon set relies heavily upon the shape-building method to create all of the iconic forms shown. Only a few elements required the point-by-point method.

Point-by-Point Method
In chapter 4, I focused on the good, the bad, and the ugly attributes of anchor points, and in chapter 5, we thoroughly defined how to discern where to place anchor points.
The point-by-point method that I'm introducing in this chapter takes the rough forms you created with TCM and PPP and transforms them into polished final art. Here's how it works.
One Point at a Time
![]()
![]()
When it comes to vector building, there is nothing more fundamental than building your shapes one anchor point at a time—hence, the name ”point-by-point.” It defines the modus operandi that most people use when working with vectors. I've created a four-step method that will help you optimize the process. The four steps are:
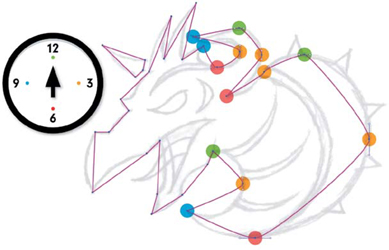
1. Rough Build: Using TCM and PPP (see chapter 5), you'll place your anchor points in their correct locations to roughly form the shape you want to build (FIGURE 6.3). If an anchor point needs to be smooth, pull the Bézier handles out just enough so you can easily grab them later (in step 4). Don't try to refine the shape too much now; all you want to focus on is the correct anchor point placement.
FIGURE 6.3 Place your anchor points using TCM and PPP as discussed in chapter 5.
2. Shape with Xtream Path: With your anchor points and their corresponding paths in place, you'll now use the Segment Direct Edit tool, which is part of the Xtream Path plug-in (covered in chapter 2). Simply grab anywhere on the path (between any two anchor points) and push or pull it to form the desired shape (FIGURE 6.4), adjusting the Bézier curves as needed to match the vector path with the underlying drawing (FIGURE 6.5). Don't worry about breaking your smooth anchor points; we'll fix those in the next step and dial it in even more.
FIGURE 6.4 Form all segments of your path with the Xtream Path plug-in's Segment Direct Edit tool (circled in green) simply by grabbing anywhere on the path and pushing or pulling it into shape. Easy peasy.

FIGURE 6.5 As you continue to shape your paths, you'll also want to make on-the-fly adjustments to your Bézier curves to move them closer to the final forms.

3. Smooth Anchor Points: Now, using the Direct Selection tool, select all of the anchor points in your design that should be smooth—not corner points (FIGURE 6.6). Once you have them all selected, from the Control panel, using the right-most button of the Convert option, click ”Convert selected anchor points to smooth” (FIGURE 6.7). At this point, your vector art is ready to refine. (For more information about anchor points, see chapter 4.)
FIGURE 6.6 All of the anchor points that need to be smooth are selected (circled here in green).

FIGURE 6.7 All selected anchor points are smooth after ”Convert selected anchor points to smooth” is clicked in the Control panel (circled here in orange).

4. Refine Shapes: It's time to focus more closely on the Bézier curves and pull their handles out to refine the path shape. Notice in FIGURE 6.8 how the Bézier handles are parallel where necessary to ensure precise curves. You'll also want to re-scrutinize your anchor point locations and make any small PPP corrections necessary in order to form an accurate vector shape. (Review Prime Point Placement in chapter 5.)
FIGURE 6.8 Take your time and pay attention to the PPP and your Bézier curve handles to ensure that they aren't overextended. Be sure to shape the paths elegantly to match your drawing precisely.

FIGURE 6.9 Continue to build the remaining vector shapes needed to produce your final art. (Note: Some of the new shapes, such as the arches that cut into the front of and define the back of the character's neck, were created using the shape-building method that we'll cover later in this chapter.)
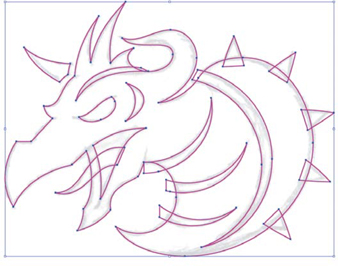
FIGURE 6.10 This shows the final vector artwork and several other avatar designs I created for an RPG game. My vector building utilized TCM, PPP, and the point-by-point method, plus the shape-building method (described later in this chapter).

At first, these four steps might seem laborious if you're not used to building your vector artwork this way, but over time all of the methods that I cover in this book will become second nature to you. Once you get used to them, you won't consciously have to think about each step of the process. It will all just be part of your natural workflow. Use these methods consistently in your work, and you'll soon see your vector build times lessen and your level of precision increase.
So no whining: Stay consistent and expect to struggle through this until it becomes your new normal. You won't be sorry.
Span the Distance Wisely
When you create any Bézier curve in your design, you'll need to analyze the length of that curved path and determine how many anchor points you'll need to form it precisely.
Getting your anchor points right is a balance between using just enough to get the job done accurately and not adding too many, which makes it harder to control the form of the vector path. We discussed this tangentially in chapters 4 and 5, but since it's a core aspect of the point-by-point method, we need to focus on it more specifically now. In FIGURES 6.11–6.13, I show how to find the balance between too many and not enough anchor points. Keep TCM and PPP in mind.
FIGURE 6.11 To form the Bézier curve elegantly and with precise control, I used three anchor points to shape this ornament accurately.

FIGURE 6.12 It's technically correct to form the same Bézier curve using only two points, but aesthetically it would be wrong because it just doesn't reproduce the artwork the way I initially drew it. This level of detail is what separates the pros from the amateurs. A pro will take the time to refine the shape, whereas an amateur will usually say, ”This is good enough.”
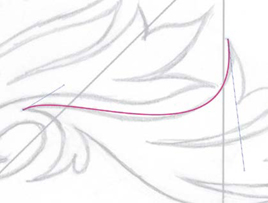
FIGURE 6.13 Final vector artwork for this ornament design.
Shape-Building Method
![]()
![]()
The shape-building method that I describe in this section is ideal for creating geometric shapes. Creating your artwork with one continuous path, point-by-point, isn't always practical, nor is it an efficient use of your time.
This is where the shape-building method comes in. It's a simple and fast way to build precise shapes using one or all of the following tools in Adobe Illustrator: the Rectangle tool (M), the Ellipse tool (L), and the Pathfinder panel (Shift-Command-F9 or Shift-Control-F9). It's faster to build simplified geometric shapes using the shape tools because they will form the entire shape needed with all of the anchor points in place automatically. So it takes less time and will be more precise than manually trying to position each anchor point on a path and then adjusting multiple Bézier curves.
To demonstrate the shape-building method, we'll create a palm leaf in three easy steps.
1. Basic Vector Shapes: Using the refined sketch as our guide, choose Rectangle > Tools > Ellipse (L) and create six circle shapes that match the contour of the refined sketch shown in FIGURE 6.14. (See chapter 2 for more information about this tool.)
FIGURE 6.14 Use the Ellipse tool (L) to create all of the circle shapes you'll need to form your art.

FIGURE 6.15 The Ellipse tool (L) and the Pathfinder panel (Shift-Command-F9 or Shift-Control-F9) can be simple, but powerful, vector building tools. I used only those two tools to create this art.

2. Pathfinder Panel (Shift-Command-F9 or Shift-Control-F9): Select the two circles that make up the shape of the palm leaf design and click the Intersect button in the Pathfinder panel (highlighted in red in FIGURE 6.15). This will create a new shape that is formed by the area where the two original circles overlap. To form the other four circular shapes that make up the stem and the notches of the leaf, select any two shapes and click the Minus Front button (highlighted in green) in the Pathfinder panel to form the shapes you'll need to punch out of the base shape (Figure 6.15). (See chapter 2 for more information on Pathfinder functions.)
3. Final Shape Building: Once you have all the necessary shape assets in place (stem and notch shapes) to form your final art, as shown in FIGURE 6.16A, you'll select them all (V-Shift) and then click the Unite button (highlighted in red) within the Pathfinder panel (Shift-Command-F9 or Shift-Control-F9) to form one compound path (FIGURES 6.16B–6.17).
FIGURE 6.16A Select one of the notch shapes on the outside of the leaf. Next, copy (Command-C / Control-C), paste (Command-V / Control-V), and rotate (R) the notch shape seven more times to use the shape for all of the other locations in the palm leaf. (Watch the ”Shape-Building Method” video on the DVD.)
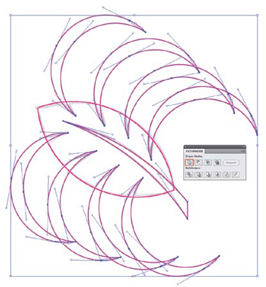
FIGURE 6.16B I select the new compound shape and the base palm shape (V-Shift) and click the Minus Front button (highlighted in green) within the Pathfinder panel (Shift-Command-F9 or Shift-Control-F9) to form the final art shape (as shown in Figure 6.17).

FIGURE 6.17 The final vector shape of the palm leaf, which was created using the shape-building method.

FIGURE 6.18 Final vector art in context.

The palm leaf is just part of the overall design shown in FIGURE 6.18. The majority of the design relied heavily on the use of the point-by-point building method, but when I got to the palm leaves it made more sense to use the shape-building method instead.
When to Use Which Method
![]()
![]()
Knowing when to use the shape-building method or the point-by-point method depends on the type of shape you're trying to create. Rarely, if ever, will you build your entire project using one or the other. For the majority of your projects, you'll start building your vector art via the point-by-point method, and sometime during that build process, you'll get to a specific part of your design that will lend itself to the shape-building method.
It's all about discerning the shape you need to build at any given moment and realizing that in one case it would be far easier and more precise to create a certain shape using the shape tools, and in another case it would be better to manually place anchor points and adjust Bézier curves. Let's take a look at a design that requires both methods (FIGURES 6.19–6.24).
FIGURE 6.19 I'll use this refined sketch of a character design as my guide for building vector shapes inside my drawing program.

FIGURE 6.20 Because I took the time to draw out my shapes, I know how to build them, which eliminates guesswork. I use point-by-point building to create the eyebrow and the Ellipse tool (L) to create the circular shapes that make up the eye. I use point-by-point to build the shapes that create the eyebrow because it's more organic and freeform and cannot be built using any of the shape tools. To create the circular shapes that make up the character's eyes, I use the Ellipse tool (L) because the eyes are simple geometric shapes that would be harder to build manually, one anchor point at a time. These are the types of simple build decisions you'll make on the fly as you create your vector forms in Illustrator.

FIGURE 6.21 I continue to use the Ellipse tool (L) to create all of the circular shapes needed to form the contour of the character's arm and hand. The shapes that make up the arm and hand are more geometric than organic, so they naturally lend themselves to using the shape tools instead of manually positioning the anchor points one a time. Using the same methods as we did to create the palm leaf (FIGURES 6.14–6.17), I select two circular shapes at a time and click the Minus Front button (highlighted in green) within the Pathfinder panel (Shift-Command-F9 or Shift-Control-F9) to create the final arm and hand shown in Figure 6.22.

FIGURE 6.22 The final shape building results.

FIGURE 6.23 As I create all of my vector art, I continue to use TCM and PPP (covered in chapter 5) to discern the anchor point placement during my point-by-point build process. I also leverage the shape-building method to create the character's other arm, teeth, wing, tongue, corners of his mouth, and one of the horns. Everything else was created using the point-by-point method.
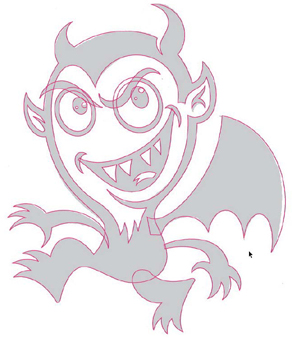
FIGURE 6.24 This final character design was part of an ad agency pitch for a Fanta Phantom character.

Using both vector build methods will help you master the creation of any shape. Don't let a complex shape intimidate you. Instead, approach it with creative confidence, knowing you can tag-team any vector challenge.
Throw-away Shapes
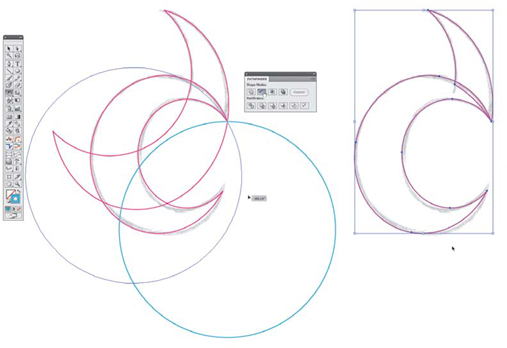
When you use the shape-building method, you'll create certain shapes for no other reason than to move another shape further along in the build process. These sacrificial shapes are important, but they will never appear in the final art (FIGURES 6.25–6.26).
FIGURE 6.25 To create this simple design, start by drawing four circle shapes with the Ellipse tool (L) (shown on the left). Select two shapes at a time and click the Minus Front button within the Pathfinder panel (Shift+Command-F9 or Shift-Control-F9), to form two new shapes (shown on the right). Then create another circular shape, which is our throw-away shape (in blue).

FIGURE 6.26 Using the Rotate tool (R), I position the throw-away shape where I need it (on the left). Next, I select my throw-away shape and my other shape and click the Minus Front button within the Pathfinder panel (Shift-Command-F9 or Shift-Control-F9) to form the final vector shapes needed (shown on the right).
BetterHandles Plug-in
![]()
When you create your art using the shape-building method, your final shape might need some additional refining. The BetterHandles plug-in by Nineblock Software can help get that job done.
Remove Redundant Points
As I griped in chapter 2, Adobe Illustrator contains a bug within the Pathfinder panel that creates redundant points in your artwork. This means that one point literally sits on top of another. When you select a shape, it might look normal, but these redundancies can cause problems later.
The BetterHandles plug-in contains a function called Remove Redundant Points that can remove all such duplicate anchor points with a path. Let's take a closer look at how this plug-in works (FIGURE 6.27).
FIGURE 6.27 Select your vector shape. On the BetterHandles panel, you'll see the number of points in your shape on the left (circled in green). If an exclamation mark appears on the right (circled in red here), your art contains redundant points. With your shape still selected, click on the BetterHandles panel and select Remove redundant points. You'll immediately see a new total point count appear on the panel, revealing how many redundant points were removed from your artwork. In this specific case, we removed 14 redundant points.

Smart Remove
Sometimes when you build vector art, whether by the point-by-point or shape-building method, you inevitably add extra points to your vector paths. Or maybe you decide later that you simply don't need one or more of the anchor points you initially placed.
You can use BetterHandles' Smart Remove tool to remove extra anchor points from a path and still retain your art's shape. Let me show you what I mean (FIGURE 6.28).
FIGURE 6.28 The final vector shape of the palm leaf motif contains a couple of extra anchor points (circled in green) that we want to remove without jeopardizing the overall shape (see the top palm image). To do this, simply select the problematic anchor points, go to the BetterHandles panel, and click the Smart Remove button (circled in red). Unnecessary anchor points are removed, and your vector shape is retained (bottom image).

E Pluribus Buildum
The phrase ”E Pluribus Unum” can be found on United States coinage. It's Latin for ”Out of many, one.”
This saying can also apply to our creative process as it relates to building vector designs. As you create your vector shapes using either the point-by-point or the shape-building method, you can also benefit by dissecting your design into more manageable individual shapes and then combining them later into the final shape you need.
We touched on this vector building method in chapter 3, and you'll notice it within many of the other images throughout the book as well.
Dissecting Your Design
A variety of complex shapes can make up any design. When it's a custom logotype, for example, the shapes also have to be consistent and precise in order to keep the letterforms readable.
A project like this is made far easier by dissecting your design into smaller individual shapes. This allows you to focus on each part and render it accurately.
By dissecting the shapes shown in FIGURE 6.29 into smaller parts, it helped me maintain the continuity of my content. For example, if you look at the letter H in the word Church in Figure 6.29, I used the horizontal width of its shapes to guide my building on other letterform widths such as the B, U, and R. If I would have tried to build each letterform as one single path, it would have taken a lot more time and effort on my part to pull it off with precision (FIGURES 6.29–6.34).
Whether you're building your design using the point-by-point method or the shape-building method, dissecting your design will work well within a systematic creative process.
FIGURE 6.29 A rough thumbnail sketch of a logotype concept.
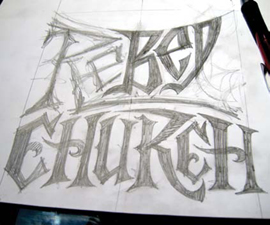
FIGURE 6.30 My refined drawing. I'll use this as my guide to build my vector shapes inside my drawing program.
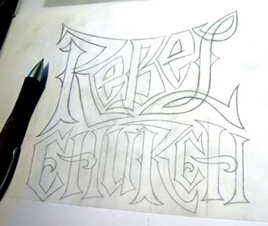
FIGURE 6.31 I focus on individual shapes within my design and dissect them into even smaller individual shapes so that I can build the vector art faster and with more precision.

FIGURE 6.32 This image shows all of the individual shapes that make up this logotype design. To form my final shape, I'll combine the individual shapes using the Pathfinder panel (Shift-Command-F9 or Shift-Control-F9).
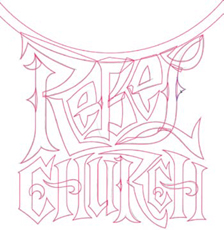
FIGURE 6.33 As you progress in the creative process, you should always allow room for improvement. No one is perfect. I noticed areas of my design that could be improved upon. This shows the shapes I'll either add to or subtract from the letterforms to refine the design. We'll go over this in more depth in chapter 8 when we cover ”The Fresh Eyes Effect.”

FIGURE 6.34 This shows the final logotype design. Note that I removed the inner curls on the C letterforms. This improved the readability and is all part of art directing yourself, which I'll also cover in the chapter 8.

Symmetry Is Your Friend
![]()
![]()
There's one additional build technique that can be used, in combination with point-by-point and shape-building, that can really speed up your work: working symmetrically.
When you create symmetrical artwork, you only have to build half of the art (top left in FIGURE 6.35). From that you'll be able to create the entire finished piece by simply cloning the shapes you need and flipping them using the Reflect tool.
Here's how:
1. Create your vector art based on your refined sketch. Select your vector shapes (V-Shift). (See the top left of Figure 6.35.)
2. With your vector shapes selected, take the Reflect tool (O) and position it on one of the center anchor points (circled in red). With the Shift key held down, drag the cursor to the left to flip the art. (The flipped vector art is colored green in the top right of Figure 6.35.)
3. Now that you have all of your shapes in place, you'll combine them using the tools in the Pathfinder panel to build your final shape. Just select the various shapes and click the Unite button (if you want to merge shapes) or Minus Front button (if you want to eliminate shapes) to create all of the final vector forms needed for your design (bottom left of Figure 6.35).
The symmetrical character art used the point-by-point method, the shape-building method, and symmetry to create the final design shown at the bottom right of Figure 6.35. The more you're able to combine the various build methods covered in this book, the more productive your workflow will become (FIGURES 6.36–6.45).
FIGURE 6.35 Profoundly simple symmetrical building can produce simply profound results.

FIGURE 6.36 Drawing the thumbnail sketch for my illustration.

FIGURE 6.37 Refined sketch of illustration. I'll use this as my guide to build my vector shapes inside Illustrator. (Note: The drool at right will not be a symmetrical element.)

FIGURE 6.38 Using TCM and PPP (covered in chapter 5), I discern my anchor point locations and build my vector art with the point-by-point method to form the flaming hair shape.

FIGURE 6.39 The end result of the four-step point-by-point process renders precise vector art that matches my underlying drawing. I continue to use this methodology as I build the rest of the vector shapes.

FIGURE 6.40 Using the shape-building method, I create six circular shapes with the Ellipse tool (L) to form part of the hair in my illustration.

FIGURE 6.41 I then select the various shapes and click the Minus Front button within the Pathfinder panel (Shift-Command-F9 or Shift-Control-F9) to knock out the sections of the curve that I don't want to show up in my final graphic. The result is a curved shape that looks more like hair than a circle.

FIGURE 6.42 As I continue to build, I select the shapes and click the Unite function within the Pathfinder panel (Shift-Command-F9 or Shift-Control-F9) along with another throw-away shape to form what makes up the tuft of hair.
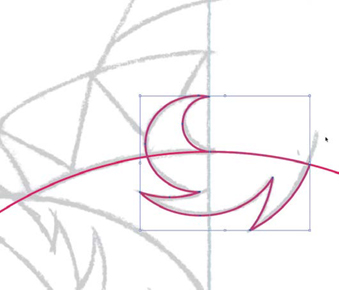
FIGURE 6.43 This image shows all of the final, symmetrically planned shapes that I will clone to complete the final image.
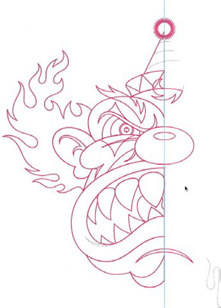
FIGURE 6.44 I clone (Command-C or Control-C, Command-F or Control-F) the vector shapes and flip them using the Reflect tool (O). Once the shapes are reflected, I select various shapes and click the Unite button in the Pathfinder panel (Shift-Command-F9 or Shift-Control-F9) to form all of the vector shapes needed for my final artwork. I remove any redundant or extra anchor points using the BetterHandles plug-in. (Review BetterHandles plug-in instructions covered earlier in this chapter.)
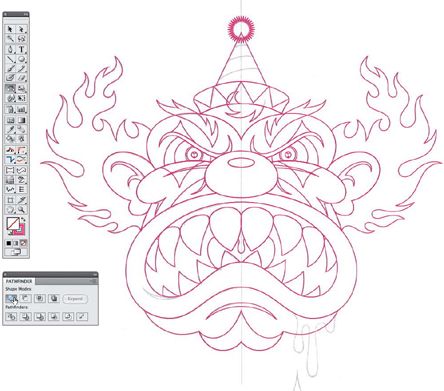
FIGURE 6.45 I titled the final artwork ”Tickles, the Evil Clown.” Tickles won several illustration awards, and a large format print was part of a gallery show at the New York Society of Illustrators.

A Healthy Creative Process
I've isolated my various build methods in this chapter so that I could walk you through each one individually. I then explained how to use the methods together in the greater context of a systematic creative process.
But the creative process isn't always as orderly. Many times a project will require you to go back and forth, utilizing earlier methods and applying them later in the creative process in order to arrive at the final vector art needed.
A good example of this back and forth was documented in FIGURES 3.34–3.36. The same will be true in your own projects as you begin to use the point-by-point method and the shape-building method we covered in this chapter.
A healthy creative process should be flexible, adaptable, and open to the use of any method needed at any given time in order to improve the final result.
Design Drills: Fast and Easy
As we covered earlier in this chapter, dissecting your vector building into smaller, more manageable shapes makes the whole process of forming your art easier and leads to faster build times, especially when you're creating complex designs.
In this section, I've gathered together a few of my more complex designs so you can see how I diced each one up. In each design, I dissected the whole into smaller pieces that were much easier to handle.
FIGURE 6.46 I created this ornament design by dissecting the overall form into multiple shapes. When the various parts are united using the Pathfinder panel, it becomes one big compound path.

FIGURE 6.47 The final ornament shape is duplicated, reflected horizontally using the Reflect tool (O), and then reflected again vertically to form a complete frame motif for a publishing project.

FIGURE 6.48 Whenever you can dissect your work and take advantage of symmetry, you'll slash your build times since you're essentially cutting your workload in half. For example, I only had to create half of the design here. (For more about dissecting, review chapter 6.)

FIGURE 6.49 Tribal bear illustration for St. Martin's Press.
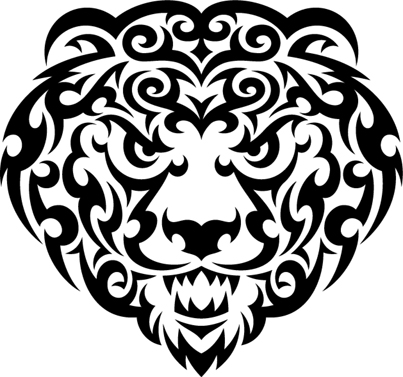
FIGURE 6.50 A complex illustration like this tiger is far easier to flesh out if you dissect the design into smaller, independent shapes. This allows you to work faster while staying focused on the smaller details.

FIGURE 6.51 This tiger illustration was commissioned by a local non-profit for use on an event poster for a diabetes research fundraiser.

