Chapter 5. Shape Surveillance
It’s time to take your refined drawing out of analog and move it into the digital realm. To do this accurately, you need to place your anchor points precisely so they form the paths needed to create your final vector art.
It does no good to spend time up front drawing and refining your shapes on paper only to fall short by building them poorly onscreen. Placing points incorrectly wastes time in the build stage of your creative process and, ultimately, gives you imprecise vector results.
I can’t stress enough the importance of proper anchor point placement. You must be able to look at any visual shape, drawn or otherwise, and know exactly how to go about building it, anchor point by anchor point. This chapter will show you how to start the build process. Chapter 6, “Vector Build Methods,” will show you how to accurately finish the build.
The Clockwork Method
The simpler the shape, the easier it is to discern where to place anchor points. With more complex shapes, it can get trickier.
To help you in your shape study, I’ve created The Clockwork Method (TCM). It’s a simple way to look at any shape and determine precisely where to place points. Basically, you imagine the clock face in your mind, rotate it as needed to orient with the shapes in your art, and use it as a guide.
When you first learned how to use a vector program like Adobe Illustrator, you most likely figured out on your own where to place anchor points when building vector shapes. You probably focused more on the tools that you needed to create vector graphics and less on the creative process that utilizes the tools.
Over time and through trial and error, you no doubt developed your skills enough to make the program work for your needs. You might still struggle, though, to pull off well-crafted vector shapes. The source of that struggle can be blamed on not knowing exactly where to place the anchor points that make up the design you want to create.
I know this was true for me. And it was only when I started teaching advanced digital illustration at a local college that I developed a coherent method that I could relay to my students and demystify the process of anchor point placement. The Clockwork Method circumvents the hassle of figuring everything out piecemeal over a period of years.
A circle provides the simplest illustration of TCM. The circle would receive anchor points at the 12-, 3-, 6-, and 9-o’clock positions (FIGURE 5.1). More complex shapes that contain both concave and convex curves won’t necessarily receive all four points every time, as you’ll see.

FIGURE 5.1 The vector circle shape at left corresponds to the clock positions on the right. I’ve used four different colors on the TCM clock as well as on the circle art so that you can see the correspondence here and in upcoming illustrations.
For shapes that are not straight up and down, you can also tilt the clock face so it better corresponds with that shape. FIGURE 5.2 shows how the tilt works and how easily it adapts to the situation and your preference in regard to anchor point placement. The 9 o’clock anchor point (highlighted blue on the left) could just as well be discerned by someone else as a 12 o’clock (highlighted green on the right) by rotating the clock in his or her mind 90 degrees instead. The Prime Point Placement (PPP) on both is still correct using TCM. (More on PPP in a bit.) It all depends on how you see it in your mind.
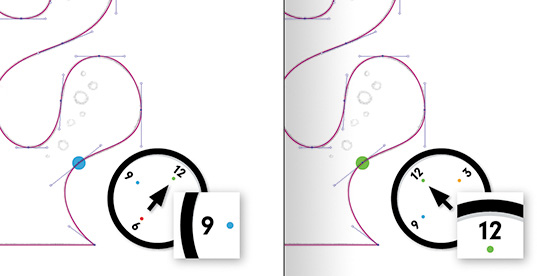
FIGURE 5.2 In this example, the 12 o’clock position is shown in two different orientations. Both are correct. Every person sees the clock orientation in his or her mind differently, but the end result is that both orientations match the curves in the art.
As Figure 5.2 suggests, your art is bound to contain many shapes, perhaps hundreds. Each individual curve that makes up the overall shape of your art will have its own custom-angled clock face.
It’s just that simple and just that flexible. Look at every shape you need to build in vector form through the transparent clock face of TCM. It will help remove the guesswork when you place your anchor points.
Train Your Brain
This method may feel a bit strange at first, but using TCM is nothing more than a mental trick to help you look at any form, isolate the various shapes (or curves) that are in it, and associate them with a clock orientation in your mind to discern the anchor point placements.
Let’s start by isolating shapes. In FIGURE 5.3 and FIGURE 5.4, you can see how I isolate particular areas of my art. Some curves define interior shapes, while some define exterior shapes. Once I’ve identified visual associations with these shapes using TCM, I can properly discern the placement of the anchor points, as shown in Figure 5.4.
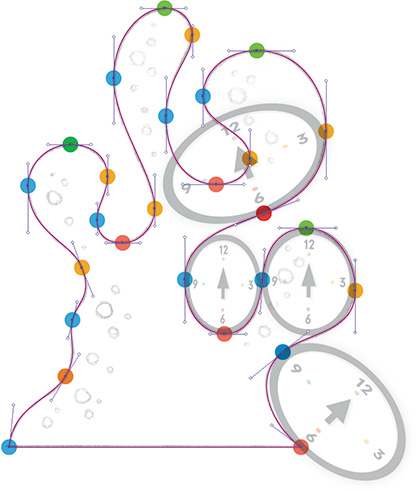
FIGURE 5.3 The illustration shows how I discerned the shapes in my art using TCM. The faded clocks demonstrate how I orient the faces in my mind before placing my anchor points.
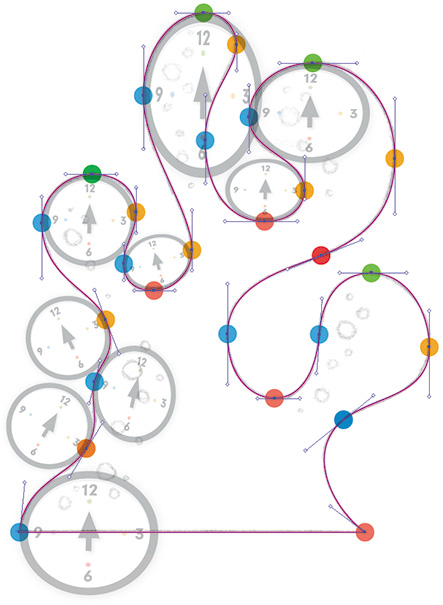
FIGURE 5.4 I continue to use TCM to discern all my anchor point placements and precisely form the path shape needed to match my drawing. Remember, wherever your art comes to a point, place a point.
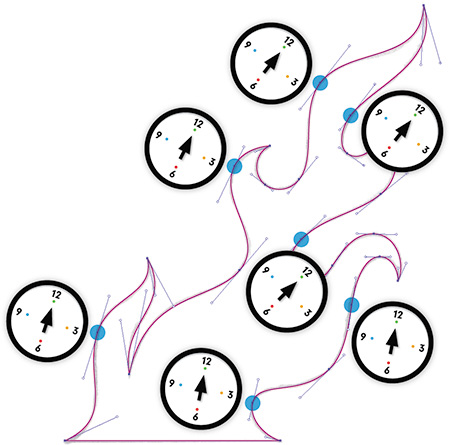
FIGURE 5.5 provides a more challenging design for your TCM consideration. The shapes are freeform and might require you to mentally rotate and orient your clock to match its curves.
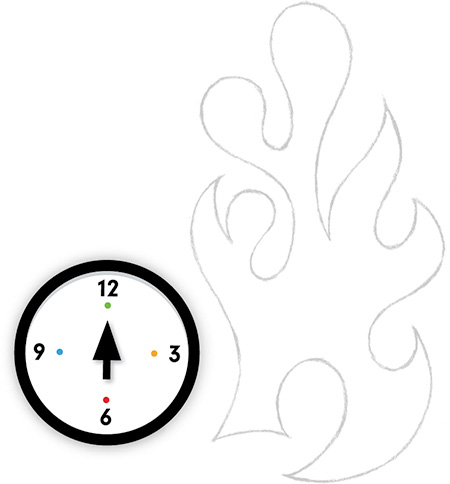
FIGURE 5.5 Look at this drawn shape and decide where you’d place anchor points using TCM. You may not need to use all four clock points on every curved shape.
As you did in Figures 5.3 and 5.4, begin to associate your mental clock with the shapes in the drawn form. Remember that when you make these visual associations, you may not use all four points on the clock to form the needed shape. In Figure 5.4, you’ll notice that many of the anchor point placements on the left side required only one point of association with the clock to form the needed curve.
FIGURE 5.6 shows how I see the first clock orientation in my mind. Continue your shape surveillance by studying the drawn art and using TCM to discern where the anchor points would be placed according to the clock in your own mind. Compare with FIGURE 5.7 and see how well you did.

FIGURE 5.6 Using TCM, I’ve discerned the first shape in the form. Can you discern where the rest of the anchor points would be placed? Refer to Figures 5.3 and 5.4 for help if you need it.
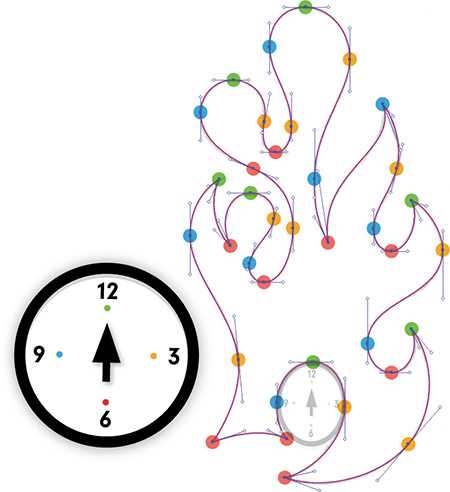
FIGURE 5.7 This shows the final TCM locations of the anchor points. How did your discernment of the drawing in Figure 5.6 compare to this?
You’ll build your vector art one anchor point at a time, mentally picturing the clock, rotating it if needed, and associating the point on the clock with the anchor point you need to place to form the specific curve within the drawn form. Some curved shapes may associate with one or more points of the clock; it all depends on how you visualize it in your mind. Once you’ve discerned an anchor point’s location, place it and then move to the next shape in your design. Repeat the same process until you have the entire vector path built (FIGURE 5.8).
Applying TCM
Of course, all shapes aren’t as simple as the circle shown in Figure 5.1. Art usually contains many different shapes and curves with many different angles. Still, discerning the anchor point placement on any shape is easier if you use TCM. Regardless of how irregular a shape may be, if you think of it as a clock, you’ll be able to place the anchor points with greater accuracy.
Let’s try TCM on another shape. Remember, the first step is to analyze the curves in the art (FIGURE 5.9). Then, think of the clock positions and you can roughly approximate them on those shapes. (Again, refer to Figures 5.3 and 5.4.) Because of the angles in the shapes of this flame motif, rotate your mental clock to associate it with the many curves within the art.

FIGURE 5.9 The first step is to perform shape surveillance by isolating the various curved shapes and mentally associating them with a clock.
Where do you start? The most obvious anchor point placements within any design are the areas that come to a point. Those are no-brainers, and it’s a good place to start your building because you don’t have to discern anything. These are absolutes: any area of your art that comes to a point gets a point (FIGURE 5.10).
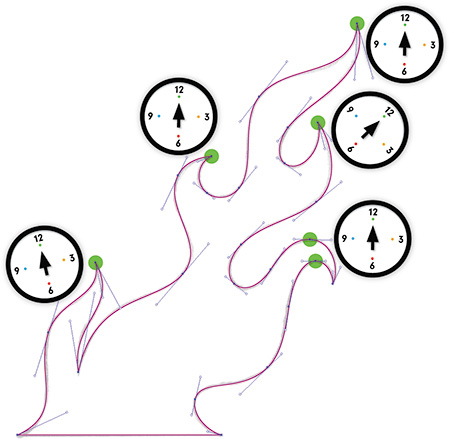
FIGURE 5.10 Most of the anchor points in this design are corner anchor points since shapes in the artwork come to a point. These are the easiest to discern because any art that comes to a point gets a point. Other easy-to-discern anchor points in this motif associate with a mental clock orientation of 12 o’clock.
After you’ve identified all the angles that come to a point, you can move on to determine the other coordinates (FIGURES 5.11–5.13).
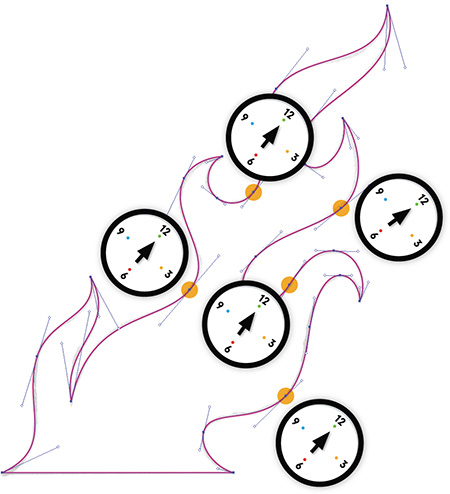
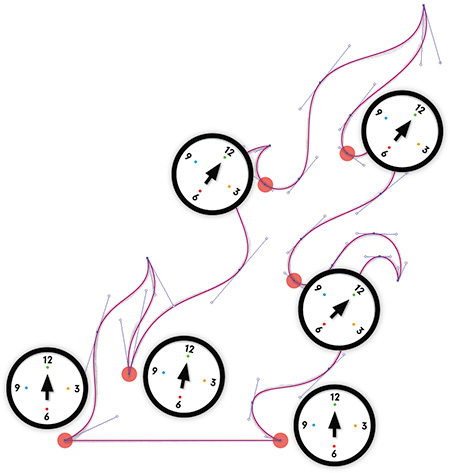
FIGURE 5.12 Here are all the anchor points that match the 6 o’clock orientation. Even though you know that all art that comes to a point gets a point, I’m showing you how the clock can still associate with those locations as well.
The more you train your brain to discern shapes using TCM, the easier it gets. Like anything new, it feels awkward and strange at first, but stick with it and you’ll enjoy the results.
Many variables will affect the quality of your vector art, as discussed in previous chapters. But determining your anchor point locations is a fundamental aspect of building your vector graphics. Get the anchor point locations wrong, and you’ll have a hard time building.
You’ll learn more about Prime Point Placement later in this chapter.
More on Rotating Your Clock
As I mentioned before, when a shape within your design is angled, it helps to angle your clock face to match it. Since this can be more confusing than a simple north/south orientation, let’s consider another example.
In FIGURE 5.14, many of the anchor points run along angled paths. In such cases, simply set your mental clock face to the same angle and start placing points. This is an instance for which one clock face can accommodate all of the angles. (You could also select the vector art and your placed refined sketch and rotate them to align with a normal north/south TCM orientation. I’ve done that on occasion, but it isn’t always practical.)
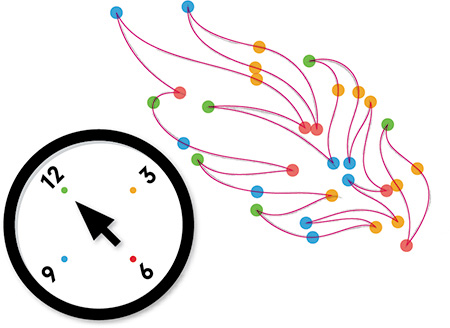
FIGURE 5.14 If a shape requires a path that needs an anchor point that falls outside the normal orientation of TCM, rotate the TCM clock to match the angle of your artwork. ![]()
Most of your designs will require you to rotate the TCM orientation to determine your anchor point placements, so that should be expected.
Building Complex Shapes
To demonstrate TCM on an even more complex shape, let’s look at the elegant ornament design in FIGURE 5.15. The shapes in this art demand precise Bézier curves that can be achieved only if the anchor points are in the correct locations.
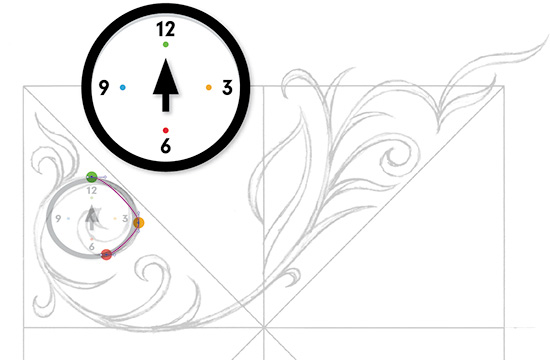
FIGURE 5.15 Using TCM, I’ll begin to perform shape surveillance on my refined sketch to figure out where to place the initial anchor points. The obvious locations are the pointed tips found throughout the vine. Once again, wherever your art comes to a point gets a point.
As always, TCM is the key to success (FIGURES 5.16–5.19).

FIGURE 5.16 Using my refined sketch as my road map, I place my initial anchor points using TCM. At this stage, the correspondence between the drawn lines and the sketch lines underneath isn’t perfect. I call this stage of the process a rough build. That said, my anchor points are in just the right spot. This will let me easily adjust the handles and push and pull the paths to form this graphic motif.

FIGURE 5.17 Once my anchor points are located in their correct positions, it’s simply a matter of pulling out my Bézier curve handles to shape the paths so they match my refined drawing and create the intended form.
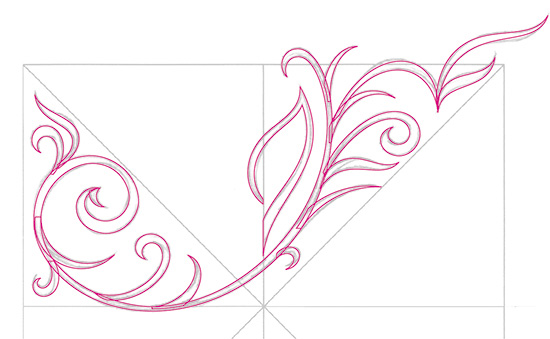
FIGURE 5.18 I continue to utilize TCM to build all the individual shapes that make up this ornament design (points and handles are not displayed in this image). Notice how my overall motif is created from numerous shapes. (Shape building is covered in greater detail in Chapter 6.)
Prime Point Placement
At the risk of sounding redundant, not to mention redundant, this bears repeating: When it comes to building your design using vector methods, it’s of paramount importance that the initial anchor points you place are in the best possible locations as they relate to the shape you’re attempting to form.
The paths in your final vector shape and the Bézier curves they utilize will be only as precise as the anchor points that control them. Make sure that the Prime Point Placement of your anchor points is correct.
TCM will get you in the right neighborhood, but PPP will pinpoint the exact address at which your anchor point will live. Determining the exact location is a process, not an event, so you’ll be leveraging both methods to fine-tune your anchor point locations.
Making a Point!
In the previous chapter, you learned about the two types of anchor points: corner and smooth. Knowing how each controls a Bézier curve and path will help you understand where to place them using both TCM and PPP.
• Corner anchor point: Place a corner anchor point anywhere your art has an apex that comes to a point. You can use these types of anchor points with or without Bézier curve handles pulled out from one or both sides when the transition between two path segments doesn’t need to be smooth (FIGURE 5.20).

FIGURE 5.20 There are 17 corner anchor points in the build shapes of this torch graphic (highlighted in orange). The handle of the torch is made almost entirely from corner anchor points.
• Smooth anchor point: Place a smooth anchor point anywhere your art needs a curve that transitions from one path segment into the next. This sort of anchor point always uses Bézier curve handles pulled out from both sides to control the shape of the curved path (FIGURE 5.21).
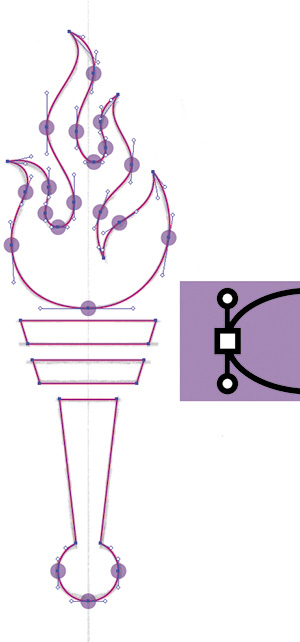
FIGURE 5.21 There are 20 smooth anchor points in the build shapes of this torch graphic (highlighted in purple). The flame contains numerous Bézier curves, so most of the anchor points to shape it are smooth.
Combining PPP and TCM
Let’s take a look at a more complex vector design. Like before, you’ll study the refined sketch and consider how to place your anchor points initially using TCM, and then you’ll use PPP to build the art precisely (FIGURES 5.22–5.25).
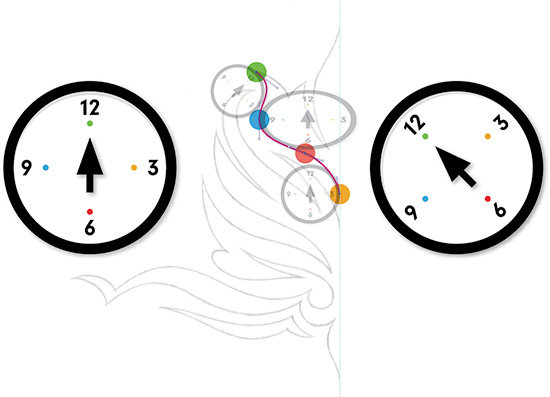
FIGURE 5.22 Using TCM, I begin to perform shape surveillance on my refined sketch, discerning my anchor point placement and orienting my clock to associate with the curves in my design, rotating it as needed.
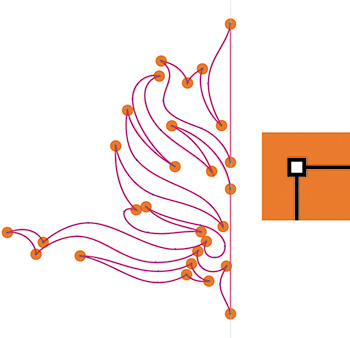
FIGURE 5.23 All the anchor points in this vector ornament design are the correct type, either corner or smooth, depending on their PPP. Corner anchor points are highlighted in orange. These were easy to discern.

FIGURE 5.24 The smooth anchor points that control the curves, which bend smoothly from one side of the anchor point to the other, are highlighted in purple.
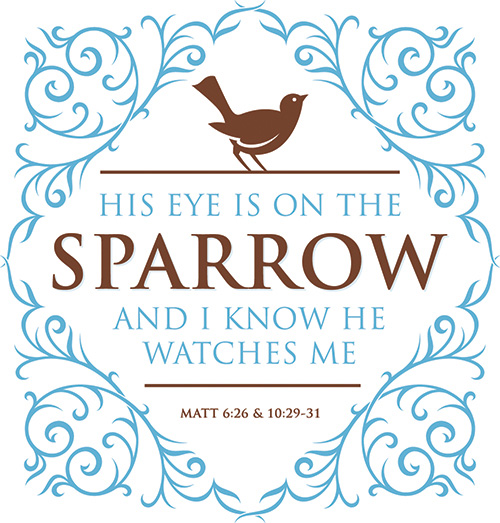
FIGURE 5.25 The final vector artwork for this visual identity utilized symmetry to form the final graphic mark. ![]()
Note that the final design for this example (FIGURE 5.25) is symmetrical, so you have to build only half of it—you can copy the final paths and flip them to form the final art. (Chapter 6 covers more benefits of symmetrical design.)
The Yin and Yang of Anchor Points
Don’t assume you’ll get your TCM correct all the time. You simply won’t. And when collaborating with others, you’ll eventually be able to spot problem areas in their work as well. These are the most common problems:
• Wrong anchor point: Make sure you’re using the correct type of anchor point in your path, either corner or smooth.
• PPP isn’t correct: Some of your anchor points are still not in the ideal position to let you control the Bézier curves accurately. Go through your path and review each anchor point with TCM in mind, and double-check the PPP for each.
• Not enough anchor points in path: You haven’t placed enough anchor points to form the shape accurately. You’re probably struggling to form the exact Bézier curves for the path you need. Review your shape with TCM in mind and add anchor points on your path using the Add Anchor Point Tool (+) (FIGURE 5.26).

FIGURE 5.26 Not enough anchor points have been placed to build the banner shape accurately. A telltale sign is overextended Bézier handles.
• Too many anchor points in path: You’ve placed too many anchor points to form the shape with precision. It will be hard to control the path’s flow and retain an elegant form. Review your shape with TCM in mind and remove the unnecessary anchor points from your path using the Delete Anchor Point Tool (–) (FIGURE 5.27). A well-built vector shape should contain only the number of anchor points needed to pull it off. No more, no less.
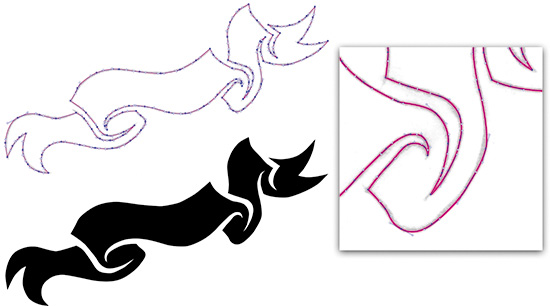
FIGURE 5.27 Too many anchor points have been placed here, which ruins the graceful curves of the banner design. Managing all the anchor points and their small Bézier curve handles makes shaping the curves a major pain in the keister.
For example, the anchor points in the design shown in Figure 5.26 are actually in their correct PPP, but the path doesn’t contain enough placed anchor points to build the shape precisely. A telltale sign you’re not using enough anchor points is overextended Bézier curve handles.
Trying to build precise vector paths with overextended Bézier handles is like trying to paint a picture using a 6-foot-long brush. You couldn’t stand close enough to your canvas to control your forms, and clearly the art would pay the price. The same is true with overextended Bézier handles. If you can’t control your forms with precision, your design will wind up paying the price.
Many of the anchor points in the design shown in Figure 5.27 are in their correct PPP, but the path contains far too many anchor points to control the shape gracefully. It ends up looking clunky.
An unnecessary anchor point by definition can never be in a correct PPP. Delete the points from your path and simplify the shape.
Your ultimate goal is balance (FIGURE 5.28). After placing the anchor points and shaping the Bézier curves with their handles to form your art, you’ll know immediately if you haven’t placed enough or if you’ve placed too many to build it accurately. Be diligent in your surveillance, and you’ll see massive improvements in your design.

FIGURE 5.28 All anchor points are in their correct PPP, and the shape has the correct balance of anchor points needed to accurately create the final banner design. The end result is a more elegant form.
The more you utilize TCM, the better you can avoid these common vector pitfalls. It’s important to be able to recognize problems in your own design and the design of others you work with so you can improve the quality and consistently create at a higher level.
Deconstructing a Vector Monster
Feeling overwhelmed? Let’s deconstruct a real-world project with TCM and PPP in mind. Then you’ll be ready to learn the various build methods presented in Chapter 6.
I created this illustrative design for a video production company. TCM and PPP played a key role in building core shapes for the final vector artwork.
Of course, smart vector build methods were also crucial in this project’s success. We’ll look at them more fully in the next chapter. That said, it’s kind of like love and marriage: you can’t have one without the other. That’s why it’s important to see everything in context, as follows:
1. The Clockwork Method: First, I performed shape surveillance and analyzed the shapes in my refined sketch using TCM (FIGURE 5.29).
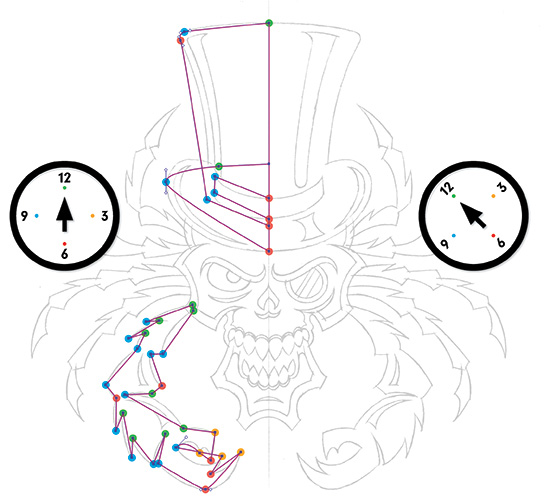
FIGURE 5.29 Using TCM, I placed my anchor points to form the core shapes needed to create the artwork. I didn’t worry about adjusting handles at this point either.
2. Prime Point Placement: At this point, I zoomed in on my anchor points, moved them into more ideal locations to facilitate accurate Bézier curves, and adjusted the handles (FIGURE 5.30).
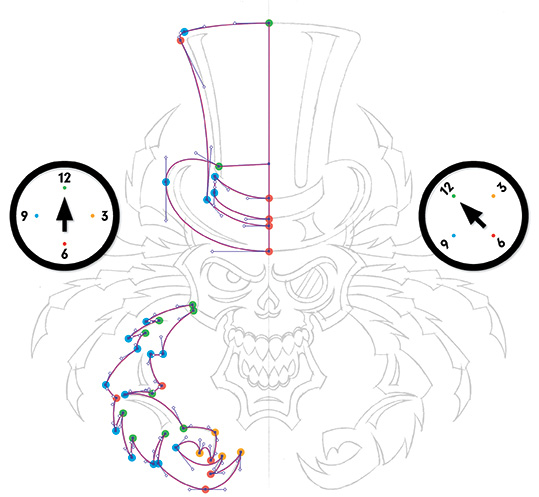
FIGURE 5.30 With my PPP determined, I pulled out the Bézier curve handles and adjusted the paths to complete the core base shapes. This is a symmetric design, so I built only half the composition at this stage.
3. Vector build methods: I continued to build every vector shape needed to create my final art using TCM, PPP, and additional vector build methods that you’ll learn about in Chapter 6 (FIGURES 5.31 and 5.32).
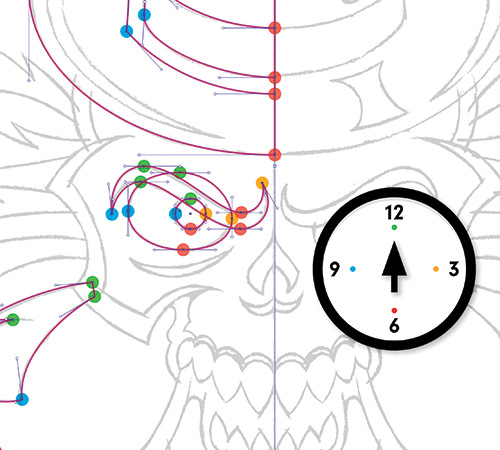
FIGURE 5.31 I used the Point-by-Point Method for most of the vector shapes in this design. But I used the Ellipse tool in Adobe Illustrator to create others, such as the pupil.

FIGURE 5.32 All the base vector shapes needed to create the final art built using TCM, PPP, and additional build methods covered in Chapter 6.
4. Final artwork: Once all my core shapes were built, I fused them together and moved on to coloring my vector art. Once coloring was done, I continued to use TCM, PPP, and additional vector build methods to build the various shapes needed for detailing the final artwork (FIGURE 5.33).
Progressive Improvements
Building your vector shapes using the systematic creative process I’ve described can seem like a laborious task even for a simple design. Managing a complex design that can easily contain thousands of points and hundreds of paths might seem impossible. But with practice and time, it gets easier, and the process becomes second nature.
You’ll never get your PPP absolutely correct the first time all the time. But the more you get into the habit of using TCM, the more consistently your anchor points will fall within the correct vector zip code as you build.
TCM and PPP are actually the first steps in the Point-by-Point Method that you’ll learn about in Chapter 6. This process will help you even more. And in Chapter 8, “Art Directing Yourself,” you’ll learn this invaluable creative and managerial tool.
 Field Notes: Practice Shape Discernment
• Where would you place the points using TCM?
• What types of points would you need to use?
• What areas of the shape would need Bézier curves?
• How many shapes would it take to make up the final form?
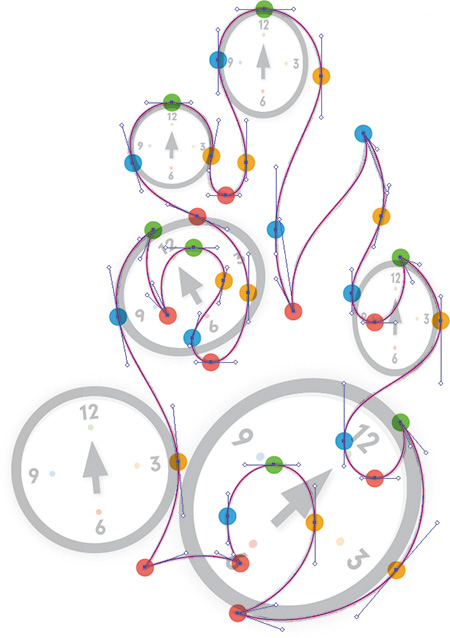
Design Drills: Spotting Clocks
When you get in the habit of using The Clockwork Method (TCM) to build your vector art, you’ll start to see clocks in every vector-based design you look at, whether you designed it or not. And that’s a good thing.
To kick-start the habit, let’s take a look at a handful of designs from my own archive and see where the clocks show up.
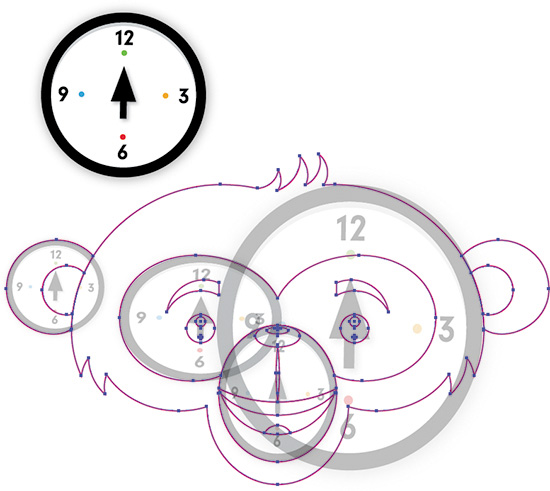
FIGURE 5.34 Sometimes the clock will form the entire shape, and sometimes it will just help create part of the shape.


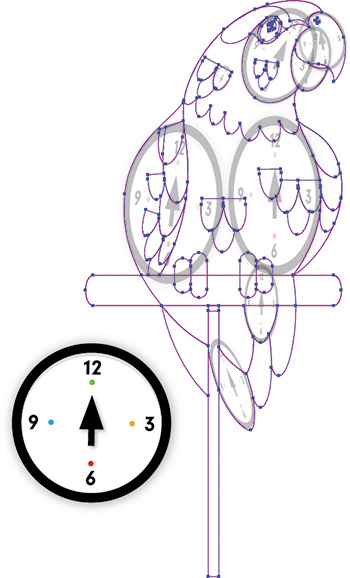
FIGURE 5.38 Remember, this is a mental trick to help you discern your anchor point placements. Polly want a clock?