
Chapter 6. Vector Build Methods
As you build your design, it’s important to clearly define your rules of creative engagement. This means choosing a build method that will not only allow you to work efficiently but also ensure that the final art is precise.
Chapter 5, “Shape Surveillance,” covered two shape surveillance techniques: The Clockwork Method (TCM) and Prime Point Placement (PPP). This chapter will show you how to leverage both techniques using what I call the Point-by-Point Method. While TCM gets your points in the right neighborhood and PPP gets them to the right address, the Point-by-Point Method builds the actual structure.
In this chapter, you’ll also learn the Shape-Building Method. This construction technique does just what it advertises: it builds shapes (with points conveniently already in place) using familiar Adobe Illustrator tools.
For the majority of your vector artwork, you’ll need to use both the Point-by-Point Method and the Shape-Building Method. They work together like an artistic tag team. But how do you know when to use a given method? It depends on the shape you need to create.
• Use the Point-by-Point Method to create shapes that are free-flowing and organic. Forms with complex Bézier curves require this method (FIGURE 6.1).

FIGURE 6.1 I designed this artwork, titled “Street Goblins,” for a skateboard deck. I built the flames using the Point-by-Point Method and built the characters’ eyes using ellipse shapes via the Shape-Building Method.
• Use the Shape-Building Method to create shapes that are more geometric or iconic. Simple forms with 90-degree angles or circular or square shapes are ideal for the Shape-Building Method (FIGURE 6.2).

FIGURE 6.2 For this icon set, I relied heavily on the Shape-Building Method. Only a few elements required the Point-by-Point Method.
By the way, when your design requires a circular shape or another basic geometric form, don’t worry about getting it perfect in your refined sketch. You can use the Shape-Building Method to do that job quickly later.
Before you begin to build in vector form, do your best to determine which parts will require the Point-by-Point Method and which will require the Shape-Building Method. The more you use both methods to create your vector art, the easier it will be to determine the one that’s the best fit for a given shape.
In almost all my artwork, I use both methods in combination. Think of your craftsmanship like wine: your ability to discern which method to use—and your skill in using them—will improve with age.
Point-by-Point Method
Chapter 4, “Getting to the Points,” focused on the good, the bad, and the ugly attributes of anchor points, and Chapter 5 showed you how to figure out where to place them.
The Point-by-Point Method takes the rough forms you created with TCM and PPP and transforms them into polished final art. Here’s how it works.
One Point at a Time
When it comes to vector building, there’s nothing more fundamental than building shapes one anchor point at a time—that’s why it’s called “Point-by-Point.” It defines the modus operandi that most people use when working with vectors. I’ve created a four-step method that will help you optimize the process.
1. Do the rough build: Using TCM and PPP, place your anchor points in the correct locations to roughly form the shape you want to build (FIGURE 6.3). If an anchor point needs to be smooth, pull the Bézier handles out just enough so you can easily grab them later (in step 4). Don’t try to refine the shape too much now; focus on placing the anchor points correctly.

FIGURE 6.3 Place your anchor points using TCM and PPP as discussed in chapter 5.
2. Shape the path: Once your anchor points and their corresponding paths are in place, you have two choices regarding tools to shape the paths. You can use Illustrator’s Anchor Point tool or the PathScribe tool (covered in Chapter 2, “Your Creative Armament”). Both have similar functions and let you grab anywhere on the path (between any two anchor points) and then push or pull it to form the desired shape (FIGURE 6.4), adjusting the Bézier curves as needed to match the vector path with the underlying drawing (FIGURE 6.5). Don’t worry if you break your smooth anchor points; you can fix them in the next step if necessary and dial it in even more. The book images here show the Anchor Point tool only, but the videos included with this publication demonstrate both tools and explain why I prefer using the plug-in by Astute Graphics.
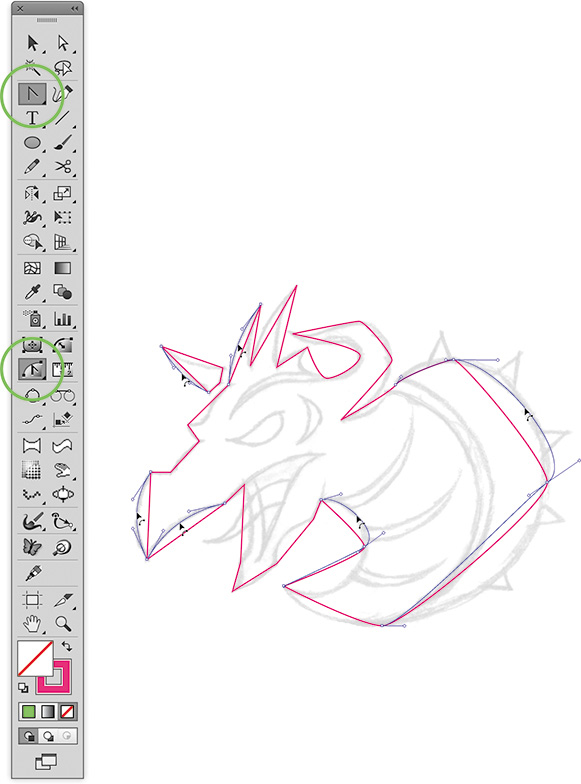
FIGURE 6.4 Form all the segments of your path with the Anchor Point tool or the PathScribe tool (circled in green) by grabbing anywhere on the path and pushing or pulling it into shape. Easy.

FIGURE 6.5 As you continue to shape your paths, you can make on-the-fly adjustments to the Bézier curves to move them closer to the final forms.
3. Smooth anchor points: Now, using the Direct Selection tool, select all anchor points that should be smooth—not corner points (FIGURE 6.6). Once you have them all selected, from the Control panel, use the rightmost button of the Convert option and click “Convert selected anchor points to smooth” (FIGURE 6.7). At this point, your vector art is ready to refine. (For more information about anchor points, see Chapter 4.)
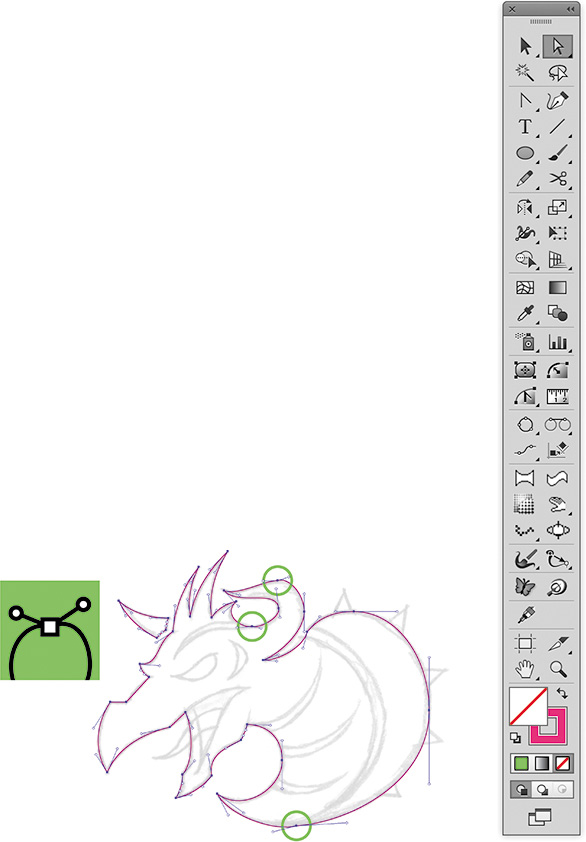

FIGURE 6.7 Smooth the anchor points (circled here in orange) by clicking “Convert selected anchor points to smooth” in the Control panel.
4. Refine the shapes: Now focus more closely on the Bézier curves and pull their handles out to refine the path shape. Notice in FIGURE 6.8 how the Bézier handles are parallel where necessary to ensure precise curves. Re-scrutinize your anchor point locations and make any necessary PPP corrections to form an accurate vector shape. (Review Prime Point Placement in Chapter 5.) Build the remaining shapes (FIGURE 6.9). FIGURE 6.10 shows the final result.
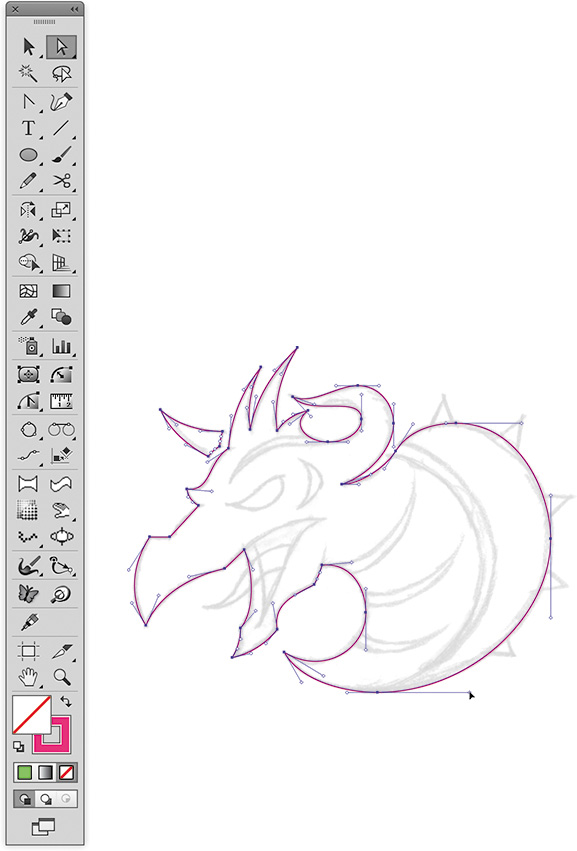
FIGURE 6.8 Take your time and pay attention to the PPP and Bézier curve handles to ensure that they’re not overextended. Shape the paths elegantly to match your drawing precisely.

FIGURE 6.9 Continue to build the remaining vector shapes needed to produce your final art. (Note: I created some of the new shapes, such as the arches that cut into the front and define the back of the character’s neck, using the Shape-Building Method discussed later in this chapter.)

FIGURE 6.10 This shows the final vector artwork and several other avatar designs I created for an RPG game. My vector building utilized TCM, PPP, and the Point-by-Point Method, plus the Shape-Building Method (described later in this chapter). ![]()
These four steps might seem labor-intensive at first, but over time all the methods you learn in this book will become second nature to you. Once you get used to them, you won’t have to think about each step of the process—they’ll all be part of your natural workflow. Use these methods consistently, and you’ll soon see your vector build times decrease and your precision and craftsmanship increase.
So, no whining: stay consistent and expect to struggle through this until it becomes your new normal. You won’t be sorry.
Span the Distance Wisely
When you create a Bézier curve, you need to analyze the length of that curved path and determine how many anchor points you’ll need to form it precisely.
Getting the anchor points right means using enough to get the job done accurately, but not so many that it’s hard to control the form of the vector path. Chapters 4 and 5 discussed this tangentially, but since it’s a core aspect of the Point-by-Point Method, it’s important to focus on it more specifically now. FIGURES 6.11–6.13 show how to find the balance between not enough and too many anchor points. Keep TCM and PPP in mind.

FIGURE 6.12 While it’s technically correct to form the same type of Bézier curve using only two points, aesthetically it’s wonky because it just doesn’t produce an elegant curve. The handlebars are extended too far, causing the path to appear flat in some areas. This level of scrutinizing detail is what separates the pros from the amateurs. A pro will take the time to refine the shape, whereas an amateur will usually say, “This is good enough.”

Shape-Building Method
Creating your artwork with one continuous path, Point-by-Point, isn’t always practical, nor is it an efficient use of your time. This is where the Shape-Building Method comes in. It’s a simple and fast way to build precise shapes using one or more of the following tools in Illustrator: the Rectangle tool (M), the Ellipse tool (L), and the Pathfinder panel (Shift-Command-F9 or Shift-Control-F9). It’s faster to build simple geometric shapes using the shape tools because they form the entire shape needed with all anchor points in place automatically. It’s also more precise than manually trying to position each anchor point on a path and then adjusting multiple Bézier curves.
Here’s how to use the Shape-Building Method to create a palm leaf in three simple steps:
1. Basic vector shapes: Your sketches needn’t be refined if the shape you’re creating is a simple one, like the palm leaf shown in FIGURE 6.14. Create the base art using the Point-by-Point Method and then switch to the Shape-Building Method: make the notches in the palm leaf with the Ellipse tool (L) and create two circle shapes that match the contour of the sketch. (See Chapter 2 for more information about this tool.)
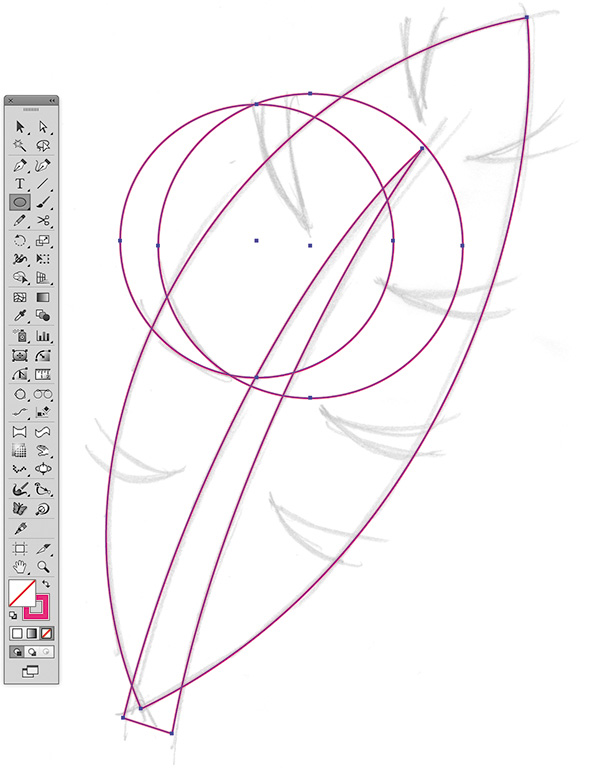
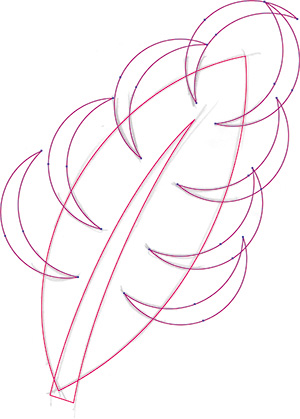
2. Pathfinder panel (Shift-Command-F9 or Shift-Control-F9): Select the two circles that make up the notch in the palm leaf and click the Minus Front button in the Pathfinder panel (circled in green in FIGURE 6.15). This will create a new shape that is formed by the top circle punching through the bottom circle (think of a cookie cutter). Copy this notch shape and size and rotate it to form the remaining notches in the leaf, as shown in FIGURE 6.16. (See Chapter 2 for more information on Pathfinder functions.)
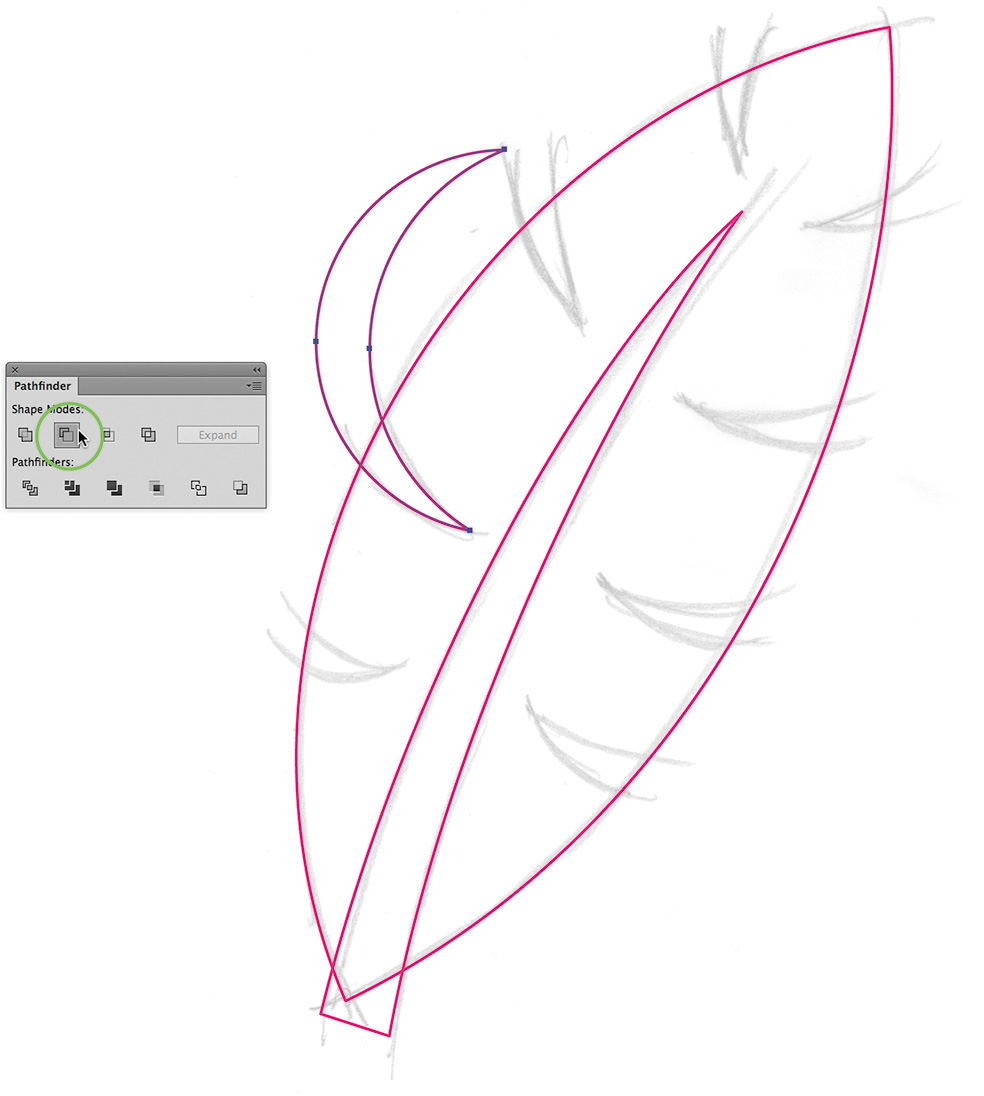
FIGURE 6.15 The Ellipse tool (L) and the Pathfinder panel (Shift-Command-F9 or Shift-Control-F9) can be simple but powerful vector-building tools. You can use them to create all the shapes needed to form the leaf’s notch details.
3. Final shape building: Once you have all the necessary stem and notch shapes in place, select them all (Shift-V) and then click the Unite button (circled in green) in the Pathfinder panel (Shift-Command-F9 or Shift-Control-F9) (FIGURES 6.17–6.19).
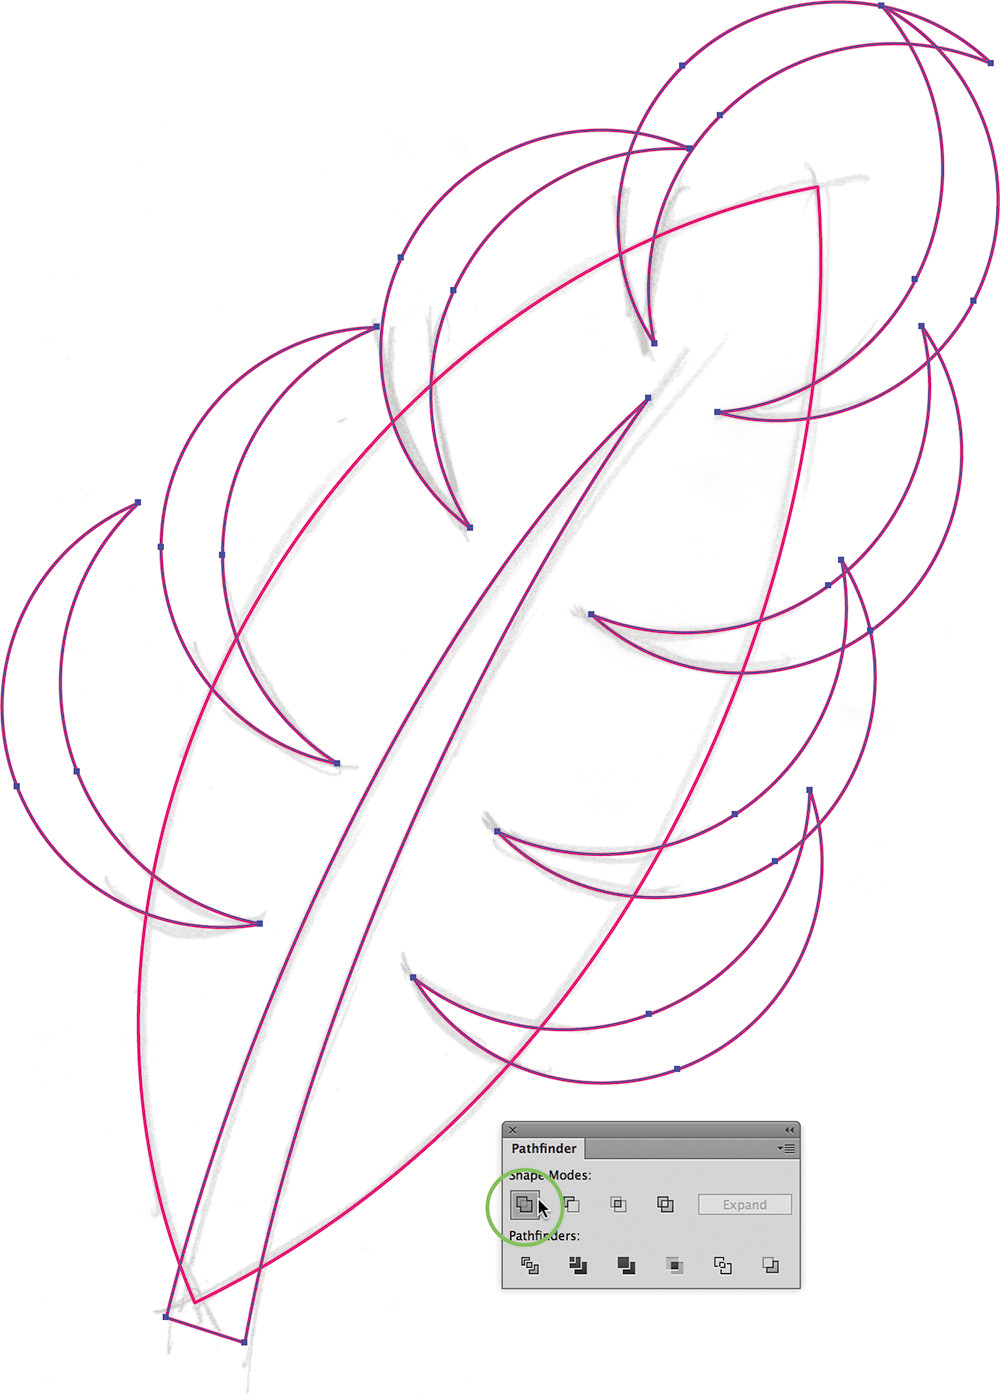
FIGURE 6.17 Select all the notch shapes and the stem shape and then click the Unite button (circled in green) in the Pathfinder panel. (Watch the “Shape-Building Method” video.)
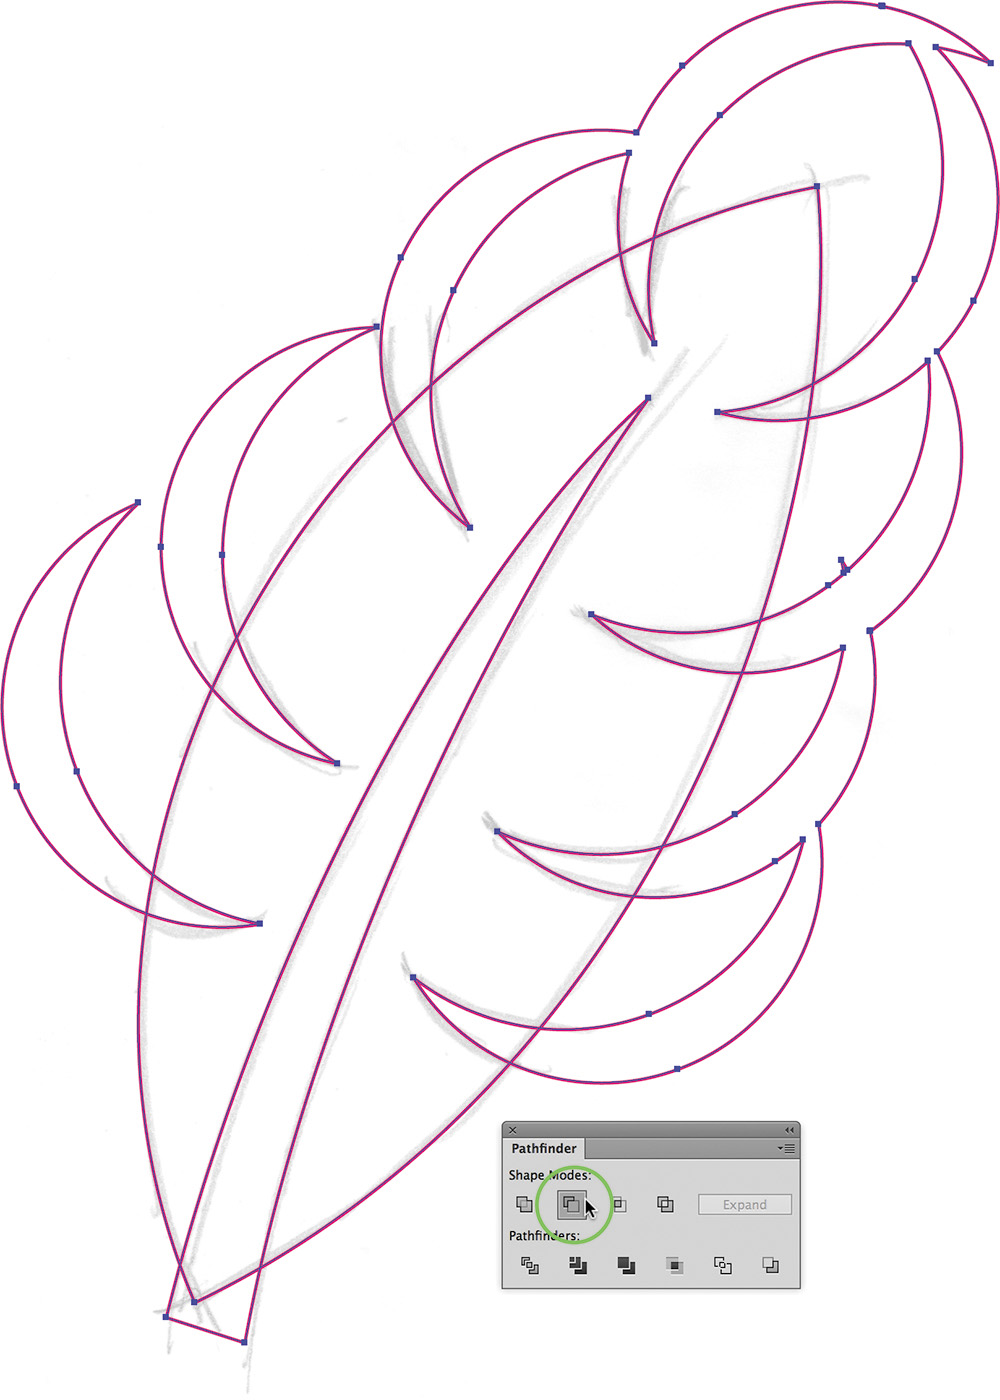
FIGURE 6.18 Select the new vector shape and the base palm leaf shape (Shift-V) and then click the Minus Front button (highlighted in green) in the Pathfinder panel (Shift-Command-F9 or Shift-Control-F9) to form the final art (as shown in Figure 6.17).
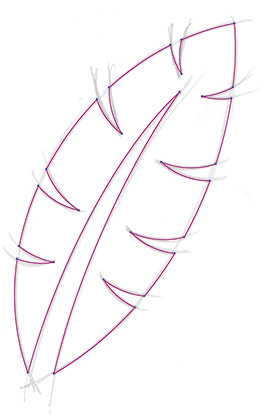
FIGURE 6.19 The final vector shape of the palm leaf, created using the Point-by-Point Method and the Shape-Building Method.
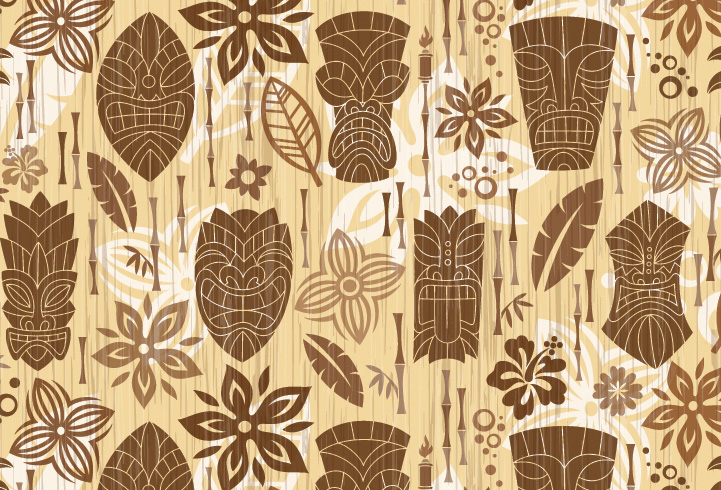
The palm leaf is part of the repeat pattern design shown in FIGURE 6.20. This artwork is a good example of using both the Point-by-Point Method and the Shape-Building Method.
When to Use Which Method
The type of shape you’re trying to create will dictate whether it’s best to use the Shape-Building Method or the Point-by-Point Method. Rarely, if ever, will you build your entire project using one or the other. For most of your projects, you’ll start building your vector art with the Point-by-Point Method, and sometime during the build process, you’ll get to a specific part of your design that will lend itself to the Shape-Building Method.
It’s all about discerning the shape you need to build and realizing when it’s easier and more precise to create a certain shape using the shape tools and when it’s better to manually place anchor points and adjust Bézier curves. Let’s take a look at another design that required both methods (FIGURES 6.21–6.26).
FIGURE 6.21 I used this refined sketch of a character design as a guide for building my vector shapes.
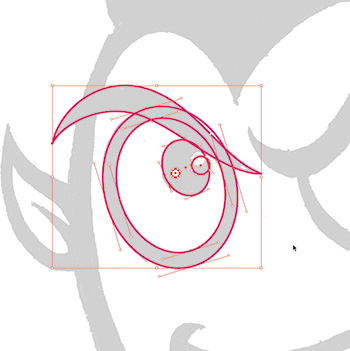
FIGURE 6.22 Because I took the time to draw out the shapes, I knew how to build them, which eliminated guesswork. I used Point-by-Point Method building to create the eyebrow and the Ellipse tool (L) to create the circular shapes that make up the eye. I used the Point-by-Point Method to build the eyebrow because it’s more free-form and can’t be built using shape tools. I used the Ellipse tool (L) to create the eyes because they consist of simple, geometric shapes that would be harder to build manually, one anchor point at a time. These are the types of simple build decisions you’ll make on the fly as you create your vector forms in Illustrator.
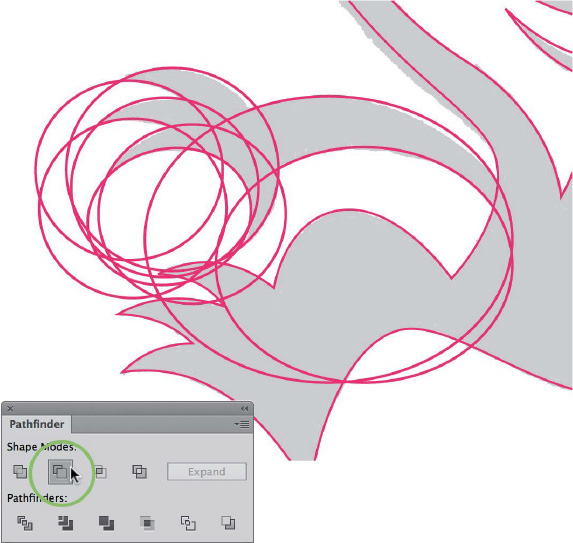
FIGURE 6.23 I continued to use the Ellipse tool (L) to create the character’s arm and hand. The shapes that make up the arm and hand are more geometric than organic, so they naturally lend themselves to using the shape tools instead of manually positioning the anchor points one at a time. Using the same method as in the palm leaf example earlier in this chapter (Figures 6.14–6.17), I selected two circular shapes at a time and clicked the Minus Front button (circled in green) in the Pathfinder panel (Shift-Command-F9 or Shift-Control-F9) to create the final arm and hand shown in Figure 6.24.

FIGURE 6.25 I continued using TCM and PPP (covered in Chapter 5) to discern the best anchor point placement during the Point-by-Point build process. I leveraged the Shape-Building Method to create the character’s other arm, teeth, wing, and tongue, along with the corners of his mouth and one of his horns. I created everything else with the Point-by-Point Method.

FIGURE 6.26 The final character design was part of an ad agency pitch for a Fanta Phantom character Halloween promotion. ![]()
Using both vector build methods will help you master the creation of any shape. Don’t let a complex shape intimidate you. Instead, approach it with creative confidence, knowing you can tag-team any vector challenge.
Throwaway Shapes
When you use the Shape-Building Method, you’ll create certain shapes for no other reason than to move another shape further along in the build process. These sacrificial shapes are important, but they never appear in the final art (FIGURES 6.27–6.31).

FIGURE 6.27 I used the Ellipse tool (L) to create this eye for a tribal owl design. With two of the circular shapes selected, I clicked the Minus Front button (circled in green) in the Pathfinder panel (Shift-Command-F9 or Shift-Control-F9) to finish off the last shape needed for the eye.

FIGURE 6.28 The end result of my shape building was this moon shape. I wanted to retain most of the shape’s form but needed to trim off some of it—that’s where I used a throwaway shape.
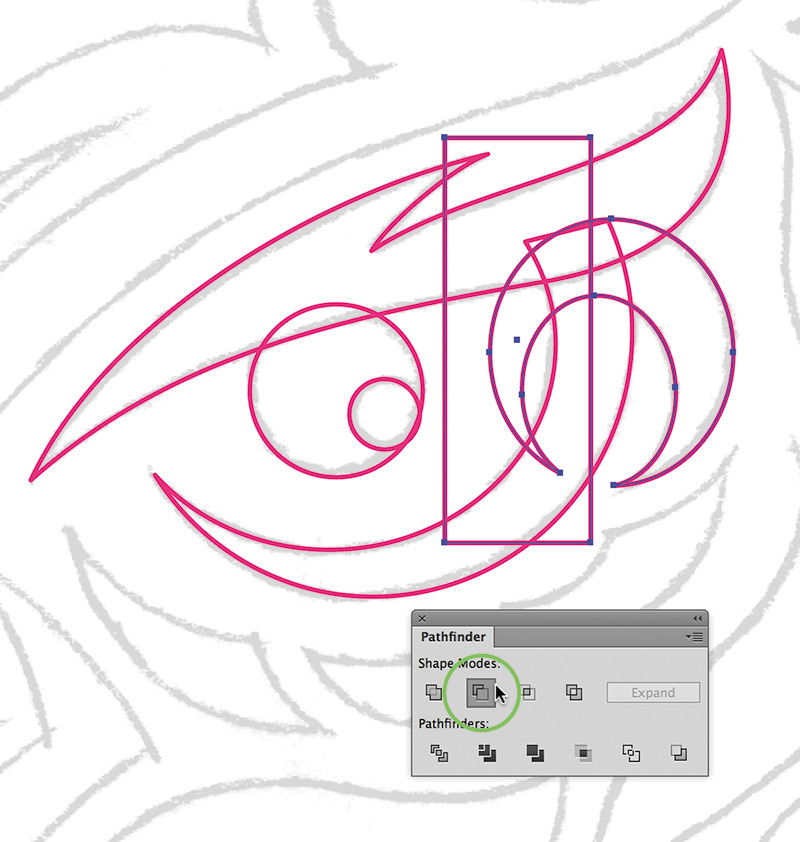
FIGURE 6.29 I created a rectangle, selected both shapes and then clicked the Minus Front button (circled in green) in the Pathfinder panel (Shift-Command-F9 or Shift-Control-F9).

FIGURE 6.30 With the throwaway shape removed, the final vector shape needed for the tribal owl illustration appeared. On a design like this, I can easily perform this same technique about a hundred times before I’m done with it.
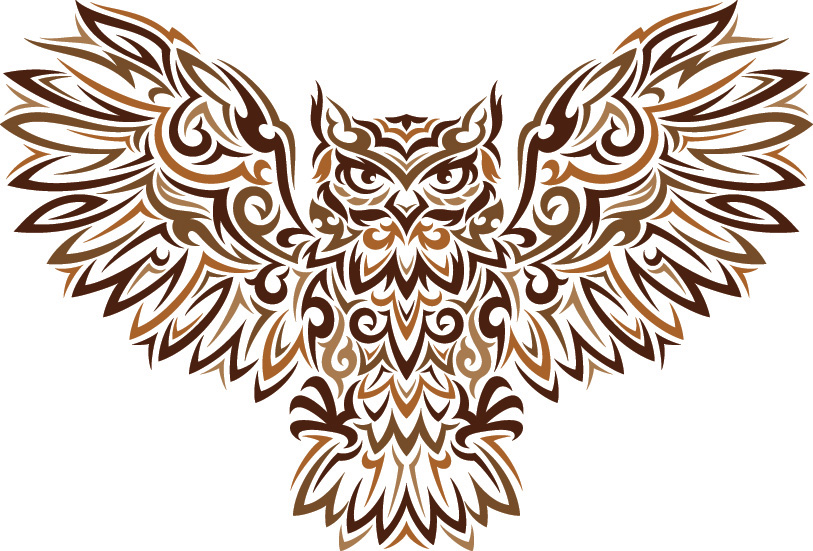
FIGURE 6.31 The final tribal owl illustration. To learn more about illustrating in this style, check out my tribal illustration course at www.drawingvectorgraphics.com. ![]()
VectorScribe Plug-in
In Chapter 2, you learned that the VectorScribe plug-in can be a valuable tool for creating vector artwork. It also has some powerful features for editing and refining your artwork.
When you create art using the Shape-Building Method, your final shape might need some additional refining. The VectorScribe plug-in by Astute Graphics can help you easily get that job done.
Remove Redundant Points
As I griped in Chapter 2, Illustrator contains a bug in the Pathfinder panel that creates redundant points in your artwork. This means that one point literally sits on top of another. When you select a shape, it might look normal, but these redundancies can cause problems later.
The VectorScribe plug-in contains a function called Remove Redundant Points that can remove all such duplicate anchor points in your entire illustration or design. Let’s take a closer look at how this plug-in works (FIGURE 6.32).
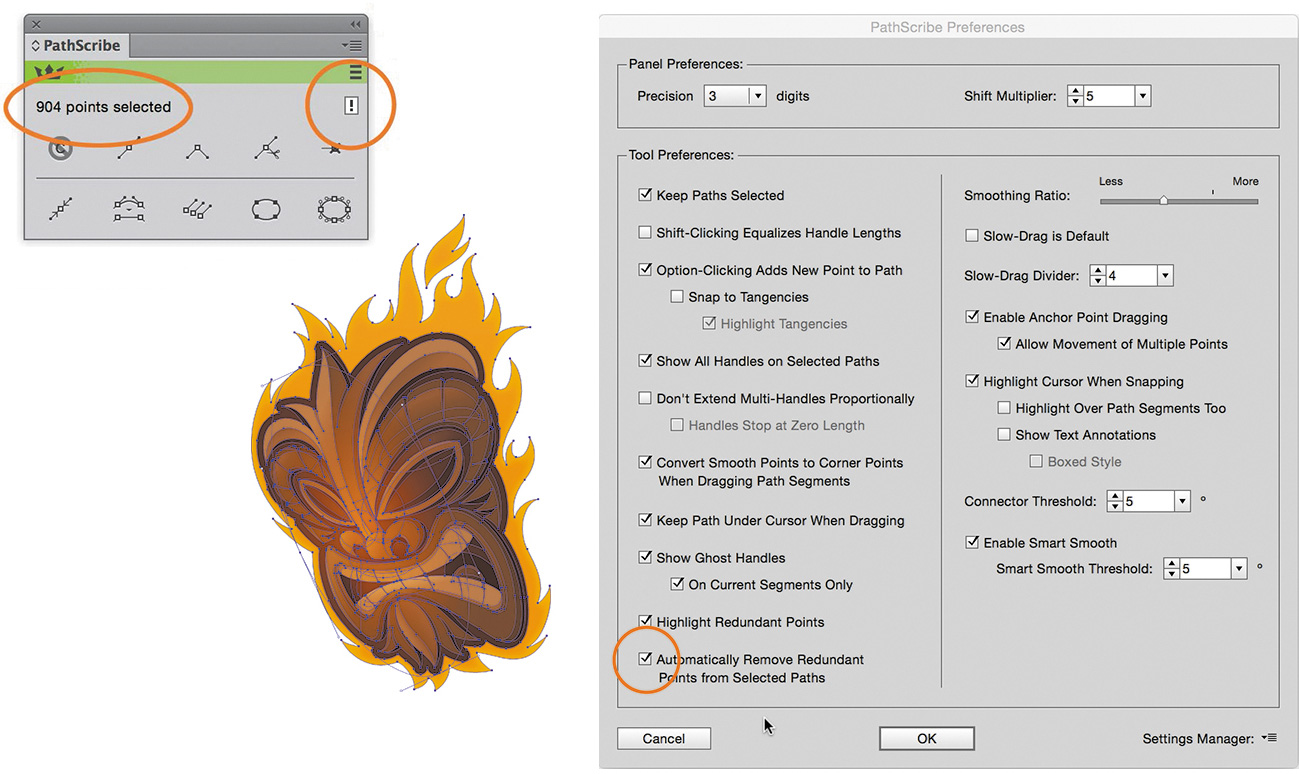
FIGURE 6.32 Select your vector shape or your entire design as shown. On the VectorScribe panel, you’ll see the number of points in your artwork on the left (circled in orange). If an exclamation mark appears on the right (circled in orange), your art contains redundant points. With your art still selected, simply click the exclamation mark. You’ll immediately see a new total point count appear on the panel, revealing how many redundant points were removed from your artwork. In this specific case, we removed four redundant points.
In the VectorScribe plug-in preferences, you can choose to have redundant points automatically removed (circled in orange). I prefer having this function turned off since at times I purposely snap to points in order to build certain content.
Smart Remove
Sometimes when you build vector art, whether by the Point-by-Point or Shape-Building Method, you inevitably add extra points to your vector paths. Or maybe you decide later that you simply don’t need one or more of the anchor points you initially placed.
You can use VectorScribe’s Smart Remove tool to remove extra anchor points from a path and still retain the art’s shape. This is a simple but useful feature that Illustrator lacks. Let’s look at how it works (FIGURES 6.33–6.35).

FIGURE 6.33 When I added a gray outline to this school mascot design, extra anchor points were added when I expanded the stroke. To remove them, I simply selected all the anchor points I wanted to remove (circled in orange) and clicked the Smart Remove button on the VectorScribe panel (circled in orange).
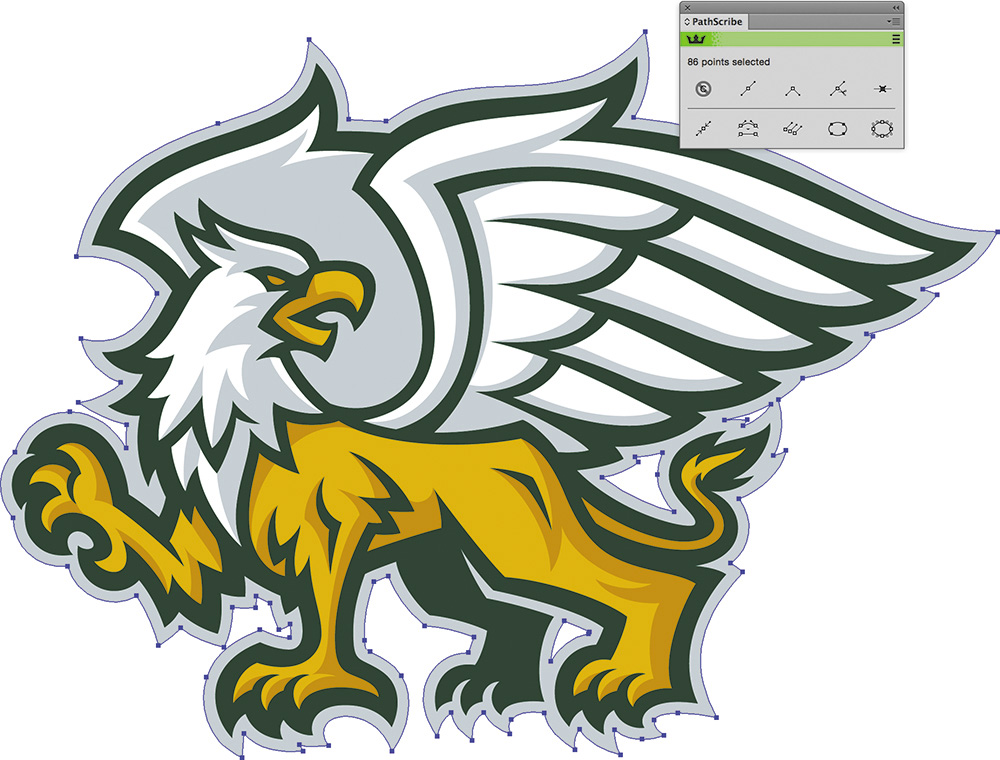
FIGURE 6.34 Notice how the vector shape retains its original form after the extra anchor points are removed. This is why this feature is called Smart Remove. I often use this feature when I build and sometimes use it with Prime Point Placement (PPP) to optimize and refine my anchor point locations as well.
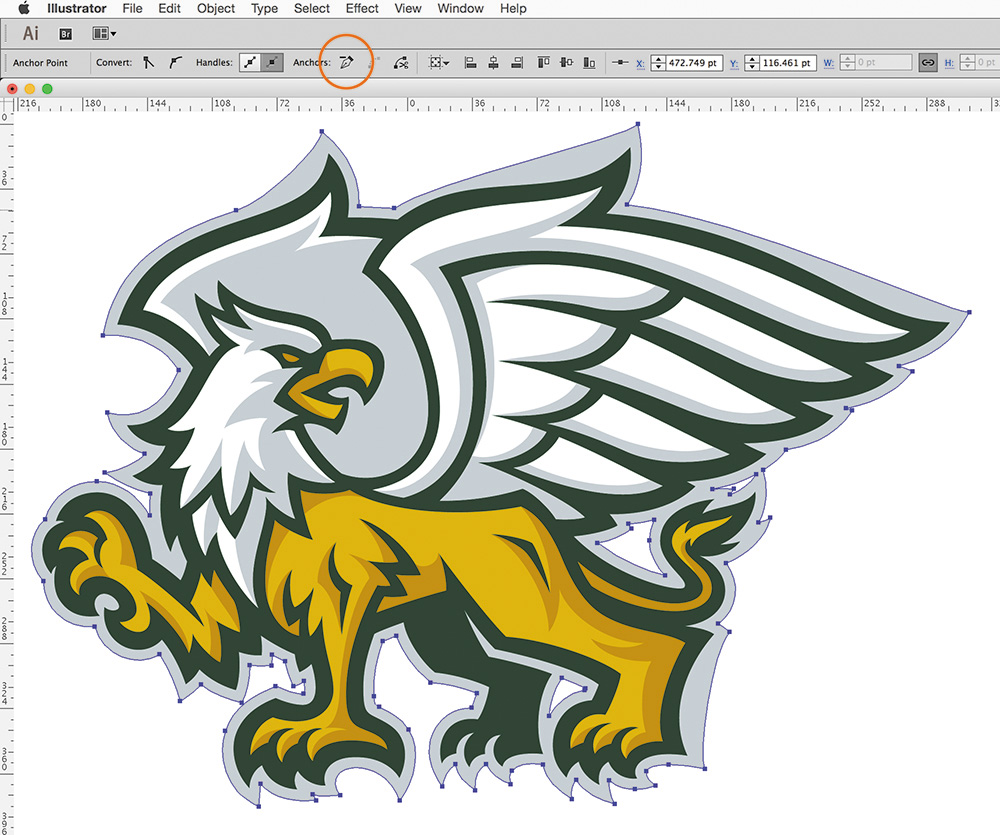
FIGURE 6.35 Trying the same kind of anchor point removal using Illustrator’s Remove Selected Anchor Point function in the Control panel (circled here in orange) ruins the original shape of the design. It’s not smart at all. In fact, I’d give it an F-minus and put it in vector detention indefinitely.
E Pluribus Buildum
You’ve probably seen the phrase E Pluribus Unum, which is Latin for “Out of many, one,” on U.S. currency.
This saying can also apply to the process of building vector designs. As you create your vector shapes using the Point-by-Point and Shape-Building Methods, you can also benefit from dissecting your design into more manageable individual shapes and combining them later into the final shape you need.
Chapter 3, “Analog Methods in a Digital Age,” touched on this, and you’ll notice it in many of the images in this book as well.
Dissecting Your Design
A variety of complex shapes can make up any design. In a custom logotype, for example, the shapes also have to be consistent and precise in order to make the letterforms readable.
A project like this is made far easier by dissecting it into smaller, individual shapes. This lets you focus on each part and render it accurately.
When I analyze a design concept like the one in FIGURES 6.36 and 6.37, I dissect the forms into more manageable pieces (FIGURES 6.38 and 6.39). This helps to maintain the continuity of the content. For example, I used the horizontal width of the shapes in the letter “H” in the word “Church” to guide my building on other letterform widths, such as the “B,” “U,” and “R.” If I’d tried to build each letterform as a single path, it would have taken a lot more time and effort on my part to pull it off with precision (FIGURES 6.40–6.41).

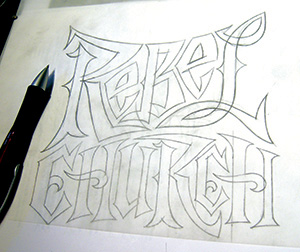

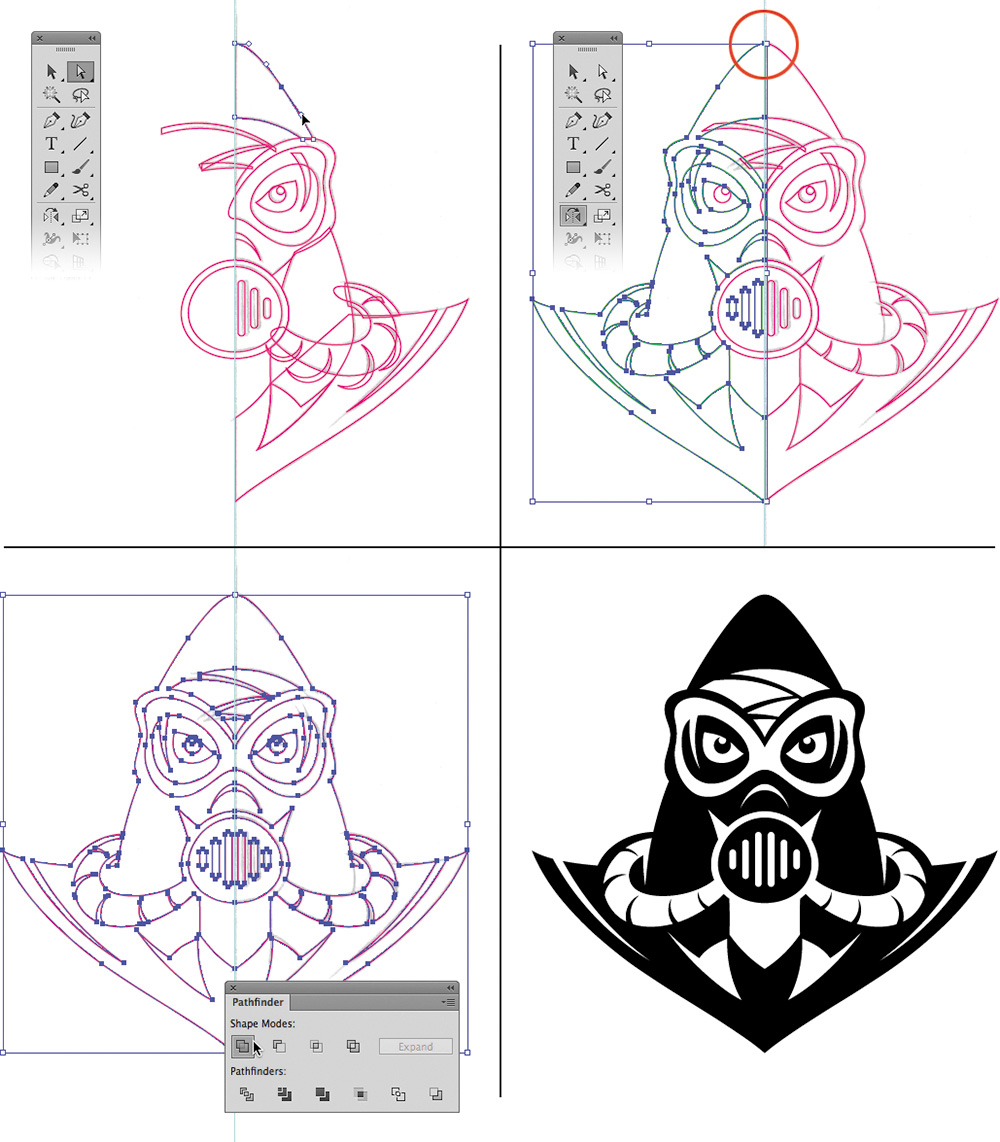
FIGURE 6.38 Focusing on individual shapes and dissecting them into even smaller individual shapes helped me build the vector art faster and with more precision.
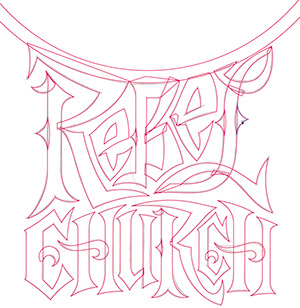
FIGURE 6.39 This image shows all the individual shapes that make up this logotype design. To form the final shape, I combined the individual shapes and punched out others using the Pathfinder panel (Shift-Command-F9 or Shift-Control-F9).

FIGURE 6.40 As I worked, I noticed some areas of the design that could be improved. This image shows the shapes I added to or subtracted from the letterforms to refine the design. This topic is covered in greater depth in Chapter 8, “Art Directing Yourself.”

FIGURE 6.41 The final logotype design. Note that I removed the inner curls on the “C” letterforms to improve readability. ![]()
Whether you’re building your design using the Point-by-Point Method or the Shape-Building Method or both, dissecting your design is a way to make the whole creative process easier.
Symmetry Is Your Friend
There’s one additional build technique you can use, in combination with the Point-by-Point and Shape-Building Methods, to really speed up your work: working symmetrically.
When you create symmetrical artwork, you only have to build half of the art (top left in FIGURE 6.42). From that you’ll be able to create the entire finished piece by simply cloning the shapes you need and flipping them using the Reflect tool.
Here’s how:
1. Create vector art based on your refined sketch. Select the vector shapes (V-Shift) (top left of Figure 6.42).
2. With the vector shapes selected, position the Reflect tool (O) on one of the center anchor points (circled in red). Hold down the Shift key and drag the cursor to the left to flip the art. (The flipped vector art is colored green in the top right of Figure 6.42.)
3. Now that you have all your shapes in place, select them and click the Unite button (to merge shapes) or the Minus Front button (to eliminate shapes) to create all of the final vector forms needed for your design (bottom left of Figure 6.42).
The symmetrical character art used the Point-by-Point Method, the Shape-Building Method, and symmetry to create the final design shown at the bottom right of Figure 6.42. The more you’re able to combine the various build methods covered in this book, the more productive your workflow will be (FIGURES 6.43–6.52).

FIGURE 6.44 I used this refined sketch as a guide to build my vector shapes in Illustrator. Nonsymmetrical elements like the hair on the forehead are always good to add to an illustration like this.

FIGURE 6.45 I discerned my anchor point locations using TCM and PPP (covered in Chapter 5) and then used the Point-by-Point Method to form the flaming hair shape.
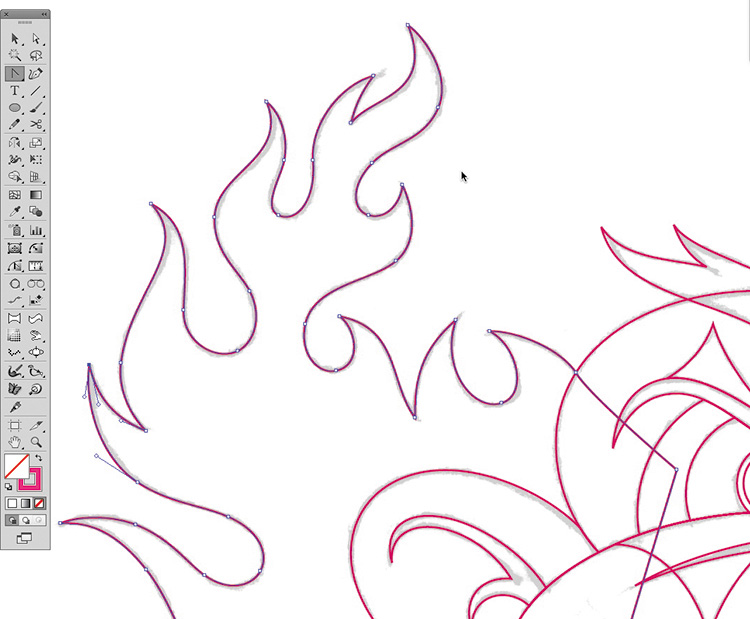
FIGURE 6.46 The rendered vector art precisely matches my underlying drawing. I continued to use this method as I built the rest of the vector shapes.
FIGURE 6.47 Using the Shape-Building Method, I created six circular shapes with the Ellipse tool (L) to form part of the hair in my illustration.

FIGURE 6.48 I then selected the various shapes and clicked the Minus Front button in the Pathfinder panel (Shift-Command-F9 or Shift-Control-F9) to knock out the sections of the curve that I didn’t want showing up in my final graphic. The result is a curved shape that looks more like hair than a circle.
FIGURE 6.49 As I continued to build, I selected the shapes and clicked the Unite function in the Pathfinder panel (Shift-Command-F9 or Shift-Control-F9) along with another throwaway shape to form the tuft of hair.
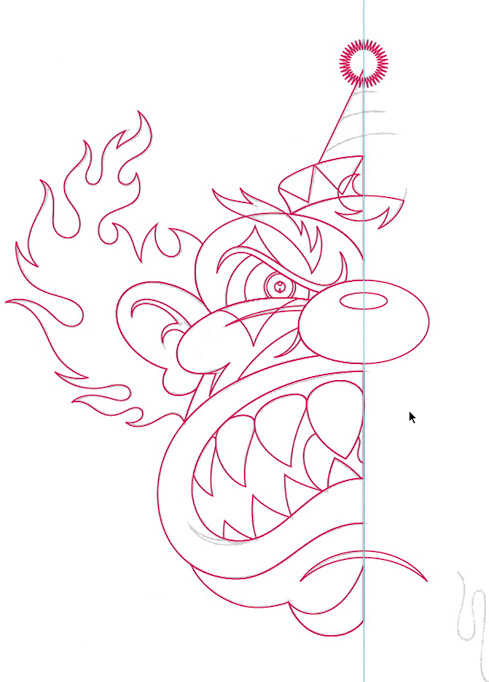
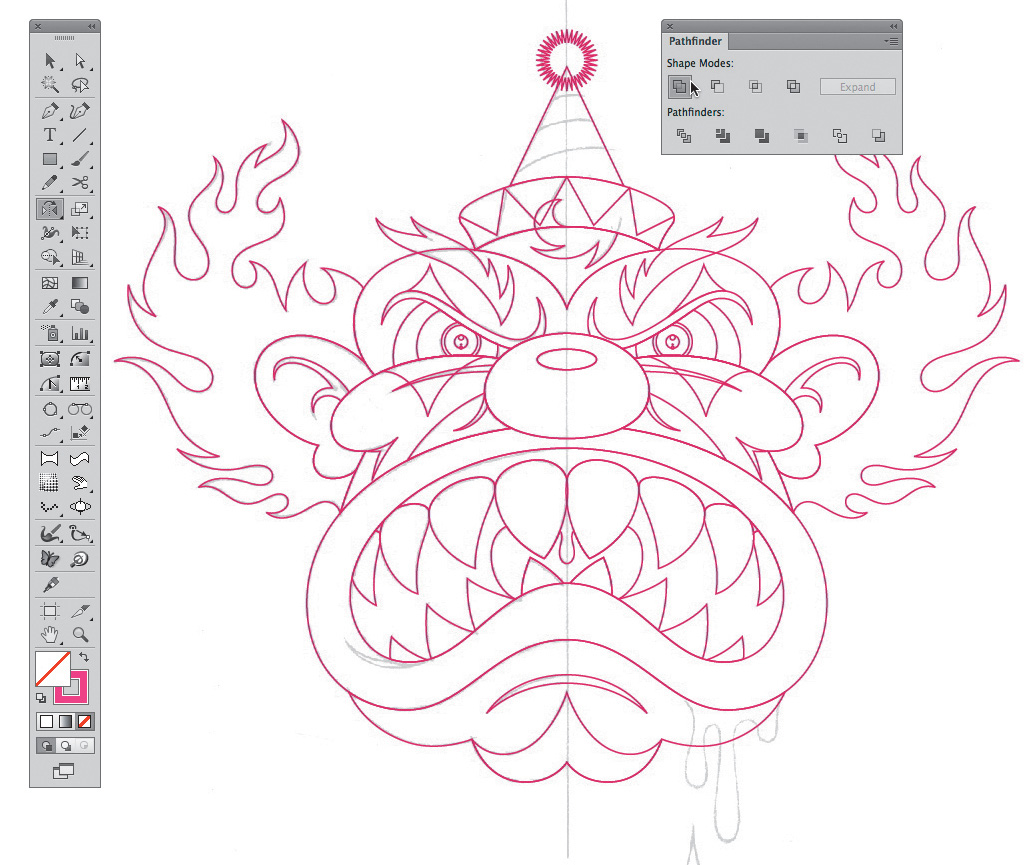
FIGURE 6.51 I cloned (Command-C or Control-C, Command-F or Control-F) the vector shapes and flipped them using the Reflect tool (O). Once the shapes were reflected, I selected various shapes and clicked the Unite button in the Pathfinder panel (Shift-Command-F9 or Shift-Control-F9) to form all the vector shapes needed for the final artwork. I removed redundant or extra anchor points using the VectorScribe plug-in. (Review the VectorScribe plug-in instructions covered earlier in this chapter.)

FIGURE 6.52 I titled the final artwork “Tickles, the Evil Clown.” Tickles won several illustration awards, and a large-format print was part of a gallery show at the New York Society of Illustrators. ![]()
A Healthy Creative Process
I isolated my various build methods in this chapter so that I could walk you through each one individually. I then explained how to use the methods together in the greater context of a systematic creative process.
But the creative process isn’t always orderly. Many times a project will require you to revisit earlier steps to arrive at the final vector art. A good example of this was documented in Figures 3.34–3.36. The same will be true in your own projects as you begin to use the Point-by-Point Method and the Shape-Building Method covered in this chapter.
A healthy creative process should be flexible, adaptable, honest, and open to the use of any method at any given time to improve the final result.
 Field Notes: Skullduggery
• Three circles
• Three rectangles
• One square
• One triangle
Design Drills: Fast and Easy
As discussed earlier in this chapter, dissecting your vector building into smaller, more manageable shapes makes the whole process of forming your art easier and leads to faster build times, especially when you’re creating complex designs.
In this section, I’ve gathered together a few of my more complex designs so you can see how I diced up each one (FIGURES 6.53–6.58).
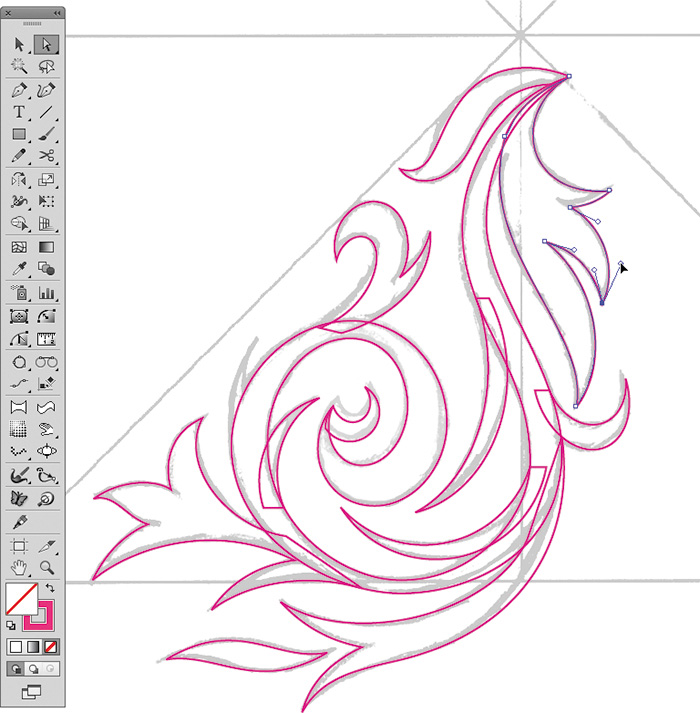
FIGURE 6.53 I created this ornament design by dissecting the overall form into multiple shapes. I united the various parts in one larger united path using the tools in the Pathfinder panel.

FIGURE 6.54 I used the Reflect tool (O) to reflect the ornament design horizontally and then reflected it again vertically to form the complete frame motif.
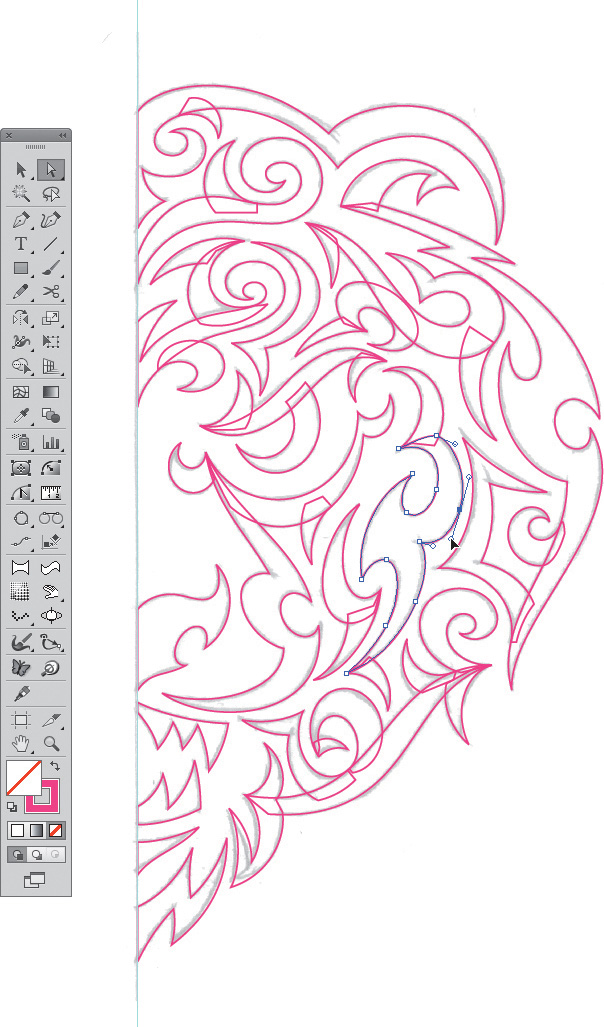
FIGURE 6.55 Symmetry is another way to cut your build time since it essentially eliminates half your workload. This example shows half of a design for a tribal bear that I created and then completed using symmetry.

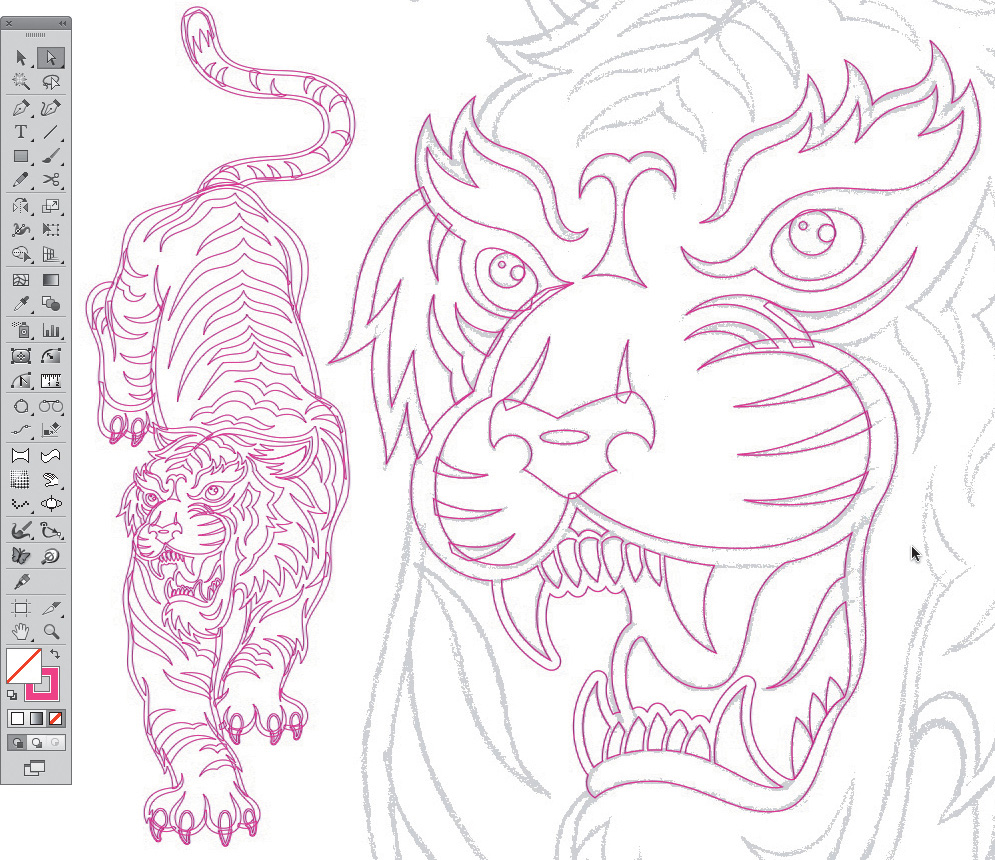
FIGURE 6.57 Distilling this complex tiger illustration into smaller shapes made it far easier to flesh out. I was able to work faster while staying focused on the smaller details.
