CHAPTER 12
Nonlinear Video Editing
Although videotape is still widely used for field acquisition, the use of linear videotape editing systems has largely been supplanted by a new generation of digital nonlinear editing systems (see Figure 12.1).
NONLINEAR VIDEO
EDITING
The process through which audio and video are edited in computer-based video editing systems that provide random access to the video and audio information during the editing process, and in which edits are made with a “cut-and-paste” process similar to the way text is edited in a word processing program, is referred to as nonlinear editing (NLE). Today’s digital nonlinear video editing systems (DNLEs) take advantage of the computer’s ability to record and play back pictures and sound, and exhibit a number of other significant characteristics that differentiate them from linear editing systems.
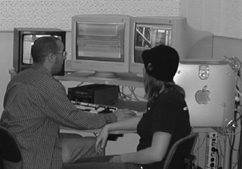
FIGURE 12.1 Editing on a Nonlinear Video Editing System
Digital versus Analog Signals
Nonlinear video editing systems work with a digital video signal, as opposed to the conventional analog signal, and most of the videotape formats used for acquisition of field footage today are digital formats.
If the field footage was acquired using a digital videotape format (e.g., DV, DVCAM, DVCPRO, Digital 8, Betacam SX), it can be transferred directly into the computer as a digital signal via the computer’s FireWire port. Some digital editing systems—particularly those designed specifically for news editing—allow the digital clips to be input into the computer at faster-than-normal playing speed, thereby speeding up the editing process. (See Figure 12.2.)
Videotape that has been shot in the field in one of the analog acquisition formats (e.g., Hi8, VHS/S-VHS, Betacam SP) must be digitized as it is transferred into the computer. Analog footage is typically digitized in real time; that is, digitized time is equivalent to the length of the clip.
Nonlinear editing systems provide several advantages over linear, tape-based systems. In particular, they allow for random access to footage and for shots to be inserted in front of or in between other shots in the time line.
As is the case with other kinds of video production equipment, nonlinear editing systems vary widely in quality and cost. Some systems are designed for consumer and prosumer users, whereas others are targeted at the professional and broadcast production markets.
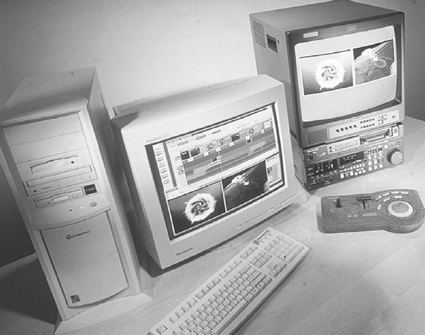
FIGURE 12.2 Panasonic DV Edit System
Nonlinear versus Linear Editing:
Random Access
Videotape editing systems are linear by nature: shots on the source tapes are recorded in a linear sequence, and they can be accessed only by fast forwarding or rewinding the source VCR. Edits are made on the editing VCR in sequential, linear fashion.
Nonlinear editing systems provide random access to source footage. The unedited field footage is imported into the computer and stored on the computer’s hard disk drives. Shots can be accessed immediately in any order—in much the same way that a compact disc (CD) player can go to any song on a CD almost instantly. In addition to providing random access to the video and audio information once it has been imported into the computer, nonlinear systems allow the user to assemble and change shot sequences easily.
Nondestructive versus Destructive Editing
Digital nonlinear editing is nondestructive of the original field footage. Like linear video editing, nonlinear editing does not damage or change the original field footage. Editing is performed on the digitized copy of the original footage. However, nonlinear editing is also nondestructive of the shots in the editing time line.
In nonlinear editing, when in and out points are marked on a shot, the parts that have been trimmed are not erased. The in and out markers merely tell the computer which parts of the original clip to play back in the time line, and the unedited original clip remains in the computer’s memory. A shot in the time line can be lengthened or shortened simply by moving the position of the in or out marker. This is different from linear editing, which actually trims each shot as it is edited into the program.
Insert and Overlay Edits
In nonlinear editing systems, even after a sequence of shots has been placed in the time line, a new shot can be inserted between them. This is called an insert edit. The finished shot sequence is equal to the total length of all of the clips. (See Figure 12.3.) There is no easy way to place a new shot between two shots that have already been recorded in a linear tape system. The ability to insert new material between shots or sequences is one of the great advantages of nonlinear editing over linear editing. Another advantage that nonlinear editing systems have over linear editing systems is that they enable a new shot to be inserted at the beginning of a sequence that has already been edited into the time line. The edited sequence is simply moved farther down in the time line and the new shot inserted in front of the edited material. In a linear system, adding a shot to the beginning of a sequence that has already been edited requires reediting the sequence in its entirety—you can’t simply add a new shot to the head of the sequence.
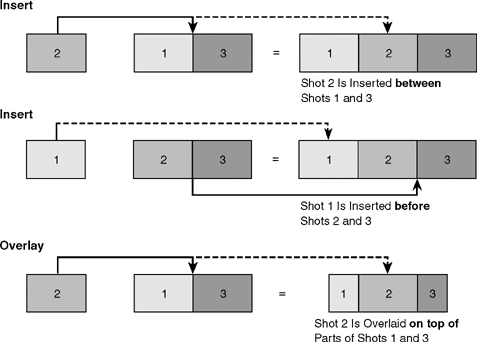
A shot that is used to replace and/or cover up a shot in the time line is called an overlay edit. An overlay does not increase the length of a shot sequence. (See Figure 12.3.) An overlay edit performed in a nonlinear system is equivalent to what has previously been defined as an insert edit performed on a linear tape system.
COMPONENTS OF A NONLINEAR
VIDEO EDITING SYSTEM
The principal components of a nonlinear video editing system (see Figure 12.4) include:
1. A computer equipped with a central processing unit (CPU) that is fast enough to process video information.
2. Nonlinear editing software to perform video editing.
3. A sufficient amount of storage capacity for the computer, usually in the form of hard drive disk arrays. Not only does editing require a lot of storage capacity, but also the system must be able to move the data through at a fast rate.
4. A VCR to send the field footage into the computer and to record the finished product when the program is complete.
5. VCR/computer interfaces to allow the computer to control the playback and recording functions of one or more source and record VCRs.
6. A video input/output board to move the video signal into and out of the computer, unless the computer has direct audio and video inputs or a FireWire connector for digital video.
7. High-quality video and audio monitors so that image and sound quality can be monitored during the editing process. It is always recommended to have a video monitor in addition to the computer monitor as image and color quality varies between the two.

For the system to function properly, all of the hardware and software components of the system must be compatible. In order to resolve the inevitable problems that occur when systems are assembled from components supplied by different manufacturers, some nonlinear editing systems are available in which all of the system components are supplied by one company. These complete systems are called turnkey systems because, theoretically, all the system operator needs to do is turn on the system and begin to edit.
User Interface and Editing Model
Each nonlinear editing system is built around its own proprietary user interface. The user interface describes the visual elements of the editing program that appear on the computer screen and the steps through which editing is accomplished. Interfaces whose elements are easy for learners to grasp are referred to as simple or intuitive interfaces. Figure 12.5 illustrates the principal user interface for two popular nonlinear editing systems: Apple Final Cut Pro and Avid.
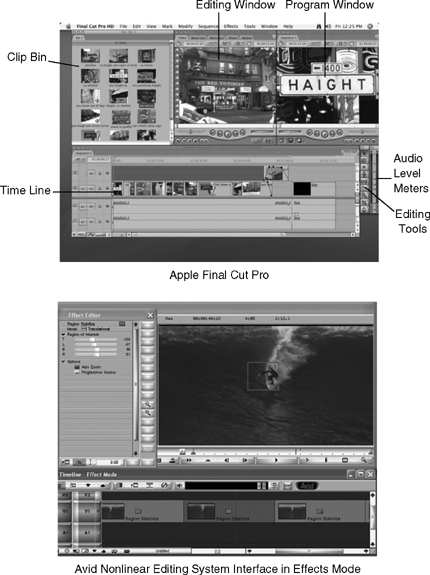
Figure 12.5 Two Popular NLEs
Nonlinear editing systems are organized around an editing model that includes the time line, bins for audio and video clips, and editing and program windows, which display the clips and program as they are edited.
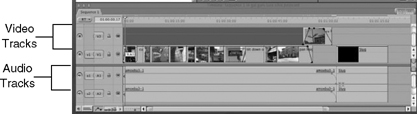
Time Line. The time line is a graphical linear representation of the program. Each of the various program tracks (video, audio, graphics) appears in a vertical stack on the screen. (See Figure 12.6.) The elements in each of the time line tracks can be manipulated independently or in conjunction with each other. For example, if an audio track is synched with video, the audio clip will move along with the video to wherever it is placed in the time line.
Clips and Bins. Clips are digital files of the source material that is to be edited. Video footage, audio sources, and graphics are all stored as clips. Clips can usually be displayed as a list, or by displaying the first frame of the clip as an icon in the bin window. This frame is sometimes called a picture icon, or picon. (See Figure 12.7.)
Editing Window and Program Window. Contemporary NLE interfaces contain two windows where clips are trimmed and where the edited program is displayed. These windows are roughly analogous to the source and editing VCR monitors in linear editing. (See Figure 12.5.)
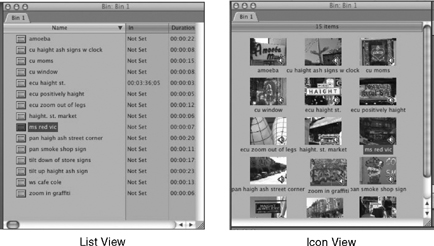
FIGURE 12.7 Clips in a Bin
Clips are trimmed in an editing window. This is similar to the source VCR monitor on a linear editing system. Entry and exit points can be selected by eye or ear (by looking or listening to find the beginning and end of each clip), by time code numbers, or by selecting either an in or an out point and then specifying the length of the clips. Clips can also be easily trimmed or extended by clicking the computer’s mouse on the beginning or end of the clip in the time line and dragging the clip to extend or trim it.
The program window—similar to the editing VCR monitor on a linear system—displays the edited program.
Different manufacturers give these windows different names. For example, in Final Cut Pro the editing window is called the “Viewer,” and the program window is called the “Canvas.” Regardless of the name assigned, the functions are similar from one system to the next.
Transitions. Once individual clips have been arranged in the proper sequence in the time line, transitions such as dissolves, wipes, and digital video effects can be added between the clips.
THE PROCESS OF
NONLINEAR EDITING
In general, the process of nonlinear video editing involves the following four main steps: (1) log your field footage; (2) capture your best takes; (3) edit your captured material; and (4) print to tape or DVD.
Step 1. Log Your Field Footage
Before you can begin to edit, you need to have a thorough and accurate record of your field footage and other source material.
Use one of the four tape-logging methods described in Chapter 10:
a. Make a window dub of your field footage and manually log your tapes by hand. The advantage to this system is that it forces you to look at all of your footage and make notes about what is good and bad. The disadvantage is that it is time consuming, and you will still need to enter into your nonlinear editing system the time code information for the clips you want to capture.
b. Make a window dub of your field footage and log your tapes using a spreadsheet program like Microsoft Excel. This is similarly tedious to logging your tapes by hand, but once you have the log information in a spreadsheet format, you can use the NLE to batch capture your footage.
c. Play your field footage directly into your NLE and log your tape clip by clip. This saves the step of window dubbing the tape, but it forces you to use the editing system as a logging station. If you have shot a lot of footage that is no good or that you simply decide not to use, you will waste a lot of editing system time performing the logging task.
d. Use automatic logging software and your personal computer to log the tapes. You will still have to review the logs and add descriptive information about each of the clips, but this can be done independently of the NLE, leaving the editing system available for editing tasks, rather than logging tasks.
Step 2. Capture Your Best Takes
Select the Footage to Be Captured. Today most videotape formats record a digital signal. The process of transferring the footage from tape into the computer is called “capturing.” In nonlinear editing systems, the amount of storage is limited by the capacity of the hard drive system available. Therefore, you must make some preliminary choices about which shots you plan to use in your final project before you begin to capture your material. If your source footage was recorded on an analog tape format, then as the footage is captured, it will be converted into digital files by the nonlinear editing system.
Select a Video Compression Rate. When video is converted from analog to digital form, it is compressed. Compression allows the computer to reduce the amount of information that is stored in digital form. By varying the image quality, a given amount of footage will take more or less storage space. Material stored at a high rate of compression (lower image quality) will take up less space on the hard drive than material that has been digitized with a lower rate of compression (higher image quality). Managing the available hard drive space by working with different compression rates is an important part of the editing process.
For example, when beginning to work on a program in a nonlinear editing system, an editor might digitize footage at a high compression rate (lower quality) in order to have access to a greater amount of the original field footage during the initial stages of editing. After the editing decisions have been finalized, the unused clips can be deleted from the computer—freeing up hard drive space—and then the clips that remain can be redigitized at a higher-quality setting (lower compression rate) so that the final version of the program will exhibit the best quality the nonlinear system is capable of producing.
Digitize/Capture Shot by Shot. Mark an in and an out point for each shot using SMPTE time code numbers, or mark the video clips “on the fly.” Leave some extra footage, called handles, at the beginning and end of each shot. Many systems will do this automatically if you activate this feature in the appropriate menu. Handles are useful if you plan to add transition effects like dissolves to your edit points. Since a dissolve will actually end after the edit point of the first shot in the sequence, and will begin before the edit point of the first shot, extra footage is needed to cover the effect, and that’s what handles provide.
Most nonlinear editing systems include a batch capture feature. Enter the time code in and out points for each shot as well as the name of the videotape reel on which each shot is located, specify which tracks you wish to digitize (video, audio 1, audio 2), or import the log of the list you want to capture from a spreadsheet program with either method; and after all the data have been entered into the editing program, the system will automatically find and digitize each of the clips. Import additional elements such as music and sound effects from compact discs and drawings, graphs, photos, and animations from illustration and animation programs.
Remember that, in most systems, digitizing and capturing take place in real time. This can be a time-consuming part of the nonlinear editing process, particularly when a large amount of footage is involved.
If the field footage was recorded onto a hard drive, flash memory card, or optical disc using a tapeless camcorder, the video clips are already in a digital file format and can be dragged directly into a bin or the timeline, significantly speeding up the editing process.
Step 3. Edit Your Captured Material
Trim Each Digitized Clip to Its Actual In and Out Points. If you captured your clips with additional handles at the beginning and end of each clip, now is the time to trim them.
Use the Time Line to Arrange Shots in the Proper Sequence. With the computer’s mouse, you can drag and drop shots into the time line at the appropriate place, and you can easily move them elsewhere if you decide to change the sequence. This is one of the most powerful advantages of nonlinear editing systems. The order of shots can be changed without reediting the entire piece.
Add Music and Sound Effects. As you are editing the picture, the sound attached to the picture will be assembled into the time line as well. In many cases, the initial definition of shots or clips may be driven by what is said, rather than by what is seen. All high-quality nonlinear systems allow for the addition of several other tracks of audio as well, and most projects will use four or more tracks (voice, natural sound, stereo music, sound effects, and so on).
Add Transitions between Shots If They Are Not Cuts. Most editing software systems allow you to choose from an extensive array of special-effects transitions.
Add Graphics. Program titles, keyed titles, and other graphics can be created electronically within the editing program and incorporated into the project.
Render Transitions, Special Effects,and Graphics. Rendering is a process through which the computer changes transitions, special effects, and graphics from computer effects to video effects. This means that the effects need to be translated into video fields and frames. Depending on the complexity of the effects and transitions involved and the speed of your computer, this process may take some time to complete. Also remember that in most systems, if you move a rendered transition or effect, it may become unrendered, forcing you to go through the rendering process again. For this reason, it is best to leave effects and transitions unrendered until you are confident that the video and audio elements of your program are in their final form.
View the Edited Project in Real Time with High-Quality Video and Audio Monitoring in Order to Judge Its Effectiveness and Acceptability. Don’t just view the program on the computer monitor. If you do not have an external video monitor as part of your editing system, output the project to videotape and watch it on a video monitor.
Make Changes as Necessary. The general ease by which sequences can be rearranged or new material integrated into the time line is the principal advantage of nonlinear editing over linear editing.
Step 4. Print to Tape or DVD
Output the final project from the computer to the VCR to make a videotape master.
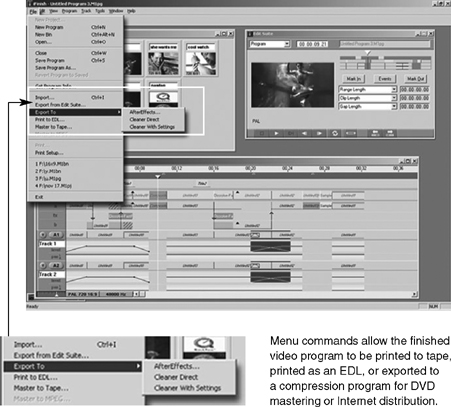
As an alternative to printing to tape, a number of nonlinear editing programs contain software that allows you to export your finished program in a compressed form that is suitable for distribution via the Internet, or for recording to a DVD (digital versatile disc). (See Figure 12.8.)
Some Additional Things
to Think About
Computers Crash. Several years ago I was in the audience at the National Association of Broadcasters annual convention when the introductory demonstration of a new nonlinear editing system had to be aborted because the computer operating the system kept crashing. The presenter sagely observed: “If television crashed as often as computers, there would be riots in the streets.”
Every Technology Has Its Weak Spot. The old linear tape editing systems often mishandled tape during editing, reducing it to a pile of useless, wrinkled mylar. Computer-based nonlinear editing systems frequently crash because they don’t have enough memory or processing speed to handle the demands of editing video or because of software conflicts within the computer. An occasional computer crash is to be expected when working with nonlinear editing. However, frequent system failures are often the result of a hardware or software problem that needs to be diagnosed and corrected if editing is to be completed in a timely manner.
Save Your Work Often. Because computers crash with frequency, experienced editors save their work often. Many editing programs have an “auto-save” feature built into them that automatically saves complete work at specified time intervals (e.g., 15 minutes, 30 minutes). Whether or not your system has this feature, get into the habit of saving your work regularly.
Pay Attention to Time Code. SMPTE time code is an important tool in production and postproduction. It can make your work easier or harder, depending on how you manage it. When you shoot field footage, try not to leave gaps in the time code on the field tapes. Most nonlinear editing systems need continuous, ascending time code on field tapes to find and cue footage to be digitized. Also remember that the (minimum) five-second preroll time applies to footage shot with time code just as it applies to footage shot with control track. Machines need time to read the time code, cue the tape, and get up to speed. And additional footage at the head and tail of shots (with time code on it) may be important if you need to lengthen a shot later on, or if you want to add transitions in place of a cut.
Label Clearly. Name and label your field tapes, give each shot a unique name when you digitize it, and name your program and its constituent parts clearly so that you can find your work on the hard drive of the computer on which you are editing.
Make Backups. Make backup copies of your work if you do not finish in a single editing session, and make a backup copy of complete projects in case you decide to reedit them at some future time.
Budget Your Editing Time Well. In many ways nonlinear editing seems to be “better” than linear editing because of its drag-and-drop editing and the ease with which edits can be made and/or changed. However, nonlinear editing is not necessarily faster than linear editing. Digitizing each clip takes time that linear editing does not require, and because it is possible to try different editing decisions before committing to them, it is not unusual for projects edited on nonlinear systems to take more time to complete than projects edited on linear systems.