
Loaders and plugins are the heart of webpack. They make up the engine that empowers webpack to do the “magical” things for you, like reading and transforming files before passing them to webpack or influencing the output of your bundle by extending the compiler capability, etc. In this chapter, we will be exploring some of the most commonly used loaders and plugins. We will go through examples of how to transpile files from one format to another. We will see how to debug our JavaScript efficiently and how to handle images and optimize them as well as our bundle for fast loading. By the end of this chapter, you will have the necessary understanding of how to use both loaders and plugins in the simplest possible way.
Loaders vs. Plugins
Loaders, on one hand, tell webpack how to interpret, translate, and make transformations to your source code (for example, from CoffeeScript to vanilla JavaScript, or SASS to CSS). They are like tasks if you are familiar with any other build tool, and basically they preprocess files whenever you import them.
Plugins, on the other hand, can do anything that loaders cannot do. Webpack considers them the backbone of its core. And you will see that they are object-like, they can take arguments, and they can be instantiated as well in order to perform many things or adding functionalities to the compilation such as optimizing your bundle.
In this chapter, we will explore both loaders and plugins, so don’t worry too much about the definition. We will get familiar with these two notions when we see the examples. What you have to know, though, is that there are tons of loaders and plugins available (official and third-party ones), and our goal is not to cover them all. Instead we will be focusing on the understanding of how you can apply them and use them in your project, so that in the future if you need to have some additional functionality in your bundling process, you will be able to go and search by yourself, then apply that specific loader or plugin.
1 - installing the loader/plugin (using npm install)
2 - requiring it (usually we require plugins but not loaders)
3 - using it (documentation is our valuable friend here)
Again, don’t worry if this seems too general for now. Once we start to go through the examples, you will absorb the principle more clearly and get the full picture. So with that in mind, let’s start exploring our first loader.
Using Babel-Loader
Let’s assume we want to write ES6 (ECMAScript 6) in our code (which is still not 100% supported yet by all the browsers, especially the old ones, at least at the moment I am writing this). While webpack is able to recognize and translate the “import/export” to its own syntax, it won’t do anything for your (other) JavaScript code if you write it in the ES6 style. One of the solutions is to use Babel JS, which is a transpiler that will translate our code from ES6 to ES5.
If you are wondering how to know what to install exactly in order to get Babel working, the answer is documentation! In order to install any loader or plugin, all you have to do is to search for “Webpack + the name of loader/plugin,” then most likely the first link will direct you to the documentation page of that loader or plugin (either webpack website or a GitHub repository) where more details are explained.
Configuration of babel-loader in order to transpile ES6 to ES5
Note that there is a “module” object, then an array of objects called “rules” where we add the rules for loaders. In this example, we added a rule for Babel; we have basically a “test” key/property with a regular expression “/.m?js$/” that tells webpack that whenever there is a file with an “.mjs or .js” extension, the babel-loader should be applied to it. The “exclude” property, as its name suggests, tells webpack to skip files if they are node modules or bower components, and then finally the property “use” tells webpack the name of the loader to use, and sets some additional options as well. In this example, the “presets” is set to ‘@babel/preset-env’.
Do not worry if you are still wondering if you should know somehow about how these things are written or if you should memorize them. Be assured that nobody does. Every loader is different on its own; and your job is to know that you can search a specific loader, copy/past the configuration in your webpack.config.js, and play with it (if needed at all) by exploring the documentation and the available options you can use for that loader.
Now that we have installed babel-loader and we have configured the webpack.config.js file to use it, let’s write some ES6 and see if it will work as expected.
While we have set the “watch” option to true in the previous chapter to survey our files when updated, in this book I will continue to mention the “npm run build” command (for clarity) whenever we make a change to our source files.

“Let” keyword translated to “var,” and the interpolation to “contact” function
Everything’s working fine, our ES6 syntax was transformed to ES5, and so that was it for Babel. Super easy, right? Now you have the tool to use ES6 without worrying about a browser’s compatibility; happy coding!
Debugging Our JavaScript
Let’s move on and talk about something I find quite useful when debugging. As we have seen before, webpack wraps our code in modules and injects some extra code in order to make things work in the webpack way. While this does not affect our browsing experience, when we want to debug our code in the browser’s developer tools, if there is any error, it will show us application.js (which is the resulting bundled file) as the source of where the error has been triggered instead of the original source code file. That makes debugging hard and sometimes impossible!
Source Map
The solution? There is a file we can generate called source map , which as its name suggests, maps our original source code to the bundled source code generated by webpack, it will be really helpful for us, especially in our development phase.
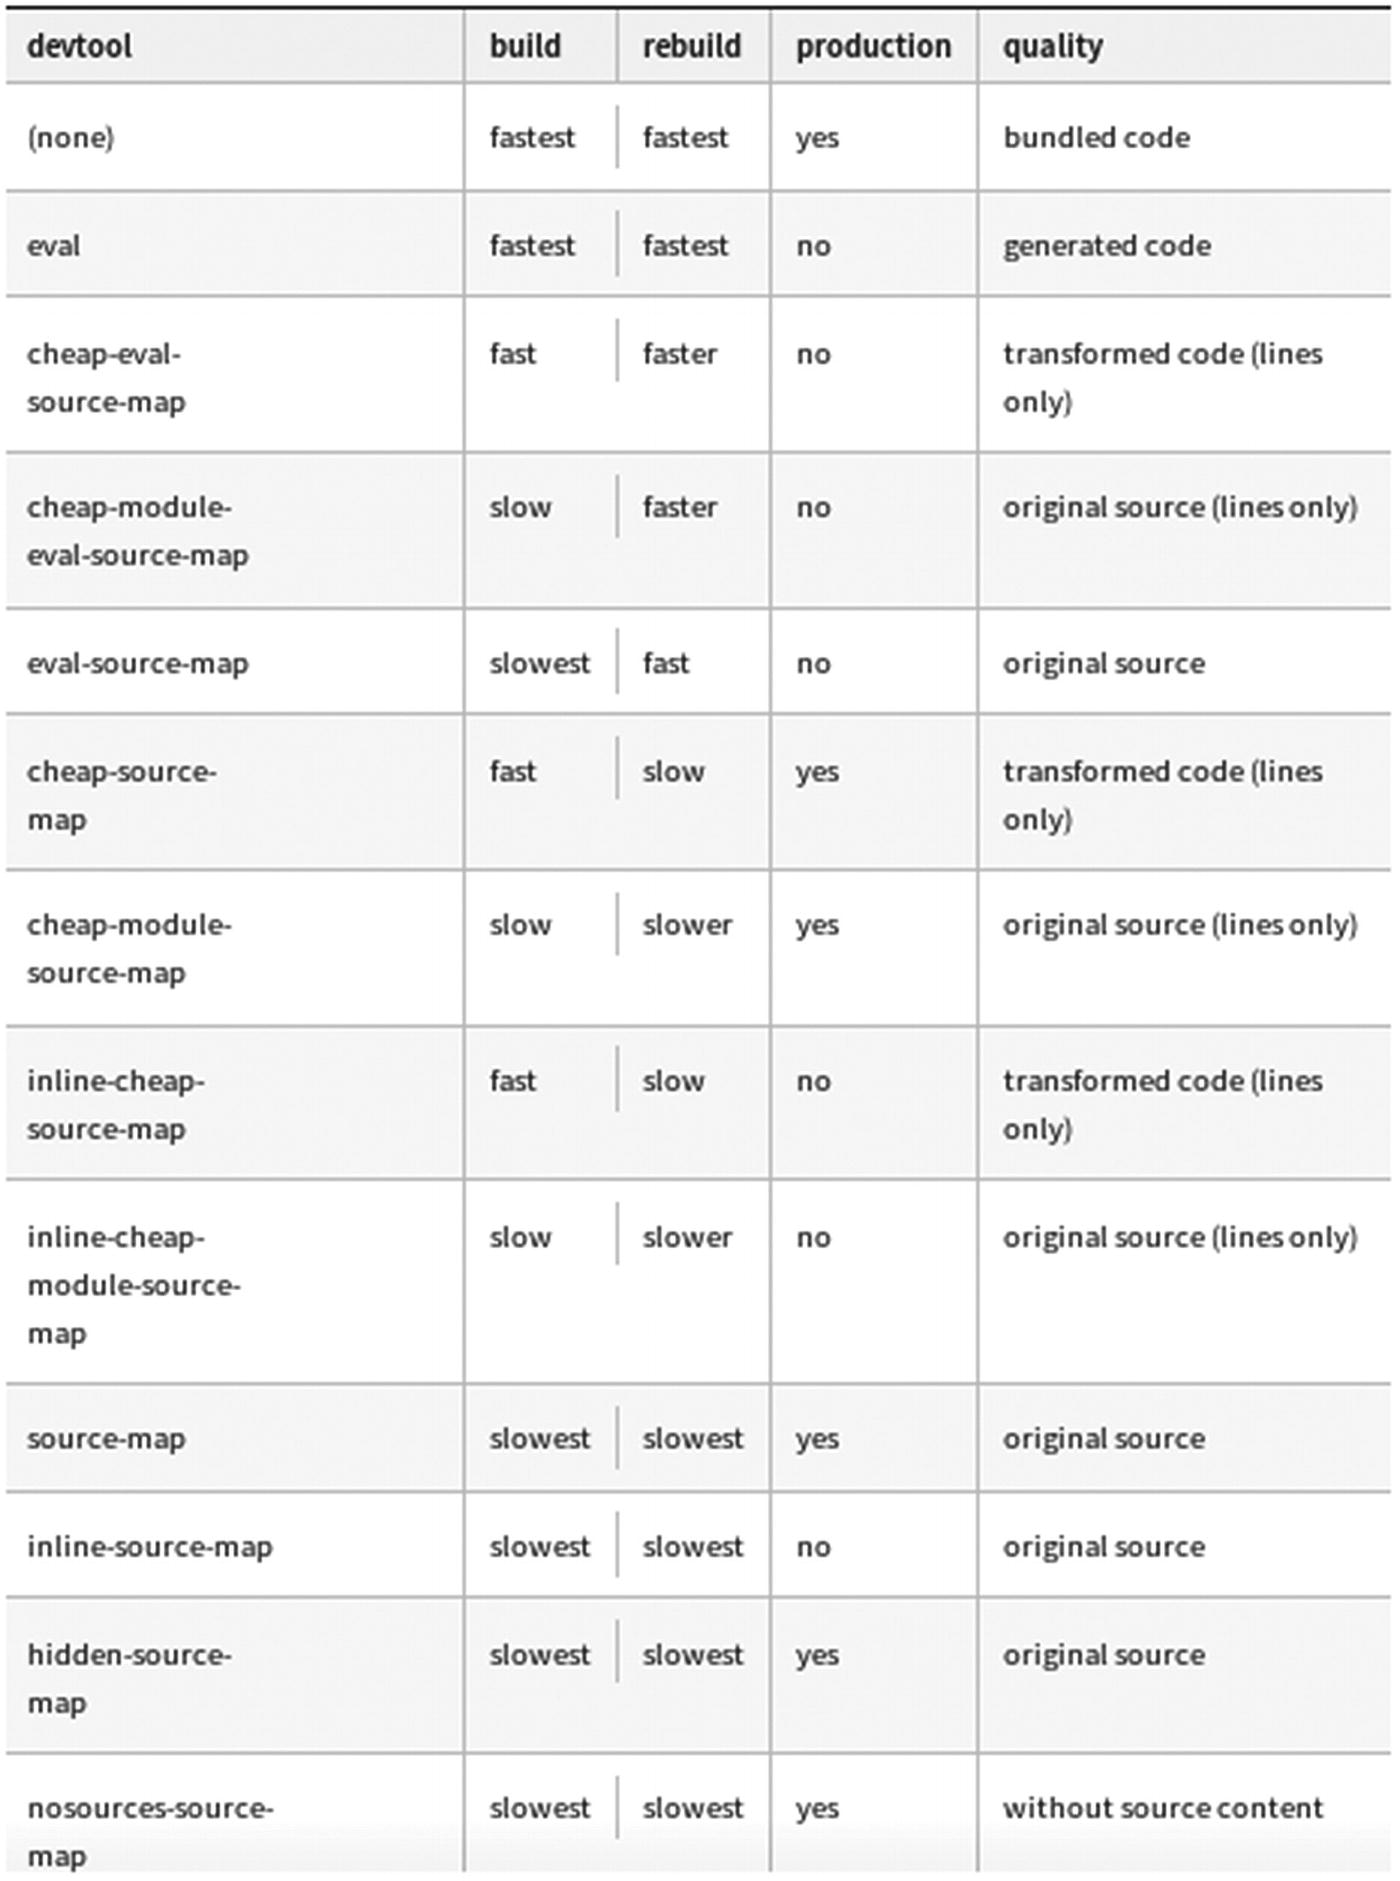
Available styles for source mapping
Some of these values are suited for development and some for production. For development you typically want fast Source Maps at the cost of bundle size, but for production you want separate Source Maps that are accurate and support minimizing.
Also note that you can use a plugin to generate the source map, but in our case we are going to just use the “devtool” with “cheap-module-eval-source-map” because it’s faster when it comes to rebuilding, and because we need it for our development only.
As mentioned in the webpack documentation, the “cheap-module-eval-source-map” will only show us the line number when debugging, which is enough for our case. But if you think you need other options, then just go ahead and pick whatever is suited for your use case.
Our full webpack.config.js file
Using console.log to debug in the browser

Opening the console in the browser
Now make sure you open the index.html in the browser (with the console opened) so we can see our message from sayHello() function logged (refresh the page if you are not seeing anything yet).

Source map points to the source of our message log
That’s the power of a source map: you can go ahead and click on it to see that it will take you to the right place, meaning the original source file, which is very handy when debugging or when errors appear in our console.
If we haven’t used the source map functionality, we would have our console lead us to application.js, which is the bundled file that contains all our JS together, and you may not know which source file the “logged” line is coming from. Now you see the power of a source map and how useful it can be during the development process.
Handling CSS and SASS Files
As I mentioned earlier, webpack is a bundling tool, not only for JavaScript (which is what it is by default) but also for other types of files as well, including CSS. In this section, we will see how we can bundle CSS and SASS files with webpack.
Importing CSS in JavaScript
I know what you are probably thinking right now: Why would we import our CSS from a JavaScript file at all? Wouldn't it be better to have the CSS managed separately? Is it a good idea to do that?
Indeed, importing CSS from a JavaScript file is quite useful in many situations. If you are importing a third-party library, for example, a calendar or a date picker that comes with its own styling (CSS files), it makes sense that you load both the JavaScript and CSS of that library at the same place, because it will make it independent from having the code in different locations, which makes the code maintenance a lot easier.

Webpack failed to process our css file
The error in Figure 3-5 shows up because webpack doesn’t recognize our CSS file. Webpack knows only how to deal with JavaScript, but if you need to import anything other than JavaScript, you have to configure webpack in order to be able to use it.
Loading CSS with CSS-Loader
As we have seen before with babel-loader, any file that will be detected as a “.js” file will be transpiled from ES6 to ES5. For the CSS we are going to use exactly the same technique, detecting any file with a “.css” extension and make it recognizable for webpack. That’s why we need a loader called “css-loader,” which we are going to use in the next step.
Adding “css-loader” to rules for webpack to handle css file
See that the error we had before disappeared, and webpack is now able to load CSS files. But that’s not all. We still need to make our imported CSS applied to the index.html page, so we are going to use another loader called “style-loader.”
Injecting CSS to Our HTML
What “style-loader” will do for us, is take the imported CSS in the index.js file and inject it into the DOM between <style></style> tags.
1- Webpack will use “css-loader” (that will transform our CSS into CommonJS)
2- The “style-loader” will be used secondly (which will inject that CSS in our page <head>)
Then open index.html file in the browser, and see that the magenta is applied.

CSS injected to our HTML file by webpack
But what if you would like to use some preprocessor like SASS? Well, in order to recognize SASS, webpack will need two loaders, which we will be exploring next.
Compiling SASS to CSS
Here we are testing if the file ends with “.scss” If so, we apply the “sass-loader” to it first. After that, “sass-loader” recognizes and compiles our SASS files, the “css-loader” will read that CSS turns it to CommonJS, and then our “style-loader” will inject it in the DOM dynamically via JavaScript.
Remember that the order of applying loaders is from right to left), so the “sass-loader” will be used first, which itself calls “node-sass” to compile SASS to CSS (without requiring us to call it explicitly).

Webpack is now recognizing scss files and the gradient color is applied
Now that we are able to use CSS and SASS in our project, let’s talk about browser compatibility and how we can apply vendor prefixes to our CSS using postcss-loader.
Prefixing CSS with Vendor Prefixes
Applying css-loader to our css/scss files
This loader cannot be used with CSS Modules out of the box due to the way css-loader processes file imports. To make them work properly, either add the css-loader’s importLoaders option, or use postcss-modules instead of css-loader.
Using importLoaders option to prevent issues with css-loader
All we did here is replace the string ‘css-loader’ by an object where we specify the name of the loader, and we set additional options. In this case, we have set importLoaders to 1.
Another thing we need to do in order to make “postcss-loader” work like we want is to use a plugin called “autoprefixer.” We have to alter our previous code slightly and change ‘postcss-loader’ from a string to an object where we can add some more options like specifying which browsers we should add prefixes to.
You can specify these browsers using browserlist property in the package.json file. But as we want to keep this option in our config file for this example, I am going to use another property called overrideBrowserslist that will work fine too.
Full rules for CSS and SCSS files
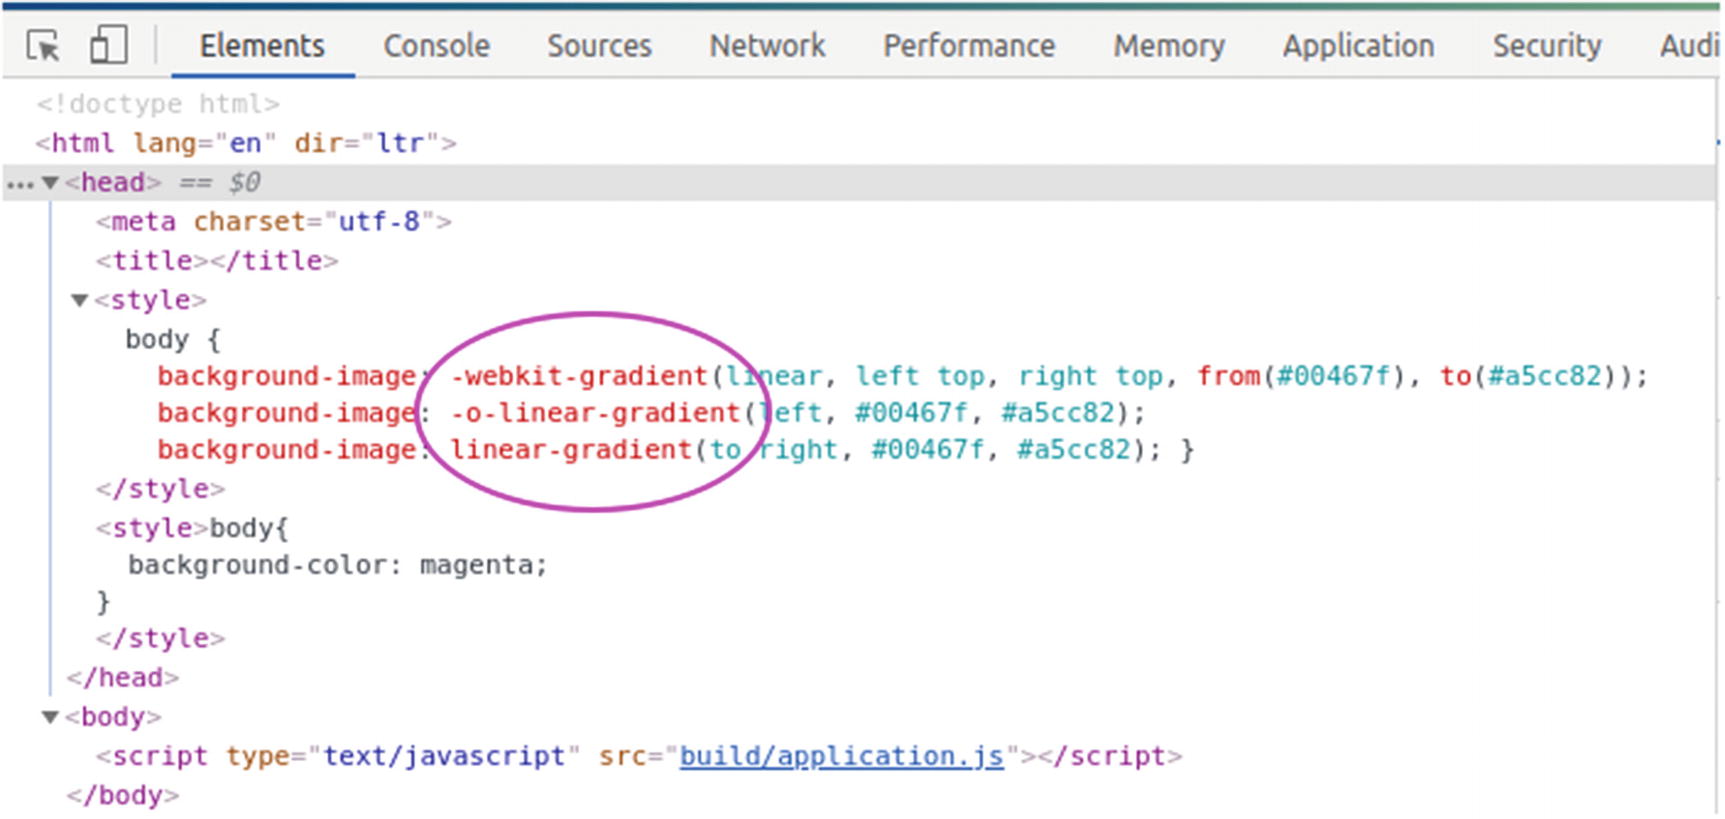
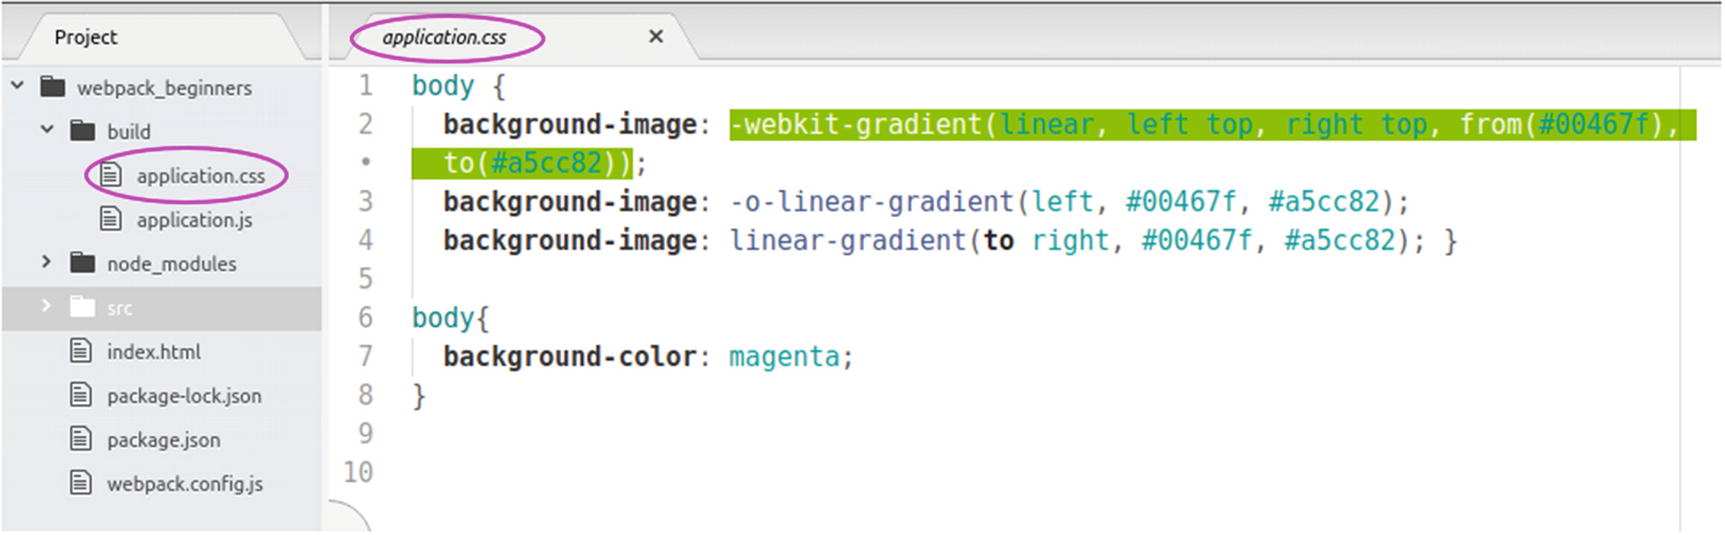
Vendor prefixes applied to “linear-gradient” by autoprefixer
In this case, two prefixes were added, one for webkit browsers and another one for opera. This can be really useful when dealing with CSS and can save you a considerable amount of time and effort.
Extract CSS to Its Own Separate File
Now that we have configured what we need for our CSS/SCSS to work, there is one thing though that is kind of annoying: our CSS is injected in the index.html page between <style></style> tags. That might be okay when we have just some few styles, but if we have a lot of CSS, then embedding it directly within our HTML page is not a good idea at all.
Here, we created a “plugins” property that takes a hash (of plugins) as value; we instantiated our MiniCssExtractPlugin and we passed a filename (application.css) to it as an argument.
Extracting our styles to a separate application.css file
Go to your browser and see that our page styling are back. Very cool!
Don’t forget to run the command “npm run build” to bundle. Then, go to the build folder. You’ll see that our application.js is minified, but our application.css is not. Webpack will do the minification only for JavaScript files; anything else, you need to add it and specify it by yourself.
Minifying the Extracted CSS
You may ask why we are using TerserJSPlugin explicitly above when we know it’s already used by default to minify our JavaScript?
Setting optimization.minimizer overrides the defaults provided by webpack, so make sure to also specify a JS minimizer.
Usage of the plugins needed to minify both JavaScript and CSS
Take a look at the build folder files (application.js and application.css). You will find that the code of both files is minified as expected.
Handling Images
One last thing I want to discuss before moving into the next chapter is using images in your CSS. For example, in case you are using the “background-image” property with an image as value, webpack won’t be able to recognize it. But, like other types of files, there are loaders that will make this possible, so in this section we will discuss how we can handle images with webpack.
Loading Image Files
I am going to use an image of a cat here from pixabay (which is a website full of free images), but you can grab any image you want. If you prefer to use the image I’m using, please refer to the source files accompanying this book.
Once you have the image in your computer, rename it to cat.jpg (for clarity) and then put it into the “src” folder.
As you might be expecting, webpack throws an error because we have no loader yet to process images, so you should get a long red message saying, “You may need an appropriate loader to handle this file type, currently no loaders are configured to process this file.”
Again, for the usage of any plugin or loader, you have to check the webpack documentation or its GitHub page. For “url-loader,” here is the direct link to the documentation: https://webpack.js.org/loaders/url-loader/.
Don’t run the command “npm run build” just yet, because we still need to specify a “name” option within the “url-loader” rule.
If the file size is equal or greater than the limit file-loader will be used (by default) and all query parameters are passed to it.
Note that we used a template: '[name].[hash:7].[ext]'. We will discuss what this is in the next chapter, but all you have to know for now is that the “url-loader” will take our file and save it (thanks to the file-loader) to the build folder by giving it a name composed of the original file name followed by a hash, followed by the original file’s extension and each part separated by a dot. So, in our case, given the template we specified above, “cat.jpg” will become something like “cat.1c28f43.jpg”.
Note that the hash “1c28f43” was resulted from the hash algorithm used by webpack based on the content of the file, so you’ll get a different hash whenever the image file changed.
If you did everything correctly, you will see no errors. But what just happened?
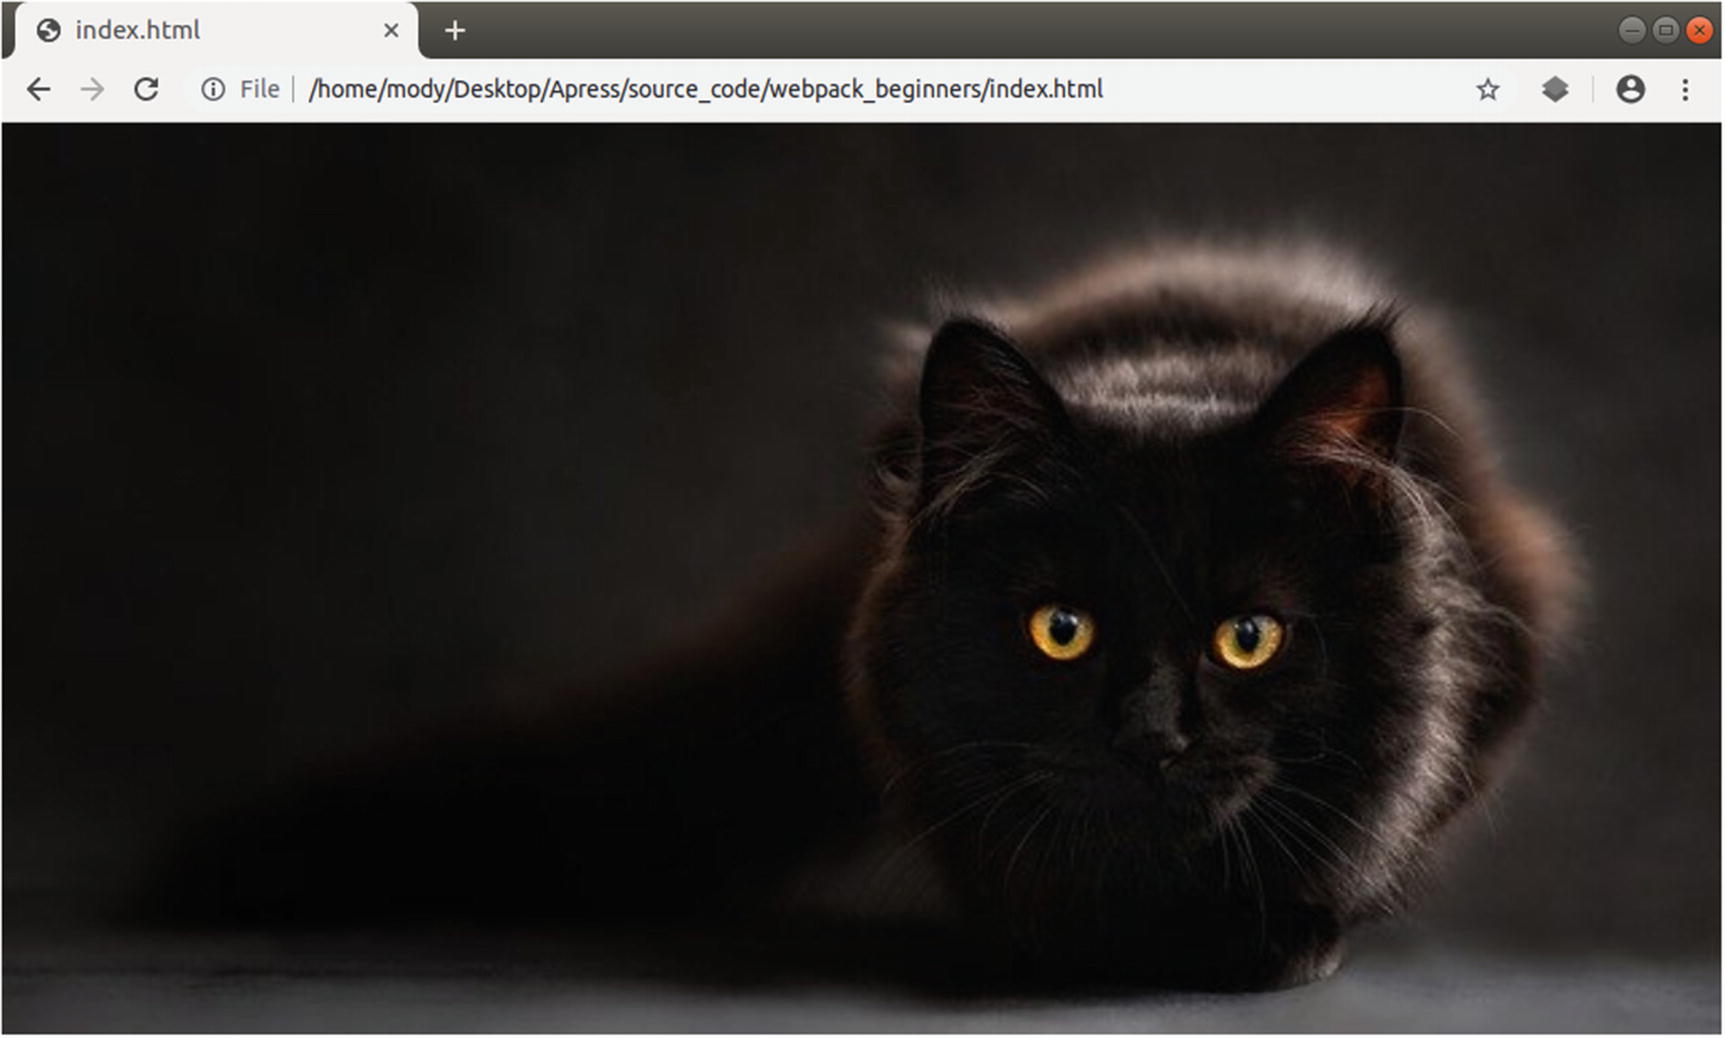
Cat image applied to the page background
If you don’t want the possibility to turn your “small-sized” images to inline base64 images, you can use “file-loader” directly instead of “url-loader,” and that would be fine too.
That’s all for this part, in the next step, we will see how we can reduce the size of our image in order to make it load fast by using Webpack Image Loader.
Compressing Images
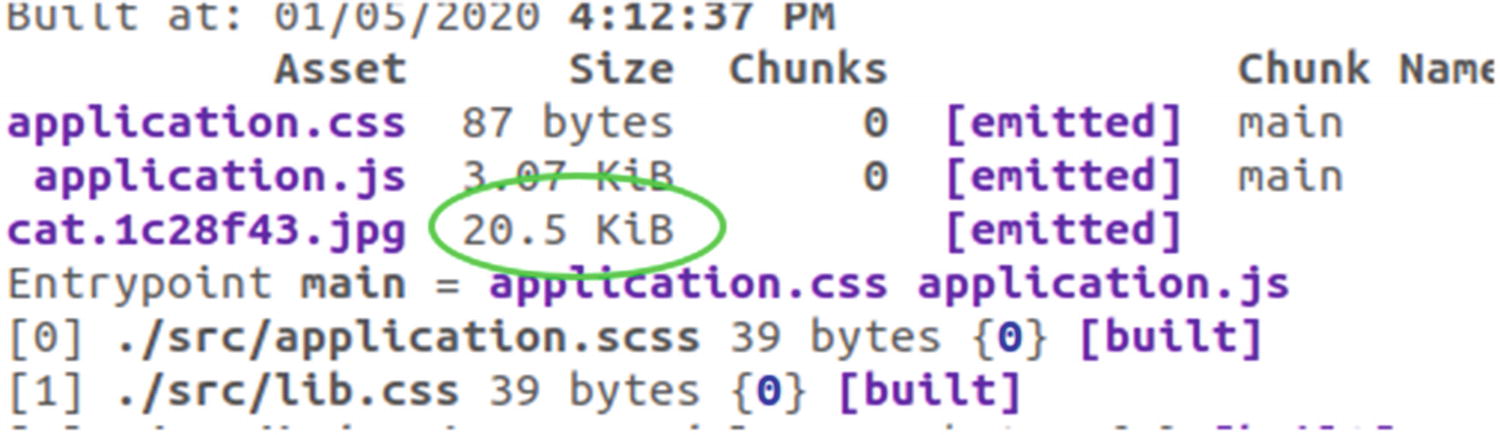
The size of bundled files after compilation

The new image size after applying ImageWebpackPlugin
See that our cat image size has decreased from 20.5 KiB to 12.5 KiB, which is super cool. Imagine what that can do for you when you have bigger images; it’s a very useful loader that I recommend using whenever possible when loading images.
Here, we just added some file extensions like woff2, eot, ttf etc, that it's possible to load with the file-loader, but you can basically add any other type of file, loaders are here for that purpose. At this point, you start to see the power of webpack, and how you can configure it to do a lot of helpful things for you. Once you grasp the syntax, you can even separate your configuration file to multiple files and include them as part of the main webpack.config.js if this later gets bigger (or in case you find it hard to read), but for the sake of simplicity in this book, we will stick with one file only.
Summary
This was a long chapter about loaders and plugins, but I wanted to provide you with as many examples as possible in order for you to understand the concept and to see the difference between both. We have seen how to use Babel in order to write modern JavaScript, and we have explored source mapping, which allows us to debug our code efficiently. We have also seen how to use CSS and SASS loaders to recognize and bundle our stylesheets, as well as images, without forgetting the minimization of our assets and the optimization of our images. The possibilities are endless with webpack as you can imagine; there are a lot of loaders and plugins out there that can do all kinds of things you may think of. At this point, I hope you are ready to explore more loaders and plugins on your own and use them in your future projects. With that said, it’s time to move on to a new chapter.