This chapter is mainly about dealing with caches and how we can automate the process of naming our files in a way that will ensure the browser fetches the latest version of resources when those resources are updated. We will see how to use substitutions, which are nothing more than placeholders for strings resolved at compilation time, in order to compose the names of our files and also to add the necessary hash string to it. Finally, we will see how to update those file names in our HTML dynamically whenever an asset is updated.
Output Files Naming
So far, we have used webpack to build one JavaScript file (application.js) that contains all our JavaScript, but there are many cases where you may want to have multiple files, and maybe you want to use each one on different pages of your web application.
Let’s, for example, assume you want to create one file “application.js” for your main app or global website and another one called “admin.js” for your admin area. How would you produce two separated files in this case?
First, in your “src” folder, create another file and name it “admin.js”. Let’s write a dummy function on how that would look:
function welcome(){
alert('Welcome to the admin area');
}
In our webpack.config.js, if you remember the “entry” option we have, it looks like this:
entry: "./src/index.js"
Webpack allows us to set more than one entry, by specifying an object where each property name will serve us later for composing output file names, and the value is the relative path to the source file for that entry.
Go ahead and try this by changing the “entry” option in your webpack.config.js as follows:
entry: {
application: "./src/index.js",
admin: "./src/admin.js"
}
The next step is to tell webpack to use the property names (application and admin) we have in our “entry” object (remember that these property names will serve us for composing the names of our generated files). Currently the “output” option is as follows:
output: {
filename: "application.js",
path: path.resolve(__dirname, 'build')
}
You notice that currently the generated filename is called “application.js.” In order to use the “entry” property names as the names for the output files, we need to replace the hard-coded “application.js” by something dynamic, what I refer to here is a substitution called [name]. Basically what you need to do is to replace “application” by the placeholder [name] like this:
output: {
filename: "[name].js",
path: path.resolve(__dirname, 'build')
}
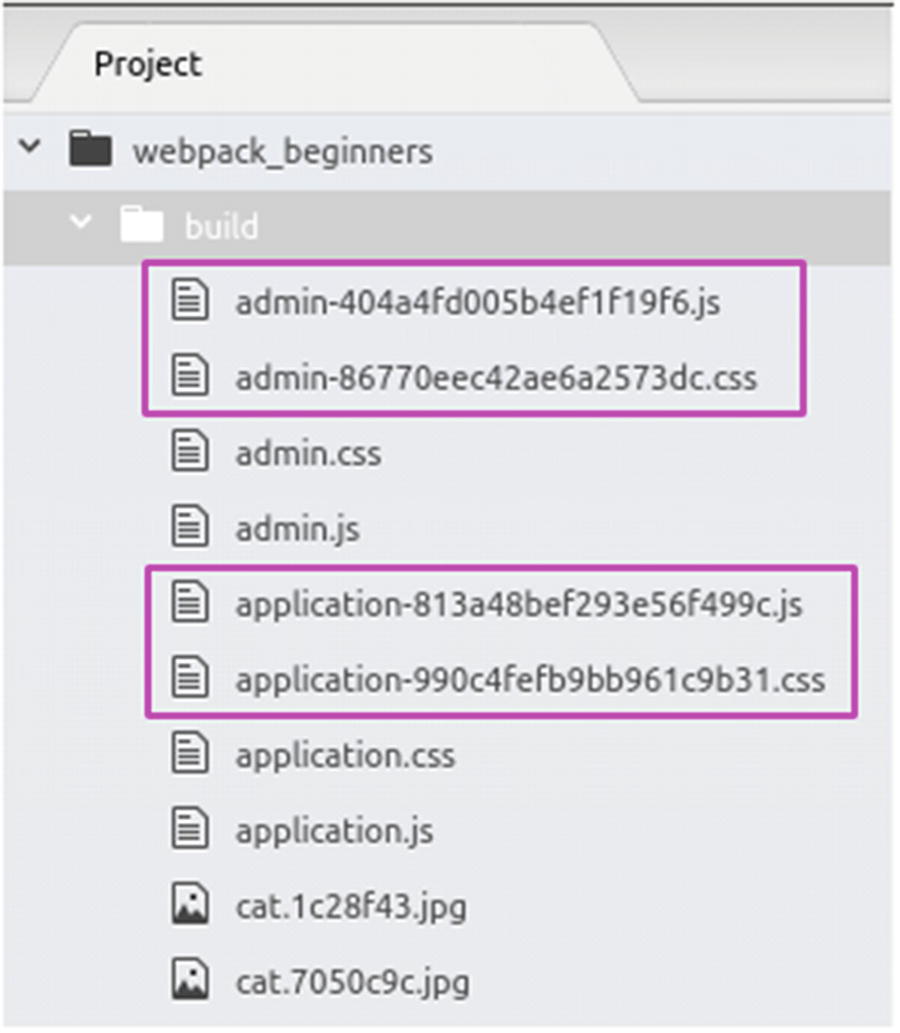
Webpack will use the “entry” property names and create your output files based on those names. If you bundle now using “npm run build,” you will see that your build folder will contain two JavaScript files: “application.js” and “admin.js” as shown in Figure 4-1.
Figure 4-1
The configured entry property names “admin” and “application” turned to JS files with same name due to the [name] substitution specified in the output setting
Equally, we can do the same for our CSS. So far, we have the “MiniCssExtractPlugin” in our configuration file extracting the CSS to a file called “application.css” as follows:
plugins: [
new MiniCssExtractPlugin({
filename: "application.css"
})
]
If you remember, the “index.js” file has the following lines at the top:
import application from "./application.scss"
import lib from "./lib.css"
// ...
That’s fine as far as we have our CSS imported from that file only. Let’s try to move the line containing the importation of “lib.css” from index.js to the first line of “admin.js” and then run:
$ npm run build
Take a look at your terminal and see what happened. As shown in Figure 4-2, there is an error about a conflict that resulted from multiple chunks trying to emit assets to the same file name, application.css.
Figure 4-2
Error while bundling because of multiple chunks trying to be bundled in one CSS file
What this error is basically saying is that we are importing CSS in more than one JavaScript file and outputting them in one CSS file, and that’s why we need to use the same technique we used with our JS files, which is [name] placeholder. All you need to do is replace “application.css” in the MiniCssExtractPlugin filename option by [name].css as follows:
plugins: [
new MiniCssExtractPlugin({
filename: "[name].css"
})
]
Let’s check again by calling webpack:
$ npm run build
Now if you check the “build” folder, you will see a new generated css file called “admin.css”. Since we imported “lib.css” in “admin.js,” you see that it was extracted to a separate “admin.css” file, while the “application.scss” we imported in “application.js” was extracted to “application.css” file. The output files are shown in Figure 4-3.
Figure 4-3
A separate admin.css created after importing “lib.css” in admin.js
If you are wondering why the output CSS file name is “admin.css” and not “lib.css,” that’s because the [name] substitution is based on the entry’s property name corresponding to the file where that CSS was imported. That means for both our entry properties here:
entry: {
application: "./src/index.js",
admin: "./src/admin.js"
}
We have an equivalent CSS file whose name corresponds to each one of the property names (“application” and “admin”) so all our imported CSS in application.js will be in application.css, and all our imported CSS in admin.js will be in admin.css.
Now that we have seen the notion of “substitution,” let’s talk about something really useful when it comes to our assets in production: cache busting.
Adding Hash Content
Any node on the network (such as reverse proxy caches, CDNs, gateway caches, web proxy caches, etc.) between the origin server up to and including your browser can potentially cache resources to reduce server load, network traffic, and latency.
Resources that change infrequently like JavaScript and CSS files are among those that can potentially benefit the most.
For instance, the origin web server can be configured to send a header telling caches to save a copy of those resources for one year. That’s a whole year of resources being served by a web browser’s private cache or intermediate shared caches and not going all the way to the origin server.
But what happens if you need to fix a bug in your JavaScript code or need to update the layout of your webpage through the CSS file before they have expired?
To solve this issue, web developers have come up with a technique for circumventing the cache (a.k.a. cache busting), which consists of adding a unique resource version identifier in such a way that the browser asks for a new resource, instead of the old cached one.
There are basically three methods for resource name versioning:
File name versioning (example: application-ers4e54aem1v8e.js)
We will focus here on filename versioning. This is what most websites do to bust caches; we can use it simply by adding a hash string to the name of our file.
Webpack has a substitution for that named [contenthash] that can be used in your configuration file. Let’s first add it to our output:
output: {
filename: "[name]-[contenthash].js",
path: path.resolve(__dirname, 'build')
}
Then to our MiniCssExtractPlugin as well:
plugins: [
new MiniCssExtractPlugin({
filename: "[name]-[contenthash].css"
})
]
Note that we have used a dash character (-) between the substitutions for name and content hash. You will find many developers using a dot (.) instead; that’s fine too – use whatever you like.
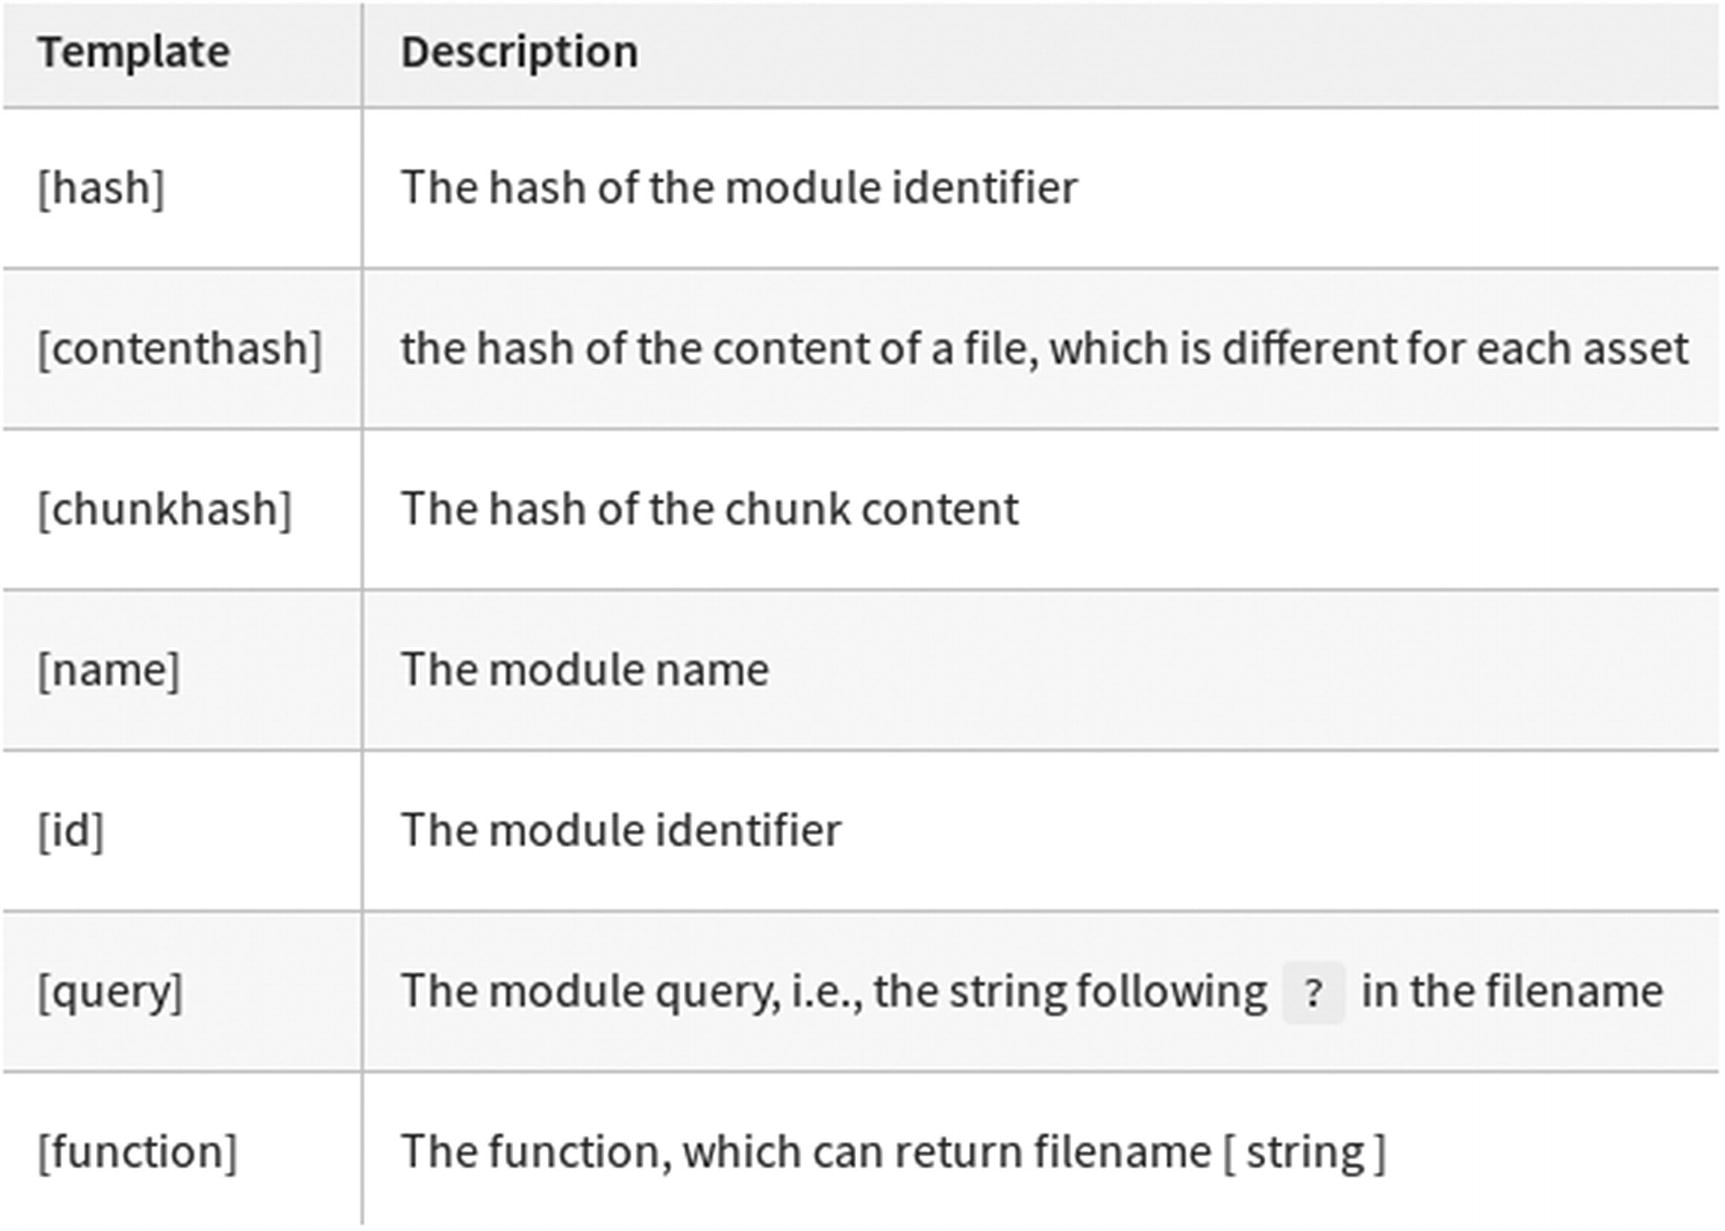
There are many other placeholders or substitutions that you can use besides [name] and [contenthash] that are shown in Figure 4-4.
Note that substitutions may have different meanings to different parts of webpack such as loaders or plugins.
For instance, back in Chapter 3, we used the substitution [hash:7] in the configuration for url-loader. In that loader, hash and contenthash are both based on calculations over the contents of the file.
It’s time to use our terminal and re-bundle using npm run build. Let’s see what we will get this time. Figure 4-5 shows the generated files after adding the contenthash substitution.
Figure 4-5
The contenthash added to our JavaScript and CSS files
As you see, webpack created our JavaScript and CSS files but with a content hash appended to the name of each file. Your content hash might be different than mine, but the idea here is to have that hash in the file name to circumvent caches when the resource gets updated.
What will happen next is if you add or change the code in one of your files, webpack will generate a file with a different content hash. As an example, we will open our admin.js file (in the “src” folder) and add some code to it. Let’s add another function like the following:
function calculate(a, b){
console.log(a+b);
}
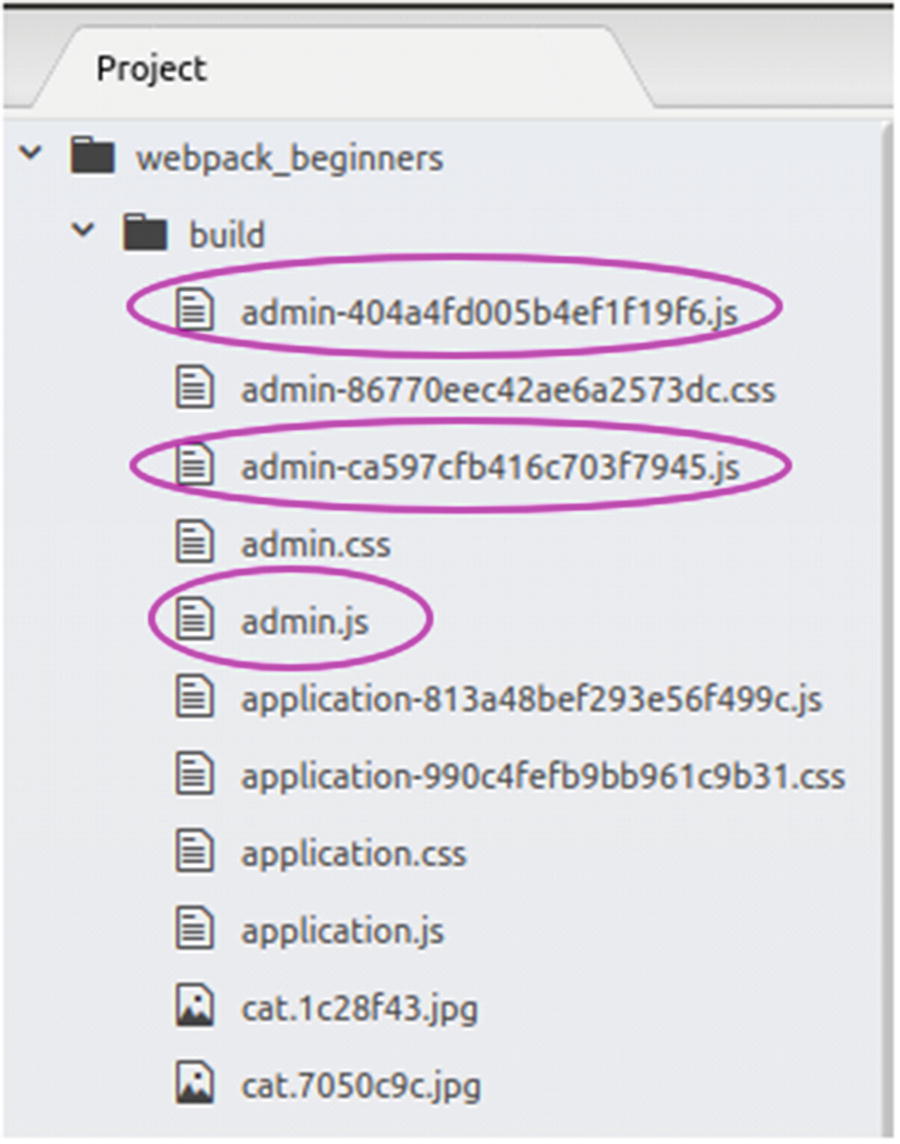
Use the command “npm run build” to bundle our files. Then see what will happen inside our build folder as shown in Figure 4-6.
Figure 4-6
Multiple versions of the admin*.js file. The first one still without a hash and the following two revisions
In addition to the original admin.js file (we got before we started using [contenthash] placeholder) and the other admin-*.js that has a contenthash, webpack just created a third admin-*.js file with a different contenthash, and that’s because the content of our src/admin.js file has changed for the second time.
Webpack creates a file name containing a new hash every time the content of a file gets updated in order to bust the caching of the old file by telling caches it should fetch the new updated file and cache that instead. The same applies to CSS files.
Cleaning the Build Directory
Like we have seen, whenever something changes in one of our source files, webpack will create a new file of it with a different contenthash without deleting the old one. For example, in the case of admin.js we have three variations:
admin.js
admin-First-Generated-Hash-Substitution.js
admin-Second-Generated-Hash-Substitution .js
What we want to have instead is a single version of the bundled file every time the contents changed. There is a way to do this using a plugin called “clean-webpack-plugin,” which is a plugin that will clean our build folder every time we generate a new build. This way, you will only have the latest generated files. As you may have guessed, we have to install it first before using it:
$ npm install --save-dev clean-webpack-plugin
Once done, as we used to do with plugins, we need to require it in the webpack.config.js file:
I know, we should maybe add a link to admin.css and admin.js as well, but this is not what I want to draw your attention to. What I’m trying to explain is that we will need to add the name (plus the content hash) of our JavaScript and CSS files, and update them every time the hash content changes for that file, but who wants to do a repetitive task like this? Let’s jump in to the next section and see if we can do it in a more efficient way.
Manifest Plugin
As we mentioned before, every time the content hash of our JavaScript or CSS files change, we need to go and update our index.html to point to the right file, but we want a more automatic way to do it. We will see one way of doing it with a plugin called “webpack-manifest-plugin,” but we won’t go deep into the usage inside our HTML (all we need to understand is the main idea). Then in the next section, we will see an alternative way. For now, let’s install our plugin:
Finally use it by adding an instance of WebpackManifestPlugin to the array of your plugins:
plugins: [
new WebpackManifestPlugin(),
// ...
]
Once it’s done, go to your terminal and run the build command, then see what happened.
$ npm run build
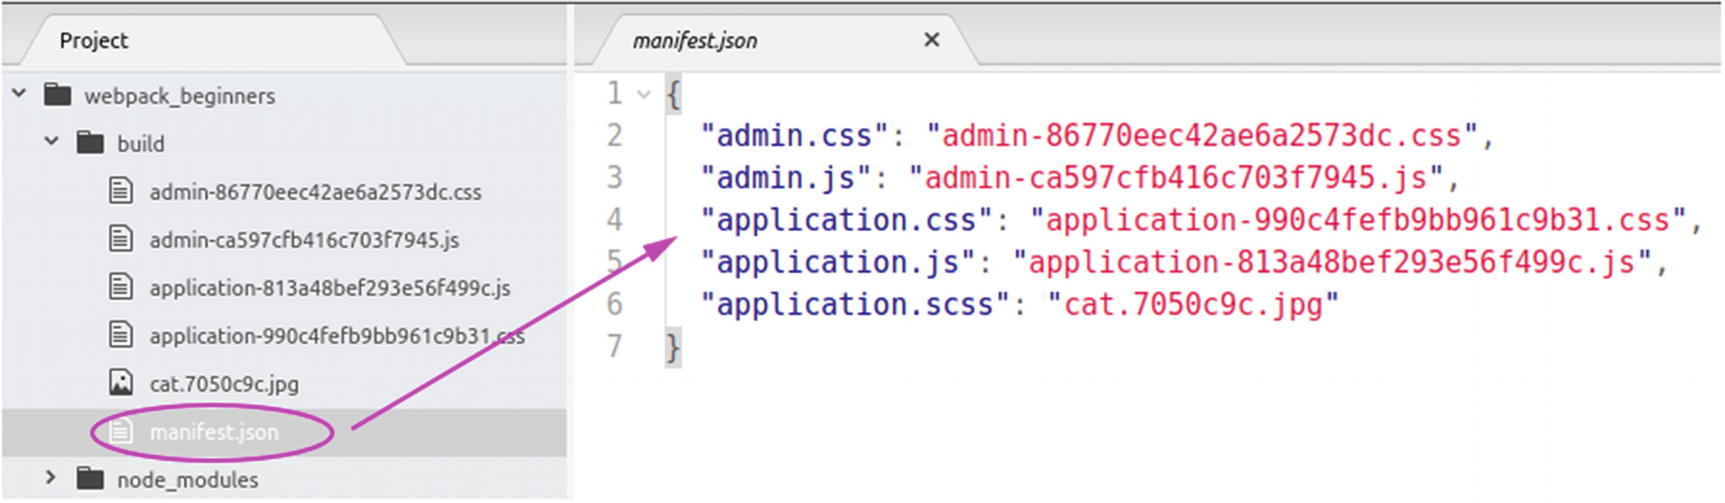
A new JSON file called “manifest.json” was added to our “build” folder like you see in Figure 4-8.
Figure 4-8
A “manifest.json” file generated that contains every file name with a simplified key
What you can do now with that file is to access it dynamically using a server-side language (like PHP or Ruby or Node, etc.). Then, instead of hard-coding the name of the static files (JS and CSS) like we did before, you can read from that file and output the equivalent file name (the one with a content hash string), or you can even imagine that you have a helper method that reads from the manifest.json file and returns the hashed version of the file name that you can use in your HTML layout as follows:
Now that we have an idea about what the manifes.json file is, we still don’t want to use it here for simplicity purposes (no need to add a server-side script or a framework stack just to demonstrate how to parse the manifest.json file and call it from our HTML). So the solution for now is to copy the name (that contains the hash string) of our desired JS/CSS file from the manifest.json and paste it manually in index.html as the source of the script or link tag.
Alternative to Manifest
But wait, are we going to hard-code these links by hand and update them every single time the hash content of a file changes?
The answer is maybe yes, if you’re not lazy. I won’t do it myself anyway, and I would prefer to let webpack do that instead by creating an output index.html for us. Let’s explore this alternative.
Instead of using the manifest.json file, there is a second option that we can use with the help of a plugin called htmlWebpackPlugin. The webpack documentation (https://webpack.js.org/plugins/html-webpack-plugin/) states that:
The HtmlWebpackPlugin simplifies creation of HTML files to serve your webpack bundles. This is especially useful for webpack bundles that include a hash in the filename which changes every compilation.
Since we have JavaScript and CSS files with a hash that changes on compilation whenever we update our source files, this plugin seems to be exactly what we are looking for. Let’s install:
$ npm install --save-dev html-webpack-plugin
The next step is to require it in the webpack.config.js file:
Then to use it, all we have to do is add it to the plugins array as was done with the previous plugins:
plugins: [
new HtmlWebpackPlugin(),
// ...
]
Now let’s run the command npm run build and check our build folder. Do you see something added in there? Yep! A new file “index.html” was generated and added to our “build” folder. It contains HTML code generated by webpack with a reference to the compiled CSS files as well as our JavaScript files (both application and admin), and you can see that the content hash we saw before was added as well. It is important to notice that the file under build folder (build/index.html) has no relation with the previously existing index.html file at the root of our project folder.
With that said, instead of opening the index.html located under root of our project folder, we will open the one created for us by webpack, which is located in the “build” folder. Try it and make sure everything is working as expected.
However, you still need one more thing to make this work perfectly. So far, Webpack created an index.html with nothing but a basic HTML code structure containing references to our bundled CSS and JS files, but if you have content (text or paragraphs or anything else) that you want to show on your page, there is no way until you tell webpack about it.
Using a custom template file, we will tell webpack to use an HTML skeleton that will be bundled into the index.html result file, and webpack will take care of it by adding the necessary html tags pointing to our stylesheets and JavaScript files so we don’t need to worry about the name of these files every time the hash content changes.
Let’s create a file “template.html” (you can name it whatever you like) under our “src” folder, and let’s add some HTML content to it as shown in Listing 4-1.
<!DOCTYPE html>
<html lang="en" dir="ltr">
<head>
<meta charset="utf-8">
<title>My custom template</title>
</head>
<body>
<p style="background:white;">
Lorem ipsum dolor sit amet, consectetur adipisicing elit, sed do eiusmod tempor incididunt ut labore et dolore magna aliqua. Ut enim a d minim veniam, quis nostrud exercitation ullamco laboris nisi ut aliq uip ex ea commodo consequat. Duis aute irure dolor in reprehenderit in voluptate velit esse cillum dolore eu fugiat nulla pariatur. Excepteur sint occaecat cupidatat non proident, sunt in culpa qui officia dese runt mollit anim id est laborum.
</p>
</body>
</html>
Listing 4-1
Creating a template for Webpack Html Plugin
Now we need to tell our HTMLWebpackPlugin to use that template to generate the index.html output. In the webpack.config.js file, we just need to add a “template” option to our plugin like this:
plugins: [
new HtmlWebpackPlugin({
template: './src/template.html'
}),
// ...
]
It’s time to run webpack to get our bundle updated:
$ npm run build
Once completed, open index.html (remember: the one located under the build folder) in your browser, you can see that our “lorem ipsum” paragraph is there, and that our stylesheet and JavaScript tags were added as well as shown in Figure 4-9.
Figure 4-9
The file build/index.html source after applying a template to HtmlWebpackPlugin
As you can see, we no longer have to change the names of our JavaScript and CSS files (manually) whenever the content hash changes. By using HtmlWebpackPlugin, Webpack will take care of injecting the right tags with the corresponding file name for each resource. To ensure this is working correctly, make sure to open build/index.html in your browser instead of the index.html at the root of the project folder.
Finally, before we move on to the next chapter, and in order to avoid any confusion, I would suggest that you delete the old index.html (in the root folder) because we will use the build/index.html generated by HtmlWebpackPlugin.
Summary
The benefit you get from using cache busting in any web application is significant, so it's one of the mandatory things you should consider when bundling your assets. We have explored many topics in this chapter, starting from naming and substituting our files names to cleaning the “build” folder, then ending by dynamically injecting the right (generated) files names to our HTML. In the next chapter, we will talk about something interesting when learning webpack: resolving folders. I hope you are still excited to learn more cool stuff. Let’s jump in.