© Mohamed Bouzid 2020
M. BouzidWebpack for Beginnershttps://doi.org/10.1007/978-1-4842-5896-5_5

5. Resolving Folders

Mohamed Bouzid1 
(1)
NA, Morocco
 

After seeing how to prepare our file for caching and exploring the necessary plugins for that purpose, it’s time to tackle a new chapter dedicated to folders: how to replace their path by aliases and how to resolve modules from them. It might seem like I’m saying something strange here, but you will understand what I mean in few minutes.

Organizing Our Files

Before going straight to the main subject, let’s do some organization. So far, all our source code was placed in one folder called “src,” and all our compiled files go to the “build” folder. What we want to do here is organize our files better, and separate our JavaScript from our CSS from our images, so let’s do that.
  1. 1)

    We are going to create three folders in our “src” folder: one called “javascripts,” one called “stylesheets,” and one called “images.”

     
  2. 2)

    We are going to move our JavaScript files to the “javascripts” folder, our CSS/SCSS files to the “stylesheets” folder, and finally our image files to the “images” folder. You can see the new structure in Figure 5-1.

     
../images/494641_1_En_5_Chapter/494641_1_En_5_Fig1_HTML.jpg
Figure 5-1

Grouping files with same extension in organized folders

Now that we have a new structure for our source files, we need to update our webpack.config.js in order to reflect that change. In the “entry” option, we need to add the “javascripts” folder to the path of our files:
entry: {
  application: "./src/javascripts/index.js",
  admin: "./src/javascripts/admin.js"
}
Let’s call webpack to compile our files:
$ npm run build
Now if you check the terminal, you will see an error. Figure 5-2 shows the output of my terminal after calling the build command.
../images/494641_1_En_5_Chapter/494641_1_En_5_Fig2_HTML.jpg
Figure 5-2

Webpack can’t resolve our CSS files after changing their location

As you can see, the error says, “Can’t resolve ‘./application.scss’... and ‘./lib.css’”; this makes sense because in our index.js file, we have this line:
import application from "./application.scss"
Which is no longer pointing to the right location, so let’s go ahead and change it as follows:
import application from "../stylesheets/application.scss"
Same thing for lib.css in “admin.js.” Here is the line after modification:
import lib from "../stylesheets/lib.css"
To prevent another error, adjust the path to “cat.jpg” in the “application.scss” file as well, for the following line:
background-image: url('cat.jpg');
The correct path to the image should be:
background-image: url('../images/cat.jpg');

Make sense? I hope so. Now if we compile our files using the “npm run build, we will get everything working correctly.

Aliases

The structure we used here is simple and recommended in most projects, but you might want to have a complex structure depending on the project you are working on. In our example, it was easy to refer to our CSS/SCSS file from our JS file; for example:
import application from "../stylesheets/application.scss."
But depending on the complexity of the nesting of your folders, you may end up using something like this:
import application from "../../../stylesheets/application.scss"

This is tedious to write, but of course I’m not encouraging you to use a complex folder structure in your project. In some situations, you may face things like that or maybe you are working on a legacy project that is structured in a horrible way. This is why I want to talk about something useful for these scenarios, which we call an “Alias” or “Aliases.”

Aliases are useful when importing or requiring modules or files, so instead of using the above complex path, we can instead add a “resolve.alias” to our webpack.config.js, which points to our “stylesheets” folder:
module.exports = {
  //...
  resolve: {
    alias: {
      CssFolder: path.resolve(__dirname, 'src/stylesheets/')
    }
  }
}
Then when we import a CSS/SCSS file, i.e: application.scss, we can simply use:
import application from "CssFolder/application.scss"
Now, run the webpack command and make sure the output in the terminal is all green:
$ npm run build

As expected, everything is working perfectly. The only difference is that now the path is cleaner.

Note

Just for the sake of remembering, whenever you make a change to the configuration file, you should rerun the webpack (build) command, even if you are using the watch mode.

Aliases can be very handy for many situations. It’s something you want to think about whenever you face a situation where you group your files in different subfolders or you just have some relative paths that look awful to type.

Resolving Modules

While we are talking about the webpack “Alias” resolver, I want to mention another helpful resolver, which is “resolve.modules.” What this does is tell webpack what directories it should be looking in when resolving modules.

By default, when doing something like importing a third-party library in one of our JavaScript files, for example, when importing jQuery we do:
import $ from 'jquery'
Webpack will look into the “node_modules” directory, which is equivalent to the resolving “node_modules” folder as seen below:
module.exports = {
  //...
 resolve: {
    alias: {
      CssFolder: path.resolve(__dirname, 'src/stylesheets/')
    },
    modules: ['node_modules']
  }
};
If we want to tell webpack to look in another directory before going to “node_modules” (let’s imagine we have downloaded some JavaScript libraries manually and we have a folder called “downloaded_libs”), in this case we are going to specify that folder before the “node_modules” folder in the resolve.modules option.
module.exports = {
  // ...
 resolve: {
    alias: {
      CssFolder: path.resolve(__dirname, 'src/stylesheets/')
    },
    modules: [path.resolve(__dirname, 'src/downloaded_libs'), 'node_modules']
  },
};

Now webpack will look in “downloaded_libs” folder first, then if the module we are looking for doesn’t exist there, it will continue the search in the “node_modules” folder, which is the “default.”

To demonstrate this, let’s create a folder named “downloaded_libs” under the “src” folder. Then, let’s download the jQuery library file from https://jquery.com/download/ and place it into the folder we have just created under the name of “jquery.js”. Figure 5-3 shows the folder we created with the downloaded jquery file.
../images/494641_1_En_5_Chapter/494641_1_En_5_Fig3_HTML.jpg
Figure 5-3

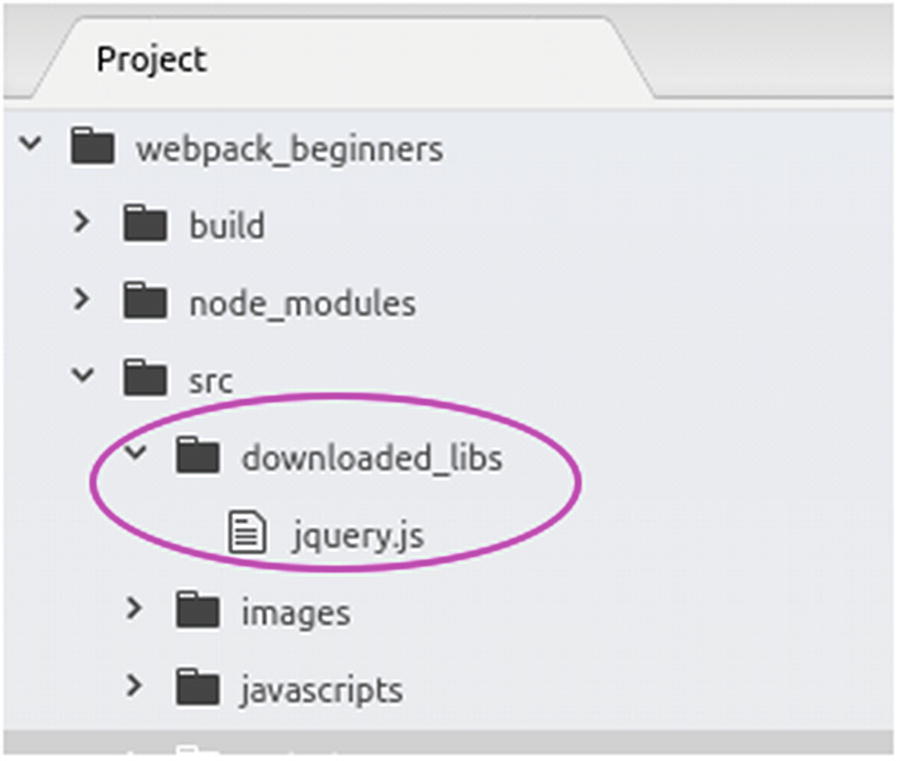
Creation of a separate folder to contain our third-party library (jquery.js)

In our index.js file, let’s import jQuery and use it to see if it’s working. First, import it and always make sure that your imports are at the top of the file:
import application from "CssFolder/application.scss"
import { sayHello } from './greeting.js';
import $ from 'jquery';

You can use whatever alias you want. I’m using a dollar ($) sign here in order to refer to the jQuery object, because that’s the convention for jQuery, but it’s up to you if you prefer to use jQuery or jq or something else. Just make sure to call the proper alias; for example, instead of using $('.selector'), you will have to use your custom alias, like jQuery('.selector') or jq('.selector'), etc.

Note that we did not use a relative path (i.e., ‘../downloaded_libs/jquery’) because as we discussed before, webpack is now able to look for the “downloaded_libs” folder automatically when importing modules.

Finally, to make sure the jQuery library was imported and it’s working, let’s add the following line to the end of index.js:
$('body').append('<div style="background:yellow;padding:10px;">Hello jQuery!</div>');
What this line does is simply add a yellow styled DIV with a text “Hello jQuery!” to our page body. Open the terminal and call the webpack command:
$ npm run build
Go to your browser and see what index.html file looks like. Figure 5-4 shows the “hello jquery!” message added by jquery with the yellow background.
../images/494641_1_En_5_Chapter/494641_1_En_5_Fig4_HTML.jpg
Figure 5-4

Appending text via jquery using “resolve module” option

You can see that it’s possible for you to add a custom folder like we did and copy your third-party JavaScript libraries into it, then let webpack figure that out for you using the “resolve.modules” option. However you will miss the power of your package manager (npm or yarn), which you would prefer to use instead of downloading manually your libraries.

I have just shown you this option to be aware of it in case you want to use it for specific cases. But I would still recommend using npm or yarn to download your JavaScript libraries and import them in your code, we will talk more about this subject in the last chapter of this book.

If you have noticed a warning in your terminal about the bundled application-∗.js file has exceeded the size limit as shown in Figure 5-5, don’t worry. It’s because the jQuery library was embedded into that file, which makes it obviously bigger.
../images/494641_1_En_5_Chapter/494641_1_En_5_Fig5_HTML.jpg
Figure 5-5

Webpack warning about our application.js size limit

For now, ignore this warning, it’s really not that important, and not all warnings are bad, including this one. We will discuss more about this later.

Summary

In this chapter, we have organized our files, seen the usage of aliases, and shown how to resolve modules from a custom folder. You can see now how flexible webpack is, and how you can make things organized in the way you want or prefer to. I hope in this chapter you learned something that will serve you in the future, as I’m sure there are many cases where you will need to refer back to the techniques described here. In the next chapter, we will explore Webpack Dev Server, which is a lightweight server that comes with webpack out of the box in order to make your development work easier.

..................Content has been hidden....................

You can't read the all page of ebook, please click here login for view all page.
Reset
3.140.198.43