Installing third-party libraries is confusing for a lot of beginners, especially when they don’t know anything about webpack. But it isn’t hard once you understand how to do it. In this chapter, we will see how to install some of the most common JavaScript libraries. Along the way, we will explore some tips and tricks you can use to install any other library you want beyond the listed examples. Finally, we will see how to use the lazy loading method to import libraries on demand in order to optimize our application.
Welcome Isolation, Goodbye Global Variables
We have seen that in order to separate our code in different files, we used the export/import syntax (to export it from one file, and import it in another one). This allows us to have a more organized code in what we call “modules” in JavaScript.
Also, for the sake of remembering, we have seen that when importing a third-party library, for example, “jQuery,” all we have to do is:
import $ from "jquery"
Importing “jquery” like above (without specifying any path to it) is how we tell webpack to find jquery.js file in the node_modules folder, which is the default folder webpack uses to resolve the third-party libraries we are importing in our JavaScript files. However, specifying a relative path to a library is totally possible, whether located in node_modules itself or in another folder; but for libraries we install via NPM or Yarn, the syntax above is the way to go.
If you remember what we did previously in Chapter 5 when we talked about resolving folders, in order to use jQuery ... we downloaded it manually from the official website to a folder we named “downloaded_libs,” and then we told webpack to resolve all modules in that folder as follows:
In this case, if we import jQuery in any file using (import $ from "jquery"), webpack will try to find it first in the “downloaded_libs” folder before moving to node_modules. This just shows you another possibility in case you have a custom folder with certain libraries that you want to resolve, but you don’t want to install via a package manager! Now that we know some different ways to import a third-party library like jQuery, let’s see how to install it.
Downloading JavaScript libraries manually is what developers used to do for a long time. In fact, many still do it that way, but time has evolved and JavaScript package managers such as NPM and Yarn (an NPM alternative created by Facebook) weren’t invented for no reason, and the benefits you get from using these tools are much better compared to the first method. All you have to do is to open your terminal, make sure you are in the root of your project folder, then run the following NPM command:
$ npm install jquery
Or using Yarn, you can just do:
$ yarn add jquery
Don’t forget to remove jquery.js file from “downloaded_libs” folder because we won’t need it anymore. We will use a JavaScript package manager in order to download all the libraries we need like we just did above. In my case, I will continue to use NPM throughout the examples.
Once the installation finishes, let’s open up our node_modules folder and try to locate the jquery file on it. Figure 7-1 shows the jquery folder under node_modules.
Figure 7-1
jQuery installed under node_modules folder
But do you remember how we imported jQuery before in our index.js file? In case you don’t, it was as follows:
import $ from "jquery"
If you’re like me, I used to wonder how the above line knows about jquery file location without the need to specify the exact path to it?
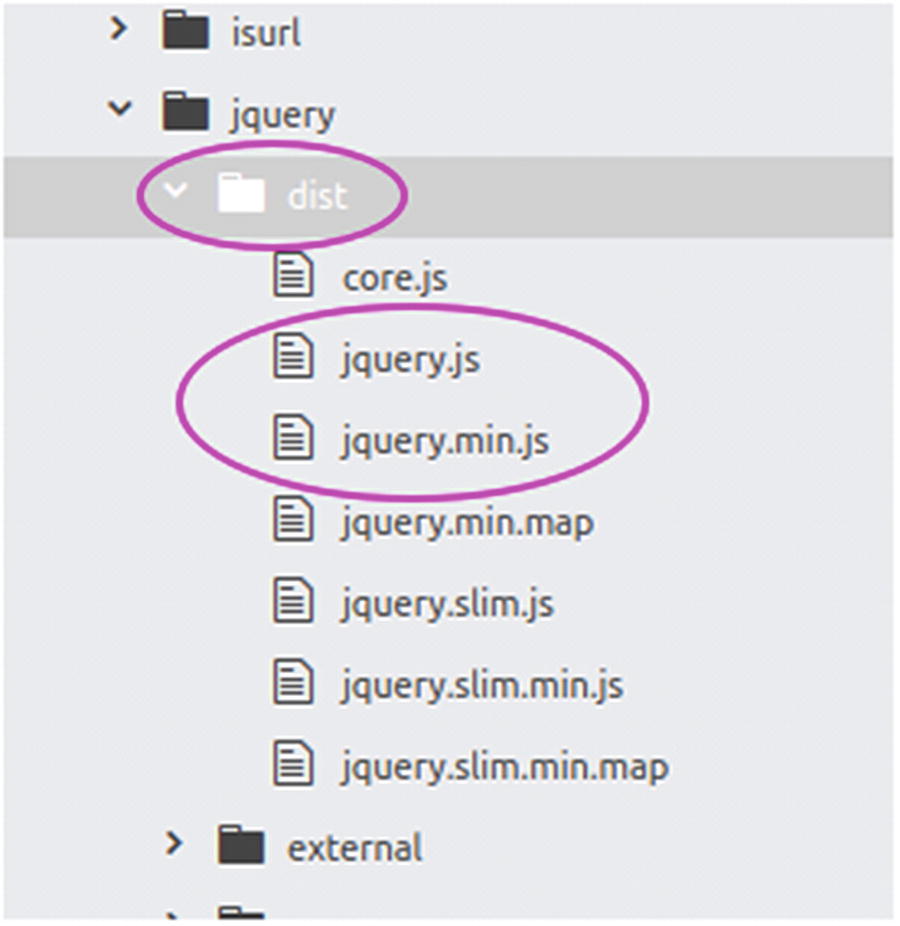
Webpack seems to look by default into the node_modules folder (like we discussed previously) and tries to find a child folder with the same name as the imported library (“jquery” in this case), but how does it know exactly which file should be imported? After all, the folder of a third-party library may contain many other subfolders and files! In Figure 7-2, you can see part of the jquery folder structure that shows the location of the main jQuery files.
Figure 7-2
Location of jquery file under node_modules/jquery/dist
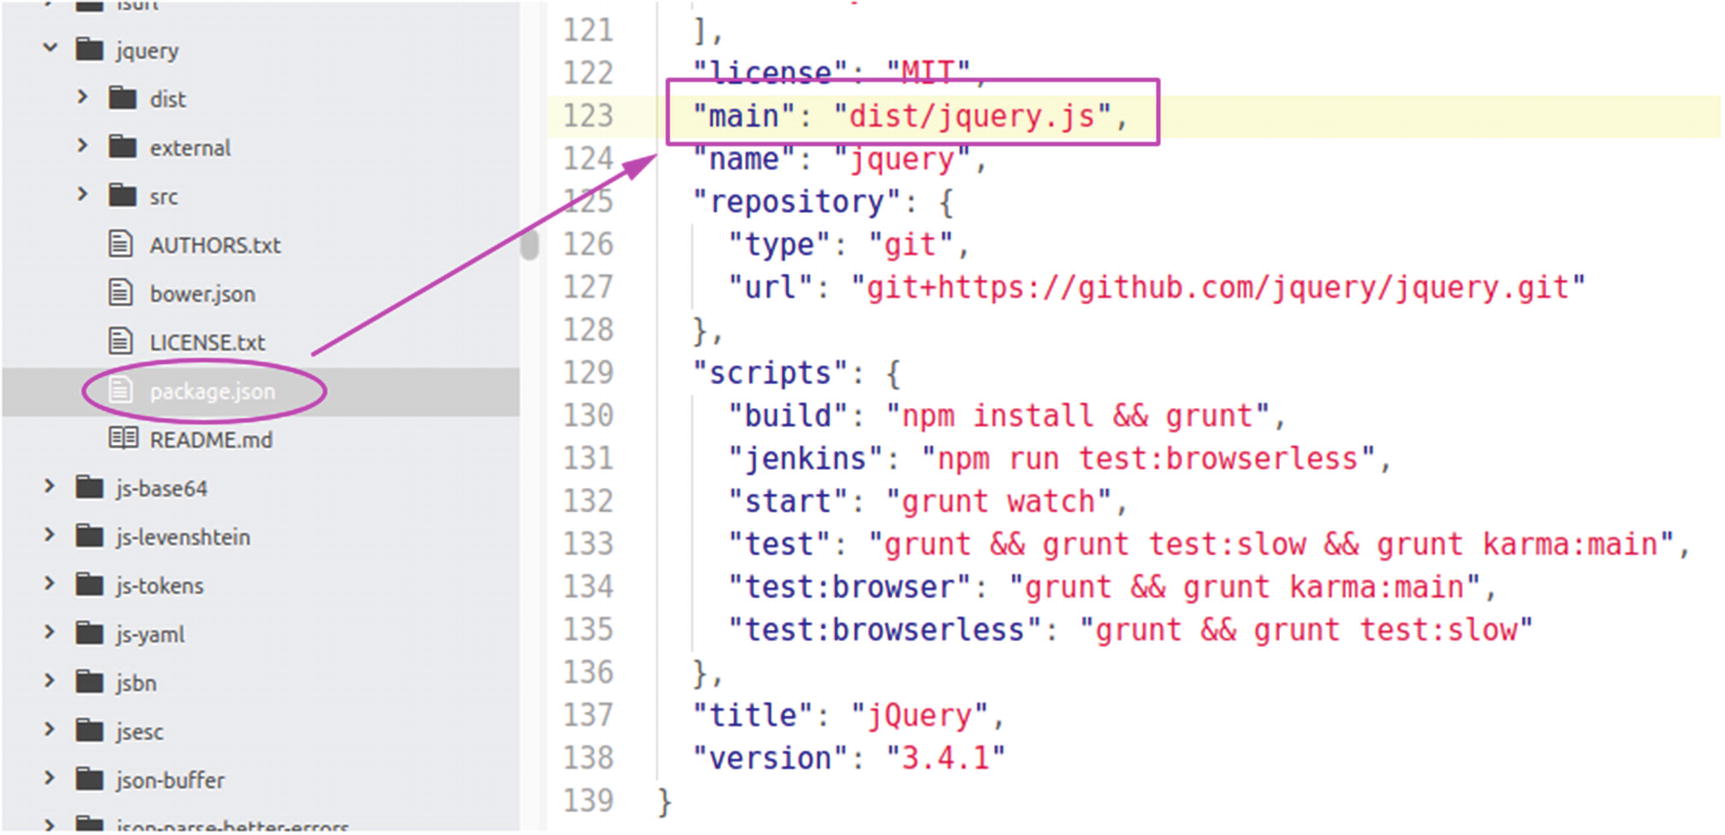
Notice that there is a dist folder inside the “node_modules/jquery/” folder. This is where jQuery files are (we have a non-minified “jquery.js” file as well as a minified version “jquery.min.js”), so if you are still wondering how webpack knows that “dist/” is the folder where the jquery.js file is located, then take a look at package.json under “node_modules/jquery/”. Figure 7-3 shows the exact line I’m referring to in that file.
Figure 7-3
A file package.json is delivered with most third-party libraries with a “main” key/entry
By searching in the package.json file, you will be able to find a line that indicates the “main” file Webpack should pick when importing jQuery:
"main": "dist/jquery.js"
In this case the main file is jquery.js under the “dist” folder, but keep in mind that it’s possible sometimes to find a JavaScript library or a plugin that isn’t well written for the modern JavaScript world, which means it’s possible to not find the package.json file at all; but fortunately, in most cases, you will.
Note
In case the third-party library you installed doesn’t include a package.json file, you can use a relative path to import it from node_modules (i.e., import lib from “../node_modules/lib_folder/lib.js”).
Now, suppose you already deleted jquery.js file from the “downloaded_libs” folder like I suggested earlier and you used a package manager to install jQuery. Let’s go to the terminal and start webpack-dev-server and then make sure everything is working (jQuery should exist) like before by opening the URL http://localhost:9000 in the browser:
$ npm run start
The thing I want you to know at this point is even if we imported jquery in src/index.js, trying to access from outside that file would be impossible (thanks to webpack, global variables don’t exist anymore). To demonstrate this case, I’m going to use jquery in the greeting.js file as shown in Listing 7-1.
If you still remember, the function above is imported in index.js as follows:
import { sayHello } from './greeting';
import $ from 'jquery'
// ...
sayHello();
Note also that we are importing jQuery after importing the sayHello function so you might be thinking, “Well, we should import jQuery before it in order to make it accessible by that function,” right?
Not exactly. That’s how we used to think and do when we were using libraries that were exposed to the global scope, but with webpack, whatever you import in one file won’t be accessible by another one. Each file is encapsulated and closed on its own. To prove this to you, let’s move the importation of jQuery before importing sayHello like this:
// ...
import $ from 'jquery'
import { sayHello } from './greeting';
Start the server if it’s not already started:
$ npm run start
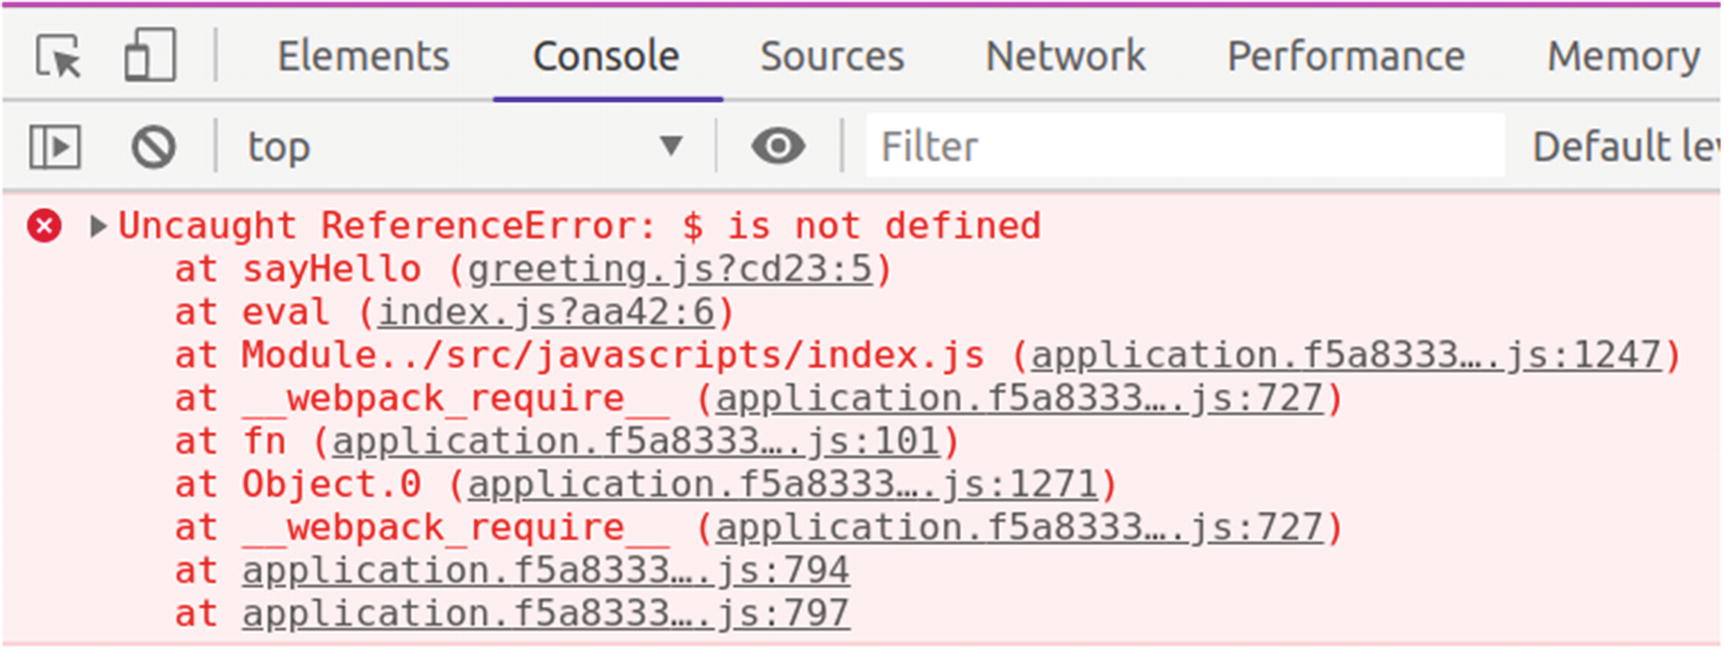
Open the console of your browser and see the log error. As shown in Figure 7-4, an Uncaught ReferenceError was thrown, which explains that $ is not defined.
Figure 7-4
Error showing the lack of jQuery library in greeting.js even after changing the order of imports
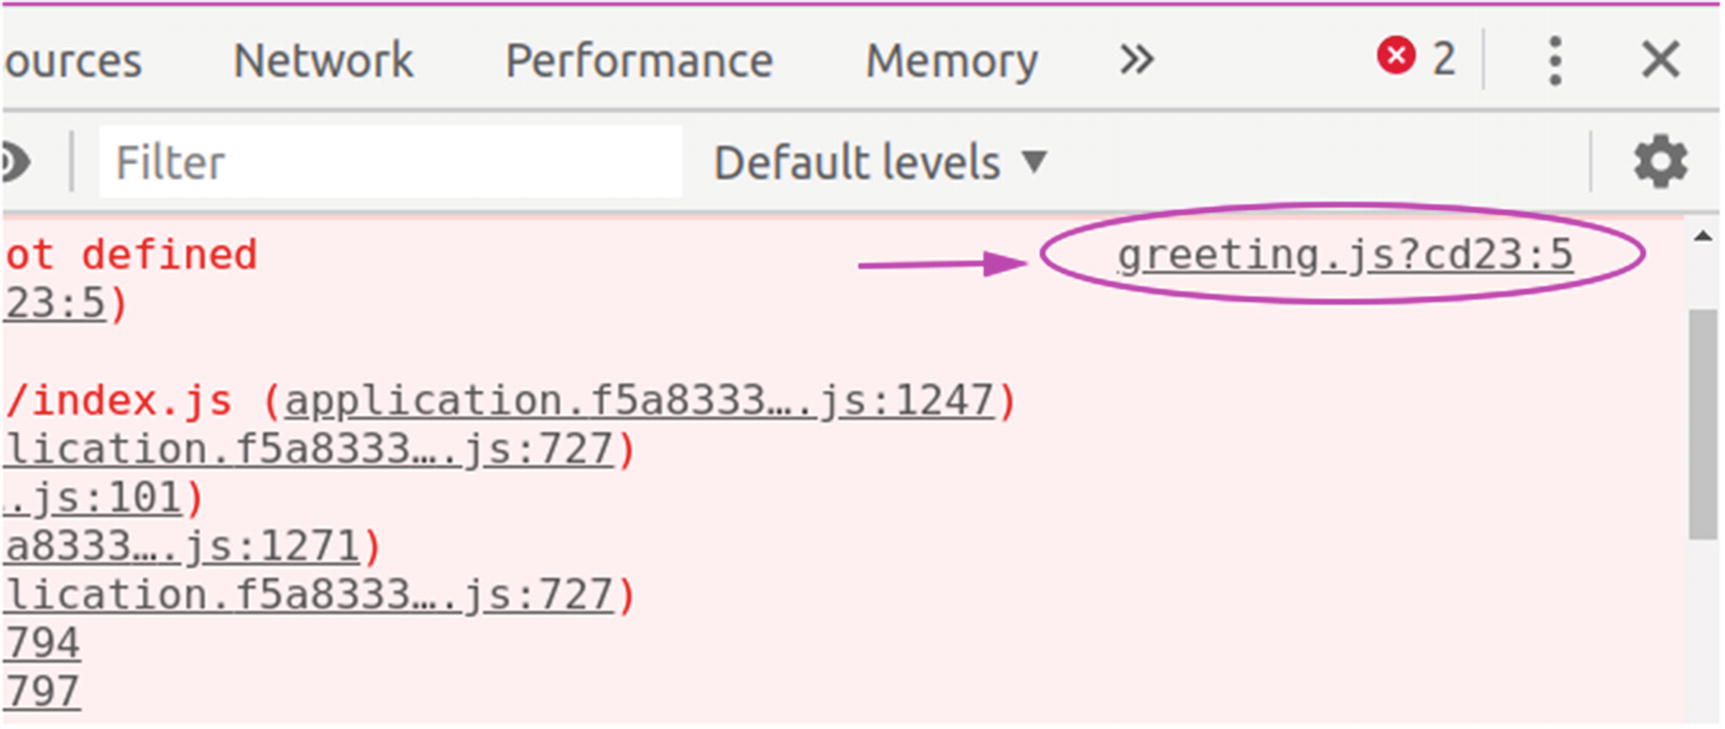
You can even click the source line to see where that error comes from. As shown in Figure 7-5, the source of the error is in the right-side corner of the error message you get in the console.
Figure 7-5
A source map link that indicates which line the error is coming from
Thanks to the source map we saw earlier in Chapter 3, clicking that will take us to the source of the error, which is self-explanatory.
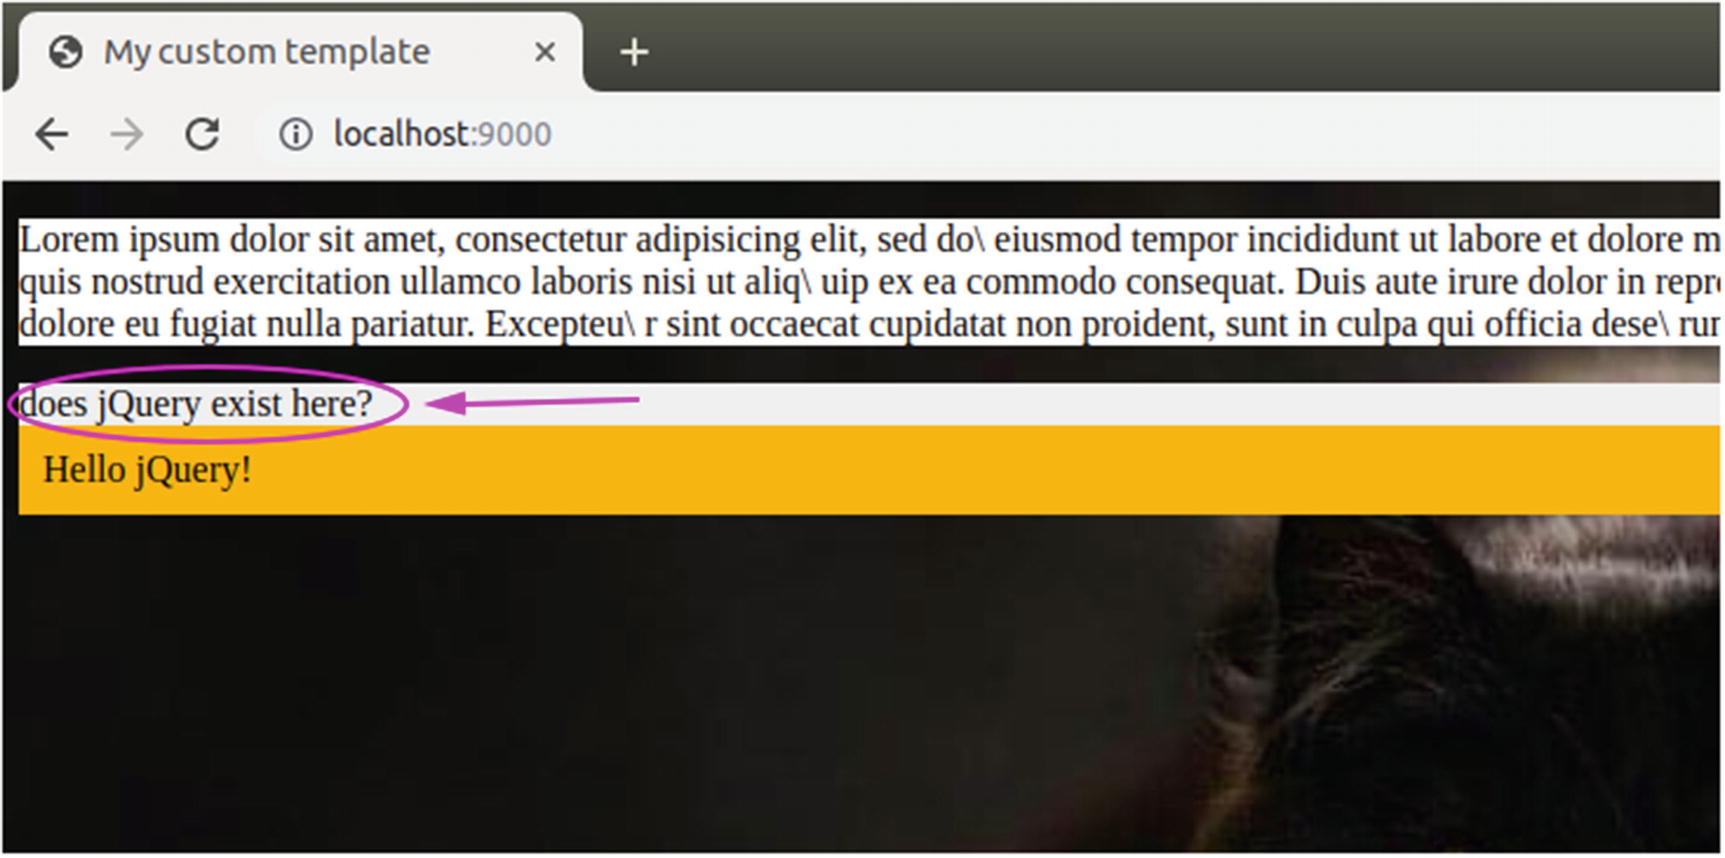
The file greeting.js cannot find jQuery, so what now? The solution is simple, as shown in Listing 7-2; you should import it there too.
Doing this will make jQuery accessible in greeting.js, but don’t worry. This doesn’t mean that jQuery code will be copied twice in your final code. It just means that webpack will handle it to make it usable in both places while including it once in your code.
Now, if you go to your browser http://localhost:9000, you can see that the HTML we appended (using jQuery) in our greeting.js appears in the page as shown in Figure 7-6.
Figure 7-6
The appended message proves that jquery is working from greeting.js file
What if we have a third file where we need jQuery? The answer is the same: just import jQuery in that file and it will work. For a case like this where there is a need to use a library like jQuery frequently in multiple files, there is a better way to do it. We will see this next.
Using Bootstrap with Webpack
What about installing another library like Bootstrap? Can you guess what we need to do? First, we need to install it using our package manager NPM (or Yarn alternatively) from the terminal:
$ npm install bootstrap
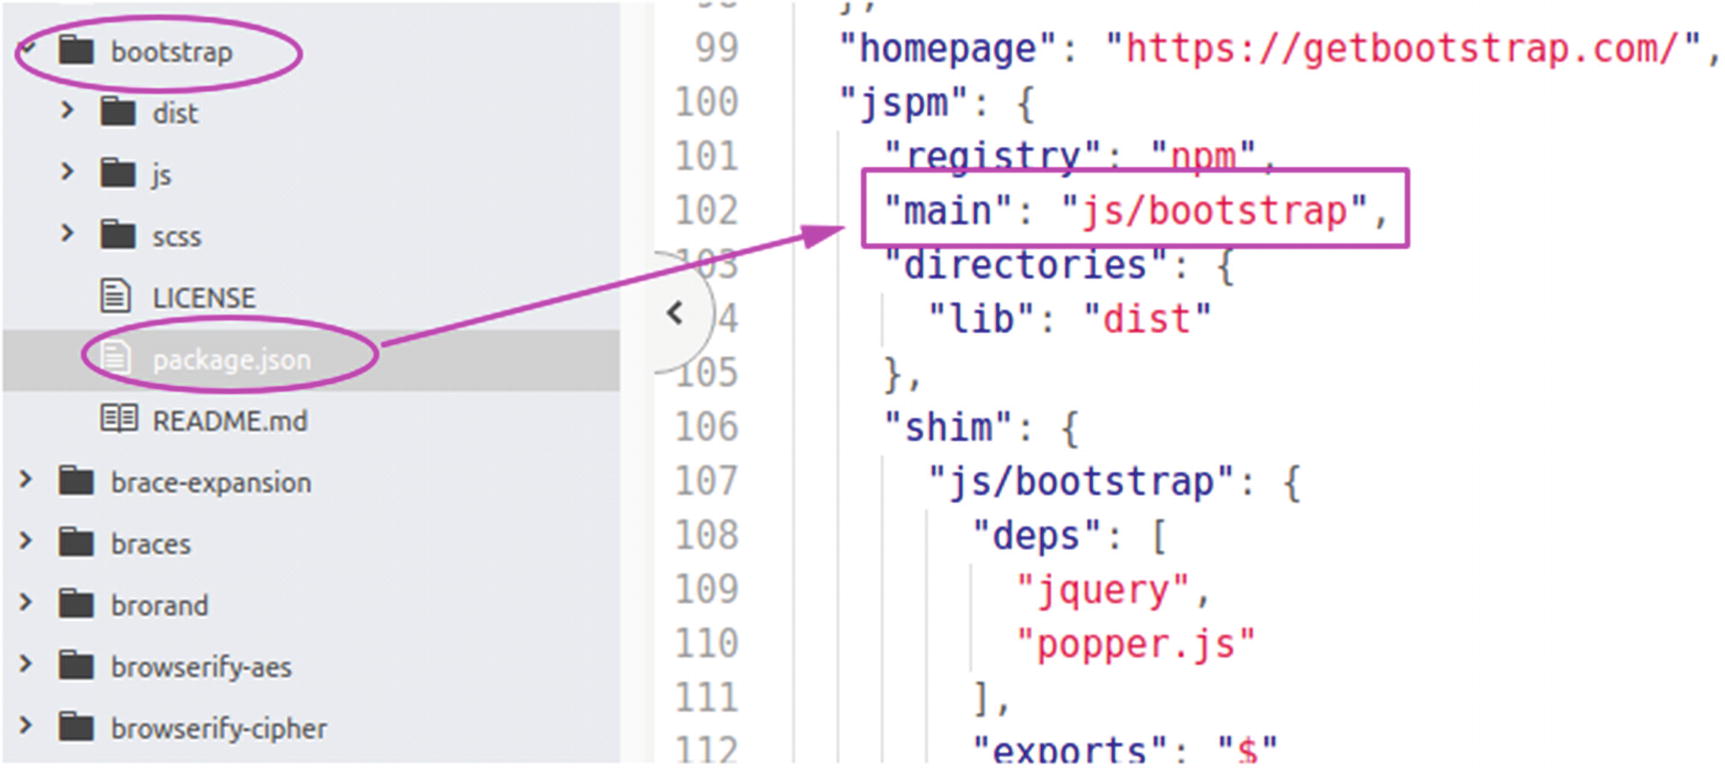
Once Bootstrap is installed, we will need to import both bootstrap.css and bootstrap.js files. There is a package.json file that guides webpack to find which file is used mainly to import bootstrap, but that’s for bootstrap.js only; we still need the styling (bootstrap.css) file. Figure 7-7 shows the main entry for Bootstrap.
Figure 7-7
Bootstrap: The main entry in package.json
For the CSS, we have to specify the path to bootstrap.css. In case you’re not sure where it’s located, you just need to explore node_modules/bootstrap/ folder and from there, you can explore more until you find it. To import bootstrap.css, use the following:
// import ...
import 'bootstrap/dist/css/bootstrap.css';
By adding this to our index.js file, we can now add something that’s bootstrap related like a button with a class “btn-primary” to our template.html file under the text paragraph we created before:
<p>Lorem ipsum...</p>
<a href="#" class="btn btn-primary">button</a>
Save and then open the URL http://localhost:9000 in your browser. Figure 7-8 shows that the button we have added is styled with the “primary” color of bootstrap.
Figure 7-8
Bootstrap style applied to the button
Now it’s time to import bootstrap.js in our index.js, which should be straightforward, as you may remember the way we used to import jQuery was as follows:
import $ from 'jquery'
We should do something similar with Bootstrap, right? Something like this:
import bootstrap from 'bootstrap'
However, that’s not true at some point, as there is a little exception here; bootstrap.js should be imported simply like this:
import 'bootstrap';
Do you see the difference? The reason is that Bootstrap JS is a jquery plugin, and jQuery plugins just add functionalities to jQuery, which means they don’t return anything for us but just extend jQuery’s prototype, so no need to import the library in a variable (like we did for the $ variable with jQuery).
We know that every file/module is isolated on its own, and in the index.js file we are importing jQuery, then we are importing Bootstrap as the following:
import $ from 'jquery'
// ...
import 'bootstrap';
But how does the Bootstrap module know about our existing jQuery here, and how it’s possible for it to add things to that exact jQuery instance?
If you see how bootstrap.js is written, you will find that it detects if we are in a modular environment like webpack, and if so it will require jQuery and Popper JS as shown in Figure 7-9, which is equivalent to the “import” method we used to import our libraries and files. (Remember that “import” is ES6 syntax while “require” is a similar function but it’s a NodeJS syntax.)
Figure 7-9
Bootstrap.js: importing jQuery and Popper js if “exports” is an object (which is the case when using webpack)
Because we already imported jQuery in the same file that bootstrap was imported to, webpack is smart enough to know this, so it will use that same jQuery instance we have imported, then it will apply the bootstrap plugin to it.
To make sure bootstrap.js is working, let’s add another button to the template.html file and apply a tooltip to it (which is based on boostrap.js) as follows:
<button type="button" class="btn btn-secondary" data-toggle="tooltip" data-placement="top" title="Tooltip on top">Tooltip on top</button>
Then in src/index.js, we need to apply the tooltip to all the elements with [data-toggle=”tooltip”] (don’t try it yet unless you read the next paragraph) after importing Bootstrap as shown in the highlighted line below:
// ...
import 'bootstrap';
$('[data-toggle="tooltip"]').tooltip();
If we look closely in our terminal, there is an error stating that it can’t resolve popper.js, which is a dependency of Bootstrap JS and it’s needed in order to make the tooltip work properly. If you already activated the overlay option (overlay: true) within webpack devServer configuration, then the error will pop up in your browser as well, which makes debugging fun. Figure 7-10 shows the overlay error message in my browser.
Figure 7-10
Error overlay shows up because bootstrap needs popper.js
The source of that error is the bootstrap.js; that’s where popper.js is required, so that makes sense because it’s not installed yet in our node modules. Let’s install popper JS using the package manager NPM in our terminal:
$ npm install popper.js
At the moment of writing this, Bootstrap requires popper.js (the version 1) but that version is marked as deprecated, and the installation output from the terminal shows that a new version 2 is available. Because bootstrap hasn’t updated the required PopperJS version yet to support the version 2, I will continue using the old version (popper.js), which is not that bad. Once Bootstrap updates the reference to the new version, then all you have to do is to install “@popperjs/core” instead.
Note
A package name might change over time if their owner(s) or maintainer(s) decided to. For example, until recently, the popperjs package name was “popper.js” (for the version 1.x), and then it has been deprecated in favor of a new version (v2) where the package name currently is “@popperjs/core.” In order to get the name of the latest version, I would recommend you check the official package website.
Once installed, we need to start our webpack-dev-server again, and you’ll see that our compilation succeeded this time:
$ npm run start
All you have to do now is to open the URL http://localhost:9000 in your browser (as you used to) and notice that the “tooltip” button is there. If you mouse over it, you will see a tooltip show up.
Like with jQuery, if you need to use bootstrap.js functions in any other file, you have to import it first. You may think that Bootstrap is already plugged in to jQuery so we can use it in other files like in greeting.js without importing it, but this won’t work because it was applied only to the jQuery instance we have in our index.js. This means if you need to use something like the tooltip function from your greeting.js, you need to explicitly import Bootstrap.
We won’t probably need to import Bootstrap frequently, for jQuery we surely do, but we don’t want to import it in every file every time we need it. We need somehow to have it available for us in every file/module we write. That’s when the webpack providePlugin comes into play.
Webpack ProvidePlugin
There is a helpful plugin that will help us to make jQuery available in all our project source files called the providePlugin. which you can learn more about at https://webpack.js.org/plugins/provide-plugin.
Here is a brief description from the Webpack ProvidePlugin documentation:
Automatically load modules instead of having to import or require them everywhere.
So, in our case, we will set up the ProvidePlugin in the configuration file (webpack.config.js) to load jQuery for us whenever there is a dollar sign ($) or jQuery object. Listing 7-3 shows us how to add the ProvidePlugin.
Note
The ProvidePlugin is shipped out of the box with webpack so you don’t have to install it yourself.
// ...
// make sure you require “webpack”
const webpack = require('webpack');
module.exports = {
// ...
plugins: [
new webpack.ProvidePlugin({
$: 'jquery',
jQuery: 'jquery'
}),
// ...
]
// ...
}
Listing 7-3
Usage of Webpack Provide Plugin
Since ProvidePlugin is part of webpack, all we have to do is require webpack, then call ProvidePlugin method on it in order to create a new instance of that plugin. What the code above will do is whenever there is a module that uses $ or jQuery variables, a code like the following will be added to that module file:
const $ = jQuery = require('jquery');
That’s really useful for us because we will probably use jQuery in every JS file we create, but it will be helpful in other situations as well, especially when utilizing third-party plugins or libraries that expect jQuery as a global variable. Webpack has got you covered in this situation.
Note that we can also add the lines below to our Webpack ProvidePlugin in order to have jQuery available in our window or global object:
new webpack.ProvidePlugin({
// ...
"window.jQuery": "jquery'",
"window.$": "jquery"
})
However, the window object here is meant to be for the build-time (for the libraries/dependencies that need window.$ during the build phase) not for the run-time (meaning you won’t be able to access $ in your browser console or in your HTML files). If you need jQuery to be exposed globally during the run-time don’t use the above way but instead, add the following to one of your modules:
window.$ = window.jQuery = $
At the end it’s up to you whether you want to expose jQuery to the window object or just make it available within your JavaScript modules only.
If you remember, we have imported bootstrap.css in index.js file as follows:
import 'bootstrap/dist/css/bootstrap.css';
While this is okay, what most people prefer to do is to have all CSS files imported and grouped in one single CSS file and have it imported by a JavaScript file. In our case, we will use the src/application.scss file to import bootstrap.css and any other CSS file, but there is a little detail to be aware of. Open the application.scss and add the following line at the top of the file:
@import '~bootstrap/dist/css/bootstrap.css';
Adding this line means that you need to remove the importation of bootstrap.css from index.js, so make sure to remove the following line before we continue:
import 'bootstrap/dist/css/bootstrap.css';
Back now to the new “import” we have made in our application.scss and note how the syntax is slightly different:
The first thing is that the “import” keyword is preceded with an @, which is the standard way of importing CSS files in a SCSS file.
The second thing is the tilde ∼ before the word “bootstrap”; the reason for it is to tell webpack that we are importing a CSS located in node_modules.
What if we want to import a CSS file that is located within the stylesheets folder instead of a third-party CSS located within node modules? In this case the tilde ∼ shouldn’t be added, but a relative path to the file like this:
@import './another_css_file.css';
The dot (.) in the line above is to tell webpack that the CSS file is located in the same folder as application.scss. After importing many CSS files, you will end up with many imports (of different CSS files) as seen in Listing 7-4.
@import '~bootstrap/dist/css/bootstrap.css';
@import './another_css_file1.css';
@import './another_css_file2.css';
// ...
Listing 7-4
Example of importing many CSS in application.scss
And the only import of CSS we will have in our index.js file will be the following one:
import application from "CssFolder/application.scss"
Remember that the “CssFolder” above is the alias we have given to our “src/stylesheets” in the webpack configuration file. With that in place, you can organize your code in a more efficient way by having your CSS file imported and grouped in one place. Now let’s move on to install another JavaScript library.
Installing jQuery-UI
Another jQuery plugin that we are going to install is jQuery UI, which is a well-known library and largely used by many websites. The principle of usage will be the same as what we have seen with bootstrap.js – to install jQuery-ui, we need first to run the following command in our terminal:
$ npm install jquery-ui
After the installation is done, let’s import jQuery UI in our index.js file as follows:
// ...
import 'bootstrap';
import 'jquery-ui';
Everything looks fine so far, but if we wish to use one of the jQuery UI widgets, we will need to import that specific widget, too, in order to make it work. For example, there is a widget called “datepicker” in jQuery-ui, and if you want to use it you have to import it explicitly as follows:
// ...
import 'jquery-ui';
import 'jquery-ui/ui/widgets/datepicker';
If you read carefully the line that imports the datepicker, you could easily guess that all jQuery UI widgets are under the folder “ui/widgets” and yes, that’s correct as shown in Figure 7-11.
Figure 7-11
The jQuery-ui widgets location
Want to use the draggable and droppable widgets? No problem; just add “draggable” and “droppable” widgets like this:
// ...
import 'jquery-ui';
// ...
import 'jquery-ui/ui/widgets/draggable';
import 'jquery-ui/ui/widgets/droppable';
Pick whatever you like and make sure you have imported ‘jquery-ui’ before importing any of these widgets.
Now back to the datepicker widget. Is importing the widget’s JavaScript file all we need? obviously we will need the related CSS file as well. To find the styling file of any widget, check the folder “themes/base” under “jquery-ui” in node_modules. Figure 7-12 shows the “themes/base” folder where our widget CSS (datepicker.css) is located.
Figure 7-12
Datepicker.css-related CSS file under jquery-ui/themes/base
Here we can find the CSS file for each widget separately, or (if you see carefully in the figure above), there is another file called “all.css,” which can be used to import all our widgets styles at once. It’s up to you to import everything (by importing all.css alone) or to just import the ones you are using in your project, which will reduce the size of your bundle of course.
It’s important to note though that while importing “all.css” will bring all the widgets styles, even the ones we are not using (this will make our final bundle bigger in development), thankfully in production mode, webpack will use something called “Tree Shaking,” which is a process to get rid of all the unused or unnecessary code. This option is used by default; no need to add anything from your side. So, either you import all the widgets CSS at once using:
@import '~jquery-ui/themes/base/all.css';
Or import only the one(s) you need, but in this case don’t forget to import the theme.css file as well, as shown below:
@import '~bootstrap/dist/css/bootstrap.css';
@import '~jquery-ui/themes/base/datepicker.css';
@import '~jquery-ui/themes/base/theme.css';
// ...
You may ask, “Where should we place these lines?”
In the “src/application.scss” like we did before, this file will contain all our third-party CSS code as well as ours.
Now that we have imported the necessary files needed for the datepicker widget, let’s make it work by adding the following HTML to the template.html file:
<input type="text" id="datepicker">
After having the input#datepicker element in place, the last thing we need to do is to apply the datepicker() method to that element as follows:
// ...
import 'jquery-ui/ui/widgets/datepicker';
$( "#datepicker" ).datepicker();
Once done, start the webpack-dev-server if not started:
$ npm run start
Then let’s see if this will work. Open the URL localhost:9000 in your browser and click by your mouse inside the input element. Figure 7-13 shows our datepicker in action.
Figure 7-13
Datepicker opened when clicking inside the input element
So cool, jQuery UI datepicker is working as expected. All you have to do now is to pick some dates and have fun!
Installing QuillJS
Now that we have seen how to install and use jQuery and some of its plugins, let’s get more familiar with installing more third-party libraries. This time, we will install another JavaScript library called QuillJS. After installing it, you will have a ready-to-use WYSIWYG editor in your web page or application.
The official QuillJS website (https://quilljs.com/docs/download/) has a list of the different ways you can use to download the library; in our case we are going to download it via the NPM package manager:
$ npm install quill
The command above will install the latest version of QuillJS for us. Now if you are familiar or used this library before (if not you can read the documentation), you will know that there are two main files we need to use in order to have this library working.
The first is quill.js file, and the second one is quill.snow.css (or quill.bubble.css in case you need a flying toolbar that follows your text selection and appears over it).
To get the QuillJS library working, we will use the same principle we used before. We will import “quill.js” in our index.js file, then in our application.scss we will import the CSS file “quill.snow.css.” So let’s start by importing quill.js in the index.js file as shown in Listing 7-5.
import Quill from 'quill';
var quill = new Quill('#editor', {
theme: 'snow'
})
Listing 7-5
Quill JS import and usage
The line after importing quill.js is how we instantiate it. Here we applied Quill to an HTML element with an id="editor" (we will create a div with that id in our template.html), but for now we still need to import the quill.snow.css, so let’s open the application.scss file and add the line:
@import '~quill/dist/quill.snow.css';
How did I know quill.snow.css exists under the dist folder? Well, I just checked manually in “node_modules/quill/dist” and found it as seen in Figure 7-14. All you have to do is import it (do not forget the tilde ( ∼ ) we talked about when importing a third-party library CSS).
Figure 7-14
Locating the file quill.snow.css file under node_modules/quill/dist
Let’s make sure our WYSIWYG editor is working by adding a div with an id “#editor” to our template.html file. Listing 7-6 shows a little code I copied from the QuillJS quick start guide. The only thing I added is that I wrapped the code in a div with a white background color (#FFF) and added some margin to it as well in order to make Quill WYSIWYG more visible.
<!-- Create the editor container -->
<div style="background:#fff;margin:20px;">
<div id="editor">
<p>Hello World!</p>
<p>Some initial <strong>bold</strong> text</p>
<p><br></p>
</div>
</div>
Listing 7-6
HTML snippet example from QuillJS documentation
Save the template.html and let’s start webpack-dev-server using:
$ npm run start
Open up the browser at http://localhost:9000 and see that Quill WYSIWYG is working as shown in Figure 7-15.
Figure 7-15
QuillJS wysiwyg interface in action
Great, QuillJS editor is working. You have just installed QuillJS successfully with a few lines of code.
Installing CKEDITOR
Let’s practice more and install another library. This time we will install CKEDITOR from https://ckeditor.com/, which is a popular WYSIWYG editor and largely used on the internet. First, to check if there is any documentation online, go to Google and search for “ckeditor webpack.” In order to save you some time, here is the link I found that explains what to do exactly: https://ckeditor.com/docs/ckeditor5/latest/builds/guides/integration/advanced-setup.html.
Note
The reason I’m encouraging you to do the search before installing/using any third-party package is because instructions can be different from a package to another. Even the package name itself can be different than the library name you want to install. Also keep in mind that any link I provide you with to a library's documentation page is subject to change in the future, that's why doing your own search is the best way to go.
Let’s install CKEDITOR like it’s described on the link we found:
$ npm install @ckeditor/ckeditor5-build-classic
Before going ahead and importing CKEDITOR in the index.js file, let’s add a textarea with an id=”ckeditor” to our template.html file. That textarea is what we will apply the WYSIWYG to:
Now, in the index.js file all we have to do is to add some lines of code as shown in Listing 7-7 (which you can find in the Ckeditor documentation) to transform our textarea to a ready-to-use WYSIWYG.
// Using ES6 imports:
import ClassicEditor from '@ckeditor/ckeditor5-build-classic';
ClassicEditor
.create( document.querySelector( '#ckeditor' ) )
.then( editor => {
console.log( editor );
} )
.catch( error => {
console.error( error );
} );
Listing 7-7
Importing and applying ckeditor to textarea#ckeditor
Save and start webpack-dev-server using:
$ npm run start
Then go to the URL http://localhost:9000 in your browser. Figure 7-16 shows that the textarea was converted to a rich text editor.
Figure 7-16
Textarea turned to Ckeditor wysiwyg
CKEDITOR WYSIWYG is functioning, and you can use the same process to install basically any other WYSIWYG editor you want in your project.
Lazy Loading
Importing third-party JavaScript libraries will make our final bundle bigger. The more libraries we import, the bigger the bundle files will get. Fortunately, in production mode, webpack will get rid of the unused code (thanks to the Tree Shaking), and also our code will get compressed, which reduces the final size drastically ... but sometimes it makes sense to reduce the size even more by relying on some techniques like lazy loading.
The idea behind the lazy loading method is to not load certain libraries upfront, but only loading them whenever we need to; good usage of this is WYSIWYG libraries like the ones we installed previously.
Some WYSIWYG libraries are heavy, and most of the time we need to use them under a specific page(s), so the lazy loading is a perfect solution in this case.
Let’s take the example of CKEDITOR that we just saw in the previous section, and let’s make it load only if the page contains an element with id #ckeditor as seen in Listing 7-8.
In the code above, we check first if any element in the page has the id #ckeditor. If it exists, we import CKEDITOR, which returns a promise, and then we use a callback function that takes an argument “ClassicEditor,” which we will use to turn the #ckeditor textarea to a WYSIWYG.
Make sure to use the property “default” on the passed argument (ClassicEditor) because this is how we get access to the imported module object when the promise is resolved, you can find a notice about this in the webpack documentation as follows.
Note
When using import() on ES6 modules, you must reference the .default property as it's the actual module object that will be returned when the promise is resolved.
That’s all it takes to start using lazy loading in your project, and the same principle can be applied to any other library. Just make sure to use it properly and start reducing your bundle size for better performance.
Summary
In this chapter, we have explored the way to install JavaScript third-party libraries. We have seen the installation and usage of some of the most popular ones like jQuery/jQuery-ui, Bootstrap, QuillJs, Ckeditor. We have also seen how jQuery plugins are slightly different in their importation than other regular libraries; but at the end, I hope you realized that installing and using any library is not too difficult. The installation will be different depending on which one you choose to install. While the principle is similar for most libraries out there, I would recommend that you always check the instructions from the official website (documentation) or the GitHub repository of each specific library.