The Dance of Sharpness, Saturation, and Contrast
Step 1: Adjust Saturation
You are going to do your first-level saturation adjustment in this image, not in the LAB space, as you did in Chapter 2, but here in the RGB color space. The reason for doing it this way, in this image, is that you need to make fairly small changes, and you can’t be sure how much color boost you’re going to need or want, if any, until after you’re done addressing the issues of blue color cast, contrast, and sharpness.
1. | Create a Hue/Saturation adjustment layer. Bring the saturation to 100% so you can analyze the color (Figure 3.20a). There is a lot of yellow in the green; the purples are more blue than cyan; there is magenta only in the highlights; and the flowers are more yellowish-green than one would have thought. Lower the saturation to 0 and move the Hue/Saturation dialog off the image. Figure 3.20a.
|
2. | Choose Blues from the Edit menu (Cmd-5/Ctrl-5). I start with the blues because the Hue/ Saturation layer revealed that there was more blue than cyan in the image. Raise the saturation until the image begins to posterize (at about 68), then lower it until it looks appealing to the eye (about 35). Increase the lightness to about 21, which will improve the quality of the saturation of the image’s blues (Figure 3.20b). Figure 3.20b.
Note Keyboard shortcuts for all of the colors are located to the right on the Edit menu. Note You may wonder why I chose to increase the lightness here. Why not just leave it alone or darken it, since darkening increases saturation? The problem is that when you darken a color, you also flatten or deaden it. So unless that’s the effect you want, consider boosting lightness. |
3. | Repeat the process with the cyans. Posterization appears at saturation 83, so back it down to 21. That gives the image a bump, but without any posterization. Boost the lightness to 41 (Figures 3.20c and 3.20d). Figure 3.20c.
Figure 3.20d.
|
4. | Select Master from the Edit menu, boost the global saturation to 20%, and click OK. This creates a problem; the green areas are too saturated, and slight posterization is occurring (Figure 3.20e). Select the Brush tool. At 100% opacity, paint over the green areas with black paint to hide them (Figure 3.20f). Figure 3.20e.
Figure 3.20f. The Hue/Saturation layer mask after painting over the greens.
The image should now look like this (Figure 3.20g). Figure 3.20g.
|
5. | Do “The Move” and name the new layer MASTER 3. |


Step 2: Remove the Blue Sunlight Cast
Using the Nik Skylight Filter
Note
You are going to create an image map after the fact instead of before, because you won’t know what you want to remove until you actually run the filter.
1. | Duplicate the MASTER 3 layer. Name the layer you just created SKYLIGHT. Choose Filter > Nik Color Efex Pro 2.0: traditional filters > Skylight filter. Click OK to run the filter using the default settings. |
2. | Create a new layer and name it SKYLIGHT IM. |
3. | Select the Pencil tool, and pick a new color with which to write as you map out the next steps. (I chose a light blue.) The changes on the image map will guide the viewer’s eye through the image, from light to dark, starting with the cluster of flowers in the lower-right corner. The eye should then go first to the upper-left flower, the middle-right flower, and finally to the lower-right flower. |
4. | So as not to affect the green areas, mark them 0%. Next do the edges, and lastly the background areas. The resulting image map looks like this (Figure 3.21a). Figure 3.21a.
Figure 3.21b.
|
5. | Make the SKYLIGHT layer active. Create a layer mask filled with black, and brush in with white using the varying levels of opacity mapped out in the SKYLIGHT IM image map (Figure 3.21b). |
6. | Do “The Move,” name the layer CONTRAST, then duplicate the layer and name the duplicated layer SHARPEN. Turn off the sharpen layer, make the CONTRAST layer active, and save the file. |


Step 3: Selective Contrast
Using the Nik Contrast Only filter
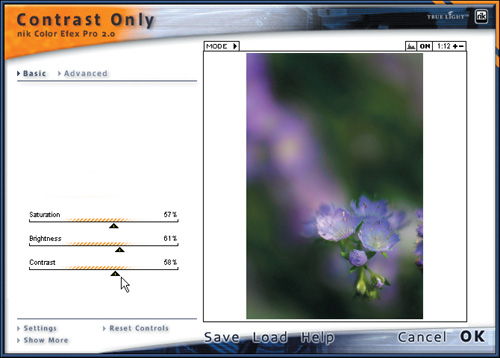
1. | Choose Filter > Nik Color Efex Pro 2.0: traditional filters and select the Contrast Only filter. In the Contrast Only dialog, click Advanced (Figure 3.22a). |
2. | Start by adjusting the contrast. Move the Contrast slider to the right until the image starts to seriously posterize and the shadows block up. Here, this happens at the right edge of the yellow zone on the Contrast slider, or 66%. This is obviously too much, but it’s usually easier soften an effect than to boost it. When using layer masks, it’s also better to be a little over than a little under. You can always lower the opacity of the effect, either by using the Fade command on the Edit menu or by lowering the opacity of the layer after you have created the relationship you like. |
3. | Back the slider down until you hit the fine edge between posterizing and not posterizing. For this image, that’s 58%. Now adjust the brightness. First make the image too bright, at 75%, and then adjust it down to 61%. Lastly, adjust the saturation. Bring it up to 64%, then back it down to 57% (Figure 3.22b). |
4. | Go to Advanced. You want to protect the image’s highlights, so you need to tell the filter where to stop boosting contrast. For this image, set the cutoff at 25% for the highlights and leave it at the default setting (0%) for the shadows. Click OK to apply the filter. |
5. | Create a new image map layer, name it CONTRAST IM, and move it above MASTER 4 COPY 3. |
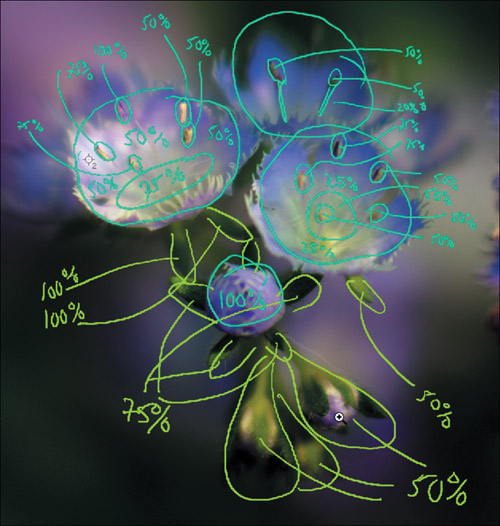
6. | You will now map the areas where you want the effect of contrast to show through, and where you don’t. You want to emphasize the flowers in the foreground, so mark the left flower 50%, the rear flower 20%, and the lower right flower 30%. Mark the smaller flowers (beneath the main ones) 20%. You also want to impart some character to the bright area in the background, so mark that 25% (Figure 3.23). Figure 3.23. The image map of contrast areas.
|
7. | Create a layer mask filled with black. (If you are using the classic contrast Curves approach, fill the adjustment layer’s layer mask with black.) Do the appropriate brushwork. |


Without the Nik contrast filter
This is the classic way to create a contrast curve, and it is much better than using Photoshop’s Brightness/Contrast adjustment.
1. | Duplicate the layer MASTER 4 three times. Turn off the eyeballs of layers MASTER 4 COPY 3, and MASTER 4 COPY 2. Make the layer MASTER 4 COPY active and rename it CONTRAST. |
2. | Create a Curves adjustment layer. Click the center point of the curve to lock it. Place the mouse pointer over the curve, two grid lines up and right. Drag that point up and to the left to increase the contrast to a level that is visually pleasing. Don’t drag too far; you just need a small amount. Click OK. Name the layer CONTRAST. |
3. | Create a layer mask filled with black, and do the appropriate brushwork. |
Step 4: Selective Sharpening by Color
To analyze the image, make the MASTER 4 COPY 3 the active layer, then create a new layer and name it SHARPEN FLOWERS IM.
Select the Pencil tool and pick a new color with which to write. (I chose cyan.) Zoom into the area of the flowers (Figure 3.24a). You are going to map out where you want the eye to go. Do this even if you aren’t going to be sharpening using the Nik Sharpener Pro 2.0 filter. Regardless of the sharpening method you use, you still should map out a sharpening strategy.
Figure 3.24a.

To my eye, it’s apparent that the core of this image consists of circles that interrupt a pattern of diagonals. You’ll play up that spiral effect, starting with the pistils of the flowers (Figures 3.24b, 3.24c, and 3.24d).
Figure 3.24b.
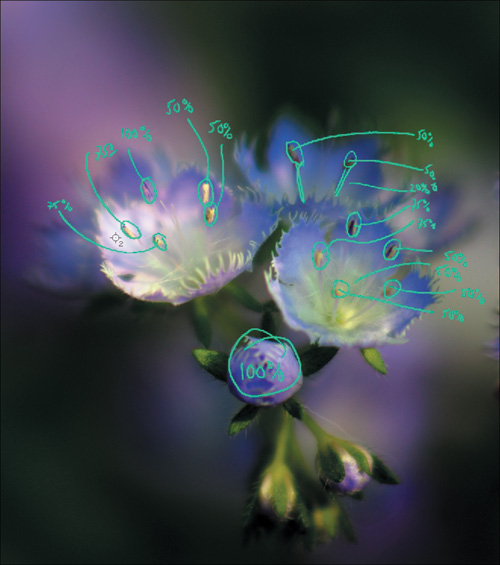
Figure 3.24c.
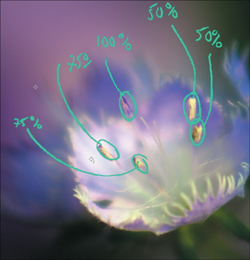
Figure 3.24d.

1. | Use 100% for the lower flower because it’s a bit too out of focus, and it needs all the help it can get (Figure 3.24e). Figure 3.24e.
|
2. | Now, define the secondary areas of sharpness in order to get the viewer’s eye to move around the flower the way you want it to (Figures 3.24f and 3.24g). When you’ve finished, hide the image map layer. Figure 3.24f.
Figure 3.24g.
|
3. | Create a new layer, name it LEAVES SHARPEN IM, and repeat the process, this time paying attention to the leaves that surround the flowers (Figure 3.24h). When you’ve finished, hide the image map layer. Figure 3.24h.
|


Using the Nik Sharpener Pro 2.0 filter
If you have the Nik Sharpener Pro 2.0 filter, continue with this section. If you don’t, skip to the next section.
1. | Duplicate the SHARPEN layer. Turn off the eyeball of the layer you just duplicated, make SHARPEN the active layer, and rename it FLOWERS SHARPEN. Zoom in on the flowers and turn the eyeball on for the image map SHARPEN FLOWERS IM. |
2. | Choose the appropriate printer output. In my case, that is Filter > Nik Sharpener Pro 2.0 > Inkjet: Epson (Figure 3.24i). Leave the viewing distance set to Auto and the paper dimensions to what comes up in the dialog. |
3. | Use the Paper Type slider to select the kind of paper on which you will ultimately print and then the Printer resolution you plan to use. (Because I was creating a fine-art print, I moved the slider to Texture & Fine Art and chose Somerset Velvet. The printer resolution for this paper is 2880 × 1440.) |
4. | Switch to the Advanced pane of the dialog. |
5. | Click the bottom eyedropper, sample one of the green leaves in the dialog, and move the slider to 0%. In this sharpening layer, you want to sharpen only the blues and purples, not the greens (Figure 3.24j). |
6. | With the eyedropper that is the second from the bottom, select the leaves of the lower bottom buds (where the green is more yellow) and move the slider for that color to 0%. |
7. | Click the third eyedropper from the bottom, sample the lower front flower, and leave the slider at 100%. |
8. | Click on the second eyedropper from the top, sample the light purple in the inside of the top left flower, and leave the slider at 100% (Figure 3.24k). |
9. | With the top eyedropper, select the lightest purple in the main flower. |
10. | Add a layer mask filled with black, and hide the layer for the moment. |
11. | Turn on the eyeball for the layer SHARPEN COPY and make that layer the active one. Rename it LEAVES SHARPEN. If you are using image maps, turn on the image map for the leaves (Figure 3.24l). Figure 3.24l. The overall sharpening image map.
|
12. | Launch the Sharpener Pro 2.0 > Inkjet: Epson filter. Switch to the Advanced pane; reverse the sharpening by moving the green sliders to 100%, and the blue-purple and white sliders to 0% (Figure 3.24m). |


When you’ve finished, continue with the “Final sharpening steps” section, below.
Using Photoshop’s Unsharp Mask filter
If you don’t have the Nik Sharpener Pro 2.0 filter, you can use Photoshop’s Unsharp Mask Filter. (See “Using Photoshop’s Unsharp Mask filter” in Chapter 2.)
When you’ve finished, continue with “Final Sharpening Steps,” below.
Final Sharpening Steps
If you worked through the Nik Sharpener Pro procedure, make sure the layer FLOWERS SHARPEN is active.
If you used the Unsharp Mask method, activate the layer SHARPEN.
1. | Create a black-filled layer mask. Zoom in on the upper-left flower. With a 50% opacity brush that is about the size of the pistils, brush and rebrush the pistils for all the flowers, increasing their sharpness (Figure 3.25a). Figure 3.25a. Sharpening a pistil.
|
2. | Increase the brush to the size of the lower flower and brush that flower at 100% opacity (Figures 3.25b and 3.25c). Figure 3.25b.
Figure 3.25c.
|
3. | Paint on the inner parts of the flowers using the opacities you marked on the FLOWERS SHARPEN image map. The result can be seen on the FLOWERS SHARPEN layer mask (Figure 3.25d). Figure 3.25d.
|
4. | Hide the FLOWERS SHARPEN layer and make LEAVES SHARPEN visible and active. (If you used the Unsharp Mask filter, keep working on the SHARPEN layer.) Also, make the LEAVES SHARPEN IM image map visible. |
5. | Repeat the process of painting with white on the layer mask using the opacities that you sketched in earlier. Here are the changes in the lower flower area (Figures 3.25e, 3.25f, 3.25g, and 3.25h). Figure 3.25e.
Figure 3.25f.
Figure 3.25g.
Figure 3.25h. Sharpening the lower flower area.
|
6. | Make the layer FLOWERS SHARPEN (or SHARPEN if you used the Unsharp Mask filter) active, and turn off any image maps. Do “The Move,” rename the new layer MASTER 4, and save the file. |