Measure Twice, Cut Once
Step 1: Analyzing the Image and Creating Image Maps
As you have seen, it’s easy to be overwhelmed by the amount of work to be done on any image, whether simple or complex. In order to avoid that feeling, it’s best to break the task into manageable steps and attack them one at a time. The first step is to map out the image. Next, define the issues you must resolve in the image and how you want to approach them. Always work from global to granular. For me, the issues in the Stardust image are:
Remove the CCD color cast.
Remove the blue color cast from sunlight.
Create areas of selective depth of field.
Retouch the face (see note, below).
Light the image.
With those five issues in mind, I will show you how to create image maps and begin to develop a workflow specific to this image.
Note
For the Stardust image, I did some retouching work on the woman’s face that entailed adding several more layers to the ones I describe in this chapter. I will skip those steps here, in order to focus on creating the glamour lighting effect. However, they are included in the 100ppi reference version of the file that you will find on the DVD.
Step 2: Removing CCD Color Cast
1. | Using the Threshold adjustment layer method, as described in previous chapters, identify the black and white points. You are looking for “meaningful” black for the black point. For the white point, choose a point as close to the first white pixel as you can get, whether or not you can recognize shape or structure within it. Once the white and black points are established, mark them with color samplers. The white and black color samplers are visible in this image as crosshair targets #1 and #2 (Figures 4.4a, 4.4b, and 4.4c). Figure 4.4a. Color sampler marking the black point.
Figure 4.4b. Color sampler marking the white point.
Figure 4.4c. The image after the initial color cast has been removed.
|
2. | |
3. | Select Skylight Filter from the Nik Color Efex Pro 2.0: traditional filters menu. For this image, leave the default setting of 25% and click OK to run the filter (Figure 4.5). Figure 4.5. After applying the Nik Skylight filter.
|
4. | Do a Save As, save the file as a Photoshop document (.psd), and name it STARDUST 16BIT. |


Step 3: Creating Selective Depth of Field to Replicate Optical Lens Blur
Because we are trying to create a probable believability, we have to make sure that all of our choices mimic reality as captured with a glass lens. When you use such a lens, the effects are optically, and not digitally, created. One of these effects is that as blur increases, there is a tendency for contrast to diminish. This does not occur in Photoshop when blurring the image with Gaussian Blur or using just the Lens Blur tool. This step will illustrate how to realistically replicate optical lens blur.
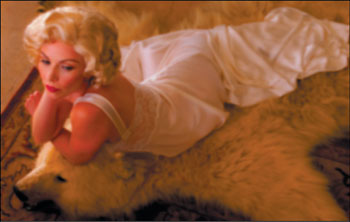
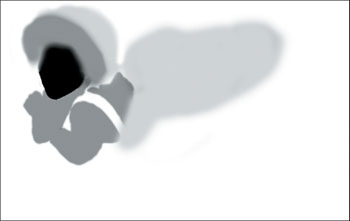
With this consideration in mind, you will be working with two aspects of controlling the unconscious eye: in focus to blur, and high contrast to low contrast. That’s because you want the eye to move from the face down the body. Specifically, you want the model’s face to be the central point of focus, then the front part of the model’s body, then the bear’s face, and then the upper background, which is the most out of focus. So blur and contrast go hand in hand for this image. Sharpness will be used very selectively (Figure 4.6a).
Figure 4.6a. The image map of how you are going to create selective depth of field.

1. | Duplicate the SKYLIGHT layer and name the new layer BLUR. Duplicate the BLUR layer and name it CONTRAST. Turn off the CONTRAST layer and make the BLUR layer active. |
2. | Choose Filter > Blur > Gaussian Blur, and use a radius of 8.8 pixels (Figures 4.6b and 4.6c). Figure 4.6b. The Gaussian Blur preview box.
Figure 4.6c. Applying the Gaussian Blur filter to the BLUR layer.
Note The amount of blur you apply to an image depends on the size of the file. The bigger the file, the higher the radius number or amount of blur. For this image, you want to blur it to the point where you can still see major image structure detail, but minor detail is smoothed out. For this reason, I chose the model’s face as the area to put in the preview box. |
3. | For the BLUR layer, create a layer mask filled with black. |
4. | Select a brush at an opacity of 75% and paint with white over the background of the upper part of the image. This reveals the blurred effect, which suggests shallow depth of field. |
5. | Change the opacity to 50% and brush the area from behind the model’s knees, all the way to the bear’s arm. At an opacity of 25%, paint the area just beneath the head of the bear, back into the area that you just brushed at 50%. Lower the layer opacity to 75 % (Figures 4.6d and 4.6e). Figure 4.6d. The blurring effect is revealed only in certain areas of the image by painting on a layer mask.
Figure 4.6e. What the layer mask looks like.
|
6. | Make the CONTRAST layer the active one. Select the Contrast Only filter from the Nik Color Efex Pro 2.0: traditional filters menu. The settings I came up with for this image were Saturation 52, Brightness 54, and Contrast 62. Click OK. Note I didn’t protect the shadows or highlights because the image didn’t need it. |
7. | Ctrl/Cmd-click on the BLUR layer’s layer mask and invert it (Shift-Ctrl-I/Shift-Cmd-I). Create a layer mask on the CONTRAST layer and lower the layer opacity to 75 % (Figures 4.6f and 4.6g). Figure 4.6f. Selective contrast applied.
Figure 4.6g. The CONTRAST layer mask.
|


Step 4: Using Curves to Create Dark-to-Light Areas
Now that you have created the desired depth of field and a more realistic relationship between in-focus-to-blur and contrast, it’s time to start building up the image’s light-to-dark/dark-to-light relationship. Again, you want the unconscious eye to move from the model’s face to the left side of her body, then to the right. Here’s the image map of how to do it (Figure 4.7a):
Figure 4.7a. The dark-to-light image map.

1. | Create a Curves adjustment layer. Click the center of the curve and drag it diagonally toward the lower right-hand corner, making sure not to clip the curve. Click OK to accept the change and close the dialog. Name this layer D2L LUM CURVE. This adjustment substantially darkens the image, except for the extreme highlights (Figures 4.7b and 4.7c). Figure 4.7b. Creating a curve to darken all but the bright highlights in the image.
Figure 4.7c. What the image looks like after darkening in the Normal blending mode.
Note To get a smaller grid pattern, Alt/Option-click on the grid. |
2. | Change the D2L CURVES adjustment layer’s blending mode from Normal to Luminosity. This ensures that the adjustment layer effects only the image’s lightness and darkness, not its color (Figure 4.7d). Figure 4.7d. The Luminosity blending mode applies an adjustment to only the brightness values in the image, leaving color values uneffected.
Note Darkening an image generally increases color saturation. Using the Luminosity blending mode applies the adjustment to the gray value (the luminescence) of each pixel, while preserving the color. |
3. | Following the image map and painting with black, brush in the face at 100%, the arms and front of the hair at 50%, and the back of the dress at 20% (Figures 4.7e and 4.7f). Figure 4.7e. The image after selective painting.
Figure 4.7f. The layer mask of the D2L CURVES adjustment layer.
|


Remember to increase and decrease your brush size where appropriate. One brush size does not fit all applications. To do that, use the bracket key (located next to the letter P). The left bracket key makes the brush smaller, the right bracket key makes it bigger.
Step 5: Creating Light-to-Dark Areas and Selectively Changing Apparent Contrast
As discussed in Chapter 2, contrast is the difference in brightness between the light and dark areas of a picture. If there is a large difference between the light and dark areas, then the result is an image with high contrast.
In Step 3 of this lesson, we increased and decreased contrast in relationship to depth of field. In Step 4, we addressed creating areas of dark-to-light by adding “darkness” to the image. The unconscious eye tracks from the lightest to the darkest area.
In this next step, you will further reinforce the movement of the unconscious eye from light-to-dark by selectively changing the apparent contrast of the image. (You have already created the relationship you like between light-to-dark and high-to-low-contrast.) How you are going to accomplish this is by creating two Curves adjustment layers: one that will address the image’s overall lightness and another that will address the image’s overall darkness.
1. | Create a Curves adjustment layer. In the dialog, click the curve’s center point and move it toward the upper-left corner, making sure that the arc of the curve is maintained and that it doesn’t flatten along the top or left side of the graph. Click OK. Select the blending mode Luminosity and name this layer L2D 1 LUM (Figures 4.8a and 4.8b). Figure 4.8a. The Curves adjustment layer.
Figure 4.8b.
You will use the next Curves adjustment layer a little differently. In order to diminish the apparent contrast between parts of the image, you are going to first darken the image, and then clip the curve. |
2. | Create a Curves adjustment layer. In the dialog, click the control point at the upper right end of the curve and drag it downward. Next, add a control point in the middle of the curve and drag it diagonally toward the lower right corner (Figure 4.8c). This substantially reduces the entire image’s brightness. Click OK to accept the change and close the dialog. Name this layer L2D 2 LUM. Figure 4.8c. Bringing the highlight and midtone point down in a Curves adjustment layer.
|
3. | With the L2D 2 LUM adjustment layer active, change its blending mode from Normal to Luminosity, and fill the Curves adjustment layer with black. With a brush at 75% opacity, paint the area behind the model. This allows part of the adjustment layer to effect the image. Change the brush opacity to 50%, and paint the area from behind her knees and lower legs to the lower-right corner of the image. With an opacity of 25%, paint the area from behind the bear’s ear to the edge of the area you just painted. Finally, lower the brush opacity to 20%, and paint the area just behind the model’s back (Figures 4.9a, 4.9b, 4.9c, and 4.9d). Figure 4.9a. The contrast image map.
Figure 4.9b. The effect of the L2D 2 LUM curves adjustment layer.
Figure 4.9c. The outcome of the brushwork and what the layer mask looks like. The model’s back, lower legs, and the foreground are darkened.
Figure 4.9d. The painted areas.
|


Step 6: Placing Lights with the Lighting Effects Filter
You have reached a point where you can no longer work in 16 bit, so the next step is to save the file. In the Save As dialog, uncheck the layers and rename the file STARDUST LIGHTING 8BIT.psd. Next, convert the image from 16-bit to 8-bit.
Note
Leave the STARDUST 16BIT.psd file open, so that if you later need something from it, you won’t have to waste time re-opening it.
1. | From the main menu, choose Image > Mode > 8 Bits/Channel to change the image’s color depth. Note For a discussion of the reasons for converting from 16-bit to 8-bit, see “Lighting the Image with Render > Lighting Effects,” in Chapter 1. |
2. | Create a new layer (Ctrl-J/Cmd-J) and name it LIGHTING BASE LAYER. |
3. | Choose Filter > Render > Lighting Effects. |
4. | From the Style pull-down at the top of the Lighting Effects dialog, select Soft Spotlight. Shape this first light by clicking each of the anchor points on the ellipse and dragging them to move the light so that it falls across the model’s face (Figures 4.10a and 4.10b). Figure 4.10a. The Lighting Effects dialog with the lighting style set to Soft Spotlight.
|
5. | When the first light is positioned where you want it, go to the Properties section of the dialog and move the Gloss slider to Shiny, the Material slider to Metallic, and increase Ambience until you start to see the rest of the image. Next, move the Exposure slider to –57. In the Light type area of the dialog, adjust the Intensity and Focus sliders to 68 and 7, respectively (Figure 4.10c). |
6. | Add a second light by clicking and dragging the lightbulb icon onto the image preview. For the light type, select Omni. Move the light so that the center point rests right on the model’s chin, and decrease the light size by dragging inward on the anchor points (Figures 4.10d and 4.10e). Figure 4.10d. Adding a second light source.
Figure 4.10e. Setting the new light source to Omni, adjusting its size, and positioning it over the model’s chin.
|
7. | Click the lightbulb icon again, and drag a third light to the area just behind the model’s head and above her left thigh. Select Omni as the light type and decrease its intensity to 32 (Figure 4.11a). Figure 4.11a. Adding another Omni light source just behind the model’s head and above her left thigh.
One other area in this image requires a light adjustment: the bear’s eyes. |
8. | Drag the lightbulb icon to a spot just above the bear’s eyes. Drag the anchors so that the light falls across the bear’s face. Increase intensity to Full and focus to Wide (Figures 4.11b and 4.11c). Click OK. Figure 4.11c. The result of the Lighting Effects filter on the layer.
|
9. | Add a black-filled layer mask to this layer. Select a smaller brush at 25% opacity with white as the foreground color. Paint over the areas across the model’s eyes and part of her forehead. Reduce the opacity to 20% and decrease the brush size to a diameter that is slightly smaller than the lips, and drag the brush over them. Still at 20% opacity, paint over the highlighted area along the tops of her thighs and knees. Use 20% opacity for the area around the bear’s eyes, then at 50% opacity, paint in the area from the lower leg of the bearskin rug to the upper leg. Don’t brush over the area of the model’s thighs and knees that you brushed at 20% (Figures 4.12a, 4.12b, and 4.12c). Figure 4.12a. The Lighting Effects image map.
Figure 4.12b. What the layer mask looks like.
Figure 4.12c. The result of selectively revealing areas of the layer where the Lighting Effects filter has been applied.
The objective of this lesson is to believably replicate a very specific approach to lighting—Hurrell’s butterfly lighting—as well as replicate the quality of the light that approach produces. You now have an image that is nearly right, but not quite. Even after the corrections you have made that were designed to address the issues of light-to-dark and contrast, you still have some problems in these areas. Because your approach to workflow has been to always give yourself an exit strategy by preserving all the layers that you create, you have built in a way to use the work you have already done, so that you don’t have to re-invent the wheel. |
10. | Make STARDUST 16BIT.psd the active file. (It should still be open.) Make the layer L2D 2 LUM the active layer and shift-drag it onto STARDUST LIGHTING 8BIT.psd. Close the file STARDUST 16BIT.psd. The image should now look like Figure 4.13. Figure 4.13. Before.
|
11. | Make the adjustment layer’s layer mask active. With the foreground color set to white, choose a 200-pixel brush at 25% opacity and paint the area around the cheeks and neck, the back and arm, and the arm beneath the face. Reduce the brush to 100 pixels and brush in the area just under the nose. Select the blending mode Soft Light and rename the layer L2D SOFTLIGHT (Figures 4.14a, 4.14b, and 4.14c). Figure 4.14a. The image map.
Figure 4.14b. What the layer mask looks like.
Figure 4.14c. After darkening the cheeks, neck, back, and arms by modifying the layer mask of L2D 2 SOFTLIGHT and changing the blending mode from Luminosity to Soft Light.
Note According to Adobe, the blending mode Soft Light “darkens or lightens the colors, depending on the blend color. The effect is similar to shining a diffused spotlight on the image.” This means that if the blend color (the light source) is lighter than 50% gray, the image becomes lightened as if it were dodged. If the blend color is darker than 50% gray, the image becomes darkened as if it were burned in. Painting with pure black or white produces a distinctly darker or lighter area, but does not result in pure black or white. |
12. | Do “The Move,” name this layer MASTER LIGHT 1, and save the file. |


Step 7: Adding a Butterfly Shadow
When adding shadowing to images, it’s a common mistake to not take into account the color of the shadow.
Note
See also “Creating a Realistic Shadow,” in Chapter 1.
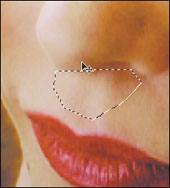
1. | Zoom in on the area of the nose and mouth. With the eyedropper, sample the color of the shadow just below the nose (Figure 4.15a). The foreground color now reflects the color of the shadow. |
2. | Create a new layer. With the Polygonal Lasso, make a selection like the one shown, and feather it by 5 pixels. The marching-ants selection border indicates the pixels that are at least 50% selected. Fill the selection with the foreground color (Figures 4.15b and 4.15c). Figure 4.15b. Selecting an area under the nose with the Polygonal Lasso tool.
Figure 4.15c. After filling the feathered selection with the foreground shadow color.
|
3. | Apply 5.3 pixels of Gaussian blur. Create a layer mask and brush around the shadow with a 40-pixel brush until you are happy with the size. (Remember to use the edge of the brush.) Now, reduce the opacity of the layer until it looks realistic; 15% is about right (Figure 4.15d). Figure 4.15d. Lowering the shadow layer’s opacity helps create a natural-looking shadow.
|