
Before we leave off talking about visuals—photos, illustrations and infographics—let’s cover storyboarding, too. Storyboards lay out the visual stories of planned video and film, including the animated sorts. In most cases, then, storyboarding involves representing moving pictures and sound with still pictures and type.
A storyboard visualizes the entire project in the form of individual scenes, shots or screens. A concept storyboard distills the project down to the minimum number of views necessary to tell the story. A production storyboard or a shooting storyboard provides more detailed information for a production crew.
If you’re planning to produce video or film of some kind, you will enlist preproduction, production and postproduction assistance from professionals. But you still may find yourself concepting a storyboard for a TV commercial or spot, a public service announcement (PSA), a corporate video, a video news release (VNR) or even an animated banner ad. Sometimes a feature news film package also benefits from a storyboard.
Whatever the project or your role in the process, this chapter gives you some of the basics of storyboarding.
GETTING STARTED
Once you have a storyboard project, you have to think about how to tell the story shot by shot. Much of what we’ve covered in earlier chapters comes to bear in storyboarding. You begin with research and brainstorming for a concept. You account for format and aspect ratio, and you experiment with visual composition using thumbnail sketches.
The elements of design—space, line, shape, size, pattern, texture, value— become your tools for telling visual stories. As you’ll see, the principles of design, including focal point, contrast, balance, movement, rhythm, perspective and unity, also become important storyboarding tools.
You don’t have to be an accomplished illustrator to create a storyboard, either. You can indicate your ideas with rough drawing and stick figures, just as you would with thumbnail sketches. Or you can use, mix and match stock images, whether photography or line art. If you fancy yourself a photographer, you might even grab a camera.
Photo © mipan Fotolia.com
Our point is that you already have a fairly large visual toolbox for dramatic storyboarding. So take advantage of it. Your eyes, however, continue to be the most useful tool in your toolbox. As to acquiring new tools for storyboarding, below we provide some necessities regarding:
♦ Framing the Shot
♦ Perspective
♦ POV
♦ Camera Angle
♦ Movement
♦ Continuity
♦ Transitions
♦ Lighting
♦ Type
♦ Audio
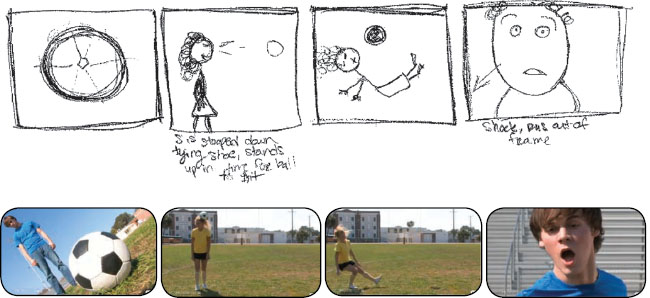
Storyboards, from thumbnail sketch to screen grab. Student filmmaker Sarah Wilson first sketched her ideas before committing her cast and crew to the week of shooting and editing it took to produce her award-winning short film “Rhapsody.” In the sequence shown here, the POV is omniscient. Notice how the first shot of this scene in the final film demonstrates a low-angle shot from below, as well as a canted camera angle producing a dynamically tilted horizon line.
“Rhapsody” storyboards and screen captures reproduced by permission of Sarah Wilson.
A VISUAL GLOSSARY OF WAYS TO THE SHOT
|
Extreme Close-up |
Medium Close-up |
Full Close-up |


|
Wide Close-up |
Close Shot |
Medium Close Shot |


|
Medium Shot |
Medium Full Shot |
Full Shot |


|
Long Shot |
Montage |
Split-screen |


Your direction for how to frame a scene within the four corners of the visual screen is called framing the shot. Common shots include variations on the close-up, medium, full and long shot. Other frames include the split-screen and montage.
An establishing shot orients viewers to the visual scene in order to avoid confusion before proceeding with the story.
Advertising giant David Ogilvy reminded would-be advertisers to make the product the hero. A beauty shot frames an object or product to show off its best visual features, as if it were a movie star. “All right, Mr. DeMille, I’m ready for my close-up,” said the aging film star Gloria Swanson playing an aging film star in the 1950 film”Sunset Boulevard.”
The farther the transparent “fourth wall” of the screen lies from the focal point of the shot, the more impersonal the symbolic tone. As the fourth wall moves closer to the focal point, the audience feels increasingly intimate with the focal point, whether it’s a person or a thing.
PERSPECTIVE
Perspective as a design principle becomes especially important in film and video, thus in storyboarding, too. If framing refers to how the shot crops the viewer’s visual field, perspective refers to how deeply the viewer sees into the shot.
You’ll recall that where the horizon line sits in the composition communicates distance to the viewer. Atmospheric perspective via value as well as linear perspective via flowing sightline and vanishing point also help establish the scale of distance. Speaking of scale, perspective by relative size of objects in the shot can enrich the sense of distance, such as framing a sweeping vista in the background with two human figures in the foreground. And remember that depth of field refers to what in the shot remains in focus and what goes out of focus, whether foreground, midground, background or some combination.
More than communicating literal spatial distance in the narrative, perspective also communicates a sense of emotional distance or, conversely, intimacy. Perspective also may communicate symbolic meanings such as a sense of freedom from wide-open spaces versus the tension and anxiety of oppressive low-ceiling closed spaces. Yet a small close space also may seem warm and sheltering while a vast sky or plain may send a lonesome message about human frailty.
Create emphasis with depth of field. A beauty shot of an American Beauty? In the top image, the rose in the foreground establishes a sense of distance thus perspective in a composition directing the eye toward the background and a porch with a hanging basket fern. But in the bottom image, a shallow depth of field transforms the rose into the focal point.

POV
Perspective also leads to considering the camera’s point of view or POV. If you think about the camera (or the screen) as an eye that looks, you need to think about whose eye is supposed to be doing the looking. While the viewing audience is always the implied eye, you can nudge the audience to identify with different points of view in the story.
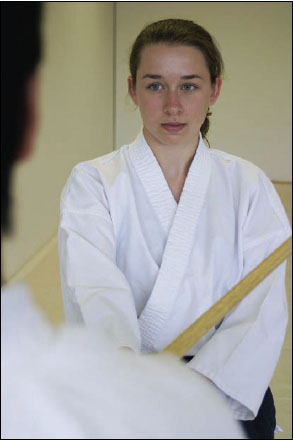
POV. An over-the-shoul-der camera angle with a third-person POV is one effective way to represent two people interacting.
Do you want the audience to remain an invisible omniscient third-person eye observing the story?
Or do you want the audience to participate in the story by seeing with the same eye as the protagonist? For example, both protagonist and audience, through the camera lens or screen, may look the villain in the eye to stare her or him down.
Or should the audience see as the villain sees, while she or he sneaks up to peer over an unsuspecting shoulder? In Alfred Hitchcock’s famous shower scene from the 1960 “Psycho,” Hitchcock famously shifts the audience’s POV between victim and villain.
If two people on screen are to have a conversation, you probably need to provide a third-person establishing shot of the two people framed together if you are going to alternate back and forth between the two characters’ first-person POVs.
Sometimes you want the viewer to ignore the fourth wall in order to participate in an admittedly one-way conversation with an on-screen personality who maybe offers a how-to, reads the news, sells a product or runs a yoga class.
In short, plan the POV.
CAMERA ANGLE
Planning the camera’s angle also relates to POV and perspective. In addition to shooting straight on or level, there are other ways to position the camera’s angle for effect. A canted or tilted camera angle creates a sense of unease by tilting the horizon line and upsetting the viewer’s visual equilibrium.
Framing the shot from above, as if the camera were looking down on the focal point, can make the focal point seem small, communicating symbolic insignificance and powerlessness. Shooting the focal point from below can have the opposite effect, communicating the focal point’s larger size and power. Both angles also can make for a comic effect because they tend to distort the proportions of the focal point. So be careful. Hard news, assumed to be objective, would avoid special effects angles.

Think beyond shooting from the front at eye-level. Use camera angle to help tell your story, such as this high-angle breakfast-in-bed scene shot from above. Shooting down on the bed flattens the scene in terms of perspective but highlights texture and pattern.
You don’t always have to shoot from the front, either. You may decide to shoot from behind, from the side or at a 45-degree angle. Mix it up, but do it with a visual communication purpose compatible with your subject matter and tone.
MOVEMENT
The design principle of movement shifts from being implied in stop-action pictures to being literal in live-action ones. Storyboarding movement shots involves knowing another vocabulary.
For example, a pan or panning indicates a stationary camera that sweeps across the scene. The effect is that of turning your head to look around. In a truck, usually accomplished with a camera on a dolly, the camera trucks sideways across the scene. The effect is like rubbernecking from a moving car.
Handheld refers to the cameraperson holding the camera as she or he walks or runs through the scene—resulting in a bumpy visual ride. This can increase realism, as in breaking news footage, but may be difficult to watch for long periods of time. The steadicam is a kind of harness the cameraperson wears to hold the camera steady as she or he shoots a handheld scene.
In a tracking shot, a stationary camera tracks along with a moving focal point. Think of the classic 1967 Patterson Bigfoot film tracking a tall hairy arm-swinging two-legged creature looking right at the camera as it walks off into the woods. Hoax or not, it’s a memorable example of a tracking shot.
Push shots push into the scene. In a zoom, a stationary camera pushes into the scene by using the lens to zoom in on the focal point. In a dolly shot, the camera itself, positioned on a dolly, moves or pushes toward the focal point.
As is often the case, purity here is not required. You might achieve several effects at once. The infamous Bigfoot tracking shot is obviously handheld. We’ve seen movie scenes in which the camera pans and zooms from atop a trucking dolly.


Movement. This sequence demonstrates tracking. A stationary camera tracks along with the on-screen action-as-focal-point, which here is moving left to right.The effect is like turning your head to watch. In the example, the composition of each frame keeps the bicyclist positioned to the left of the scene but moving toward the negative space positioned to the right.Without that negative space, the action would appear to “hit a brick wall” or just disappear off screen.
CONTINUITY
Unity is critical when you’re telling one story using many shots. Each shot must build on the previous one and prepare for the next. That makes for narrative continuity. Does the visual story hold together as one cohesive narrative from beginning to end and from shot to shot? Are the POV and chronology clear to avoid confusing the audience? Is the dramatic or comedic timing impeccable?
Think of your storyboard as having an obvious beginning, middle and end. Make each pull its visual storytelling workload. Beginnings should capture attention immediately—no warm-up necessary—and establish the relevant W’s. Middles do exposition and drama. That’s the convey information and evoke emotions part. Endings put closure on the tale or ask for the sale. Advertising always ends with a call to action, whether explicit or implicit.
Speaking of advertising, timing takes on special significance if you only have 10, 15 or 30 seconds of exposition. You can’t storyboard a :60 or even a :12 if you only have :10.
Regardless of the type of project, make sure your storyboard is doable given your time constraints. Where appropriate, indicate the timing of shots on the storyboard, use a watch to test your timing and make sure your math is accurate.
TRANSITIONS
In film and video, part of continuity is transitioning or segueing between shots and scenes. The most common type of transition is the simple cut from one shot to the next, such as cutting from an establishing shot of two actors conversing to a close-up of one of the actors speaking.
A cutaway “cuts away” from the main action by inserting something else going on simultaneously in the scene. If the scene shows two arguing people standing beside a car stopped on the side of the road, inserting a shot of the dog’s head poked out the car window watching the argument is a cutaway. A shot of cars whizzing past the arguing people would be a cutaway, too.
A cut-in or insert’cuts in” or”inserts” a close-up shot of something significant to the meaning of the scene. In the scene of two people arguing beside a car stopped on the side of the road, inserting a shot of the flat tire on the stopped car would be a cut-in underscoring the reason for the stopped car and ensuing argument.

Fill light. Fill light applied to the bottom scene adds needed light in shadowed areas.
You have to be careful with cutting so the viewer can keep up with the chronology of events. Some kinds of transitions are helpful for indicating different events occurring simultaneously, perhaps even in different locations, or, conversely, flashbacks in time. But, again, make sure the viewer is keeping up.
The wipe, dissolve and fade each transition between shots in the manner their names imply. These transitions, while time-honored in the hands of professionals, may come off as cheesy or kitschy if you’re not careful, however.
LIGHTING
In storyboarding, you can use light and shadow for dramatic effect. Here the principle of contrast comes into play.
A key light is the main or key light source in the shot, whether natural or artificial. Fill light supplements the key light by filling in unwanted shadows for less contrast. Backlight is a light source used to highlight the focal point from behind to give it contrast and dimension. Most shots require a combination of all three light sources to produce what viewers would perceive as a natural or realistic effect.
For additional drama, you might consider the amount and direction of light. Soft light or high key evens out the shadows to decrease harsh contrasts. It makes people and products look more attractive. (“I’m ready for my close-up.”) Hard light or low key emphasizes shadows, thus contrast, including shadows on people’s faces—an interesting if less-than-flattering effect.
A key light shining directly from above (over lighting) or from below (under lighting) can form sinister shadows, especially on people’s faces. Backlighting can make a focal point appear angelic with a halo effect or make the focal point appear powerful or significant (think backlit grand stage entrances of silhouetted super heroes, rock stars or pro wrestlers). Side lighting casts long shadows and increases the sense of three-dimensional space, as opposed to the flattening effect of soft light.
As you storyboard, think about how you might cast light as a supporting actor in your story. All these effects work for inanimate objects, too, as well as information graphics. A side light on a pie chart gives it shadow and dimension. Go easy, though. Like a backlit super hero, overly dramatic lighting not only may seem cartoon-like when that isn’t your intent but also may distract viewers from your visual communication purpose.

Lower Third. In TV business lingo,”lower third” refers to supers, which mostly appear somewhere in the lower third of the screen.
Remember the rule of thirds? And foreground, midground and background? Foreground, at the bottom of the screen, appears closer than mid-or background. Hence, supers get the lower third.
The lower third super might be copy or an image like a logo. It can be static or a crawl. But it must be visible and readable, especially if overlaid on moving images.Why is Channel 7’s “Morning News” super readable?
Photo © David Lawrence - Fotolia.com
TYPE
Last we move on to dealing with words and sounds, whether onscreen or off and whether part of the show or merely behind-the-camera direction.
As for on-screen type, a super is any type or graphic superimposed over a picture. A crawl is moving type running—or crawling—across the screen. You see this on cable news channels or when your area comes under a severe weather alert.
When you super, design for typographic readability and legibility, whether the super is static or animated. Contrast, thus color and value, are crucial, whether you reverse or not.
AUDIO
In a chapter about storyboarding in a book about visual communication, audio becomes the proverbial elephant in the room. Hello—sound? If your storyboard project includes audio, you obviously have to represent it visually on the storyboard by using textual direction.
Using a script setup, type your audio direction to correspond with visuals. Make your intent abundantly clear, including who is speaking when.
Also specify direction for things such as music, sound effects (SFX) or visual effects (FX). An off-screen voice, narrator or announcer (ANNCR) is called a voiceover, indicated as VO. Background music is called a music bed or track.
As far as dialogue goes, nothing is more difficult to write well. And nothing is worse than stilted unnatural repartee. So fair warning. We advise amateurs to develop concepts that avoid multiple characters engaged in dialogue, especially in extended conversations, which provide little visual interest anyway. “Show, don’t tell.”
On the other hand, don’t shortchange audio because you’ve become a visual communicator. Audio—ear candy—can make or break your visual story. Think creatively and include the details on your storyboard.
AFTER THE STORYBOARD
After the storyboard and before the actual production shoot, there may be an in-between stage that cheaply simulates what the storyboard might look like as live action. This generally is done using software to cut together rough approximations of the shots. It might be accomplished with stock, archived or homemade footage or stills that come as near as possible to the storyboard’s visuals. Or you might use animated illustrations or cartoons.
These kinds of preproduction pieces have been called spec cuts, videomatics, animatics and ripomatics. They tend to be more impressive, thus persuasive, when you’re presenting your storyboard to the conceptually challenged or to the person holding the purse strings. But, lest we wax creative snobbery, speculative cuts also can be helpful as narrative, shot and timing trials before you start spending big bucks on production.
And that leads us, at last, to some final advice concerning production budgets: KISS. Video production is expensive, and film, even more so. Hollywood director Cecil B. DeMille developed a reputation for visual spectacle using elaborate productions and, as the expression goes, casts of thousands. But he had the financial backing of the Hollywood studio system. We’re guessing you work with more modest budgets.
If you’re a beginner, focus on generating a killer concept. No amount of money can make a bad concept look good. The best concepts are usually the most parsimonious anyway. Don’t script for two warm bodies when one will do. Don’t storyboard an on-location shoot if you can get away with a studio shoot. Don’t storyboard multiple sets if one is sufficient. And don’t storyboard more shots than necessary. If it isn’t vital to advancing the story, cut it.
Be smart, have fun, and, as they say, “Break a leg.”
1. Develop a concept for a short educational video on storyboarding. Then execute a storyboard for your concept.
2. Storyboard a favorite scene from a favorite movie. Account for:
♦ Framing
♦ Perspective
♦ POV
♦ Camera Angle
♦ Movement
♦ Continuity
♦ Transitions
♦ Lighting
♦ Type
♦ Audio
How does each contribute to the narrative?
3. Storyboard a TV commercial currently running. Account for:
♦ Framing
♦ Perspective
♦ POV
♦ Camera Angle
♦ Movement
♦ Continuity
♦ Transitions
♦ Lighting
♦ Type
♦ Audio
How does each contribute to the narrative?
4. Remember the Patterson Bigfoot film? Let’s get silly to make a serious point. Choose three of the following and storyboard a few conceptual frames for each:
♦ A music video starring Bigfoot
♦ A televised interview with Bigfoot
♦ A reality-style episodic show featuring Bigfoot
♦ A wildlife cinematic extravaganza on Bigfoot in its natural habitat
♦ A sports highlights-style review of Bigfoot sightings
♦ An infomercial teaming up Patterson and Bigfoot to sell product
♦ A corporate training video using Bigfoot as the spokes model
♦ A PSA of some kind using Bigfoot as the spokes—ahem—person
This is definitely a use-your-imagination no-holds-barred exercise. Don’t forget that “experts” believe the Patterson Bigfoot is female.
5. Storyboard a new :15 TV spot for a commercial consumer product currently in your kitchen, pantry, laundry room or bathroom. Start with a unique selling proposition (USP) or claim about the product. Then develop a concept. You know the rest of the drill by now.


Embedded photos reprinted by permission of Kathi Roberts.