3. Exposure Simplified
Understanding ISO, Aperture, and Shutter Speed: Their Relationship to Each Other and to Light
Photography is the language of light. The quality, quantity, and direction of light adds drama and mood to your images. If a picture is worth a thousands words, then exposure must be the dictionary filled with rich vocabulary from which you find the “words” that so eloquently tell your story of wild and wonderful encounters with nature through your images. Understanding the elements that make up the exposure triangle (ISO, aperture, shutter speed) allows you to control depth of field (aperture), stop action or blur motion (shutter speed), and your sensor’s sensitivity to light (ISO).
Poring Over the Picture
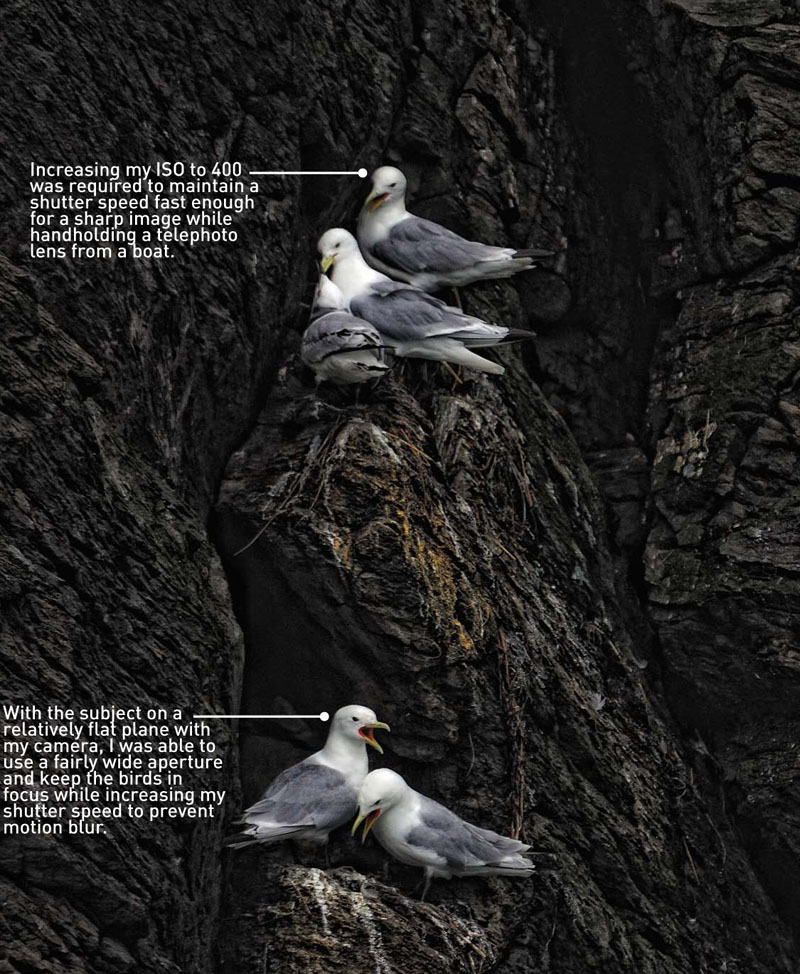
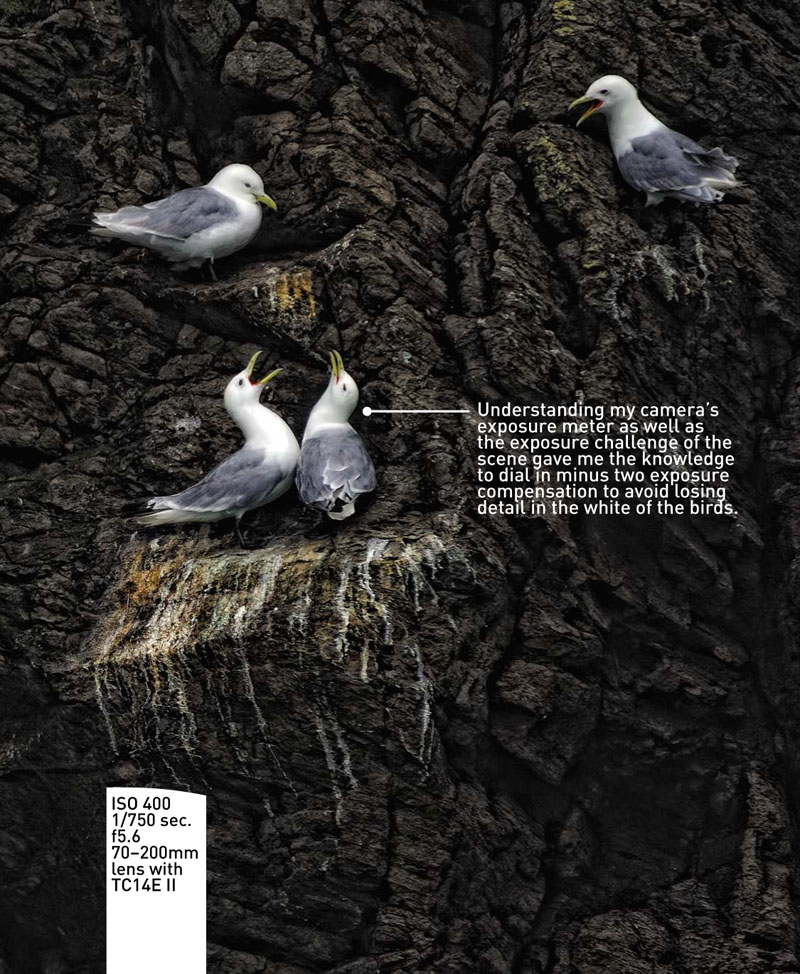
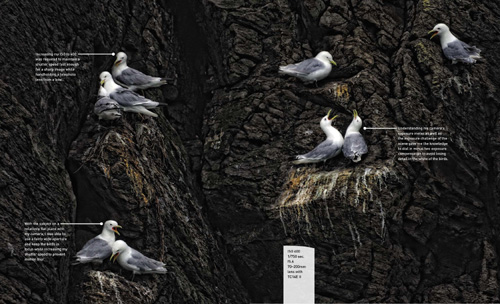
When faced with an exposure challenge of small, light subjects against a large, dark background, a decision must be made as to what creative exposure combination will best capture the essence of the Black-legged Kittiwakes precariously nesting on a rock face.
Poring Over the Picture
In most situations I simply rely on my camera’s exposure meter to determine my base exposure and adjust ISO, aperture, and shutter speed to capture the effect I desire. But when faced with lighting challenges, having a good understanding of light and my camera’s meter gives me the skill to make appropriate exposure decisions that result in images that represent my vision.
Exposure Defined
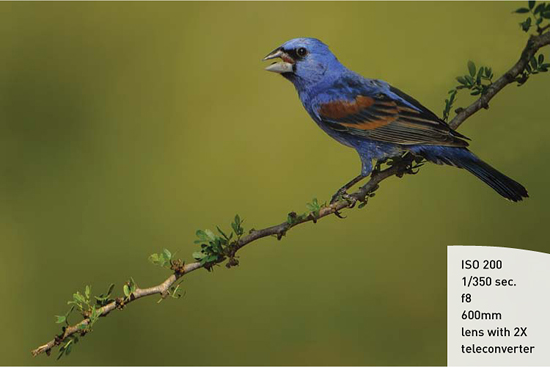
“What’s your exposure?” is a question I am asked frequently when in the field. What is exposure? Wikipedia defines exposure as the total amount of light allowed to fall on the photographic medium (sensor) during the process of taking a photograph. The three elements that play big roles in the making of well-exposed images are ISO, aperture, and shutter speed. When properly mixed and matched in various combinations, those three elements provide your image with the mood you are trying to convey. Today’s cameras are highly sophisticated machines. They can evaluate a scene and calculate what they consider to be a good exposure based on selected criteria that you have dialed into your camera, all in a split second. That criteria includes ISO, aperture, or shutter speed, as well as the focal length of your lens, and yes, even adding in the focal point used in the overall calculation. In even, mid-tone scenes (Figure 3.1) I rely on my camera’s built-in light meter to give me the proper exposure value. I select the appropriate ISO and aperture to suit my vision of the finished image and then let my camera match the correct shutter speed based on my settings and the light.
Figure 3.1 Diffused, even light allowed me to let my camera establish the correct exposure value for this Blue Grosbeak while I concentrated on the bird’s behavior.
Let’s take a look at ISO, aperture, and shutter speed—the three elements that make up the exposure triangle—their relationship to each other and to light, and how the various combinations of the three affect the end result of your images.
Exposure Triangle
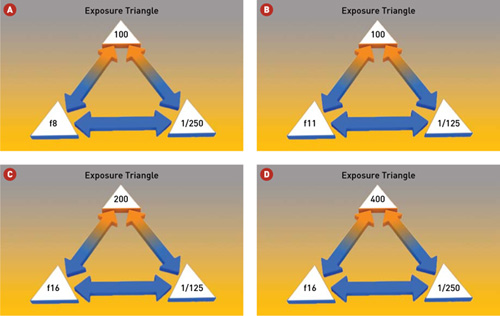
For every correct exposure there are several exposure combinations that will result in the same exposure value but with very different results in the overall look of your images. Which combination you choose is directly related to the story you want to tell—from a sharp, storytelling image where everything is in focus (great depth of field) to one where the subject stands out in sharp relief against the softly blurred background (shallow depth of field), which is controlled by the aperture you select. When the light is low, the ISO you choose directly impacts the aperture and shutter speed combinations available; the trade-off for increased ISO may be greater noise in your images. And the shutter speed you end up with determines whether you will stop action (fast shutter speed) or blur motion (slow shutter speed). If any one element changes, the other settings will be affected. Using the exposure triangles in Figure 3.2 as a starting point, let’s look at the result of changing your settings.
Figure 3.2 A The exposure triangle with a basic exposure on a partly sunny day: ISO is set to 100, aperture is set to f8, and the resulting shutter speed is 1/250 sec.
B 100 ISO, f11 at 1/125 sec. Changing the aperture from f8 to f11 causes the shutter speed to slow from 1/250 sec to 1/125 sec.
C 200 ISO, f16 at 1/125 sec. If you need to maintain the shutter speed you have but still need more depth of field, increase the ISO to 200 and close down the aperture to f/16 while staying at 1/125 sec.
D 400 ISO, f16 at 1/250 sec. If you need to increase the shutter speed but still keep the depth of field, increase the ISO to 400 and leave the aperture at f/16, which increases the shutter speed to 1/250 sec.
Note
Each of the exposure settings in Figure 3.2 is the equivalent of the same amount of light reaching the sensor. But the result can be dramatically different depending on the combination you choose in a given situation.
ISO
ISO is the camera sensor’s sensitivity to light. The lower the number (100, 200, etc.), the brighter the light needed to make a correct exposure. A tripod will aid in capturing sharp images with low ISO settings. With low ISO settings (Figure 3.3), you’ll notice ultrafine detail and smooth-looking images with low noise. One big advantage to digital cameras is the ability to change ISO from one frame to the next as the light levels dictate. Even with the low noise capabilities of today’s digital cameras, I keep my ISO set to the lowest I can get away with to ensure the best quality possible in my images.
Figure 3.3 Setting the camera to its lowest ISO setting of 200 produced a smooth, noise-free sky.
Higher ISO settings (800, 1600, etc.) allow you to maintain a faster shutter speed or smaller aperture in low light. The resulting effect of high ISO is more noise (Figure 3.4). Even though I prefer to keep my ISO as low as I can, if raising the ISO makes the difference between capturing a sharp, noisy image and one that ends up being deleted because it is blurred due to slow shutter speeds that were unable to stop the action, I’ll choose a higher ISO. High ISO settings enable me to handhold my camera in low light.
Figure 3.4 The low light of late-evening skies forced me to increase my ISO to capture a late-night visitor outside my cabin in Alaska.
I start every exposure by setting my ISO value first, based on the amount of light for a given scene.
Aperture
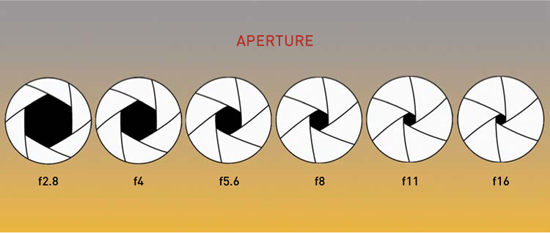
Aperture (often referred to as an f-stop) is the size of the lens opening that allows light to pass through to the sensor. The aperture I select is so important to the appearance I am able to capture in my images that I nearly always shoot in Aperture Priority. It is also the element of the exposure triangle that is the most confusing to many people. Let’s take a look at apertures and their role in the exposure equation. The smaller the aperture number (2.8, 4.0, etc.), the bigger the lens opening (Figure 3.5). The bigger the lens opening, the more light is let through the diaphragm.
Figure 3.5 Small numbers equal less depth of field; large numbers equal more depth of field.
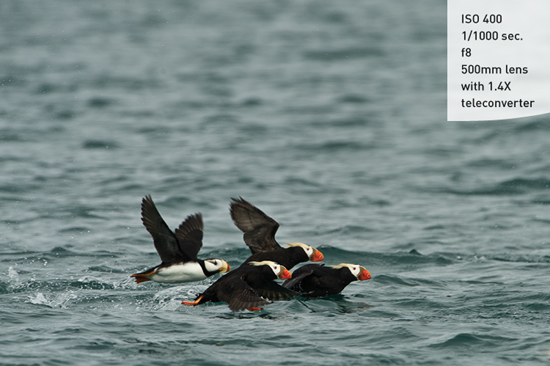
Wider apertures produce less depth of field (Figure 3.6) for a selective focus look and faster shutter speeds (Figure 3.7) to stop action and allow me to handhold my camera.
Figure 3.6 A wide aperture blurs the background into a palette of soft colors, making the Great Blue Heron stand out against the background.
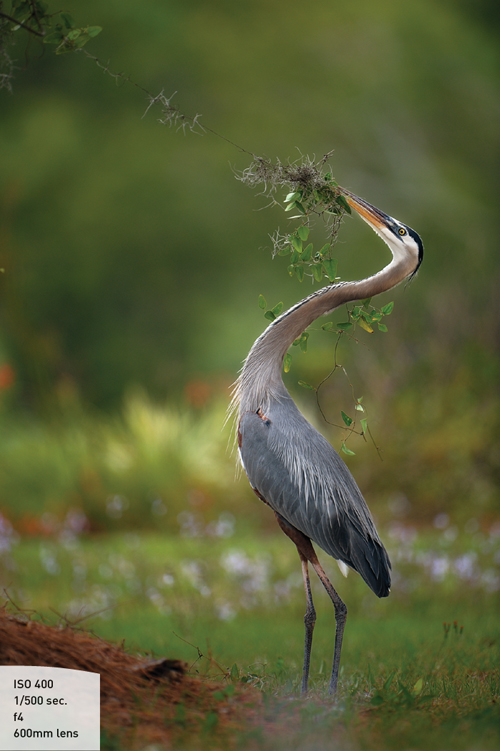
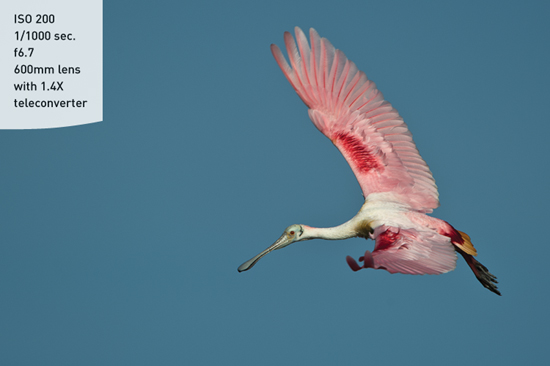
Figure 3.7 I needed a fast shutter speed to capture the puffins sharp in mid-flight.
The bigger the number (f11, f16, etc.), the smaller the lens opening. Smaller apertures produce greater depth of field (Figure 3.8) and slow shutter speeds (Figure 3.9), requiring the use of a tripod for stability.
Figure 3.8 A small aperture allowed me to get all three Hooded Mergansers in focus.
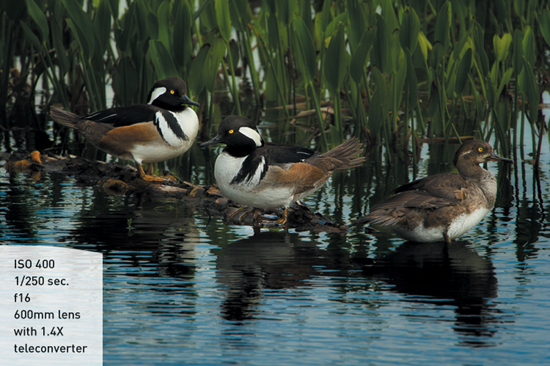
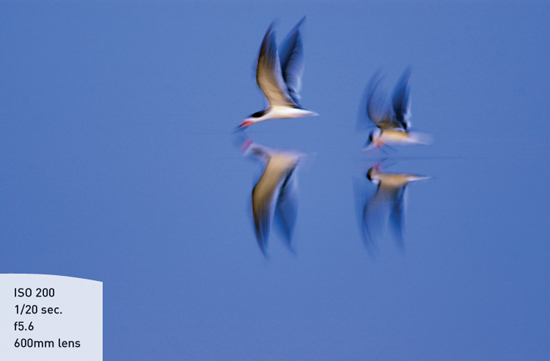
Figure 3.9 A slow shutter speed created a romantic blur as a pair of Black Skimmers are reflected in the mirror-like water as they fish at twilight.
Shutter Speed
The shutter speed is the length of time the shutter remains open, allowing the light to pass through the aperture and onto the sensor (Figure 3.10).
Figure 3.10 A shutter-speed graph.
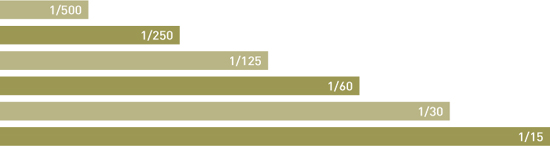
A fast shutter speed (1/500, 1/1000, etc.) stops action. Bright light or a high ISO setting is required to stop action (Figure 3.11). Handholding the camera is easiest with a fast shutter speed. Slow shutter speeds (1/15, 1/30, etc.) blur motion (Figure 3.12). A tripod is an essential tool in the making of blur-motion images to get a smooth panning action.
Figure 3.11 A fast shutter speed stopped the spraying water drops in midair as a Common Grackle bathed.
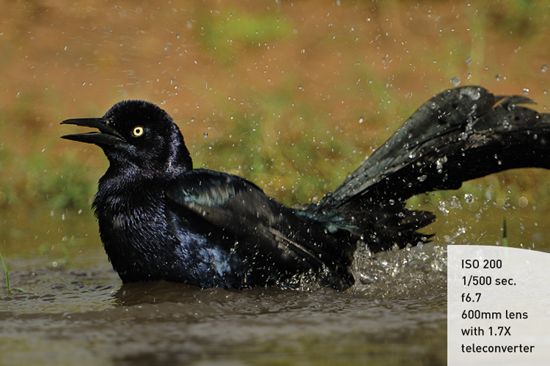
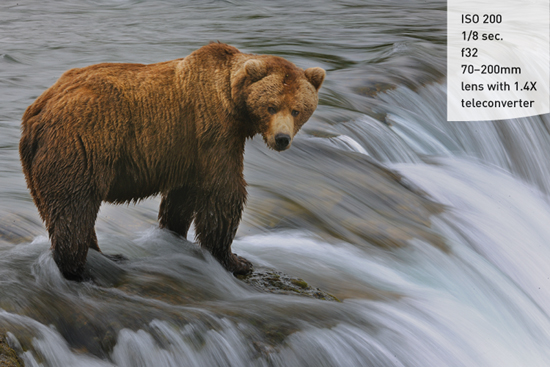
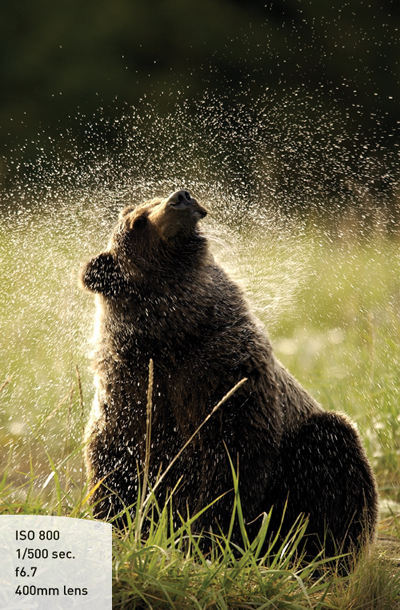
Figure 3.12 A sense of motion is captured with a slow shutter speed, blurring the water while keeping the motionless bear sharp.
Light
Light is the basis of all your exposures. Light is ever-changing and wildlife is constantly moving, so you must be ready at a moment’s notice to adjust the settings on your camera to deal with the changing light to capture the spontaneity of a fleeting instant.
Your camera meters the amount of light in a given situation, evaluates the settings you have made, and formulates an exposure. The brighter the light, the faster the shutter speed to stop action, the smaller the aperture for great depth of field, and the lower the ISO for noise-free images. The lower the light, the slower the shutter speed, resulting in blurred motion. A wider aperture renders shallow depth of field. High ISO settings allow shooting in lower light with a cost of greater noise. The direction and quality of light adds mood and drama to your images. How you handle that light and where you place yourself to capture that light all plays into the end result, your image.
Quality and Quantity of Light
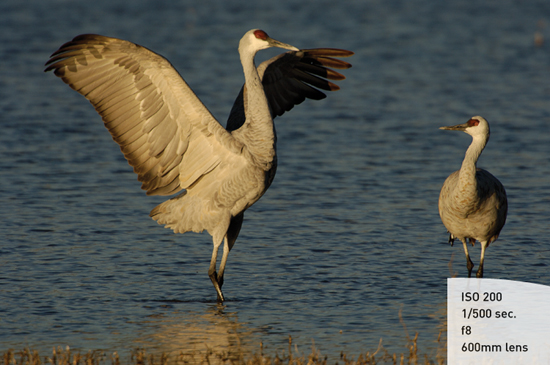
Quality and quantity of light go hand-in-hand. Many situations that have the best light also have low light, whereas the times of day with the greatest amount of light are often too bright and contrasty for the quality of light you are looking to record. Dedicated wildlife photographers will get up at o’dark thirty and head out to be in place and ready for sunrise to capture the golden colors of early morning light bathing their subjects in a warm glow (Figure 3.13).
Figure 3.13 With the sun over my shoulder, the warm light casts an even glow on the sandhill crane, emphasizing the feather detail.

In a matter of minutes the sun rises higher in the sky, the warmth of the early light fades away, and the quality of light moves into cooler tones, changing the mood entirely (Figure 3.14).
Figure 3.14 The angle of the sun changes the quality of light. Cooler tones prevail around mid-morning.
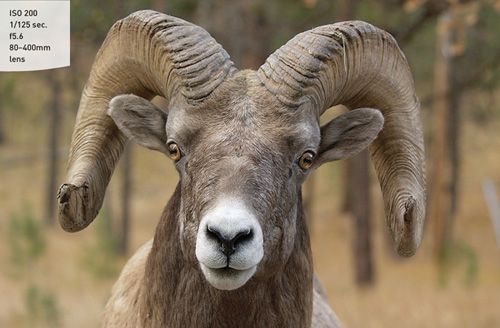
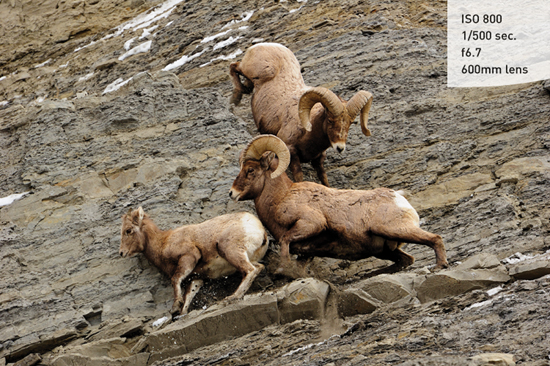
Overcast light is a good, safe light for photographing mammals and birds (Figure 3.15). The light is soft and diffused, enabling you to capture the greatest detail along with good color saturation. Once the beautiful light of early morning is gone, I prefer an overcast day to prolong my shooting time.
Figure 3.15 The diffused light of an overcast day enhanced the detail in the hair and horns of a Bighorn sheep.
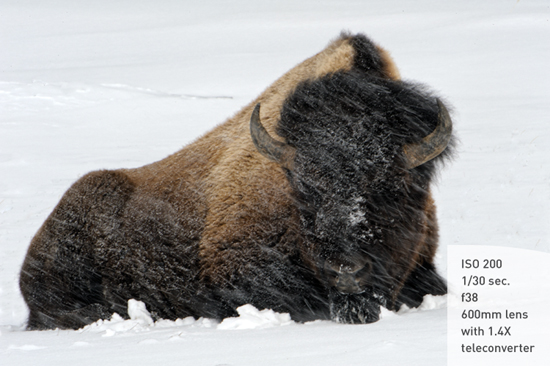
Stormy weather is one of my favorite shooting conditions because of its dramatic light and extreme effects. While everyone runs for cover, I stay out in the worst of weather and poor light to capture the intensity of a blowing snowstorm and a bison’s struggle to survive (Figure 3.16). You need to know how to expose for the flat (quality), low (quantity) light to emphasize the severity of the situation and capture the blowing snow.
Figure 3.16 Low light and a small aperture enabled me to shoot at a shutter speed slow enough to capture the blowing snow in motion.
Sunny days give you another challenge to deal with—shadows (Figure 3.17). Once the sun has risen into the sky on a sunny day, the light gets hard with strong highlights, heavy shadows, and an exposure range that is greater than your camera’s sensor can capture, making you choose the area of most importance in the image when adjusting for the extreme contrast. Do you let the highlights blow out? Or, do you let the shadows go to black? What exposure best communicates the story you are trying to tell with your image?
Figure 3.17 The hard light of midday brings with it bright highlights and heavy shadows.
Note
Most photographers wait out the middle part of the day, downloading and editing images, and waiting for the sun to drop lower in the sky and the light to become softer and more pleasing to the eye.
Direction of Light
Light not only has quality and quantity, but it also has direction. And like quality and quantity, the direction of the light is part of the overall equation that makes your images look the way they do. In some cases you can control the direction by simply placing yourself on the axis from the sun that you desire. More often than not, however, you are forced to work with the direction of light based on the subject’s location and whether or not you have freedom of movement.
Front-lit subjects (Figure 3.18) show the greatest detail in feathers or fur with little to no shadows. This light is easy to expose when using your camera’s meter, and the exposure range is usually within the sensor’s capability to capture information from the brightest spot to the darkest shadows.
Figure 3.18 Front light is considered best for capturing great detail and low contrast.
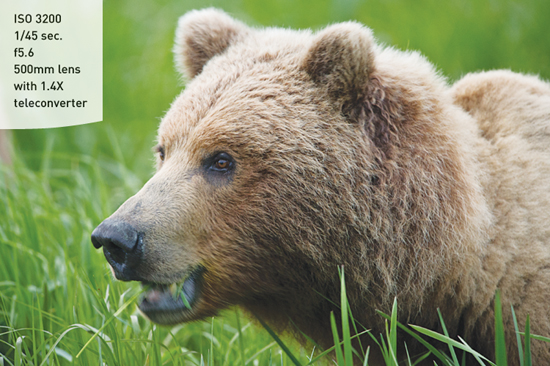
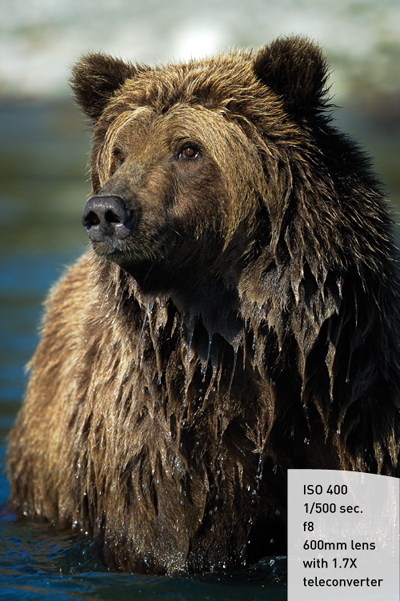
Sidelight adds texture, form, and shape to an image (Figure 3.19). Contrast is greater with the shadows and highlights defining your image. Images exhibit more drama, and your subjects exhibit more character with contrast, shadow, and light directing your viewer’s eye within the frame.
Figure 3.19 Sidelight emphasizes the texture of a grizzly bear’s fur.
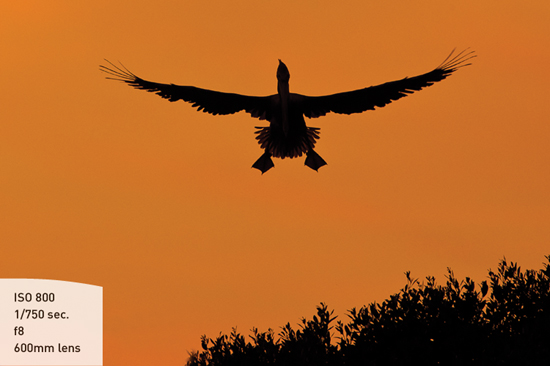
Many people avoid backlit subjects because they feel that they lose detail in the shadows. I find backlight to be very dramatic and bold, lending a graphic element of shape and form to the subject. With the subject revealed as a silhouette (Figure 3.20), an air of mystery and drama is added to the image.
Figure 3.20 A backlit pelican coming in for a landing is recognizable by its silhouette.
Putting It All Together
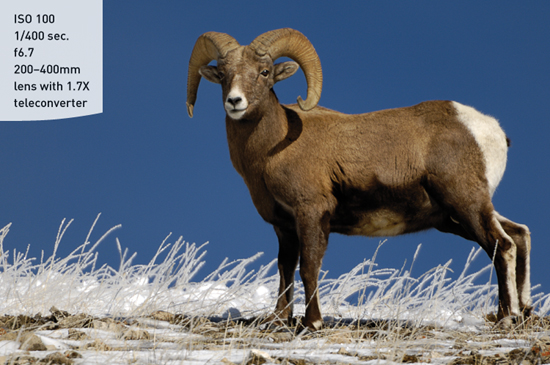
All the best equipment and proper shooting techniques are useless without good exposures. The exposure I choose is dictated by light, my subject, what it is doing, and the effect I am hoping to capture. By understanding light and the elements in the exposure triangle, I have complete control over the effects I can achieve with my images. During a spontaneous moment between two Bighorn rams vying for a ewe’s favors, I compromised some noise by selecting a high ISO to reach a shutter speed that would stop the action and give me a sharp image (Figure 3.21).
Figure 3.21 Low light and fast action called for a high ISO to capture the moment.
When a grizzly bear crossed the river, climbed out on the far bank, and began to shake (Figure 3.22), I thanked the photo gods for the backlighting that emphasized the spray of water against the dark background. The lack of detail in the bear draws the viewer’s attention to the spray, which is really the subject in this image. With plenty of light to stop the action, I was able to keep my ISO low, and to emphasize the silhouette effect, I dialed in minus one stop of exposure compensation (more on exposure compensation in Chapter 8, “Advanced Techniques”).
Figure 3.22 Backlighting highlights the spray of water as a bear shakes.
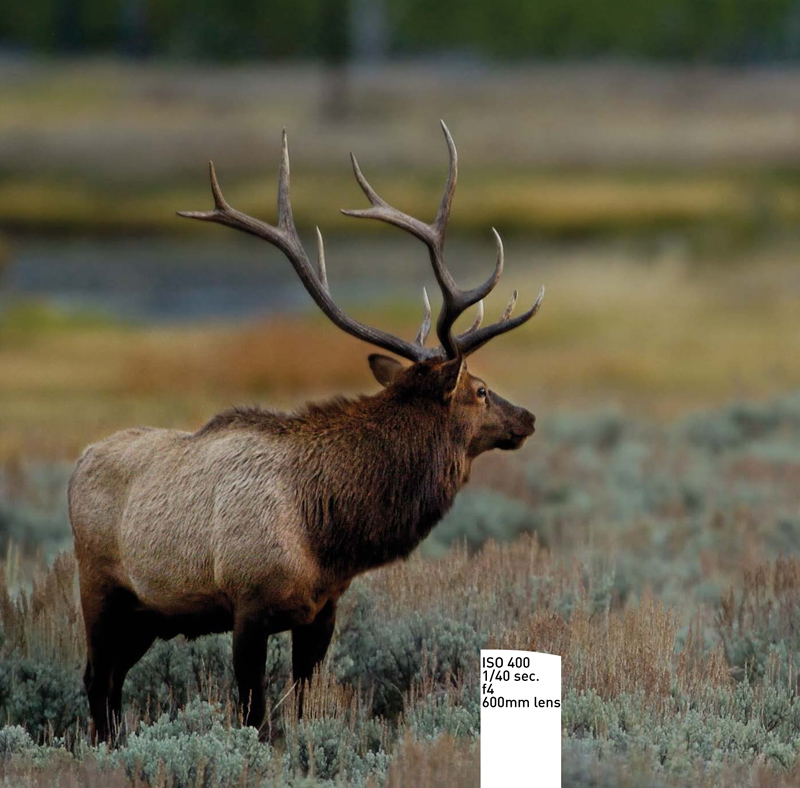
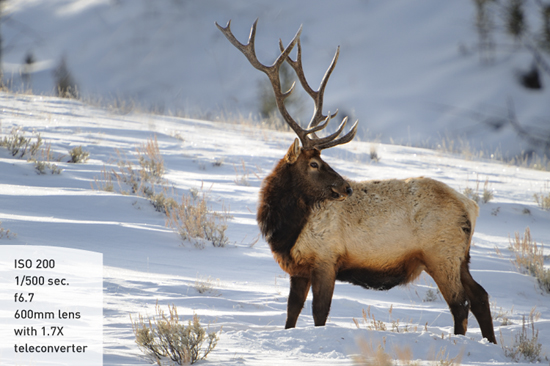
Exposing for a subject in a snow scene is not the challenge it once was. My meter does a great job of getting me in the ballpark, and based on the Highlight warnings, I can make adjustments to my exposure while I still have a chance to get it right on the spot. When a bull elk paused from grazing on the grass shoots sticking out of the snow, I composed and clicked knowing that there would be some blown-out highlights in the bright snow. I chose to let them blow out to keep the detail in the elk (Figure 3.23).
Figure 3.23 With an exposure range greater than my sensor could capture, I was faced with blown-out snow or a dark elk. Because the elk was my subject, I chose to expose on the bright side to better reveal the detail in its fur.
A lot of information was covered in this chapter, but the end result of your images relies on your ability to understand light and the elements that make up your exposure, so you can make decisions based on the outcome you are hoping to achieve. With a strong grasp of ISO, aperture, and shutter speed, and their relationship to light, you will be well on your way to making great wildlife shots.
For more on exposure, check out Jeff Revell’s excellent book Exposure: From Snapshots to Great Shots (Peachpit, 2010).
Chapter Assignments
Before moving on, be sure to take the time to do the following assignments, which are meant to help you increase your understanding of light and exposure.
Understanding ISO
On an overcast day, set up your camera on a tripod and photograph the same scene at different ISO settings. Begin at the lowest ISO your camera has and continue in one-stop increments to its highest ISO. Compare the results on your computer to get an idea of what level you can increase your ISO to and still get the quality image you expect. Each camera is different, just as each photographer will have a different tolerance for noise. By knowing what your camera is capable of, you can make needed adjustments in the field to capture your subject as you see it.
Understanding Aperture
Once again set your camera on a tripod and find a scene with a foreground, middle ground, and background. Focus midway into the scene (approximately one-third of the way in), and with your camera in Aperture Priority, cycle through the available apertures on your lens. Once back in the digital darkroom, compare the images to see the effects of different aperture settings on depth of field. If you understand the basics, you can make informed decisions on which aperture best captures your subject.
Understanding Shutter Speed
Find a scene with movement, a waterfall or stream, moving cars, and so on, and set up your camera on a tripod. Once again, set your camera to Aperture Priority and cycle through the various apertures in one-stop increments. This time when you review your images, look at the motion rather than depth of field. Notice what the varying shutter speeds do to either stop motion or blur it and the different moods created by each technique.
Relationship of ISO, Aperture, and Shutter Speed
Find a scene with visual depth (foreground, middle ground, and background) as well as movement. Using a tripod, cycle through your ISO settings, apertures, and shutter speeds. Examine your EXIF data to see the effect of increasing your ISO on your aperture and shutter speed, the change in shutter speed when you adjust your aperture, and so forth.
Share your results with the book’s Flickr group!
Join the group here: flickr.com/groups/wildlifephotographyfromsnapshotstogreatshots.