2. Camera Settings and Shooting Techniques
Getting It Right in the Camera Is the First Step to Making Great Shots
With patience, persistence, and practice, wildlife photography can be a rewarding endeavor. You’ll encounter long periods of waiting and brief bursts of action. Being on top of your game makes the difference between getting the shot or not. Taking the time to learn the buttons and dials of your camera and optimizing it for wildlife photography is an important step to making great shots. Instinctively knowing where the buttons and dials are allows you to make changes quickly, capturing peak of action. Practicing proper shooting techniques will enable you to capture sharp images whether you are handholding your camera or photographing from a tripod. The time to learn your camera’s settings is now, not in the field. When the action is hot and heavy, you don’t want to be fumbling with the buttons and dials on your camera and miss a great shot.
Poring Over the Picture
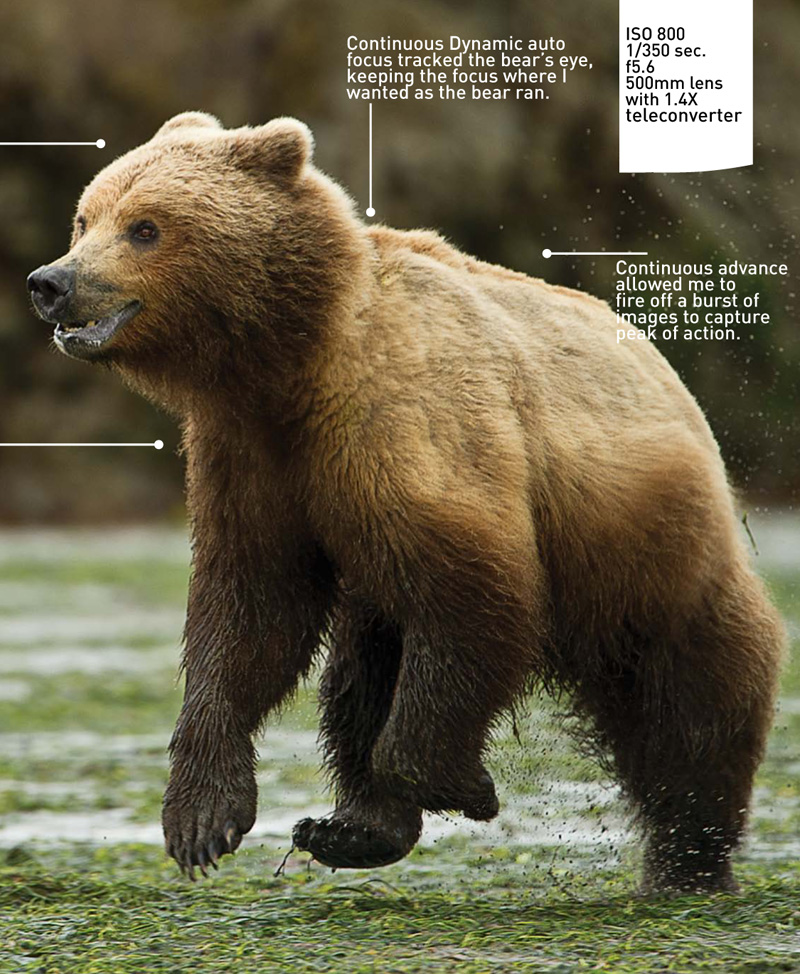
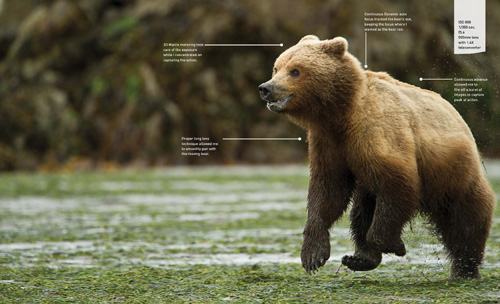
We watched from the shore as the drama of two bears pursuing a sow unfolded on the mudflats. When the boars got too close, the sow would take off running, spraying water and mud in her wake. Understanding my camera’s buttons and dials and having the skills to track a moving subject enabled me to capture a wonderful sequence of images.

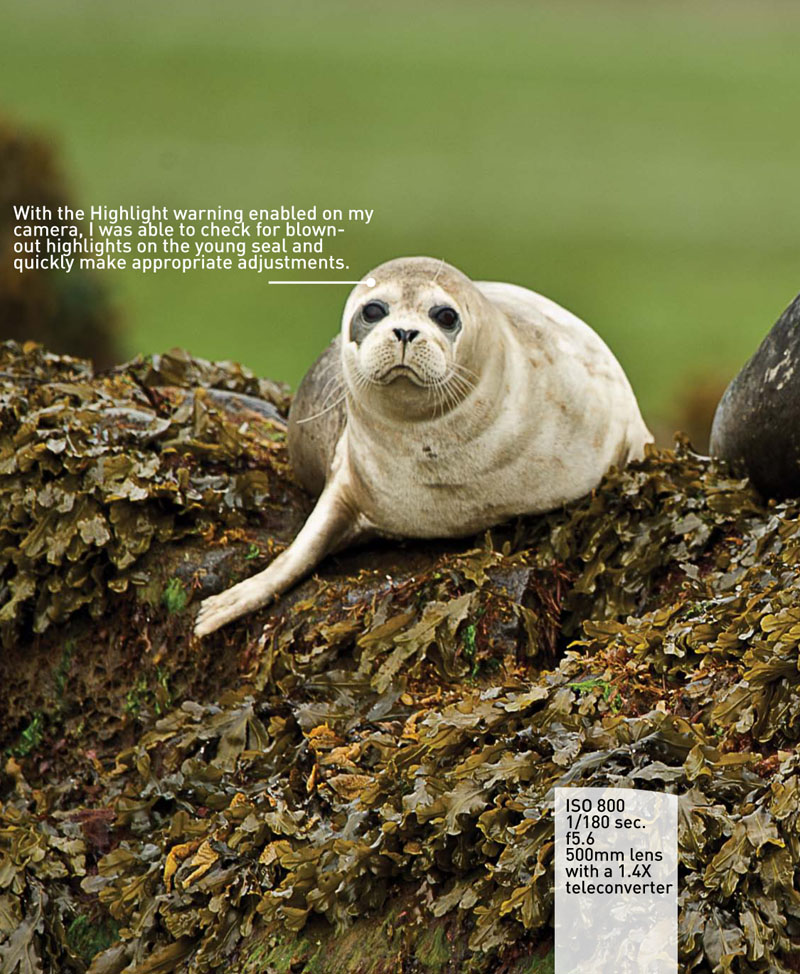
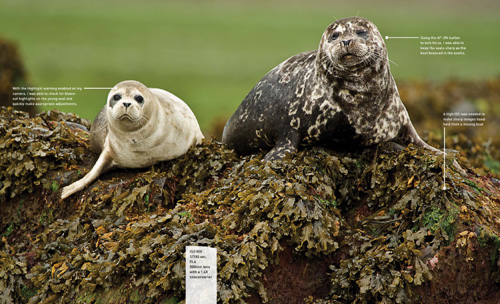
Poring Over the Picture
Photographing from a moving boat introduces several challenges that if not met, can impair the quality of my images. Knowing my camera’s capabilities and using proper handholding technique enabled me to make the appropriate adjustments and capture sharp images of a harbor seal with her young pup.

Camera Settings
Now that you have your digital camera, have taken it out of the box for the first time, and have really looked at it, you’ll find more buttons, dials, and menus than you’ll know what to do with. Do you just turn on the camera and start shooting, or do you sit down with the instruction manual and try to interpret what seems to be a foreign language? How do you get from snapshots to those great shots you see in coffee table books and magazines? By taking the time to go over the settings your specific camera offers and getting to know those that are useful to your photography style, you can get started in the wonderful world of wildlife photography and expect to make some excellent images.
Note
Many cameras offer the settings discussed in the “Camera Settings” section. Refer to your camera’s instruction manual to determine if it offers these settings and how to adjust them.
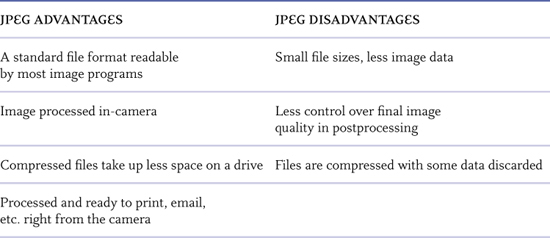
RAW vs. JPEG
Like many photographers just getting into digital photography, I began my digital photography shooting in the JPEG format. It seemed the best choice for a photographer who used to shoot slide film; what you saw in the final image was what you shot. Tweaking the exposure, the white balance, and so on was not an option with film, so why would I start fiddling with those settings when shooting digital? JPEG seemed to be the answer because it took all the camera settings I had dialed in and processed the image at the point of capture. All I had to do was download the images, edit them, and enjoy my successes—well, at the expense of some loss of quality due to the compression process while saving a JPEG file.
As time went on, I kept hearing about RAW and how it gives a photographer much more control over the end result, not only at the point of capture, but throughout the finishing process as well. With RAW files, I would have more image data to work with and could actually makes changes to some camera settings before “processing” the image.
So, which format should you choose? Do you want the creative control of finishing your images in the digital darkroom? Do you need the greatest image quality and size for large output? Are your images used primarily on the Web and in emails? How much postprocessing are you willing and able to do on your images?
Some cameras will shoot both RAW + JPEG, giving you the best of both worlds at the small cost of needing greater storage capacity.
Tables 2.1 and 2.2 compare the advantages and disadvantages of shooting in RAW and JPEG formats, respectively.
Table 2.1 RAW Advantages and Disadvantages
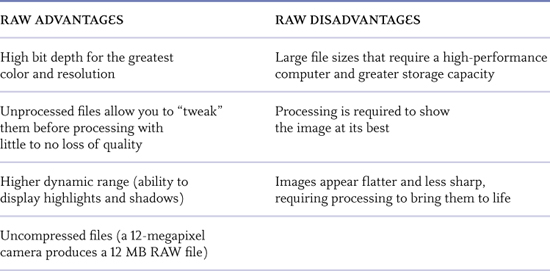
Table 2.2 JPEG Advantages and Disadvantages
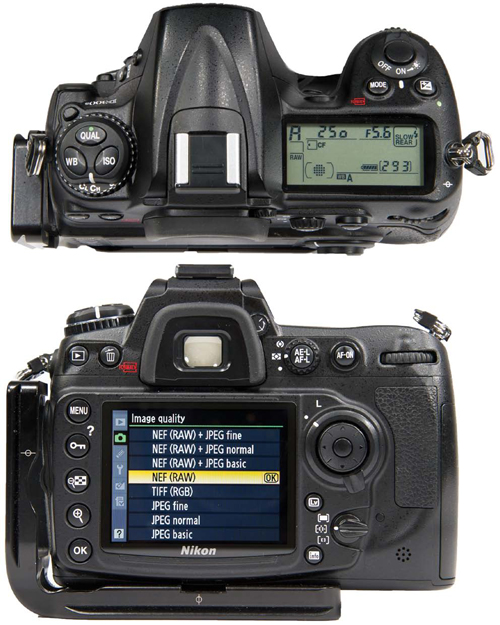
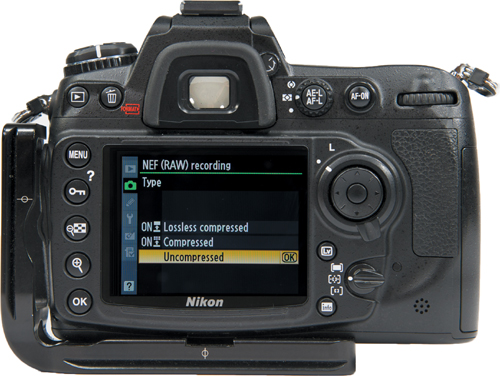
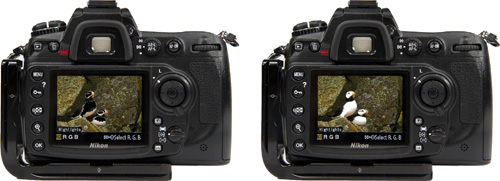
Located in the Shooting menu, you can select from several JPEG formats (basic, normal, and fine), RAW, or RAW + JPEG (Figure 2.1). Additionally, you can set the bit depth (Figure 2.2) (the greater the bit depth, the greater the file size and more information) and the amount, if any, of compression (Figure 2.3).
Figure 2.1 The RAW format can be found in the Shooting menu under Image quality on most cameras.
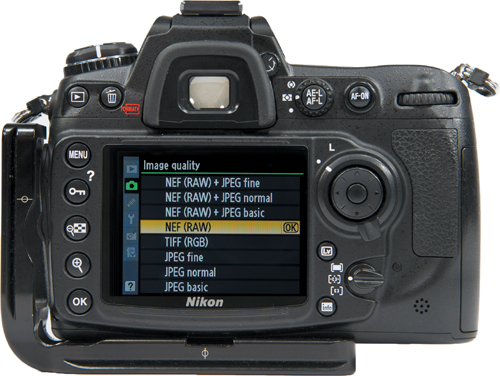
Figure 2.2 Bit depth is found in the Shooting menu (under RAW recording on Nikon DSLR cameras) and is adjustable when the RAW format is selected.
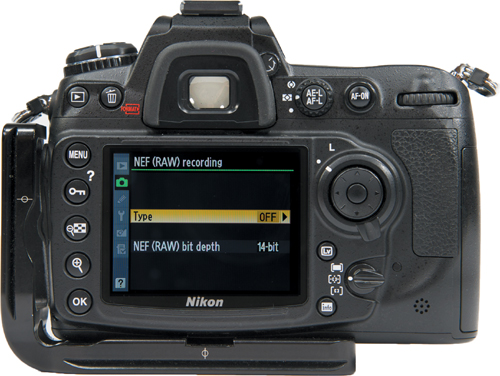
Figure 2.3 Compression options are found in the Shooting menu (under RAW recording on Nikon DSLR cameras) and are adjustable when the RAW format is selected.
Aperture Priority
My camera’s exposure mode is normally set to Aperture Priority, which gives me the greatest control over the way my image will look. By simply turning the Aperture dial, I can control just how much (Figure 2.4) or how little (Figure 2.5) of the image is in sharp focus. And, as a result of the Aperture I select, I can also control whether I capture stop action (Figure 2.6) or blur motion (Figure 2.7) in my images.
Figure 2.4 Great depth of field includes both the subject and background in focus.
Figure 2.5 Shallow depth of field makes the subject stand out from the blurred background.
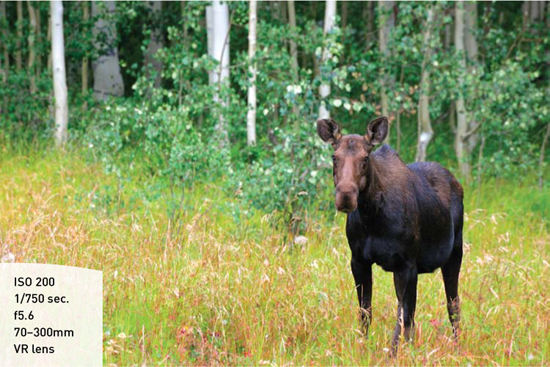
Figure 2.6 A stop-action shutter speed; a direct result of the aperture I selected.
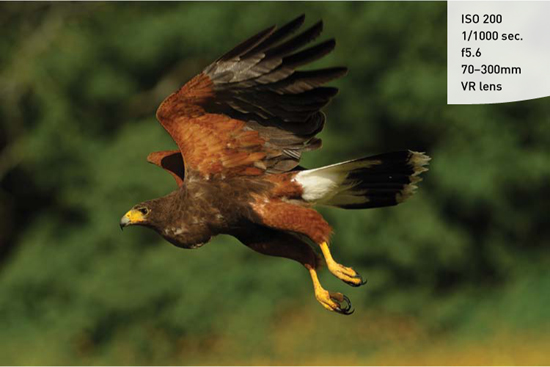
Figure 2.7 A blur-motion shutter speed; a direct result of the aperture I selected.
More on the aperture and its roll in depth of field and shutter speed in Chapter 3, “Exposure Simplified.” More on exposure in Chapter 3.
Matrix Metering
I typically use 3D Matrix metering (evaluative on Canon cameras) for its ability to quickly and correctly evaluate a scene. Nikon cameras divide the scene into segments (420 or 1005 individual segments depending on your camera model). The camera then meters each segment individually, comparing highlights and shadows, contrast, color, and even subject distance from the camera based on the selected focus point. The camera then processes the information and compares the data to tens of thousands of known situations and gives me a base exposure based on my camera’s settings. As long as the exposure range is not greater than my sensor can render, I will get a good exposure. When the light is contrasty, the camera gives me the best overall exposure. It’s up to me to decide on how to deal with the shadows and highlights.
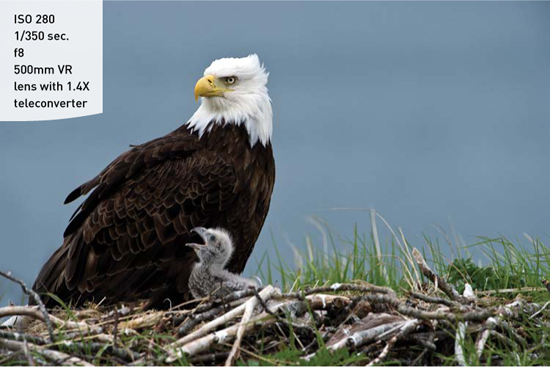
Figure 2.8 illustrates the accuracy of Matrix metering on an image with multiple light values—from the white of the eagle’s head to the dark brown of its body and the medium tones of the chick, the background, and nest.
Figure 2.8 The eagle and its chick were correctly exposed using Nikon’s 3D Color Matrix metering.
Continuous Focus
To capture a sequence of images in sharp focus, I set my focus to Continuous AF (AI Servo on Canon cameras). I then focus on my subject’s eye and begin panning with it as it moves. The camera continually focuses with my moving subject, fine-tuning as the distance changes.
Nikon has upped the ante with its Dynamic AF setting (Figure 2.9). All I need to do is select the focus point and depress the shutter button halfway down to acquire focus. When I begin to pan with a moving subject, Dynamic AF takes over, expanding the focus area to include several focus points (9 or 21 on the D3 family; refer to your manual to see if your camera offers this feature). As long as I can keep the subject within the expanded focus area, the camera will continue to track focus with a moving subject.
Figure 2.9 Dynamic AF uses multiple focus points grouped in a cluster to maintain focus on a moving subject.
Continuous Advance
Part and parcel of the continuous focus setting is continuous advance (Figure 2.10) where the camera fires continuously as long as you hold down the shutter (or the buffer fills). High-performance cameras have large buffers to allow for a greater number of sequential images. The buffer is where images are stored while the camera writes the files to the Compact Flash card (or SD media). The Nikon D3S has a 36-frame buffer (in RAW), which at 9 frames per second means I can capture 36 images in 4 seconds. Or, I can shoot in small bursts and keep following the action while my camera writes the files to the card. Now that’s performance!
Figure 2.10 The continuous high setting allows me to shoot at up to nine frames per second on the Nikon D3S.
Most cameras have continuous advance. Refer to your manual for the frames per second rating and buffer size of your camera.
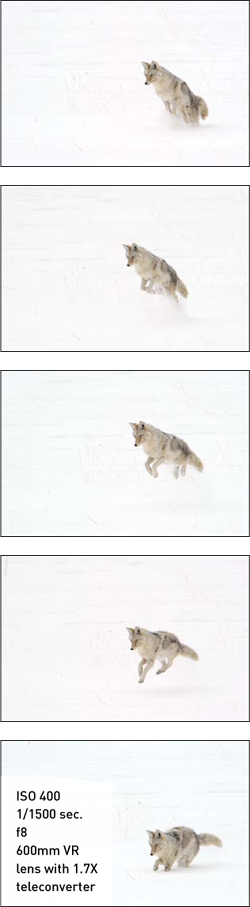
Using continuous Dynamic AF along with continuous advance allows me to capture peak of action. Figure 2.11 illustrates continuous Dynamic AF and continuous advance used together to capture a sequence of images as I tracked a coyote mousing in the snow in Yellowstone National Park. I focused on his eyes and followed him as he worked the meadow. When he jumped in the air, I simply held down the shutter while panning with his movement, confident that Dynamic AF would keep him in focus.
Figure 2.11 I was able to capture a sequence of images using Nikon’s continuous Dynamic AF along with continuous advance.
Note
A side benefit of using continuous advance is that typically the middle frames in a sequence are the sharpest. So, if you fire off three or more frames, you have a higher chance of one or more images being tack sharp.
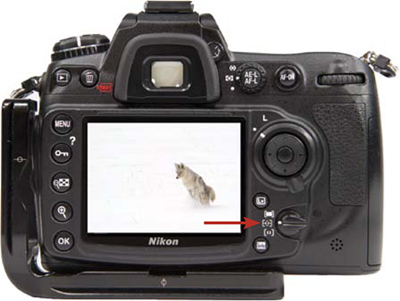
Highlight Warning
One of the many benefits of digital photography is the rear LCD of a DSLR camera that allows you to review the images you have captured. Although it is a great tool for providing instant feedback on sharpness, composition, and exposure, I find it lacking in providing a true visual of the correct exposure. Enter Highlight warning (found in the Playback menu on Nikon and Canon cameras; check your instruction manual to see if your camera offers this invaluable feature); this setting, when enabled, allows me to see problem areas in the brightest part of my image. If I have Highlight warning turned on (Figure 2.12) and there are parts of a scene that are blown out without any detail, the affected areas will blink black, white, black, white (Figure 2.13), warning me that there is an exposure issue that I should be aware of. Based on this information, I can choose to change the brightness of the overall scene using exposure compensation, bracket several exposures and blend them into an HDR (high dynamic range) image, or simply let it go and keep shooting. My choice is based on the subject and whether or not it is moving.
Figure 2.12 Highlight warning is enabled in the Playback menu.
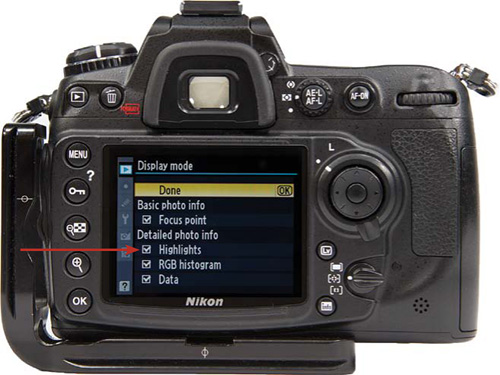
Figure 2.13 The areas that blink black and white indicate blown-out (bright) highlights with no detail.
ISO
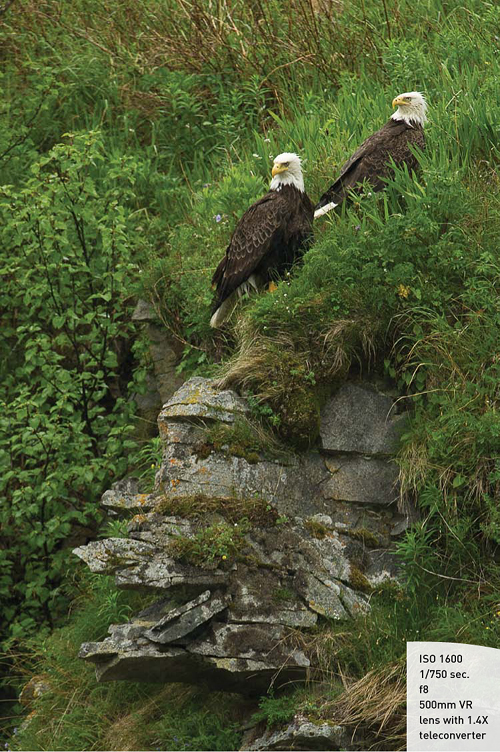
Another great advantage of digital photography is the ability to change the ISO from one image to the next as the light values dictate. Even with the low-noise capabilities of today’s cameras, I still try to set my ISO at the lowest setting I can get away with to maintain the lowest noise and highest resolution in my images. However, if I do need to increase my ISO to make sharp images, I can do so with confidence, knowing that my images will be crisp and relatively low noise (Figure 2.14). The amount of noise generated from high ISO settings varies from camera model to camera model. Cameras with full-frame sensors and greater pixel depth tend to produce low noise images even at high ISO settings. All of today’s digital cameras do a much better job than those just a few generations old.
Figure 2.14 An ISO setting of 1600 enabled me to photograph a pair of bald eagles perched on a cliff in low light while hand holding my telephoto lens.
Tip
Increasing your ISO should only be done when the benefit of the higher ISO (faster shutter speed) outweighs the increase in noise.
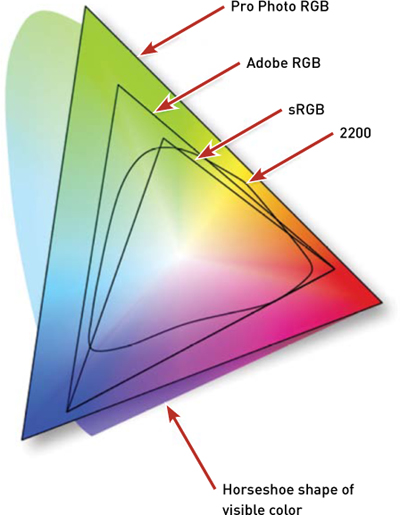
Color Space
Digital cameras have two color space options: sRGB and Adobe RGB (Figure 2.15). For the Web, sRGB is the color space used. Most computer screens don’t have the resolution to show the full color gamut of an Adobe RGB image; therefore, if you are working on images for email or the Web, sRGB is the color space best suited for the job. If, however, you plan to output your images to print or work on them extensively in the digital darkroom and want the greatest color gamut and even transitions, Adobe RGB is the color space to use. With its millions of colors compared to hundreds of thousands of sRGB files, the color and tonal transitions are smoother and color accuracy is easier to achieve. If you have your camera set to shoot in RAW format, it is a moot point which color space you use. But coming from the school of getting it right in the camera, I make a habit of setting everything I can in-camera to avoid errors and long processing time in the digital darkroom. As a result, if I decide to change to say shooting in JPEG format for a project, I don’t have to remember to change my color space.
Figure 2.15 This image illustrates the difference in size between sRGB and Adobe RGB color spaces.
Note
Color space is only applicable when processing images with software that utilizes color spaces, such as Adobe Photoshop and Lightroom.
File Number Sequence
It’s easy for a photographer to get carried away when out in the field surrounded by wildlife and shoot several cards in a day. Depending on how you edit and file your images, you may end up with several card’s worth of images in one folder. If you have File number sequence turned on, you can easily add card after card of images into that one folder. If you don’t have File number sequence turned on, beware! You see, if file number sequence is turned on and you fill one card with say, images numbered 1–99, the next card will begin numbering at 100–199 and so on, preventing duplicate numbers between cards. If the setting is turned off, each card you use will repeat the sequence of numbers beginning at 1, potentially causing you to overwrite the first set of images with those of the same name in a folder. Setting your camera to File number sequence On (Figure 2.16) will prevent you from feeling the heartbreak of overwriting your images one day; trust me.
Figure 2.16 Turning File number sequence on sets your camera’s numbering system to count consecutively from 1–9999.

Shooting Techniques
Now that you have adjusted the buttons, dials, and menus on your camera, it’s time to take it in hand and begin photographing. To do so successfully requires that you use proper handholding and long lens techniques to capture sharp images. Whenever possible, I use a tripod, but when circumstances are not favorable for using a tripod, I have no problem hand holding my camera, even at relatively slow shutter speeds. With the proper technique and some practice, you’ll be able to get sharp images from your camera at surprisingly low shutter speeds.
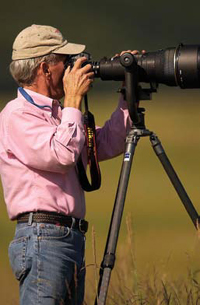
Proper Handholding Technique
There is a right way and a wrong way to hand hold your camera. The right way (Figure 2.17) enables you to become a solid support for your camera and allows you to capture well -defined images. Just follow these steps:
1. Begin by holding your left hand out palm up.
2. Rest your lens in your left hand
3. Using your right hand, take hold of the grip.
4. Bring your camera to your eye and press your eye against the rubber eyecup firmly (you do have a rubber eyecup, don’t you?).
5. With both elbows tight against your side and the camera gripped firmly in both hands, gently squeeze the shutter button.
Figure 2.17 Keeping your elbows close against your body makes you a more stable platform when hand holding your camera.

Proper Long Lens Technique
Just because you mount your camera with a long lens to a tripod does not ensure sharp images. Just like proper handholding aids in acquiring sharp images, so too does proper long lens technique. Many people feel that using Mirror Lock Up and/or a remote shutter release is the best bet for making the sharpest image possible, and although there are definitely times in which both techniques can be used, wildlife photography is a hands-on activity. You never know when your subject will move, and if you have the mirror up or are fumbling for the remote release, you will miss some great shots. Instead, by incorporating proper long lens technique, you can achieve sharp images even while panning with a moving subject. Here’s how:
1. Mount your longest lens to the tripod using a gimbal head (gimbal heads improve your panning skills with their smooth operation) so they are perfectly balanced when you’re not touching them.
2. Loosen the knobs on the head so they are loose enough to move with some tension.
3. Loosen the rotating collar release knob so the lens rotates freely.
4. Place your left hand loosely on the barrel of the lens directly over the center of the tripod (Figure 2.18).
Figure 2.18 Resting your hand on the barrel of the lens dampens vibration caused by mirror flop and the shutter opening and closing.
5. Grasp the camera in your right hand.
6. Press your eye against the rubber eyecup with some constant pressure.
7. Gently squeeze the shutter release button as you exhale.
Tip
Your left hand also acts as a guide for steering your lens when panning.
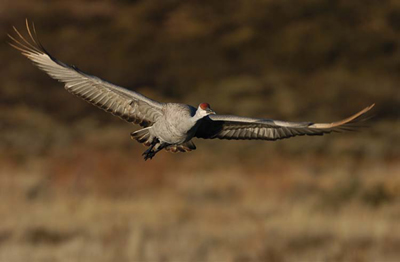
Proper Panning Technique
Using the same techniques described in the preceding sections, you can incorporate panning into your image making and capture action in a still photograph. Whether you want a tack sharp, stop-action image or one that has a romantic blur to it, using proper handholding and long lens techniques along with some panning skills, you’ll be working the action in no time.
I begin to acquire focus as soon as I can get my lens on the subject, no matter how far away the subject is. This gives me ample time to find the subject, focus, and get the rhythm of its movement as it approaches, so I am panning at the same speed as my subject (Figure 2.19). I continue to pan with the subject keeping the shutter partially depressed to enable continuous focus as my subject nears the firing zone. Once the subject is within firing range, I gently depress the shutter, continue panning, and follow through until the subject has passed the zone. I then lift my finger from the shutter while continuing the panning motion beyond the last click to ensure that I don’t jerk the camera on the last frame, potentially missing the best shot.
Figure 2.19 Smooth panning at the same speed as your subject is key to making clear images of moving subjects.
Chapter Assignments
By now you have a good idea of some key settings to make on your camera and the proper shooting techniques to capture wildlife. It’s now time to get down to business and practice what you’ve learned. Take some time to work through each of the assignments. Look for your strong points and where you need the most work, and spend time becoming proficient with your camera’s settings and managing your equipment.
Basic Camera Settings
Sit down with your instruction manual and camera and get to know them both. Go step by step through the book and set the buttons, dials, and menus on your camera to suit your shooting style. Some features you might never use, so just pass them by. But there are also features that you might use occasionally, so it’s good to know that they are available and accessible at some point when you need them.
Proper Handholding/Long Lens Technique
Part A: Using your camera with one lens, carefully hand hold the camera and shoot a series of images from the slowest shutter speed to the fastest. Compare the images to see just how slow a shutter speed you feel comfortable with. Then keep practicing until you can shoot at even slower shutter speeds while hand holding the camera.
Part B: Mount your camera and longest lens on your tripod, and follow the same steps as in Part A using the proper long lens technique you learned in this chapter. Compare the images to see how slow you can comfortably shoot a stationary subject with your camera mounted on a tripod.
Panning Techniques
Mount your camera and longest lens on your tripod, and do the preceding Part B exercise, only this time pan with a moving subject. Once you find your comfort level as far as shutter speed, keep practicing panning until your image keeper ratio is higher than the number of your throwaway images. You will find that you have a higher keeper ratio with a fast shutter speed, and that the keeper count dwindles as your shutter speed decreases. Keep practicing your panning technique until you can consistently capture sharp images.
Share your results with the book’s Flickr group!
Join the group here: flickr.com/groups/wildlifephotographyfromsnapshotstogreatshots.