1. Equipment Essentials
Recommended Equipment and Accessories for the Wildlife Photographer
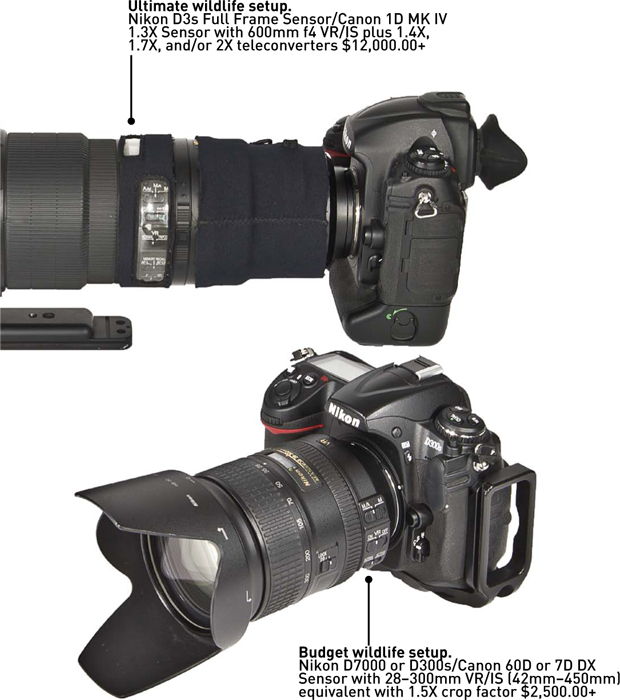
Wildlife photography conjures up visions of trekking miles into the wilderness stalking your prey with super telephoto lenses mounted on tripods carried over one shoulder, a second body with a mid-range telephoto zoom over the other, and the rest of the paraphernalia required to be a wildlife photographer strapped to your back or belted around your waist. But wait, you don’t have to have the biggest and best camera with the longest lens available to go beyond snapshots and begin making great wildlife shots. Yes, you will be at a distinct advantage with a super telephoto at isolating your subject and capturing in-your-face, frame-filling images. But it is possible to make great shots with more economical equipment, and you can begin close to home, right in your own backyard or at a local park. With careful consideration and wise purchase planning, you can build a system that will gain you entrance into the wonderful world of wildlife photography.
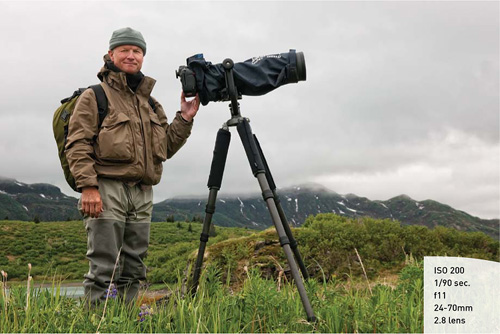
Poring Over the Picture
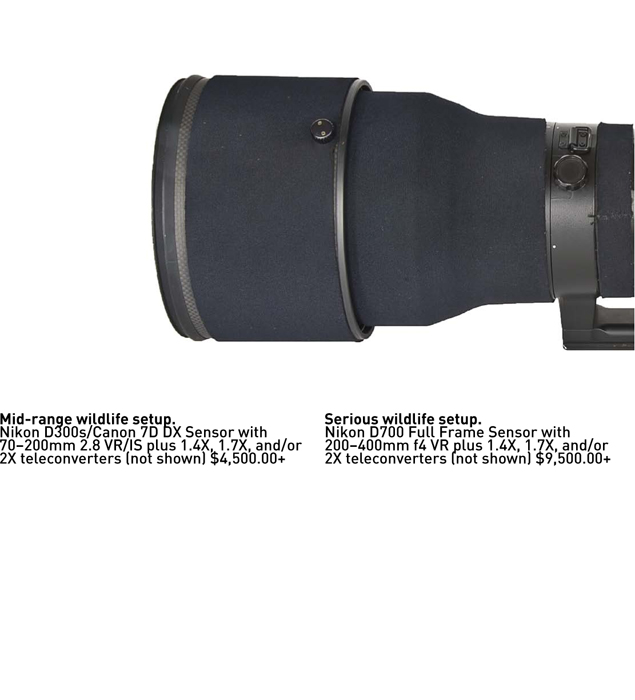
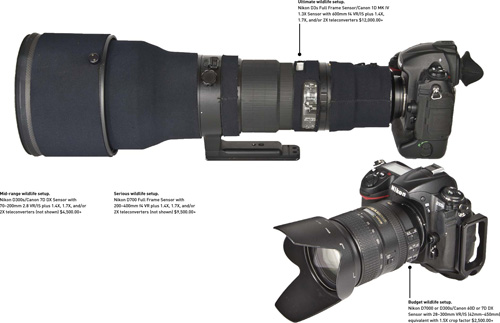
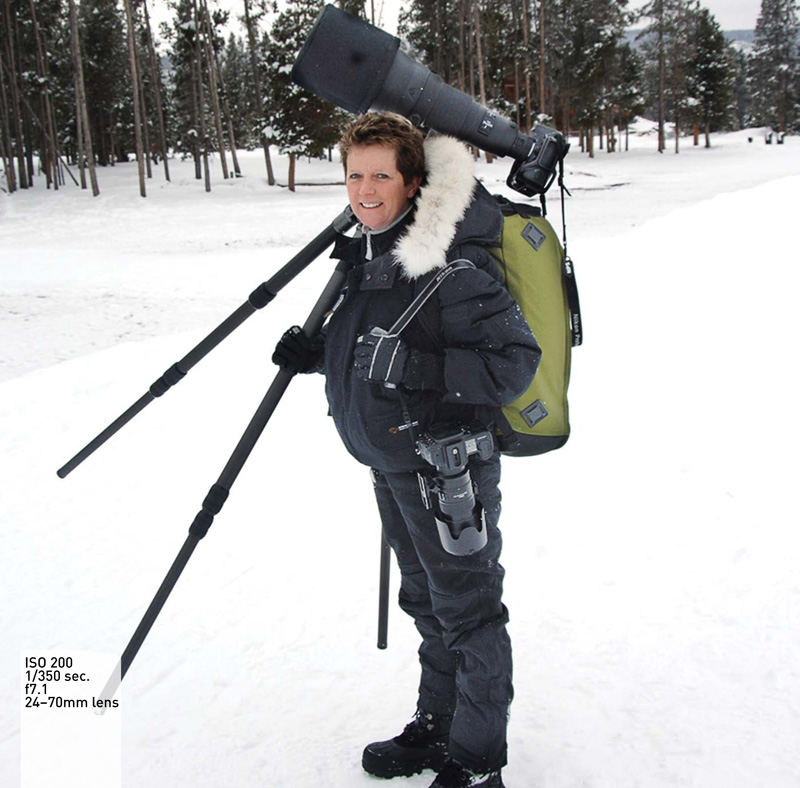
There is a wildlife photography setup for nearly every budget. Configuring a system to match your photographic style while staying within your means is achievable. By making smart decisions at the outset, you can build your system as your needs, interests, and income grow. I recommend buying the best equipment you can afford; you save money in the long run by preventing frequent equipment upgrades. Count on doubling your investment from the budget setup to the mid-range, and from the mid-range to the serious setup.
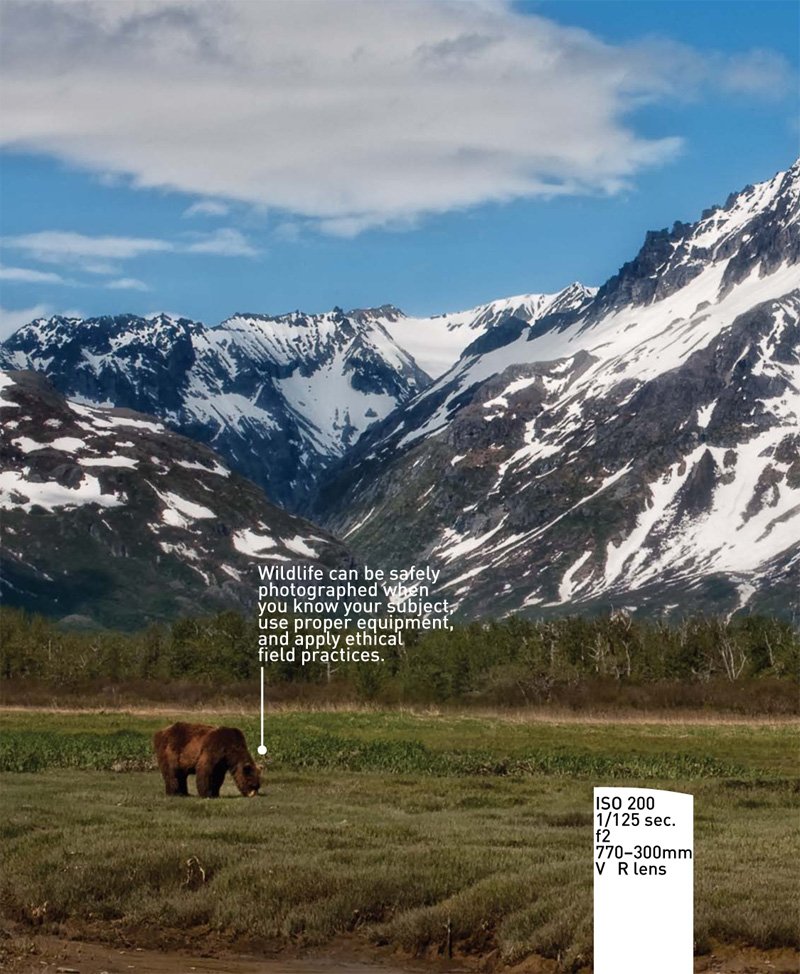
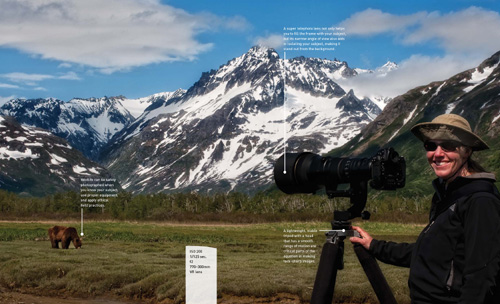
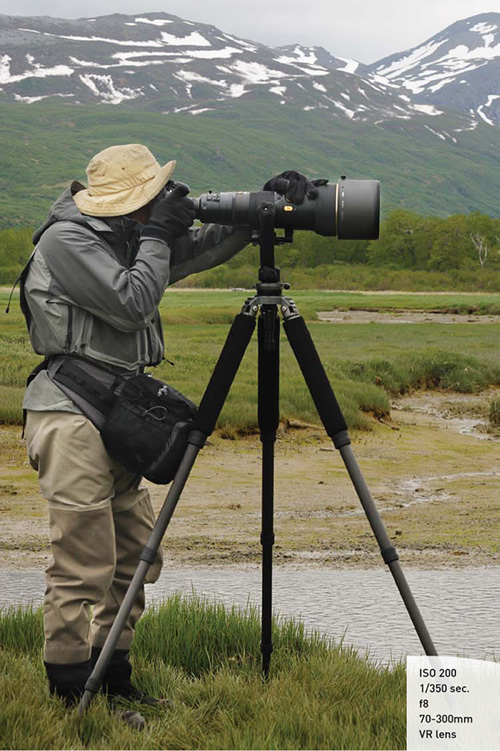
Poring Over the Picture
What is man without the beasts? If all the beasts were gone, man would die from a great loneliness of the spirit. For whatever happens to the beasts, soon happens to man. All things are connected.
—Chief Seattle
Use photography to share your wildlife adventures with others who do not have the same opportunities to enjoy such amazing experiences in person.

Camera Selection
One of the first questions I ask photographers looking to buy a new camera is, “Do you photograph places you visit, or do you specifically visit locations with photography as the main objective?” The answer helps me to direct buyers towards the right type of camera to suit their needs. A casual photographer can be put off by all the gear a more enthusiastic shooter will carry into the field. It’s true that it’s the photographer, not the equipment, that makes an image—up to a point. There are flat-out times that having the extra reach is an advantage, because you simply cannot get closer or it is unsafe to do so. Better tripods add extra stability when shooting at slow shutter speeds, and higher-performance cameras can give you an edge when it comes to capturing peak of action. How willing and able are you to carry a big camera and lens for a long distance? Even if you are willing and able, can you afford a more expensive setup? And what are the benefits to be gained by stepping up? You’ll need to consider your preferences and the available options when making new camera-buying decisions.
What features should you look for when purchasing your next wildlife camera? What features are you willing to compromise on for the sake of size, weight, cost, and so on? If you are new to DSLR photography, consider brands very carefully. Think ahead to the lenses you would love to have one day (even if you think it’s a pipe dream); does the system offer upgraded bodies and lenses? Does it have the accessories suitable to your style of wildlife photography? You don’t want to invest in a system and then discover that you’ve outgrown it down the road and have no upgrade options.
If you’re thinking of upgrading your camera, consider your motivation. What is it the newest body offers that yours does not? Do you really need those features? Would your money be better spent on lenses or perhaps a photography trip? How much will you have to spend to acquire a camera with the features you need? Let’s look at some of the advantages and disadvantages of the different DSLR formats of similar resolution, as well as examples and additional features to consider when buying a new camera with the goal of photographing wildlife.
Full Frame vs. Cropped Sensor Cameras
In the film days, the image size recorded on 35mm SLR (Single Lens Reflex) cameras was a standard size of 24mm x 36mm. Not so with digital cameras where every camera brand has its own standard sizes. Nikon, for example, has its full-frame (FX) sensors, which are the same image size as 35mm film cameras, and its cropped (DX) sensors, which are smaller (known as crop factor) and therefore give the effect of having greater magnification. DX sensors are found in Nikon’s entry-level to prosumer bodies. Canon offers three sensor formats in its line of DSLR bodies: full-frame, 1.3X, and 1.6X depending on the level of body.
When looking for a new camera, I always have a wish list. Tables 1.1 and 1.2 contain what I consider to be the advantages as well as the disadvantages between FX (full-frame) and DX (cropped) cameras.
Table 1.1 FX Advantages and Disadvantages

Table 1.2 DX Advantages and Disadvantages
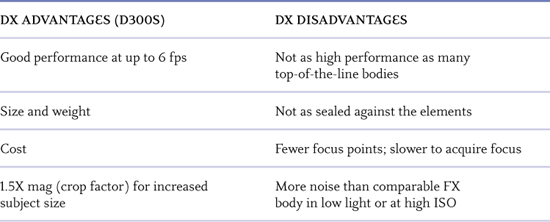
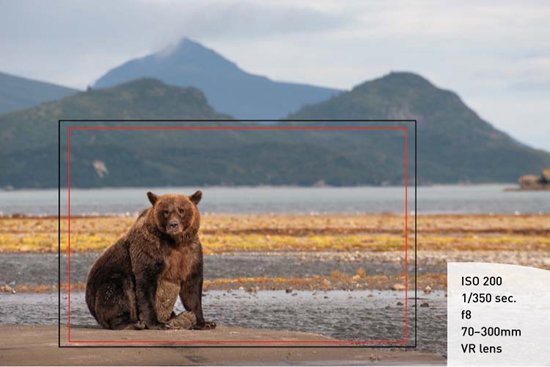
Figure 1.1 was captured with a Nikon D700 and a 70–300mm VR lens. The red and black crop lines show what the effective magnification (crop factor) would be with a DX body. (Black is Nikon’s 1.5X sensor; red is Canon’s 1.6X sensor.)
Figure 1.1 Although image size from a DX body is larger in the frame, giving you the feeling of greater magnification, this is achieved by the image being recorded on a smaller sensor that increases the size of your subject in the final image.
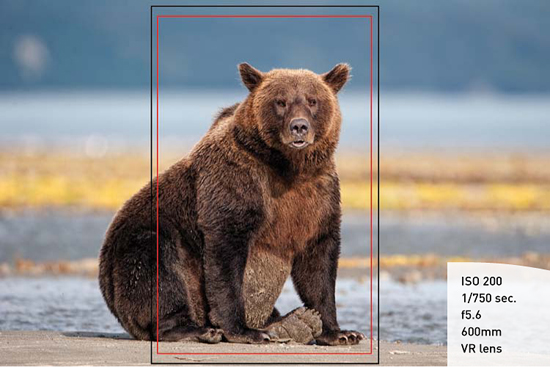
A telephoto lens can be used to fill the frame with your subject. Add a DX body with its magnification (crop factor) for even tighter, frame-filling images. Figure 1.2 was made with a Nikon D3 and a 600mm f4 VR lens.
Figure 1.2 The black and red crop lines represent what the image size would be with Nikon’s 1.5X (black lines) and Canon’s 1.6X (red lines) sensor crop factor using a 600mm lens.
Sensor size is just one aspect of the many important features to consider when buying a camera to photograph wildlife. Other important features include:
• Frame rate. The number of frames per second aid in capturing peak of action. The faster the frame rate, the better when the action is hot and heavy. A fast frame rate gives you the opportunity to capture that defining moment in a flurry of activity.
• 100% viewfinder. What you see is what you get with the 100% viewfinder. Top-of-the-line cameras have 100% viewfinders, whereas most DX bodies have 95–96% viewfinders, which means that you don’t see everything that will be included in your final capture through the viewfinder. I prefer not to crop in order to keep the full resolution of my files and find that having a 100% viewfinder allows me to compose the image and capture it just the way I see it.
• Resolution. The resolution should be high-enough quality to satisfy your largest output. The highest resolution is not always the best solution if the compromise is performance when photographing action or higher noise in low light. Even entry-level bodies have excellent resolution to output up to poster size and beyond if the exposure and focus are good.
• Low noise. There is a balancing act that you need to resolve when photographing nature in low light: You’ll need a shutter speed fast enough to stop movement but will want low noise for the best image quality. A low-noise body is essential to allow higher ISO settings as needed to stop movement under less than ideal lighting conditions.
• Cost vs. features. You’ll need to decide how much money you have budgeted for your equipment. Let’s face it, photography is not cheap. I recommend buying the best camera and first lens “you can afford”! Make a list of the features you want or need, and then narrow down your search based on cost versus features. Don’t get caught up in the latest and greatest just for the sake of having the best with no regard as to whether you will benefit from all the features, quality, and so on. The latest, greatest camera in the world won’t do you any good if you spend all your money on equipment and can’t afford to go out and photograph.
• Video. Many DSLR cameras now include video. The camera you select might have video whether you want it or not. However, if you do want video, be sure to include it in your list of desired features and know which resolution and features are best for the type of video you want to make. Complete books on the subject of making videos with your DSLR are available to help you become a better videographer.
Can’t get all the features you need and want within your budget? Consider buying last year’s higher-end body used. Once a new model is released, the previous models drop significantly in price, becoming excellent values. And get this—they are still great cameras, just not the latest and greatest.
Lens Selection
The lenses you select are equally, if not more, important than the body for capturing wildlife. In addition to magnification (biggest is best, right? You’ll see some excellent images throughout the book that were captured with the affordable 70–300mm VR), you need to consider the speed or maximum aperture (how much light the lens lets in) as well as focus speed (how fast the lens will acquire focus). Does the lens you are considering utilize Vibration Reduction? What do all the other designations on lenses mean, and are they important to your photography? Here, I’ll discuss the key features to consider when making your next wildlife lens purchase.
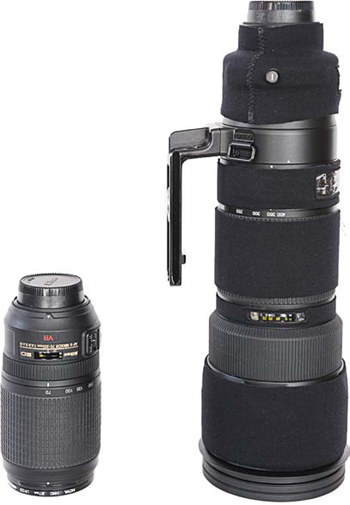
By now you’ve chosen your camera, so you can make good lens decisions based on the camera format and your future needs. DX lenses work great on DX bodies and give you increased range at affordable prices, but they don’t work very well on FX bodies due to the fact that the area of coverage doesn’t fit a full-frame sensor: You must go into crop mode in the camera when using DX lenses on FX bodies, which results in a significant loss of resolution (12 megapixels at full sensor size versus 5 megapixels in DX crop mode on a Nikon D3s). If you currently own a DX camera, consider whether your plans include going full frame in the future; if so, determine if there is a better lens choice for both your current and future photographic needs. If you made the decision to stick with a DX body, you can get away with a shorter, less expensive lens, making up for lack of magnification with the smaller DX sensor. The 70–300mm lens is smaller, lighter, and less expensive than the 200–400mm (Figure 1.3). The 200–400mm has a third more magnification, a larger maximum aperture at f4, and accepts Nikon’s high-quality teleconverters for even greater magnification. See the section “Increasing Focal Length with Teleconverters” later in the chapter in which I discuss teleconverters for potential compatibility issues.
Figure 1.3 A 70–300mm lens (left) and a 200–400mm lens (right).
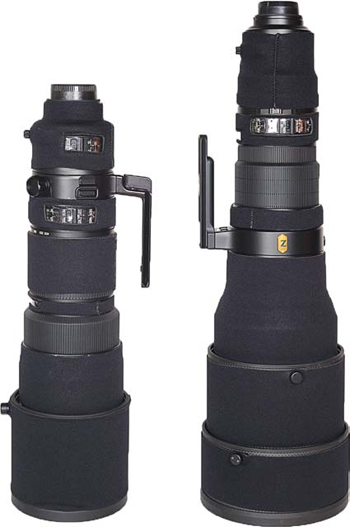
Both the 200–400mm and the 600mm (Figure 1.4) have maximum apertures of f4. Size, weight, cost, and versatility are the advantages of the 200–400mm lens. But, when the greatest magnification possible is needed, there is no substitute for having the longest lens you can get.
Figure 1.4 A 200–400mm lens (left) and the 600mm lens (right).
Choosing a Prime or Zoom Lens
One very important aspect to consider when purchasing a telephoto lens is whether to go with the speed of a prime lens (fixed focal length) or the versatility of a zoom. Is there a zoom available that covers the focal length you are considering? Your shooting style plays a big part in the consideration of a new lens. Can you handhold a 600mm from a bouncing boat? (Believe me, it’s tough in even the calmest seas.) A smaller body and lens combination gives you more freedom of motion when shooting handheld than a super telephoto will. Will you be walking great distances or shooting from a nearby vehicle? How close can you get to your subject? The closer you can safely get to your subject, the less magnification you need. Which lens gives you the greatest mobility, versatility, and magnification for your specific shooting needs? Is the wildlife habituated to people? If so, you can often move in a little closer and get frame-filling images with shorter-length telephoto lenses without disturbing your subject. The image in Figure 1.5 was captured with a Nikon D3 full-frame body and a 70–300mm VR lens handheld from a boat.
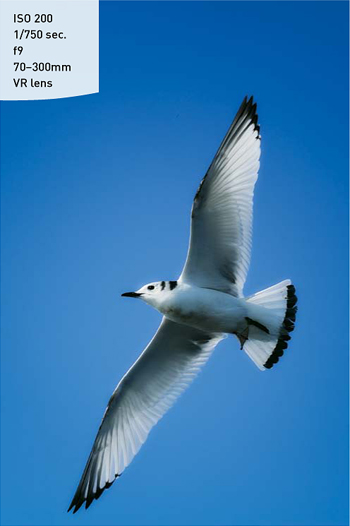
Figure 1.5 The lightweight and compact size of the 70–300mm VR lens enabled me to easily handhold and pan with the Black-legged Kittiwakes from a boat as they flew over my head.
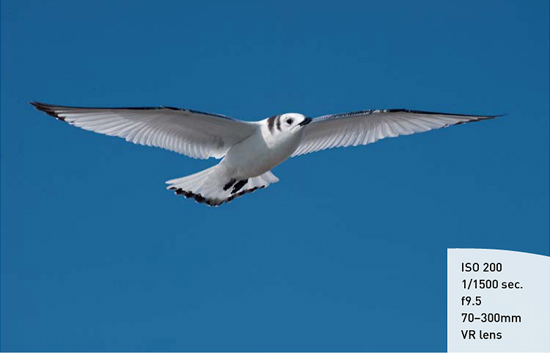
The versatility of a zoom enables you to change focal lengths on the fly as your subject gets closer, preventing clipped wings, cropped feet, and so on. While maintaining focus on a bird’s eye, you can turn the zoom ring to pull the focal length back smoothly as the bird approaches, keeping it all in the frame. Having a zoom range from 70–300mm (Figure 1.6) enabled me to acquire focus and begin firing at 250mm while the birds were farther away and pull back to the wider-angle end of the zoom as they flew right over my head.
Figure 1.6 Proof of the benefits of a zoom range from 70–300mm. A fixed focal-length lens would have limited the number of frames I could make without clipping wings as the bird approached.
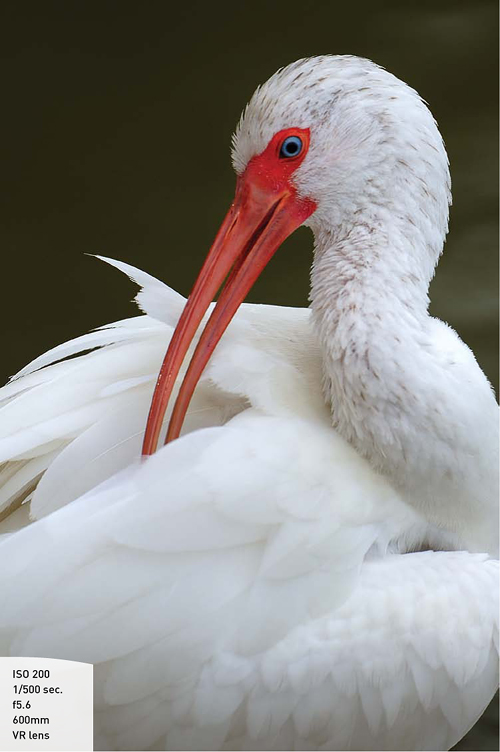
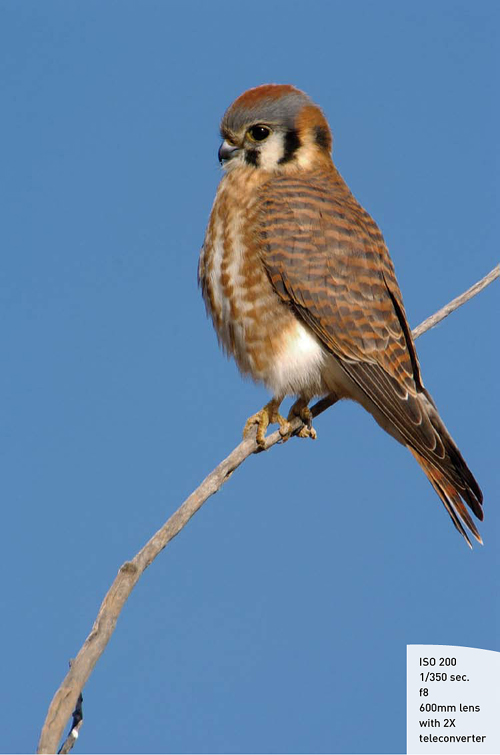
When I have the solid feel of terra firma beneath my feet, I prefer to use a stable tripod with a fluid, gimbal head to do the heavy lifting and panning, allowing me to use my big gun for in-your-face, frame-filling photographs of my subjects. A 600mm not only enables me to compose tighter, but its narrow angle of view gives me greater control of the background and the shallow depth of field makes the subject stand out from the blurred background. Although many people think of a super telephoto for bringing a distant subject up close, I prefer to use it as a means to isolate elements within the frame from a relatively close distance (Figure 1.7), which produces tight framing that matches my photographic style.
Figure 1.7 The magnification and narrow angle of view of a 600mm allowed me to fill the frame with the White Ibis as it preened, eliminating the background.
Additional Lens Considerations
Focal length and speed are just a couple of considerations to think about when buying a new lens for wildlife photography. But once you’ve decided on a focal length range, is there more than one lens choice? If so, what are the differences between the lenses? Additional features to consider when purchasing a new lens include:
• AF-S/USM. Silent Wave motors enable quick and quiet focus, and give you the ability to override the autofocus by simply taking control of the focus ring without having to reach for the focus switch. This makes it possible to manually focus on your subject when the camera is having difficulty focusing and still capture the action.
• VR/IS. Vibration Reduction or Image Stabilization allows you to handhold up to four stops slower of a shutter speed than would otherwise be possible without it. VR/IS is a great feature when handholding telephoto lenses or when shooting from a moving object like a car or boat. Stabilization significantly helps you to nail that sharp image when the elements are stacked against you.
• ED/L. Nikon’s Extra Low Dispersion or Canon’s Fluorite glass is incorporated into the higher-quality lenses. The manner in which the light travels through the multicoated elements and converges onto the sensor gives a sharper, snappier appearance to an image. The special, multicoated, high-quality optics usually come at a premium price.
• Minimum focus distance. Just how close will your lens focus? The Nikon 600mm f4 VR has a minimum focus distance of 15.7 feet, whereas the Nikon 200–400mm f4 VR can focus as close as 6.6 feet. Although you may not have much choice over minimum focus distance and lens selection, it’s good to know up front just how close your new lens will focus. You can make up for lack of magnification if you can move in closer to your subject.
Tip
Don’t treat your lens purchase lightly. A good lens is a lasting investment compared to a camera body that becomes obsolete every 18–24 months. Purchased wisely, the right lens will last you for years to come.
Increasing Focal Length with Teleconverters
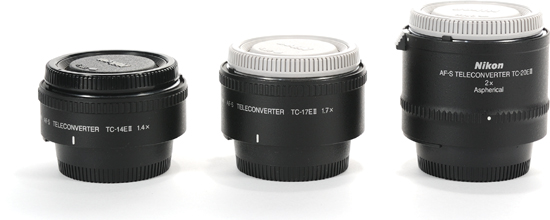
When even greater reach is needed to bring the subject to the desired size in the frame, teleconverters are available from manufacturers that match up with their high-end long lenses for increased magnification. It’s an inexpensive way to increase your focal length. But the cost is loss of light, beginning with a one-stop loss of light with a 1.4X, a one-and-a-half stop loss with a 1.7X, and two full stops of light lost with a 2X teleconverter. Your camera adjusts for the change of exposure automatically. Nikon and Canon’s teleconverters are designed to work with their longest and fastest lenses. Refer to your instruction manual to see which teleconverters are compatible with your camera/lens combination. Figure 1.8 shows Nikon’s teleconverters.
Figure 1.8 From left to right, Nikon’s TC-14E II, TC-17E II, and TC-20E III.
A small, shy subject needs all the magnification you can get so you can keep your distance and yet still get a sizeable image in the frame. The 600mm f4 with a 2X teleconverter becomes a 1200mm f8 super telephoto (Figure 1.9).
Figure 1.9 Manual focus was used due to the two-stop loss of light, giving a maximum aperture of f8.
To Flash or Not to Flash
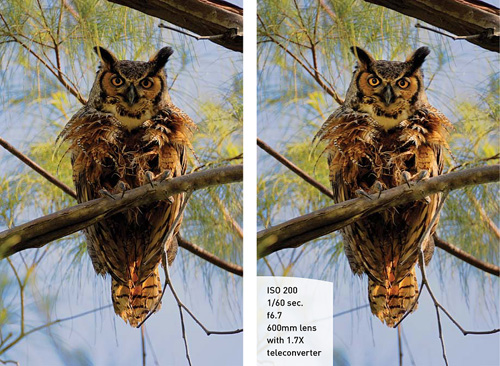
Although I don’t often use flash in the field, preferring natural light in most cases, there are times when adding a little fill light simply makes all the difference between a snapshot and a great shot. Flash will remove a color cast caused by the light conditions, bringing out the true colors of your subject, as well as add a catchlight to your subject’s eyes. One case in point was when I was trying to photograph a Great Horned Owl in an Australian pine at Fort De Soto in Florida. He was perched high among the branches with a bright sky behind him that backlit him and made him appear too dark. I could have added plus exposure compensation, but it would have brightened the background as well as the owl. So, I reached into my bag and pulled out my SB-900 with the Better Beamer flash extender (Figure 1.10). I didn’t want to have a “flashed” look to the image but rather wanted to pop just a little fill light onto the owl to bring out its feather detail and make its eyes stand out. I slid the flash onto my Wimberley flash bracket, attached the TTL flash cord, and dialed in minus output settings on the flash until I got the desired effect at minus 1.3. The result was a natural-looking image that draws your attention to the owl. When shopping for a flash, it is important to get one with plenty of power and the ability to control the output. The two photos in Figure 1.11 show the difference between natural light and fill flash.
Figure 1.10 The Better Beamer uses a Fresnel to concentrate the light to a narrow beam, giving it greater reach with a spot effect to illuminate just your subject. By concentrating the light, the output may not be as much of a drain on the batteries.
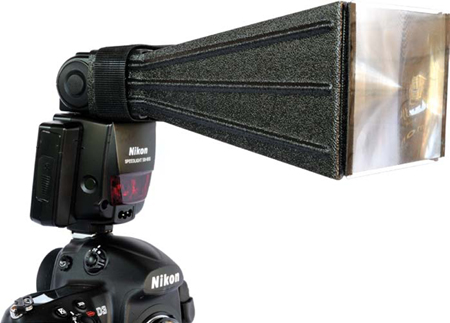
Figure 1.11 Exposing to get an average of the bright background and the darker, backlit owl resulted in an exposure that was too dark for the owl (left). Dialing in plus exposure compensation would have resulted in an even brighter background that would draw attention away from the owl. Leaving the ambient light as it was and using Nikon’s Creative Light System to get the base exposure, I dialed down (minus) the flash power, adding just enough fill light to brighten the owl (right) and make its eyes pop with catchlights and color.
If I will be using flash extensively in continuous firing mode, I’ll add an external power pack to enable the flash to recycle faster and give me more flashes between recharges.
Tip
The TTL (through the lens) tends to do too good of a job at matching the fill light with the ambient light. I prefer the moodiness of just a hint of flash fill, so I usually dial down the flash to minus output.
Utilizing Tripods and Heads
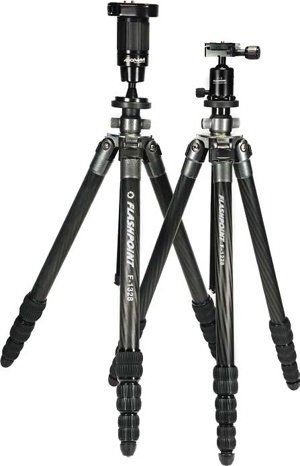
For improved image quality, I am a firm believer of tripod use. I realize there are times that in order to even get the shot, you need to be extremely mobile and a tripod is not an option, or that some locations forbid the use of tripods. But for those times when you can set up a tripod and utilize it for support, you will find a noticeable improvement in your images. In my experience, a tripod is invaluable in not only aiding me in making sharp images, but it allows me to shoot for hours without becoming fatigued from handholding a heavy camera and lens. A stable tripod combined with a fluid gimbal head allows me to pan smoothly along with a moving subject, enabling me to capture tack-sharp images during peak action. A stable support is worth its weight in gold. Just like camera bodies and lenses, there are tripods and heads for every type of photography and every budget. You have a lot of money invested in your equipment, so purchasing a tripod is not the time to become too budget conscious. A good tripod will serve you well for years. Flashpoint tripods and heads (Figure 1.12) are excellent options for the budget-minded photographer with a good selection to match the tripod and head with the equipment you own.
Figure 1.12 A tripod is an investment in your equipment’s safety as well as all the future sharp images you will make when using a tripod properly. You don’t have to break the bank to get good quality, as proven with the Flashpoint brand of tripods and heads.
Important features to consider when purchasing a new tripod include:
• Maximum extended height (preferably without a center column). You’ll want a tripod that will extend to at least your full height. This will prevent fatigue from bending over your tripod all day and avoid tilted horizons from bending over at an angle to look through the viewfinder. If you can stand at ease with your tripod at eye level, you will be able to shoot in a more relaxed fashion for a greater length of time.
• Maximum weight. You’ll want a sturdy tripod that can support at least twice the weight you’ll ever mount on it. Not only does the additional weight of the tripod add to its stability in windy conditions, but you’ll have room to grow and add longer lenses without the need to upgrade. The compromise is worth the little bit of extra weight for the added stability. I use the Gitzo line of carbon fiber tripods for their light weight and strong support.
• Minimum collapsed length. If you travel, your tripod needs to fit in your suitcase for transport. Many Gitzo models come in three- and four-section options. The three-section extension does not extend as high nor does it collapse as short as the four-section version, but it does have slightly larger legs without the fourth leg extension. The four-section extension version extends higher for taller people and collapses shorter for easy transport.
• Center columns. It is tempting to use a center column when you have it, but it degrades the stability of your tripod with only its single column supporting your camera. It also prevents you from dropping right to the ground for eye-level shots of small shorebirds and other low-to-the-ground subjects.
• Lightweight and solid construction. Tripods made from carbon fiber and other lightweight materials are considerably easier to carry into the field. In addition, they offer great strength and stability.
• Overall weight. If you photograph in the field, you must be willing and able to carry your tripod. Determine the greatest distance you may venture from your car, and keep that in mind when you’re checking the weight of a tripod you are considering.
• Cost vs. long-term use. Your tripod will last you a lifetime if you purchase it with care and consideration for future additions to your system. There may come a time when you need two tripods, one for lightweight shooting where you won’t be mounting your biggest lenses and another for your big gun to provide maximum support.
Two types of heads to consider when purchasing a new head include:
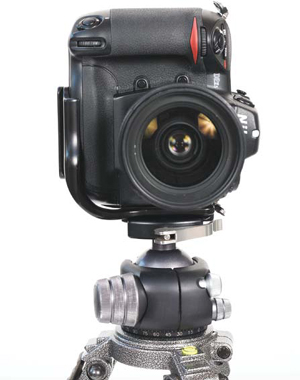
• Ballhead. A ballhead gives you the greatest ease of use: One knob releases it to move in all directions and another knob is used for panning. It’s that simple. What’s not so simple is finding the right ballhead for you. One issue with lesser-priced ballheads is drift, which means the head shifts slightly after tightening it. A head that doesn’t drift comes at a higher price but is well worth it. The Really Right Stuff ballheads (Figure 1.13) are the best I’ve used to date. While you’re at it, don’t forget to add an L-Bracket (quick release) to your camera (Figure 1.14). An L-Bracket allows you to mount the camera in a vertical position and keep it positioned over the center of the tripod for the greatest stability.
Figure 1.13 The Really Right Stuff ballhead offers smooth operation and can be adjusted with one knob for convenience and speed.
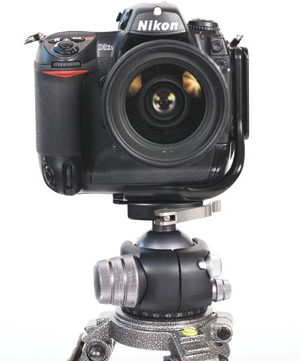
Figure 1.14 An L-Bracket from Really Right Stuff allows the camera to be turned to a vertical position and still balance the weight over the center of the tripod for the greatest stability.
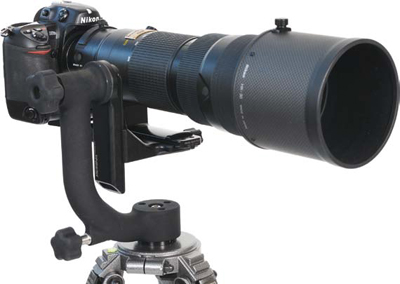
• Gimbal head. A gimbal head is the preferred head for wildlife photographers who use long lenses. The operation of a good gimbal head is as smooth as it gets. The lens simply glides from left to right and up and down. With the lens collar loosened, there is no direction you can’t turn to follow your subject quickly, smoothly, and easily. Quality and convenience come at a price, and this is no spontaneous purchase item. But for those who do own long lenses and photograph moving subjects, it’s well worth the investment. Wimberley (Figure 1.15) and Really Right Stuff offer well-made, high-performance gimbal heads, and both accept the “Arca Swiss” style quick-release plates for ease and speed of mounting your lenses to the head.
Figure 1.15 A Wimberley gimbal head is the ideal platform when using lenses that have their own tripod collar. The smooth operation allows for easy panning with a moving subject.
Tip
Carbon fiber tripods are not only lightweight and stable, they don’t transmit the cold like aluminum tripods, which is a real bonus for those who photograph in freezing temperatures.
Buying CompactFlash Cards
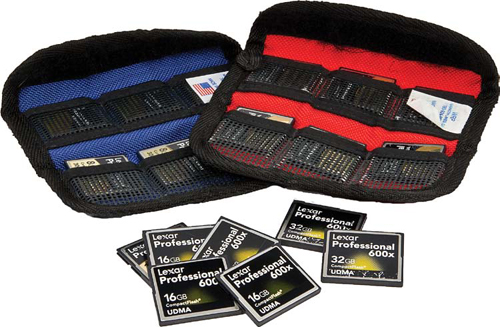
Buy the biggest and fastest cards your camera can use and you can afford. They will not only write at your camera’s fastest capability, they will download into your computer as fast as your drive will transmit. You can never have too much speed or too much storage in the digital world. I always tell my participants to bring as much storage as they can. They are often surprised at just how much they do shoot and are glad that they heeded my advice. Memory and storage are cheap compared to all the money you have invested in your equipment and the expense to travel to a location. I rely on my cards to capture images and store them safely until I can download and back up the images. That’s why I only use name-brand cards. Your camera may take CompactFlash (CF) cards (Figure 1.16), SD media, or some other format. Make sure you know the correct size and buy extras! Cards are inexpensive, and your memories are priceless! My father instilled in me a long time ago that film is cheap in comparison to the expense of returning to a location. Not only that, but there will never be another right now! So, when you see that special shot, don’t think that you can come back. It will never be exactly the same.
Figure 1.16 Compact Flash cards come in a variety of capacities and speed. By buying the biggest and fastest cards, I can shoot hundreds of images to one card without having to change at the peak of action, and the download time is reduced for a more efficient workflow.
Note
Rob Galbraith has done extensive testing and research on the best cards and their performance as well as reliability. You can read about it at www.robgalbraith.com.
Even the best cards can fail. The best $29 you will ever spend is on PhotoRescue software from DataRescue (www.datarescue.com). If you ever need to salvage deleted images from a card, it’s PhotoRescue to the rescue!
Backpacks and Fanny Packs
There are as many types of bags to get your equipment to and from location and into the field as there is equipment to fill them. Those who venture off the beaten path use backpacks and fanny packs. Because I travel from one end of North America to the other on a regular basis, I need a bag that will not only work in the field, but one that I can also carry on an airplane. Nowadays, you must consider the type of bag that you can use in the field as well as the logistics of getting your equipment to location by air, bus, car, boat, and so on. And let me tell you that it’s not getting any easier because of size and weight restrictions, and baggage charges. It’s getting progressively harder to even bring your camera bag onboard a plane anymore. That’s why I use the backpacks that I do. They range from a Moose Peterson MP-1 to the MP-3 or MP-7 (Figure 1.17), depending on the equipment I’m bringing with me. They will fit in even the smallest overhead compartment on small commuter jets. I simply state with confidence that the bag will fit. If I get questioned, I ask if I can at least try and offer to relinquish it if it won’t fit, all the while knowing that it will fit! I’ve not been refused yet.
Figure 1.17 Venturing farther afield and needing more gear, such as a second body with a mid-range zoom, wide and macro lenses for capturing the landscape from intimate detail to sweeping panoramas, teleconverters, cards, batteries, gloves, and assorted odds and ends, requires a larger backpack to hold everything and distribute the weight evenly on my shoulders. (An AquaTech rain cover protects the camera and lens against the elements.)
In the field it’s essential to have your hands free to carry your long lens and tripod, and to be ready to set it down and start shooting at a moment’s notice without being hindered by extra gear getting in the way. I prefer a backpack in the field because it evenly distributes the weight on my shoulders, allowing me to go for hours with fairly significant weight packed in it. On shorter forays, I carry a small fanny pack (Figure 1.18) with extra batteries, cards, lens cleaning supplies, a teleconverter, and other small miscellaneous items.
Figure 1.18 When my primary focus is wildlife, I will carry my longest lens mounted on my tripod with teleconverters, a wide-angle lens, spare batteries, CF cards, and other small miscellaneous items in a fanny pack to free up my hands.
Creative Filters
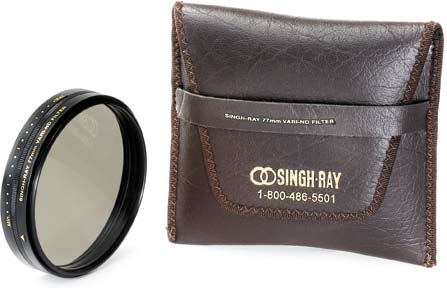
Although you can replicate nearly every filter imaginable in the digital darkroom, I prefer to get the effect or look I’m after as close as possible in-camera. Rather than “fixing” something I could have corrected in-camera, I can use my time in the digital darkroom for creative endeavors. Also, some effects are just not the same, no matter how skilled and creative you are in Adobe® Photoshop®. One of my favorite effects is the blur pan (this technique is also discussed later in the book): You shoot at slow shutter speeds while panning with a moving subject, such as a bird in flight. When the light is low, I can achieve a slow shutter speed at my lowest ISO and smallest aperture. But when the light is strong and I want to work with blur pans, I simply turn to my Singh-Ray Vari-ND (Figure 1.19) with its 2–8 stop range of neutral density strength (for lenses up to 77mm thread) or my Hoya HMC ND8X that threads into my drop-in filter holder on long lenses (52mm slim is needed to fit into the drop-in slot on a super telephoto lens).
Figure 1.19 The Singh-Ray Vari-ND is a two-ring filter; you turn the outer ring to vary the strength of the neutral density filter from 2 to 8 stops. Getting the exposure is easy with digital: Simply dial it down until you reach the desired slow shutter speed, take a test shot, adjust the exposure using exposure compensation until you have the desired effect, and fire away.
There is a romantic feel to a well-done blur pan when you keep the eye sharp and the rest of the subject and surrounding background softly blurred by using a slow shutter speed. Bosque del Apache in Socorro, New Mexico, is an excellent location to practice this technique if you go during the winter months. At that time, nearly 10,000 sandhill cranes and 35,000–40,000 snow geese winter over, providing opportunities to practice panning. Each morning the cranes and geese leave the shallow ponds for the cornfields where they spend the day eating and then return in the evening to roost in the ponds once again. With my ISO at its lowest setting and my aperture closed down to its smallest opening, I may still need some help to get a shutter speed slow enough for the blur effect I want. By adding a neutral density filter, I am able to slow down the shutter speed enough to achieve a blur pan and can select an aperture that gives me the limited depth of field I want without having to close down the aperture (Figure 1.20).
Figure 1.20 The blurred effect of the sandhill crane in flight is achieved by adding a neutral density filter to the lens to slow down the shutter speed while keeping the aperture open a bit for less depth of field.
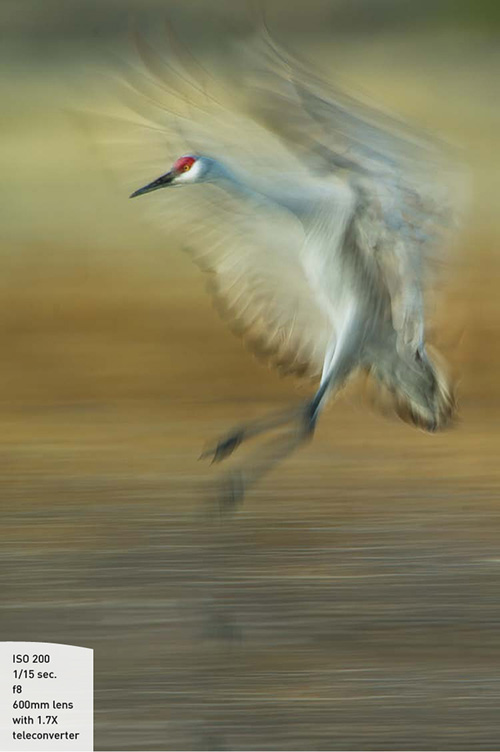
Your keeper ratio decreases dramatically when working with blur pans, but all it takes is one or two great shots to consider the reward worth the effort. So, don’t despair if you don’t get it right away.
Additional filters that I carry with me in the field for protection and creative control over my images include:
• UV filter. My lenses are exposed to some pretty harsh conditions, such as extreme temps, sea spray, blowing sand at the coast, dust and dirt in the field, steam from thermal features in Yellowstone, and so on. I feel strongly about protecting my front elements against environments that can ruin the coatings.
Tip
When adding a filter for creative effect, I remove the UV filter to avoid shooting through multiple filters, which can degrade the image as well as cause vignetting (dark areas in the four corners of your image) with wider-angle lenses.
• Polarizer. Not only does a polarizer darken the sky and make the clouds stand out, it removes reflection, cutting through glare and coaxing the natural, beautiful colors out from behind the reflection.
Tip
A polarizer can help when you need a slower shutter speed. It will reduce the exposure by up to two stops. It can also take the shutter speed too low for sharp images when you simply want to remove reflection. I use a polarizing filter sparingly when photographing wildlife.
• Graduated ND. When the exposure range is greater than your camera can capture in one click, a graduated ND filter works to compact the exposure between the foreground and sky. I use a Lee graduated ND 3-stop soft filter and hold it in front of the lens by hand. A fairly straight line between the bright and dark areas is necessary to make a natural transition. This filter is useful for landscapes as well as environmental wildlife photography.
• Canon 500D Close-up lens. When macro is not the primary focus of a shoot, I may leave my macro lens at home, but I always carry a Canon 77mm 500D Close-up lens that threads onto the front of both my 24–120mm VR and 70–200mm 2.8 VR. The 500D is a two-element, close-up filter that has fairly low distortion and enables me to focus closer than my lenses’ minimum focus distance, allowing me to capture close-ups in nature. The 500D comes in a variety of sizes and strengths to accommodate most lenses regardless of the brand you shoot.
Protective Coverings
One of the first items you should invest in if you buy a new long lens is a LensCoat protective neoprene cover (Figure 1.21). LensCoat covers will help protect your investment against bumps, bangs, dings, and to some degree weather. If you take good care of your equipment, it will continue to work hard for you.
Figure 1.21 The LensCoat long-lens cover protects lenses from getting banged up in the field, keeping them working and looking good.

Camera Cleaning Kit
It’s important to keep your sensor clean and free of particles. At best, it can take extra time to clean up images in the digital darkroom, and at worst, you will end up with a spot on a hard-to-remove area. Every night after a day’s shoot, I clean my camera and check the sensor to ensure that it is free of any debris that might appear on my images. If you are in the field and are changing lenses, you will get dust on your sensor; so, having a cleaning kit along is essential. I use the Visible Dust products for their innovative designs, quality, and the fact that their liquids are not flammable. As a result, the TSA will not confiscate them and leave me a nastygram in my suitcase and no cleaning fluid on location.
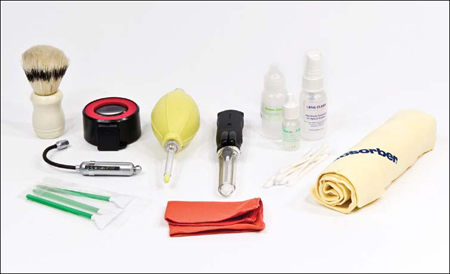
The items included in my cleaning kit (Figure 1.22) consist of:
• A man’s shaving brush to remove surface debris and dust from the outer part of my camera and lenses
• Visible Dust Sensor Loupe to get a magnified view of the sensor while checking for dust
• Zeeion Blower to “blow” dust off the sensor as needed
• Arctic Butterfly with light to “brush” dust that the blower didn’t remove from the sensor
• Visible Dust Sensor Swabs and Sensor Clean fluid to remove those pesky specks that won’t blow or brush off
• Q-tips, lens-cleaning solution, a microfiber cloth, and an Absorber (car chamois)
• I use the Q-tips with a little bit of lens-cleaning fluid to clean tight places and the contacts of my camera and lens, and the Absorber to remove surface grime from my camera and lenses.
Figure 1.22 I always carry my cleaning kit with me on my travels to keep my camera and sensor in tip-top, clean condition.
Tip
Yours truly has a step-by-step tutorial on sensor cleaning and camera maintenance at Kelby Training. Check it out at www.kelbytraining.com.
Flashlight/Headlamp
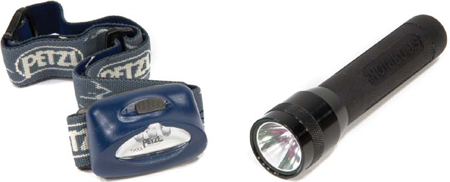
As a wildlife or nature photographer, you’ll usually be in the field well before first light and be the last to leave after the sun has set, assuming you are not staying out for night photography as well. Therefore, to light the way to your destination as well as to check your camera settings in the dark, be sure to use a flashlight or a headlamp in the field (Figure 1.23). A headlamp frees up your hands to work the camera while illuminating the buttons and dials.
Figure 1.23 A Streamlight flashlight is bright enough to “paint with light” in addition to aiding you in seeing your camera settings in the dark. A headlamp frees up your hands to work the camera while lighting the buttons and dials.
Tip
Most cameras have an illuminated display to help you see the settings, but a flashlight is useful for finding the buttons and dials in the dark.
Chapter Assignments
Now that you have all your gear, the following assignments will help you become more familiar with your equipment and accessories.
Get to Know Your Equipment
Take time to get to know your equipment. Set up your tripod and focus on the same subject. Shoot each of your lenses at their widest angle and then their longest focal length. Move in to minimum focus distance to see just how close you can get to your subject with each lens. Try filling the frame with your subject using different focal lengths to better visualize the difference between moving in tight with a shorter lens as opposed to staying back a bit with a longer lens.
Take Inventory Now So You Have the Right Equipment on Location
Go through your bag to make sure you have all the items you might need in the field. Do you have quick-release plates for your cameras and lenses with tripod collars that fit your tripod head? Do all your lenses have protective UV filters? Do you have enough media to get through an entire day’s shoot? With a little planning before you leave for a shoot, you won’t have any unpleasant surprises when you arrive on location in some remote area and find you are missing a key accessory or part.
Go Ahead, Clean That Sensor
Many people break out in a nervous sweat when they think about cleaning their camera’s sensor. Relax; it’s not that hard. If you don’t have a basic cleaning kit, now is the time to invest in one, so that when you are on location, you don’t end up with a dust storm on your sensor that shows up in your photos. It’s not realistic to think that you will never get dust on your sensor. Be prepared!
Share your results with the book’s Flickr group!
Join the group here: flickr.com/groups/composition_fromsnapshotstogreatshots.