
Using the inline assembler in VC++ 2008 is simple and convenient enough. However, the caveats are that certain conditional commands such as .IF, .WHILE, and .REPEAT, as well as macros cannot be utilized. Let us look at the three described methods of working with assembly code with your regular toolkit. Visual Studio can be configured to compile assembly code using the MASM assembler in the C code. The C runtime library can be integrated during linking to facilitate this. Create a Win32 project as usual and add a new item.
From the Visual C++ menu, choose the Code and CPP file, and name your file with a .asm extension.
Right-click the project name in the Solution Explorer, and choose Properties | Configuration Properties | Linker | Input.
Type mscvrt.lib in the Additional Dependencies box, and click OK. Then, set Ignore All Default Libraries to Yes.

Right-click on the .asm extension assembly file and choose Properties. Open Custom Build Step | Command Line and type: ml -c -Zi "-Fl$(IntDir)$(InputName).lst" "-Fo$(IntDir)$(InputName).obj" "$(InputPath)":
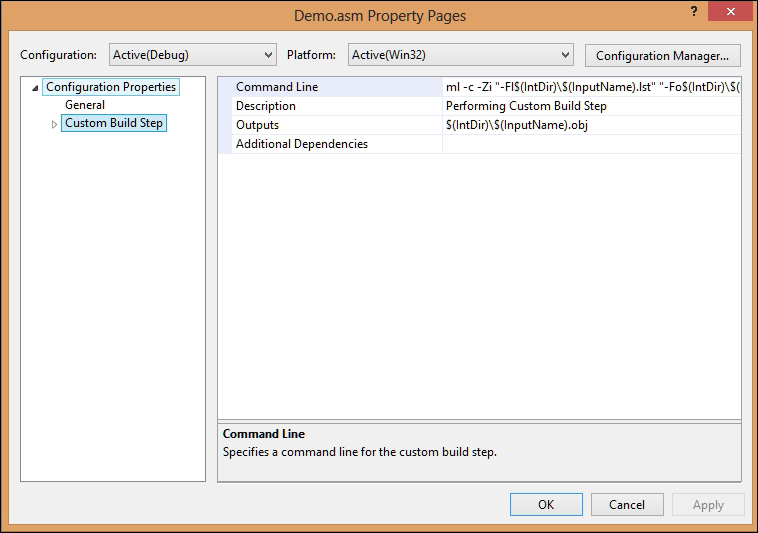
-Fl generates a .lst listing file. –Zi is for symbolic debug information. –c is for assembling without linking.
Then, type $(IntDir)$(InputName).obj in the Outputs box.
In more recent versions of VC++ (2008 and above), you can configure the following by right-clicking on project, selecting Build Dependencies | Build Customizations | check masm. Then, right-click on the .asm file and change Item Type to Microsoft Macro Assembler | Compile.
A basic "Hello World!" program can be compiled to check whether your MASM syntax is successfully compiling in the current setup. As you will be using the user mode debugger, OllyDbg, in the later chapters, you are advised to explore the View | Source option that allows the use of debugging with disassembly. If the symbol files are available on a debug build, the hint pane in OllyDbg will also display the source code pertaining to the current disassembly line. This is an essential feature that most debuggers support, including Windbg, Microsoft's kernel debugger:
.listall
.386
.model flat,c
printf   PROTO arg1: Ptr Byte, printlist:VARARG
.data
Msg   byte "Hello World!", 0Ah,0
.code
main     proc
         INVOKE printf, ADDR Msg
ret
main  endp
    end
To set a breakpoint in the debugger while the program is executing, you can insert int 3 in any part of the code between main proc and main endp to instruct the debugger to break at the 0xCC opcode before it is assembled. This will enable you to SINGLE STEP (F11) the code within Visual C++ without getting into keyboard input code or macros at this point, which is useful if you want to see line-by-line execution in the IDE without the console window closing.
If you are acquainted with Win32 programming, you can also use API calls to programmatically insert breakpoints using kernel32!DebugBreak and ntdll!DbgBreakPoint, which are the user mode and kernel mode versions of the breakpoint API calls.
Note the .listall directive at the beginning of the source code, which creates a listing file of the assembler-generated code of the high-level directives, will also be seen. This will be found in the project folder as a file with a .lst extension. This can be opened inside VC++ by pressing Ctrl + O or from the File | Open | File menu item. The other benefit of the listing file is that the assembled opcodes are also displayed, which can be used for offline study.
Study the following listing file excerpt text and investigate the different sections:
Microsoft (R) Macro Assembler Version 9.00.30729.01


  .386
  .model flat,c
  printf PROTO arg1: Ptr Byte, printlist:VARARG
 00000000  .data
 00000000 48 65 6C 6C 6F  Msg   byte "Hello World!", 0Ah,0
     20 57 6F 72 6C
     64 21 0A 00
 00000000    .code
 00000000    main    proc
 00000000    CC      int 3
 INVOKE printf, ADDR Msg
 0000000E    C3      ret
 0000000F    main    endp
  end
In case you were wondering how these macros were used, you can open any item in the Property Pages project and click the downward arrow, and if there is an <edit> option, you can click it to go to the macros dialog and build the macro sequence. You can type in the text box or double-click the macro definitions in the list box below. You can also search for visual studio macros for build commands and properties on your favorite search engine.
To see the various command-line parameters for the ml.exe assembler, open Visual Studio 2008 command prompt from the start menu installation folder in Windows and type ml /?.
Another variant of this method of integrating assembly code and C/C++ code is to simply write assembly code in a text file, without bothering about the .asm extension and include this file in Visual Studio by using Add | Existing Item from the context menu for the Source Files folder. You can add a text file by going to File | New | File | General | Text File. Thereafter, right-click the .txt file and navigate to the Custom Build Step column and type the following:

Note that the filename is used as both the object file name and the function name. However, this is optional as the defining parameter is the function name in the assembly code. To use this piece of code in a regular C program, you need to insert the following line in the source file before main():
extern "C" void <function_name/filename>(char *);
Type the following into a text file in Visual C++ and include the file in the solution source files folder or add a new file and rename the extension to .txt and configure the build step as described earlier. Ml.exe, which is the assembler, does not itself need the extension of .asm and can be set to anything:
/* SpaceCounter.txt
*Assembly procedure to determine the number of spaces and the total length of the string*/
.586                 ; enables assembly of non-privileged instructions of
                     ; 80586 processor
.model flat, C       ; Flat memory model of 4GB range with origin 00000000h
                     ; denotes size of code and data pointers
                     ;language type C, with cdecl calling convention
    .stack 1024      ;this is the default value of the stack segment size
    .code            ; indicates start of the code segment
    public SpaceLenCounter
SpaceLenCounter proc uses esi,coolString:ptr , spacesCount:ptr, totalLength:ptr
   pushad
mov esi,coolString
mov ecx,0          ; initialize the counters to zero
mov ebx,0
push totalLength   ; save the addresses to stack
push spacesCount
L1:
mov al, [esi]
cmp al, 20h    ; check for the ASCII space hexadecimal value
jnz next
inc ecx        ; spaces counter increment
next:
inc esi
inc ebx        ; character counter increment
mov eax,0
cmp [esi],eax  ; check for null character or end of string (character array)
jnz L1
pop eax          ;restore the address of spaceCount variable
pop edx          ;restore the address of totalLength variable
mov [eax],ecx    ; copy the value in ecx to the address referenced by eax
mov [edx],ebx    ; copy the value in ecx to the address referenced by ebx
popad
Ret
SpaceLenCounter endp
End
In the main .cpp file, you can type the following:
#include "stdafx.h"
#include <stdio.h>
#include <conio.h>

extern "C" void SpaceLenCounter(char *,int *, int *);

char coolString[48] = "How many spaces in this text and what length???";
//can be replaced with user input functions from standard library

int main(int argc, char* argv[])
{
printf ("%s
", coolString);
char *p=coolString;
int totalSpaces=0;
   int lengthOfString=0;SpaceLenCounter(coolString,&totalSpaces, &lengthOfString);
printf ("Total Spaces = %d  & Length of String = %d
", totalSpaces, lengthOfString);
_getche();
return 0;
}
The output is as follows:
The extern "C" keyword adds the function that is defined externally as a C function. The object code and then the subsequent linking are handled by the Visual C++ build environment, which requires you to configure the build steps prior to compilation.
Here, in the C source, we pass the address of the variables and a pointer-to character array (pointer to a pointer or pointer to array[0]), and hence, the data types in the function definition have the ptr data type.
Consider the assembly code for SpaceLenCounter:
public SpaceLenCounter
SpaceLenCounter proc uses esi, coolString:ptr , x:ptr, y:ptr
mov esi,coolString
You have to declare SpaceLenCounter() as a public procedure so that it can be linked by the compiler as is visible in the global namespace:
SpaceLenCounter proc uses esi, coolString:ptr , x:ptr, y:ptr
Is the PROC directive with the optional uses parameter for register allocation and the three arguments passed as per definition? The arguments are passed in the <identifier>:<type> format.
The pushad and popad instructions save and restore the stack state as the execution enters the function call. Eight general registers are pushed to the stack taking a DWORD (d in pushad for DWORD) each. Their counterparts for the EFLAGS register are pushfd and popfd.
ptr is essentially a 32-bit unsigned value as it denotes the memory addresses.
The rest of the assembly code is self-explanatory as per the comments. Try to see whether you can implement it in another manner.
You can build a .lib library file from the assembly code file given earlier. By the current configuration, you already have a .obj file in the project folder. You have noted that the PUBLIC directive was used in the assembly code to expose function parameters to the global namespace. You have also noted that the EXTERN directive is to be used in the calling program, here, in the C language source code. A library file is a binary format that encapsulates an assembly code-assembled object file and builds a unit that can be reused and shared in other projects as and when needed with minimal recoding. If regular assembly programming is to be done, then the library .lib files are of immense value.
This is known as static linking wherein the function code is extracted from the library module and compiled in the main binary as part of the final executable. The other method is dynamic linking where the dynamic link library is dynamically linked and the import tables and export tables are filled by the loader during runtime process mapping with the addresses of the library functions. These jump thunk tables are then used by the code during runtime to access the invoked function entry points. For most functions that return a value, EAX is the register. By convention, the return values are fed back after function exit.
To build a library file from the object file, you have to invoke LIB.exe from Visual Studio Command. If not already present, you can use ml.exe /c /Cx /Coff <.asm file> to generate the object file for that particular assembly source only. Go to the prompt and type LIB <objectfile.obj> to generate the library file from the object file.
Thereafter, you have to include this library in your VC++ project. To do so, you have to right-click on the project name and open Properties, navigate to Linker | Additional Dependencies, and type "$(InputDir)SpaceCounter.lib".
Remember to enter the line with quotation marks so that VC++ does not complain about not finding the lib file. Use the name of the lib file that you have named:

In the new source text, include the preceding extern "C" statement as described and press F5 to compile, link, and run the new project.
In Visual Studio Command Prompt, you can type dumpbin /all SpaceCounter.lib to familiarize yourself with the binary format and attributes of particular interest (as mentioned in the following excerpt). You first have to set the current path to the path of the library file; else, you have to feed the full path (~ shortening of paths also works in Windows). Study the output; notice how the public symbols are exposed. Also notice the binary format, which is a version of the PE/Coff (common object file format) format for Windows. You will see the various section names and their section headers. The file header looks as it should for a typical 32-bit PE binary; here, the binary has 4 sections and is x86 compatible. RAW DATA #1 is the opcode sequence for the assembly code in the hexadecimal format. .debug$S is the section name for debug symbols, with RAW DATA #4 giving the hex dump view of the debug strings.
You can download the PEView tool and open the lib file in it to see a more comprehensive and consolidated view of the entire file structure in hexadecimals, including the parsed headers.
Let us compile the project with the library file to see how the static linking takes place. Open the executable in OllyDbg. The debugging details will be covered later on, but as a starter, you can look for the following code sequence inside OllyDbg.
Right-click in the main disassembly window to get to the context menu, and choose Search For | Binary String or press Ctrl + B. In the modal dialog box, type the following in the HEX box: 55 8B EC 56 8B 75 08
You have just typed the function prologue and some more opcodes from the function. The sequence 8B 75 08 moves the first argument value, which is a pointer to a character array to ESI. The number appended to the box name is the length of the hexadecimal string in bytes. Keep the Entire block option checked.

You should be reaching an address in the binary where the statically linked function assembly code is compiled in the preceding binary. Note that the process memory addresses might be different in your system.
You can use the inline assembler along with GUI code in Visual Studio so that you get the best of both worlds and build software with user interactivity and fast optimizations for regions where you feel the assembler fits best. While the classic use of Win32 API function calls to build a Windows form or dialogs using callbacks and message queues is well documented in C/C++ programming and even x86 assembly code, it is important to understand that there are other methods that can be leveraged immediately from the current setup. This also lets you focus on the algorithms rather than spend the time writing OS-specific boilerplate code, which can be investigated later on if so required. Once you are comfortable with the foundations, you can safely pursue GDI+/DirectX/assembly 2D/3D graphics programming on your own.
In Visual C++ 2008, create a CLR-based project and choose Windows Forms Application. Give a name and click OK.
You get a plain Windows form in the designer view. Press F5 to run the application. Close the form after you verify the execution and see how the form works by default; see if the minimize, maximize, and exit buttons work as expected.
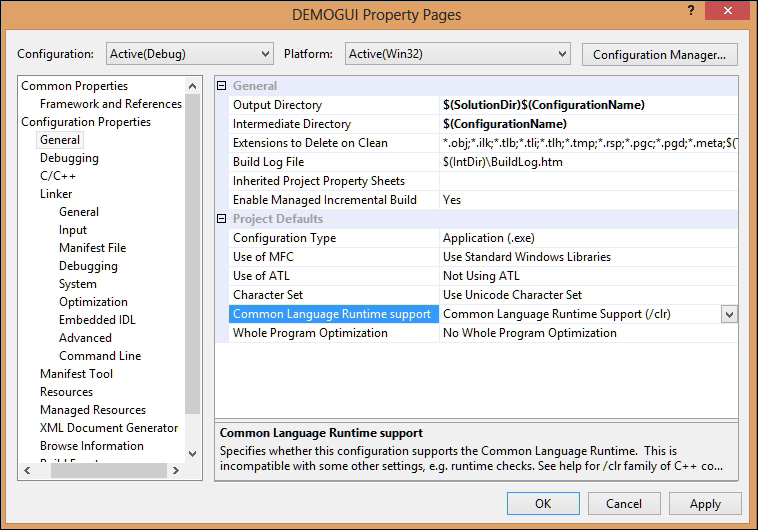
Open project properties, navigate to Configuration Properties | General, and change the Common Language Runtime Support option to Common Language Runtime /clr from /clr:pure. This will ensure that inline assembly compiles in the project. The GUI runs in a managed environment called the CLR, which is like a bytecode-based machine and executes Microsoft Intermediate Language (MSIL) pseudo code in .NET technology-based applications. This is not like the native instruction set of Intel microprocessors but a layer of abstraction above that. It eventually is Just-In-Time (JIT) compiled to native code. To ensure that your inline assembly is compiled properly, you have to place your code before all managed code in the source file.
In the designer view, press Alt + Enter to open the Properties Window (View | Other Windows | Properties Window) view. In this pane, you will see a list of attributes that you can set. Toolbox from the View menu (Ctrl + Alt + X) provides form controls that can be dragged and dropped. You can double-click the form itself to reach the event handler for the Form1_Load event.
Drag a label and a button to the form and arrange the controls as shown. Use the Properties view to change the value of the label text to Counter.
Double-click on the button to create the event handler for the button.
In the source, type the following at the top of the file or just after the #pragma directive and the namespace definition at the top of the file. Notice how these are inside regular function definitions:
#pragma once

namespace DEMOGUI {

  using namespace System;
  using namespace System::ComponentModel;
  using namespace System::Collections;
  using namespace System::Windows::Forms;
  using namespace System::Data;
  using namespace System::Drawing;

int increment (int a){
_asm {
lea eax, a
mov eax, [eax]
inc eax
mov a, eax
}
return a;
}

int compare(int b) {
  int result=0;
  _asm{
    cmp b,10
  jle ender
    mov result,1
ender:
  nop
  }
return result;
}//… skipped managed class declaration below
In the button event handler, type the following:
static int counter=0; /* initialize a static integer variable as a
counter */
private: System::Void button1_Click(System::Object^  sender, System::EventArgs^  e) {
  System::String^ result = counter.ToString();
  counter=increment(counter);
  label1->Text=result;
  if (compare(counter)){
    counter=0;
    MessageBox::Show("Rollover at 10");
  }

}
Press F5 to run the application, and press the button to see the counter value incrementing. At counter=10, a message box modal dialog shows the value 10. The counter is also reset to 0 on the next click.

If you use keyboard and mouse event handling in VC++ with Windows forms along with assembly code, as well as the standard C library and the C++ STL library among tons of other external libraries, you can build any application that you can think of, which has user interactivity as well as speed and an environment for rapid development.