
We’ll Cover
In this chapter, we’ll cover the overall architecture for deploying the holy grail of secure wireless networks: WPA-Enterprise using certificates for authentication. We’ve already covered the majority of the components from a 20,000-foot view, so now it’s time to take a much deeper look at how these technologies function and how they will cooperate in a wireless environment.
Introduction to WPA2-Enterprise with Digital Certificates
Before we dive into this chapter, let’s cover the reasons why we would choose to deploy a WPA2-Enterprise network using digital certificates over other options. By using digital certificates, we get the following benefits:
Digital certificates are considered to provide much stronger authentication than traditional passwords. Because a digital certificate is an actual file, it’s typically harder to compromise than a traditional password. Whereas a password might be written down in an insecure location, spoken aloud, or just chosen poorly, a certificate does not have these problems.
Both the user and the computer can authenticate to the wireless network without any interaction from the person at the keyboard. You’re probably familiar with cached credentials for Windows systems. Using cached credentials, users can authenticate directly to a system that they’ve authenticated to in the past without having network access to query Active Directory. This is a common scenario for wireless networks. If you have to wait for a user to log into a system before he can authenticate to the wireless network using those same credentials, then what do you do if the user hasn’t logged into this particular system before?
You can use digital certificates to have the workstation authenticate to the wireless network before the user logs in. Thus, even if the user has never logged into this particular system before, the system has access to authenticate to Active Directory. This can be extremely handy for wireless devices that get passed around a lot.
In addition, using certificates we can provide mutual authentication. Mutual authentication means that both parties are authenticating each other. In this case, the client is authenticating the wireless network and the wireless network is authenticating the client. This ensures that both parties are communicating with the intended party.
For these reasons, WPA2-Enterprise with digital certificates is considered the best solution for environments demanding the most security from their wireless networks. For the most challenging of environments, you might consider using WPA2-Enterprise with smart cards, but this is beyond the scope of this book.
LINGO
A smart card is a physical device that houses a digital certificate.
Public Key Infrastructure and Digital Certificates
Public Key Infrastructure (PKI) and digital certificate services are extremely complex topics. By no means am I inferring that these topics are beyond your comprehension; on the contrary, they are actually very easy to understand. There are just a lot of “moving parts” and new concepts that you need to learn to fully appreciate them. So, take your time and make sure you fully understand every section before moving on to the next. We will lay the foundation for you to understand PKI and digital certificates and then focus on the components and issues as they apply directly to a wireless infrastructure. Like many other things in this book, I simply don’t have the space (or the patience) to cover every possible configuration option for deploying certificate services. If you intend to use certificate services to support additional initiatives, be sure you fully research the specific needs for those technologies.
A Public Key Infrastructure is not simply the complex math and algorithms behind public keys, private keys, and digital certificates; it is actually all of the technologies, servers, systems, and even human processes that support digital certificates. Many times people will incorrectly refer to PKI as the mathematics that make digital certificates possible, but this is incorrect and doesn’t paint the entire picture. Typically, people are actually referring to Public Key Cryptography, which is a component of an entire Public Key Infrastructure. You can see some of the components that make up a Public Key Infrastructure in Figure 7-1.

Figure 7-1 PKI components
Public Key Cryptography: Asymmetric Encryption Algorithms
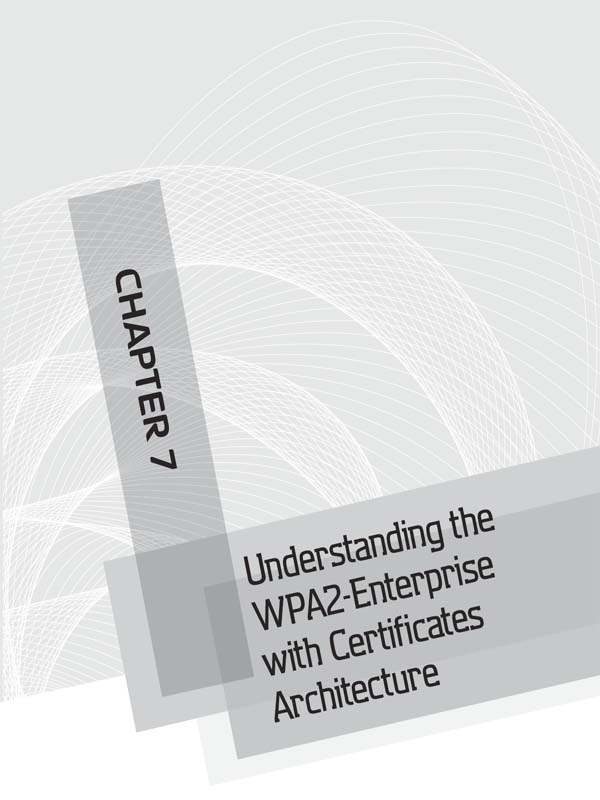
Public Key Cryptography is the complex math behind public and private keys. Public Key Cryptography is integral to a Public Key Infrastructure and digital certificates. Remember that there are two main types of encryption algorithms: symmetric and asymmetric. In a symmetric algorithm, the same key that is used to encrypt data is used to decrypt the data. This is illustrated in Figure 7-2.
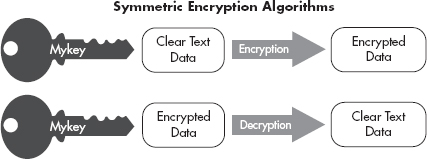
Figure 7-2 Symmetric encryption algorithm
 Note
Note
Any discussion of Public Key Cryptography should mention that the security and math behind it is based on extremely large prime numbers.
In an asymmetric encryption algorithm, one key is used to encrypt the data and a completely unique but corresponding key is used to decrypt the data (see Figure 7-3). These two keys are typically called public and private keys. PKI is based heavily on the use of public key cryptography and thus public and private keys. This is not difficult to understand, but many people who are new to the concept tend to question how this can be secure.

Figure 7-3 Asymmetric encryption algorithm
Every entity in the digital world that wishes to authenticate using digital certificates has two keys (which can be generated by a third party or generated by the entity itself). The public key can be given to anyone else, and the private key is kept, well, private. Data encrypted using the private key can only be decrypted using the public key. Conversely, data encrypted using the public key can only be decrypted using the private key.
Into Action
Can your public key really be given to anyone, even an attacker? Absolutely. Remember that the only thing an attacker could do with a public key is encrypt data that can then only be read by you, or decrypt data that you’ve encrypted with your private key. It is up to you upon receiving that data to verify whether that communication is trustworthy, but the simple fact that the attacker has your public key does not in any way directly impact the security of your private key.
If an entity signs a message with their private key, they can then send this message to anyone with their public key and that message can be verified as coming from the entity using their public key. This does two things: It actually tells the recipient that the message was sourced from the sender, and it also tells the recipient that the data has not been changed in any way in transit. This proves the integrity of the message as well as who sent the message. What does it mean “to sign” a message using a private key? Well, if I want to send a message to someone and have this person be able to verify that the message came from me and that it wasn’t changed in transit, I can digitally sign the data using my private key. This process is shown in Figure 7-4.
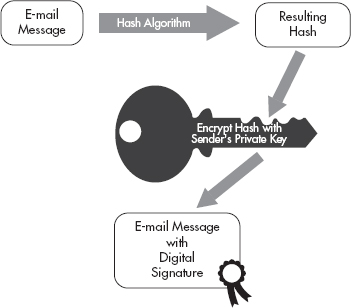
Figure 7-4 Digital signature process
The process is as follows:
1. I take every bit of the data and run it through a hashing algorithm (such as the MD5 algorithm).
2. I take the output from the hashing algorithm and encrypt this using my private key.
3. I append this data (or otherwise just include it with the data) and send it over to my recipient.
The recipient then follows a very similar process to verify that the data is from me and hasn’t been changed in transit:
1. The recipient takes my public key, which she already has, and decrypts the signature to get the output that I, the sender, had from the hashing algorithm.
2. The recipient takes all the unencrypted data and runs it through the same hashing algorithm.
3. The recipient compares the two values: the unencrypted challenge and the hash that was derived. If they match, she knows that the data has not been tampered with because she used my public key to obtain the same hash result.
A hash or “one-way hash” is an integral part of many cryptographic systems. A hashing algorithm is very similar to an encryption algorithm, except that the resulting cyphertext cannot be decrypted. That seems a little odd, doesn’t it? Let’s take a deeper look at how this works and why it would be used.
Hash functions take in a variable amount of data and produce a fixed-length hash code, or simply “hash.” The reason for this is simple: If we want to verify that two sets of data are the same, we can run both sets of data through a hash algorithm and if the resulting hash (which is much smaller and much easier to compare) is the same, we know the input data was the same. Thus, a hash function will always produce the same hash value for the same input data. The input data can be anything from a binary program file, an entire e-book, or an e-mail with three words in it. The resulting hash will still be the same fixed length.
The hash function cannot be reversed, meaning you can’t take the resulting hash value, run it through a “reverse hashing algorithm” and come up with the original data. This is where the term one-way hash comes from. Arguably the two most popular hashing algorithms today are Secure Hash Algorithm (SHA) and Message Digest Five (MD5). MD5 produces a 128-bit output, whereas SHA-1 produces a 160-bit hash value. In Figure 7-5, you’ll see that although two input files are vastly different in size they both produce the same output length from the hash function.
Figure 7-5 Hash function explanation
Many password systems use a hashing algorithm to store the “encrypted” value of the password on the system. Both Unix and Windows systems store passwords as hashed values. If an attacker obtained these hashed values, he couldn’t directly reverse them. Although you can’t reverse a hashed password, you can obtain a password via brute forcing. Remember that brute forcing a password involves running a list of cleartext passwords through the hashing algorithm; if the resultant hash matches the user’s hash, you have ascertained the password.
Into Action
We’ll take a look at an example of obtaining the MD5 hash of a simple text file. The commands we’ll use are available by default on BackTrack, so be sure to follow along. You can see in Listing 7-1 that we check the contents of the secret.txt file, which shows it’s just a simple text file with the contents “My Secret Message.” We then run the md5sum command and give it the file for which we want to have the MD5 hash.
Listing 7-1: md5sum
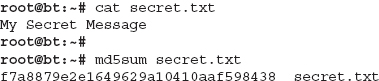
We then add a single character to the end of our message, as shown in Listing 7-2. We’ve changed the message to “My Secret Message1,” and then we rerun the md5sum tool. You’ll notice that now the resulting MD5 hash is vastly different.
Listing 7-2: md5sum2
So now you understand that a person can use Public Key Cryptography to send a message and have the recipient verify the authenticity and integrity of that message. Let’s take a look at some of the practical points of how a person would use a public and private key to send a secure message. Let’s take two fictitious people who want to e-mail each other securely over an untrusted network; we’ll call them Neo and Morpheus. Neo and Morpheus are close buddies. One day, before they part ways, they exchange their public keys with each other on USB thumb drives. Therefore, Morpheus knows he can trust the public key as coming from Neo because Neo physically handed it to him.
When Neo composes an e-mail and addresses it to Morpheus, he signs the e-mail using his private key. Remember that to sign the message, the e-mail program Neo is using will run the entire e-mail through a hash algorithm and then encrypt the resultant hash value using Neo’s private key. Neo then appends this signature value to the end of the e-mail and sends it on its way to Morpheus.
When Morpheus receives the message from Neo with details of their next rendezvous point, Morpheus wants to verify that the e-mail has come from Neo and that the message has not been tampered with by anyone. To do this, he takes Neo’s public key and decrypts the signature on the e-mail to come up with the encrypted hash value. He then creates a hash value for himself and compares this with the hash value from Neo’s signature. If the values match, Morpheus knows the message is from Neo and that it has not been changed.
Into Action
You should note that it is not a necessity to physically hand someone a copy of your public key. However, it’s typically advisable for you to send your public key using an “out-of-band” method. That is to say, you wouldn’t want to send your public key using the same communication path you wish to be secure. For example, if you want to use Public Key Cryptography to secure e-mail communications, you wouldn’t necessarily want to first e-mail someone your public key.
Why exactly wouldn’t you want to do that? It’s simple: If an attacker is intercepting your communications at that point, he can simply substitute his own public key for yours and your recipient would have no way of knowing this happened. Of course, there are ways for a human to verify this, but from your computer’s perspective, it would be a difficult attack to detect.
Into Action
You should note that this process of using a private key to create a signature and attaching it to the e-mail message is typically done automatically. It would be a little too cumbersome for the average user to be expected to manually perform all these tasks.
Likewise, the receiver of the e-mail message wouldn’t manually decrypt the signature and compare the hashes; this, too, would be done automatically.
Note
Keep in mind that e-mail is not the only system with which one can use public and private keys to authenticate messages. Public and private keys can be used to authenticate any message for any protocol. You could use them to digitally sign a file before you upload it to an FTP server or you could use them to authenticate every packet for an instant messaging system.
You should now understand that certificates provide a better means for authentication. Another very good reason to use certificates to authenticate to a wireless network is that users don’t need to enter a password. The authentication can happen automatically without any intervention from the user. If we configure the user’s system to authenticate using the computer certificate, we can authenticate to the wireless network before the user logs into the computer.
Attacking Public Key Crypto-Secured Messages
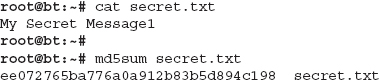
You may have a nagging voice in the back of your mind telling you that there has to be a way for an attacker to circumvent or break the protection offered by Public Key Cryptography. Let’s look at a few scenarios an attacker might attempt to tamper with data in transit. Let’s say that our attacker, Mr. Smith, is performing a man-in-the-middle attack, as shown in Figure 7-6. Mr. Smith could change the data of the message, remove the digital signature, or change the digital signature. Let’s see what would happen to the message under the following scenarios:
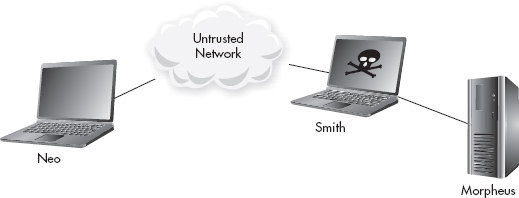
Figure 7-6 Mr. Smith’s MITM attack
If Mr. Smith changes the actual data in the message and forwards the message on to Morpheus, what will happen? Morpheus receives the message and decrypts the signature using Neo’s public key. So far, so good. This message did in fact come from Neo. However, when Morpheus runs the data through a hashing algorithm and compares that to the hash from the digital signature, they will not match. Therefore, Morpheus will know something is wrong with the message—it was changed either on purpose or accidentally while in transit. Either way, the message is no longer valid, and Morpheus should disregard the message.
So the attacker can’t simply change the data and leave the digital signature, so what can he do? What if the attacker changes the data in the e-mail and also removes the digital signature from the e-mail and then sends it on to the recipient. If Morpheus receives the e-mail and it does not contain a digital signature, the source simply can’t be verified and Morpheus should completely disregard the message.
It would appear Mr. Smith’s only choice is to manipulate the data in the message as well as change the digital signature. So, one last time, Mr. Smith changes the message body and tries changing a few bits in the digital signature. Once Morpheus receives the message and tries to decrypt the digital signature using Neo’s public key, it will fail to decrypt the digital signature, so Morpheus knows he can’t trust the validity of this message.
In the previous examples, we started with the caveat that Neo physically handed Morpheus his public key. In the real world, it would be completely feasible to physically hand someone your public key. In this case, this person doesn’t need a certificate because he knows you personally and has verified the source of the public key for himself. But what about on the Internet or even just a large network where there are potentially thousands of users? Do you really want to figure out a way to obtain, organize, and keep secure thousands of public keys? Unless you’re a complete masochist, the answer should be no. So how do we manage a situation where we can’t possibly personally verify the validity of public keys? The answer is digital certificates, of course, and that is our next topic.
Digital Certificates
A certificate can be thought of as a digital ID card. The ID card says who you are as well as who verified your identity, and it includes your public key. Your identity can be an individual user, a system on a network, or even a specific process on a computer. So who exactly does the certifying? A Certificate Authority (CA) is responsible for verifying identities and issuing certificates.
LINGO
Certificate Authority can refer to either the organization that issues digital certificates or the actual computer system that issues digital certificates.
Let’s first take a minute to ponder what real-world problem we are trying to solve with digital certificates. We’re trying to authenticate that a person (or system) is who they say they are. Certificates can provide a strong solution to this problem, and PKI is the infrastructure that supports the secure distribution and authorization of digital certificates.
Note
Keep this concept in mind during this entire chapter: The main reason why we use digital certificates is to solve the real-world problem of authenticating identities in a digital world. The identity we’re referring to can be either an individual human or a computer system on a network.
The process of verifying a user’s or a computer system’s identity can involve humans actually verifying information or it can be completely automatic based on existing network credentials. We’ll look at both scenarios shortly.
Let’s first start with a very basic example of how a computer system would use a digital certificate to authenticate itself and then move on to a deeper understanding of exactly how the technologies behind the scenes work. The example everyone is familiar with involves visiting an e-commerce website on the Internet. How do you know the website you’re visiting is the actual intended website and not a website hosted by a malicious attacker that looks completely identical to the legitimate website, waiting to grab your credit card details? Also, how does the owner of the e-commerce website convince you (the potential shopper) that their site belongs to a legitimate business that is reputable to some degree and that your communications are with the intended party.
The e-commerce website will have a digital certificate that states their identity as well as who has verified their information. The certificate presented to you by the e-commerce website will be digitally signed by a “trusted” third-party known as an Internet Certificate Authority. There are many Certificate Authorities available to the owner of the e-commerce website to sign their digital certificate and thus prove the identity of the website.
Into Action
Remember from the previous section on Public Key Cryptography that digital signatures rely on having the public key of the entity that digitally signed the certificate. Therefore, if a certificate has a signature from a Certificate Authority, to verify the authenticity of that certificate, you’d need the public key from the Certificate Authority.
Note
Some of the most popular Internet Certificate Authorities include VeriSign, Thawte, and Entrust, among others.
So how does an individual obtain the public key for the issuing Certificate Authority? Every modern operating system (and modern browser) comes with the public keys for the major Internet Certificate Authorities already installed. The operating system or browser is also configured to “trust” any certificates signed by these certificate authorities. From your computer’s perspective, it will not alert you for any certificates it receives if it “trusts” the signing Certificate Authority. In Figure 7-7, you can see the lock icon that indicates the Chrome browser trusts the Certificate Authority who issued the certificate for the website. On the other hand, if your computer (or browser) is not configured to trust a particular Certificate Authority, it will warn you with an error similar to the one shown in Figure 7-8.

Figure 7-7 Accepted certificate in a browser
Figure 7-8 Untrusted CA certificate warning
The locations on your computer where certificates are saved are known as certificate stores. The Trusted Root Certification Authorities Store is the location of all the Certificate Authorities your computer is configured to trust.
IMHO
Trust is an integral concept in any discussion of information security, and nowhere else is this more apparent than in a discussion of digital certificates and PKI. When first introduced to digital certificates, people can often get pretty confused due to an inefficient or incomplete explanation of how they work. One of the biggest components often left out of the digital certificates conversation is that of the human element.
Unlike many other security protocols, there’s actually a considerable amount of human processes (or administrative work) involved with digital certificates. These processes manifest themselves in users’ interaction with their own certificates as well as certificates from “unknown” servers, server administrators configuring and distributing certificates, and even third-party administrators working behind the scenes handling verification processes and certificate distribution (you’ll probably never even meet them).
I’ll point out when we’re reviewing human processes versus logical computer processes, as well as the distinction between human trust and the computer vernacular.
So here’s where the real-world problem presents itself. Yes, your computer is preconfigured to trust VeriSign and thus trust certificates signed by VeriSign, but does that mean that you (a flesh and blood person) should actually trust VeriSign, and what exactly does that even mean (to trust a company)? Ultimately, if you as a flesh and blood person trust VeriSign, that would tend to imply that you trust Verisign’s processes for thoroughly verifying the identity of the people and businesses they provide digital IDs for. This, of course, is a difficult thing for many reasons. First of all, people who don’t work for a Certificate Authority will probably not know the inner workings of how the Certificate Authority actually verifies identities. Second, these verification processes have proven to have flaws, where individuals and businesses that should not have passed the verification process have received digital certificates.
Remember that we’re talking about the process that employees of Certificate Authorities follow to verify identities. Whenever there is human involvement in a security process, your ears should perk up, because humans are far more prone to error than computers.
The vast majority of digital certificates today are in the format of an X.509 certificate, which is currently in version 3 (X.509 v3). The X.509 standard utilizes the X.500 naming convention. The X.500 standard has its own hierarchical naming convention, which we’ll look at later. You might already be familiar with the X.500 standard, which deals with electronic directory services. The Lightweight Directory Access Protocol (LDAP), which is a component of Microsoft Active Directory, has a similar hierarchical naming convention.
Digital Certificates contain important information, including the owner of the certificate, the issuer of the certificate, and the public key of the owner. Remember that all of this information is signed using the issuing Certificate Authority’s private key. Thus, if anyone, including the owner of the certificate, tries to change any of the information, the signature will indicate that something is wrong with the certificate.
Into Action
There have been cases of people being approved for a certificate even though they submitted entirely fake information. This, of course, is a serious flaw that impacts the very foundation of digital certificates. Of course, after such a certificate is identified, it is revoked.
In Figure 7-9, you’ll see the major fields in a typical digital certificate. The following table lists the fields shown in Figure 7-9.

Figure 7-9 Certificate with fields

In Figure 7-10, you can see the certificate for www.google.com. You can see the Common Name (CN) is www.google.com; this is synonymous with the Subject. You can also see that Thawte is the company that issued this certificate.

Figure 7-10 Google certificate
In Figure 7-11, you can see a few of the entries in the giant list of trusted Certificate Authorities that the Chrome browser trusts by default. You can manually add trusted Certificate Authorities to this list.
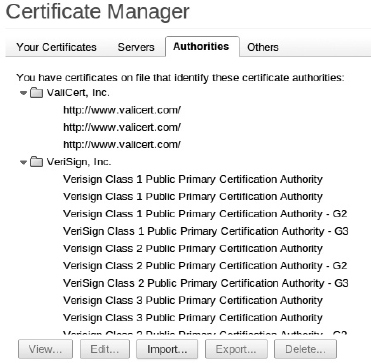
Figure 7-11 Chrome Certificate Authorities
Note
Another important benefit to using certificates is known as nonrepudiation. Essentially, if you sign a message using your digital signature, this proves that only someone with your private key (which should only be you) created the message. This means that you can’t deny (or repudiate) that you had approved the message. This can be a very good thing when dealing with legal contracts (and other critical communications) in a digital world; however, it doesn’t necessarily directly relate to authentication, so we won’t cover it further.
Authenticating as a user to your wireless network is slightly different from an e-commerce website authenticating to you. Conceptually, though, it’s almost identical. You will present your certificate to an authentication server on your network. Your certificate will contain your public key and the signature of a Certificate Authority that your authentication server is configured to trust. We’ll cover this in more detail later in the chapter.
Certificate Authority Server Structure
The infrastructure that supports certificates is built on a hierarchy of Certificate Authorities, with a root CA at the highest point in the hierarchy and Certificate Authorities underneath the root CA known as subordinate CAs or intermediate CAs. This is shown in Figure 7-12. This highly segmented hierarchy makes sense for large-scale deployments and Internet Certificate Authorities, but most businesses and enterprises will find that a much smaller hierarchy makes sense for their environment.
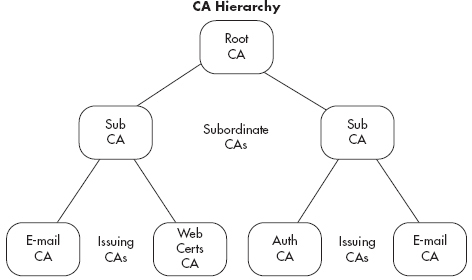
Figure 7-12 Certificate Authority Hierarchy
You can think of each of the subordinate CAs as a child to the higher-level CA. The parent CA would sign that child’s certificate, at which point the child could sign certificates using its own certificate (or private key). It is typically advised to take the root CA offline once you have deployed your intermediate CAs to ensure the security of your entire CA hierarchy. A compromise of any of the Certificate Authorities would compromise all of the CAs beneath it in the hierarchy. Many times segmentation makes sense to separate CAs with different functions. For example, you might have one CA that issues only authentication certificates while another CA issues certificates used solely for secure e-mail.
Handling Compromised Certificates
What happens if a certificate is compromised? How do we alert users to no longer trust that certificate? To do this, Certificate Authorities will use Certificate Revocation Lists (CRLs) or the Online Certificate Status Protocol (OCSP). A CRL is literally just a list of certificates that have been revoked. The Certificate Authority that issued the certificate will be responsible for revoking the certificate. An administrator of the issuing CA will mark the certificate as revoked. Any certificates that have been revoked are listed by serial number in a file that is publicly available. The problem with CRLs is that they can grow to be very large and a little cumbersome to manage. OCSP was developed to deal with these shortcomings. OCSP is a simpler request/response protocol typically handled over HTTP to determine the status of individual certificates.
Into Action
If your root CA is compromised, you’ll have to revoke all of your certificates and redeploy all of your enterprise Certificate Authorities. Therefore, either powering off your root CA or otherwise removing it from the network is advisable.
Supporting Services
Certificate services rely heavily on the Domain Name System (DNS) and the Network Time Protocol. Clearly, if your system time differs greatly from that of your Certificate Authority, you may incorrectly believe a certificate to be expired. Likewise, DNS needs to be functioning properly for many aspects of certificates, including communication with your Certificate Authorities, Active Directory domain controllers, and domain systems.
Microsoft Certificate Services
Microsoft is clearly the dominant player in enterprise directory services. We’ll take a look at configuring Microsoft Certificate Services to support authentication for your wireless network in the next chapter. For now you need to understand a few of the nuances of Microsoft Certificate Services. Microsoft refers to its certificate servers as either “standalone” or “enterprise” servers. A stand-alone Certificate Authority is not integrated into Active Directory, and Microsoft recommends that it not even be a member of your Active Directory domain.
An enterprise certificate server, on the other hand, has to be a member of an Active Directory domain. This integration with Active Directory allows for additional features and greater flexibility. The following are the defining characteristics of an enterprise certificate server, straight from Microsoft:
Auto-Enrollment and Certificate Templates
In previous discussions on creating certificates, I explained that an administrator is required to verify the user’s identity that is requesting the certificate. As you might have guessed, this can quickly become cumbersome for a large organization. If you had to manually create and potentially verify delivery of each certificate, you could quickly become overwhelmed. Microsoft Certificate Services includes functionality called certificate auto-enrollment to automatically create and distribute certificates to users.
Wait a minute, doesn’t that run completely counter to everything we just discussed about issuing certificates? If we have a server automatically sending people certificates, how do we know that it’s giving the certificates to the appropriate people? An excellent question. In this case, because we’re configuring an enterprise Certificate Authority, which integrates with Active Directory, we just rely on the fact that the users have already authenticated themselves with their Active Directory credentials and are on clients that are members of our domain.
LINGO
Remember from previous discussions that the Trusted Root Certification Authority Store holds the certificates of the root CAs that the computer trusts.
In addition, because an enterprise CA has access to write to Active Directory, it can publish the root certificate to Active Directory as well as the Certificate Revocation List. The root certificate for the domain will then propagate down to each member of the AD domain to the Trusted Root Certification Authority Store on that system.
Microsoft also defines certificate templates, which are a necessary component for using auto-enrollment. Creating a template defines the type of certificate, the key size, the hash algorithm used, what the certificate will be used for, and so on. You then select the users who are allowed to automatically obtain certificates using that template. We will cover the steps to configure automatic enrollment and certificate templates in the next chapter.
Remote Authentication Dial-In User Service
Remote Authentication Dial-In User Service (RADIUS) is a very flexible authentication protocol. RADIUS is an IETF standard; the Internet Engineering Task Force is very similar in nature to the IEEE. Clearly, based on its name, RADIUS has been around for some time. However, RADIUS is not restricted to just authenticating users in a dial-up network. Instead, RADIUS offers the flexibility to authenticate users for a variety of scenarios and technologies.
RADIUS provides authentication, authorization, and accountability (or AAA). Therefore, the RADIUS server is sometimes referred to as a “Triple-A server.” It’s easy to understand how RADIUS provides authentication, as this may be considered its primary purpose. Authorization can be performed and is closely related to authentication. Authorization can stipulate specific actions that the user can perform or certain resources the user can access. In addition, the server can keep an audit log of a user’s activity, which would provide accountability of the user’s actions.
Your RADIUS server can be a stand-alone system that authenticates users against a local database, or it can authenticate users against an external database such as Active Directory. In Figure 7-13, you’ll see an example of a RADIUS server using a database on the same system which holds the user credentials. In Figure 7-14, you’ll see an example of a RADIUS server authenticating to a separate server which holds the database of user credentials, such as Active Directory.
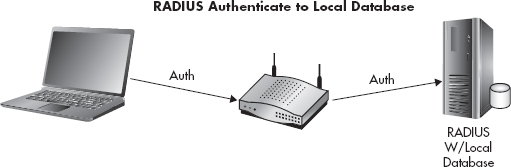
Figure 7-13 RADIUS local database

Figure 7-14 RADIUS Active Directory
RADIUS is assigned UDP ports 1812 and 1813 by the Internet Assigned Numbers Authority (IANA). Port 1812 is used for authentication, whereas port 1813 is used for accounting. However, before the official UDP ports had been assigned by IANA, many vendors had settled on using UDP port 1645 for authentication and UDP port 1646 for authentication. Therefore, some RADIUS servers listen to both sets of UDP ports by default. Microsoft RADIUS servers default to using UDP ports 1812 and 1813. You should check the documentation for your specific RADIUS server to determine which UDP ports it listens on by default. However, the protocol operates completely identical no matter which UDP port the server is configured for. The administrator of the RADIUS server configures a shared secret, which must be entered on the authenticator to ensure it’s also an authorized agent.
The communication between the clients, the authenticator, and the authentication server happen using the Extensible Authentication Protocol (EAP), which we discussed in Chapter 6. Essentially, the authenticator (in our case, the access point) is relaying the messages between the supplicant and the authentication server and doesn’t necessarily understand the messages being exchanged. It just waits to see an authentication success message from the authentication server, at which point it grants access to the wireless client.
Note
Keep in mind that you have the option to configure RADIUS to use a unique database to authenticate users, but you can also accomplish the same thing by using Active Directory and granting specific users and groups rights to authenticate to the wireless network. We’ll cover this in more detail in the next chapter.
802.1x: Port-Based Access Control
The 802.1x protocol is an IEEE standard for port-based authentication. The 802.1x standard also defines the implementation of the Extensible Authentication Protocol Over LAN, or EAPOL. We covered different EAP methods in Chapter 6.
LINGO
Remember not to confuse 802.1x with 802.11x, which is a common way to refer to all the 802.11 wireless standards.
To better understand how 802.1x functions on a wireless network, you should understand its roots in wired networks. 802.1x, or Port-Based Access Control, requires users to authenticate to the switch they’re physically connected to before they’re granted access to the network. Typically, this authentication will happen against a unique database that resides on a server separate from the network device the user is directly connected to. 802.1x has its own unique nomenclature to identify each component in the authentication process. 802.1x refers to these components as a supplicant, authenticator, and authentication server. In a wireless network, a user’s laptop would be the supplicant, the wireless access point would be the authenticator, and the RADIUS server would be the authentication server. This basic architecture is shown in Figure 7-15.
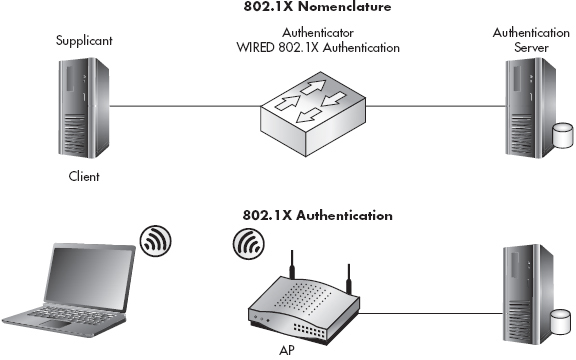
Figure 7-15 802.1x topology and nomenclature
Any client device (supplicant) that wishes to connect to the protected network must support the 802.1x protocol in the form of client software, typically referred to as supplicant software. Most modern operating systems come preinstalled with supplicant software; however, you may need to install supplicant software, depending on your client devices and authenticators.
RADIUS and 802.1x
RADIUS and 802.1x will typically go hand in hand when an 802.1x solution is being deployed. Remember that 802.1x encompasses the three components of the core architecture—client, network device, and server—whereas RADIUS deals with actually authenticating the user’s credentials. This is shown in Figure 7-16.

Figure 7-16 802.1x authenticates to RADIUS
Both RADIUS and 802. 1x are highly versatile systems. Remember that as well as being able to operate separately, these two systems handle much more than just authentication for wireless clients. You could employ an identical design using switches to authenticate users before they’re allowed access to the wired LAN. In some documentation, you may see WPA-Enterprise referred to as WPA-802.1x
Also remember that certificates are optional in a WPA-Enterprise network. The core architecture is the same except for the addition of the Certificate Authority. This is shown in Figure 7-17 and 7-18, respectively. We’ll cover the configuration of WPA-Enterprise without certificates in Chapter 9.

Figure 7-17 WPA-Enterprise components without a CA

Figure 7-18 WPA-Enterprise with a CA
WPA Enterprise Architecture
So how do we tie all of these technologies together to support our secure wireless network? In Figure 7-19, you can see the overall topology for a WPA-Enterprise network using certificates to authenticate users. In the next chapter, we’ll look at actually implementing this. For now let’s discuss the nuances of implementing these technologies to support a wireless network.

Figure 7-19 Overall architecture with all components
LINGO
In this case, you’re probably safe to substitute nuances with “headaches.” Don’t worry, though, we’ll get through this together.
The major steps we would follow to deploy a WPA2-Enterprise network using certificates for authentication would look like the following:
1. Deploy the enterprise CA.
a. Configure the certificate templates.
b. Deploy the root certificate to laptops (laptops plugged in).
c. Deploy the user certificate to laptops.
2. Configure the RADIUS server.
a. Create a RADIUS client entry for the access point.
b. Create a connection request policy.
c. Create a Network Policy.
3. Configure the access point.
a. Configure for WPA2-Enterprise.
b. Configure the RADIUS server to authenticate users against.
c. Test the authentication.
We’ll start by deploying our enterprise Certificate Authority. In our example, we’ll install the service on our domain controller, but the process is identical if you’re installing on a stand-alone server. We’ll then configure certificate templates and choose the groups that are allowed to obtain certificates via auto-enrollment. We’ll then obtain the CA certificate on the client computer and obtain the user’s certificate for authentication.
You should understand that for a client computer to download the certificate for the CA, it must have network access to Active Directory, meaning that this can’t happen over the same wireless network the user wants to authenticate to without having previously obtained the certificate. Therefore, you must ensure that the computer is connected to the network via hardwire or a different wireless network before attempting to authenticate to the wireless network to allow the computer to download the CA certificate. The same is true for the user’s certificate obtained through auto-enrollment.
Before we go any further, we’ll do exactly that. We’ll connect our laptop to our LAN and verify that it was able to download both the Certificate Authority certificate and the user certificate to be used for authentication to the wireless network. We’ll then configure our RADIUS server. In Windows 2008, the RADIUS functionality is under the role of the Network Policy Server (NPS).
A connection request policy is a policy on the NPS that designates which RADIUS clients we’ll accept requests for and what we’ll do with them. In our case, the RADIUS client is our access point, and we will accept authentication requests from this client. We then create a Network Policy that combines the connection request policy and assigns the users and the conditions that allow them to authenticate successfully.
Finally, we’ll configure our wireless access points, which is probably the easiest part. We’ll configure the access point to use WPA2-Enterprise and configure it to authenticate to the IP address of the RADIUS server we configured. Then we’ll test authentication from our client device to the access point. After successful authentication, you can pour yourself a huge glass of your favorite drink and take a much-deserved vacation!
We’ve Covered
In this chapter, we covered all the technologies necessary to implement a WPA2-Enterprise network using digital certificates for authentication. You can clearly see that this solution is not something you just roll out without any forethought. Successfully deploying it takes marked consideration and should not be done in haste.
In this chapter, we looked at the following topics:
PKI and digital certificates
WPA-Enterprise example
..................Content has been hidden....................
You can't read the all page of ebook, please click here login for view all page.