

We’ll Cover
In this chapter, we’ll discuss the various methods for dealing with rogue access points. We’ll discuss ways to manually identify rogue access points and track them down on your network. You’ll learn about some of the technologies available to automatically enumerate and respond to rogue wireless networks.
We’ll also cover the methods for securing your client devices from rogue wireless networks as well as using group policy to restrict which wireless networks they can associate to. We’ll discuss strategies for creating your own security education programs and how to get the most from your program.
You may have some questions about other wireless technologies. We’ll briefly cover the application of your new security knowledge to other wireless technologies as well as future wireless technologies. You’ll also be introduced to two of the most interesting technologies for deploying and managing wireless networks: lightweight wireless systems and cloud based wireless systems.
Handling Rogue Access Points
Rogue access points have become a sort of hot-button issue. Rogue access points are any wireless access points that exist on your network without the consent of the business. Even “secure” rogue access points that are connected to your network can pose a security risk. Preventing rogue access points can be a little tricky, although not impossible. Not only is it critical for you to find and remove rogue access points from your network, but it can actually be pretty fun!
We discussed in previous chapters the many different types of devices that could be used to create rogue wireless networks, as well as the potential for these devices to be deliberately or accidentally placed on your network. Remember that regardless of the intent, a rogue access point does pose serious security risks.
Into Action
Rogue wireless networks have received so much attention that some compliance standards require businesses to specifically address them. For example, the Payment Card Industry (PCI) Data Security Standard, which is the security standard that companies that process credit card information must comply with, has the following requirement:
PCI-DSS 2.0:11.1 Test for the presence of wireless access points and detect unauthorized wireless access points on a quarterly basis.
Even though your organization might not have to comply with PCI, this is still a great process to adopt.
Preventing Rogue Wireless Networks
There are actually very reliable ways to prevent rogue wireless networks from working on your network. You should note that I didn’t say “prevent them from being plugged into your network.” There’s really no way to truly prevent rogue wireless devices from being plugged into your network. The best you can do is educate your users on the dangers of plugging rogue devices into your network and back up the policy with administrative discipline if users don’t comply. As far as preventing outsiders from placing rogue devices on your network for malicious purposes, you have to rely on your physical security to do this. In addition, you should educate your users to notify the IT department if they notice anything plugged into a network jack that doesn’t look like it belongs there.
Therefore, if you can’t rely on preventing the devices from being plugged into your network, you should focus on preventing them from functioning properly once they are plugged in. Here are your best solutions for preventing them from operating:
802.1x Port-Based Access Control
Yes, good old 802.1x. You should be very familiar with it at this point. Remember that 802.1x does not allow a device to communicate past the authenticator (in this case, a network switch) until after the device has authenticated. For a more in-depth refresher of 802.1x, you should revisit Chapter 9. In this case, the network switch would play a role similar to that of an access point configured for WPA2-Enterprise, and would be considered our 802.1x authenticator.
Just as with 802.1x for wireless networks, we have the flexibility to authenticate against a variety of backend systems. In Figure 11-1, you can see we’re authenticating to a RADIUS server, which authenticates the user against Active Directory. The same restrictions we covered in previous chapters can be configured here—restrictions based on user, group, or even time of day to grant or deny access to the network.

Figure 11-1 802.1x network switches
If you configure your switches to require 802.1x authentication, how will this prevent an unauthorized wireless network from operating on your network? The first and most important point is that an attacker should not have valid credentials for your network. Even if an attacker plugs a device with an 802.1x supplicant (client software) into your network, he won’t be able to authenticate, and therefore the port will be useless to the attacker.
Most access points today don’t have 802.1x supplicant software, so that prevents most devices from being able to even operate on your network. This would also prevent most regular inside users who try to plug a regular access point into the network because it would simply not work.
There is one situation that 802.1x would not help to prevent. If an insider (most likely with malicious intent) were to use a device such as a laptop to act as an access point, the user could authenticate to the switch using her credentials and then configure the wireless card on the laptop to provide wireless services to other users (see Figure 11-2). In this scenario, 802.1x alone would have no way of preventing this action. You should note, however, that this is an extreme scenario, and if you have an inside user capable of doing this, you probably have bigger issues on your hands.
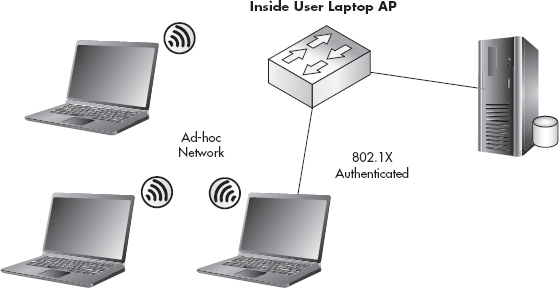
Figure 11-2 Inside user employing a laptop to bypass 802.1x and set up an access point
We’ll now look at the most basic example of configuring 802.1x on a Cisco switch. After entering configuration mode, we define our RADIUS server with the radius-server command. In this example, our RADIUS server is 10.0.0.10 and we’re using a RADIUS password of RadPassword1.
Into Action
If enabling 802.1x on a network switch prevents an access point from working, you might be wondering if this will also prevent your access points from working. Remember that you enable 802.1x for a network switch on a per-port basis. Thus, you’d simply disable 802.1x for any port connected to an authorized access point. This is also true of uplinks to other devices that don’t support 802.1x, such as other switches, printers, and so on.
Next, we use the aaa new-model command, which enables AAA services on the device. We then configure dot1x to use the configured list of RADIUS servers. In this example, we have only one RADIUS server configured, so the switch will authenticate to this server.
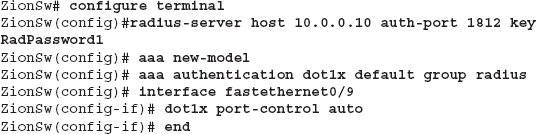
Next, we configure the interface fastethernet 0/9. To enable 802.1x authentication for this port, we simply use the command dot1x port-control auto. Voila! Now any device connected to interface fa0/9 will have to authenticate to the Zion switch before being allowed access to the network.

As you can see in Figure 11-3, we have two switches connected together via interface FastEthernet0/1. We also have an access point on interface FastEthernet0/2 on the second switch. We could go through and manually apply the dot1x port-control auto command to each interface; however, we make things easier by using the interface range command. By using the interface range command, we apply the commands that follow to all of the interfaces specified. A full walkthrough of configuring 802.1x on your network switches is beyond the scope of this book. For a more detailed configuration guide, check your switch manufacturer’s website.
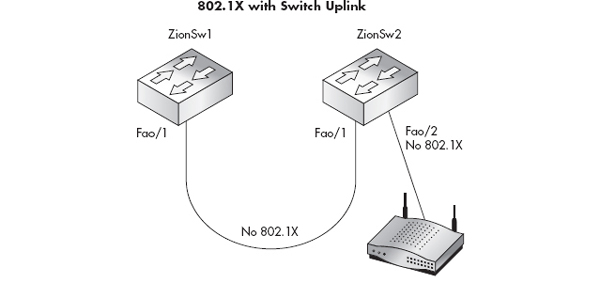
Figure 11-3 Multiple switches with 802.1x
Into Action
Typically, but not always, NAC will actually use 802.1x on the backend to facilitate authentication of the client device. Other NAC options can be agent based, where the end station must install client software to verify settings and allow clients onto the network.
Network Access Control
Network Access Control is a terrific technology that operates similarly to 802.1x and really expands on the idea of authenticating endpoints before they’re allowed to use your network. NAC builds on 802.1x by allowing you to examine endpoints and make sure they are compliant with certain technical policies configured. These technical policies can include verifying that the endpoint has up-to-date antivirus software installed, up-to-date operating system patches or service packs, and even specific registry settings and configuration options and many other options.
In the event a user plugs an unauthorized access point into your network that is restricted by NAC, you would have a similar situation to the one previously described with 802.1x. A lot of this ultimately depends on exactly how you’ve configured your NAC policies. For example, some NAC solutions allow you to quarantine unauthenticated devices into a restricted VLAN. This restricted VLAN could give these devices access to only specific resources, such as the Internet, or nothing at all.
Now, this isn’t to say that you should go out and deploy NAC to combat the risk of rogue wireless networks. However, if you already have NAC or are considering deploying NAC, it’s good to know that it can also mitigate the risk from rogue access points. There are many choices for NAC solutions and an insane number of ways to configure them.
In Actual Practice
Network Access Protection (NAP) is Microsoft’s answer to NAC competitors. NAP operates very similarly to NAC in that it enforces defined policies on endpoint systems. However, it currently does not integrate (well) with your network equipment, so unfortunately NAP won’t help you to prevent rogue access points.
Port Security
Port security allows you to configure MAC address restrictions on physical switch ports. The restrictions can limit the total number of MAC addresses allowed to come into a particular port or the port can be restricted to allow only specific MAC addresses. You can also configure the action taken if either of these restrictions is violated. The action can be to disable the port and /or alert an administrator. Alternatively, you can drop any packets that are not from an allowed source MAC address. If you configure port security to disable the port, an administrator would have to manually enable the port to return it to a functional state.
You need to understand the operation and limitations of port security if you’re going to use it. Typically, you won’t want to enable port security on uplinks between switches. To support our goal of preventing rogue wireless access points, we’ll want to configure port security only on “edge” ports, or ports that connect to end devices. Let’s look at a few simple scenarios. First, we’ll configure our switch to only allow one MAC address on the port:
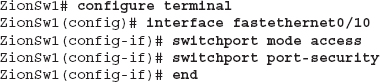
In the preceding example, you can see that the only command we need to enable port security on interface FastEthernet0/10 is the switchport port-security command. This uses the default configuration of only allowing one dynamically learned MAC address on the port. If more than one MAC address is learned on the port, the interface will be disabled.
If someone were to plug an access point into a port that restricted the total number of MAC addresses to one, let’s see what would happen. As you can see in the listing below, the interface Fa0/10 has changed to a down state (in this case, err-disabled) because of a port security violation. In this mode, it is not allowing any packets to traverse this port. Now you have to consider why this is the case. In this example, even though there’s only one client connected to the wireless access point, the switch has seen traffic from the access point itself (MAC address 2222.2222.2222) as well as the client system and therefore has two MAC addresses entries learned from this interface, so it disables the port.

Into Action
As you can see from the previously mentioned technologies, a common security method is to disable a port if it violates one of the configured policies. One way to add another layer of security to your switches is to simply disable any unused ports. Now this isn’t a perfect solution in itself, but it’s definitely a good practice to adopt. Again, this will add more administrative work because you’ll have to manually enable a port when you need to connect a new device, but this is a relatively easy task and pretty common in some industries. Keep in mind, though, this alone doesn’t prevent an attacker from stealing a network connection from an operational jack and plugging an access point into it. To prevent this, you’d want to use multiple security measures, such as using 802.1x and disabling unnecessary ports.
We could also choose to only allow specific MAC addresses to enter the switch through the configured ports. The MAC addresses that are allowed on a specific port are referred to as secure MAC addresses. You can either manually define the MAC addresses allowed on a port, learn them dynamically, or a combination of the two.
Port security actually has many more configuration options. We’ve covered a few of the most common scenarios for configuring port security. For a more in depth look at the configuration options available, check out the Cisco website.
Manually Detecting Rogue Wireless Networks
Manually detecting rogue wireless networks is currently the most prevalent method of detection. Of course, one of the core methods for manually detecting rogue wireless networks involves some of the skills you learned in Chapter 4. Essentially, you’ll be wardriving in your office area, even though you might not be in your car.
First, how do we define a rogue wireless network and what should you do if you find one? A rogue access point is any unauthorized wireless device that is connected to your network. Once you enumerate a potential wireless device, you need to determine whether it’s connected to your network.
The first step is to choose the wireless enumeration tool you wish to use. Remember, you can’t rely solely on the built-in tools in your operating system because they won’t show you wireless networks that aren’t broadcasting their SSID. In addition, you’ll want a tool that can show you the MAC address of the access point as well as has the ability to capture traffic and show associated client devices. Why do you want the ability to capture traffic? The more information you can obtain about the target network, the better. This includes client MAC addresses associated with the rogue wireless network and IP addresses of clients and destinations.
You’ll also want to account for different technologies as well 802.11a/b/g/n, for example. If you’re scanning your environment with an 802.11n card, you won’t be able to enumerate any 802.11a wireless networks in your area. Therefore, let’s choose the tool to use. As you’ll remember from Chapter 4, your best choices are the following:
If you enumerate an open rogue network, you have a few choices for determining where it terminates. The simplest way to determine whether it’s on your network is to associate to it. Once you’re associated, you should check your IP address to see if it’s an internal address on your network. You shouldn’t stop there, however, because the access point could be performing Network Address Translation (NAT). You should try to ping or browse to an internal server, and as a last resort you can always check the current IP address of the Internet connection by browsing to a website such as Whatismyip.com.
If you enumerate an encrypted rogue network, what should you do? Based on everything you’ve learned, don’t assume that just because a wireless network is encrypted that you should ignore it. Remember that a crafty attacker might secure the wireless network to prevent eavesdroppers from seeing what he’s doing. Even if an employee were responsible for placing the encrypted access point on your network, it could still pose a security risk. What if the encryption key chosen is very weak or, even worse, a default? Therefore, you should even take measures to determine whether an encrypted network is connected to your network.
How do you go about gathering enough intelligence on an encrypted wireless network without attempting to crack the encryption? Easy. Remember that even though the network is encrypted, you can still see the MAC addresses of clients associated to the network as well as that of the access point itself. If you search your network switches for those MAC addresses, you can determine whether they are on your network.
Remember that MAC addresses are a total of six bytes, usually represented as 12 hexadecimal digits. The first three bytes represent the organizationally unique identifier (OUI). The last three bytes are specific and unique to the end station (see Figure 11-4).

Figure 11-4 MAC address structure
This technique offers an effective way to track down wireless access points without using wireless technologies and using only your switching infrastructure. If you’ve already identified a wireless network you suspect might be connected to your network, you can scan for the MAC address (or the OUI of the MAC address) on the CAM tables of your switches (CAM stands for content addressable memory). These tables are the ones on your switches that list which MAC addresses exist off of which ports. This is what allows your switch to operate more efficiently than a hub and send traffic to specific ports rather than to every port.
With Cisco switches, you use the command show mac-address-table, which will show you all the MAC addresses the switch has seen as well as which ports it has seen them on, as in the following example, where you’ll notice that only five MAC addresses have been seen on this switch:
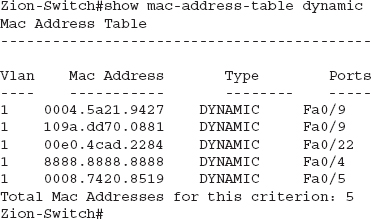
The first column shows the VLAN the associated MAC address is on. In this example, it looks like the switch might not have any VLANs configured because all the MAC addresses are on VLAN 1 (the default VLAN). The next column is the MAC address using periods instead of colons to split the MAC address into three groups of two hexadecimal digits. Don’t ask me why, but it’s common to find MAC addresses in this format in networking equipment. The next column shows whether this MAC address was learned dynamically or was statically assigned to the port (in this case, all these MAC addresses were learned dynamically). The final column shows the actual port where the switch has seen source traffic from this MAC address.
In this example, you can see we have two MAC addresses on port Fa0/9. If this were a stand-alone switch, we would not expect to see any ports with more than one MAC address on them, so let’s dig deeper. First, let’s start by doing a lookup on the OUI of the MAC addresses to see if we can gather a little information on what these devices might be. You can search the IEEE website at http://standards.ieee.org/develop/regauth/oui/public.html. If you enter the OUI of the MAC address (the first six hexadecimal digits) and click Search, you’ll see the company responsible for these MAC addresses. For the first MAC address, we search for 00045a and find that this is a Linksys device. Next, if we search for 109add, we find that this is associated with an Apple device. Now we’re getting somewhere. Based on this, we might conclude that a Linksys access point with an Apple client is connected to our network. However, remember that an attacker can change the MAC address, so we shouldn’t base our assumptions solely on the OUI of the MAC address.
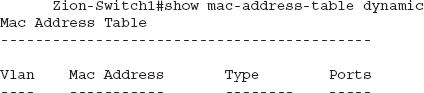
The next step would be to trace out port Fa0/9 on the switch to determine where it physically terminates. This process can be very different, depending on your environment. Some companies are good about keeping an up-to-date list of where cables physically terminate in their organization, but more often than not this information is not complete or current. You should note that an access point is not the only reason why you’d see multiple MAC addresses on a single port. For example, in Figure 11-5 we have two switches connected to each other. Let’s see what the CAM table on switch 1 would look like as compared to switch 2.

Figure 11-5 MAC addresses across switch uplinks
Into Action
An effective method for tracing rogue access points can be to search your CAM tables for just the OUI of an observed access point. For example, in the previous example, we could use the command show mac-address-table I include 0004.5a, which would show any MAC address beginning with 0004.5a that we’ve identified as a potential Linksys device.
You can see that the first switch sees all three MAC addresses as being off port Fa0/1. If we trace this port, we’ll notice that it is the uplink to the Zion-Switch2. Then, if we check the CAM table of Zion-Switch2, we’ll see exactly where these devices terminate.
Tracing Malicious Rogue Access Points
In the previous example, we started with a scenario where we didn’t know whether a rogue wireless access point was connected to our environment and set out on a quest to find one by querying the CAM tables of our switch and looking for any ports that had more than one MAC address on them. This is not a foolproof system, as stated previously. What if the access point were put there maliciously and a crafty attacker has disabled the access point itself from sending any traffic or configured NAT so that the edge switch would only see one MAC address on that port.
We need a way of identifying access points in the worst-case scenario. Let’s say an attacker has configured an access point for the most aggressive stealth possible. He has changed the MAC address of both his client and access point, configured the access point to use channel 12, is using NAT so that we only see one MAC address in our CAM tables (that of the access point), is not broadcasting his SSID, and is using an SSID with an innocuous-sounding name. How in the world will we ever find this access point? First, we start by firing up one of our favorite wireless network detection tools. We’ll choose airodump for the examples here. For a refresher on using airodump, see Chapter 4. In Listing 11-1, you can see that we’ve enumerated a wireless network with a hidden SSID of INSECURE.
Listing 11-1: Using airodump to enumerate MAC addresses

In this example, you can see that the access point has a MAC address of 22:22:22:22:22:22, and the client has a MAC address of 44:44:44:44:44:44. Clearly, these MAC addresses are not legitimate and are used here for illustrative purposes. If an attacker wished to be even stealthier, he might choose misleading MAC addresses such as those that might indicate a printer or other computer.
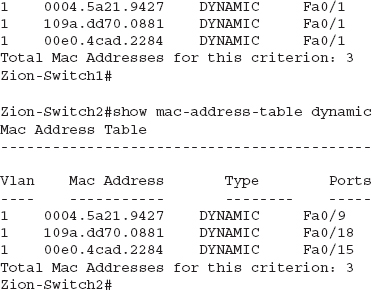
Now that we have the MAC address of both a client and an access point, we can search our CAM tables for these two specific addresses. To search our CAM tables for a specific MAC address, we can run the show mac-address-table command as usual and pipe it to “include” to search only for lines that match our search string. In the following example, you can see that we search for the string “2222,” which would match the MAC address of the access point. However, this returns nothing. We then search for “4444,” which is the MAC address of the client device. You can see that this MAC address is located on port Fa0/19.
In the Real World
I used to work in network operations for a Fortune 10 company. Tracking down MAC addresses to physical ports was a very common task on such a large network. You should become proficient in this process because it comes in very handy in many situations.
You will also notice that the header for the output of this command, indicating what the columns are, is no longer there. This is normal because the include command will only show lines that match exactly what we have entered.

So what if the attacker is really crafty and used an entirely different MAC address for the Ethernet port on his wireless access point and used NAT to hide the client MAC address? In that case, we can’t use this method and our best bet is the old-fashioned way of simply tracking down the wireless access point based on signal strength.
Specialty wireless devices are available for exactly this task, but it’s debatable whether they provide any real benefit over simply using Netstumbler or Kismet. Both Netstumbler and Kismet have functionality to display signal strength and map it as it changes over time. The Netstumbler signal interface is shown in Figure 11-6.
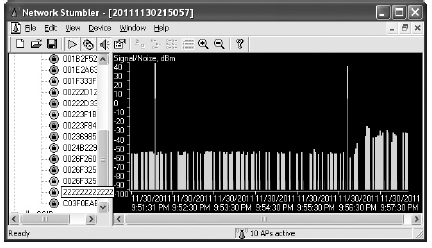
Figure 11-6 Netstumbler signal strength
You should keep in mind that sometimes the signal strength alone can be a little misleading. Although it would be extremely rare for you to be sent on a wild goose chase very far from your target network, sometimes the raw signal chart can be a little misleading. Once you have a generally strong signal strength, you should look in the vicinity for the target access point.
You should also take into account that typically when the device is placed right side up with the antennas facing upward, the wireless signal tends to propagate stronger in a half bubble shape, as shown in Figure 11-7. Therefore, in some scenarios, if someone were to place an access point flat on the ceiling tile, you might get a stronger signal directly over the access point on the floor above rather than directly under the access point on the floor below. Again, this shouldn’t provide any challenges other than taking slightly longer to find the access point.
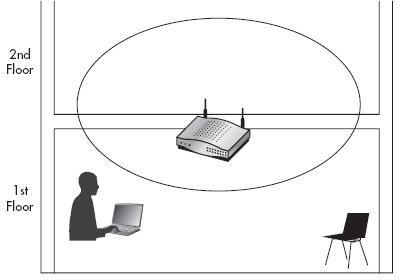
Figure 11-7 Typical access point radiation pattern
You also need to be able to account for wireless frequencies that are out of the range of your wireless equipment. You’ll remember that in the United States you are allowed to use the channels 1 through 11. However, most hardware is capable of supporting channels 1 through 14. So, if an attacker has configured an access point for channel 14 and placed it on your network, how will you detect it? Wireless cards are available that allow you to scan these other frequencies as well (the Alfa USB wireless card, for example). The Alfa wireless cards are very popular for their ability to manually set the power and configure channels up to 14.
Handling Rogue Access Points
So you’ve successfully located the rogue access point. Now what do you do? Do you just unplug it and congratulate yourself on a job well done? This is another decision that’s best handled by someone who can make executive decisions. More often than not, the answer should be not to unplug it from your network; instead, you need to gather evidence for potential legal matters. You’ll also want to try and track down exactly who is using the wireless network and what they’re doing.
What are the best ways of determining how a malicious access point is being used? Once you’ve physically tracked down the access point, you should look into monitoring the traffic entering your network through the access point. You can do this by configuring a SPAN port to copy all the traffic that enters the switch from the access point to another port, which you can then connect a sniffer to and monitor (as well as save) all the packets traversing that link. SPAN ports were covered in detail in Chapter 6. The configuration to apply a SPAN port is typically pretty straightforward; the following is a simple example for a Cisco switch:

In this example, we’re instructing the switch to copy every packet that enters or exits the fastethernet0/9 interface and send a copy of these packets to fastethernet0/20. It doesn’t matter where a packet is destined to; if it comes in from the access point or is destined for that port, we will be able to view it. Remember that the configuration for your model of switch might be different but it’s typically not much more complicated. Another option is to simply plug a network hub between the access point and your network switch. You can then plug your network sniffer into any port on the hub and view all the packets from the attacker.
Into Action
Any time you’re dealing with a potential legal issue, you need to treat every decision and action with special care. Keeping a detailed log of the decisions and actions you take, along with the time and date, is critical. Even with something as simple as handling a single rogue access point, you can quickly become overwhelmed. Don’t be afraid to call in a professional Incident Response Team to assist. You need to watch out for a lot of pitfalls to make sure the evidence you gather can actually be used in any legal action. And don’t forget: document, document, document.
You should also consider the best way to physically track down anyone using the wireless network. Running into your parking lot and frantically looking into every car might tip off someone that you’re on to them. Instead, you should first decide whether law enforcement should be involved. If you’ve decided to wait to contact law enforcement, you should carefully but quickly determine your strategy for finding the person who’s using the network.
Into Action
What do you do if there are no clients currently associated to the rogue wireless network? Do you just assume it was placed there accidentally and forgotten? Are you then okay to remove the access point without investigating any further? The answer of course is, it depends. You need to decide what makes the most sense for your environment, including the potential risk of leaving the access point in place. However, keep in mind that simply removing the access point does not give you any insight into who placed it there or why. You should consider putting a network sniffer or IDS in place to monitor any activity from the access point. If nothing is observed within a reasonable amount of time (two to four weeks, for example), you should consider removing the access point.
Into Action
Many of us wouldn’t mind living like we’re in a spy thriller, tracking down the attacker who’s trying to break into our network. But before you kick down the door to your parking lot and run out guns blazing, be sure the access point wasn’t placed there by an employee. Checking with other IT staff and even simply asking employees near the location where you discovered the access point might be the best place to begin.
Alerting your fellow IT staff to keep an eye out for any strange behavior is a good way to start. In fact, alerting other employees to be on their toes and telling them whom to contact if they see anything suspicious can be very helpful. If you have a wireless management system, it might be able to aid you by giving an approximate location of any client devices associated to the rogue access point. If you don’t have a wireless management system, you’re pretty much stuck with the old-fashioned method, which involves walking around and looking for the culprit.
Although you could employ some technological methods to help you, it might be easier to just look in obvious places first. If you have a shared office, this might be a little more difficult because the attacker could potentially be located in an area you can’t easily get to. Regardless, start with the obvious places. Also, if you have security cameras, be sure to leverage them to inconspicuously look for the culprit.
Automated Detection of Rogue Wireless Networks
Besides relying on the manual approach, you can also use certain technologies to assist in finding rogue wireless networks. Some of these technologies will simply aid you, whereas some of the more sophisticated technologies will almost handle the entire job for you.
Many solutions use your existing wireless infrastructure to scan the wireless frequencies and alert you to any rogue access points. Lightweight access point solutions typically have this functionality built right into the access points and controllers. Many of these systems offer really interesting functionality beyond simple alerting. For example, they might allow you to estimate an approximate position of the rogue access point based on the signal strength from multiple access points.
You would accomplish this by first uploading an image of a map of the area where you have deployed your access points. This can be a blueprint of a building, an image of a campus, or even an image saved from a service such as Google maps. You would then typically draw a line on the map (using a tool on the appliance) to set the scale of the image, such as one inch on the screen being ten feet in reality. Now, when your lightweight access point system detects a rogue access point, it can display the approximate location on the map.
Into Action
I’ve used the following method many times during penetration tests: Walk into the target organization, plant an access point, walk out, and start penetrating the network from the parking lot. Therefore, looking for someone in a parked car with a laptop is probably a good place to start. Ironically, I haven’t been caught, yet. Hopefully someday if I’m hired to penetrate your network, you’ll make short work of finding me!
Such a system can also alert an administrator once it detects a rogue access point. Most systems give you the ability to whitelist a specific BSSID, once you verify that the particular BSSID is not connected to your network, to stop being alerted to its presence. Some systems even give you the ability to deauthenticate clients from the rogue network. This can be a great feature for preventing your own internal clients from associating to an insecure wireless network.
Non-wireless-centric systems can also help you to identify when a rogue device has been placed on your network. Some of your best options include an intrusion detection system and arpwatch.
Arpwatch is an open source program that allows you to monitor your network for “ARP events.” It keeps a database of current IP address and MAC address pairings and can alert you to any changes. In addition, it can alert you to any new MAC addresses it observes. Arpwatch is very easy to install and configure; in fact, it is preinstalled on BackTrack. Arpwatch is very similar to an IDS in that it is very noisy when you first install it. However, once you have it configured and running for a short period of time, it’s extremely low maintenance and very helpful.
To run arpwatch on BackTrack and have it alert you of events via e-mail, you first need to install the sendmail program using apt-get install sendmail. You can then run arpwatch and specify any e-mail address to send alerts to. In the following example, we’ve configured arpwatch to monitor the eth0 interface and alert [email protected] of any events.
Next, you see an example of an e-mail alert for a new MAC address detected on the eth0 interface. You should note that the Ethernet vendor information is pulled automatically from a database based on the OUI and therefore is not always accurate. The alert also provides the time this MAC address was first seen, which can be great information for your records.

Other Wireless Technologies
You may have questions about how other wireless technologies will impact the security of your organization. The fact is that you already have most of your answers. The same security issues that plague 802.11a/b/g/n need to be dealt with no matter what the underlying wireless technology is. Systems such as Bluetooth, long-range wireless, and broadband wireless (802.16) need to ensure the confidentiality, integrity, and availability of their clients and systems.
The specific attacks will be unique to each technology, but the attack vectors are the same. For instance, Bluetooth (802.15), which is a short-distance technology used to create “wireless personal area networks,” or WPANs, is vulnerable to the same type of attacks as traditional 802.11 wireless networks. For example, if the communication is unencrypted, someone can easily sniff the data and eavesdrop on communications.
Bluetooth operates in the 2.4GHz frequency, which is the same as 802.11 technologies, but it has a much shorter range (by design). Bluetooth is geared toward consumer electronic devices such as keyboards, mice, headsets, and so on. Researchers have demonstrated that with high-gain antennas, they can communicate with Bluetooth devices from very far away, up to a few miles in some cases. This, of course, has the same implications as it does for other wireless systems in that you can’t rely on the signals not being accessible to potential attackers.
Zigbee is a wireless protocol for very short-range and low-power devices. Zigbee operates in a few frequencies, including support for 2.4GHz. The main target for using Zigbee is within smaller appliance solutions such as home appliances. Wireless technologies in the future will become available that are not based on anything available today, so they too will have to provide security measures for the following attack vectors:
Next-Gen Solutions
Two wireless systems really represent the future of wireless solutions. They are lightweight wireless solutions and cloud wireless solutions. These systems don’t really change the fundamentals you have learned in this chapter but instead make deployment and management of large-scale wireless networks considerably easier.
Another emerging technology is wireless Intrusion Detection Systems (IDS). You’ll remember that we touched upon these systems in Chapter 6. Although my view is that you can gain almost all of the same benefits from a traditional wired IDS, technology is always changing and wireless IDS systems are starting to offer some interesting features. It’s your job to figure out if these features are worth the additional cost.
Lightweight Wireless Solutions
Lightweight wireless solutions are definitely the way to go for any medium-to-large-scale deployments of wireless networks. Lightweight wireless solutions allow you to deploy access points and have them automatically configured based on profiles you create. Most lightweight solutions today are based on either the Lightweight Access Point Protocol (LWAPP) or the Control and Provisioning of Wireless Access Points (CAPWAP) protocol.
In fact, many existing wireless access points can be upgraded (with a simple firmware update) to “lightweight” to gain some of the management advantages of lightweight technologies. The two leaders for lightweight wireless solutions today are Cisco and Aruba. We won’t go into the specifics of either offering here but instead discuss how LWAPP systems operate.
When you receive a new LWAPP access point from the manufacturer, you can take it right out of the box and plug it into your network. Assuming the controller has been configured correctly, the access point will query for the wireless controller, download its configuration, and start serving wireless automatically within minutes. This general process is shown in Figure 11-8. There are a few ways for the access point to “find” the wireless controller. The two most popular ways are for the access point to broadcast at Layer 2 for the controller or to obtain the IP address for the controller via DHCP. This is done by configuring option 43 in your DHCP scope to the IP address of your controller. Alternatively, you can create a DNS entry for the wireless controller, which the access points can query for. For example, for Cisco LWAPP access points, you would create a DNS record for cisco-lwapp-controller.localdomain that points to your controller.

Figure 11-8 Controller-based access points discovery
You should keep in mind that using lightweight wireless systems doesn’t really change any of the fundamentals you’ve learned in this book. You still configure the same recommended encryption and authentication settings and apply them to your access points; the backend management and configuration of the access points is really all that changes. Typically, you would manage the controller (and thus the configuration profiles for access points) through a web interface on the controller.
Controller-based systems really ease the management of wireless access points as well. As mentioned earlier, most management systems have the ability to upload an image, set the scale, and then mark the locations where you’ve installed your access points. The controller can then show you approximate locations of associated clients, rogue access points, and even rogue client devices. You can also view a heat map, which shows an approximation of the wireless strength in different areas on the map. In addition, built-in wireless IPS functionality can be leveraged from all the access points.
Cloud-Based Wireless Solutions
Cloud-based wireless solutions comprise a new breed of wireless access points that are currently taking the benefits of LWAPP access points a step further. The number-one cloud based wireless provider today is Meraki (www.meraki.com). It’s important to understand that these access points are not LWAPP access points but rather operate in a similar way. Instead of the access point querying the local network to find a controller, the access point is preconfigured with the address of the Meraki controller located on the Internet.
Arguably the most complex part of deploying an LWAPP solution is configuring the actual controller. With cloud-based wireless solutions, you don’t need to configure and deploy the controller itself. The controller already exists (in the Cloud) and is ready to configure and control your wireless access points.
Into Action
The Cloud is a new buzzword for something that has existed for a very long time—services hosted on the Internet. In recent years, many existing technologies have been moved to the Cloud that had never been offered in such a way before. For cloud wireless services, you take the access point controller, which used to exist on your local network, and move it to a hosted location on the Internet.
Budget Note
The fact that you no longer have to pay for a controller means that potential cost savings can be realized in going with a cloud-based wireless solution. However, you need to make sure you account for all the costs of both solutions if cost is a concern. The main advantage is that you don’t have the cost of the controller or the cost of having the controller configured (education or consulting). The main disadvantage is that you will have the ongoing subscription cost of the service as well as being locked into whatever pricing structure the provider chooses.
You manage your access points through a web interface and you have all the configuration options you’re used to. Once you plug an access point into your network, it downloads its configuration from the controller on the Internet and operates exactly as a normal access point. In Figure 11-9, you can see the general topology of a cloud based wireless solution. If the controller is inaccessible, the access point will still function as normal; however, you won’t be able to view statistics for the access point or reconfigure it until you restore communications to the controller.
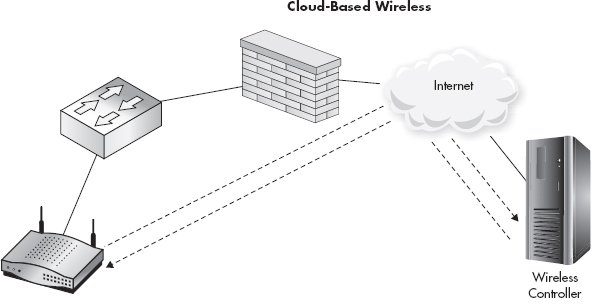
Figure 11-9 Cloud-based access points
You might think that cloud-based wireless access points wouldn’t be as robust as traditional access points, but they offer identical services that you can configure from a pretty slick web interface. Some of the services include the following:
Dedicated Wireless IDS
Wireless intrusion detection systems perform the same function as a traditional IDS, except they have the added benefit of monitoring the airwaves for indications of attacks. With wireless IDS systems, you don’t have the same placement decisions as traditional intrusion detection systems. Instead, you have to come up with a physical deployment strategy to effectively monitor the airspace of locations where you need to monitor.
As far as commercial wireless IDS systems go, there’s currently no competing with Fluke Networks Airmagnet Enterprise. Airmagnet uses dedicated wireless scanning devices that unsurprisingly look very similar to many wireless access points. It supports scanning beyond the frequencies of any wireless card you can find—well beyond channels 1 to 14.
For a complete list of all the functionality provided by Airmagnet, check out the Fluke website at http://www.flukenetworks.com.
You can also use Kismet as a dedicated wireless IDS system. It operates very similar to what you’re used to from a wardriving program; in fact, you can get a good look at its operation as an IDS by running it from your laptop. You can use a wireless interface in the IDS computer or you can use Kismet drone devices to send information to the Kismet server.
Kismet has a good list of IDS signatures. Some of the signatures include detection of the following:
Client Protection
Protecting your wireless endpoints should obviously be a priority. In Chapter 5, we discussed a myriad of ways to exploit and compromise end systems as well as their network communication. There are technical and nontechnical solutions for ensuring the integrity of your endpoint systems. Not surprisingly, you might mitigate a majority of your risks by properly educating the users who will be using your wireless systems.
User Education
One of the most important things you can do to increase the security of your endpoints is to properly train the people responsible for them! Many companies offer automated training (typically via videos accessible over the Internet) or classroom-based training. However, after reading this book, you now have all the information you need to craft a great security-awareness training program.
Be sure to tailor all of your training to fit the specific needs of your business. You should make the information practical for the users, both in their personal and work lives. Providing value by helping users to protect themselves from being exploited in everyday life will really help ensure they pay attention and get the most out of the training. In addition to making the information applicable to your attendees, you should make it interesting. Most of the attacks detailed in this book are pretty darn interesting! If you explain to users the attacks that are currently possible (and in wide use) and back it up with some cool-looking demonstrations, you’re sure to capture their attention.
Here are some of the specific topics you might want to cover:
Technical Solutions for Endpoint Security
The topic of endpoint security has become a hot button issue and the industry has responded with a lot of choices for ensuring the security of endpoints. Traditional endpoint security systems should not be overlooked, and you should understand how they all operate together to ensure that wireless devices remain secure. Non-wireless-centric systems such as antivirus, intrusion detection systems, and intrusion prevention systems are at the top of the list.
Group Policy Objects
You can use the Windows wireless settings within Group Policy to restrict what users are able to connect to. Create a new Group Policy Object and expand Computer Configuration | Policies | Security Settings | Wireless Network (IEEE 802.11) Policies. Then right-click in the right screen and choose Create a New Wireless Network Policy for Windows Vista and Later Releases. The first window you’ll see is similar to Figure 11-10. In this window, add any of the wireless networks you want this client to be able to connect to.

Figure 11-10 Restrictive wireless GPO
Next, click the Network Permissions tab, and you’ll see a window similar to Figure 11-11. The options at the top portion of this screen are pretty straightforward. The first option prevents the system from associating to ad-hoc wireless networks. If you have specifically denied any wireless networks, you can disable the user from even viewing the wireless networks in the wireless network list of the Windows WLAN Configuration utility. The fourth option allows users to create wireless profiles that any other user of the local computer can use. This, of course, is a moot point if the fifth check box is also checked. The option Only Use Group Policy Profiles for Allowed Networks is an important one. If this is enabled, users can only connect to wireless networks that have been configured by Group Policy.
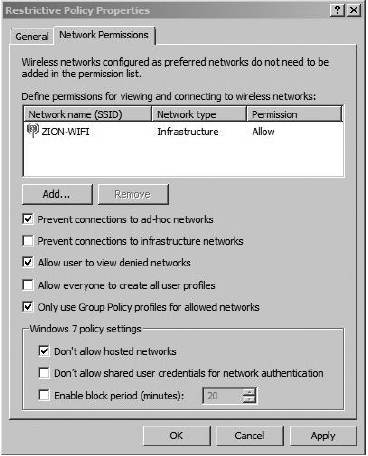
Figure 11-11 Restrictive wireless GPO settings
The last three options, under Windows 7 Policy Settings, only apply to Windows 7—go figure! The first option is important because it prohibits the users from turning their machine into an access point (a new feature to Windows 7). The second option prohibits the computer from storing user credentials to then use to authenticate to wireless networks when no user is logged on. The final option configures the amount of time a computer will wait before automatically connecting to a preferred network.
Remember to think through all your choices and determine exactly which risks you are mitigating by deploying a specific security solution. In the case of configuring a GPO to restrict which wireless networks a client can associate to, what exactly are you preventing? By only allowing users to connect to configured wireless networks, you’re preventing the user from connecting to potentially malicious networks.
Keep in mind, however, that if you have configured preferred wireless networks with weak authentication methods, it’s probably not doing you much good against an attacker. Remember from Chapter 5 that an attacker can respond to beacons from the client computer claiming to be any wireless network requested. Thus, if you’ve configured a preferred wireless network with no encryption or authentication, an attacker can spoof this network wherever the user may be. Also keep in mind that if you’re using WPA2-Enterprise and not authenticating the access point, your users might still be vulnerable.
We’ve Covered
In this chapter, we covered ways for you to deal with rogue wireless networks. You learned ways to prevent a rogue device from operating properly on your network as well as ways to logically and physically track down rogue devices. In addition, we covered the following topics:
Handling rogue access points
Other wireless technologies
Next-gen solutions
Client protection
..................Content has been hidden....................
You can't read the all page of ebook, please click here login for view all page.