

We’ll Cover
In this chapter, we’ll implement the architecture covered in the previous chapter. This includes the implementation of every technology necessary to support this network. The only prerequisite is that you have an Active Directory domain in place.
We’ll start by deploying our enterprise Certification Authority. In our example, we’ll install the service on our domain controller, but the process is identical if you’re installing on a stand-alone server that’s part of your domain. We’ll then configure certificate templates and choose the groups that are allowed to obtain and automatically enroll for the certificates. We’ll then obtain the CA certificate on the client computer and obtain the user’s certificate for authentication.
We’ll then move on to installing the RADIUS server and configuring it to accept authentication requests from our access points. We’ll then configure our access points to authenticate users against the RADIUS server and test authentication.
Install and Configure the Certification Authority
We’ll start by installing the Certification Authority and configuring certificate auto-enrollment. Next, we’ll create a certificate template for client auto-enrollment and then enable the template on the Certification Authority. Finally, we’ll configure group policy to enable clients to automatically obtain certificates. The major steps in configuring the CA are as follows:
1. Install Active Directory Certificate Services.
2. Copy the certificate template and modify it to fit our needs.
3. Issue the certificate template on the CA.
4. Configure a Group Policy Object to enable certificate auto-enrollment.
5. Log onto a workstation covered by the Group Policy Object.
Into Action
I have deployed WPA2-Enterprise with certificates many times, and I don’t think I can remember a time when everything worked perfectly right away. Give yourself plenty of time and understand that because there are so many moving parts, you might have to retrace your steps and troubleshoot an issue or two.
If you have the resources, you should absolutely configure all of these technologies in a lab before installing them in a production environment. You should make sure you’re familiar with each component of a WPA2-Enterprise network.
Install Active Directory Certificate Services
Let’s dive right into installing and configuring our Windows Certificate Services server on a Windows 2008 server. The default settings for Active Directory Certificate Services should be fine for most installations. To install Active Directory Certificate Services (AD CS), open Server Manager, right-click Roles, and choose Add Roles.
The welcome screen is a generic screen you’ll see whenever adding a role to the server. Simply choose Next at the welcome screen. On the next screen, check the box for Active Directory Certificate Services. You’ll notice that the column on the left side now indicates all the steps necessary to configure AD CS (see Figure 8-1). Click Next to continue.
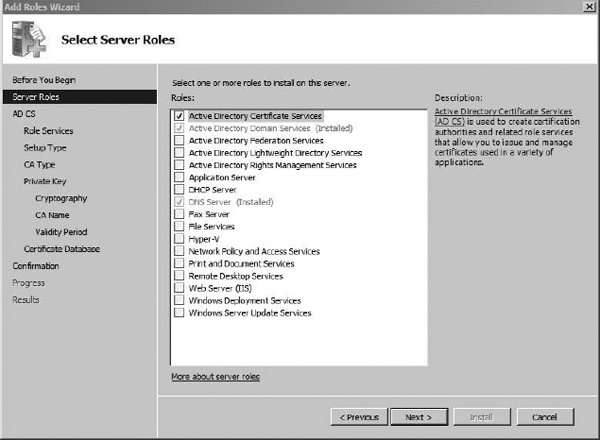
Figure 8-1 Adding the Server role
The next screen is mostly informational, but it does include links to help topics for installing and managing Active Directory Certificate Services. Take the time to at least click the links and get an idea for the type of information that’s available to you from Windows Help. Click Next to continue.
In the next screen, you only need to check the box for Certification Authority. The other options are not necessary for our installation. If you highlight the other options, you’ll notice a description for each on the right side of the window.
In the next screen, you’ll see the two options for the different types of Certification Authorities we discussed in the previous chapter. You’ll also remember that we need to install an Enterprise Certification Authority to integrate with Active Directory and allow auto-enrollment. Select Enterprise and choose Next.
You’ll see the option to install a new root CA or a subordinate CA for an existing CA infrastructure. We’ll assume that you don’t have any Certification Authorities in your environment and install a root CA. Select the Root CA option and choose Next.
We’ll also assume you don’t have an existing private key. Therefore, in the next screen, select Create a New Private Key and choose Next.
In the next screen, shown in Figure 8-2, you’ll see the cryptographic options to generate the new private key, which will be used to sign all the generated certificates. The defaults here are acceptable, so you can choose Next to continue.

Figure 8-2 Configuring the private key cryptography settings
In the next screen, shown in Figure 8-3, you’ll see the options to name the Certification Authority, which will also show up in every certificate this CA generates. The defaults here should also be sufficient. Choose Next to continue.
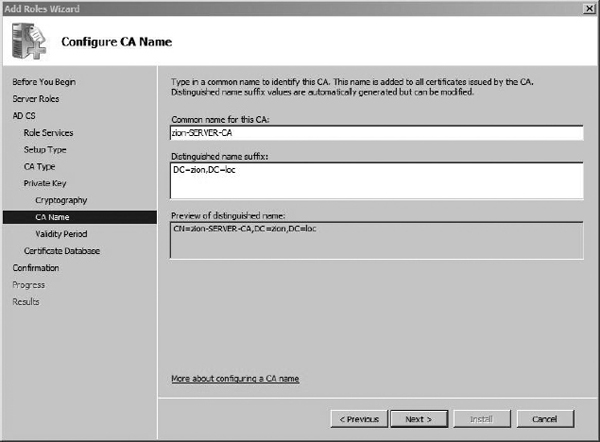
Figure 8-3 Configuring the Certificate Authority name
In the next screen, you can configure the validity period of the certificate of the new Enterprise Certification Authority. Keep in mind that you won’t be able to issue any certificates past the time when the Certification Authority’s certificate expires. Therefore, I typically extend the period to ten years. Once you’ve entered the time period that’s sufficient for your network, choose Next.
The next screen, shown in Figure 8-4, gives you the option of changing the default certificate database and certificate database log locations. If you have a separate disk or partition you use for log files, you should select that location; otherwise, the defaults are sufficient. Click Next to continue.
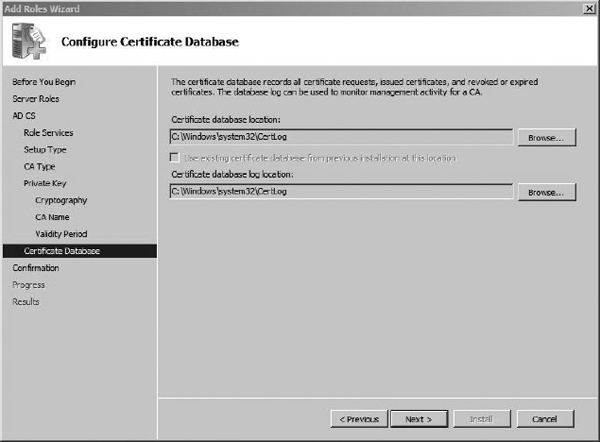
Figure 8-4 Configuring the certificate database location
The next screen, shown in Figure 8-5, gives you a summary of all the configuration options you chose during the installation. You should save this information whenever you add a role to your server, or you can even just take a Screenshot. You never know when it might be helpful, when you’re troubleshooting an issue, to quickly look back at the options you chose during installation. Save the information and then click Install to install the Certification Services.
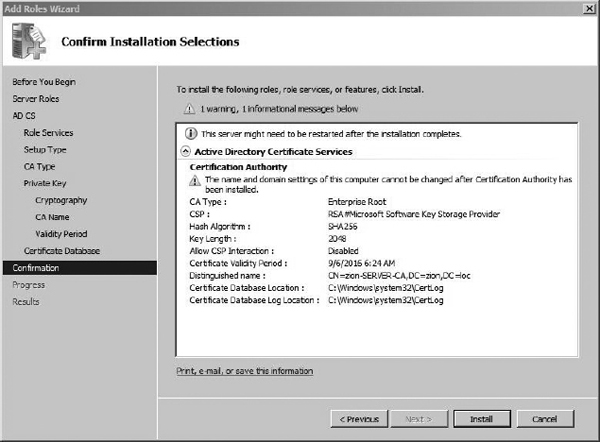
Figure 8-5 Certification Authority installation settings
Once the installation is complete, you’ll be presented with the results screen. All this should say is that the installation was successful. Click Close to exit out of the Add Roles Wizard.
Congratulations, you’ve now successfully installed Microsoft Certification Services and are ready to start deploying certificates. At this point, you can manually create and distribute certificates, but that is not our ultimate goal. Next, we’ll look at configuring certificate templates and configuring which users are allowed to automatically obtain certificates.
Configure the Certificate Template and Auto-Enrollment
Now we’ll move on to configuring the certificate template, which defines the specific settings for the certificate, what the certificate will be used for, and who can obtain the certificate. In the following examples, we’ll create new Organizational Units and user groups to really define and restrict who is able to obtain the certificates necessary to authenticate to the wireless network. We’ll then assign the correct user permissions to the certificate template for the Wireless group to allow the members of that group to automatically obtain that certificate. Here are the steps we’ll take in this process:
1. Create the Wireless Organizational Unit and the WirelessUsers group.
2. Create the Wireless Group Policy Object.
3. Apply the Group Policy Object to the Wireless Organizational Unit.
4. Create and issue the certificate template.
5. Log onto the workstation and obtain the user certificate.
Create the Wireless Organizational Unit and the WirelessUsers Group
Creating the Wireless Organizational Unit and the Wireless users group are common Active Directory administration tasks, but I’ll cover them here in case you need a quick refresher. Open Server Manager | Roles | Active Directory Domain Services | Active Directory Users and Computers. In our example, we’ll create an Organizational Unit right in the root of our domain. To do this, right-click the domain and choose New I Organizational Unit. In Figure 8-6, you can see we’ve named this Organizational Unit “Wireless” and we’ve created a standard Windows group called WirelessUsers.
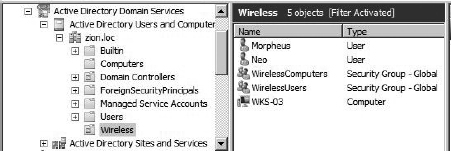
Figure 8-6 The Wireless Organizational Unit and the WirelessUsers group
Create the Wireless Group Policy Object
Now we’ll add a Group Policy Object that enables the clients to automatically enroll in the available certificates. The Group Policy can be configured to allow users, computers, or both to automatically enroll in certificates. You should also keep in mind that certificate templates are specific to users and computers. Therefore, certificate templates that allow users to automatically enroll in certificates can’t be used by computers to automatically obtain certificates.
To configure the Group Policy Object, open Server Manager, expand Features, Group Policy Management, expand your forest (zion.loc, in our example), right-click the Wireless Organizational Unit, and choose “Create a GPO in this domain, and link it here.” Name the Group Policy Object something logical (in this example, we’ve named it WirelessCertAutoEnroll) and then click OK. Right-click the newly created Group Policy Object and choose Edit.
Apply the Group Policy Object to the Wireless Organizational Unit
The location for configuring certificate auto-enrollment for users is User Configuration I Policies | Windows Settings | Security Settings | Public Key Policies, as shown in Figure 8-7.
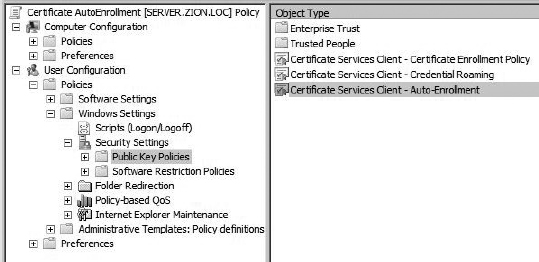
Figure 8-7 Auto-enrollment Group Policy location
Double-click “Certificate Services Client – Auto-Enrollment” to configure the policy. You’ll want to use the settings shown in Figure 8-8. To enable auto-enrollment, change the Configuration Model setting to Enabled. Check all three boxes and then click OK to continue.
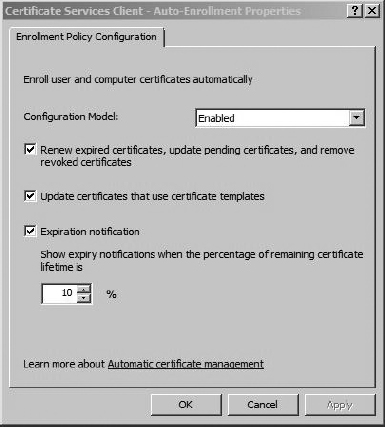
Figure 8-8 Auto-enrollment settings
Next, double-click the “Certificate Services Client –Certificate Enrollment Policy” setting. Change the Configuration Model setting to Enabled and then click Apply. You’ll notice that the policy shows that auto-enrollment is enabled, as shown in Figure 8-9.

Figure 8-9 Certificate enrollment policy
To configure the computer account to automatically obtain certificates, you configure the same policy under Computer Configuration. The only option that isn’t available is to notify about pending certificate expiration. This doesn’t matter because there’s no reason to notify a computer of a pending certificate’s expiration. Remember that to allow a computer to authenticate to the wireless network, before a user has logged on, we’ll need to enable the computer to automatically obtain certificates. The location of the group policy settings for a computer account is; Computer Configuration | Policies | Windows Settings | Security Settings | Public Key Policies.
Create and Issue the Certificate Templates
Now that we’ve created the Group Policy settings to enable computers to automatically obtain certificates, we need to configure our Certification Authority with the certificates that users can obtain. This is a key step that can be a little confusing. To start, we configure our certificate templates and then configure the CA to issue certificates for these templates.
 Tip
Tip
Be careful when choosing and configuring templates. Choosing the wrong type of certificate template doesn’t present itself in obvious ways. You need to make sure you follow along carefully and choose the correct type of certificate template for the type of deployment you’re planning.
Open Server Manager, expand Roles | Active Directory Certificate Services, and also expand the server name. You should see a structure similar to what’s shown in Figure 8-10. You’ll notice that in Microsoft’s infinite wisdom, they decided to create two items labeled “Certificate Templates.” The first Certificate Templates item directly under Active Directory Certificate Services is the location of the actual templates we will configure. The Certificate Templates item under the server (in this case, zion-SERVER-CA) holds the actual templates that this Certification Authority will issue certificates for.

Figure 8-10 Certificate Services under Server Manager
If you click the first Certificate Templates item, you’ll see all the preconfigured templates that will assist us in creating our certificate templates. You can actually manipulate these templates directly; however, for the sake of keeping everything organized, we’ll just copy a template and rename it to something logical. The two templates we’ll configure are
Locate the two templates labeled “User Signature Only” and “Computer.” The difference between the User template and the User Signature Only template is that the User template enables the certificate to be used for the Encrypting File System. I’ll let you decide if this additional functionality is necessary for your environment. If you only need your users to authenticate to the wireless network using this certificate, then the “User Signature Only” template is sufficient.
Right-click the User Signature Only template and choose Duplicate Template. If you have any Windows 2003 Certificate Servers in your environment, choose that option in the resultant dialog box (see Figure 8-11) and then click OK. Otherwise, select Windows Server 2008 Enterprise and click OK.

Figure 8-11 The Duplicate Template dialog box
In the General tab of the Properties of New Template dialog box, name the template using something indicative of what it will be used for. In our example, we’ve named our template “Zion–Wireless User.” Next, click the Security tab and add the group that we want to have the ability to auto-enroll for certificates using this template. In our example, we’ve added the WirelessUsers group. Assign this group the Read, Enroll, and Auto-Enroll permissions and then click OK (see Figure 8-12).

Figure 8-12 Configuring the group’s ability to auto-enroll
After you’ve created the certificate template, you need to issue it on your CA. Right-click the Certificate Templates folder under your CA name and choose New | Certificate Template to Issue. Find the newly created template and click OK. At this point, we are completely set for the users to obtain their certificate.
Let’s continue by creating the certificate template for computers to obtain certificates and then we’ll discuss the details of obtaining the certificates through auto-enrollment. The process is exactly the same as the previous template; however, we’ll apply the permissions to the group WirelessComputers. Right-click the Computer certificate template and choose Duplicate. Select the CA type for your environment. Name the template appropriately. On the Security tab, add the WirelessComputers group and give it the Read, Enroll, and Auto-Enroll permissions. Then click OK.
Log onto the Workstation and Obtain the User Certificate
Now if you log onto a workstation that’s a member of the WirelessComputers group, the computer will automatically obtain the computer certificate. Likewise, if you log onto any domain computer using an account that is a member of the WirelessUsers group, that user will automatically obtain the certificate. Because these settings are pushed out via Group Policy, you’ll need to make sure the Group Policy gets pushed to the client computer. You can force this by running gpupdate /force at a command prompt.
The auto-enrollment process is triggered upon user logon, so if you’re already logged on, you need to log out and log back into the computer to trigger the auto-enrollment process. You should understand that for a client computer to download the certificate for the CA and the user’s certificate, the computer must have network access to Active Directory. This means that the computer can’t initially download the certificate necessary to authenticate to the wireless network over the same wireless network. The user must have previously obtained the certificate. Therefore, you must ensure that the computer is connected to the network either hardwire or a different wireless network before attempting to authenticate to the wireless network to allow the computer to download the CA certificate and obtain the certificate.
After logging into the computer, we can view the certificate store on the client computer using the Microsoft Management Console. Click Start | Run, type mmc.exe, and hit ENTER. Click File I Add/Remove Snapin and then double-click the Certificates item. Click OK to close the dialog box. Expand the path Certificates | Current User | Personal and you’ll see something similar to Figure 8-13.
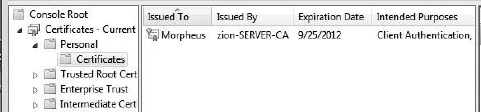
Figure 8-13 Certificate MMC console
You’ll notice the issuing CA is the name of the Certification Authority we configured. If you scroll to the right, you’ll also see the certificate template that was used to create this certificate. This can be very handy information when you’re troubleshooting auto-enrollment issues. Now expand the node for Trusted Root Certification Authorities and click Certificates. Scroll down to find the certificate for your Certification Authority. If you double-click the certificate, you’ll notice that it’s issued to and issued by the same entity.
Figure 8-14 shows an example of the certificate issued to Morpheus from the zion-server-CA Certification Authority.
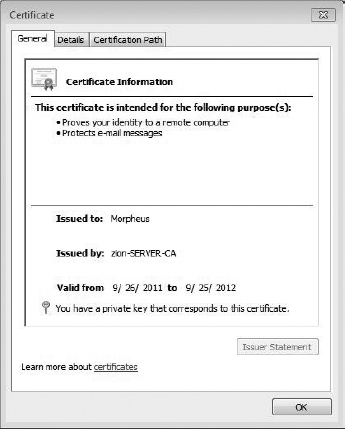
Figure 8-14 Certificate issued to domain user Morpheus
Allow Pre-logon Authentication
We discussed the advantages of configuring the computer to connect to the wireless network before the user has authenticated to the computer. There are many benefits to this, not the least of which is the fact that users who have not logged onto the workstation before can authenticate directly to Active Directory without having to be hardwired to the network.
You’ve already configured the majority of what you need from the client’s perspective. You only have one more task. You need to configure a wireless network that the computer will connect to without user intervention using Group Policy. You can choose to create a new Group Policy or add to the certificate auto-enrollment policy we created earlier. I typically recommend creating a new Group Policy Object, but you can decide for yourself. By creating a new Group Policy, you can avoid any confusion later as to what the Group Policy does. If you choose to add these settings to another Group Policy and later decide to remove that policy (forgetting that the wireless settings are there), you’ve just created an unnecessary headache for yourself.
Create a new Group Policy Object and navigate to Computer Configuration | Policies | Windows Settings | Security Settings I Wireless Network (IEEE 802.11) Policies. If you right-click the Wireless Network (IEEE 802.11) Policies node, you’ll see two options:
The configuration options are almost identical between the two. We’ll focus on the Windows XP policy because Windows XP is currently the most popular Windows desktop operating system. In Figure 8-15, you’ll see the configuration options on the General tab. Most of the configuration here is self-explanatory: Give the policy a name and configure it to connect to infrastructure networks only.

Figure 8-15 Wireless 802.11 policy
Next, click the Preferred Networks tab and click Add to add the settings specific to your wireless network. You’ll see the New Preferred Setting Properties window in Figure 8-16. Again, most of this is straightforward, and you’re really just configuring it to match the SSID, authentication, and encryption settings of your wireless network.

Figure 8-16 Adding a preferred wireless network
Next, click the IEEE 802.1x tab to configure the authentication settings. This is where we configure the computer to authenticate to the network using certificates. Your configuration should look similar to Figure 8-17.
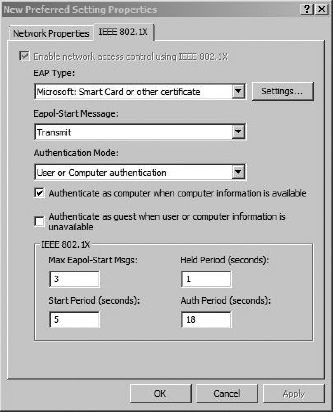
Figure 8-17 Configuring the Policy 802.1x settings
Configure the RADIUS Server
Now we’ll move on to configuring our RADIUS server. We’ll install the service on our server and configure a connection request. Each of the steps below could be performed manually; however, once the RADIUS service is installed, there’s a very handy wizard which will walk us through the required steps.
1. Install RADIUS Service.
2. Create a RADIUS client entry for the access point.
3. Create a connection request policy.
4. Create a Network Policy.
To install the RADIUS service, we need to install the Network Policy and Access Services role. Start the Server Manager, right-click Roles, and choose Add Role. Select the Network Policy and Access Services check box, shown in Figure 8-18, and then click Next.
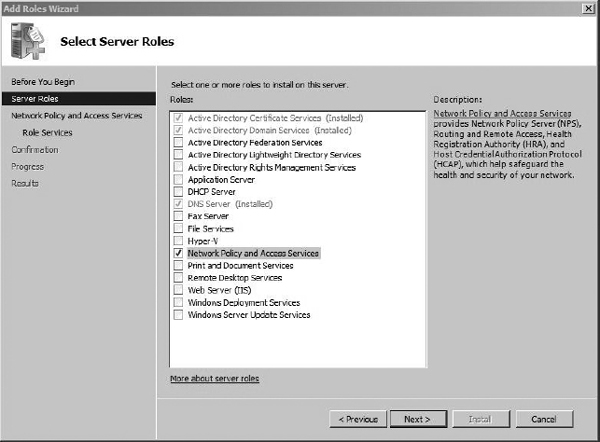
Figure 8-18 Selecting the Network Policy server roles
The next screen is purely informational. Feel free to take the time to view the types of information available to you. Click Next to continue. Select the Network Policy Server check box and click Next to continue.
The next screen provides a summary of the options you’ve chosen to install. Click Install. The next screen should indicate that the installation has succeeded. Click Close to exit this screen.
Now we’ll configure our newly installed Network Policy Server. Open Server Manager and expand Roles, and you’ll see a new entry for “Network Policy and Access Services.” If you highlight the first node, labeled “NPS (Local),” you’ll see a screen similar to Figure 8-19. The easiest way to configure our NPS to perform RADIUS authentication for our wireless network is with the 802. 1x configuration wizard. To start the wizard, click the drop-down box and select “RADIUS server for 802.1x Wireless or Wired Connections,” and then click Configure 802.1x.
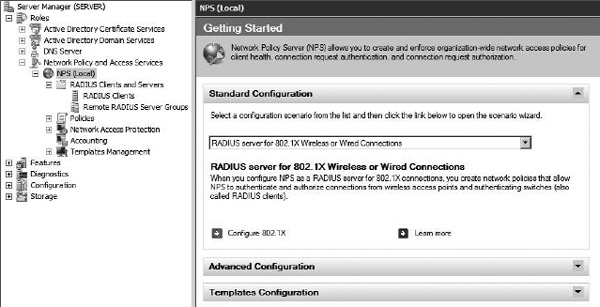
Figure 8-19 The Network Policy Server
In the next screen, select the Secure Wireless Connections radio button and provide an appropriate name in the text box. In Figure 8-20, you can see we’ve named ours “Secure Wireless Connections.” Not too creative, but it gets the job done.
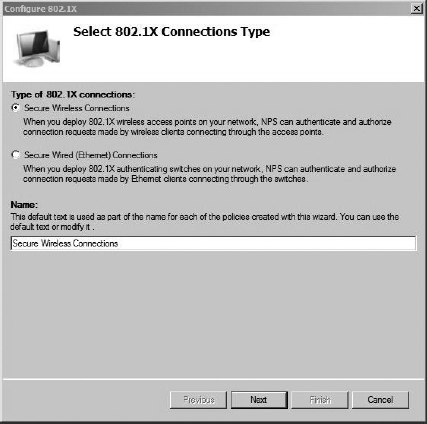
Figure 8-20 802.1x configuration wizard
In the next screen, we’re going to add the 802.1x authenticators. For our wireless network, the authenticators are the access points. Click Add and fill in the information for each individual access point. You should create a shared secret that is unique to each access point. Your entry should look similar to Figure 8-21. Click OK to continue. Click Add and enter any additional access points you have.

Figure 8-21 Adding the RADIUS client
When you’re finished adding your access points, click Next. The next window allows you to set the authentication method that clients will be using. In this case, we want our client systems to use certificates, so choose the drop-down menu and select “Microsoft: Smart Card or other certificate.” Click Next to continue.
In the next screen, shown in Figure 8-22, you can configure the groups that are allowed to successfully authenticate against this policy. Click Add and add the groups that are allowed to authenticate. Keep in mind that the users don’t have to be a member of all the groups in this list to authenticate; they only need to be a member of one of the groups. In our example, we’ve kept everything nice and organized and created a group called WirelessUsers. Click Next to continue.
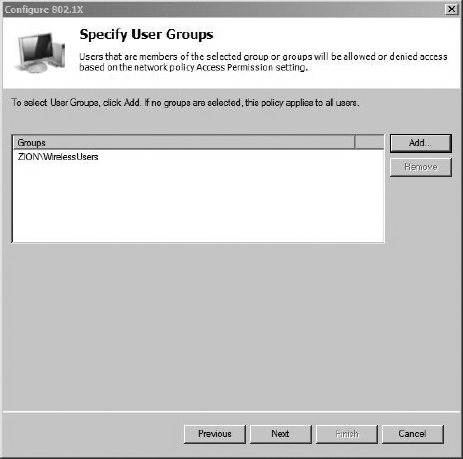
Figure 8-22 Configuring the user groups to apply the policy to
In the next screen, you can configure traffic-control attributes if your access points support it. This is not a standard configuration, so click Next to continue. In the next screen, you can see a summary of the configuration options. This is actually a helpful screen. Take a minute to look at it. Not only does it show all the access points you configured, but also the name of the Connection Request Policy and the Network Policy.
The Network Policy Server states the following for each type of policy:
For the Network Policy, we configured the following conditions: the request comes from an 802.11 device, the user belongs to the WirelessUsers group, and the user is authenticating with a certificate. If the user successfully authenticates and these conditions are met, the user is granted access to the network.
At this point, your NPS is configured, but you have one final task to allow it to start processing requests. Right-click the “NPS (Local)” node again and choose Register Server in Active Directory. You’ll then see the message in Figure 8-23.

Figure 8-23 Registering the NPS in Active Directory!
We’re almost there. You have the most complex configuration behind you. Now it’s time to configure the access point and test authentication.
Configure the Wireless Access Point
Ironically, the configuration of the wireless access point is typically the easiest part of this project. We won’t cover the configuration of the basic wireless settings because you should be very familiar with those at this point. Items such as the SSID and channel are assumed to be configured.
In Figure 8-24, you can see the configuration of a Linksys WRT54G running the dd-wrt firmware. Keep in mind that although the interface for your access point may be different, the configuration should be just as simple. You’ll notice that Security Mode is set to WPA2 Enterprise, which brings up the option to configure a RADIUS server. We’ve also configured the WPA algorithm as AES, as opposed to the less cryptographically secure TKIP protocol.
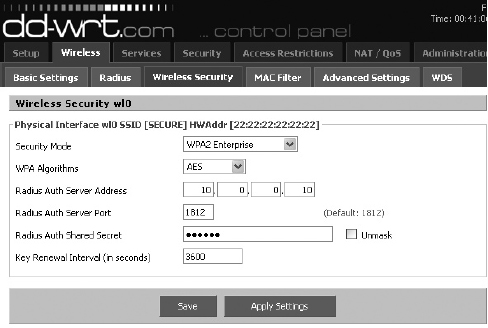
Figure 8-24 Access point WPA2 configuration
All you need to authenticate your clients is the IP address of the RADIUS server as well as the RADIUS shared secret you configured previously. That’s it! Keep in mind that the RADIUS authenticator (in this case, the access point) is completely unaware of how you authenticate to the destination RADIUS server. Whether you use certificates or simple passwords, the configuration is the same on your access point because the actual authentication is handled on the RADIUS server.
Authenticate to the Wireless Network
Now that we’ve configured all the infrastructure components to support our wireless network, the only thing we have left to do is authenticate. Because we’ve already verified that the user certificate is installed on the client machine, virtually no user interaction should be required to connect to the wireless network. If you haven’t configured the wireless network to auto-connect using Group Policy, all the user has to do is double-click the wireless network to connect to. When connecting, you should briefly see the message shown in Figure 8-25, indicating that the user’s identity is being validated.

Figure 8-25 Authenticating to WPA2 with a certificate
Once successfully connected, you should see the familiar “connected” message.
We’ve Covered
In this chapter, we walked through the installation of an entire infrastructure to support WPA2-Enterprise wireless networks using certificates for authentication. Remember that if you have the opportunity to implement this configuration in a lab environment before going to production, you absolutely should.
Configure the Certification Authority
Configure the RADIUS server
Configure the wireless access point
..................Content has been hidden....................
You can't read the all page of ebook, please click here login for view all page.