
The Linux Operating System
During your career, you will invariably come across multiple operating systems regardless of your job role. Only a handful of operating systems dominate the IT world, and Linux is definitely part of that group. If you never had the opportunity to work with Linux, now is the perfect time to do so. There are many wireless security tools available for Linux that simply do not run on Windows or the Mac OS. The Linux operating system not only makes a perfect desktop OS for wireless users, but is also a dominant player in the server market. Familiarizing yourself with Linux will prove to be a huge benefit to you in your career.
Linux is a free and open source operating system (kernel) released under the GNU Public License model. The term open source means that the underlying code is available for anyone to view and manipulate. This is in direct contrast with most commercial software, which is closed source, meaning the source code is not available to the public.
Different variations or “flavors” of Linux are referred to as Linux distributions. Trying to grasp why there are so many Linux distributions, what the real differences are, and why to choose one over the other can be a little confusing. After spending some time with a few different distributions, you’ll quickly understand what makes each distribution unique and start developing your own preference for different distributions. Technically, Linux derives its name from the kernel of the operating system, created by Linus Torvalds. However, many people refer to the operating system itself and any of its distributions as “Linux,” which is perfectly acceptable.
Here are some of the main differences between the various Linux distributions:
Arguably the two most important differences are the support available from a commercial company as well as the default programs installed. Many businesses will only allow open source software be used in their environment if they can count on support being available. Some Linux distributions, including RedHat and SuSe, offer commercial (and very good) support. For an extremely extensive list of Linux distributions, check out the Distrowatch. com website. Here’s a list of the most popular Linux distributions (in no particular order):
If you’re new to Linux or have never even touched it before, don’t worry! Don’t worry even the littlest bit. Despite Linux being extremely extensive, it’s actually quite easy to get used to. The graphical environment has been designed in such a way that it’s intuitive for people familiar with Windows to navigate. I installed Linux on my girlfriend’s laptop (who is not a technical person), and she had zero problems getting everything done that she needed to. Connecting to a wireless network, browsing the Internet, downloading files, writing documents—she had no problem doing all these things without any help.
In this book, we’ll cover many tools and utilities that work only on Linux, but this really doesn’t make it any more difficult to use. You’ll find Linux to be a very logically configured operating system, maybe even more so than the commercial operating systems you’re used to using.
BackTrack: Our Linux Distribution of Choice
All of the attack tools covered in Chapters 4 and 5 come preinstalled on BackTrack. Some of the tools of defense covered in Chapter 6 come preinstalled on the BackTrack distribution of Linux. At the time of this writing, BackTrack version 5 R1 is currently offered. BackTrack can be run on both 32-bit and 64-bit Intel computers.
In addition to all of the wireless-centric tools, BackTrack comes with an insane amount of other security tools preinstalled. If you’re responsible for the security of your organization, or even if security is just a hobby, you’ll find BackTrack’s large list of tools helpful. BackTrack is based on the Debian distribution of Linux, which means it uses the apt set of utilities for program installation. The apt group of commands makes installing, uninstalling, upgrading, and otherwise managing the programs installed on your computer incredibly easy.
 Note
Note
If you’re unsure whether your computer is 32 or 64 bit, you can find out by viewing the processor information in the BIOS. Alternatively, if you’re using the Windows operating system, you can right-click My Computer and choose Properties to find this information.
Downloading and Burning BackTrack
You can download the BackTrack operating system from the BackTrack download page (http://www.backtrack-linux.org/downloads/). On the download page, you may be prompted to register. If you wish to give your e-mail address, feel free to do so; however, it’s not necessary.
Choose the release you wish to download (currently the newest release is BackTrack 5 R1). Under the WM flavor, choose Gnome. This field indicates which window manager to download. Window managers implement the look and feel of the Linux graphical environment. The various window managers will look different and give you different configuration options for changing your graphical environment. Gnome and KDE are arguably the two most popular choices. Both greatly resemble the Windows desktop you’re probably familiar with.
Choose the architecture of the computer you’ll be running BackTrack on. Under the Image section, choose ISO. An ISO is essentially an “image” of an entire DVD in one file. Most DVD-burning programs allow you to burn an ISO directly to a DVD. If you’re familiar with BitTorrent, you can choose the Torrent option; otherwise, choose Direct to download the file directly from backtrack-linux.org. The file size is just over 2GB, so it won’t fit on a CD.
Your browser should look something like Figure A-1.
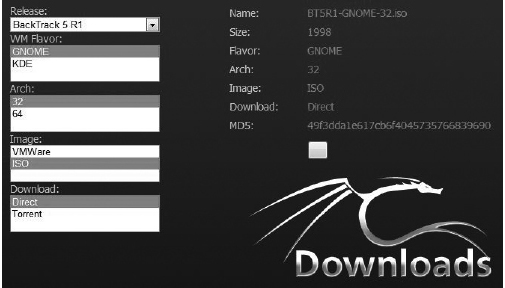
Figure A-1 BackTrack download page
Once you’ve downloaded the BackTrack ISO, you need to burn it to a DVD to be able to boot to the operating system. Most DVD-burning programs have an option such as “Burn a DVD Image” or “Burn a Bootable DVD.” If you choose to burn a regular data DVD, your computer will not be able to boot to the DVD. Make sure you understand exactly which options to choose with your particular burning program to make the DVD bootable.
Booting BackTrack from a USB Drive
As an alternative to burning a bootable DVD, you can use a program called UNetbootin to extract the ISO file to a USB drive and make the drive bootable (see Figure A-2). To create a bootable Linux USB drive, download UNetbootin from http://unetbootin.sourceforge.net. Click the large Download button for the operating system you’ll be running UNetbootin from.
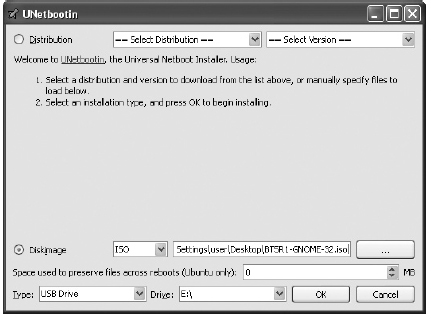
Figure A-2 UNetbootin makes a bootable USB drive
UNetbootin includes a feature that downloads the operating system and then copies it to the USB drive. Because we’ve already downloaded the ISO, we don’t need to use this feature. I’ve found that it’s a little more reliable to download the ISO separately and then copy it to a USB drive using UNetbootin.
Instead of choosing the distribution in the upper portion of UNetbootin, click the Diskimage radio button in the bottom portion. Choose ISO and browse to the location of the BackTrack ISO. In the boxes below, choose USB Drive for the Type setting and select the drive letter in the Drive box. Click the OK button and the USB drive, and when the ISO is finished being copied you will have a bootable USB drive.
Booting to BackTrack
Booting to your new BackTrack DVD or USB drive is very straightforward. When you first boot up, you’ll see a boot prompt similar to Figure A-3. You can simply press ENTER at this screen to see the boot selection menu, shown in Figure A-4.

Figure A-3 BackTrack boot screen

Figure A-4 BackTrack boot menu
At the boot selection menu, you have a few choices that change how BackTrack loads. For all of our work in this book, you can choose the first option: BackTrack Text – Default Boot Text Mode. The third option, BackTrack Forensics, is great for performing forensic analysis of a system and does not “touch” any of the physical drives by default. You can also boot to your computer’s operating system by choosing the last option, Hard Drive Boot. The other options are definitely worth exploring, but won’t help you with the examples.
Once BackTrack is finished booting, you’ll see a terminal prompt similar to the following:
You’ll notice two notes above the terminal prompt instructing you that the default root password is toor (simply root backwards) and that the command to start the graphical environment is startx. To start the graphical environment, you type startx, which loads X. Linux, unlike Windows, is not deeply tied to a graphical environment and can be run even without loading the graphical environment. The graphical environment, referred to as X or X11, is very basic. On top of X you run a window manager, which adds features and makes Linux look even “prettier.”
The Gnome Graphical Environment
The Linux interface is very intuitive, and in very little time you’ll be moving around like a pro. The bar at the bottom of the screen shows you all your open windows, very much like the taskbar in Windows. These bars are referred to as panels in Gnome. Unlike Windows, the button at the bottom left is not the Start button; instead, it minimizes all the currently open windows (very handy). Also, you’ll notice four squares along the right side of the same bar. These represent virtual desktops, which keep your open windows separate. This can be extremely handy when you have many windows open. You can open windows designated for a specific task on one desktop and then switch through the other desktops by clicking the corresponding icons in the bottom right.
The dragon icon in the upper-left corner operates very similar to the Windows Start button. Click it to view a list of groupings of common programs. From the Internet group, you can launch the Firefox browser or open Wicd Network Manager. The Wicd program is used to configure your wireless and wired network interfaces through a simple-to-use graphical interface. If you’ve used the Windows wireless configuration tool, you’ll have no problem using Wicd.
You’ll also see a Places button on the main panel. It includes shortcuts to local “places” such as your home folder and any locally attached drives. To the right of this you’ll see the System button, which contains many of the tasks you’d expect to find under the Control Panel in Windows, such as configuring your mouse, keyboard, sound, power management, and so on.
To the right of System, you’ll see the icon shown in Figure A-5. This is a shortcut to the gnome-terminal. The gnome-terminal adds a few handy graphical features to the standard X terminal. For example, you can highlight any text in the terminal, choose Edit | Copy, and then paste the text anywhere you need it. You can also open multiple terminals in one window by using multiple tabs. To create a new tab, click File and then choose Open Tab.
Figure A-5 The gnome-terminal icon
Basic Linux Commands
Historically, people think of Linux as being a somewhat difficult operating system to use, partly because it’s command line centric. In the past it was true that the graphical environments weren’t half as intuitive as they are today; however, most of the power of Linux comes from the fact that you can perform any task you need right from the command line. This also means that every task is also scriptable, making common tasks much, much faster.
Let’s discuss some of the most basic tasks you’ll have to perform in Linux:
Understanding the Linux Shell
In Windows, you’re used to running cmd.exe if you want to use command-line tools. In Linux, you actually have a few options for command-line interfaces. At the most basic level, most shells are nearly the same. The only time you see a real difference is when you start creating scripts for different shells. We’ll cover scripting more in depth shortly.
The most popular shell is the Bourne Again Shell, or bash. This is a play on words on the A Shell, or ash. Each shell has different built-in commands; for example, cd (short for change directory) is built into the shell rather than an external binary program.
Running Commands
Running a command from a shell is extremely easy—just type the command. You need to be aware of the PATH variable, which tells the shell which folders to look in for the programs you’re trying to run. In the bash shell, your path is configured with the $PATH variable. To view your current path, simply type echo $PATH (note that variables are case sensitive).
The most basic commands to move around the file system are the same as they are in Windows, as shown in the following table. You use cd to change to a directory, and you can use dir to list the contents of your current directory. However, you should get used to using the ls command, which stands for list. The ls command is basically the Linux version of dir. Many systems have a command alias configured so that when a user types the dir command, the ls command is actually run.

The alias command is probably one of the most useful, yet under-utilized tools on a Linux system. The alias command is built right into the bash shell and allows you to create a sort of command shortcut. When you start exploring Linux and using it more often, you’ll see that you type the same commands with the same arguments often. Wouldn’t it be nice if you could type far fewer characters and have the same action performed? With the alias command, you can do exactly that!
Let’s start with the most basic example. In Figure A-6, you can see that we first try to run the command p and are informed that it is not a valid command. Then we configure p to be an alias for the pwd program (Present Working Directory). Then when we enter p, the pwd program runs, showing us our current working directory.

Figure A-6 An alias command example
To view the current aliases, just run the alias command. In Figure A-7, you can see the default aliases configured for your BackTrack shell.
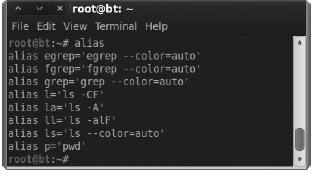
Figure A-7 Default alias commands
Now let’s look at a slightly more complex example. What if we want to create an alias for a command as well as the arguments to the command? We can simply enclose the entire command in quotes, as in the following example:
Another command you should definitely familiarize yourself with is the grep command. The grep command allows you to search for a specific pattern within any text output. The grep command is extremely flexible, and we will barely scratch the surface here. The most basic example would be to show the contents of a file using the cat command and pipe the output to grep and search for the word root. The command might look like this:
The pipe is a special character you can use between commands to send the output of one command to be the input for the other command. The pipe character looks like a straight vertical line. The pipe character key is typically above the ENTER key on your keyboard. In the previous example, we took the output of the cat command and sent it as the input for the grep command.
Getting Help with Linux Commands
Obtaining help and additional information on Linux programs and systems is extremely easy to do. Beside the usual Internet resources, such as forums and websites, you have a few built-in options for obtaining help. The three most helpful commands for obtaining help for a known program are man, info, and help. The man command stands for manual, and you simply provide the name of the program as the argument. For example, to see the manual page for the nslookup command, you would type the following:
A newer version of the man command is the info command, which typically will give you more information than man. The syntax is exactly the same; simply provide the name of the program as the argument. There’s also the help command, which will give you helpful information about the bash shell. This can be particularly useful when you are creating bash scripts.
You can also use the apropos and find commands if you just need a point in the right direction. The apropos command searches the manual pages for the keyword you provide. For example, if you use the following command, apropos will find any man pages for wireless-related tools (very handy):
Likewise, you should familiarize yourself with the find command. The find command simply searches the path you specify for any keywords you specify, much like the Windows search functionality. A very basic example would be the following:
The first argument is the directory to search; in this case, we’re starting from the root directory and searching all subdirectories. The final argument is the name of the file we’re searching for. The iname argument tells the find command to search for any file named passwd regardless of case (case insensitive). Like most Linux commands, the find command has many options available that make it extremely flexible. You can also use the special characters you’re used to using in Windows. For example, to search for any file with “passwd” anywhere in the filename, you could use *passwd*. You should research some of the other options available using the man command.
The following table summarizes the basic Linux commands.

Navigating the Linux File System
The Linux file system is very straightforward, and in time you’ll find it much easier to use than the Windows file system. In Windows, you’re probably used to the C drive being your root partition; in Linux, the root partition is referred to by a single forward slash. Everything, including other drives, are mounted somewhere under the root folder.
The following table lists some of the most important folders in the default BackTrack installation.

A period represents your current working directory. Therefore, to list the contents of your current directory, you could run the following command:
To represent the directory above your current directory, you can use two periods. Thus, your parent directory would be as follows:
You can also move up a directory like so:
Installing Software on BackTrack
BackTrack is based on the Debian distribution of Linux, which means the core system for installing software is the apt group of tools. It couldn’t be any easier to install software on a Debian-based operating system. You can search for a program, and once you’ve identified the name of the package, you simply run the apt program, which automatically downloads the program, along with any necessary files from a list of defined (and approved) servers, and installs it on your system.
Using apt, you can even upgrade your entire operating system automatically. This is sort of like typing one command and having your Windows XP computer upgraded to Windows 7 over the Internet! Pretty slick, if you ask me. Most of the tools and programs mentioned in this book actually come preinstalled on BackTrack, making it the perfect distribution for our needs. However, let’s look at a simple example of installing pidgin, a popular multiprotocol chat client.
The first thing we must do is make sure the list of software available for us to download is up to date. To do this, we run the apt-get command with the update argument, as shown here:
For apt to be able to update all of its indexes, you need to be connected to the Internet. You’ll see a lot of output; don’t worry about what each line individually says. At the end of the output, you’ll most likely see a line similar to the following:
This is completely normal; it simply means that some of the servers in our list might be unreachable at this time. Next, we search for the name of the program we wish to install using apt-cache search. In this case, we know the name of the program, so we run the following command:
On the left side of the output is the name of the package we can install. You’ll notice that there are many results when we search for pidgin. That’s because the search results include anything that references pidgin, not just the pidgin program itself. Typically, you’ll have to search through the list to find the most likely candidate for the package you wish to install. Other times you might be following a tutorial, which will tell you exactly which package to install.
In this case, we see a package simply labeled “pidgin.” That seems a likely candidate, so let’s install it. We install it using the apt-get install option:
You’ll notice that before the program is installed, you are informed of how much disk space is necessary to install the program. In this case, a measly 36.9MB of disk space is required. Type y to acknowledge this, and you’ll see the program is downloaded and installed. When it’s finished, you are returned to your terminal and you can run the program. Type pidgin to run the pidgin program.
The following is an apt program installation cheat sheet:

Basic User Administration
Users and groups are created and managed a little differently than in Windows systems. User accounts are stored in the /etc/passwd file (called the password file). The password file is a text-based file with each account on a separate line. Let’s take a look at a few of the entries in the passwd file (see Figure A-8).
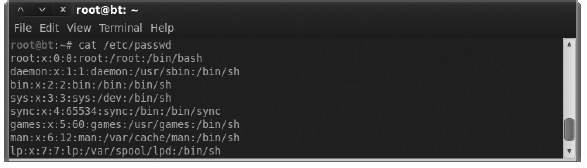
Figure A-8 Contents of passwd file
The fields are separated by colons, and the first field is the username. In Figure A-8, you’ll see the first entry is for the root account. The second field, which is simply the letter x, denotes that the password is stored elsewhere. Ironically, passwords are no longer stored in the password file. Because the password file is readable by every user on the system, it makes sense to store the passwords in a separate file.
The last field shows the default shell for the user; the root user uses the bash shell located at /bin/bash. The field before that identifies the user’s home directory (/root for the root user). The field before that lists the name of the primary group the user is a member of.
The passwords are stored in encrypted form in the /etc/shadow file. In Figure A-9, you’ll see we grep the shadow file for an entry for root. You’ll notice that the password is hashed.
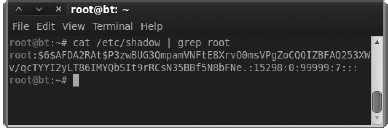
Figure A-9 The root entry in shadow file
Changing your password is very simple. From a terminal, type the passwd command with no arguments; it prompts you for your old password and to enter your new password twice. You can also reset a password for another user account by providing the login name as an argument to the passwd program. For example, to change the password to user account jsmith, you’d type the following:
To create new user accounts, you can use the useradd program or the adduser script. You supply the adduser script with a username you’d like to add, and it prompts you for the rest of the information. You can see in Figure A-10 that we run

Figure A-10 An adduser command example
and are prompted for the rest of the necessary information.
Basic Networking Configuration
Linux is an extremely network-centric operating system. This is great news for you, given that you’re reading a book on networking! Numerous built-in commands and default programs are installed to perform a myriad of networking tasks, including the ability to script every network configuration you can think of.
Some of the command-line tools you’re used to using on Windows exist on Linux, and most of them include enhancements that provide additional functionality or even just make them operate better or faster than their Windows counterparts. Commands such as ping, nslookup, and telnet operate almost exactly the same as the Windows versions.
We clearly can’t go over all the networking commands and all the available arguments and their uses; however, the following table provides a good list to get you started. Be sure to play with each of the commands; if you need help, remember the skills you learned earlier about getting help.
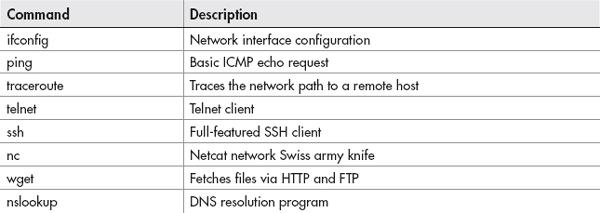
The ifconfig command (short for interface configuration) is the most basic command for configuring a network interface on a Linux computer. As you can see in Figure A-11, just running the command by itself will show you all the interfaces currently enabled (but not necessarily connected).

Figure A-11 The ifconfig network configuration command
Most of the time, hardwired Ethernet interfaces are referred to as ethX, where X is a unique number. However, sometimes other network interfaces, including wireless interfaces, will have an ethX name. In Figure A-11, you can see that the first Ethernet interface (eth0) has an IP address of 192.168.1.105 and a MAC address of 08:00:27:52:2b:75. To show all of the interfaces (and even the currently shutdown interfaces), use the –a option. To enable an interface, use the up keyword. Here’s an example:

To configure a static IP address, type the IP address followed by the netmask keyword and then the network mask, as in the following example.
To view and manipulate the routing table, use the route command. The route command without any options will show you the current routing table. As you can see in Figure A-12, the default gateway is configured as 192.168.1.1.

Figure A-12 Viewing the routing table on a Linux host
You can add a static route using the route command with the add keyword. The keywords “default gateway” can also be used to add a default gateway, as in the following example:
The DNS servers are typically stored in the /etc/resolv.conf file. Using the cat command we learned earlier, we’ll take a look at the existing /etc/resolv.conf file. In Figure A-13, you can see that we have two DNS servers configured using the nameserver command and that our default domain to search is zion.loc.
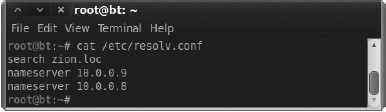
Figure A-13 DNS resolution file resolv.conf
However, all the previous methods are the manual way of configuring your basic network settings. If you prefer a graphical configuration method, you can open the Wicd network configuration manager by clicking Applications | Internet | Wicd Network Manager. You might receive an error stating that you could not connect to Wicd’s D-Bus. This can be safely ignored; click OK to close. Then click Properties under the interface type you wish to configure (hardwired or wireless) and click Properties.
In Figure A-14, you’ll see a window that looks very similar to the Windows IP Configuration window. Simply fill in the appropriate entries and click OK to apply the configuration. A very handy feature is the ability to create different connection profiles. If you find yourself on a few networks frequently and wish to save your IP address info, you can create separate profiles and apply them with a simple click of the mouse.

Figure A-14 Graphical network configuration using Wicd
Understanding Linux File Permissions
Linux file permissions are very different from Windows file permissions. This can be a little tricky for new comers, but it’s easy once you get used to it. To view the permissions for a file or directory, simply use the –l argument for ls. Figure A-15 shows a directory with two results.

Figure A-15 Viewing file permissions from the command line
The line for each file starts with a possible ten bits; if a bit is set, you will see a character. If it is not set, you will see a dash. The first entry in Figure A-15 is for a directory; we can tell it’s a directory because the first entry is “d,” whereas for a file it would be just a dash. Following the directory bit are three groups of three bits. The bits are the read bit, write bit, and execute bit, which are shown as r, w, and x, respectively, if they are set. The three groups of bits represent the permissions for the specified user, the specified group, and all other users of the system, respectively.
The user and group follow the permissions for the file. In Figure A-15, the owner of the file is the root user and the group is the root group. The first block of permissions is set to rwx, meaning that the root user has read, write, and execute permissions on this directory. The second block of permissions is set to r-x, meaning any member of the root group can read and execute this directory. Finally, the last block is also set to r-x, meaning every other user on the system can read and execute this directory. You should note that the execute bit must be set on a directory for a user to actually enter that directory.
To adjust the permissions of a file or directory, you use the chmod command, which stands for change mode. First, you designate the users you wish to change the permissions for and then you specify which permissions to add or remove. The letters used for the users are u, g, o, and a. These letters represent the following users:

Permissions are represented with rwx. You add permissions with a plus sign (+) and remove permissions with a minus sign (−).

Let’s look at a few examples. To remove all permissions on a file called file.txt, you would start with the following command:
To then allow only the file owner to read and write the file, you would use this command:
Any program you wish to run needs to have the execute bit set. Thus, to allow any user on the system the ability to execute the program, use the following command:
Although there is more you need to know when configuring permissions on files and directories, this is enough to get you started.
Basic Scripting
Scripts are extremely easy to create to perform even very complicated tasks. The most basic scripts use the native shell of choice; however, more robust languages such as Perl exist to handle more advanced tasks. Using scripts, you can call any external program by simply typing it exactly as you normally would, with all the same arguments.
Let’s take a look at a basic script. Open the gedit program by typing gedit in a terminal or by opening Applications | Accessories | gedit Text Editor. Enter the following text and save the file as script.sh:

Finally, give this file execute permissions with the following command:
In Figure A-16, you can see we first check for the permissions of the file to ensure it is executable. We do this by running ls with the –lh options and then grep for our file. We can see that the execute bit is set. We then run our script, which gives us some nice output as well as the date and who commands included in it. You’ll notice that for two lines we included the echo command, which simply prints the text we include into the terminal. The double equals signs don’t mean anything special; we just add them to make our output a little easier to read.
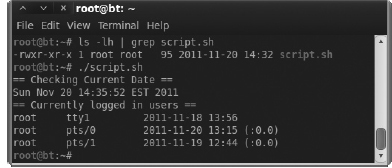
Figure A-16 The output of our sample script
If you find yourself frequently typing the same commands over again, you should considering creating a custom script to save yourself some keystrokes.
Conclusion
You’re now armed with enough knowledge to start using Linux as a desktop operating system with the details in this appendix. From connecting to and configuring network settings, to adding new user accounts and creating scripts to perform common tasks quickly, you’ll find you can easily perform most of the tasks you’re familiar with in the Windows operating system. Most operating systems include many configuration options—enough to fill entire books—and Linux is no exception. If you plan on making Linux your OS of choice, be sure to check out Linux: The Complete Reference, Sixth Edition, by Richard Petersen (McGraw-Hill, 2007), or Linux Administration: A Beginner's Guide, Sixth Edition, by Wale Soyinka (McGraw-Hill, 2012).
..................Content has been hidden....................
You can't read the all page of ebook, please click here login for view all page.