
6. Setting Up Your WordPress Site Right the First Time
Part I of this book was all about getting WordPress running: installing things, getting themes in hand and ready to test, picking plugins to add extra features to your site. Now in Part II, the rubber hits the road and it’s time to get your WordPress site really working for you. The first step is all about settings. The good thing is, there aren’t many settings you need to worry about. In fact, many of the steps and tasks here are: download this plugin, activate it, configure it, and then forget about it (just keep it updated). Although I’ll describe and show you all the main (default) settings screens, we’re going to change settings on only two of them, and even those aren’t going to be much of a change.
Basic WordPress Settings
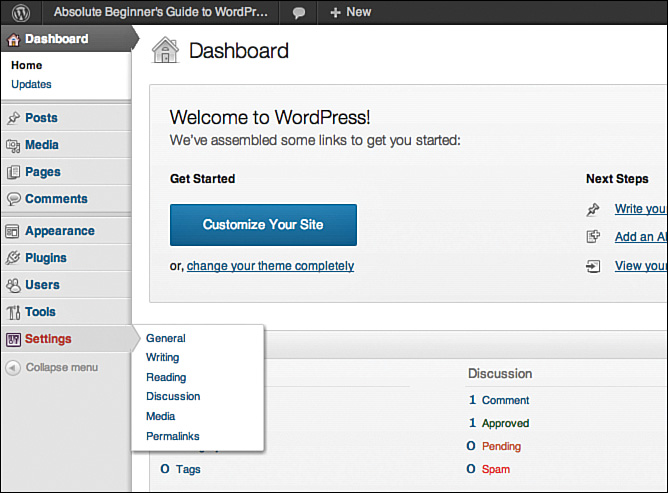
From your Dashboard, the Settings button is where all the action for the basic WordPress settings happens. As we add and activate more plugins, some of those settings will appear under there as well. Some plugins and themes create their own buttons on the sidebar. It’s nice in some ways, but annoying in others. When you turn on a plugin, sometimes it feels like a game of hide and seek to know where the settings are going to appear (if there are any to begin with). Figure 6.1 shows the Settings button with the fly-out menu. We’re going to start with General settings, which you can pick from the fly-out menu, or just click the Settings button.
General Settings
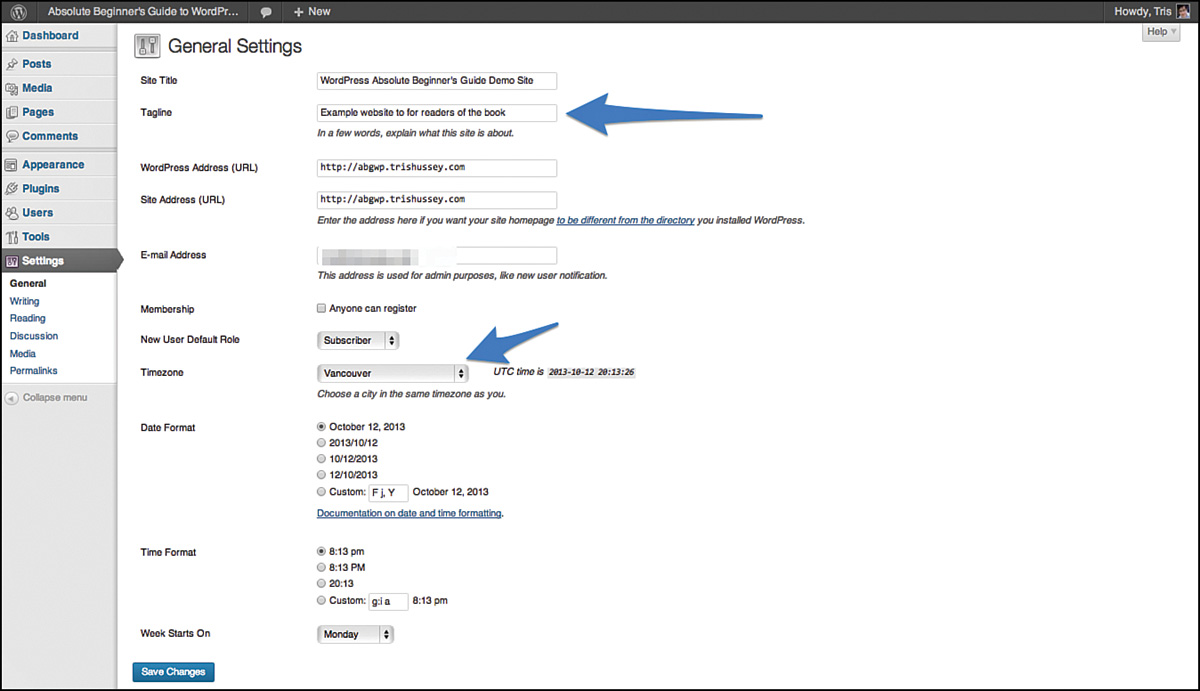
Our first stop is General Settings. You need to look at only a couple things on this screen. First is the tagline. The Site Title you’ve already set, but if you’d like to take another stab at the title now, be my guest. The tagline helps describe the site a bit more for readers and search engines. Keep it to a short sentence at most. For the most part, you won’t ever need to worry about the Site URL or WordPress Address—unless you move the website or something like that. I’ll cover those instances in Chapter 17, “Advanced WordPress Settings and Uses,” but for the time being, those are settings best left alone. Really—alone. Messing with those settings might not only take down your website, it could make it really hard for someone to help you fix it. If you need to update or change the email address for the site, here’s where to do it. This is where things like new comments, notifications when users sign up, and password reset instructions are sent. This address gets all those emails.
Unless you’re running a restricted members-only site or forum, you don’t need to worry about the Anyone Can Register box or the default member role. These come in handy when you want people to register to get access to certain parts of your website, but that’s about it. Visitors can still leave comments and read the public content of your site without being “a member” of the site.
The next section focuses on Time and Date. Of all the settings (how you format the date and time are self-explanatory), it’s the time zone that’s most important. Make sure you pick the time zone based on your city. Why? Because this makes sure that when you schedule posts or just plain old post, the timestamp of the post matches what you expect. It’s really odd to see the post you just wrote show up at 5 a.m. the following day when it’s really evening where you are. It’s all about the time zone. WordPress doesn’t really care what time it is, but you do! Figure 6.2 shows you all the settings and changes I made.
When you’re done, don’t forget to click Save Settings, or they won’t be saved! That goes for all these settings screens, by the way.
Writing Settings
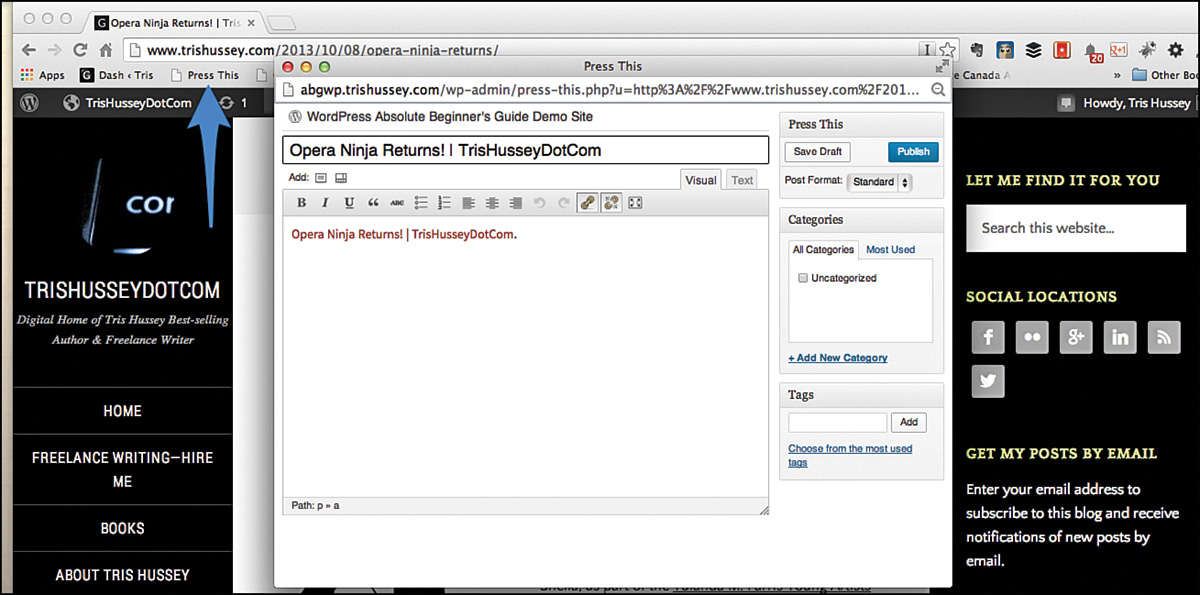
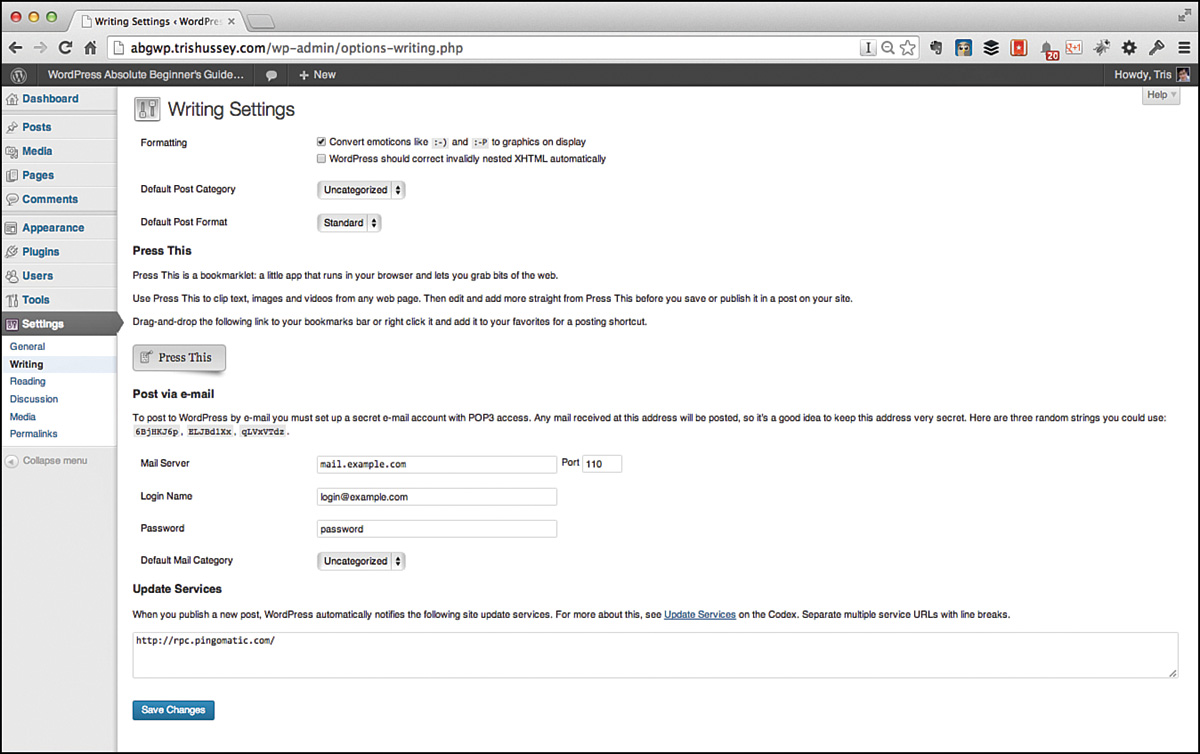
On this screen, you might, at some point, want to change the default category all posts will be assigned to if you don’t assign a Category when you create the post. This will make a lot more sense in Chapter 11, “Using WordPress: Content,” but for the moment, we can leave this setting alone. The Default Post Format (Standard/Normal, Aside, Quote, and so on) is going to be theme dependent. A theme will or won’t support Post Formats (again, more in Chapter 11) and if your theme does support them, here is how to choose which Post Format will be selected when you start a new Post in the Editor. The Press This bookmarklet is very handy if you like to start a Post based on something you see online. After you drag the bookmarklet to your browser’s menu bar, the next time you’re on a site or post you’d like to include in new post, just click the bookmarklet and a little new post window pops up. Figure 6.3 shows you what this looks like.
The section on Post by Email is an interesting one. Very few people take advantage of this feature. You can, believe it or not, send an email to a specific email address and it will appear as a post on your site. Yes, there could be issues with this (if someone got a hold of that address or spam was sent to it), but it was handy for a time. Starting in WordPress 3.9, this is one of the core WordPress features (like the Import-Export function several versions ago) that will be pulled out of the WordPress core, and if someone needs the functionality, it can be installed as a plugin. To you, this means that chances are that you won’t even see this feature and probably didn’t need it anyway.
The final section, Update Services, is one that, again, most users don’t even know is there or what it’s for. Way back in the early days of blogging, it was essential to use a service like Ping-o-matic to help get the word out. Today, it’s helpful, but not required. Why is it still there? Because there is some benefit to using it to help search engines and other services know you have new content. Autoposting to Facebook and Twitter (which we’ll cover later in this chapter) has almost entirely replaced Ping-o-matic and RSS for finding content online, but the majority of Internet users start a new search for something on Google or another search engine. Ping-o-matic: gone but not forgotten. You can see all the settings in Figure 6.4.
Reading Settings
Although you might not go into the Reading Settings very often—or at all—this settings screen manages one of the most important parts of your website: what the home page will look like. Right at the top (Figure 6.5), you can see Front Page Displays and the choices Your Latest Posts or A Static Page. Here’s what’s going on there. Your latest post means your last 10 (that’s the default number, and you can change it below) posts will make up the home page. However, this doesn’t mean that your home page is limited only to posts. All this means is that a specific part of your WordPress template is set as the home page. That template part can do a lot of amazing things, more than just showing posts. A lot of “magazine style” themes need you to set Your Latest Posts as the setting so it can pull in all sorts of other dynamic content.
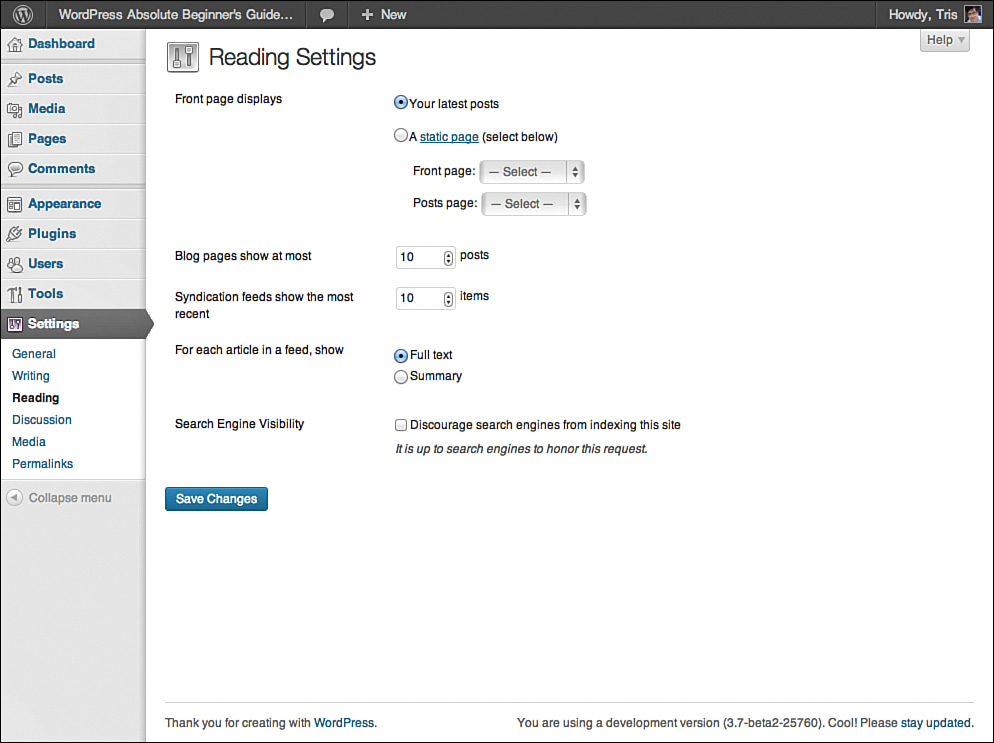
On the other hand, a static page means one page (we’ll get to posts versus pages in Chapter 11) will be the home page. Whatever that page’s content is will be there. It’s great for creating a “traditional” website where you want the same sort of landing page content for all your visitors. Below that option button, you see the menus to choose which page will be the Front Page and which will be the Posts Page. I’ll show you how all this works in Chapter 17, “Advanced WordPress Settings and Uses,” but for the time being, if you pick the static page option, you need to set only the Front Page menu. We’ll talk about what the Posts Page does later.
Below those settings are the choices for how many posts are on the home page (assuming that’s the option you chose) and how many posts are included in your RSS feed. You might have noticed if you’ve visited my personal site, http://trishussey.com, that I have only five posts on the home page. Why? I used to have 10, but lately I’ve been writing closer to two to three times a week instead of two to three times a day. I felt that showing the latest five posts gave readers a more current post list than doubling that number. Another bonus is that with half as many posts on the home page, my site loads marginally faster than it did with 10 posts. How many posts to show on your home page is up to you; pick the number that seems to match the frequency of your updates. I’ve seen more and more blogs with only the single newest post on the home page, but that selection also covers the subsequent pages, so I think paging through a blog a single post at a time is tedious.
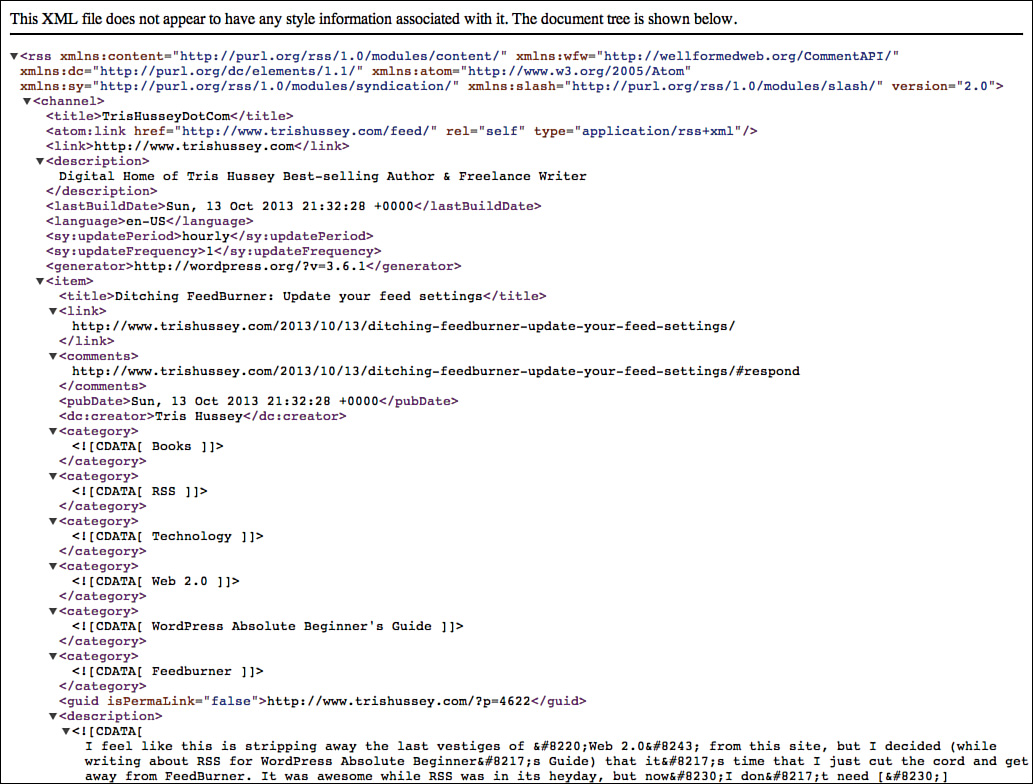
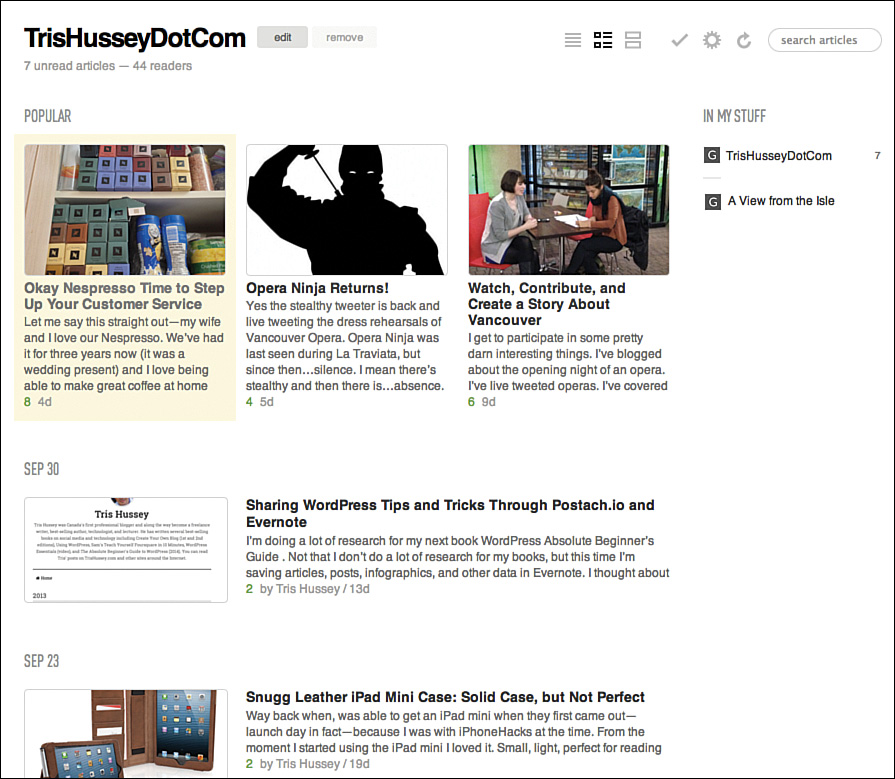
As for the RSS feed choice, I’d leave it at 10 regardless of how many posts are on your home page. I’ve put a discussion about RSS on the sidebar, but essentially RSS is a computer-readable version of your posts (not pages). The number of posts you set determines how many of your posts people who use RSS to find and read blogs will see at a given time. RSS and RSS Readers never hit the mainstream, but they are still used and loved by the tech set to find, share, and read new content from websites. As for the choice of full text or summary in your feed, that is more complicated—and beyond the scope of this book—what it comes down to is whether the people reading your posts through an RSS reader will be able to read the entire post in their reader or have to click through to your site after the first few sentences. I pick full-text myself because I prefer to have people read my entire post in their RSS reader. However, I do experiment with switching to summaries to see if that changes my website traffic. I also publish the last 15 posts in my feed instead of the usual 10.
What Is RSS?
The last part of the screen is whether you tell search engines to index your website. The box is unchecked by default because most people want search engines like Google to index their site. If you check the box, you’re telling search engines not to index the site or visit again. When you uncheck the box, and save the settings, search engines will index the site again after you remind them you’re around. We’ll cover search engines and search engine optimization (SEO) later in this chapter. For the moment, just remember this is where the setting is if you need it.
Discussion Settings
The Discussion Settings page is jam-packed with check boxes and decisions, but in reality you probably won’t ever need to visit it—the default settings are fine. I’m going to suggest a change or two, but even if you don’t take my advice, things will be just fine. Really. Based on user feedback, the default Discussion Settings have been tweaked and tuned over the years, so they really have the best settings for 95% of bloggers and site owners. Let’s start at the top with the Default Article Settings (Figure 6.8).
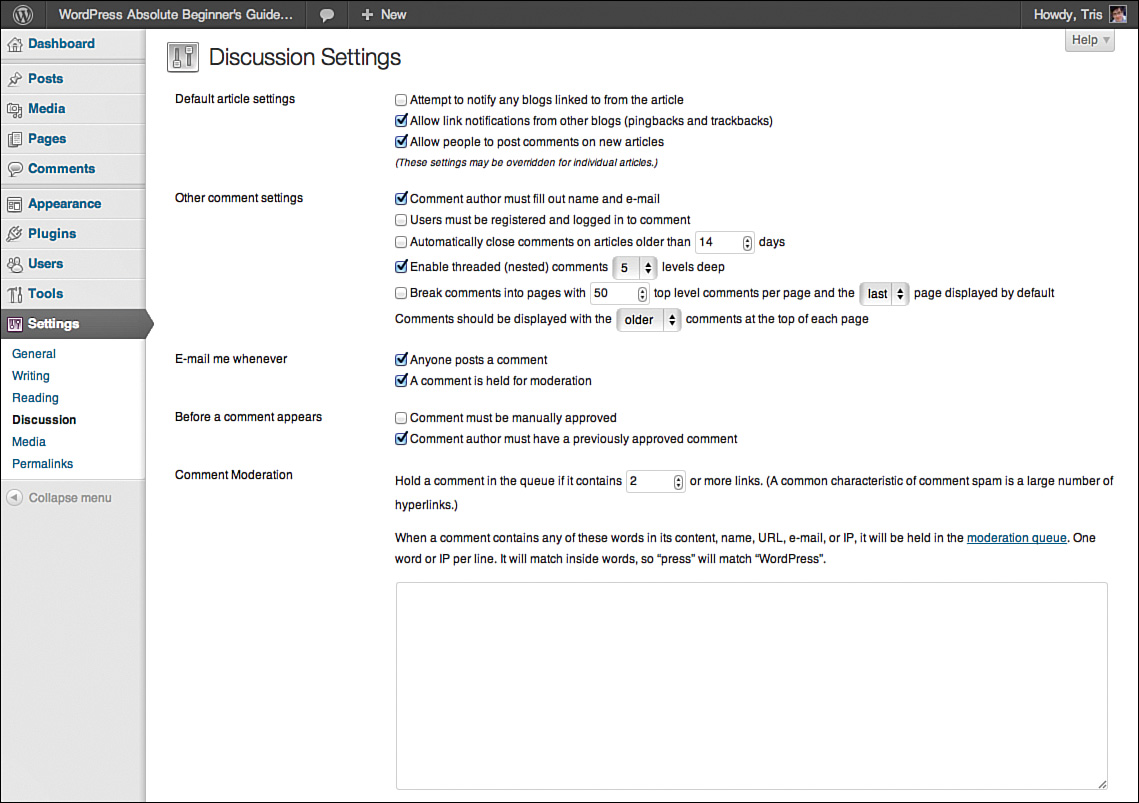
The first two settings—Attempt to Notify Any Blogs Linked To from the Article and Allow Link Notifications from Other Blogs (Pingbacks and Trackbacks)—have to do with how your site interacts with other sites. If the first check box is checked, then whenever you post something, WordPress (at the server level) will attempt to let that other site know you’ve linked to it so that article can be included in the comments section of its site. The second box refers to how your site handles those same requests. Should you check them? (By default, the first one is not and the second one is.) If the first box is checked, you are helping to let other sites (and the people that run them) know you’ve linked to them, but the downside is that it can slow down how quickly your post is posted (by a second or two) if you link to a lot of different sites. The second box is more interesting. It is checked by default, and when someone links to your site, that link is listed as a “comment.” That can look strange when there aren’t any “comments” (real people leaving words about the post), but a number of comments is shown. It used to be that it was considered good blog citizenship to make sure both of these options were active, but today I don’t believe it’s as important. I’ve unchecked both of the boxes on my own blog. This doesn’t mean that people can’t link to my site—you can’t stop that by the way—it just means that their links don’t show up as comments (nor to mine on their sites). I’m willing to accept that for a little less clutter on my posts.
The last check box in this section, Allow People to Post Comments on New Articles, has to do with whether people can leave comments on posts. This is on by default, so your Posts and Pages will accept comments. As you see below the section, you can change any of these settings on a per article basis (either before or after you publish it). If you decide to leave this option checked and allow comments, and then change your mind later, there will be no comments allowed on future Posts and Pages. This isn’t a retroactive change, so you will need to go back and turn off comments on your Posts and Pages manually. There are quick ways to do this, and I’ll cover those in Chapter 11.
The Other Comment Settings section is pretty self-explanatory, but I’d like to mention one of the settings: Users Must Be Registered and Logged In to Comment. You might be tempted to require people to register an account on your site before they can leave a comment—resist this temptation. If you want people to leave comments, you need to make this as easy as possible. I think requiring a name and email is the right balance. By requiring someone to create an account, you will reduce the number of comments you will receive on your site. I know this from personal experience. Before I switched over to WordPress in 2005–2006, I used a great (and ahead of its time) engine called Blogware run and owned by Tucows. Blogware required—and there was no way around it—people to create a Blogware account to leave a comment. It was a royal pain for everyone. I probably would have received an order of magnitude more comments on my posts back then (and this is when I was blogging a lot) if there hadn’t been an artificial barrier to commenting. Take my advice—leave this unchecked unless you need to require more information from people (for instance, if it’s a restricted members-only site).
The email settings, by default, make sense. It lets you know when someone leaves a comment or there’s a comment in moderation. Speaking of comment moderation, that’s what the next several sections focus on.
Comment moderation means that before a comment will appear on your site, it has to pass through some steps. By default, the first time a “person” leaves a comment, it is held for you to review before it goes live. After that first approved comment, whenever that “person” leaves a comment, it will be posted immediately. I put “person” in quotes because, like email, blogs and websites receive comment spam. Special programs (called bots) comb through the Internet looking for blogs and sites they can leave comments on. The comments might seem real, but they contain links for illegal download sites, online pharmacies, and pretty much anything you get in your email spam. This could make approving comments a little tricky. What if you read a comment that sounds real (and the comment spam comments are getting better and better) and you approve it? Then that bot will know it can post spam comments willy-nilly on your site. Ouch. You might then be tempted to check to manually approve all comments all the time. Resist this temptation. We use plugins like Akismet to help protect our sites from spam. I’ll talk more about Akismet later in this chapter, but for now, taking the step to require that you read and moderate everything is extreme. I can foresee cases where this would be a good idea, but in general, it’s an extra burden on you that you don’t need.
The boxes for Comment Moderation and Comment Blacklist (Figure 6.9) allow you to automatically flag (or block) comments that are submitted to your site. The number of links triggering moderation is a safety net in case you accidentally approve a spammer. Spam comments often contain lots of links (generally two or more) to the sites they’d like your visitors to fall victim to (and Google to index), so even if you’ve approved a comment from someone, if future comments contain two or more links, the comment will be thrown back into moderation. The box below that section allows you to enter words or phrases that automatically trigger moderation. You can put in any words you like, or leave it blank and allow Akismet to do the work for you. The Comment Blacklist section allows you to automatically dump comments with particular words, email addresses, and so on into spam. This is a blunt (like sledgehammer blunt) instrument, so use it with caution. I don’t have anything in my comment blacklist—I haven’t needed to—and if someone is going to inundate my site with spam, either Akismet will take care of it or they will be smart enough that trying to block their email or IP address (the computer where the comment was sent) will be fruitless.
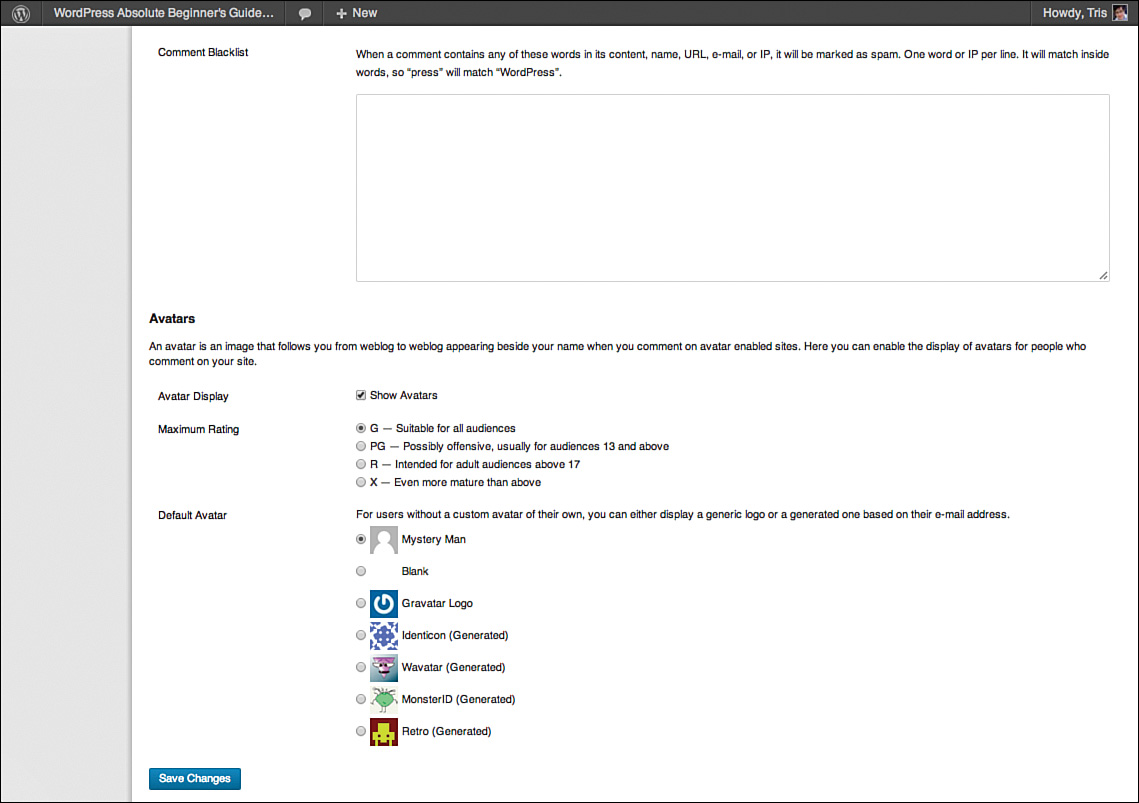
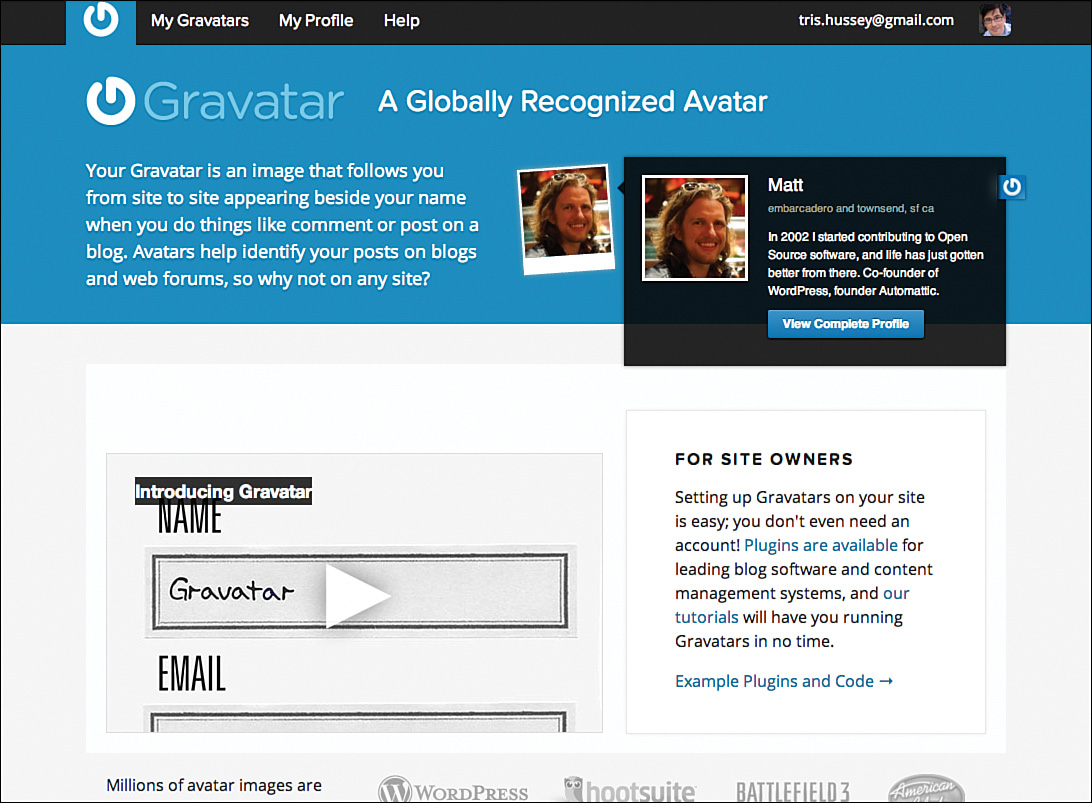
The final section covers whether you will allow little pictures next to the comments people leave. The pictures are called avatars; you have choices on how tame or racy people’s avatars can be (I leave my settings at “G”) and if someone doesn’t have an avatar, what to assign them. How do you get an avatar to show up with your comments? You just use Automattic-owned Gravatar (Figure 6.10) and register your name and email address. WordPress (and WordPress.com) will automatically pick up and pull in the picture you set. If you have lots of email addresses, you can include those in your profile and assign different pictures to different addresses. Figure 6.11 shows you all my avatars (or Gravatars) for my email addresses. Yes, it’s the same picture; I like to be consistent with my photo around the Internet. Setting up Gravatar (it’s free, by the way) is a great way to personalize your site for visitors. It gives a face to the words.

That does it for discussion settings. Remember, the default settings are fine, so if you never visit this settings page again, you’ll be fine.
Media Settings
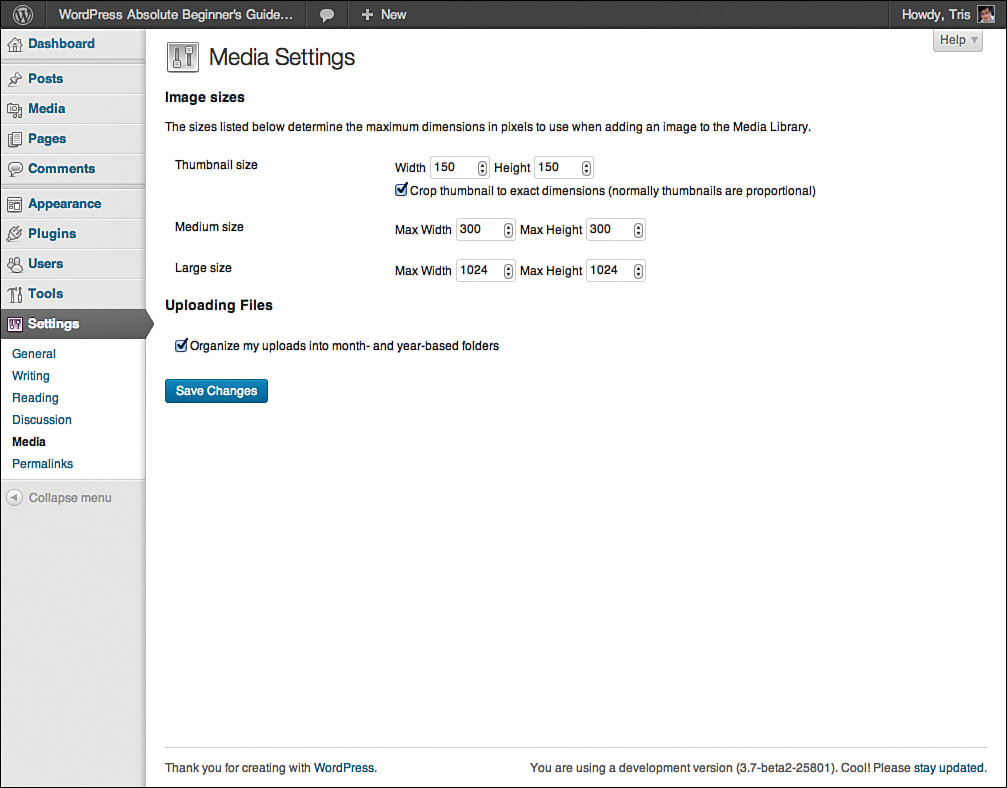
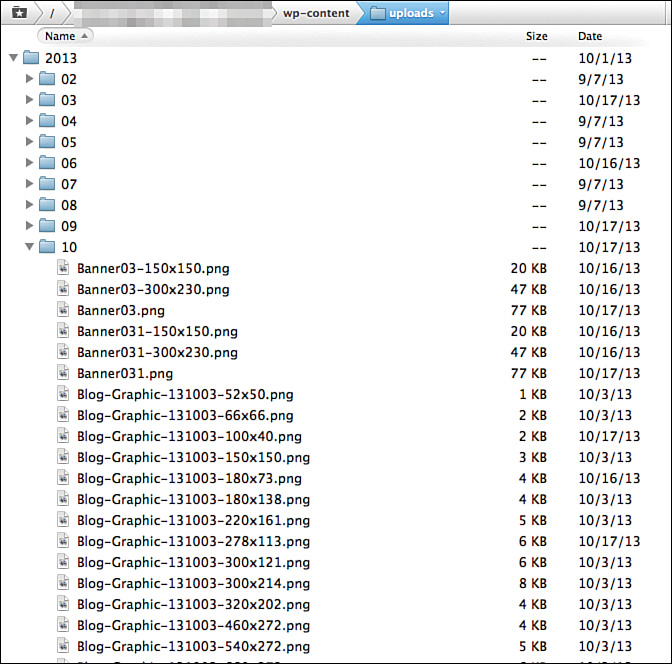
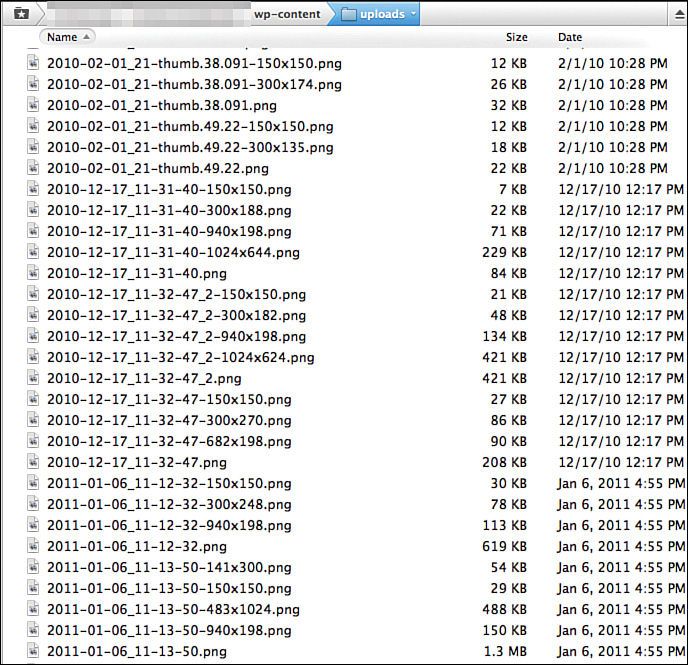
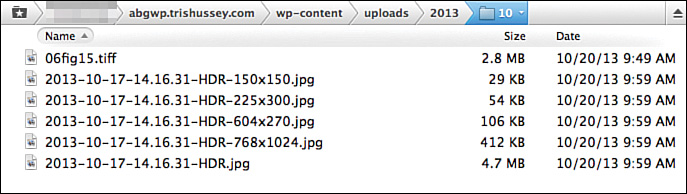
Media settings don’t manage or control what you can or can’t upload, but rather how images are handled when you upload them (as well as other media types). Figure 6.12 shows the settings for this page. Let’s jump to the bottom of the settings and the check box Organize My Uploads into Month- and Year-Based Folders. I suggest you keep this checked. Figure 6.13 shows you what this looks like when you use FTP to connect to your site and look at the uploads directory. All the images are nicely organized. Figure 6.14 shows you what it looks like when you don’t check the box. Day to day, will this make a difference to most users? No. Most WordPress users don’t FTP into their sites to look for images very often; however, if you do need to look for an image, this is a much easier way to do things.
Now back to the top of Media Settings.
When you upload an image to WordPress, WordPress automatically tries to make three copies of your image: thumbnail, medium size, and large size (WordPress won’t make copies that are larger than the original image). This means if you upload an image that is 600×700 pixels, WordPress won’t create the Large size image, only the Medium and Thumbnail sizes. Why does WordPress do this at all? Flexibility and speed. In Chapters 11 and 12, we’ll talk more about media and how to use it, but here’s the gist of it.
When you want to insert an image into a page, WordPress gives you the option of choosing from these predefined sizes. This helps you match the size of the image to what you what to show (flexibility), but instead of inserting the full-size image scaled down for the screen, WordPress uses an image that is actually smaller (dimensions and file size). For example, a picture from an 8-megapixel camera produces images that are about 2448×3264 pixels and 4.7 megabytes. When you upload that image to WordPress, copies of that image are created with those new dimensions—the same as if you opened the image in an image editor, scaled the image down, and saved the smaller image. Figure 6.15 shows you what happens when I uploaded my 4.7 (rounded to 5) megabyte picture to WordPress. I have the Original, Large, Medium, Thumbnail, plus an extra size for Featured images. Note that it isn’t just the dimensions that are smaller, but the file sizes are smaller as well. Smaller files download faster and load faster onscreen. One of the old ways of making an image look smaller was to load the original image but scale it onscreen to the size you need. This would mean that the same 5-megabyte image would need to download regardless of how small or large the image appeared onscreen. Nice trick, but it made for slow-loading websites.
Often, people change these size settings based on their theme or preference. The check box below the Thumbnail size means that the image will be cropped to those (square) dimensions. If you uncheck the box, the thumbnail will be cropped based on the longest side and the other dimension in proportion with the original image. So a rectangular image will have a rectangular thumbnail with the longest side at 150 pixels.
Permalinks
The final default setting (before activating any plugins) is permalinks. Your first question is probably, “What the heck is a permalink?,” which is a good question because it gets to the heart of why WordPress and other modern Content Management Systems (CMS) are much, much better than ones that came before (including the commercial ones that cost tens of thousands of dollars).
Back when people first realized that it was much more efficient to manage a website when the content was stored in a database and the theme kept separate, it was an amazing innovation. It made managing large websites much easier for Webmasters and administrators. People could update content, and there was little risk of something going wrong that could take down the site. The problem was that the URLs (the addresses you see in your browser’s address bar) were created only when a user—an individual human user—clicked a link to visit that page. If you tried to bookmark that page, it wouldn’t work; often you’d wind up back at the home page (if done well) or with a page not found error (if handled poorly). Why? Because that original URL didn’t exist any longer. This gave rise to two problems: One, people couldn’t bookmark websites. Annoying, but not a killer. Two, Google couldn’t index the website beyond the home page. Google’s indexing robots often couldn’t find or follow the links from one page to another. And if it did follow them, subsequent visits would return different URLs for the same pages. This was a search engine disaster for site owners. Then came the idea of “permalinks,” or permanent links. Instead of the posts you write and publish having a different URL whenever someone visits the post, it will always have the same URL. Also, when any page is rendered for visitors or Google’s indexing bots, the code uses regular HTML links that can be followed, indexed, and bookmarked. The permalink meant that CMSs that use them would be treated by visitors and Google as “regular” websites, while still reaping the benefits of keeping content in a database and themes safety out of reach.
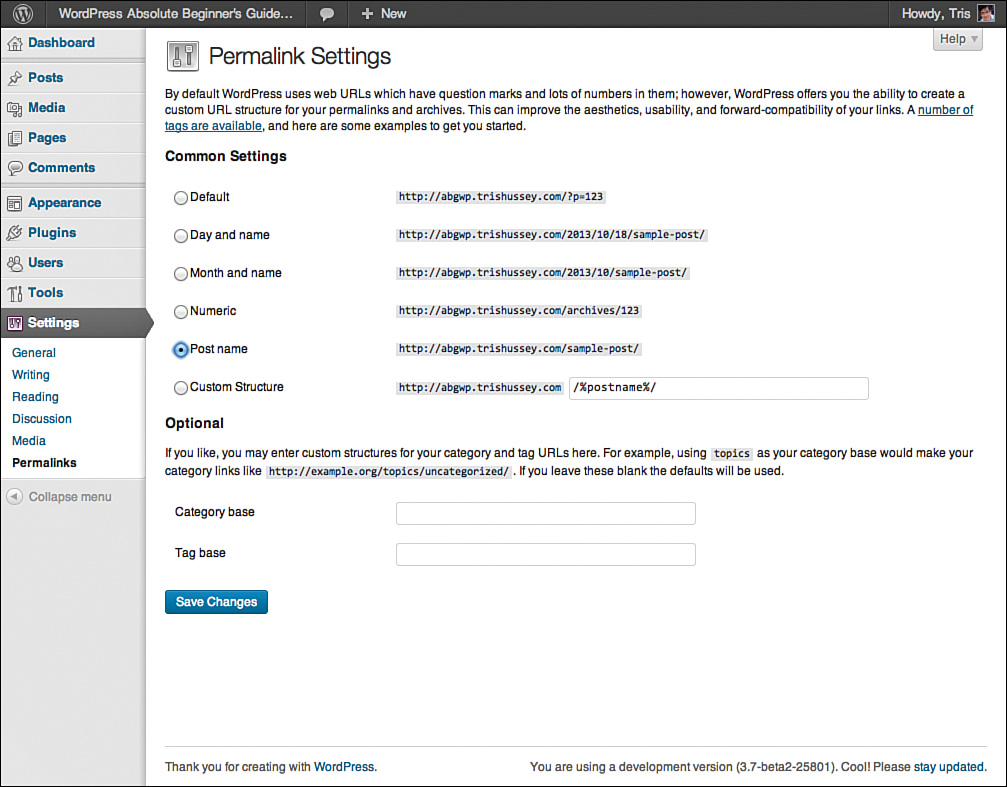
The Permalink Settings screen (Figure 6.16) allows you to set how the permalinks are set and created for your site. The default is pretty ugly and looks like this: http://abgwp.trishussey.com/?p=123. This is a problem because the URL doesn’t give any indication of what the post or page’s title is. Maybe that’s not a big deal to people, but the URL name does matter to Google. The examples on the settings screen—at least the ones I recommend—all include the post name as part of the link. There is a trend—and recommendations from many SEO experts—that the setting Post Name is the best choice for most people. Although this is true, just having the post name doesn’t give your visitors a clear sense of when that post was written. Including a combination of year, month, and day fixes that. Is it better? That is an answer best left up to you. I had the Day and Name setting (including year, month, day, and post name) for a long time, but recently changed to Post Name. I think Post Name looks cleaner and pleasing to visitors (as well as better for search engines). Don’t worry, WordPress won’t allow for duplicates in the Post Name field—that’s an automatic thing handled when you create a post or page.
 NOTE
NOTE
What if I change my mind? I mentioned that I had one Permalink setting and then changed it. So, is that a problem? Not if you handle it correctly. What you have to do is make sure that search engines that have recorded the URLs of all your posts and people who have bookmarked a particular post will get to the right post. This is handled with a redirect. There are plugins to help you with permalink redirects, but the most efficient way to manage them is to edit your .htaccess file yourself with the right code. Which brings up the next question: What is the right code? That’s a little more complicated because it depends on what you had and what you are changing to. I used a handy tool from SEO expert Joost de Valk (http://yoast.com/change-wordpress-permalink-structure/) that let me enter what the previous permalink structure was before switching to Post Name; it then generates the code so no visitors (human or computer) would lose their way. Other tools will let you change from any permalink structure to another, but because the trend (and my preference) is now Post Name, this is what I’d suggest you try. Or just start with Post Name to begin with.
The last section of the setting screen is an optional one and allows you to change what visitors see when they are reading a category or tag archive. The default would be like this: http://abgwp.trishussey.com/category/about-wordpress/. You could change it to read http://abgwp.trishussey.com/topic/about-wordpress/. A subtle difference, but it matters in some cases. We’ll talk more about Category and Tag archives in Chapter 10, but remember where this setting is if you decide to change it later.
Like all settings, before you leave the page, you need to click Save Changes. Unlike other settings, your Permalink Settings edit a file on the server—the .htaccess file—which tells the web server how to create the URLs for posts, pages, visitors, and search bots. Generally, when you click Save Changes, you will see a yellow bar at the top of the screen that says Permalink Structure Updated, but if WordPress can’t modify the file on the server, you will be told you have to do it manually. Don’t worry—you’re given the code to do it, but this means you will have to use FTP connect to your site, open the .htacess file in a text editor (you will probably need to tell your FTP client to show invisible files; .htaccess is a file the servers like to keep hidden), copy the code from the Permalink Settings page, paste it into .htaccess, and save it back to your server. The good thing is that this error happens much more rarely now that it did in the past. If you get stuck on this part, don’t worry—it will be easy to find someone close by to help you.
Akismet
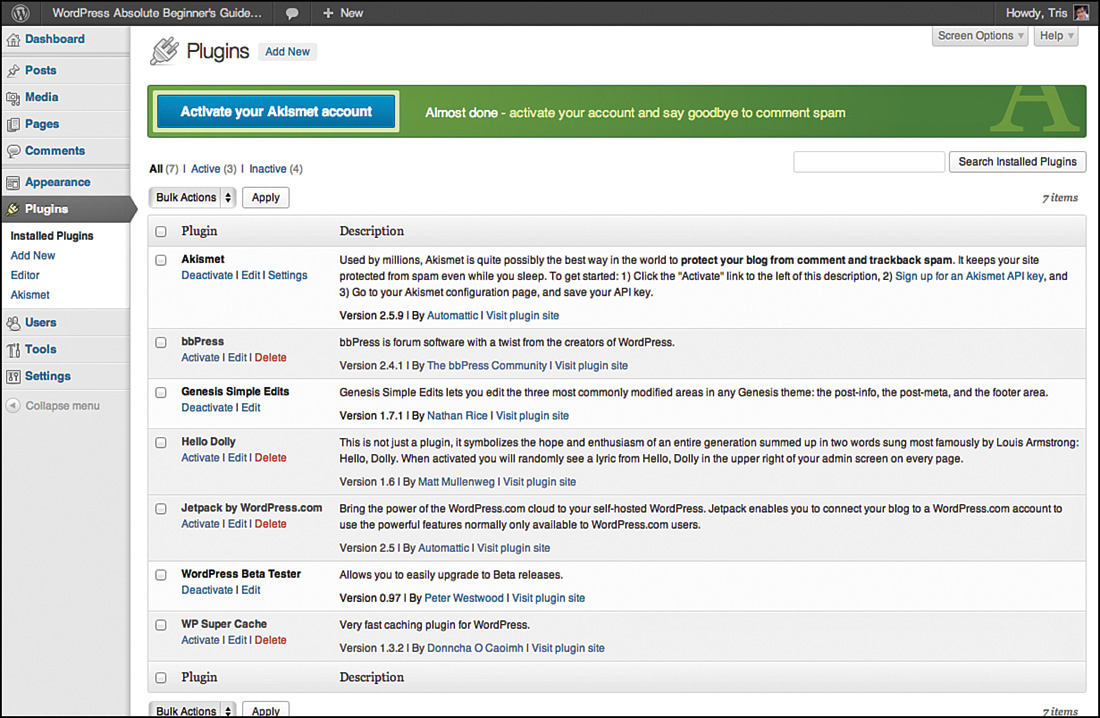
This is the only plugin-specific setting and section that we’re going to tackle in this chapter. Akismet is a free plugin from Automattic that is preinstalled (not activated) with WordPress. Akismet’s entire purpose is to keep your blog free of comment and trackback spam. Believe me, you want to have Akismet activated and configured on your blog. Without it, you risk spammers leaving comments and trackbacks on your posts and pages that you do not want there; also, links to bad sites lower your search engine ranking on Google. Turning on Akismet is easy. Just go to the Plugins screen and click Activate. The next step is to request an Akismet key from Akismet.com (Figure 6.17).
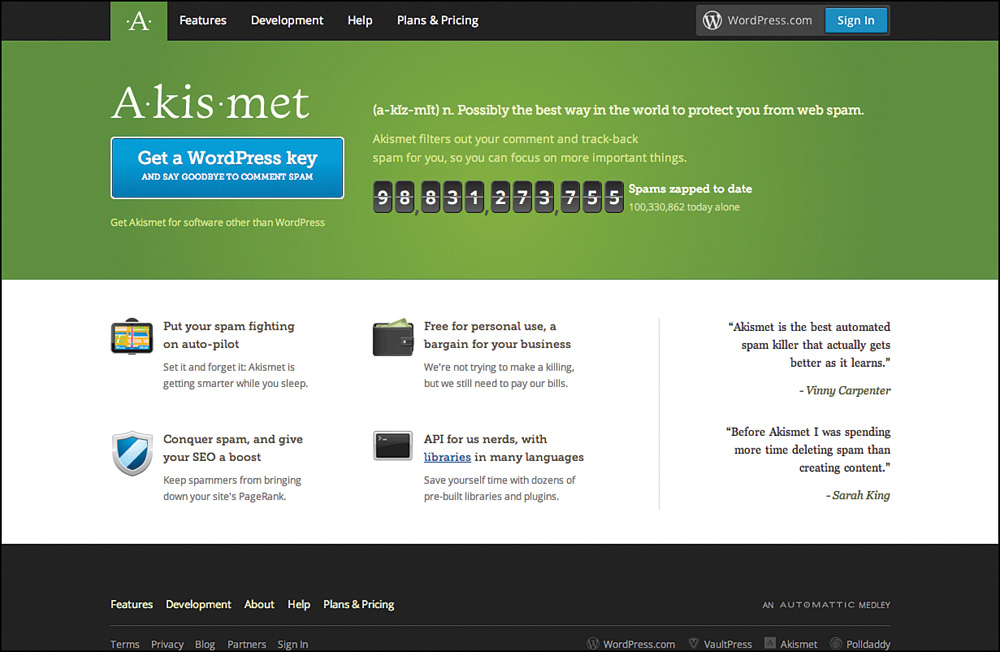
Akismet works through a network of servers that constantly monitor sites for spam comments. As users mark comments spam (or not spam), Akismet learns so it can improve. As you can imagine, this kind of processing horsepower doesn’t come cheap, which is why Akismet has pricing plans for users. There are plans ranging from free to enterprise level (Figure 6.18).
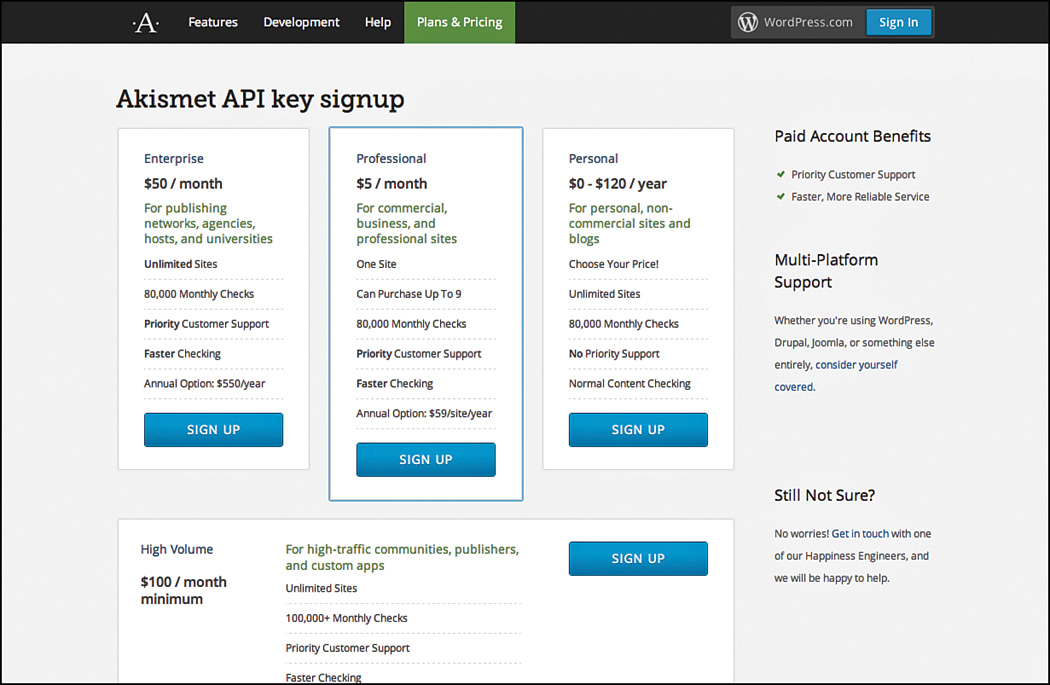
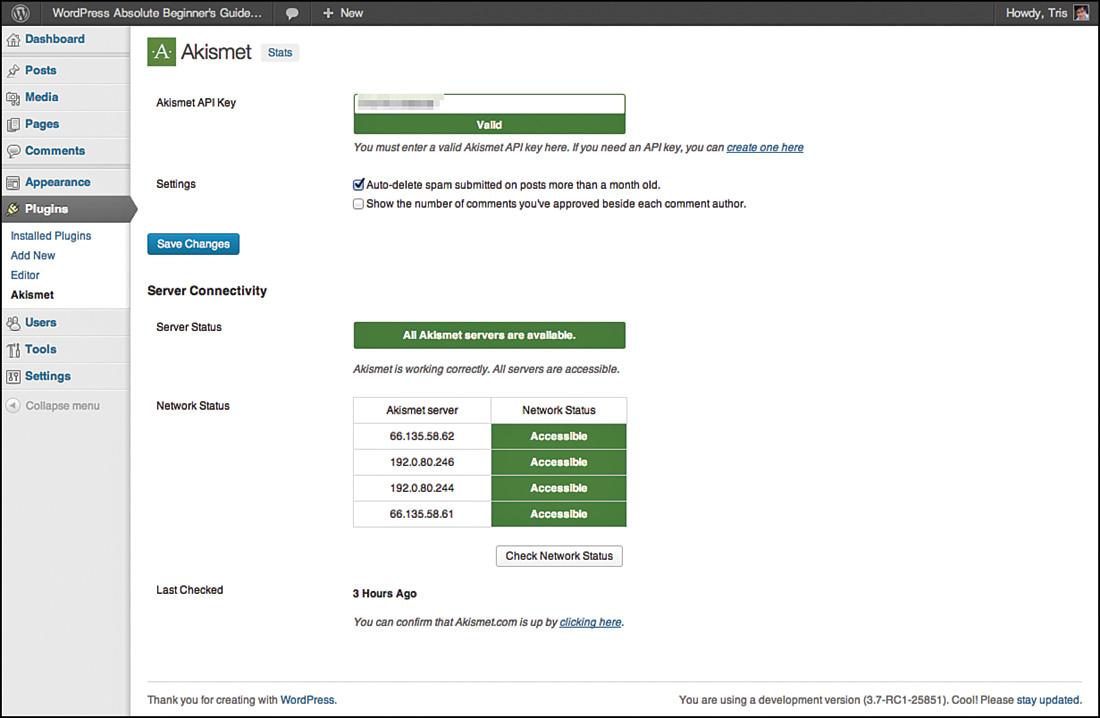
For personal users, picking the free level is fine, but if you’d like to chip in a little to help, that is better. Companies and people using Akismet for business should purchase a plan so they get better support, faster spam checking, and other benefits. The Akismet settings screen (Figure 6.19) is pretty straightforward. Except for putting the number of comments approved by each commenter’s name (I’d leave that one off), there isn’t anything to do. The default is to automatically delete spam comments on posts more than a month old (which helps keep clutter down). Before you can get to this point, however, you need to get your Akismet key.
When you first turn on the plugin, you’ll see something like Figure 6.20.
When you click the button, you get to Figure 6.21.
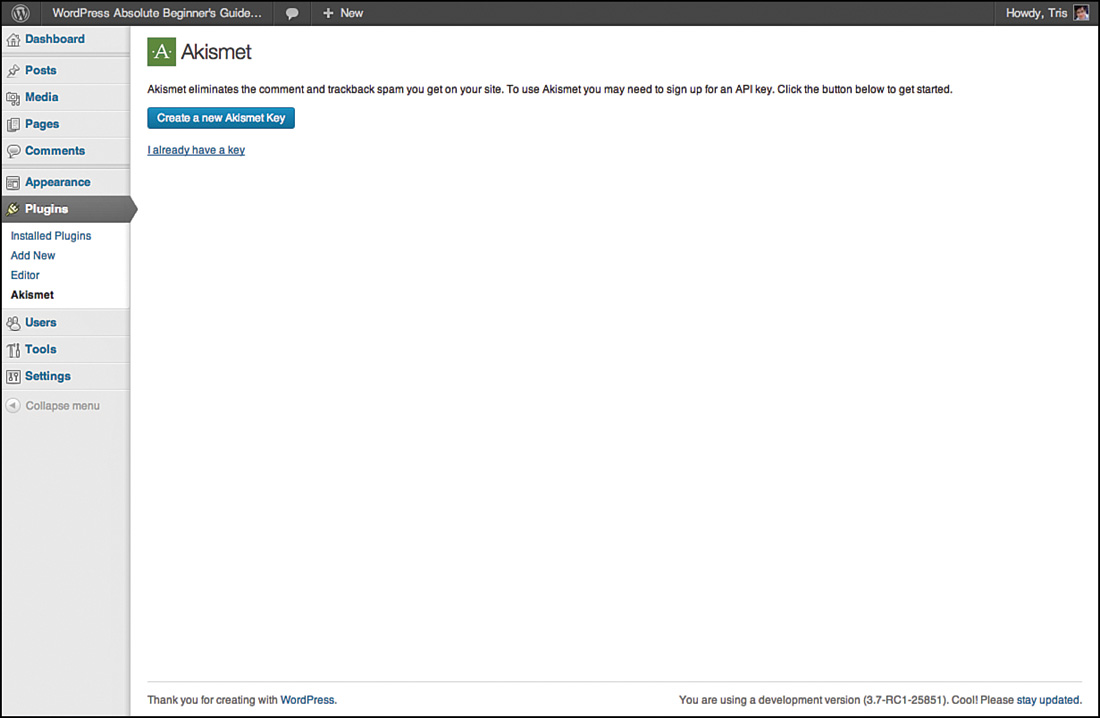
If have your Akismet key already (when you request or buy your key, you receive it in email as well as onscreen), click the link below (Figure 6.22).
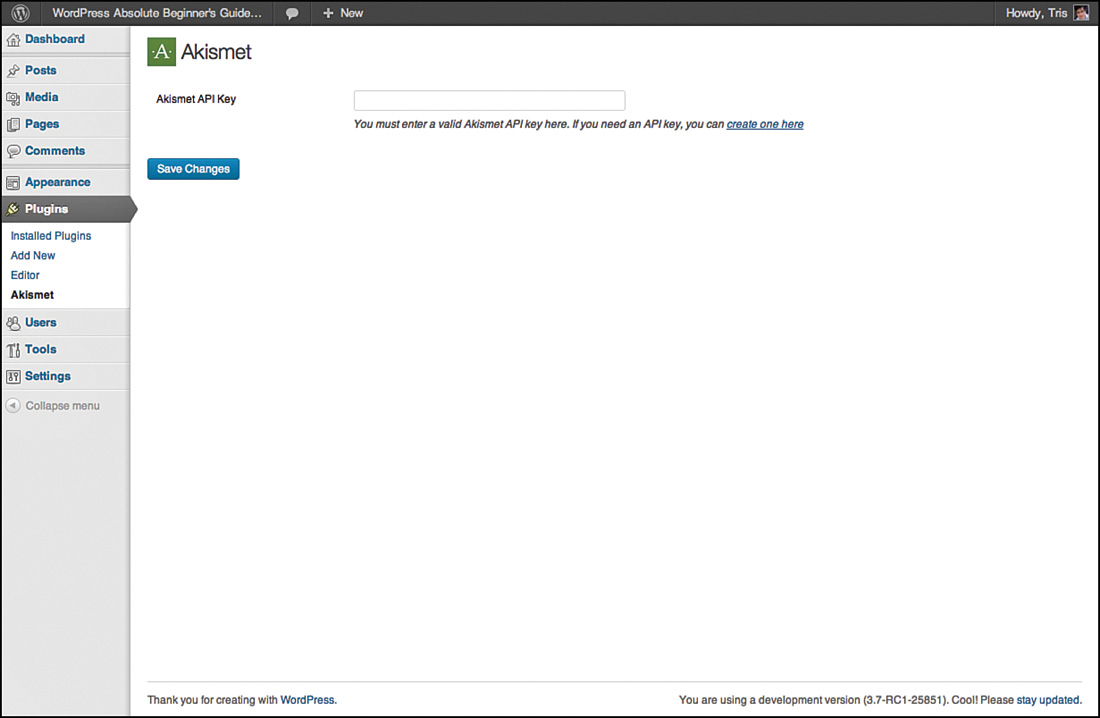
If the key is valid, you should see a page similar to Figure 6.19. That’s it! Akismet should be ready and running, and you won’t have to think about it again.
Setting the Right User Roles
In Chapter 3, “Installing WordPress,” I talked briefly about users and user roles. Now I’m going to delve a little deeper into the topic and give you the full story on how to create and manage users. First, here are the five main WordPress user roles/types:
• Administrator—Somebody who has access to all the administration features within a site.
• Editor—Somebody who can publish and manage posts, including the posts of other users.
• Author—Somebody who can publish and manage his or her own posts.
• Contributor—Somebody who can write and manage his or her own posts but cannot publish them.
• Subscriber—Somebody who can only manage his or her profile.
When you installed WordPress, the Administrator role was created for you. User number one is always an Administrator—at first. You can have more than one user given Administrator privileges on the site, but make sure the people who have these privileges need them and you can trust them not to break things. The Administrator role has enough privileges to do your site serious harm if used carelessly (or maliciously). Administrators can change all the settings, add and remove plugins, add and remove themes, and create and delete content. Administrators can do everything on the website. I’ve worked with a lot of people who’ve set all the people who need to post or contribute to a site with Administrator (or Admin, for short) privileges. One of the first things I suggested was to audit who needs to do what and adjust their roles as needed. Because Admins can do everything on a site, and that’s not always a good idea, who should have the previously described roles? First let’s look at the user-creation process; then we’ll talk about the promoting and demoting aspect of this.
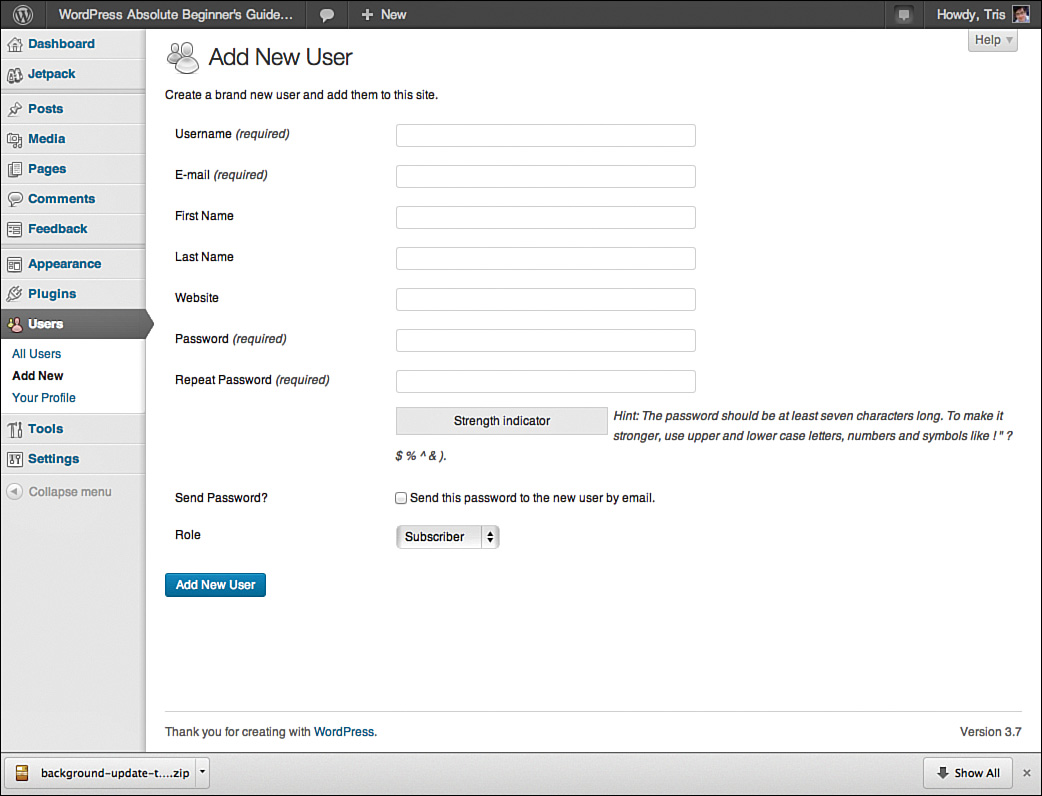
From the Dashboard, pass your mouse pointer over the Users button, and from the fly-out menu, choose New User (Figure 6.23).

The Add New User screen (Figure 6.24) is straightforward, and the only things you need to set right now are the user’s email address, username (you can use capitals and spaces, so “Tris Hussey” is an acceptable username), the password, and role. Although WordPress 3.7 brought in a better password strength meter, there isn’t an option for a random password to be assigned for the user. If you’re the sort who’d like your site to be secure, using good, strong passwords is a must. I use a random password generator through my password manager program, but if you don’t have access to one of those, here are three places you can generate random passwords for users:
• RANDOM.ORG—Password Generator (random.org)
• Norton Identity Safe Password Generator (https://identitysafe.norton.com/password-generator)
• Symantec/PCTools Password Generator (http://www.pctools.com/guides/password/)
I also check the box to have the password emailed to the user. The only downside to that approach is that the email doesn’t include the URL to log in to the site (which is http://[siteurl]/wp-login.php—that is, http://abgwp.trishussey.com/wp-login.php). Which means you either send two emails to each user or one email, but you send it manually. I’d go for the latter option in many cases, unless you’re dealing with people who are old hands at WordPress and will be able to figure out where to go.
Now let’s talk about who should have which roles on your site. Admins should only be the people who need to change settings, manage updates, install plugins, install themes, manage users, and have the final say over content. On most sites, this should be one or two people (maybe three). Just having one admin (and if the rest of the team doesn’t know the login) is too risky for me. I like to plan for the “hit by a bus” scenario; there needs to be a backup to the admin in case something goes wrong and the primary admin isn’t available. Yes, for your own personal site, this is overkill, but for a company or group, it’s absolutely critical to have a backup admin, even if that backup admin is there only for emergencies.
The Editor role is what even admins only need to use day-to-day. Editors have complete control over all the content on the site. They can publish (or unpublish) content from any user on the site. The person in this role can be trusted that when content is published live, it is good, has been proofread, and is acceptable. You can have multiple editors, of course. For a lot of sites, this is probably a handful of people you trust with content decisions, but not with administering the website. I tend to set the boss as Editor so she feels in control of all the content, but can’t accidentally do something to completely break the site.
There is a good case to be made—and a common security recommendation—that even for a personal site, you should log in to an admin account only when you need to administer things (updates, settings, and so on) and use an editor account the rest of the time. I’ve tried this myself and find the switching back and forth to be too much of a hassle. Usually when I’m running a site, I’m doing admin things pretty often (especially plugin updates), so the back and forth thing doesn’t work for me—which means that I have to be extra careful with my passwords and how (and where) I log in to my site.
The Author role is for people you trust to be able to write and post content on their own, without an Editor needing to give it a once over first. This is a standard, general role for most site users. If you work in a team where everyone needs to be able to work on all the content, you’ll have fewer Authors than Editors, but if you have just a core of writers, the Author role is perfect. Authors can manage only their own content, not other Authors or Contributors.
Contributors can write whatever they please, but the content can’t be published until an Editor or Admin does it. This is the kind of role you use for writers who need to have a quick read of their posts before they go live.
Subscribers are “members” of the site, but can’t create content at all. They are just readers/viewers of the site. If you’re creating a private site, which I’ll talk about in Chapter 17, “Advanced WordPress Settings and Uses,” this role will let people in to read the content of the site.
If you need to change someone’s role, first click All Users under Users (or just click the Users button itself). Then click the Edit Link that appears when you pass your mouse pointer under the user’s name. Figure 6.25 shows the top of the Edit User screen.
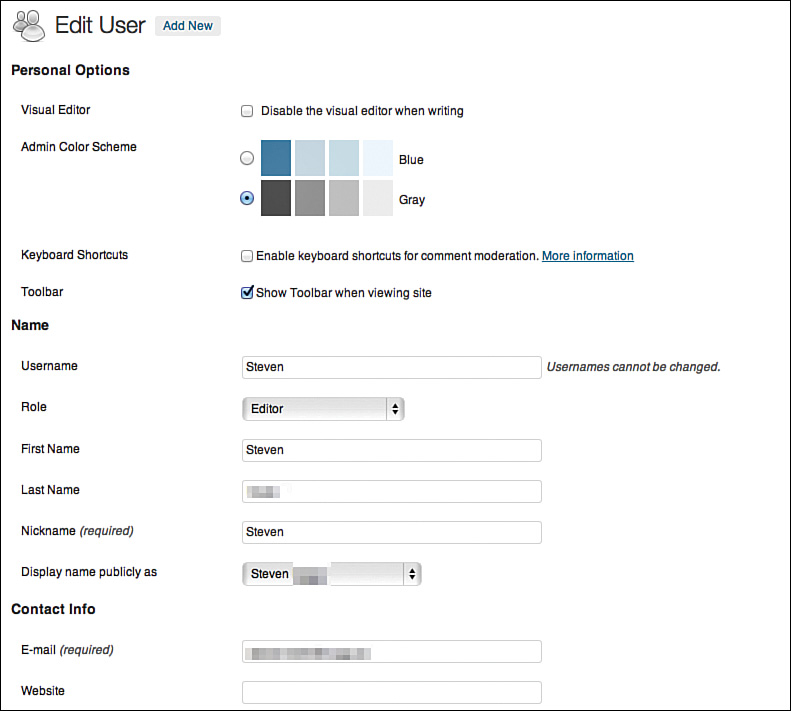
From this screen, you can edit everything about the user that you need to—as long as you’re an admin. As an admin, if you need to demote another admin, you can do that as well, but you can’t demote yourself from being an admin. You can change anything else about your user profile, except your own role.
The rest of the Edit User screen (or Edit Profile, if you’re editing your own account) covers things like what color scheme you’d like to use for the Dashboard, your nickname, how to show your name publicly, website, and bio. Other plugins add fields like Twitter ID, Google+ profile, and other social media links. At the bare minimum, I’d have people make sure their first name, last name, nickname, and how to display their name on the site are all set.
That’s all about users in a nutshell. As the admin, you can reset people’s passwords, delete them, and do all sorts of things. Use that power wisely or you might wind up with your site in a world of hurt.
Conclusion
This chapter is just the first part in a settings chapter trilogy that sets the stage for you to have a really great site. In this chapter, I’ve covered the basic settings you need to get going. If you were to stop here and jump ahead, you’d be okay for a while—we have the important, basic things all covered. The next two chapters start to dig into the nitty gritty of setting your site up the right way—the first time. In Chapter 7, “Setting Up Your WordPress Site the Right Way: SEO, Social Media, and More,” I’ll cover making sure your site is found and indexed by search engines, how to connect your site to social media, how to make your site load as fast as possible, and finally, include a little discussion about backup and security. Chapter 8, “All About Jetpack Settings,” is all about the very powerful—and a little controversial—plugin Jetpack by WordPress.com. Yes, a whole chapter on a single plugin. The funny thing is, I cover only the best parts of the plugin in the chapter. There is so much more to the plugin that it could have a book all its own.
So we’ve got the basic settings done, and I’m sure you’re ready for more tweaking and tuning. So—on with the next chapter in the settings trilogy: SEO, social media, and more.