
8. All About Jetpack Settings
In This Chapter
• Setting up the Jetpack plugin
• Using some of the most popular Jetpack functions
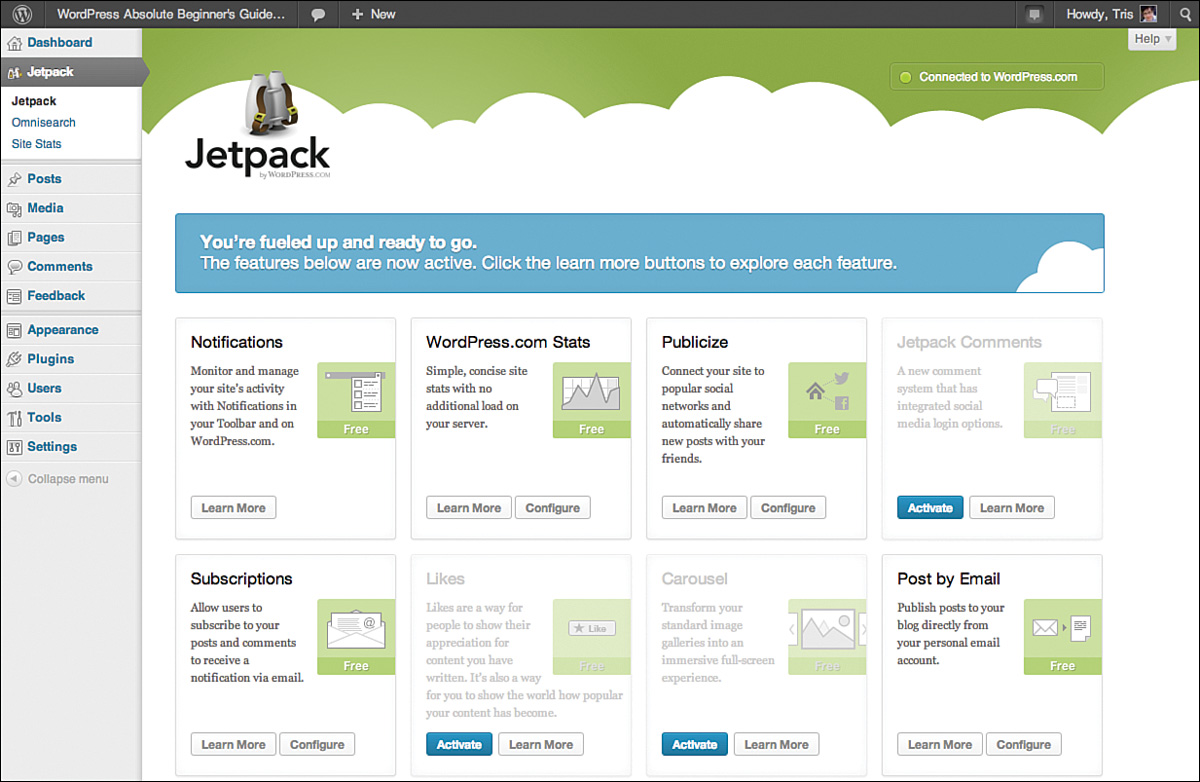
Jetpack from Automattic is a plugin designed to allow DIY WordPress users to have many of the same features found on WordPress.com—all built in to one plugin. This makes Jetpack very powerful, very complex, and, potentially, something that could slow down your site. Remember, all plugins come with a cost. Every plugin you install requires server resources to run. Using a lot of plugins might not only use more resources than your web host allocated to you (and believe me, your host will let you know when that happens), but your website might load a lot slower than you’d like. This is what makes Jetpack a very interesting plugin to discuss. On one hand, it can replace an easy half-dozen other plugins (mark in the plus column). On the other hand, because it is so large and complex, it can put a drain on your site—if you try to turn on all of its features. Figure 8.1 shows just the top third of the Jetpack options screen. There are two more screens full of options below that one.
Let’s back up for a moment and talk about what happens when you first activate Jetpack on your site. Figure 8.2 shows the handy message that you see at the top of the Plugins page (and throughout the rest of your site until you complete the next steps).
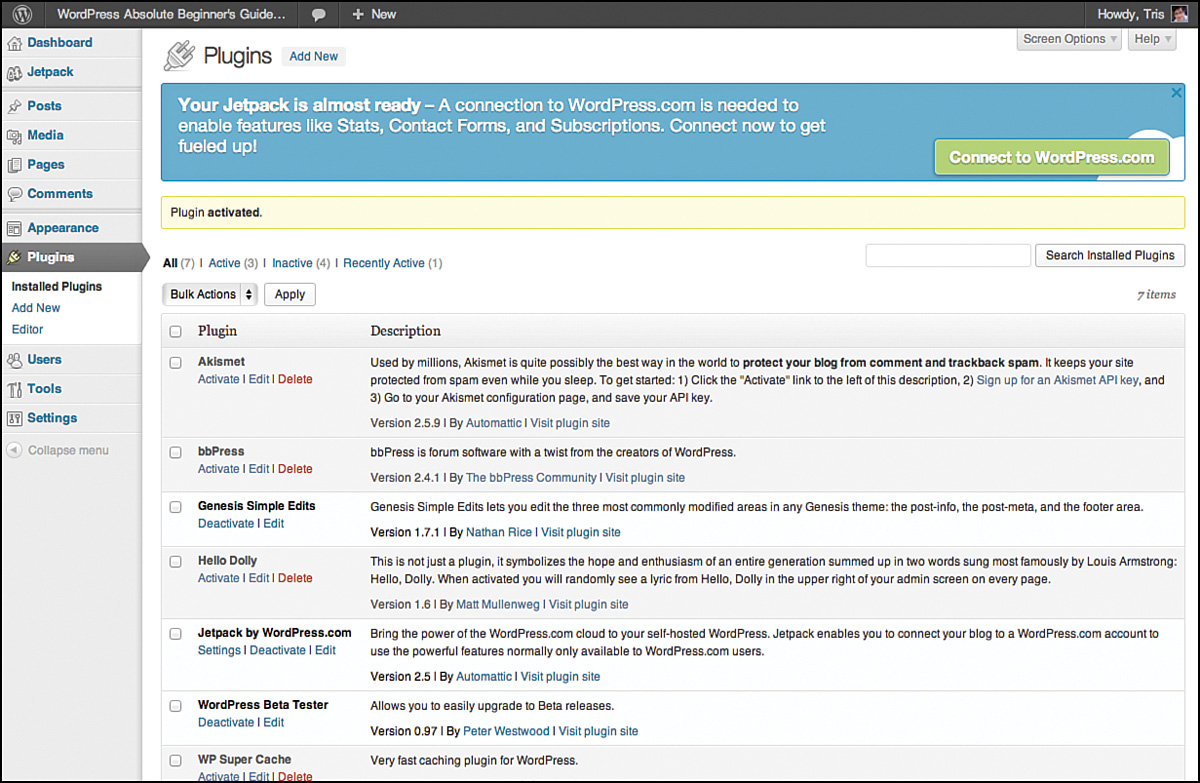
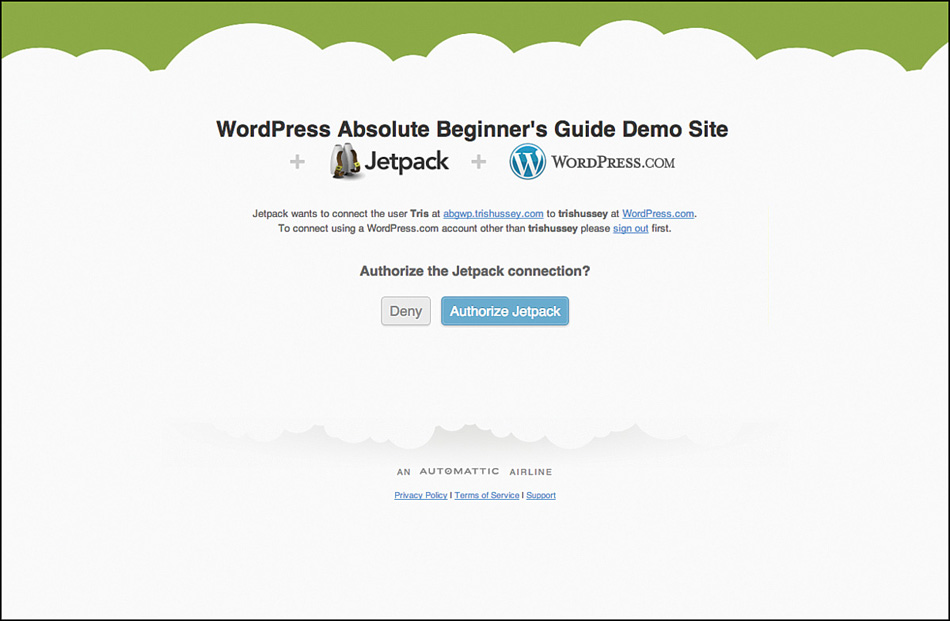
When you click the button, you’ll be asked to log in to your WordPress.com account. Don’t have one? Well, you should. It’s very handy for this kind of thing, and for being able to experiment with WordPress.com if you feel like it. After you’re logged in to WordPress.com, you’ll be asked to authorize Jetpack (Figure 8.2) (on that site—you can use Jetpack on as many sites as you’d like) to connect to your account. After you’re connected, come back to your site and you’ll see Figure 8.3.
Now comes the hard part: settings. It’s not that any of the settings are terribly hard to use or even configure—it’s that there are so many that discussing them all could be a book all to itself! Rather than discuss all the features of Jetpack, I’m going to cover in detail only a few of the most common (and handy) features. For more details, I encourage you to visit www.Jetpack.me. Even giving you a simple list of all the features isn’t easy—new features are constantly being added to Jetpack to make it more powerful and useful.
Here are the features that Jetpack includes as of this writing (from the Jetpack.me FAQ):
• Beautiful Math—Mark up your posts with the LaTeX markup language, perfect for complex mathematical equations and other über-geekery.
• Carousel—Transform your standard image galleries into an immersive full-screen experience.
• Comments—Give your readers the capability to comment using their WordPress.com, Twitter, or Facebook accounts.
• Contact Form—Insert a contact form anywhere on your site.
• Custom CSS—Customize your site’s look without modifying your theme.
• Enhanced Distribution—Share your public posts and comments to search engines and other services in real-time.
• Extra Sidebar Widgets—Add images, Twitter streams, and your site’s RSS links to your sidebar.
• Featured Content—The Featured Content module allows you to display specific posts in a highlighted area on your site’s home page, letting you draw attention to your most important content.
• Google+ Profile—Show a link to your Google+ in the sharing area of your posts and add your blog URL to your Google+ profile.
• Gravatar Hovercards—Show a pop-up business card of your users’ Gravatar profiles in comments.
• Infinite Scroll—Learn how to add infinite scroll support to your theme.
• JSON API—Allow applications to securely access your content through the cloud.
• Likes—Likes are a way for people to show their appreciation for content you have written. It’s also a way for you to show the world how popular your content has become.
• Mobile Push Notifications—Get notified of new comments on your Apple device.
• Mobile Theme—Optimize your site for mobile devices.
• Omnisearch—Search once, get results from everything! Omnisearch is a single search box that lets you search many things.
• Photon—Accelerate your site by loading images from the WordPress.com CDN.
• Post by Email—Post by Email is a way of publishing posts on your blog by email. Any email client can be used to send the email, allowing you to publish quickly and easily from devices such as cell phones.
• Publicize—Publicize makes it easy to share your site’s posts on several social media networks automatically when you publish a new post.
• Social Links—This module is a canonical source, based on Publicize, that themes can use to let users specify where social icons should link to.
• Sharing—Share your content on Facebook, Twitter, and more with a few simple clicks.
• Shortcode Embeds—Embed content from YouTube, Vimeo, SlideShare, and more into your site, no coding necessary.
• Spelling and Grammar—Improve your spelling, style, and grammar with the After the Deadline proofreading service.
• Subscriptions—Allow users to subscribe to your posts and comments to receive notifications via email.
• Tiled Galleries—Display your image galleries in three new styles: a rectangular mosaic, a square mosaic, and a circular grid.
• Toolbar Notifications—Get notified of activity on your site, right from the toolbar.
• Widget Visibility—Control what pages your widgets appear on.
• WordPress.com Connect—Let users log in with their WordPress.com credentials, through WordPress.com Connect.
• WordPress.com Stats—Monitor your stats with clear, concise reports and no additional load on your server.
• WP.me Shortlinks—Enable WP.me-powered shortlinks for all your posts and pages for easier sharing.
Yeah, wow. I’m going to talk about the features that I think you will get the most out of and you might have questions about. Many of the settings for these options are merged with other settings (for example, Gravatar Hovercards is found under Discussion), so when I cover the settings for these, if you think you’re seeing some familiar screens—you are. I’ve also grouped some of these options together that have separate tiles on the Jetpack screen (Publicize, Sharing, and Google+ specifically) but all go to the same settings screen for configuration. One final note, although it says on the Jetpack.me FAQ:
I don’t want to use all the features. Can I turn some of them off?
Sure! You can deactivate any feature you don’t feel like using, and reactivate it at any time.
To turn specific features off, first head to the main Jetpack page in your dashboard. In the box explaining the feature you’d like to turn off, click the ‘Learn More’ button. A ‘Deactivate’ button will appear. Click that button and that feature will be completely deactivated.
This isn’t entirely true. You can’t, for example, disable WordPress.com Stats without turning off Jetpack entirely. Which means that if you have Jetpack enabled, you will have some features loading on your site whether you want (or need) them or not. This “feature” has caused a bit of controversy within the WordPress community because sometimes new features (that you can’t disable) conflict with a critical plugin or your theme. Mark Jaquith wrote a plugin to help prevent new Jetpack features from automatically turning on when they are introduced (http://wordpress.org/plugins/manual-control/). It doesn’t, however, give you the capability to manually turn features off that don’t appear to have an off switch.
WordPress.com Stats
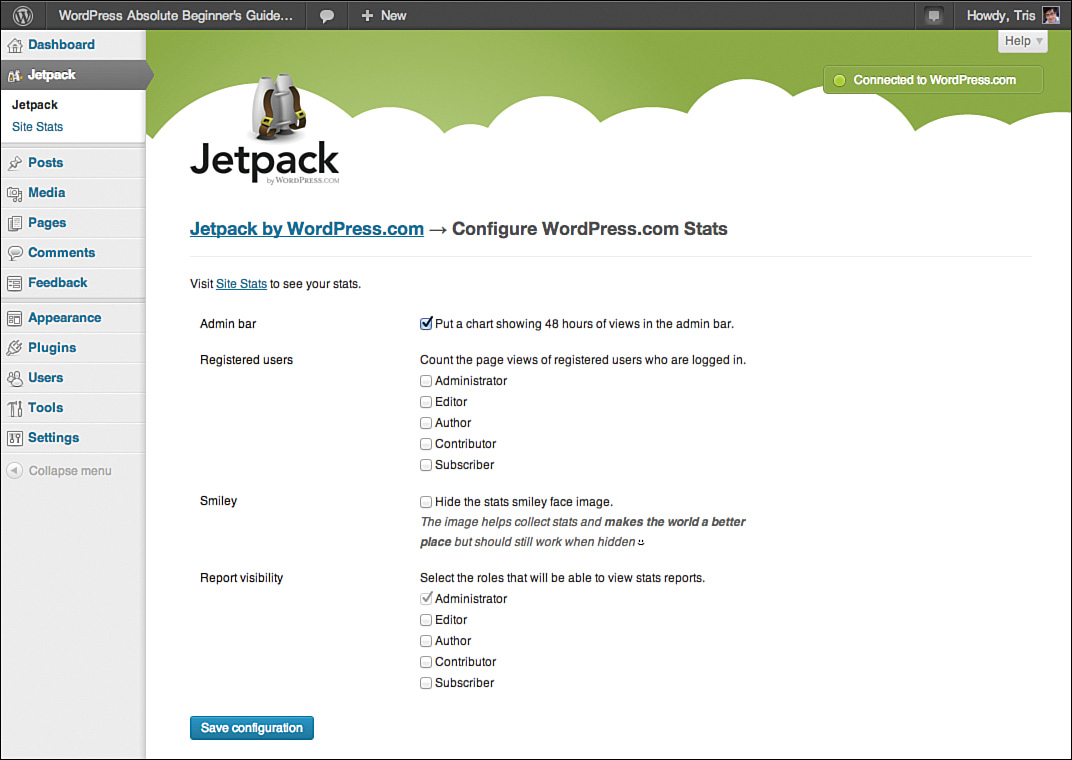
A few features of Jetpack are well worth the price of admission, and WordPress.com Stats is one of them. WP.com stats are simple, elegant, and live so you can see moment to moment what the traffic is like on your site without having to leave the Dashboard. I’ll talk in more detail about stats and tracking later in this chapter, but as far as WP.com stats goes, there isn’t much to configure. The only thing you might need to adjust is which logged-in users to count and who can see the stats (Figure 8.4). Why might you want to count logged-in users? Because if you’re running a membership website or a WordPress site using bbPress (the forum plugin), those users are logged in, but you’d still like to know what they do and see on the site. WP.com Stats is an elegant stats package that works nicely on its own, but is also a nice complement to the tremendous amount of detail that you get from products like Google Analytics.
Publicize and Sharing
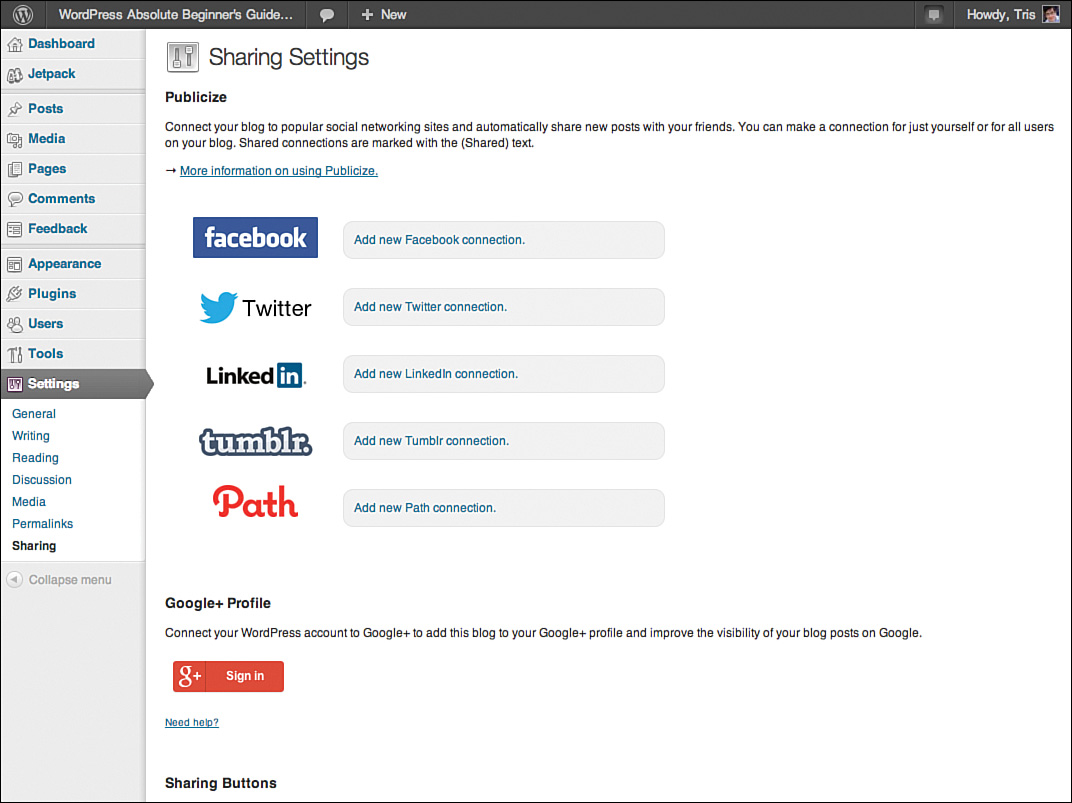
Another of the awesome features of Jetpack is how smoothly and easily it allows you to connect your site to your various social media profiles and let your visitors share your posts on social media sites. Figure 8.5 shows the top half of the Sharing settings screen where you click the button next to the service you want to add, go through the steps required (for most sites, this just means logging into the site and clicking an Authorize button), and you’re done! Connecting Google+ is a little different and means something different than the other connections. For Twitter, Facebook, and LinkedIn, the connection is used to allow you to automatically post new Posts to your profile on those social networks. For Google+ (or G+) it’s to claim authorship on Google for the posts you write on the site. Don’t worry, if you have more than one author on your site, each person can claim authorship of his or her posts as well. Why would you bother to do this? For better Google search results on the posts you’ve written. Figure 8.6 shows what a Google search result that found one of my posts looks like.

Not too shabby. My name, picture, and other profile information are all right there for searchers to see and use.
The bottom half of the Sharing screen powered by Jetpack is all about helping people share your posts and pages on social networks (Figure 8.7). Just drag the service icons you want to the area below (noted with Drag and Drop Available Services Here) in the order you want them; then save them, and you’re done. I like to keep the number of visible searches pretty tight (for my site, I focus on Twitter, Facebook, LinkedIn, and email) and place the extras in the other box to appear as a Share menu. You can experiment for yourself which services are used the most by your visitors and adjust accordingly. WP.com stats can help you determine which services are working best for you.
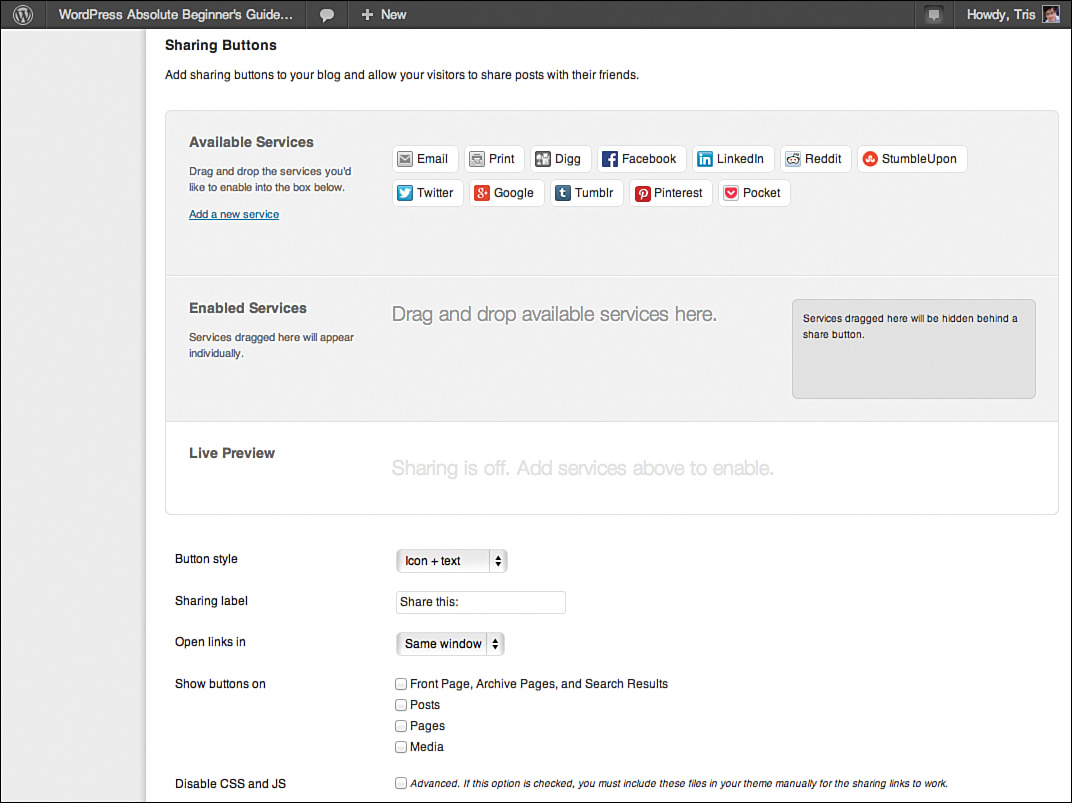
Below the button layout area are the settings for where the sharing buttons should appear on your Posts and Pages and what they should look like. As you change the settings, you can see a preview of the layout before you click Save Changes and seal the deal. Personally I have sharing buttons only on Posts, not on the Front Page, Pages, or Archives. Why? Because I only want people to share posts, and because my home page shows only an excerpt of the post, it doesn’t make sense for sharing to happen before someone reads the entire post. But that’s just me. The beauty of these kinds of settings is that you can try different ones and measure the results for yourself. My suggestion is to start off with the settings that you think look and feel right to you. Then keep track of the results through WordPress.com Stats or Google Analytics and adjust if you need to. The most important thing is just having social media sharing options available. Sharing content through social media is essential to the success of any website.
Subscriptions
Although we geeks might think everyone should use RSS to receive updates from our favorite sites and blogs, the majority of people either visit the site manually, see it on Facebook, see it on Twitter, or receive an email when there is new content. This is why Subscriptions is a popular Jetpack feature that many blogs can’t live without. Subscriptions makes it easy—just fill in your email address and click—for site visitors to receive an email whenever you publish a new post (remember we still have to talk about Posts versus Pages, but this is one of the key differences; new Posts are included in RSS and Subscriptions, but Pages aren’t). The settings (there are only a couple) for Subscriptions are under Discussion settings right at the bottom below Avatars (Figure 8.8).
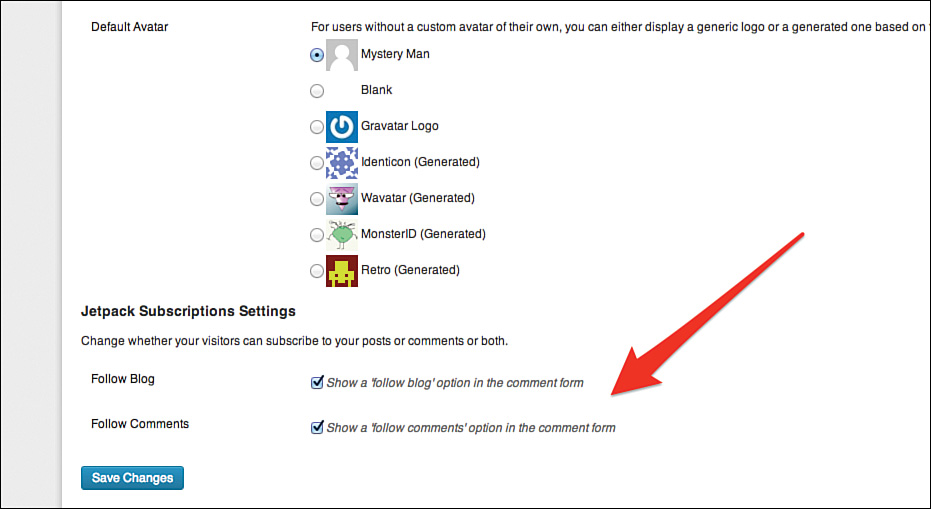
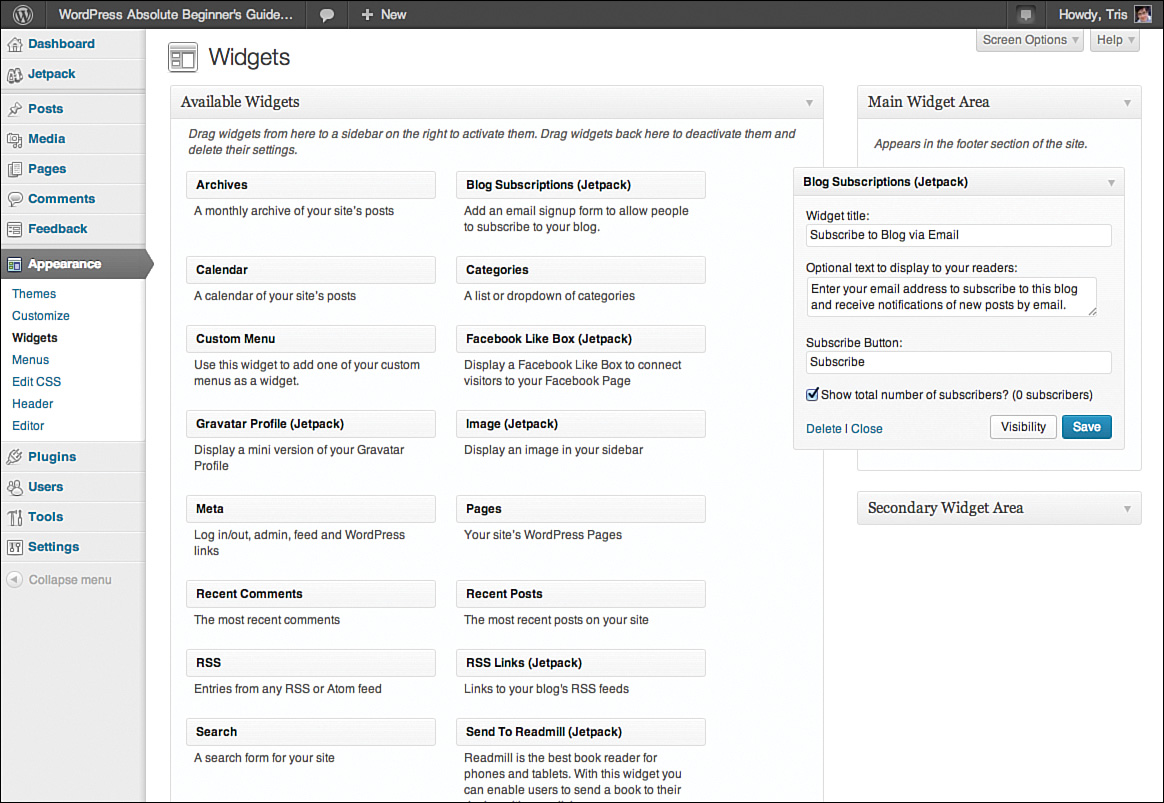
These check boxes allow for readers to sign up for updates when they are leaving a comment on one of your Posts (or Pages). To allow visitors who aren’t leaving a comment to subscribe, you need to use the Blog Subscriptions widget. We’ll talk about using widgets in Chapter 10, “Tweaking, Tuning, and Customizing Your WordPress Site,” but Figure 8.9 shows you the options available in the widget. Essentially the settings are the title, what message you’d like to entice potential readers with, the text for the button, and if you’d like to show the number of people who subscribe to the site (I’d opt for no on that, unless you have thousands of subscribers).
Subscriptions are an easy way to encourage more people to receive updates from your site. Again, one of the modules that is worth the price of admission to Jetpack.
Likes
If you’d like to have star ratings below your posts, activating Likes is the way to do it. Likes is one of the Jetpack modules that you have to activate before you can use them (unlike Stats, Subscriptions, and others), and after you do, the settings appear under the Sharing settings screen (Figure 8.10).
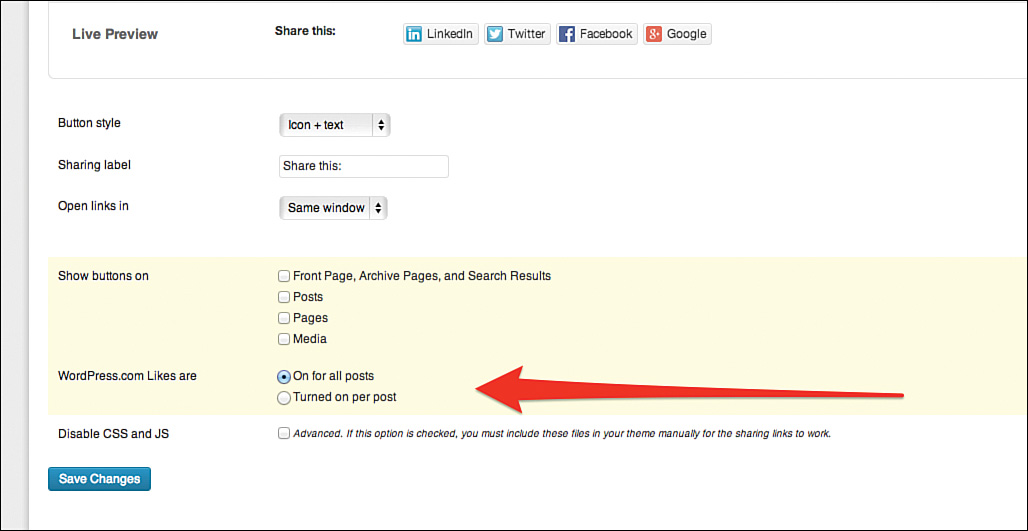
Again, these are very simple settings, either on for all posts or on a post-by-post basis. My take on Likes is that if you have an audience who will Like your posts on a regular basis, great. If not, it’s another thing cluttering up your posts that might draw people’s attention away from the content. (Read: Gee, no one has Liked this post—maybe it isn’t very good.)
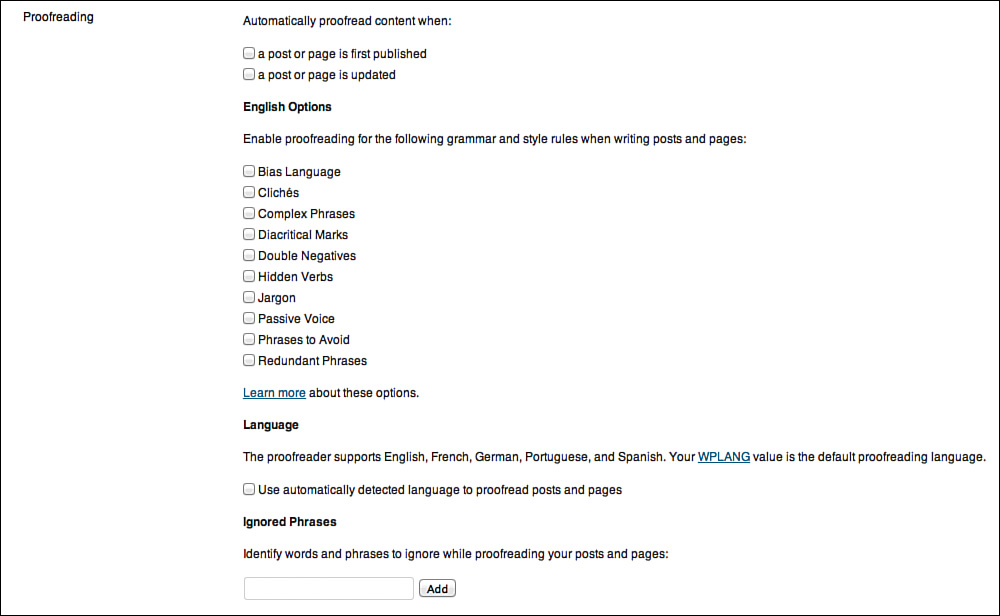
Spelling and Grammar
Some people don’t need spell check. Some people don’t need to be reminded of grammar rules. Then there’s the remaining 99% of writers. The spelling and grammar tool takes the built-in spell check and includes grammar and proofreading options powered by After The Deadline (http://www.afterthedeadline.com/). What is checked (beyond spelling) is enabled on a user-by-user basis on the user’s profile page (Figure 8.11). I’m not saying that I’m great at proofreading, grammar, or editing (the editors of this book can attest to that!), but I didn’t find the suggestions helpful. Probably because I’m a writer and I think my way is right. I have my own style, quirks, and “Tris-isms” that I like to spice my writing with. Other writers—especially beginning writers—might appreciate the safety net of some proofreading help. There is no harm in trying a few of the settings to see whether they are a help or a hindrance.
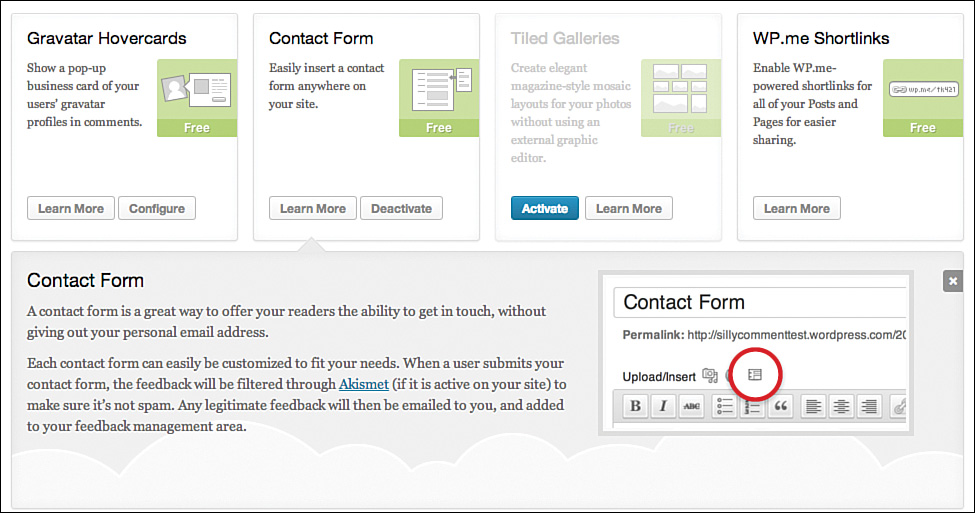
Contact Form
Having a contact form on your website is critical to people running websites for a business. If you don’t need to hear from your readers, you might not need this. However, because more and more people are using WordPress to power their business sites, the contact form tool is essential. Creating contact forms (or any form) can be maddening. Getting the right short codes, creating the page, embedding the form—although there are plugins that make it pretty simple, there’s nothing like Jetpack Contact form for making it just plain simple (Figure 8.12). Contact form is one of the Jetpack features that is automatically on when you activate Jetpack—which also means you can’t disable it, either. The feature is made up of two parts. One is the button in the Editor to allow you to create and insert a contact form into a post or page (my preference is page, but it doesn’t matter which you choose); the other is the Feedbacks section of the Dashboard, which will gather all the contact form submissions in one place (in addition to them being emailed to you).
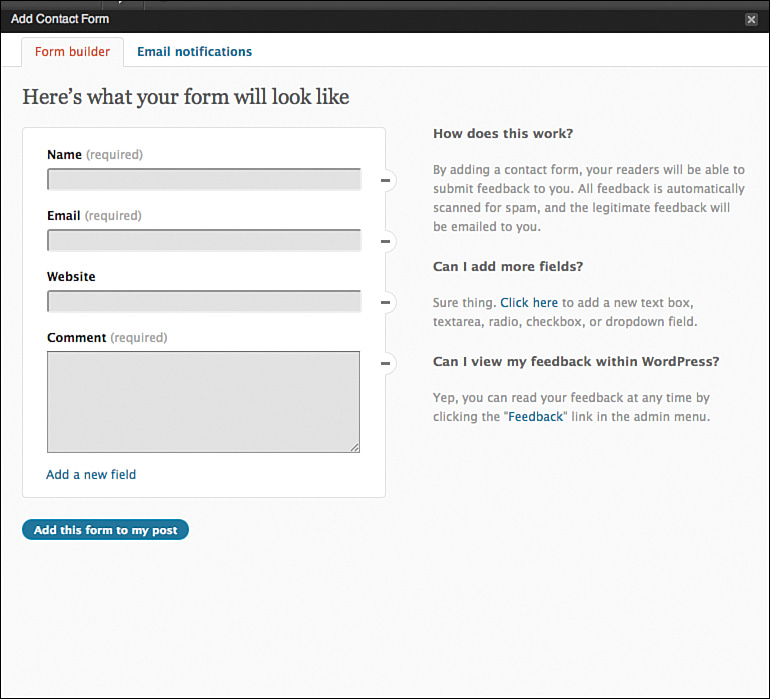
As I said, inserting a form is about as drop-dead easy as it can get. In the Editor window—don’t worry, we’ll get further into this in Chapter 11, “Using WordPress: Content”—click the Add Contact Form button; then, if the default fields are okay with you, click Add This Form to My Post. If you need to add, remove, or reorder the fields, you can do that before you insert the form (Figure 8.13). The code for the form looks pretty intense at first, but on closer inspection, it does make sense. Don’t worry about that, though; if you’re done, click Publish and the result should look something like Figure 8.14.
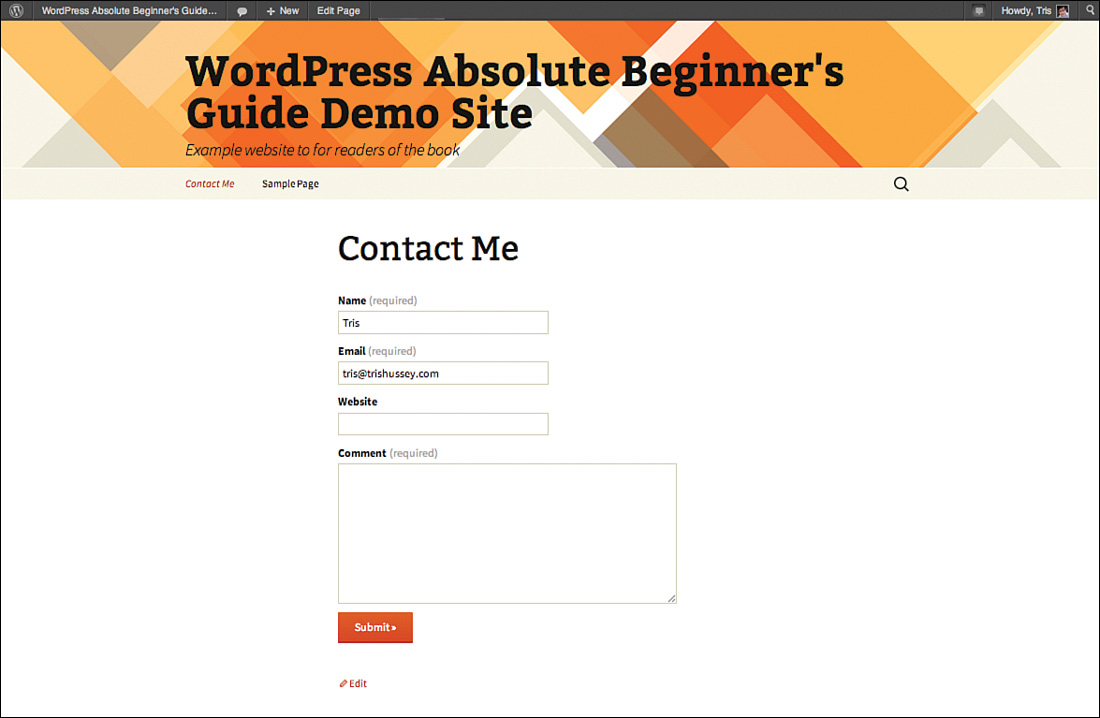
As I mentioned previously, when the contact form is submitted (and after it passes through Akismet to make sure the submission isn’t spam), you’ll be emailed the submission, and all of the submissions will be gathered together in the Feedback section of the Dashboard (Figure 8.15).
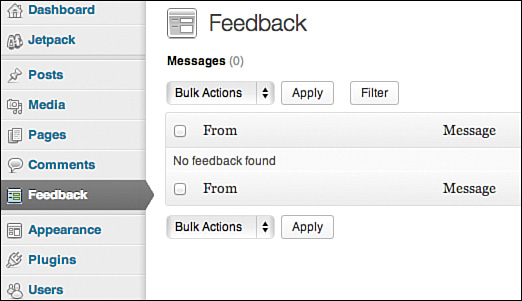
I don’t think there is a simpler way to collect and gather feedback on your site. Jetpack Contact forms might not be the most full-featured of contact tools out there, but it is certainly the simplest one I’ve ever used.
WP.me Shortlinks
Since Twitter emerged on the scene in 2006, people suddenly became aware of how long their links were. When you only have 140 characters to say your piece, having a URL like http://www.trishussey.com/watch-contribute-and-create-a-story-about-vancouver/ is really long, which is why link shorteners were invented. All link shorteners do is create a shorter form of that link (usually with a really short domain like wp.me) that still points to the original post so you can post to Twitter or other social networks (short links also tend to look tidier, as well). For example, the shortlink for the contact form page in Figure 8.14 is http://wp.me/P3YUcF-k. The Get Shortlink button is available in the Editor with or without Jetpack. Without Jetpack, the post on my site above has a shortlink of http://www.trishussey.com/?p=4593, which is really the post’s unique ID number assigned to it when it was created (all posts, pages, categories, and tags have to have a unique id number within the database or things get broken). With Jetpack, the URL is passed through WordPress.com (if you just enter wp.me in your browser’s address bar, that’s where you end up) and is given a unique URL only associated with that post—forever.
Shortcodes
If you frequently embed videos, images, or other media from other sites into your posts or pages, shortcodes will make your life much easier. In Chapter 12, “Using WordPress: Images, Videos, and Other Media,” I’ll talk more about inserting media and the magic of oEmbed, but for right now, this is what you need to know. WordPress will automatically insert and correctly embed videos, images, and many other types of media natively. For many sites, you only need to have to put the URL of the media on its own line in a post or page. This will put that media there and format it according to your site’s theme style. However, if you’d like more control over how the media is embedded, shortcodes will let you control many aspects of the final result. Figure 8.16 shows you all the currently supported media services you can use shortcodes for.
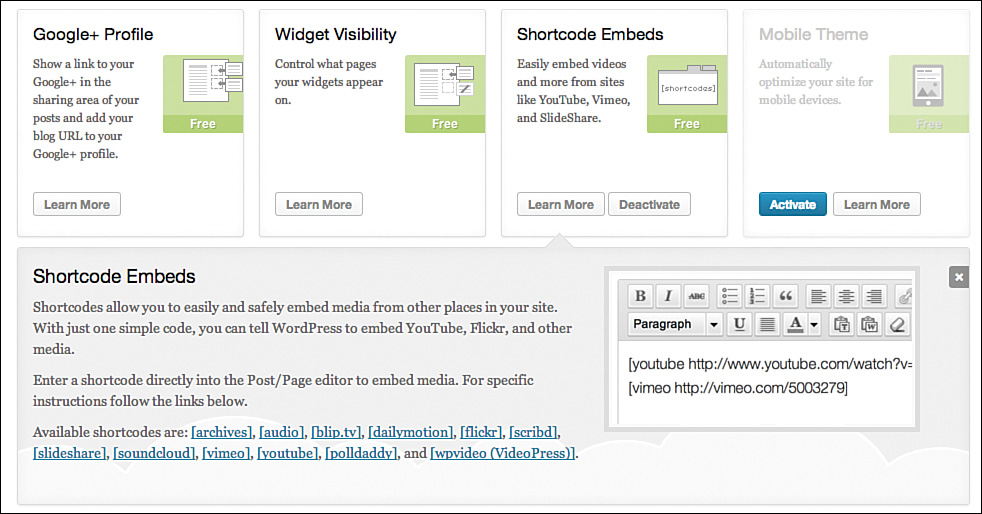
That’s a lot of services! Some of them you might not have even heard of, but you’ve probably heard of YouTube, and when you click the link within the Jetpack screen, you come to a page on WordPress.com (http://en.support.wordpress.com/videos/youtube/) that tells you all you need to know about shortcode embeds for YouTube. Following is a quick reference list from the page with some of the common things people like to do with YouTube videos:
• To embed the video with default width and height adapted to your theme: [youtube=http://www.youtube.com/watch?v=JaNH56Vpg-A]
• To specify the width and height explicitly: [youtube=http://www.youtube.com/watch?v=JaNH56Vpg-A&w=320&h=240]
• To specify the width only: [youtube=http://www.youtube.com/watch?v=JaNH56Vpg-A&w=320]
• To hide the related videos from appearing after the video is done: [youtube=http://www.youtube.com/watch?v=JaNH56Vpg-A&rel=0]
• To start at a certain point in the video, convert the time of that point from minutes and seconds to all seconds, then add that number as shown (using an example start point of 1 minute 15 seconds): [youtube=http://www.youtube.com/watch?v=JaNH56Vpg-A&start=75]
• To specify a start and end time for a video, do the same as the above but add the end time as shown: [youtube=http://www.youtube.com/watch?v=JaNH56Vpg-A&start=75&end=85]
There are similar support pages for each of the supported services. More sites are being added all the time, so by the time you are reading this, there are probably several more services that you can use shortcodes with.
 NOTE
NOTE
Just because a service doesn’t have a shortcode, it doesn’t mean you can’t embed its media into your posts or pages. Many sites without shortcodes support oEmbed (more on that in Chapter 12) or have their own way to embed media.
NOTE
What if I don’t want to use Jetpack? Will I still be able to insert media?
Yes, absolutely! Jetpack just makes the embedding functions a little easier. WordPress has extensive support for media embedding even without Jetpack installed.
Shortcodes can be very convenient for people who embed a lot of media. For folks who don’t, it’s not a big deal, except that this is another of the Jetpack features that is turned on by default and you can’t turn off.
Custom CSS
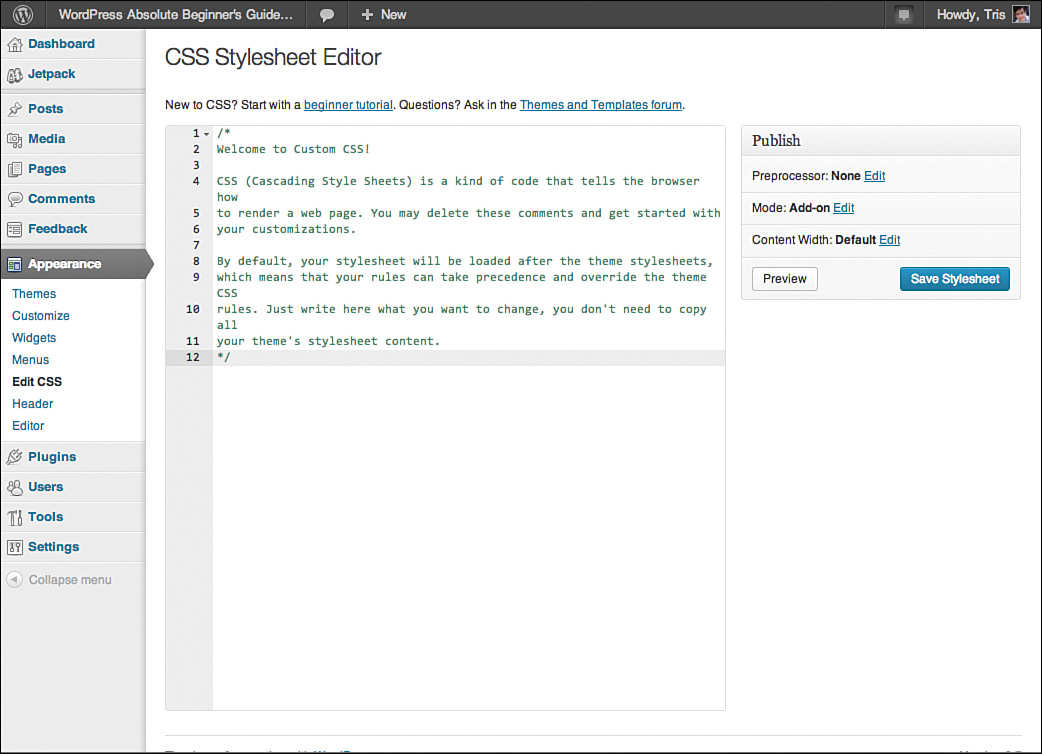
Cascading Style Sheets (CSS) are what give themes their look and feel (colors, fonts, font sizes, how links look, how images are placed). Changing the style of your theme isn’t terribly hard, and I’ll cover some of the easier ways to do this in Chapter 16, “Customizations Without (Much) Coding.” What this Jetpack module does is help you make changes to your theme without editing the files themselves. Why is this a big deal? Because if your theme is updated, and you’ve edited the actual files for the theme (again, Chapter 16), when you run the update, you will likely lose all your customizations. Royal pain doesn’t even scratch the surface of the headache this causes. The Custom CSS module solves this problem by storing your customizations separately from your theme. When the theme is updated, your changes are preserved. Figure 8.17 shows you the Edit CSS screen (which you find under Appearance settings). We discuss what to do here and all the options in Chapter 9, “How WordPress Themes Work,” and Chapter 16.
If you don’t think you’ll need or want to use Custom CSS, you can disable it by clicking the Learn More button under Custom CSS in the Jetpack settings screen.
Extra Sidebar Widgets
In Chapter 10, we talk all about widgets, how to use them, and what they are good for (and not so good for). This Jetpack module, which can be disabled, adds four additional sidebar widgets to the default ones WordPress enables for all themes (and any widgets your theme might include, as well):
• The RSS Links widget lets you easily add post and comment RSS feeds to a sidebar on your theme.
• The Twitter widget shows your latest tweets within a sidebar on your theme.
• The Facebook Like Box widget shows your Facebook Like Box within a sidebar on your theme.
• The Image widget lets you easily add images to a sidebar on your theme.
These are all very handy widgets and ones that a lot of people want to have on their sites. There are ways to add all these widgets without using Jetpack, although it is certainly handy that they are bundled together in one plugin.
Photon
Everyone who has a site wants it to load quickly. It’s just a fact of being on the Internet. If a site doesn’t start loading in a couple seconds, you might not bother waiting around for it. In addition to the caching settings we covered in Chapter 7, “Setting Up Your WordPress Site the Right Way: SEO, Social Media, and More,” what Photon does is make copies of your uploaded images and use the massive network of servers that power WordPress.com to serve them to your site visitors. This is called a Content Delivery Network (CDN) where servers located around the world attempt to send your content to your visitor from a server physically closest to them. So Photon would serve a visitor in New York City your images from a server there (or close to there) and a visitor from San Francisco from a server there. The closer the server is to you, the faster it should load for you because Photon makes copies of your images and serves them instead of the ones from your server. There can be issues if you upload an image and then edit it. Photon wouldn’t have the latest version of the image on its servers.
Will this cause most people grief? No. Can Photon make your site faster? Yes. Noticeably? Maybe, it depends on if your site has a lot of images already. It can’t hurt to try, test, and see what (if any) improvement you see.
Conclusion
This section touched on only a fraction of the features and modules that Jetpack provides. If you look at the Jetpack screen and the list of all the modules from earlier, you can see this is a massive plugin. As we talked about in Chapter 4, “Installing WordPress Plugins,” you can have too many plugins. You can easily have plugins that conflict with each other and cause issues. You can add so many plugins that your site crashes or loads like molasses in February. Because Jetpack is such a massive plugin and has so many features that are turned on by default and can’t easily be disabled, it is a controversial plugin. Some folks love it. Some folks hate it. Some folks have a love-hate relationship with it. In the past, I’ve insisted that it be turned on for all the sites I manage. Now I’m more discerning about which sites need to run Jetpack and which ones don’t. For sites that absolutely must have the fastest load times possible, Jetpack is out of the question. The weight far outweighs the benefits. I don’t need many of the Jetpacks features on my personal site—at the moment—so I’ve deactivated it. Could I change my mind in the future? Very likely. It all depends on the new features added and if I can turn off the things I don’t need.