1
An Introduction to the X Window System
This chapter describes the features of a typical X display, while introducing some basic window system concepts. It also provides an overview of the X Window System's client-server architecture and briefly describes the most commonly used clients.
In This Chapter:
1
An Introduction to the X Window System
The X Window System, called X for short, is a network-based graphics window system that was developed at MIT in 1984. Several versions of X have been developed, the most recent of which is X Version 11 (X11), first released in 1987.
X11 has been adopted as an industry standard windowing system. X is supported by a consortium of industry leaders such as DEC, Hewlett-Packard, Sun, IBM, and AT&T that have united to direct, contribute to, and fund its continuing development. In addition to the system software development directed by the X Consortium, many independent developers are producing application software specifically for use with X, including spreadsheets, database programs, and publishing applications.
First, we'll take a look at a typical X display and consider some general system features. We'll also briefly compare a standard X application (written with the X Toolkit) to a Motif application (written with the Motif Toolkit). Then we'll discuss what distinguishes the X Window System from other window systems. We'll also introduce some of the more important programs included in the standard distribution of X, and the mwm window manager shipped with OSF/Motif.
Anatomy of an X Display
X is typically run on a workstation with a large screen (although it also runs on PCs and special X terminals, as well as on many larger systems). X allows you to work with multiple programs simultaneously, each in a separate window. The display in Figure 1-1 includes five windows.
The operations performed within a window can vary greatly, depending on the type of program running it. Certain windows accept input from the user: they may function as terminals, allow you to create graphics, etc. Other windows simply display information, such as the time of day or a picture of the characters in a particular font, etc.
The windows you will probably use most frequently are terminal emulators, windows that function as standard terminals. The terminal emulator included with the standard release of X is called xterm. Figure 1-1 depicts three xterm windows. In an xterm window, you can do anything you might do in a regular terminal: enter commands, run editing sessions, compile programs, etc.

The display in Figure 1-1 also includes two other application windows: a clock (called xclock) and a calculator (xcalc). X provides many such small utility programs—analogous to the so-called “desk accessories” of the Macintosh environment—intended to make your work easier.
The shaded area that fills the entire screen is called the root (or background) window. Application windows are displayed on top of this root window. X considers windows to be related to one another in a hierarchy, similar to a family tree. The root window is the root or origin within this hierarchy and is considered to be the parent of application windows displayed on it. Conversely, these application windows are called children of the root window. In Figure 1-1, the xterm, xclock, and xcalc windows are children of the root window.
As we'll see later, the window hierarchy is actually much more complicated than this “two generation” model suggests. Various parts of application windows are windows in their own right. For example, many applications provide menus to assist the user. Technically speaking, these menus are separate windows. Knowledge of the complexity of the window hierarchy (and the composite parts of an application) will become important when we discuss how to tailor an application to better suit your needs.
One of the strengths of a window system such as X is that you can have several processes going on simultaneously in several different windows. For example, in Figure 1-1, the user is logging in to a remote system in one xterm window and editing a text file in each of the two other xterm windows. (As we'll see in Chapter 5, The xterm Terminal Emulator, you can also cut and paste text between two windows.) Be aware, however, that you can only input to one window at a time.
Another strength of X is that it allows you to run programs on machines connected by a network. You can run a process on a remote machine while displaying the results on your own screen. You might want to access a remote machine for any number of reasons: to use a program or access information not available on your local system; to distribute the work load, etc. We'll discuss X's networking capabilities in more detail in the “X Architecture Overview” later in this chapter.
Now let's take another look at our sample display in Figure 1-1. Notice that the xterm windows overlap each other. Windows often overlap much like sheets of paper on your desk or a stack of cards. Be aware that overlapping does not interfere with the process run in each window. However, in order to really take advantage of windowing, you need to be able to move and modify the windows on your display. For example, if you want to work in a window that is partially covered by another window, you need to be able to raise the obscured window to the top of the window stack.
Window management functions are provided by a type of program called a window manager. The window manager controls the general operation of the window system, allowing you to change the size and position of windows on the display. You can reshuffle windows in a window stack, make windows larger or smaller, move them to other locations on the screen, etc. The window manager provides part of the user interface—to a large extent it controls the “look and feel” of the X Window System.
The window manager provided with OSF/Motif is called mwm, the Motif window manager. The most distinguishing feature of mwm is the “frame” it places around all windows on the display. Notice that each top-level application window in the illustration is surrounded by this frame. As we'll see, by clicking a mouse or other pointing device on various parts of the window frame, you can perform management functions on the window.
The mwm window frame is a composite of several parts, the most prominent of which are shown in Figure 1-2.
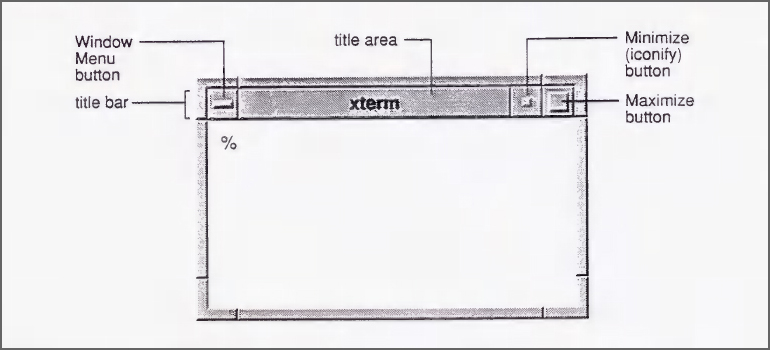
The top edge of the frame is wider than the other three edges and features most of the window management tools. This wide horizontal bar spanning the top of the window is known as a titlebar. The large central portion of this top edge is called the title area mainly because it contains a text description of the window. (Generally, this is the application name, but as we'll see later, you can often specify an alternate title.) The titlebar also features three command buttons whose functionality we'll discuss in Chapter 3 and Chapter 4. We'll also see how to use the sides and bottom of the frame to resize a window and to raise it to the top of the window stack.
mwm attempts to create a three-dimensional appearance, which is somewhat more aesthetic than the look provided by many other window managers. You'll probably notice that window frames, various command buttons, icons, etc., appear to be raised to varying heights above screen level. This illusion is created by subtle shading and gives many display features a “beveled” look, similar to the beveled style of some mirrors.
mwm is intended to be used with the OSF/Motif graphical user interface. For those not using Motif, there are several other window managers available in the market today. In the standard distribution of X from MIT (as of Release 4), the official window manager is called twm. (twm originally stood for “Tom's window manager,” in honor of its developer, Tom La-Strange. However, it has since been renamed the “tab window manager.”) The twm window manager provides a different “look and feel” than mwm. Rather than framing application windows, twm simply provides each window with a titlebar, different from the mwm titlebar in style, but offering similar window management functions. Earlier releases of X supported a third window manager, uwm, the “universal window manager,” which is still available as part of the user contributed part of the MIT X distribution. The contributed distribution includes several other window managers and still others are available commercially.
Aesthetics notwithstanding, one of the primary advantages mwm has over other window managers is inherent in the nature of a frame: it provides window management tools on four sides of the window. twm's titlebar is a useful window management tool, but a titlebar is often covered by other windows in the stack. In most cases at least a part of a window's frame should be visible—and thus accessible to the user.
Also pictured in Figure 1-1 is an icon. An icon is a small symbol that represents a window in an inactive state. The window manager allows you to convert windows to icons and icons back to windows. You may want to convert a window to an icon to save space on the display or to prevent input to that window. Each icon has a label, generally the name of the program that created the window. The icon in Figure 1-1 represents a fourth xterm window on the display. Icons can be moved around on the display, just like windows.
The contents of a window are not visible when the window has been converted to an icon but they are not lost. In fact, a client continues to run when its window has been iconified; if you iconify a terminal emulator client such as xterm, any programs running in the shell will also continue.
If you've used other window managers, you may notice that icon symbols generated by mwm are somewhat larger and more decorated. The detail on icons is another aesthetic advantage of mwm.
All X displays require you to have some sort of pointer, often a three-button mouse, with which you communicate information to the system. As you slide the pointer around on your desktop, a cursor symbol on the display follows the pointer's movement. For our purposes, we will refer to both the pointing device (e.g., a mouse) and the symbol that represents its location on the screen as pointers. Depending on where the pointer is on the screen (in an xterm window, in another application window, on the root window, etc.), it is represented by a variety of cursor symbols. If the pointer is positioned on the root window, it is generally represented by an X-shaped cursor, as in Figure 1-1. If the pointer is in an xterm window, it looks like an uppercase I and is commonly called an I-beam cursor.*
A complete list of standard X cursors is shown in Appendix D, Standard Cursors. OSF/Motif provides some additional cursors. Some of the most common standard cursor shapes, as well as two Motif-specific cursors, are shown in Figure 1-3. As we'll see later, some applications allow you to select the cursor to use.

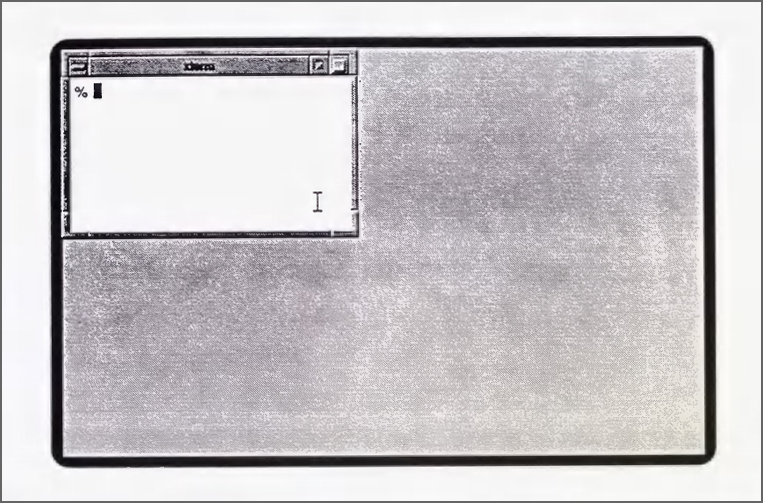
You use the pointer to manage windows and icons, to make selections in menus, and to select the window in which you want to input. You can't type in an xterm window until you select that window using the pointer. Directing input to a particular window is called focusing. When a window has the input focus, the window frame and the text cursor (if any) are highlighted, as in Figure 1-4. The window to which input is directed is often called the active window.
Be aware that the frame may be highlighted in different ways, depending on the version of mwm you are running and the color resources specified for your system. The frame may change from black to white, from grey to white, etc. In any case, the active window's frame will be a different color than the frames of all other windows on the display.
Most window managers require you to select the active window in one of two ways: either by moving the pointer so that it rests within the desired window or by clicking the pointer on the window. By default, the Motif window manager requires you to click the pointer on the window to which you want to direct input. This focusing style is commonly referred to as “click-to-type” or (“explicit focus”). However, as we'll see in Chapter 11, Customizing mwm, mwm can be customized to allow you to direct input focus simply by moving the pointer. This focusing style is commonly referred to as “real-estate-driven” (or “pointer focus”).
The twm window manager uses the real-estate-driven style: you direct input focus by moving the pointer into the desired window and leaving it there. As long as the pointer remains within the window's borders, the keystrokes you type will appear in that window (when the application accepts text input) or will somehow affect its operation (perhaps serve as commands). If you accidentally knock the pointer outside the window's borders, the keystrokes you type will not appear in that window or affect its operation. If you inadvertently move the pointer into another window, that window becomes the focus window. If you move the pointer onto the root window, the keystrokes are in effect lost—no application will interpret them.*
As previously mentioned, by default the Motif window manager uses the click-to-type focusing style: you must click the pointer on a window to focus input on that window. When you begin using X with mwm, you'll need to select the window to receive input by placing the pointer anywhere within the window and clicking the first (generally the leftmost) button. Once you select the focus window in this way, all input is directed to that window until you move the pointer and deliberately click on another window.
One of Motif's greatest strengths is that it allows you to choose the focus policy. This flexibility makes mwm a desirable choice for users with a variety of needs and work habits. As you might imagine, both focusing policies have their advantages. Click-to-type focus requires a little more work than pointer focus. (It's simpler to move the pointer than to move and click.) On the other hand, click-to-type focus is more precise—you can't inadvertently change the focus by moving the pointer.
We find click-to-type focus somewhat laborious. However, a touch typist, who is not inclined to look at the screen, might consider pointer focus too risky. It's possible to knock the pointer out of a window and lose a large amount of text before noticing. Another disadvantage of pointer focus is that it sometimes takes a moment for the input focus to catch up with the pointer, especially on slower machines. If you type right away, some keystrokes may end up in the window you left rather than in the new window. This is actually a bug that happens because of the additional overhead involved in complex window managers such as mwm or twm. Since you can change the focus policy rather simply, you might want to experiment with both methods. For now, we'll assume you're using the default click-to-type focus.
The most important thing to recognize is that focusing on the proper window is integral to working with an application running with a window system. If something doesn't work the way you expect, make sure that the focus is directed to the correct window. After you use X for a while, awareness of input focus will come naturally.
The pointer is also often used to display menus. Some X programs, notably mwm and xterm, have menus that are displayed by keystrokes and/or pointer button motions. More versatile than many other window managers, mwm provides two default menus, each representing a different menu “style.”
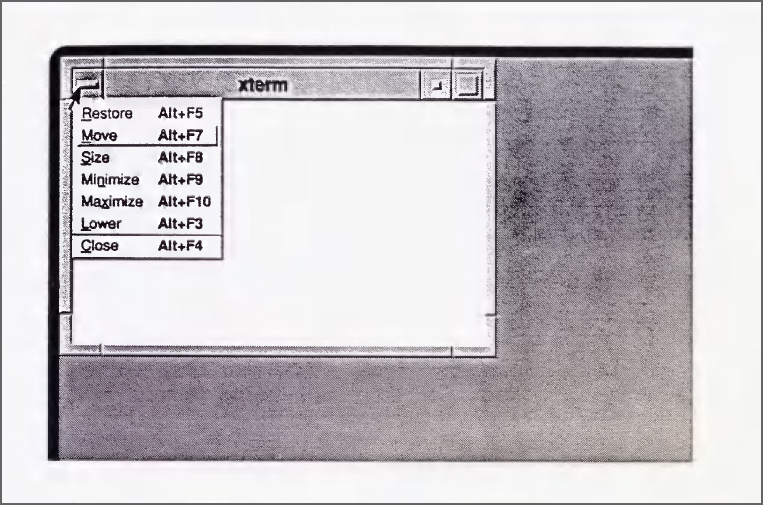
The Window Menu is a “pull-down” menu that can be displayed on any window by placing the pointer on the small rectangular button in the upper-left corner of the frame and either clicking or pressing and holding down the first pointer button. Roughly defined, a pull-down menu is accessed from a graphical element that is always displayed, such as a command button or a menu bar. Figure 1-5 shows an xterm window with the Window Menu displayed by clicking the first pointer button in the menu button on the frame.
As you might infer from some of the menu items, you can use the Window Menu to move, resize, and otherwise manage the window on which it is displayed. When you display the Window Menu by clicking the first pointer button (as opposed to pressing and holding it down), the first the first item available for selection is surrounded by a box. In this case, the first available selection is Move. The first item on the menu, Restore, is used to change an icon back into a window; therefore, it is not useful at this time. The fact that Restore is not selectable is indicated by the fact that it appears in a lighter typeface. The Window Menu is discussed in detail in Chapter 4, More about the mwm Window Manager.
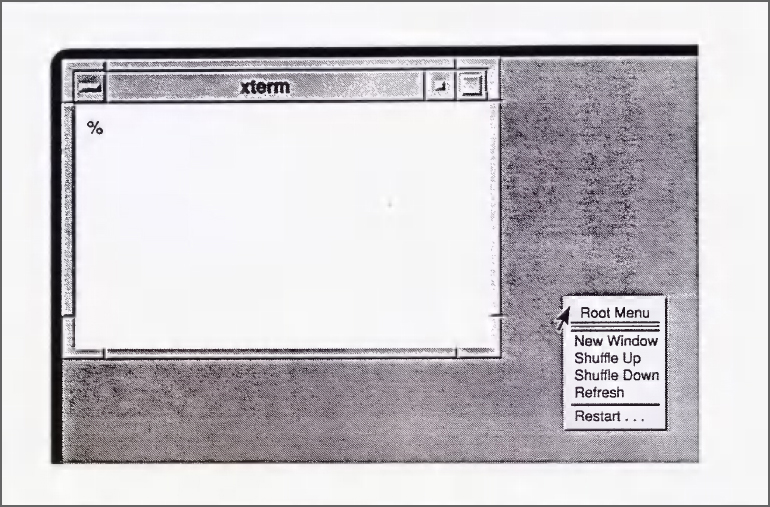
mwm also supports “pop-up” menus, which are displayed at the current pointer position. (Many X clients also use pop-up menus.) In addition to keyboard keys and pointer button motions, the location of the pointer plays a role in displaying menus. For example, xterm menus can only be displayed when the pointer is within an xterm window. Figure 1-6 shows the mwm Root Menu, which is generally displayed by placing the pointer on the root window and pressing and holding down the first pointer button.
In Figure 1-6, the arrow next to the menu title represents the pointer. As you drag the pointer down the menu, each of the menu selections is highlighted. Regardless of the program, you generally select a menu item by dragging the pointer down the menu, highlighting the item you want, and releasing (or sometimes clicking) the pointer button. (mwm generally highlights an item by placing a rectangular box around it.) The Root Menu provides commands that can be thought of as affecting the entire display (as opposed to a single window). For example, the first menu item, New Window, creates a new xterm window on the local machine and display.
Though mwm's menus can be useful, you'll probably find that you perform most window management functions simply by using the pointer on the window frame. In Chapter 3, Working in the X Environment, we'll describe several of these functions. Keep in mind, however, that both of the menus can be useful in certain circumstances. For instance, the Window Menu may be useful when parts of the window frame are obscured by another window. The Root Menu can be customized to execute system commands, such as the xterm command initialized by the New Window menu item. It's fairly simple to add items to the Root Menu; you might want to add menu items to start some of the applications you use regularly. Chapter 11, Customizing mwm, describes how to add menu items and to perform a variety of modifications.
As we'll see in Chapter 8, Other Clients, some programs provide menus that you can display simply by placing the pointer on a particular part of the window, e.g., a horizontal menu bar across the top.
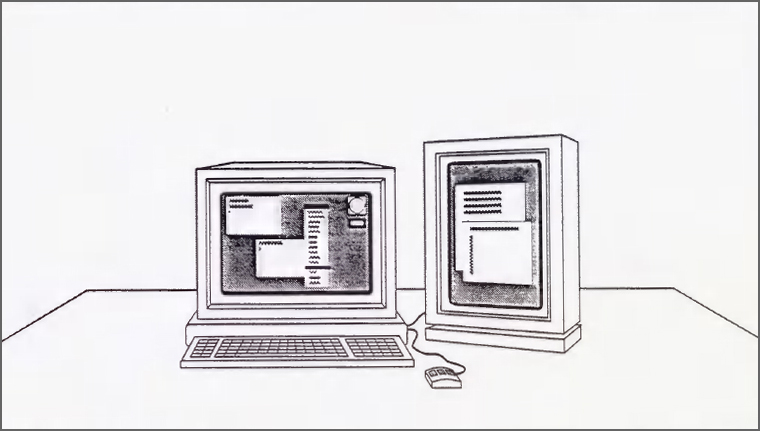
A final note about the X display: in X, the terms display and screen are not equivalent. A display may consist of more than one screen. This feature might be implemented in several ways. There might be two physical monitors, linked to form a single display, as shown in Figure 1-7. Alternatively, two screens might be defined as different ways of using the same physical monitor. For example, on the Sun-3/60 color workstation, screen 0 is color, and screen 1 is black and white. Each screen is the size of the monitor; you can only view one screen at a time. In practice, the two screen seem to be side by side: you can “scroll” between them by moving the pointer off either horizontal edge of the screen. By default, windows are always placed on screen 0 but you can place a client window on screen 1 by specifying the screen number in the -display option when starting the client. (See Chapter 3 for instructions on using the -display option.)
Standard X Clients versus Motif Clients
The window manager running on a display helps determine the “look and feel” of an application. The mwm window manager frames each window on the display and allows you to manage a variety of application windows using the same mechanisms.
However, the look and feel of an application is not wholely determined by the window manager. In addition, the programming routines used to create the application also distinguish it. With the exception of mwm, all the applications we've looked at so far have been written (or rewritten) using what is known as the X Toolkit, developed at MIT.
The X Toolkit is a collective name for two subroutine libraries designed to simplify the development of X Window System applications: the X Toolkit (Xt) Intrinsics and the Athena widget set (Xaw). The Xt library consists of low-level C programming routines for building and using widgets, which are pre-defined user interface components or objects. Typical widgets create graphical features such as menus, command buttons, dialog boxes, and scrollbars. Widgets make it easier to create complex applications. A common widget set also ensures a consistent user interface between applications.
Remember that X does not provide a distinct graphical user interface (GUI). X is a basic window system upon which almost any style of GUI can be built. The X Toolkit provides a simplified approach to creating graphical user interface components—guidelines for writing and implementing widgets—rather than offering a set of components with a predefined look and feel. (However, the Athena widget set does provide X Toolkit applications with certain common features, many of which are mentioned in Chapter 8.)
In response to the need for a graphical user interface for X, the Open Software Foundation developed the Motif Toolkit. The Motif Toolkit is based upon the Xt Intrinsics and upon widget sets originally developed by two OSF sponsor companies, Digital Equipment Corporation and Hewlett-Packard. The Motif widget set was designed to emulate the look and feel of the IBM/Microsoft Presentation Manager, popular in the microcomputer world. An application coded using the Motif Toolkit has a distinct look and feel.
AT&T and Sun Microsystems have also developed a GUI—or more precisely, a specification for a GUI—called OPEN LOOK. At present the two major implementations of the OPEN LOOK specification are Sun's XView toolkit (which is not Xt based) and AT&T's OPEN LOOK widget set (which is Xt based). OPEN LOOK and Motif are the prime contenders to establish a graphical user interface standard in the market.
With the exception of mwm and a program called mre (the Motif resource editor), all of the clients discussed in this guide are standard X clients shipped by MIT. Most of these clients have been built with the X Toolkit and illustrate the use of many of the Athena widgets. When you run these standard clients with the mwm window manager, your environment is something of a hybrid—neither a vanilla X nor a Motif environment (with Motif applications in addition to the window manager).
A standard X client running with mwm is different from a true Motif application, one coded using the Motif Toolkit. At first look, they may seem very similar—when mwm is running all clients on the display are framed in the same way. In addition, certain graphical features provided by the Motif widgets are also provided, albeit with slight variations, by the Athena widgets. However, other features are unique to Motif.
Without dissecting every component or closely examining how it functions, let's briefly compare a standard X application to a Motif application, highlighting some of the major differences (primarily in appearance). Many features of Motif and standard X applications also operate differently. We'll examine the functionality of various Motif and Athena widgets in more detail in Chapter 8, Other Clients.
For the comparison, we'll use a Motif demo program called mre, the Motif resource editor. Developed at OSF by Mitch at OSF by Mitch Trachtenberg, mre assists you in editing your own resource specification file. The editing help mre provides is minimal, but the program clearly demonstrates many of the Motif widgets—as it was intended to do.
The standard X client we're using is xclipboard, which you use in concert with xterm's “cut and paste” facility, described in Chapter 5. The xclipboard client provides a window in which you can paste multiple text selections and from which you can copy text selections to other windows. Similar to the clipboard feature of the Macintosh operating system. xclipboard is basically a storehouse for text you may want to paste into other windows, perhaps multiple times.
The mre window in Figure 1-8 contains a resource file to be edited. (Resources are a mechanism that allow you to customize the operation of X clients.) The xclipboard window in Figure 1-9 contains a long text selection “cut” from an xterm window. Some prominent features of each application are labelled. Both clients are illustrated without the mwm frame. (When the window manager is running, the frame creates a superficial resemblance among all clients on the display.)
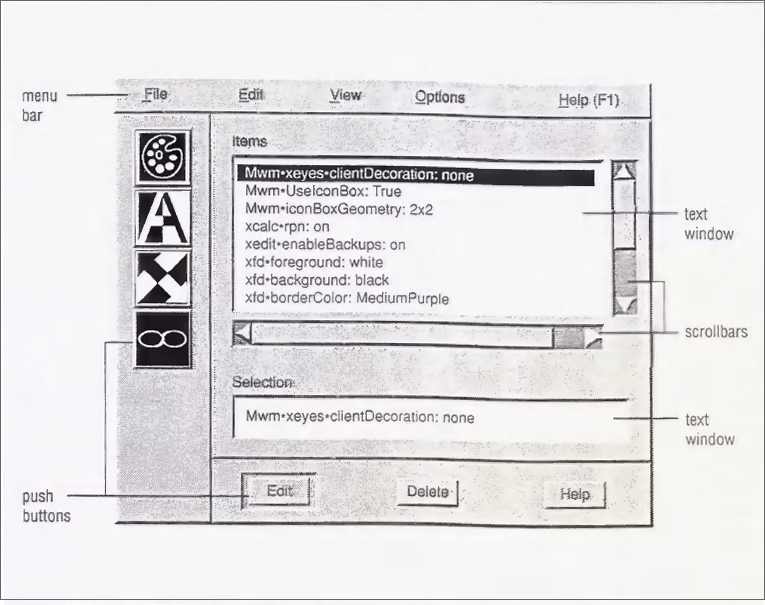

The most striking difference between the two clients is simply the amount of detail. Like the Motif window manager, the individual Motif widgets create a three-dimensional appearance. The subwindows labelled Items and Selection seem to be set in to the application window. The push buttons (and drawn buttons) are shaded to suggest that they are raised above the level of the application window. (The drawn buttons also feature bitmapped images, three of them rather elaborate.) The menu bar is shaded to appear raised. The scrollbars have clearly distinguishable components, all of which are shaded and contoured to maintain the 3-D impression.
By contrast, the xclipboard window seems almost like a preliminary sketch of an application. It is basically flat. The text window, command buttons, and scrollbars are rendered in simple lines, without contouring, and with virtually no shading (though a portion of each scrollbar is shaded).
Another difference is that the mre window has a menu bar. Each word on the menu bar is the title of a pull-down menu that you can access by placing the pointer on it and clicking (or pressing and holding down) the first pointer button. The xclipboard application doesn't provide any menus—it's a fairly simple program. However, some standard X clients (notably xman discussed in Chapter 8) provide pull-down menus accessed by pressing and holding down a pointer button.
Motif pull-down menus generally have a few advantages over pull-down menus provided by standard X clients. While you must press and hold down a pointer button to dislay a menu provided by a standard X client, you can display a Motif menu simply by clicking a pointer button—and the menu stays displayed until you click again. Motif menu items can also be invoked in multiple ways (including pointer actions and keystrokes); the only way to invoke an item from a standard X menu is by dragging the pointer down the menu and releasing the button. The various ways you can work with a Motif pull-down menu are described for mwm's Window Menu in Chapter 4.
Despite differences in general appearance and complexity, mre and xclipboard have many analogous components. Both applications feature a subwindow containing text that can be edited. (mre actually has two such windows, labeled Items and Selection.)
Both applications feature buttons: push buttons in the mre window; command buttons in the xclipboard window. From a user's viewpoint, push buttons and command buttons are functionally equivalent (though you can invoke a push button's function in more ways). The Motif and Athena widget sets simply identify them by different names. The four push buttons on the left side of the mre window are actually called drawn buttons. Drawn buttons are just push buttons decorated with a bitmap rather than a text label.
Both the mre and xclipboard windows have a horizontal and a vertical scrollbar, which are used to look at text that is currently outside the viewing window. (These scrollbars are only displayed when the text read into the window extends beyond the bounds of the viewing area. If the text only exceeds the viewing area in one direction—either horizontally or vertically—only one scrollbar will be displayed.) The Athena scrollbar is basically rectangular (actually one rectangle within another). The Motif scrollbar is somewhat more elaborate. Notice the arrows on either end, for instance. These arrows are the hallmark of a Motif scrollbar and can help you readily identify a Motif application. The arrows also provide functionality not duplicated by the Athena scrollbar.
In general, once you've mastered the basics of working with the MIT client programs running under the mwm window manager, you should have no problem making use of any additional features provided by commercial applications built with the Motif widget set.
X Architecture Overview
Most window systems are kernel-based: that is, they are closely tied to the operating system itself and can only run on a discrete system, such as a single workstation. The X Window System is not part of any operating system but instead is composed entirely of user-level programs.
The architecture of the X Window System is based on what is known as a client-server model. The system is divided into two distinct parts: display servers that provide display capabilities and keep track of user input and clients, application programs that perform specific tasks.
In a sense, the server acts as intermediary between client application programs, and the local display hardware (one or perhaps multiple screens) and input devices (generally a keyboard and pointer). When you enter input using the keyboard or a pointing device, the server conveys the input to the relevant client application. Likewise, the client programs make requests (for information, processes, etc.) that are communicated to the hardware display by the server. For example, a client may request that a window be moved or that text be displayed in the window.
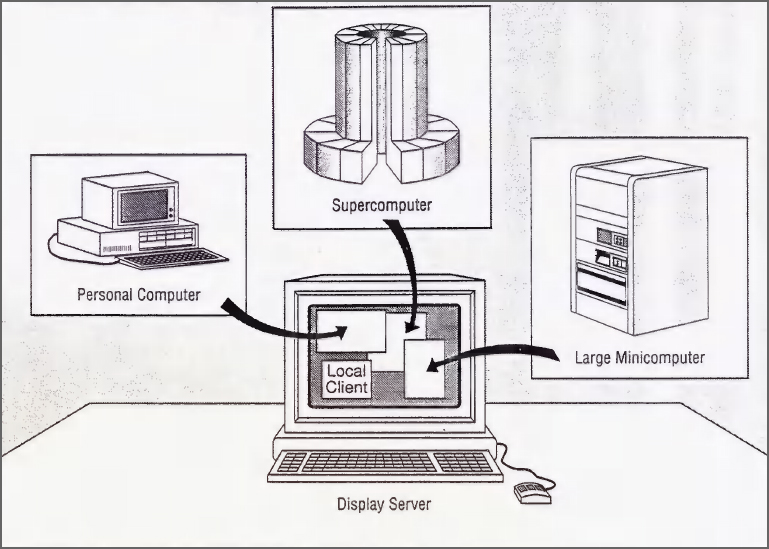
This division within the X architecture allows the clients and the display server either to work together on the same machine or to reside on different machines (possibly of different types, with different operating systems, etc.) that are connected by a network. For example, you might use a relatively low-powered PC or workstation as a display server to interact with clients that are running on a more powerful remote system. Even though the client program is actually running on the more powerful system, all user input and displayed output occur on the PC or workstation server and are communicated across the network using the X protocol. Figure 1-10 shows a diagram of such a network.
You might choose to run a client on a remote machine for any number of reasons. Generally, however, the remote machine offers some feature unavailable on your local machine: a more efficient or powerful processor; a completely different architecture better suited to a particular task; different application software; file server capabilities (and perhaps large data files you'd rather not transfer over the network). X allows you to take advantage of these remote features and to see the results on your local terminal.
The distinction between clients and the server also allows somewhat complicated display situations. For instance, you can access several machines simultaneously. (This can greatly simplify the work of a system administrator.) X also allows you to output to several displays simultaneously. This capability can be very helpful in educational situations. Hypothetically, a teacher could display instructional material to a group of students each using a graphics workstation or terminal hooked up to a network.
There is another less obvious advantage to the client-server model: since the server is entirely responsible for interacting with the hardware, only the server program must be machine-specific. X client applications can easily be ported from system to system.
The X Display Server
The X display server is a program that keeps track of all input from input devices, such as the keyboard and pointer, and conveys that input to the relevant client applications; the server also keeps track of output from any clients that are running and updates the display to reflect that output. Each physical display (which may be multiple screens) has only one server program.
User input and several other types of information pass from the server to a client in the form of events. An event is a packet of information that tells the client something it needs to act on, such as keyboard input. Moving the pointer or pressing a key, etc., causes input events to occur.
When a client program receives a meaningful event, it responds with a request to the server for some sort of action affecting the display. For instance, the client may request that a window be resized to particular dimensions. The server responds to requests by a client program by updating the appropriate window(s) on your display.
Servers are available for PCs, workstations, and even for special terminals (generally called X terminals), which may have the server downloaded from another machine or stored in ROM.
Clients
As previously mentioned, a client is an application program. The standard release of X from MIT includes more than 50 client programs that perform a wide variety of tasks. X allows you to run many clients simultaneously: each client displays in a separate window. For example, you could be editing a text file in one window, compiling a program source file in a second window, reading your mail in a third, all the while displaying the system load average in a fourth window.
While X clients generally display their results and take input from a single display server, they may each be running on a different computer on the network. It is important to note that the same programs may not look and act the same on different servers since X has no standard user interface, since users can customize X clients differently on each server, and since the display hardware on each server may be different.
Remember that the server conveys input from the various input devices to the appropriate client application; likewise, the client issues output in the form of requests to the server for certain actions affecting the display.
In addition to communicating with the server, a client sometimes need to communicate with other clients. For example, a client may need to tell the window manager where to place its icon. Interclient communication is facilitated by the use of properties. A property is a piece of information associated with a window or a font and stored in the server. Properties are used by clients to store information that other clients might need to know, such as the name of the application associated with a particular window. Storing properties in the server makes the information they contain accessible to all clients.
A typical use of properties in interclient communication involves how a client tells the window manager the name of the application associated with its window. By default, the application name corresponds to the client's name, but many clients allow you to specify an alternative name when you run the program. A window manager that provides a titlebar needs to know the application name to display in that area. The client's application name is stored in the server in the property called WM_NAME and is accessed by the window manager.
See the xprop reference page in Part Three of this guide, and Volume One, Xlib Programming Manual, for more information about properties and the xprop client.
Several of the more frequently used client programs are discussed in the following sections.
The Window Manager
The way a kernel-based window system operates is inherent in the window system itself. By contrast, the X Window System concentrates control in a special kind of client application, called a window manager. The window manager you use largely determines the look and feel of X on a particular system.
The window manager shipped with OSF/Motif is called mwm. As we've discussed, mwm allows you to move and resize windows, rearrange the order of windows in the window stack, create additional windows, and convert windows into icons, etc. These functions are discussed more fully in Chapter 3 and Chapter 4.
mwm is compliant with the X Consortium's Inter-Client Communication Conventions Manual (ICCCM), introduced at Release 3. The ICCCM contains standards for interaction with window managers and other clients. It defines basic policy intentionally omitted from X itself, such as the rules for transferring data between applications, for transferring keyboard focus, for installing colormaps, and so on. As long as applications and window managers follow the conventions outlined in the ICCCM, applications created with different toolkits will be able to coexist and work together on the same server.
In this guide, we assume you are using mwm. Other popular window managers, such as twm (the tab window manager), awm (Ardent™ window manager), rtl (tiled window manager, developed at Siemens Research and Technology Laboratories, RTL), and olwm (the OPEN LOOK™ window manager), are also widely used.
If the mwm window manager has been customized at your site or you are using a different window manager, many of the concepts should remain the same. However, the actual procedures shown may differ. See Chapter 11, Customizing mwm, for a discussion of how to tailor mwm to your particular needs.
The xterm Terminal Emulator
X11 itself is designed to support only bitmapped graphics displays. For this reason, one of the most important clients is a terminal emulator. The terminal emulator brings up a window that allows you to log in to a multiuser system and to run applications designed for use on a standard alphanumeric terminal. Anything you can do on a terminal, you can do in this window.
xterm is the most widely available terminal emulator. xterm emulates a DEC® VT102 terminal or a Tektronix® 4014 terminal. For each xterm process, you can display both types of windows at the same time but only one is active (i.e., responding to input) at a time.
Running multiple xterm processes is like working with multiple terminals. Since you can bring up more than one xterm window at a time, you can run several programs simultaneously. For example, you can have the system transfer files or process information in one window while you focus your attention on a text-editing session in another window. As you might imagine, having what are in effect multiple terminals can increase your productivity remarkably. See Chapter 3, Working in the X Environment, and Chapter 5, The xterm Terminal Emulator, for more information about xterm.
The Display Manager
The display manager, xdm, is a client that is designed to start the X server automatically (from the UNIX /etc/rc system startup file) and to keep it running. (X can also be started manually, as described in Chapter 2, Getting Started.) In its most basic implementation, the display manager emulates the getty and login programs, which put up the login prompt on a standard terminal, keeping the server running, prompting for a user's name and password, and managing a standard login session.
However, xdm has far more powerful and versatile capabilities. Users can design their own sessions, automatically running several clients and setting personal resources (such as keyboard, pointer, and display characteristics). The system administrator can also customize special xdm files to manage several connected displays (both local and remote) and to set system-wide X resources (for example, client default features). Resources are introduced in Chapter 3, Working in the X Environment, and discussed fully in Chapter 10, Setting Resources.
Many commercial vendors provide alternative display/session managers. If you are using a display manager other than xdm, many of the concepts should remain the same. However, the actual setup procedures may differ. See Appendix A, System Management, for a discussion of how to set up and customize the xdm display manager.
Other X Clients
The standard distribution of X from MIT includes more than 50 client applications. The client you will probably used most frequently is xterm. We've grouped some of the other more useful applications as follows:
Desk accessories
| xbiff | Mail notification program. |
| xclock, oclock | Clock applications. |
| xcalc | Desktop calculator. |
| xload | System load monitor. |
| xman | Manual page browser. |
Display and keyboard preferences
| xset | Allows you to set various display and keyboard preferences, such as bell volume, cursor acceleration, and screen saver operation. |
| xmodmap | Allows you to map keyboard keys and pointer buttons to particular functions. |
| xlsfonts | Lists available fonts. |
| xfd | Displays the characters in a single font. |
| xfontsel | Allows you to display multiple fonts sequentially and select a font to be used by another application. |
Graphics utilities
| bitmap | Bitmap editor. |
| atobm, bmtoa | Programs to convert ASCII characters to bitmaps and bitmaps to ASCII characters. |
Printing applications
| xwd | Dumps the image of a window to a file. |
| xpr | Translates an image file produced by xwd to PostScript® or another format, suitable for printing on a variety of printers. |
| xwud | Redisplays a window dump file created using xwd. |
Removing a window
| xkill | Terminates a client application. |
Window and display information utilities
| xlsclients | Lists the clients running on the display. |
| xdpyinfo | Lists general characteristics of the display. |
| xwininfo | Lists general characteristics of a selected window. |
| xprop | Lists the properties associated with a window. |
These and other client applications are described in Chapters 5 through 8, and in Chapter 11. In addition, a reference page describing each client and listing its options appears in Part Three of this guide. As more commercial and user-contributed software is developed, many more specialized programs will become available.
Customizing Clients
Most X clients are designed to be customized by the user. A multitude of command-line options can be used to affect the appearance and operation of a single client process. A few of the more useful command-line options are introduced in Chapter 3. Chapter 9 discusses several options in detail. Part Three of this guide includes a reference page for each client that details all valid options.
X also provides a somewhat more convenient way to customize the appearance and operation of client programs. Rather than specifying all characteristics using command line options, default values for most options can be stored in a file (generally called .Xresources or .Xdefaults) in your home directory. Each default value is set using a variable called a resource; you can change the behavior or appearance of a program by changing the value associated with a resource variable.
Generally, these resource values are loaded into the server using a program called xrdb (X resource database manager). Then the values are accessed automatically when you run a client. Storing your preferences in the server with xrdb also allows you to run clients on multiple machines without maintaining an .Xresources file on each machine.
There is a separate customization file for the mwm window manager called .mwmrc, which is also kept in your home directory. By editing the .mwmrc file, you can modify several aspects of the window manager's operation, such as the contents of menus, and the key and pointer button sequences used to invoke actions. See Chapter 11, Customizing mwm, for more information.
Client customization is introduced in Chapter 3, Working in the X Environment, and described fully in Part Two of this guide.
*Even though the actual image on the screen is called a cursor, throughout this guide we refer to “moving the pointer” to avoid confusion with the standard text cursor that can appear in an xterm window.
*In a few cases, the window manager may interpret these keystrokes. For example, you can customize mwm to display a menu when you type certain keystrokes while the pointer rests on the root window. See Chapter 11, Customizing mwm, for more information about mapping window manager functions to certain keys and pointer actions.