4
More about the mwm Window Manager
This chapter describes additional functions you can perform using the Motif window manager, mwm.
In This Chapter:
Input Focus and the Window Manager
Transferring the Focus with Keystrokes
What to do if mwm Dies and the Focus is Lost
The Window Menu Button: Display a Menu or Close the Window
Pointer Commands to Manage Icons
4
More about the mwm Window Manager
In Chapter 3, we explained the procedures for raising, moving, and iconifying windows using the pointer on the mwm window frame. mwm allows you to perform many other window management functions, which are described in this chapter. You can:
- Create additional xterm windows.
- Change the size of windows.
- Lower windows (move them to the back of others).
- Refresh your screen.
- Remove windows.
The Motif window manager allows you to invoke window management functions in a variety of ways:
- Using the window “frame” and various features available on it: the Minimize (iconify) button, Maximize button, title area, Window Menu, etc.
- Using the Root Menu.
- Using keyboard keys, pointer buttons, and key and button combinations.
In this chapter, we'll review some basics about focusing input to a window or icon and consider how window management functions rely on focus being directed properly. Then we'll consider some additional window management functions you can perform using the mwm frame and take a closer look at the Window Menu and Root Menu.
As we'll see, some window management functions can be performed using keyboard shortcuts. These shortcuts involve using special keys, commonly called modifier keys. Before considering window management functions, we'll take a brief look at the special keys significant to X.
Keep in mind that mwm is very flexible. In Chapter 11, we'll consider how to customize various features of the window manager. Perhaps the most useful customization that can be performed involves selecting a keyboard focus policy, either pointer focus or click-to-type (also referred to as explicit) focus. By default, mwm uses click-to-type focus. Keyboard focus is described in Chapter 1.
This chapter is intended primarily for those using the Release 1.1 version of mwm. (Unlike the 1.0 version, mwm 1.1 is compatible with Release 4 of X.) If mwm has been customized at your site or you are running a different version, the principles should be basically the same, but the window management functions may be invoked in different ways. From time to time, we'll mention how commands or functionality might vary, depending on the version of mwm.
Using Special Keys
Undoubtedly you know the basics of using a keyboard. However, X interprets certain keys somewhat differently than the labels on the keys would indicate.
Most workstations have a number of “modifier” keys, so-called because they modify the action of other keys. Generally these keys are used to invoke commands of some sort, such as window manager functions.
Three of these modifier keys should be familiar to any user of a standard ASCII terminal or a personal computer—Shift, Caps Lock, and Control. However, many workstations have additional modifier keys as well. A PC has an “Alt” key, a Macintosh™ has a “fan” key, a Sony workstation has keys named “Nfer” and “Xfer,” and certain model Sun workstations have three additional modifier keys, labeled “Left,” “Right,” and “Alternate.”
Because X clients are designed to run on many different workstations, with different keyboards, it is difficult to assign functions to special keys on the keyboard. A developer can't count on the same key always being present!
For this reason, many X clients make use of “logical” modifier keynames, which can be mapped by the user to any actual key on the keyboard.
Up to eight separate modifier keys can be defined. The most commonly used (after Shift, Caps Lock, and Control) has the logical keyname “Meta.”
We'll talk at length about this subject in Chapter 12, Setup Clients, but we wanted to warn you here. When we talk later in this chapter about pressing the “Meta” key, you should be aware that there is not likely to be a physical key on the keyboard with that name. For example, on one workstation, the Meta key might be labeled “Alt” and, on another, “Funct.” And as we'll show in Chapter 12, you can choose any key you want to act as the Meta key.
Unfortunately, X provides no easy way to find out which key on your keyboard has been assigned to be the Meta key. When you need to know, please turn to the discussion of key mapping in Chapter 12, for information on how you can find out.
Input Focus and the Window Manager
As explained in Chapter 3, the default operation of mwm is that you select the window to receive input (the active window) by clicking the first pointer button anywhere within the window. This focus policy is called click-to-type, or explicit. Whether mwm is started automatically or you started it by typing in an xterm window, you must then click in a window in order to enter text.
Once you focus input to a window, all text typed is interpreted by that client, regardless of where you move the pointer. In the case of xterm and similar clients, the text appears in the window. Other clients might simply interpret the keystrokes as possible commands. Some clients, such as xclock, do not recognize keyboard input at all. Regardless of the client, certain keystrokes might also be interpreted as commands to the window manager to effect changes on the focus window. In order to type in or issue commands to affect another window, you must transfer focus to that window by clicking the first pointer button within it. In Chapter 11, Customizing mwm, we'll describe how to make the keyboard focus follow pointer movement.
Also keep in mind that in order to manage a window using the various methods provided by mwm, the window must have the input focus. Since most actions you'll perform involve placing the pointer somewhere on the frame and performing some kind of pointer action (such as clicking, pressing, releasing, etc.), controlling a window using the frame selects that window to receive the input focus at the same time.
However, before invoking certain window management functions, you must first select a focus window (or icon). For example, each Window Menu item has a keyboard shortcut. If you want to affect a window using a keyboard shortcut, you must first select it as the focus window by clicking on it with the pointer—otherwise the keyboard shortcut will affect the current focus window. This is probably the only circumstance in which you would select a window that doesn't accept keyboard input (such as xclock) as the focus window. Keyboard shortcuts for Window Menu functions are described in “Using the Window Menu.”
As we've seen, when you focus input on a window, the window frame changes color. The color of the active window's frame depends on the version of mwm you are running and the color resources for your system. In some versions, be aware that the black window frame of non-active windows obscures the titlebar text, which also appears in black. Only the title of the active window is visible in these cases.
If you are working with a stack of windows that overlap, selecting a window as the active window automatically raises that window to the top of the stack. This behavior is controlled by an mwm resource variable called focusAutoRaise, which is true by default when click-to-type focus is in effect. (This resource is described in Chapter 11, Customizing mwm.) If the focus window is killed or converted to an icon, the focus switches back to the window that previously had it.
Focusing Input on an Icon
Though it may not be immediately obvious, you can select an iconified window to receive the input focus. You direct input to an icon by placing the pointer on it and clicking the first button. As illustrated in Chapter 3, Working in the X Environment, this action displays an mwm menu (the Window Menu) over the icon. (See Figure 3-4.)
The icon label also becomes wider and the label and the frame surrounding the icon are highlighted. These changes indicate that the icon has the input focus. Even after the menu is removed, the label will remain wider and the border highlighted (that is, the icon will retain the focus), until you direct focus to another window or icon.
When an icon has the input focus, the application window the icon represents will not interpret keystrokes. However, the window manager will interpret relevant keystrokes as commands. For instance, you need to focus input to an icon in order to invoke a Window Menu item on it using the item's keyboard shortcut. Keyboard shortcuts for Window Menu functions are described in “Using the Window Menu on Icons” later in this chapter.
Transferring the Focus with Keystrokes
If you are running the default version of mwm (which assumes click-to-type focus), you can cause the focus to circulate from window to window (including iconified windows) within the stack using any of the key combinations that appear in Table 4-1.
Table 4-1. Key Combinations to Change Focus Window
| Key Combination | Action |
| Meta-Tab | Move focus to next window in stack. |
| Meta-Shift-Tab | Move focus to previous window in stack. |
| Meta-Escape | Move focus to next window in stack. |
| Meta-Shift-Escape | Move focus to previous window in stack. |
The key combinations Meta-Tab and Meta-Escape circulate the focus from the current top of the stack to the bottom. What this means is that the top window in the stack is moved to the bottom; the second highest window becomes the top window and gets the input focus.
The key combinations Meta-Shift-Tab and Meta-Shift-Escape circulate the focus from the current bottom of the stack to the top. In other words, the lowest window in the stack is moved to the top and given the input focus.
As explained previously, there is probably no key labeled “Meta” on your keyboard. Meta is a logical keyname recognized by X which is mapped to a physical key. Also be aware that, in most cases, mwm considers the Meta key and the Alt key interchangeable. (Alt is another logical keyname that may be mapped to a key with another label.) Thus, the actions in Table 4-1 should also work if you substitute Alt for Meta. For help in locating the Meta and Alt keys on your keyboard, see the discussion of xmodmap in Chapter 12, Setup Clients.
mwm's ability to transfer focus from window to window according to keystrokes is important to some Motif applications. The Motif Toolkit supports the building of applications that use several subwindows, each with a different albeit related purpose. (Such applications can be described as form-based.) A form-based Motif application can be built that allows users to move among the subwindows using keystrokes.
Some of the more common elements of Motif applications are described in Chapter 8, Other Clients.
What to do if mwm Dies and the Focus is Lost
If the mwm process dies, the focus policy should revert to pointer focus. To restart the window manager, you should simply be able to move the pointer into an xterm window and enter the mwm command. However, mwm has a bug that makes it possible to lose the focus entirely when the window manager dies. Obviously, restarting the window manager in such a situation is problematic. If mwm dies and no window retains the focus, you can restore focus to an xterm window using the Secure Keyboard item of the client's Main Options menu. See Chapter 5, The xterm Terminal Emulator, for details.
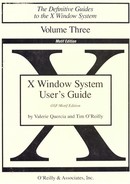
Using the mwm Window Frame
In Chapter 3, Working in the X Environment, we introduced some of the basic window management functions you can perform using the pointer on the mwm frame, which appears surrounding an xterm window in Figure 4-1.
Before proceeding, read the section “Raising, Moving, and Iconifying Windows” in Chapter 3. (This section also describes some basic actions you can perform on icons using the pointer: raising and moving an icon and converting an icon back to a window.)
The following sections describe the features of the mwm window frame not covered in Chapter 3 and the functions they perform. Later, we'll take a look at menu items and keyboard shortcuts that also perform window and icon management functions.
Maximizing a Window
The two command buttons on the right side of the titlebar are the Minimize and Maximize buttons. The Minimize command button converts a window to an icon, as described in Chapter 3, Working in the X Environment.
Maximizing a window means enlarging it to the size of the root window. This action can be performed using the Maximize command button.
The Maximize Button
To the right of the Minimize command button (in the upper-right corner of the window), the Maximize command button is identified by a larger square in its center. The Maximize button allows you to enlarge the window to the size of the root window, and once it has been enlarged, to convert it back to its original size.
To maximize a window, use the following steps:
- Place the pointer within the Maximize command button. The pointer simply has to rest within the button's outer border, not within the square identifying it.
- Click the first pointer button. The window is maximized. Figure 4-2 shows how it's done.
The large window should function in the same way it did before it was maximized. Theoretically, you can maximize an xterm window to have a single, very large terminal screen. However, be aware that certain programs you may run within an xterm, such as the vi text editor, do not always work properly within a window of this size (even if you've used the resize client, as described in Chapter 5, The xterm Terminal Emulator). The Maximize function is more safely used with an application that displays a graphic image or performs a simple function, such as xclock.
Also, some client programs that do not support resizing, such as the Release 3 version of xcalc, cannot be maximized correctly. In the case of xcalc, the frame surrounding the calculator application is maximized, but the actual calculator remains the same size.
The Maximize button is a toggle. To convert a maximized window back to its original size, click on the Maximize button again with the first pointer button.

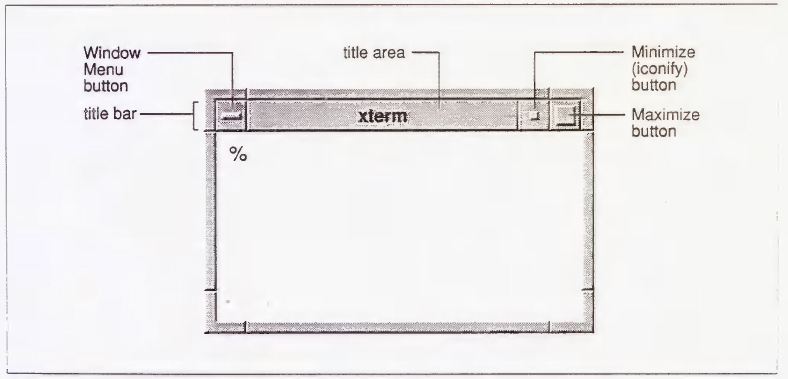
Resizing a Window
One of the most distinctive and useful features of the mwm window frame is not at all obvious. The entire frame (other than the titlebar—i.e., the title area and command buttons) is designed to allow you to resize the window using the pointer. Notice that the frame is divided by small lines into eight sections: four long borders (two horizontal and two vertical) and four corners. Figure 4-3 shows these sections of the window frame.
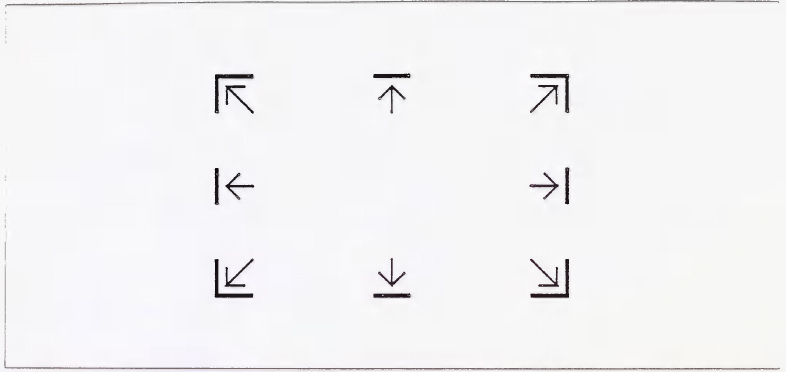
If you place the pointer within a window and then move it into one of the long horizontal or vertical borders, you'll notice the pointer changes to a new shape: an arrow (pointing toward the window border), with a short line perpendicular to it. This short line represents the window border. Try moving the pointer in this fashion in one of the windows on your display to get a better idea of what the pointer looks like. If you move the pointer from within a window into the outer border at one of the corners, the pointer will become an arrow pointing diagonally at a small corner symbol, as pictured in Figure 4-4. Figure 4-5 shows all of the possible resize pointers.
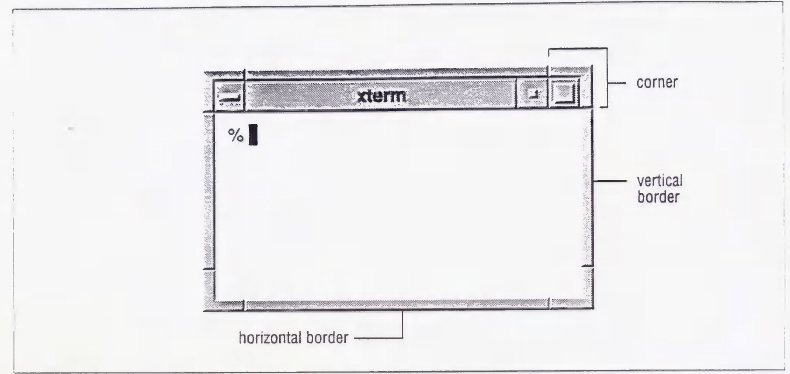
Once the pointer changes to one of these shapes, you can move the border (or corner) of the window. Resizing from one of the long borders only allows you to change one dimension of the window: a horizontal border can only be moved up or down, changing the height; a vertical border can only be moved left or right, changing the width.
Resizing from a corner offers the most flexibility. You can move a corner in any direction you choose, changing both dimensions of the window if you want. For example, you can drag the lower-right corner of a window down and to the right to enlarge the window in both dimensions.
You determine the size and shape of the window by choosing the border or corner you want to extend (or contract) and moving it the desired amount using the following steps:
- Move the pointer from within the window to the border or corner you want to move. The pointer changes to one of the symbols pictured in Figure 4-5.
- Press and hold down the first pointer button and drag the window border or corner in the direction you want. As you resize the window, an image of the moving border(s) tracks the pointer movement. Also, in the center of the display, a small rectangular window shows the dimensions of the window as they change (in characters and lines for xterm windows, in pixels for most other clients).
- Resize the window as desired.
- Release the first pointer button. The window is redisplayed in the new shape. (The border image and window geometry tracking box disappear.)
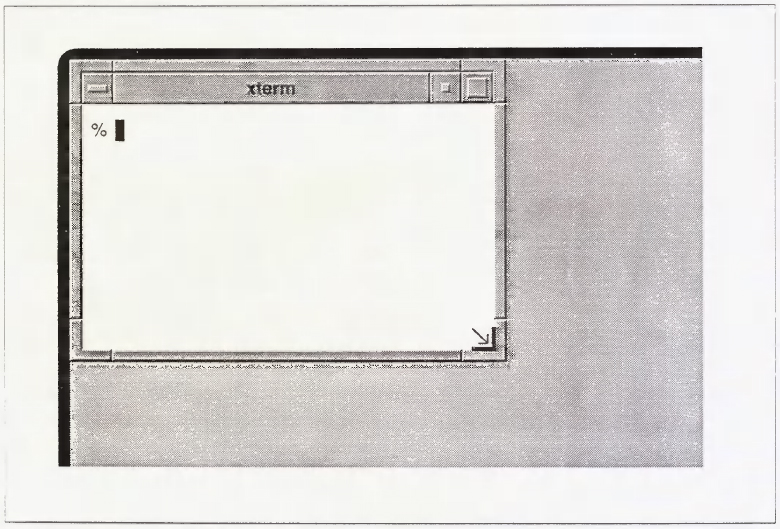
Figure 4-6 shows a window being “stretched” from the lower-right corner.

The Window Menu Button: Display a Menu or Close the Window
The command button on the left side of the titlebar is used to bring up the Window Menu, which provides seven items that can be used to manage the window and its icon. The following sections describe how to bring up the Window Menu and invoke its various functions.
This command button also has another function. Double-clicking the first pointer button on the Window Menu command button kills the client program and closes the window. Be aware that, like other methods of ‘killing’ a program (such as the xkill client), double clicking on the Window Menu button can adversely affect underlying processes. Refer to the section on xkill in Chapter 8, Other Clients, for a more complete discussion of the hazards of killing a client and a summary of alternatives.
You can customize mwm so that double clicking performs no function by setting a resource variable, wMenuButtonClick2, to false. See the sections “Setting mwm Resources” and “mwm-Specific Appearance and Behavior Resources” in Chapter 11, and the mwm reference page in Part Three of this guide for details.
Using the Window Menu
The Window Menu can actually be displayed from either a window or an icon. As we'll see, certain menu functions apply only to one or the other. This section describes using the Window Menu to perform various management functions on a window. (The section “Working with Icons,” later in this chapter, describes the use of Window Menu items, pointer commands, and other shortcuts on icons.)
The Window Menu command button is in the upper-left corner of the window frame and is identified by a narrow rectangle in its center. You can display the Window Menu from a window by moving the pointer to the command button and either:
- Clicking the first pointer button.
- Pressing and holding down the first pointer button.
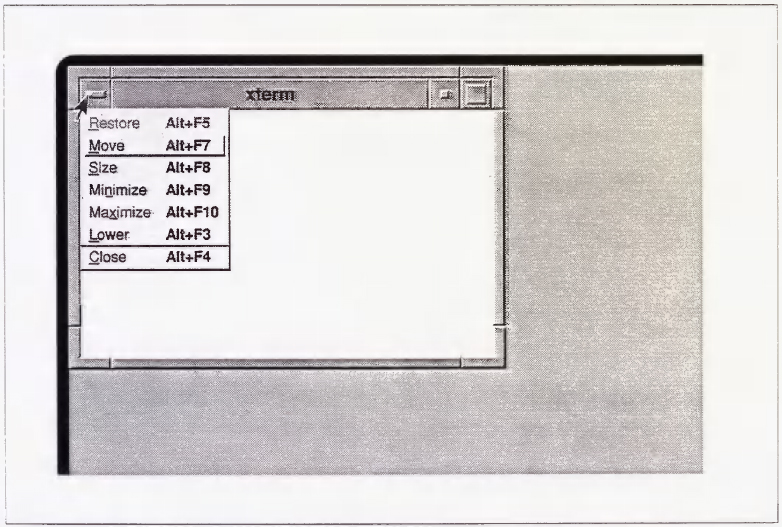
(You can also display the menu using keyboard shortcuts described at the end of this section.) If you've clicked the first pointer button to display the menu (the easier method), the first item that is available for selection is highlighted by a box. Figure 4-7 shows the default Window Menu, which has been displayed by clicking the first pointer button in the menu command button.
There are also keyboard shortcuts to display the Window Menu on the focus window: Shift-Escape or Meta-space.
The function performed by each of the Window Menu items is fairly obvious. Six of the seven menu items (all but Lower) allow you to perform functions that can also be performed by simple pointer actions on the mwm window frame. Since effecting changes on a window using the frame is very simple and accessible, you will probably not use the Window Menu often.
You may want to use the menu to Lower a window (to the bottom of the stack), since this function cannot be performed by a simple pointer action on the frame. (If you learn the keyboard shortcut for this menu item, explained later in this section, you may not need the Window Menu to manage windows at all.) You may find the menu more helpful in managing icons, as described later in this chapter.
In any case, learning how to invoke the Window Menu items is helpful in orienting yourself within the Motif environment.
Invoking Window Menu Items
Let's take another look at the Window Menu in Figure 4-7. Notice that the first item available for selection (indicated by the surrounding box) is Move. The first item on the menu, Restore, is used to change an icon back into a window or a maximized window back to its original size; therefore, it is not useful at this time. The fact that Restore is not selectable is indicated by the fact that it appears in a lighter typeface.
Notice also that one letter of each menu item is underlined. This letter represents a unique abbreviation for the menu item, called a mnemonic, and is useful in selecting the item.
A keyboard shortcut follows each command. These shortcuts are known as accelerators because they facilitate the action. The keyboard accelerators allow you to perform all of the functions without having to display the menu (though they also work while the menu is displayed). To invoke an action using an accelerator, the window must have the input focus.
All of the keyboard accelerators for the menu items involve the Alt key and a function key. Remember that mwm considers the Alt and Meta keys to be equivalent. What this boils down to is that, for any of the shortcuts, you can substitute Meta for Alt.
Once the Window Menu is displayed, you can select an item in the following ways:
- If you displayed the menu by pressing and holding down the first pointer button, drag the pointer down the menu to the desired item and release the first button.
- If you displayed the menu by clicking the first pointer button, either:
- Move the pointer onto the item and click the first button.
- Type the unique abbreviation (the underlined letter). (Though several of the abbreviations are capital letters, you should type the lowercase equivalent.)
- Type the accelerator key combination. (Though these are intended to save you the trouble of displaying the menu, they also work when it is displayed.)
- To select the boxed item (the first available for selection), you can alternatively press either the Return key or the space bar.
To remove the menu without making a selection, move the pointer off of the menu and release or click the first pointer button, as appropriate.
Most items work similarly to the comparable functions performed using the pointer on the frame. The primary difference relates to moving or resizing a window. Using the frame, you press and hold down a pointer button, move the pointer, and release the button to complete the action. Once you invoke the Move or Size item from the Window Menu (by any of the methods described previously), you simply move the pointer (without holding a button down); then click the first pointer button to complete the action.
If you test the various items, you'll find that each item works in a fairly predictable way. When you select Move, for instance, the pointer changes to the cross-arrow cursor, which appears in the center of the window; as you move the pointer, a window outline follows; you place the window in its new location by clicking the first pointer button. When you select Size, the pointer again changes to the cross-arrow cursor in the center of the window; move the pointer into any part of the resize border and the pointer symbol becomes one of the resize cursors; as you drag the border or corner, a window outline follows the pointer; then complete the resizing by clicking the first pointer button.
Pointer Commands to Manage Icons
In addition to managing windows, mwm provides several easy methods for managing icons. The following functions can be invoked using simple pointer button actions on an icon:
Move
Hold down the first pointer button and drag the icon to the desired position. Then release the button.
Raise
Click on the obscured icon with the first pointer button. The icon is raised to the top of the stack. (mwm does not allow icons to overlap one another; you'll need to raise an icon only when it's obscured by a window.)
Restore (Deiconify)
To convert an icon back to a window, double click on the icon with the first pointer button.
Each of these icon management function using the pointer is described in greater detail in the section “Raising, Moving, and Iconifying Windows” in Chapter 3, Working in the X Environment.
Using the Window Menu on Icons
You can also display the Window Menu from an icon and invoke menu items that affect it. To display the menu, just place the pointer on the icon and click the first button. (You can also press and hold down either the first or third button; or you can use either of these keyboard shortcuts: Shift-Escape or Meta-space.)
The Window Menu displayed from an icon is virtually identical to the menu displayed from a window; it contains all of the same items, but only five of the seven are selectable. (When displayed from a window, six of the seven items are selectable.) The five selectable items are: Restore, Move, Maximize, Lower, and Close. These items perform actions on an icon analogous to those performed on a window (see “Using the Window Menu” earlier in this chapter).
Two menu items, Size and Minimize, appear in a lighter typeface, indicating they are not available for selection. Size cannot be selected because, unlike a window, an icon cannot be resized. Obviously, Minimize cannot be used to iconify an icon.
Table 4-2 summarizes the Window Menu functions when invoked from an icon. For instructions on selecting an item and performing the various functions, read “Using the Window Menu” earlier in this chapter. Note that the keyboard shortcuts (accelerators) for the commands are also the same as those described for windows.

To invoke a Window Menu action on an icon using the keyboard accelerator, the icon must have the input focus. As explained earlier in this chapter, you can direct focus to an icon by placing the pointer on it and clicking the first button (which also displays the Window Menu). The icon label becomes wider and the border is highlighted.
An icon also retains the input focus when you display the Window Menu and then remove it without selecting an item (by clicking anywhere outside the menu). The icon label will remain wide and the border highlighted until you direct focus to another window or icon. As long as an icon remains highlighted, you can invoke Window Menu commands using their keyboard accelerators.
In Chapter 11, we'll discuss using mwm resources to set up an icon box, a window for organizing icons on the display. Using an icon box changes the way you work with the Window Menu from an icon and introduces another menu item, PackIcons, which reorganizes icons in the icon box.
The Root Menu
The Root Menu is mwm's main menu. It provides commands that can be thought of as affecting the entire display. To display the Root Menu, move the pointer to the root window and press and hold down the first pointer button. The default Root Menu appears in Figure 4-8.
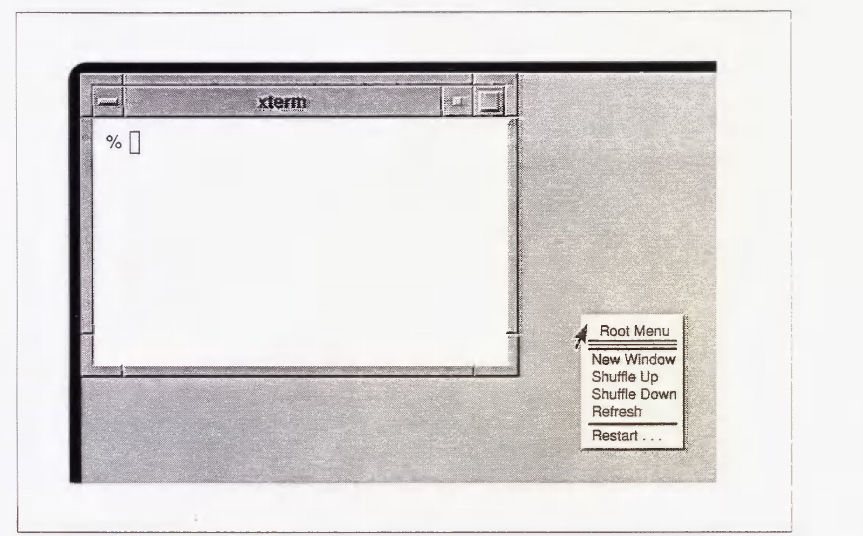
When you display the Root Menu, the pointer changes to the arrow pointer. As you can see, the default Root Menu offers only five items. To select an item, use the following steps:
- As you continue to hold down the first pointer button, move the pointer onto the desired item name. (If you accidentally move the pointer off the menu, it will still remain displayed, as long as you continue to hold the first button down.) As you move the pointer onto an item, notice that a rectangular box is displayed around the item to highlight it.
- Once the pointer is positioned on the item you want, release pointer button one. The action is performed.
The functions performed by the default Root Menu are described below.
New Window
By default, this command runs an xterm window on the display specified by the DISPLAY environment variable, generally the local display. When you create a new window (by using the menu or typing the command in an xterm), the new window automatically becomes the active window.
Shuffle Up
If windows and/or icons are stacked on your display, this command moves the bottom window or icon in the stack to the top (raises it). (It's generally simpler to raise a window or icon by placing the pointer on it and clicking the first button.)
Shuffle Down
If windows and/or icons are stacked on your display, this command moves the top window or icon in the stack to the bottom (lowers it).
Refresh
This command is used to refresh the display screen, that is, redraw its contents. Refresh is useful if system messages appear on the screen, overlaying its contents. (The xrefresh client can be used to perform the same function. Simply type xrefresh at the system prompt in an xterm window.)
Restart…
Stops and restarts mwm. This is useful when you've edited the .mwmrc configuration file, which specifies certain mwm features, and want to activate the changes. Since this function is potentially more dangerous than the other Root Menu options, it is separated from the other options by a horizontal line.
When you select Restart, a dialog box appears in the center of the screen with command buttons asking you to either OK the restart process or Cancel the request. Click on the appropriate command button using the first pointer button. (Dialog boxes commonly appear in applications written using the Motif Toolkit. For more information, see “Dialog Boxes and Push Buttons” in Chapter 8, Other Clients.)
If you select OK, the window manager process is stopped. The screen will momentarily go blank. The new mwm process will be started immediately. While the new mwm process is starting, an hourglass symbol is displayed in the center of the otherwise blank screen. The hourglass appears to be filling up with sand until the window manager is running and the windows again are displayed on the screen.
Keep in mind that you can add, change, or remove menu items using the mwm configuration file, .mwmrc, in your home directory. We'll discuss customizing the Root Menu in Chapter 11.