8
Other Clients
This chapter gives an overview of other clients available with X, including window and display information clients, printing utilities, the xkill program, and several “desk accessories.” It also examines some of the features common to applications written with the Motif Toolkit.
In This Chapter:
Clock Programs: xclock and oclock
A Scientific Calculator: xcalc
Mail Notification Client: xbiff
Monitoring System Load Average: xload
Browsing Reference Pages: xman
Printing Utilities: xwd, xpr, xdpr
Killing a Client Window with xkill
Problems with Killing a Client
Window and Display Information Clients
Displaying Information about a Window: xwininfo
Listing the Window Tree: xlswins
Listing the Currently Running Clients: xlsclients
Generating Information about the Display: xdpyinfo
Previewing Colors for Your Monitor: xcol
Working with Motif Applications
Selecting a File from the Files Box
Choosing a File from another Directory in the Directories Box
8
Other Clients
In addition to xterm, the MIT distribution includes many other clients. This chapter discusses some of the more useful clients, grouped according to basic functionality:
- Desk accessories: xclock, oclock, xcalc, xbiff, xload, and xman.
- Text editor: xedit.
- Printing utilities: xwd, xpr, and xdpr.
- Program to remove a client window: xkill.
- Window and display information programs: xwininfo, xlswins, xlsclients, and xdpyinfo.
- Alternative window managers and other user-contributed clients, including a program to display available colors and change color preferences: xcol.
Most sections in this chapter are intended to acquaint you with the major features of some of the available clients. Additional detailed information is provided on the reference pages for each client in Part Three of this guide.
Many of the standard clients have been written (or rewritten) with a programming library called the X Toolkit. As explained in Chapter 1, the X Toolkit includes a set of predefined components (or widgets), known as the Athena widget set. Widgets make it easier to create complex applications; they also ensure a consistent user interface between applications.
Although most of the standard clients described in this guide were originally written before the X Toolkit was fully developed, many have since been rewritten to use the Toolkit. In discussing various clients in this chapter, we'll point out some of the features attributable to the X Toolkit.
For a comprehensive treatment of the X Toolkit, see Volume Four, X Toolkit Intrinsics Programming Manual, and Volume Five, X Toolkit Intrinsics Reference Manual.
Later in this chapter we'll also take a look at some of the features common to applications written with the Motif Toolkit.
Desk Accessories
The clients xclock, oclock, xcalc, xload, xbiff, and xman can be thought of as desk accessories. (Desk accessories is a term we've borrowed from the Macintosh environment, meaning small applications available—and useful—at any time.)
You can start these clients from the command line in any xterm window or, if you like, you can add them to an mwm menu. (See Chapter 11, Customizing mwm.)
Clock Programs: xclock and oclock
The standard release of X includes two clients that display the time: xclock and oclock (the oclock client was added to the standard distribution of X in Release 4). The time displayed by both xclock and oclock is the system time set and displayed with the UNIX date(1) command.
xclock continuously displays the time, either in analog or digital form, in a standard window. The analog xclock shows a round 12-hour clock face with tick marks representing the minutes. The digital xclock shows the 24-hour time (2:30 PM would be represented as 14:30) as well as the day, month, and year. You can run more than one clock at a time. The analog clock is the default. Figure 8-1 shows two xclock applications being run: an analog clock above a digital clock.

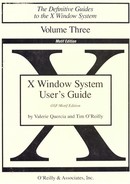
The oclock client (available as of Release 4) displays the time in analog form on a round 12-hour clock face without tick marks. The only features of an oclock display are the round clock outline, hour and minute hands, and the “jewel” marking 12 o'clock.
Though it is somewhat more difficult to read the precise time on the simple oclock display, the oclock is perhaps a little more aesthetic than the analog xclock.
oclock also makes use of the X Shape extension, which supports non-rectangular windows. If you try to resize the round oclock, you'll discover that it's possible to “stretch” it into various oblong shapes, as shown in Figure 8-3.

Though the default colors for oclock are black and white, it was designed to be run in color. The minute hand, hour hand, jewel, clock border, and background can all be set to a color, using either command line options (as described in Chapter 9) or by specifying client resources (as described in Chapter 10). See the oclock reference page in Part Three of this guide for the necessary command line options and color suggestions.
Removing an xclock or oclock
Usually when you invoke xclock or oclock you will leave the clock running. However, if you experiment with these programs to test size, location, or color, you will notice that there is no obvious way to delete an unwanted clock. (Moving the cursor to the clock and pressing Control-C, Control-D, q, or Q doesn't work with xclock or oclock.)
One way to remove an xclock or oclock window is to identify and kill the process using the standard UNIX control mechanisms. First, find the process identification (PID) number for the client. For example, to determine the process ID number for xclock, go to an xterm window and type:
% ps -aux | grep xclock
at a system prompt. Under System V, type:
% ps -e | grep xclock
at a system prompt. The resulting display should look something like this:
128 p0 0:00 xclock
142 p0 0:00 grep xclock
The number in the first column is the process ID. Type:
% kill process_id
The xclock display will be removed, and you will get the message:
Terminated xclock
The same sequence of commands can be used to remove an oclock window.
You can also remove either an xclock or oclock window by using the Close item of mwm's Window Menu or by double clicking on the Window Menu command button, as described in Chapter 4. Be aware, however, that these and other methods of “killing” a client have certain liabilities. See “Problems with Killing a Client” later in this chapter.
A Scientific Calculator: xcalc
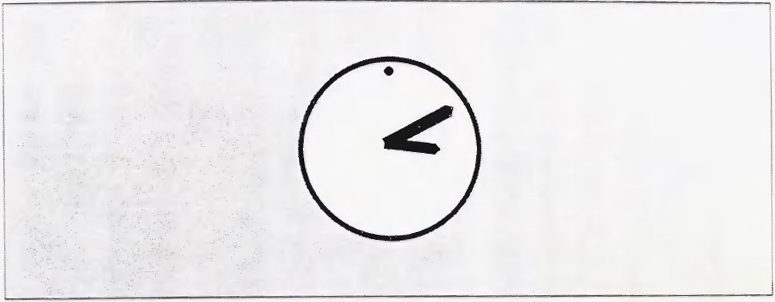
xcalc is a scientific calculator that can emulate a Texas Instruments TI-30 or a Hewlett Packard HP-10C. Once you place the pointer within the xcalc window, the calculator can be operated in two ways: with the pointer, by clicking the first pointer button on the buttons in the calculator window, or with the keyboard, by typing the same numbers and symbols that are displayed in the calculator window. When using the first method, notice that the pointer appears as a small hand, enabling you to “press” the buttons. Figure 8-4 shows xcalc on the screen.
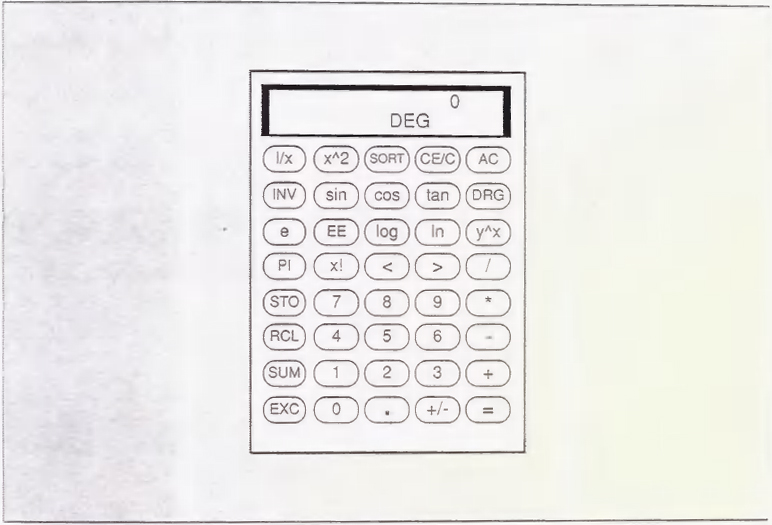
Figure 8-4 depicts the version of the calculator provided with Release 4 of X. As you can see, it features oval buttons. If you are running an earlier release, the calculator will have rectangular buttons and may also have a darker background color. These differences do not affect functionality. However, the Release 3 and Release 4 versions of xcalc do work somewhat differently. We describe some of those differences later. For additional information, see the xcalc reference page in Part Three of this guide.
The values punched on the calculator and the results of calculations are displayed in the long horizontal window along the top of the xcalc. You can enter values either by clicking on the calculator keys with the pointer, or by pressing equivalent keys on the keyboard. Most of the calculator keys have keyboard equivalents. The not-so-obvious equivalents are described on the xcalc reference page in Part Three of this guide.
By default, xcalc works like a TI-30 calculator. To run xcalc in this mode, enter:
% xcalc &
You can also operate the calculator in Reverse Polish Notation (as an HP-10C calculator operates), by entering:
% xcalc -rpn &
In Reverse Polish Notation the operands are entered first, then the operator. For example, 5 * 4 = would be entered as 5 Enter 4 *. This entry sequence is designed to minimize keystrokes for complex calculations.
As of Release 4, xcalc allows you to select the number in the calculator display. You select the number using the first pointer button and paste it in another window using the second button. See Chapter 5, The xterm Terminal Emulator, for information about copying and pasting text selections.
The Release 4 xcalc can also be resized. In prior releases, this was not possible. Also as of Release 4, xcalc no longer emulates a slide rule.*
For more information on the function of each of the calculator keys, see the xcalc reference page in Part Three of this guide.
Terminating the calculator
Terminate the calculator by either:
- Clicking the third pointer button on the TI calculator's AC key or the HP calculator's ON key, or:
- Positioning the pointer on the calculator and typing q, Q, or Control-C.
Mail Notification Client: xbiff
xbiff is a simple program that notifies you when you have mail. It puts up a window showing a picture of a mailbox. When you receive new mail, the keyboard emits a beep, the flag on the mailbox goes up, and the image changes to reverse video. Figure 8-5 shows the xbiff mailbox before and after mail is received.
After you read your mail (and the mail file is empty), the image changes back to its original state; or you can click on the full mailbox icon with any pointer button to change it back to empty. Regardless of the number of mail messages when you do this, xbiff remembers the current size of your mail file to be the empty size.

This feature of xbiff has two implications, one obvious and the other not so obvious: when additional mail arrives (and the mail file becomes larger), xbiff notifies you; but when you delete messages from the current mail file (and the file becomes smaller), xbiff also notifies you—when you exit the mail program and the file is saved. This can be a little confusing until you get used to it.
While xbiff is intended to monitor a mail file, it can actually be set up to watch any file whose size changes using the -file option (followed by the name of the file to be monitored). For instance, if you're running a program that produces output intermittently, you can start xbiff with -file followed by the name of the output file; then xbiff will notify you when output is returned. (You can even specify an image other than the mailbox using resource variables—even for a single xbiff process.) See the xbiff reference page in Part Three of this guide for a list of options and resources. See Chapter 10, Setting Resources, for the syntax of resource specifications.
Monitoring System Load Average: xload
xload periodically polls the system for the load average and graphically displays that load using a simple histogram. By default, xload polls the system every five seconds. You can change this frequency with the -update option. For example, if you enter this command in an xterm window:
% xload -update 3 &
the resulting xload window will poll the system every three seconds, as in Figure 8-6.

If you are using both the local machine and remote machines, you can display loads for all systems and do your processing on the system that is fastest at the time.
Like xclock and oclock, xload provides no exit command. To remove an xload window, you need to kill the client process. See “Removing an xclock or oclock” earlier in this chapter.
Browsing Reference Pages: xman
The xman client allows you to display and browse through formatted versions of reference pages. By default, xman lets you look at the standard UNIX manpages found in subdirectories of the directory /usr/man. The standard version of X assumes there are 10 subdirectories: man1 through man8, corresponding to the eight sections of reference pages in the UNIX documentation set; manl (man local) and mann (man new). You can specify other directories by setting the MANPATH system variable. (The individual directory names should be separated by colons.)
This section describes the version of xman provided with Release 4 of X. From a user's viewpoint, the general operation of the client has not changed much since prior releases but the organization of menus and options has changed.
Regardless of the version of X, you run xman by typing:
% xman &
in an xterm window.
The initial xman window, shown in Figure 8-7, is a small window containing only a few commands.

This window is small enough to be displayed for prolonged periods during which you might have need to examine UNIX manual pages. You select a command by clicking on it with the first pointer button.
The Manual Page command brings up a larger window in which you can display a formatted version of any manual page in the MANPATH. By default, the first page displayed contains general help information about xman. Use this information to acquaint yourself with the client's features.* (The actual xman reference page in Part Three of this guide primarily describes how to customize the client.)
Once you've opened this larger window, you can display formatted manual pages in it. Notice the horizontal bar spanning the top edge of the window. (If you're running mwm or a similar window manager, this bar appears beneath the titlebar provided by the window manager.) The bar is divided into three parts labeled Options, Sections, and Xman Help. The part currently labeled Xman Help is merely informational and the text displayed in it will change depending on the contents of the window. The parts labeled Options and Sections are actually handles to two xman menus.
If you place the pointer on the Options box and press and hold down the first button, a menu called Xman Options will be displayed below. The menu is pictured in Figure 8-8.

The functionality of these options is described in the online xman help page. To select an option, move the pointer down the menu and release the first button on the option you want. The option you will probably use most frequently is the first one, Display Directory.
Display Directory lists the reference pages in the current reference page directory (also called a section). By default, this is man1, the user commands. When you list the contents of man1 in this way, the informational section of the horizontal bar reads Directory of: (1) User Commands.
xman displays each manpage directory in a window known as a viewport, created with the Athena Viewport widget from the X Toolkit. A viewport is a composite widget that provides a main window and horizontal and/or vertical scrollbars. The Athena Viewport widget is analogous to the Motif Toolkit's ScrolledWindow, described later in this chapter.
xman's scrollbar is also an Athena widget. (See Chapter 5, The xterm Terminal Emulator, for instructions on using an Athena scrollbar.) The Motif Toolkit also provides a scrollbar widget, described later in this chapter, which looks and operates somewhat differently than the Athena scrollbar.
For a list of the Athena widgets, see Appendix G, Athena Widget Resources. For complete information about the X Toolkit, see Volume Four, X Toolkit Intrinsics Programming Manual, and Volume Five, X Toolkit Intrinsics Reference Manual.
Once you've listed a reference page directory in the xman window, you can display a formatted version of any page in the list simply by clicking on the name with the first pointer button. Figure 8-9 shows the formatted reference page for the UNIX cd(1) command.
To display another manual page from the same directory, display the Xman Options menu again. Select Display Directory and the directory listing is again displayed in the window. Then click on another command name to display its manual page in the window. (If you decide not to display another reference page, you can remove the directory listing and go back to the reference page previously displayed by using the second Xman Options menu selection, Display Manual Page. Display Directory and Display Manual Page are toggles of one another.)
To display a manual page from another directory in the MANPATH, you must first change to that directory using the second xman menu, Xman Sections. Bring up the menu by placing the pointer in the Sections box in the application's titlebar and holding down the first button. The Xman Sections menu lists the default directories of UNIX manual pages, as shown in Figure 8-10.
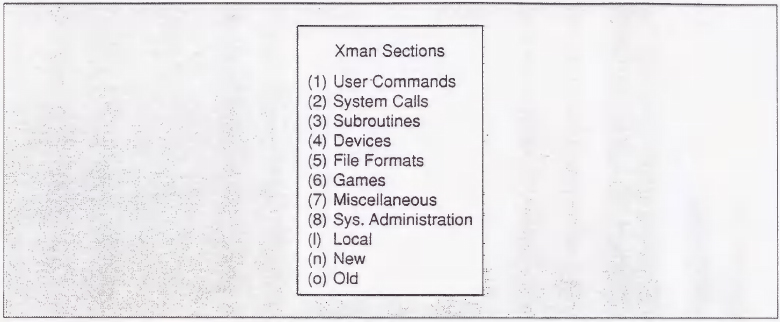
Click on the first pointer button to select another directory of reference pages from which to choose. Once you select a directory, the files in that directory are listed in the window. Again, you display a page by clicking on its name with the first pointer button.
You can display more than one “browsing” window simultaneously by selecting the Open New Manpage option from the Xman Options menu. An additional reference page window will be opened again starting with the help information.
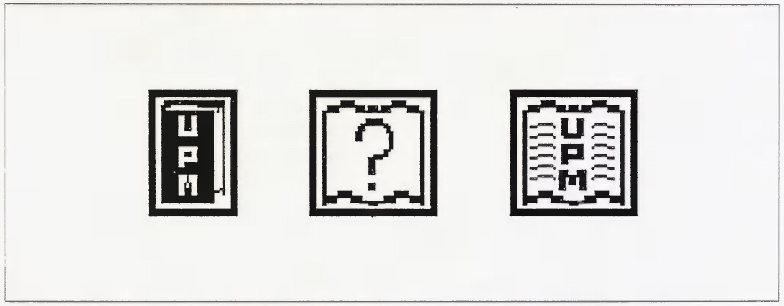
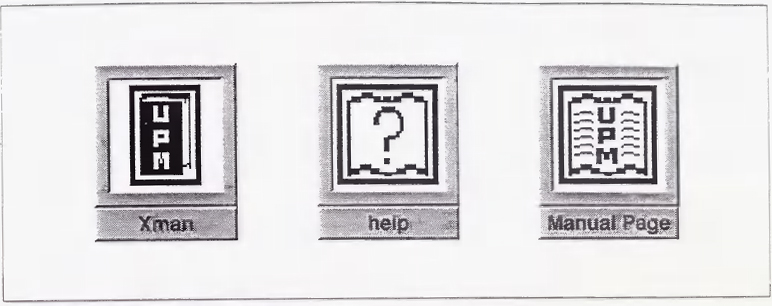
The various windows xman creates can all be iconified and each is represented by a different icon symbol. The icon symbols for the initial xman window, the help window, and the browsing window appear in Figure 8-11. When the mwm window manager is running, the icons appear as in Figure 8-12. Keep in mind that if you've displayed several browsing windows simultaneously, you can iconify each of them.
You can remove a browsing window by selecting the Remove This Manpage option from the Xman Options menu. (Prior to Release 4, selecting this option resulted in an error and caused the xman program to exit.)
Selecting Quit from the Xman Options menu or from the initial xman window causes the client to exit.
The xedit Text Editor
The xedit client provides a window in which you can create and edit text files. The editing commands xedit recognizes are provided by the Athena Text widget. Many other standard and user-contributed clients also include areas in which you can enter text. Several of these clients, including xclipboard and xmh, also use the Text widget, and thus recognize the same editing commands as xedit.
The xedit client is valuable to illustrate the use of the Athena Text widget. (xedit can also be used to illustrate several other widgets.) However, we do not recommend using xedit as your primary text editor. The program is somewhat buggy and its behavior can be erratic. For example, it's fairly easy to overwrite files inadvertently, as explained in the discussion of the Load button later in this section. The redraw command (Control-L) causes text in the window to scroll so as to reposition the cursor in the center of the editing window—not a welcome surprise. Some of the commands to create a new paragraph may also inadvertently copy preceding text. These are just a few of xedit's inconvenient features.
Still, it is necessary to know something about the Athena Text widget in order to be able to enter and edit text in windows provided by many clients.
xedit recognizes various Control and Meta keystroke combinations that are bound to a set of commands similar to those provided by the emacs text editor.* In addition, you can use the pointer to move the cursor in the text or to select a portion of text. The xedit cursor is a caret symbol (^). A caret cursor appears in each of the three areas that accept text entry. (These areas are described later in this section.) Pressing the first pointer button causes the insertion point (cursor) to move to the location of the pointer. Notice that the cursor always appears between characters, rather than on a character as the xterm cursor does. Double-clicking the first pointer button selects a word, triple-clicking selects a paragraph, and quadruple-clicking selects everything. After you select text, the selection may be extended in either direction by using the third pointer button.
You can invoke xedit by entering:
% xedit &
Since no filename has been specified, the main section of the xedit window is empty, as illustrated by Figure 8-13.

Notice that the xedit window is divided into four parts:
- A commands section, which features three command push buttons (Quit, Save, and Load) and an area to their right in which a filename can be entered.
- A message window, which displays messages from the client and can also be used as a scratch pad.
- The filename display, which shows the name of the file being edited and the read/write permissions for the file.
- The edit window, in which the text of the file is displayed and in which you issue the editing commands.
The xedit application uses the Athena VPaned widget (of the X Toolkit), which arranges subwindows one above the other without overlapping. The subwindows are also known as vertical panes and the non-overlapping, top-to-bottom arrangement is commonly described as vertical tiling.
The individual panes organized by a VPaned widget can be any other type of widget. In the case of xedit, for example, the commands section is one pane that contains three command buttons (another widget) and a small window to the right of the buttons (a Text widget) in which a filename can be entered.
Notice the three small black rectangles on the borders between the panes. These features are called grips and they serve as handles to allow you to resize the subwindows. When the pointer is positioned on the grip and a button pressed, an arrow is displayed that indicates the direction in which the border between the two windows can be moved. If you move the pointer in the direction of the arrow (while pressing the button), one subwindow will grow while the other will shrink.
You can enter text in three areas of the xedit window: the message window, the edit window, and the small window immediately to the right of the command buttons in which you can enter a filename. (Thus all three use a Text widget.) Note that the small filename window to the right of the command buttons is different from the filename display (lower in the xedit window). The filename display is simply that—a display of the filename; the window does not support editing.
All three areas that permit editing display the caret text cursor. In order to focus keyboard input to a particular area, the pointer must rest in that area—regardless of whether mwm is operating with the default click-to-type focus. (If click-to-type focus is in effect, the xedit window must also be selected as the focus window.) This is extremely important to remember. Both the message window and the edit window will display a vertical scrollbar if the text is too large to fit. (Be aware also that a scrollbar technically is not part of the text entry window it borders. If the pointer is resting in a scrollbar, keyboard input will be lost—it will not be directed to the corresponding text area!)
The three push buttons in the commands section have the following functions:
Quit
Exits the current editing session and closes the window. If changes have not been saved, xedit displays a warning in the message window, and does not exit, thus allowing the user to save the file.
Save
Writes the file. If file backups are enabled (using the enableBackups resource), xedit first stores a copy of the unedited file as filename.BAK and then overwrites filename with the contents of the edit window. The filename used is the text that appears in the area immediately to the right of the Load button.
Loads the file displayed immediately to the right of the button into the edit window. If a file is currently being displayed and has been modified, a warning message will ask the user to save the changes, or to press Load again.
This interface has at least two serious pitfalls. First, if you're working on a file that has unsaved changes and you try to load a second file, it's possible to overwrite the second file. This is how it happens. In order to load a second file, you must enter the name of the file in the area next to the Load button; then press Load. If you try to load a second file while editing a file with unsaved changes, xedit warns you to save or press Load again. If you press Save the current file will be saved—but as the name to the right, the second file you intended to load.
If backups are not enabled, this action will overwrite the file you wanted to load. If backups are enabled, the first file will be saved under the name of the second file with a .BAK extension and the second file will not be overwritten. Because of this potential problem, we recommend that you set the resource enableBackups to on (and load the resources using xrdb) before using xedit.
A second problem can occur after you've loaded a file by entering the name in the window next to the Load button. Say you've been editing the file for some time, but haven't saved the changes. If you go to save the changes and accidentally double-click on Load (not that difficult to do), you'll reload the version of the file before you made the edits. The changes are lost!
Now, after considering some of the possible pitfalls, let's load a file into the empty xedit window as shown in Figure 8-13. (Obviously, in this case, there's no danger of overwriting an existing file.) To load a file called test:
- Place the pointer in the area to the right of the Load button.
- Type test. Notice that the caret cursor moves as you type.
- Place the pointer on the Load command button and press the first pointer button.
The file called test is displayed in the edit window, as shown in Figure 8-14.

The simpler commands to edit or append text are intuitive. A backspace deletes the character to the left of the cursor. Typing enters characters immediately before the cursor point, causing the cursor to advance to the right. When you first load a file, the cursor appears at the beginning of the text in the edit window. If you want to append text to the end of the file, move the pointer to the end of the text and click the first button. The caret cursor appears where the pointer is and any text you type is added to the end of the file, moving the cursor to the right.
The list at the end of this section summarizes all of the editing command recognized by xedit. In this list of commands, a line refers to one row of characters displayed in the window. A paragraph refers to the text between manually inserted carriage returns or blank lines. Text within a paragraph is automatically broken into lines based on the current width of the window.
The keystroke combinations are defined as indicated. (Note that “Control” and “Meta” are two of the “soft” keynames X recognizes. They are mapped to particular physical keys which may vary from keyboard to keyboard. See the “xmodmap” section in Chapter 12, Setup Clients, for a discussion of modifier key mapping.) If you are using an earlier release of X, a few of these keystroke combinations may produce slightly different results.
Keep in mind that you can redefine any of these key combinations using what are known as translations. Translations allow you to assign actions recognized by a client to particular key combinations, or key and pointer button combinations. For example, xedit recognizes actions to delete text, to copy text, to move the cursor, etc. xedit defines key combinations to invoke these actions. (The key/action mappings appear in the list at the end of this section.) For information on specifying alternate mappings, see “Event Translations” in Chapter 10, Setting Resources.
Note that the function assigned to the Return key in the following list applies only to the edit window and message window. In the filename window (next to the command buttons), Return simply moves the cursor to the end of the line.
Printing Utilities: xwd, xpr, xdpr
xwd stores window images in a formatted window dump file. This file can be read by various other X utilities for redisplay, printing, editing, formatting, archiving, image processing, etc.
To create a window dump file, type:
% xwd > file
The pointer will change to a small crosshair symbol. Move the crosshair pointer to the desired window and click any button. The keyboard bell rings once when the dump starts and twice in rapid succession when the dump is finished.
To make a dump of the entire root window (and all windows on it), use the -root option:
% xwd -root > file
When you select a single window, by default xwd takes an image of the window proper. As of Release 4, to include a window manager frame or titlebar, use the -frame option.
xwd allows you to capture a single window or the entire root window. But what if you want an image that includes more than one window or parts of multiple windows? You can use xmag (described in Chapter 7) to capture an image of multiple windows and then use xwd on the xmag window! Since xmag is intended to magnify, if you want the window image to be the actual size, you must specify that no magnification is performed. To do this, you run xmag with the option -mag 1. See Chapter 7, Graphics Utilities, and the xmag reference page in Part Three of this guide for more information.
To redisplay a file created with xwd in a window on the screen, use the xwud client, an undumping utility. Specify the dump file to display as an argument to the -in option:
% xwud -in file
Then remove the image by typing Control-C in the xterm from which you started xwud.
xpr takes as input an X Window System dump file produced by xwd and converts it to a printer-specific format that can be printed on the DEC LN03 or LA100 printer, a PostScript printer such as the Apple LaserWriter, the IBM PP3812 page printer, and as of Release 4, the HP LaserJet (or other PCL printers) or the HP PaintJet. By default, output is formatted for the DEC LN03 printer. Use the -device option to format for another printer. For example, to format a window dump file for a PostScript printer, type:
% xpr -device ps file > file.ps
Other options allow you to change the size, add headers or footers, and so on. See the xpr reference page in Part Three of this guide for details.
You can use xwd and xpr together, using the standard UNIX pipe mechanism. For example:
% xwd | xpr -device ps | lpr
The xdpr command rolls these three separate commands into one. xdpr accepts most of the options accepted by xwd, xpr, and lpr(1). Thus, you could use the command:
% xdpr -device ps
to take a window dump (xwd), convert that file to PostScript (xpr -device ps), and print the output (lpr). See the xdpr reference page in Part Three of this guide for more information.
Note that when you start piping together the output of X clients, you run into some ambiguities. For example, if you pipe the output of xwd to xpr and for some reason the xpr command fails, xwd will still be there waiting for pointer input. The original UNIX pipe mechanism doesn't have the concept of data dependent on pointer input! The integration of the UNIX model of computing (in which standard input and output are always recognized) and the window model is not always complete, sometimes leading to unexpected behavior.
As an even more flagrant example, you can create a pipe between two programs, the first of which doesn't produce standard output and the second of which doesn't recognize standard input. The shell doesn't know any better and the programs themselves go on their merry way with pointer and windows.
However, it is nice to know that you can pipe together program output, even when some of those programs may not produce output until you intervene with the pointer.
Even without pipes, you should start thinking about how these programs could work together. For example, the pictures of fonts in Appendix B, Release 4 Standard Fonts, were created by these steps:
- Display a font with xfd. (See Chapter 6, Font Specification, for instructions on how to use xfd.)
- Resize the window to improve readability, using the mwm resize handles or the Resize item of the Window Menu.
- Create a window dump file with the command xwd > file.
- Create a PostScript file from the dump with the command:
xpr -device ps file > file.ps
- Print the PostScript file on an Apple LaserWriter with the standard print command lpr(1).
Even though the UNIX shell will accept a pipe between xfd, xwd, and xpr, what actually happens is that xwd starts up faster than xfd, and is ready to dump a window before the xfd window appears.
Killing a Client Window with xkill
The xkill program allows you to kill a client window or, more specifically, to force the server to end the connection to the client. The process exits and the associated window is removed.
xkill is a fairly drastic method of terminating a client and should not be used as the method of choice. In most cases, clients can be terminated in other ways. The possible repercussions of using xkill and some of the alternatives are discussed in the next section.
xkill is intended primarily to be used in cases where more conventional methods of removing a client window do not work. It is especially useful when programs have displayed undesired windows on the screen. To remove a stubborn client window, type:
% xkill
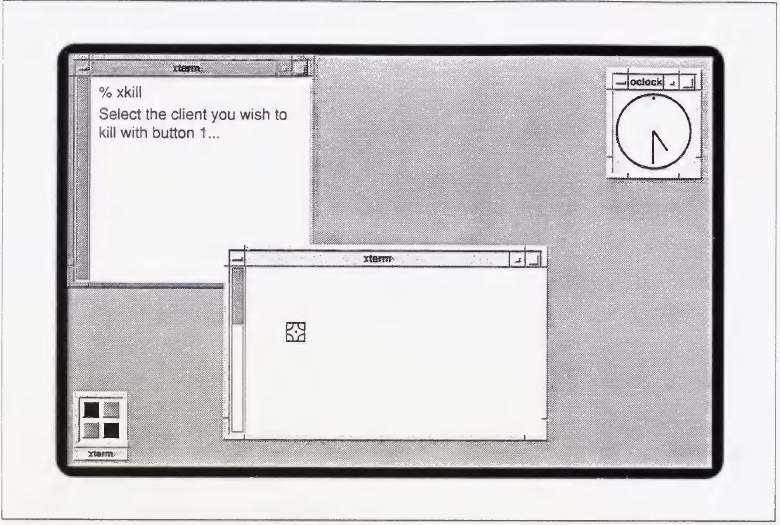
on the command line of an xterm window. The pointer changes to a “draped box” pointer and you are instructed to:
Select the window whose client you wish to kill with button 1 …
Move the draped box pointer to the window you want to remove, as shown in Figure 8-15, and click the first pointer button. The window is removed. (xkill does not allow you to select the root window.)
You can also specify the window to be killed by its window ID (also called the resource ID). Every window has an identification number associated with it. The xwininfo client can be used to display a window's window/resource ID (see the section “Window and Display Information” later in this chapter).
To remove a window using its ID number, type:
% xkill -id number
The window with the ID number is removed. Killing a window by its ID number is more cumbersome but it's somewhat safer than choosing the window to be killed with the pointer. It's too easy to click in the wrong place. (Of course, it's less treacherous to use the pointer on an isolated window than a window in a stack.)
Problems with Killing a Client
The most obvious problem with xkill is that it's possible to kill the wrong window inadvertently. Perhaps less obvious is a problem inherent in “killing” a program. As a general rule, a command that “kills” a program does not give the program time to save or complete processes that are still running—in effect, to clean up after itself. The processes that can be adversely affected may be visible to the user, such as an editing session, or they may be underlying system processes, such as writing to or reading from a socket.
Most clients can be terminated in ways that allow them to finish all relevant processes and then exit cleanly. These methods should be attempted before you use xkill, or some other program that kills the client.
For example, you can generally remove an xterm window by typing in the window the same command you use to log off the system. You should also be able to remove an xterm window with various Main Options menu commands, depending on the signals that can be interpreted by your system. (Some of these signals, such as SIGHUP and SIGTERM, are more gentle to the system. See the xterm reference page in Part Three of this guide for a list of menu commands and the signals they send.) An xcalc window can generally be removed by typing q, Q, or Control-C in the window. A bitmap window has a Quit command button, etc.
A few clients, such as oclock, cannot be removed except by killing. You must use xkill or a similar method to remove an oclock window.
Generally, however, you should exhaust the safer alternatives before you use xkill and other commands that kill a client.
When you want to remove a window, depending on the client and what commands it recognizes, try these methods (roughly) in this order.
- Methods that cause the client to exit after finishing relevant processes:
- Special commands (e.g., exit) or key sequences (e.g., Control-D, Control-C, q, Q) recommended to stop a client.
- Certain application-specific menu items (e.g., for xterm, the Main Options menu commands Send HUP Signal, Send TERM Signal, and Quit; the bitmap Quit button).
- When these methods don't work or don't apply (as in the case of oclock), then use commands or menu items that kill the client:
- The Send KILL Signal item on the xterm Main Options menu, for removing xterm windows only. (See Chapter 5, The xterm Terminal Emulator.)
- The Close item on the mwm Window Menu; or a double click on the Window Menu command button. (See Chapter 4, More about the mwm Window Manager.)
- The UNIX kill command with the client's process ID number, which is determined using ps. (This method of removing a window is described for xclock earlier in this chapter.*)
- The xkill client.
Window and Display Information Clients
The standard release of X includes four clients that provide information about windows on the display and about the display itself. Much of the information is probably more relevant to a programmer than to the typical user. However, these clients also provide certain pieces of information, such as window geometry, window ID numbers, and the number and nature of screens on the display, that can assist you in using other clients.
Displaying Information about a Window: xwininfo
The xwininfo client displays information about a particular window. Some of this information can be useful in determining or setting window geometry (described in Chapter 3). xwininfo also provides you with the window ID (also called the resource ID). Each window has a unique identification number associated with it. This number can be used as a command line argument with several clients. Most notably, the window ID can be supplied to the xkill client to specify the window be killed.
You can also use the window ID as an argument to the xprop client, which displays various window properties. As described in Chapter 1, a property is a piece of information associated with a window or a font and stored in the server. Properties facilitate interclient communication; they are used by clients to store information that other clients might need to know. Storing properties in the server makes the information they contain accessible to all clients. See Chapter 1, the xprop reference page in Part Three of this guide, and Volume One, Xlib Programming Manual, for more information about properties and the xprop client.
To display information about a window, type this command in an xterm window:
% xwininfo
The pointer changes to the crosshair pointer and you are directed to select the window about which you want information:
xwininfo ==> Please select the window about which you
         ==> would like information by clicking the
         ==> mouse in that window.
You can select any window on the display, including the window in which you've typed the command and the root window. (Rather than using the pointer, you can specify a window on the command line by supplying its title, or name if it has no title, as an argument to xwininfo's own -name option. See Chapter 9 for information about setting a client's title and name. See the xwininfo reference page in Part Three of this guide for a list of its options.)
Figure 8-16 shows the statistics of xwininfo supplies with some typical readings.
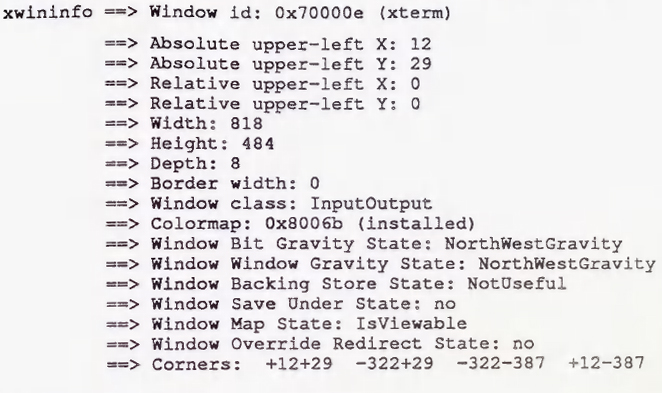
These readings are for a login xterm window displayed using a 12-point Roman Courier font. All numerical information is in pixels, except depth, which is in bits per pixel. The mwm window manager is also running. The statistics from Figure 8-16 that are most significant for the average user are:
xwininfo ==> Window id: 0x70000e (xterm)

         ==> Absolute upper-left X: 12
         ==> Absolute upper-left Y: 29
         ==> Relative upper-left X: 0
         ==> Relative upper-left Y: 0
         ==> Width: 818
         ==> Height: 484
         ==> Depth: 8
         ==> Border width: 0
         ==> Colormap: 0x8006b (installed)
         ==> Corners:  +12+29  -322+29  -322-387  +12-387
The first piece of information is the window ID, which can be used as an argument to xkill. Specifying the window to be killed by its ID number is somewhat less risky than choosing it with the pointer.
With many window managers, you can use some of the other statistics to gauge the window's geometry (size and position). Generally, the absolute upper-left X and Y correspond to the positive x and y offsets that can be supplied to the -geometry option used to place a client window. (The use of the -geometry option is discussed in Chapter 3.)
The mwm frame complicates matters. When mwm is running, the absolute upper-left X and Y correspond to the x and y coordinates of the application window—but not the framed window!
Let's take another look at the sample xwininfo output. The absolute upper-left X and Y suggest that the window is located at coordinates 12,29. However, the output is actually for an xterm located at coordinates 0,0! The 12,29 are the coordinates of the xterm window itself; the coordinates represent the distance of the window from 0,0 including the dimensions of the frame. The default frame is actually 12 pixels in the x dimension and 29 pixels in the y dimension (because of the titlebar).
If you're using the default configuration of mwm, you can determine the positive x and y offsets of a window by subtracting 12 and 29 from the absolute upper-left X and Y provided by xwininfo. These figures can be supplied as arguments to the -geometry option on the command line to specify window placement, as described in Chapter 3. (Chapter 3 also describes a somewhat simpler method of gauging x and y offsets.)
The relative upper-left X and Y are not meaningful if you're running mwm. Regardless of a window's location, the relative upper-left X and Y are 0 and 0.
The four corners (again, including the frame) are listed with the upper-left corner first and the other three clockwise around the window (i.e., upper-right, lower-right, lower-left). The coordinates of the upper-left corner are, of course, the absolute upper-left X and Y. The width and height in pixels are somewhat less useful, since the geometry option to xterm requires that these figures be specified in characters and lines.
The values for window depth and colormap relate to how color is specified. See the discussion of color in Chapter 9 for more information.
The other statistics provided by xwininfo are listed below:
==> Window class: InputOutput
==> Window Bit Gravity State: NorthWestGravity
==> Window Window Gravity State: NorthWestGravity
==> Window Backing Store State: NotUseful
==> Window Save Under State: no
==> Window Map State: IsViewable
==> Window Override Redirect State: no
These statistics have to do with the underlying mechanics of how a window is resized, moved, obscured, unobscured, and otherwise manipulated. They are inherent in the client program and you cannot specify alternatives. For more information on these and other window attributes, see Chapter 4 in Volume One, Xlib Programming Manual.
You can also use xwininfo with various options to display other window attributes. See the reference page in Part Three of this guide for details.
Listing the Window Tree: xlswins
Windows are arranged in a hierarchy, much like a family tree, with the root window at the top. The xlswins client displays the window tree starting with the root window, listing each window by its resource ID and title (or name), if it has one. (See Chapter 9 for a discussion of setting a client's title and name with command line options.)
A resource ID can be supplied to xkill to specify the window to kill. You can also supply a resource ID to xwininfo to specify the window you want information about, or to xprop to get the window's properties. Being able to display the ID numbers of all windows on the screen simultaneously is especially helpful if one or more windows is obscured in the stack. The xwininfo client is virtually useless in situations in which one window is hidden behind another. xlswins allows you to determine by process of elimination which window is hidden—without having to circulate all the windows on your screen. You can then use xwininfo with the ID number (displayed by xlswins) to get information about the obscured window.
Figure 8-17 shows the results of xlswins for a simple window arrangement: a single xterm (login) window on a root window. (The mwm window manager is not running.)

The xterm window is easily identified. Any client that displays an application window, such as xterm, xclock, xfd, bitmap, etc., will be listed by name (in parentheses) following the ID number.* The root window is listed above the xterm in the window hierarchy. Client (and other) windows displayed on the root window are called children of the root window, in keeping with the family tree analogy; thus, the root window is the parent of the xterm window. In the xlswins listing, a child window is indented once under its parent.
But what are the other windows listed in Figure 8-18? A superficial examination of these other windows provides a brief introduction to the inner workings of X. An underlying feature of X is that menus, boxes, icons, and even features of client windows, such as scrollbars, are actually windows in their own right. What's more, these windows (and client window icons) may still exist, even when they are not displayed.
The two remaining windows are unnamed. From the relative indents of the windows, we can tell certain information. The first unnamed window is a child of the xterm, the second is a child of the child.
If we again run xlswins, this time requesting a long listing (with the -1 option), we get geometry information that helps identify each window. This is shown in Figure 8-18.

The first number on each line refers to the level of the window in the hierarchy, the root window being at level 0, client windows at 1, etc. Following the xterm application window are what are known as the instance and class resource names for the client (in this case, xterm, XTerm). You use the instance and class resource names to specify default window characteristics, generally by placing them in a file in your home directory. This is described in detail in Chapter 10, Setting Resources.
The first geometry string is the complete specification relative to the parent window. The second geometry string is the current position relative to the root window. Since mwm is not running, frames are not an issue. Thus, a window at coordinates 0,0 would have the position +0+0 relative to the root.
The two unnamed windows under xterm are the VT102 window and the window's scrollbar, respectively. (The first xterm listing is the application shell window, which can be displayed both as a VT102 and a Tektronix window.)
The listing in Figure 8-18 was generated when the mwm window manager was not running. If mwm is running, the xlswins output is considerably more complicated. Many of the features provided by mwm, such as the window frame and its command buttons, and the Root Menu and Window Menu, are actually all windows. This greatly complicates the window hierarchy. If you run xlswins while mwm is running, even if the display has only a single application window, the output will be dozens of lines long; you can assume that most of the mysterious windows in the hierarchy are features provided by the window manager.
You may also notice that application windows, such as xterm, are now at level 3 in the hierarchy. This is because mwm reparents all client windows; that is, the window manager creates another window that is the parent window of the application window and is itself the child of the root window. (The frame is actually a window in its own right; think of the window manager as creating a window that contains the application window.)
The geometry strings for application windows will also be different when mwm is running because of this reparenting and because of the presence of the frame. The first geometry string, which gives the position relative to the parent window, will always end with the x,y coordinates +0+0, since the parent is the window manager. The second geometry string, which gives the position relative to the root window, will include the dimensions of the frame. A window located at coordinates 0,0 will have the string +12,+29 because the x and y dimensions of the default frame are 12 and 29 pixels, respectively. See the preceding discussion of xwininfo for more information.
For more information on the window hierarchy, see Volume One, Xlib Programming Manual.
Listing the Currently Running Clients: xlsclients
You can get a listing of the client applications running on a particular display by using xlsclients. Without any options, xlsclients displays a two-column list, similar to:
colorful  xterm -geometry 80x24+10+10 -ls
colorful  xclock -geometry -0-0
The first column shows the name of the display (machine) and the second the client running on it. The client is represented by the command line used to initiate the process.
This sample listing indicates that there is one xterm window and one xclock window running on the display colorful. (The option -ls following the xterm command reveals that the shell running in this window is a login shell.)
You can use xlsclients to create an .xsession or .xinitrc file, which specifies the clients you want to be run automatically when you log in. In order to do this, you must have set up client windows in an arrangement you like using command line options alone (that is, without having moved or resized windows via the window manager). You can then run xlsclients to print a summary of the command lines you used to set up the display and include those command lines in your .xsession or .xinitrc file. See Appendix A, System Management, for information on setting up a user session.
By default, xlsclients lists the clients running on the display corresponding to the DISPLAY environment variable, almost always the local display. You can list the clients running on another display by using the -display command line option. See Chapter 3, Working in the X Environment, for more information about the -display option.
With the option -1 (indicating long), xlsclients generates a more detailed listing. Figure 8-19 shows the long version of the listing on the previous page.

For each client, xlsclients displays six items of information: the window ID number, machine name, client name, icon name, command line used to run the client, and the instance and class resource names associated with the client.
As we'll see in Chapter 9, many clients, including xterm, allow you to specify an alternate name for a client and a title for the client's window. If you've specified a title, it will appear in the xlsclients Name field. If you haven't specified a title but have specified a name for the application, the name will appear in this field. Neither of the clients in the sample display has been given an alternate name or title.
You use the instance and class resource names to specify default window characteristics, generally by placing them in a file in your home directory. This is described in detail in Chapter 10, Setting Resources.
Generating Information about the Display: xdpyinfo
The xdpyinfo client gives information about the X display, including the name of the display (contents of the DISPLAY variable), version and release of X, number of screens, current screen, and statistics relating to the color, resolution, input, and storage capabilities of each screen. The xdpyinfo reference page in Part Three of this guide shows a listing for a display that supports both a color and monochrome screen.
Much of the information provided by xdpyinfo has to do with how clients communicate information to one another and is more relevant to a programmer than to the typical user. However, the basic statistics about the name of the display, the version and release of X, and the number and nature of screens might be very helpful to a user, particularly one who is using a display for the first time.
In addition, the detailed information about each screen's color capabilities can also be very valuable in learning how to use color more effectively. This information includes the default number of colormap cells: the number of colors you can use on the display at any one time. See Chapter 9, Command Line Options, for more information on the use of color and how to specify colors for many clients.
See Volume One, Xlib Programming Manual, for insights into some of the other information provided by xdpyinfo.
User-contributed Clients
In addition to the clients in the standard MIT X distribution, there are many user-contributed clients available in the X source tree, distributed over Usenet, and perhaps included with various commercial distributions. If you have access to Usenet, the newsgroup comp.windows.x contains voluminous discussions of X programming and the newsgroup comp.sources.x contains sources.
Prior to Release 4, uwm (the universal window manager) was the official window manager shipped with the standard X Window System. As of Release 4, uwm is no longer supported but is still available as a user-contributed client. However, be aware that uwm does not comply with accepted interclient communication conventions and thus, should probably not be the window manager of choice.
Several other window managers are widely used and have been tailored to reflect the interclient communication conventions proposed in Release 3. Some of the more popular window managers that reflect these conventions are:
awm
Ardent window manager (written by Jordan Hubbard of Ardent Computer Corporation).
rtl
Tiled window manager (written by Ellis Cohen at Siemens Research & Technology Laboratories, RTL).
olwm
OPEN LOOK window manager (developed by AT&T).
A version of the OPEN LOOK window manager is available as a user-contributed client.
Commercial products (such as spreadsheets, word processors, and graphics or publishing applications) based on the X Window System are also becoming available.
Previewing Colors for Your Monitor: xcol
Among the more useful user-contributed clients is xcol, developed by Helmut Hoenig. Most X applications allow you to specify colors for a window's background, foreground, and border. In addition, the mwm window manager allows you to specify the color of the frame it places around all windows on the display. The standard colors recognized by the X server are listed in a file called rgb.txt which is generally stored in /usr/lib/X11. See Chapter 9 for a discussion of the color options accepted by most clients and an overview of X's color capabilities and the standard colors provided.
Colors can look different on different monitors, perhaps much different than a color name suggests. Hypothetically, you could spend a lot of time experimenting with color specifications. The xcol client allows you to see how colors appear on your display before you specify the colors for a client. Once you've selected certain colors, xcol can also assist you in editing the color specifications in your .Xresources file. (See Chapter 3, Working in the X Environment, for an introduction to resources, and Chapter 10, Setting Resources, for more detailed instructions.)
To run the xcol program, simply enter:
% xcol&
A window titled ColorView will be placed on your screen. The ColorView window displays the outline of a cube containing scattered pixels of the available colors, almost like a universe of colored stars. The position of each of the colored pixels in the cube represents its RGB value (see Chapter 9).
In many cases, a primary shade is associated with several subshades, which are distinguished from the primary shade by a number appended to its name. For example, you can specify the color dark sea green, and also DarkSeaGreen1 through DarkSeaGreen4. Within xcol's ColorView window, colors with the same name but different RGB values (signaling different intensities) are represented by a single pixel.
The pixels are not labeled but you should be able to distinguish basic colors on a good quality color monitor. If you place the pointer on any of the pixels, a small box containing the color name will be displayed. The color name appears in white and the border of the box appears in the color specified. If the pixel represents several associated colors of differing intensities, the box will also contain a spectrum of those colors (though the individual shades are lumped under the primary name). By moving the pointer onto various pixels, you should be able to get an idea of how certain colors look on your display.
Some areas of the window are more cluttered with pixels than others. In these areas, you may not be able to distinguish individual pixels. However, if you move the pointer slowly over these “bunches,” the individual color names will be displayed, outlined in the color.
While the pointer is in the ColorView window, you may notice the rest of the display becomes slightly darkened. This darkening happens because xcol provides its own colormap, different from the default. It is a normal effect and will stop when you move the pointer out of the window.
In addition to letting you preview colors, xcol can also be used to edit color resource specifications. If you want to edit the color specifications in your .Xresources file, start the client using the command line:
% xcol -/.Xresources &
This time two windows will be displayed: the ColorView window and a second window titled TextView, which contains the specifications pertaining to color from the .Xresources file, as in Figure 8-20.
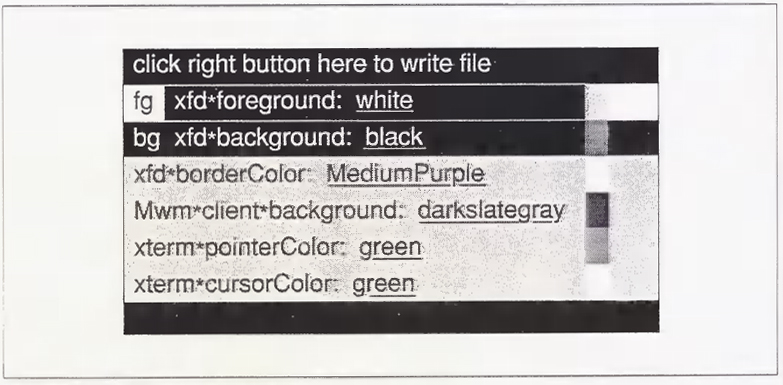
The size of the TextView window depends on the number of color specifications in the .Xresources file. Though you can't tell from our black and white illustration, each specification in the TextView window appears in the color it names (the color is the foreground color of the text line). If you click the second pointer button on a specification line, a reverse video effect takes place: the named color becomes the background and the previous background color (gray by default) becomes the foreground (text) color. An “R” appears to the left of the text line, indicating that reverse video is enabled. Although reverse video is not necessary, it sometimes provides a better look at a color than the default display—and also a better look than the boxes surrounding color names in the ColorView window. Reverse video display is a toggle: if you want to return to the default display, click the second pointer button on the text line again.
By using the pointer on both the TextView and ColorView windows, you can change the colors specified in the .Xresources file. To select the resource to change, place the pointer on the corresponding line in the TextView window and click the first button. The selected line will be outlined in the current foreground color.
Once you've selected a resource, you can change the corresponding color value:
- Place the pointer on a pixel in the ColorView window; wait until the color name box is displayed.
- While the pointer rests on the pixel, click the first button.
The color value of the resource in the TextView window is changed to the color you select. The named color is also displayed as either the foreground or background color of the text line—background if reverse video was active. You can change the color any number of times without saving changes to the text file—just to take a look at some colors.
Now let's consider a practical example. Say we want to change the following specification in our sample resource file:
Mwm*client*background: darkslategray
which makes client window frames dark slate gray. First we select the resource by clicking on it with the first pointer button. Then we move the pointer to the ColorView window and search for an alternative color that would be good for the mwm frame. Moving the pointer among the colored pixels in the ColorView window, we settle on medium orchid. While the pointer rests on the medium orchid pixel and the box enclosing the color name is displayed, we click the first pointer button. The resource in the TextView window changes to reflect our choice:
Mwm*client*background: mediumorchid
and the color in which the line is displayed also changes from dark slate gray to medium orchid.
If the file displayed in the TextView window includes background and foreground specifications for the same resource, those resources are grouped together, and the letters “fg” and “bg” appear to the left of the foreground and background resources, respectively. These associated resources are displayed using the foreground and background color specifications they name. In our sample TextView window, the following resources are grouped:
xfd*foreground: white
xfd*background: black
These resources set the foreground and background colors for the xfd font displayed, described in Chapter 6, to white and black respectively. Thus, in the TextView window these specification lines appear in white with a black background.
To switch the colors specified by a foreground/background pair, place the pointer on either resource line and click the second button. Our sample resources would be changed to:
xfd*foreground: black
xfd*background: white
and the resources in the TextView window would also switch to black on white.
Keep in mind that you can change only one of the associated resources if you want, by using the method described previously.
Once you've selected colors you like, you can save the changes to the text file by placing the pointer in the horizontal bar at the top of the TextView window right below the frame and clicking the third button. The bar contains the message:
click right button here to write file.
When you click the third pointer button on this bar, xcol beeps and asks you to confirm the choice by displaying:
confirm writing with right button!
To write the file, click the third button on the bar again. The .Xresources file is saved and the following message is displayed in the horizontal bar:
file written with backup.
The previous version of the .Xresources file is saved as a backup and given the filename .Xresources. To restore the old settings, simply rename the backup file .Xresources.
To quit the application, place the pointer on either the TextView or ColorView window and type q. Be aware that xcol will allow you to quit without saving changes and will not inform you.
Working with Motif Applications
The Athena widget set provides X Toolkit applications with certain common features, many of which have been described in this chapter. As explained in Chapter 1, an application coded using the Motif widget set has a slightly different look and feel.
In the remainder of this chapter, we'll look at some of the features you're liable to encounter in a Motif application and learn how to use them. Some of these features are provided in a slightly different flavor by the Athena widget set; others are unique to Motif.
Most of the sample components we're using are taken from the mre demo program introduced in Chapter 1. The Motif resource editor assists you in editing your own resource specification file, but it is primarily intended to demonstrate many of the Motif widgets.
The following sections mention the comparable Athena widgets where appropriate. Some of the Athena widgets are illustrated using the standard MIT clients earlier in this chapter, as well as in Chapter 5, The xterm Terminal Emulator, and Chapter 7, Graphics Utilities.
Dialog Boxes and Push Buttons
If you've tried to restart mwm from the window manager's Root Menu, you've already encountered a Motif dialog box. When you select the Restart menu item, the dialog box pictured in Figure 8-21 is displayed.
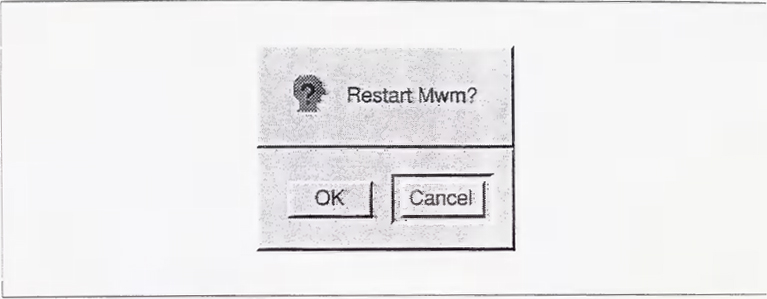
A dialog box generally displays a message relevant to the application and requires a response from the user. In this case, the dialog box queries whether you really want to Restart mwm?.
A Motif dialog box contains one or more push buttons that allow you to respond to the message. (Many applications use push buttons; they are not confined to dialog boxes.) When a dialog is displayed and the default click-to-type focus is in effect, the input focus is usually switched to the dialog window. Until you respond to the dialog box, the application cannot continue. Once you respond to the dialog, the focus should switch back to the main application window.
Whether the dialog box contains one push button or multiple buttons, one button is always highlighted, generally by outlining. You can push the highlighted push button simply by pressing the Return key on your keyboard. To push another button, you must place the pointer on it and click the first pointer button.
A response might be a simple acknowledgment that you've seen the message: some dialogs feature only one button that reads OK. For instance, when you start the mre resource editor demo without a filename argument, the program looks for a file called .Xdefaults in your home directory. If mre cannot find the file, it displays a dialog box containing a message similar to:
Couldn't open /home/pat/.Xdefaults.
with an OK button. When a dialog has only one button, the button is always highlighted. Pressing Return or clicking the first pointer button on the OK button informs the client that you've seen the message and removes the dialog window.
Some responses request an action, such as proceeding with a previously invoked process, cancelling the process, or even exiting the program. The dialog box in Figure 8-21 contains two push buttons labeled OK and Cancel. Pushing the OK button tells mwm to proceed with the restart process. The Cancel button gives you a chance to avert the restart process in case you invoked the command by mistake or have changed your mind. Since Cancel is highlighted, you can push it either by pressing Return or by using the pointer.
Whatever the message or potential responses, you react to a dialog box either by pressing Return (to push the highlighted push button) or by placing the pointer on one of the push buttons and clicking the first pointer button. Action will be taken if requested and the dialog box will be removed.
As we'll see, some Motif applications support another kind of push button called a drawn button. A drawn button is basically a push button decorated with a bitmap rather than text.
The Athena widget set provides comparable widgets to the Motif dialog box and push button. An Athena dialog box provides virtually the same functionality as a Motif dialog. The most obvious difference is that, in an Athena dialog, you must click on a command button to invoke it. The Return key shortcut only works with a Motif push button. See “Dialog Boxes and Command Buttons” in Chapter 7, Graphics Utilities, for more information about Athena dialogs.
Menu Bars and Pull-down Menus
Figure 8-22 illustrates the menu bar on the mre window.

A menu bar is a horizontal bar from which pull-down menus can be displayed. Each word on the bar is a menu title; you display the menu by placing the pointer on its title and clicking the first pointer button. The title becomes raised and highlighted by a box, the menu is displayed and the first selectable item is also raised and boxed. Figure 8-23 shows mre's File pull-down menu.

Notice that one letter of each menu item is underlined. As explained in Chapter 4, that letter represents a unique abbreviation, or mnemonic, for the menu item, which can be used to select the item.
Notice also that each menu item has a keyboard shortcut, or accelerator, that appears in the right hand column of the menu. An accelerator can be used to invoke the action without displaying the menu at all (though they also work while the menu is displayed).
When you've displayed a menu by placing the pointer on the title and clicking the first button, you can select an item by:
- Placing the pointer on the item and clicking the first button.
- typing the mnemonic abbreviation for the menu item.
- Typing the accelerator key combination. (Though these are intended to save you the trouble of displaying the menu, they also work when it is displayed.)
- To select the boxed item (the first available for selection), you can alternatively press either the Return key or the space bar.
You can also display a menu from a menu bar by placing the pointer on the title and pressing the first pointer button. The menu is displayed as long as you continue to hold the pointer button down. To select an item, drag the pointer down the menu (each item is highlighted by a box in turn), and release the button on the item you want.
File Selection Box
Several Motif applications feature something called a file selection box, which allows you to select a filename from a list.
Using a file selection box is not exactly difficult, but it's not particularly obvious either. Let's consider the file selection box that is displayed when you select Open … from mre's File menu illustrated in the preceding section. The Open … menu item is used to read a file into mre's main edit window. When you select Open …, a second window is displayed—the file selection box illustrated in Figure 8-24.
Notice the window labeled Selection near the bottom of the box. You want to place the name of the file to select in this window. Initially this window contains an incomplete pathname—a directory is specified but no file. You can specify a file in a variety of ways.
Notice the two areas labeled Directories and Files. These are list boxes that are contained within the larger window. The Directories box lists the directories from which you can choose a file; the first directory is usually highlighted. The Files box lists the files within the highlighted directory.
Notice that the list boxes are bordered by horizontal and vertical scrollbars, which allow you to view text that is currently outside the box. (The Scrollbar widget is discussed in the next section.) A list box and its accompanying scrollbars form what is known as a Scrolled-Window. The Motif ScrolledWindow is comparable to the Athena Viewport widget, discussed in the section “Browsing Reference Pages: xman” earlier in this chapter.

The file selection box allows you to select a file from any directory on the system, using various procedures. You can select a file from the list currently in the Files box; you can list the files in another directory currently displayed in the the Directories box and select one of those files; or you can list the contents of an entirely different directory and select a file from that directory.
Selecting a File from the Files Box
To select a file currently in the Files box:
- Place the pointer on the filename.
- Click the first pointer button. The filename is highlighted by a dark bar; the letters appear in reverse video.
Notice also that the Selection window will be updated to reflect the filename; and the push button to confirm the selection (OK in many applications) will be highlighted, indicating that you can select the file by pressing Return.
- Select the filename either by pressing Return or by placing the pointer on the OK push button and clicking the first pointer button.
When you select a file in mre's file selection box, the file is read in to the initial mre editing window and the selection box disappears.
Choosing a File from another Directory in the Directories Box
To list the files in another directory in the Directories box and select one of those files:
- Place the pointer on the directory name and click the first button. The directory name is highlighted. Notice that the box labeled Filter is updated to reflect the new pathname and the Filter push button at the bottom of the box is highlighted for selection.
- Then, to display the contents of the highlighted directory in the File box either:
- Press Return; or
- Click on the Filter push button.
- To select a file from the updated Files box, follow the steps outlined previously in “Selecting a File from the Files Box.”
Choosing a File from Another Directory on the System
You can specify an alternative directory from which a file can be selected by changing the filter, that is, the path in the Filter window (near the top of the file selection box). Initially the Filter window reflects the current working directory. In Figure 8-24, the filter is /work/motif/demos/mre/* and the Directories box lists two directories:
/work/motif/demos/mre/.        “the current directory
/work/motif/demos/mre/. .     “previous directory in the tree
To specify another filter, place the pointer within the Filter window and double click the first pointer button. The window becomes highlighted with a black bar (the text is visible in reverse video); now whatever you type will replace the current text.
When you type a pathname and hit Return (or click on the Filter push button at the bottom of the file selection box), the Directories box will be updated to reflect the filter you've specified. For example, if you enter the following pathname in the Filter window:
/home/pat/*
and hit Return or click on the Filter push button, the Directories box will be updated to reflect the directory /home/pat, its subdirectories, and the directory above it in the tree, as shown in Figure 8-25.

Notice that the first directory in the Directories box, /home/pat/., is highlighted and the files in that directory are listed in the Files box.
You can then choose any of the files in the Files box using the steps outlined previously in “Selecting a File from the Files Box.”
The Motif Scrollbar
Each of the list boxes in the File Selection Box features both a horizontal and a vertical scrollbar. A vertical scrollbar is commonly used review text that has scrolled off the top of a window or extends past the bottom. In the case of mre's Files box, the vertical scrollbar is used to scan a list of files too long to fit in the window at one time. A horizontal scrollbar is commonly used to view text or graphics that are too wide to fit in the viewing area. You'll probably encounter vertical scrollbars most often.
Both the Motif and Athena widget sets provide scrollbar widgets. A Motif scrollbar operates differently than an Athena scrollbar, such as the one used by xterm. As you know, an Athena scrollbar is simple in design—just a rectangular thumb within a rectangular scroll region. Both parts are flat; the thumb is distinguished from the scroll region only by its (generally) darker color. The Athena scrollbar also operates differently than the Motif scrollbar. While a Motif scrollbar has separate parts to invoke different types of scrolling, the Athena scrollbar moves text according to which pointer button you use and how you use it. (See Chapter 5, The xterm Terminal Emulator, for instructions on how to use xterm's scrollbar.)
Now let's take another look at the Files box from mre's file selection box, which is bordered by two scrollbars. A Motif scrollbar is comprised of four parts, labeled in Figure 8-24: two arrows (one at either end of the bar), the scroll region between the arrows, and the thumb, the raised area which moves within the scroll region. The thumb displays the position and amount of text currently showing in the window relative to the amount saved. If text does not extend beyond the window, the thumb fills the entire scroll region. In Figure 8-24, the thumbs in both scrollbars indicate that text extends beyond the bounds of the window.
Let's consider the pointer commands used to operate a vertical scrollbar. (You'll probably use a vertical scrollbar most often.) To scroll the text forward one window, place the pointer below the thumb and click the first button. To scroll the text back one window, place the pointer above the thumb and click the first button. Clicking on one of the arrows scrolls the text one line at a time: each click on a down arrow lets you view one more line of text at the bottom of the window; each click on an up arrow lets you view one more line of text at the top of the window.
A horizontal scrollbar lets you view the remaining part of lines that are too wide to fit in a single window. You use the same pointer commands to use a horizontal scrollbar as you do a vertical scrollbar; obviously the orientation of text and directions of movement are different. Clicking to the right of the thumb scrolls the text horizontally to the right. Clicking to the left of the thumb scrolls the text horizontally to the left. In Figure 8-24, the Files box is displaying filenames only—the earlier parts of the pathnames are not in view. Notice that the horizontal scrollbar's thumb is all the way to the right of the scroll region. If you place the pointer to the left of the thumb and click the first button, the text is scrolled to the left to reveal the earlier parts of the pathname. Clicking on either arrow of the horizontal scrollbar moves the text one character to the left or right, depending on the direction of the arrow.
The unit scrolled when you click on an arrow depends on the application. Scrollbars are also sometimes featured on application windows that contain graphic elements rather than text. Obviously, such a window cannot be scrolled by text characters or lines. The mwm icon box, described in Chapter 11, Customizing mwm, can be scrolled the height or width of one icon.
Drawn Buttons
A drawn button is a push button decorated with a pixmap rather than a text label. Figure 8-26 shows four drawn buttons from mre's main window.

The image on a drawn button should signal its function. If a program uses drawn buttons effectively, they can enhance an application's aesthetics.
mre uses drawn buttons well. The button decorated with an artist's palette tells mre to place resource specifications relating to color in the application's editing window. The button showing the letter “A” places resources specifying fonts in the editing window. The button featuring the mirror image of the arrows in reverse colors is a rather clever graphical representation of a difficult concept. The image is a sort of technical yin-yang symbol: it tells mre to place resources that can be toggled (turned on or off; set to be true or false, yes or no, etc.) in the editing window. Finally, the button featuring the eternity symbol tells mre to put all of the resources in the user's resource file in the editing window.
Radio Boxes and Toggle Buttons
A radio box is made up of a column of toggles (mutually exclusive choices). Figure 8-27 shows four radio boxes in mre's Font Selection window.
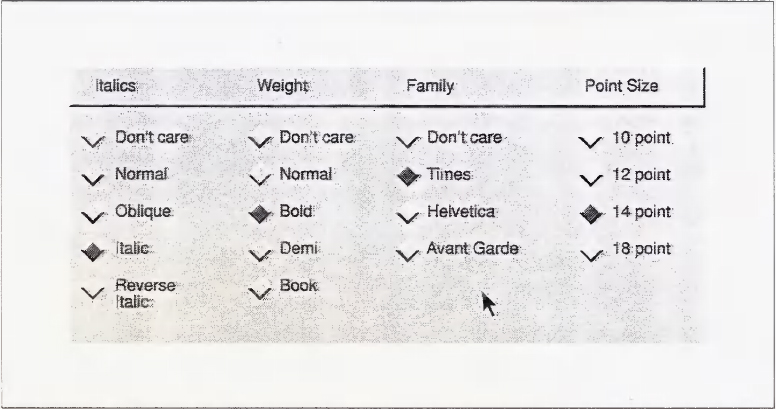
Each column is one radio box; each box contains several diamond shaped toggle buttons. You push a toggle button by placing the pointer on the diamond symbol and clicking the first pointer button. The toggle button becomes darker (appearing as if it's been pressed). Actually, if you examine the button closely, the highlighting has just switched from the bottom edge to the top edge of the button. When you first make a selection from a column, the button and the accompanying text label are highlighted by a box. When you make a selection in another column, the highlighting box appears in that column (and disappears from the previous one).
Toggles in the same column are mutually exclusive. If you select one and then select another from the same column, the first one is toggled off. (The button appears to pop up—i.e., the highlighting switches back to the bottom edge of the button; also the highlighting box appears around the latest selection.)
*If you are running an earlier release of X, you can operate xcalc as a slide rule by using the -analog option. Drag the slide using the first pointer button. Be aware that the slide rule mode doesn't work very well. To terminate the slide rule, use kill(1), as described in Chapter 8 for oclock. The slide rule emulation was eliminated in Release 4.
*Selecting the Help command also opens a large window in which the same help information is displayed. The Help command is something of a dead end, however; you cannot display any other text in this window.
*The commands may be bound to keys different from the defaults described below through the standard X Toolkit key translation mechanisms. See Chapter 10, Setting Resources, for more information.
*This method is powerful but in practice has limitations. Many versions of UNIX only allow you to kill a process if you are the owner of the process or if you are root. Thus, if a client has been started on your display from a remote system and you don't know the root password, you may not be in a position to use the UNIX kill command.
*Most likely, you will not have to deal with the ID numbers for windows other than the explicitly named client windows. You can use the IDs of the client windows in all of the ways we've discussed: with xkill, xwininfo, xprop, etc.