5
The xterm Terminal Emulator
This chapter describes how to use xterm, the terminal emulator. You use this client to create multiple terminal windows, each of which can run any programs available on the underlying operating system.
In This Chapter:
Terminal Emulation and the xterm Terminal Type
Copying and Pasting Text Selections
Copying and Pasting between Release 2 and 3 Clients: xcutsel
Saving Multiple Selections: xclipboard
Problems with Large Selections
Editing Text Saved in the xclipboard
5
The xterm Terminal Emulator
xterm provides you with a terminal within a window. Anything you can do using a standard terminal, you can do in an xterm window. Once you have an xterm window on your screen, you can use it to run other clients.
You can bring up more than one xterm window at a time. For example, you might want to list the contents of a directory in one window while you edit a file in another window. Although you can display output simultaneously in several windows, you can type in only one window at a time.
When you start an xterm process on the command line in one xterm window, the second xterm inherits the environment variables of the first (including the DISPLAY setting); the second shell also starts in the working directory of the first shell.
The basic operation of xterm should be obvious to anyone familiar with a terminal. You should be able to work productively immediately.
But xterm provides much more than basic terminal capabilities. Two of xterm's most useful features are a scrollbar, which allows you to review text in the window, and a “copy and paste” facility, which allows you to select text from one window using the pointer and paste it into another (or even the same) window.
As we'll see, you can create an xterm window with a scrollbar using the -sb command line option or specify a scrollbar as a default characteristic of xterm using the scrollbar resource variable. You can also add a scrollbar to (or remove one from) an xterm window already running on the display by using one of the client's four menus. Without customizing the client in any way, you can cut and paste text between xterm windows.
Among the less obvious features of xterm is a dual functionality. By default, xterm emulates a DEC VT102 terminal, a common alphanumeric terminal type. However, xterm can also emulate a Tektronix 4014 terminal, which is used to display graphics. For each xterm process, you can switch between these two types of terminal windows. You can display both a VT102 and a Tektronix window at the same time but only one of them can be the “active” window, i.e., the window receiving input and output. Hypothetically, you could be editing in the VT102 window while looking at graphics in the Tektronix window.
You switch between the VT102 window and the Tektronix window using items from certain xterm menus. xterm has four menus that can be used to control the VT102 and Tek windows, to select many terminal settings, and to run other commands that affect the xterm process.
The VT Fonts menu represents a welcome Release 4 innovation. Using this menu, you can change the font used to display text in the VT102 window. You may want to change the font for a number of reasons. Perhaps you need a larger font to read text more easily; or maybe you want to use a smaller font to reduce the size of a window while a program is running and you don't need to monitor it's progress. Prior to Release 4, if you didn't like the display font, you had to start a new xterm process, specifying an alternative. The VT Fonts menu makes xterm much more flexible.
We'll take a look at some of the more useful items on each menu as well as some alternatives to menu items later in this chapter. For more complete information about menus, see the xterm reference page in Part Three of this guide.
We'll also consider how to run a program in a temporary xterm window, which goes away when the program finishes.
But first, let's consider some preliminary issues: which terminal type to specify for xterm and what to do when resizing an xterm window causes problems with its terminal emulation.
Then we'll look at the xterm features you'll probably use most frequently: the scrollbar and the text selection mechanism.
Terminal Emulation and the xterm Terminal Type
Anyone who has used a variety of terminals knows that they don't all work the same way. As a terminal emulator, an xterm window must be assigned a terminal type that tells the system how the window should operate, that is, what type of terminal it should emulate. When xterm is assigned an invalid terminal type, the window does not display properly at all times, particularly when using a text editor such as vi. If one of your login files (.login, .profile, .cshrc, etc.) currently specifies a default terminal type, you will need to replace this with a type valid for xterm. (If none of your login files specifies a terminal type, xterm automatically searches the file of TERMCAP entries for the first valid entry.)
xterm can emulate a variety of terminal types, which are listed on the client reference page in Part Three of this guide. An xterm window most successfully emulates a terminal when it has been assigned the terminal type xterm. For the xterm terminal type to be recognized on your system, the system administrator will have had to add it to the file containing valid TERMCAP entries. (The xterm TERMCAP entry is supplied with the standard release of X.) If this has not been done, the system will not recognize the xterm terminal type. In these cases, try the vt100 terminal type, which also generally works well or use one of the other types listed on the client reference page.
See Appendix A, System Management, and the xterm reference page in Part Three of this guide for information about customizing the termcap file.
Resizing an xterm Window
xterm sets the TERMCAP environment variable for the dimensions of the window you create. Clients (including xterm) use this TERMCAP information to determine the physical dimensions of input and output to the window.
If you resize an xterm window, programs running within the window must be notified so they can adjust the dimensions of input and output to the window. If the underlying operating system supports terminal resizing capabilities (for example, the SIGWINCH signal in systems derived from BSD 4.3), xterm will use these facilities to notify programs running in the window whenever it is resized. However, if your operating system does not support terminal resizing capabilities, you may need to request explicitly that TERMCAP be updated to reflect the resized window.
The resize client sends a special escape sequence to the xterm window and xterm sends back the current size of the window. The results of resize can be redirected to a file that can then be sourced to update TERMCAP. To update TERMCAP to match a window's changed dimensions, enter:
% resize > filename
and then execute the resulting shell command file:
% source filename C shell syntax
or:
$ . filename Bourne shell syntax
TERMCAP will be updated and the dimensions of the text within the window will be adjusted accordingly.
If your version of UNIX includes the C shell, you can also define this alias for resize:
alias rs ‘set noglob; eval ‘resize’; unset noglob’
Then use rs to update the TERMCAP entry to reflect a window's new dimensions.
Note that even if your operating system supports terminal resizing capabilities, xterm may have trouble notifying programs running in the window that the window has been resized. On some older systems (based on BSD 4.2 or earlier), certain programs, notably the vi editor, cannot interpret this information. If you resize a window during a vi editing session, vi will not know the new size of the window. If you quit out of the editing session and start another one, the editor should know the new window size and operate properly. On newer systems (e.g., BSD 4.3 and later), these problems should not occur.
Using the Scrollbar
When using xterm, you are not limited to viewing the 24 lines displayed in the window at one time. By default, xterm actually remembers the last 64 lines that have appeared in the window. If the window has a scrollbar, you can scroll up and down through the saved text.
To create a single xterm window with a scrollbar, use the -sb command line option:
% xterm -sb &
To display all xterm windows with a scrollbar by default, set scrollBar in your .Xresources file, as described in Chapter 10. The appropriate resource setting is illustrated below:
XTerm*scrollBar: true
If an xterm window was not created with a scrollbar, you can add one using the Enable Scrollbar item on the VT Options menu. See the section “VT Options Menu” later in this chapter for instructions on selecting a menu item.
Many applications provide horizontal and/or vertical scrollbars that allow you to look at a window's contents that extend beyond the viewing area. You move text (or images in graphics applications) in the window by placing the pointer on the scrollbar and performing some sort of action.
xterm's scrollbar is created by the Athena Scrollbar widget. (As we'll see in subsequent chapters, several of the standard X clients use Athena scrollbars.) An Athena scrollbar looks and operates differently than a scrollbar provided by a Motif application (that is, one created using the Motif widget set), as described in Chapter 8. If you're accustomed to using a Motif (or even a Macintosh) scrollbar, the Athena scrollbar may take some getting used to. While Motif and Mac scrollbars have separate parts to invoke different types of scrolling, the Athena scrollbar moves text according to which pointer button you use and how you use it.
Figure 5-1 shows an xterm window with a scrollbar.
The Athena scrollbar has two parts: a thumb (the highlighted area within the scrollbar) which moves within the scroll region. The thumb displays the position and amount of text currently showing in the window relative to the amount saved. When an xterm window with a scrolbar is first created, the thumb fills the entire scrollbar. As more text is saved, the size of the thumb decreases. The number of lines saved is 64 by default but an alternative can be specified with either the -sl command line option or the saveLines value in an .Xresources file.
You scroll through the saved text using various pointer commands. When the pointer is positioned in the scrollbar, the cursor changes to a two-headed arrow. The scrollbar commands are summarized in Table 5-1.


The first command in Table 5-1 involves dragging the text in the window using the second pointer button. This command is the simplest and offers the most control over how much scrolling takes place. To drag the text in this manner: first place the pointer on the scrollbar; press and hold down the second pointer button; then drag the thumb up and down. Notice that text moves as you move the thumb. If you drag up, the window scrolls back toward the beginning of information saved in the window. If you drag down, the window scrolls forward toward the end of information in the window. When you release the button, the window displays the text at that location. This makes it easy to get to the top of the data by pressing the second button, dragging the thumb to the top of the scroll region, and releasing the pointer button.
The next three pointer commands in Table 5-1 involve a click that causes the text to scroll However, if you test them, you'll find that it's difficult to judge how much text you're going to scroll with a single click.
Clicking the first pointer button in the scrollbar causes the window to scroll toward the end of information in the window.
Clicking the third pointer button in the scrollbar causes the window to scroll toward the beginning of information in the window.
Clicking the second pointer button moves the display to a position in the saved text that corresponds to the pointer's position in the scroll region. For example, if you move the pointer to the very top of the scroll region and click the second button, the window scrolls to a position very near the beginning of the saved text. As you might imagine, it's very difficult to guess how much scrolling will take place when you use the scrollbar in this way.
Copying and Pasting Text Selections
Once your xterm window is created, you can select text to copy and paste within the same or other xterm windows using the pointer. You don't need to be in a text editor to copy and paste. You can also copy or paste text to and from the command line.
Text copied into memory using the pointer is saved in a global cut buffer and also becomes what is known as the PRIMARY text “selection.”* Both the contents of the cut buffer and the contents of the PRIMARY text selection are globally available to all clients. When you paste text into an xterm window, by default the contents of the PRIMARY selection are pasted. If no text is in the PRIMARY selection, the contents of the cut buffer (called CUT_BUFFER0), are pasted. (In most cases, these will be the same.)
Copying and pasting is one way in which clients exchange information, in this case, text. Later in this chapter, we'll consider some of the complications that can arise when copying and pasting between applications that save information differently. For now, however, let's see how to copy and paste text between xterm windows.
Selecting Text to Copy
There are several ways to select (copy) text. You can select text by individual words or lines, or you can select a passage of text.
In order to copy text from a window, the window must have the input focus. The click to focus input is not interpreted as an attempt to start a text selection.
There are two methods for selecting a passage of text. First, you can make the selection by dragging the pointer: place the pointer at the beginning of the text you want to select; hold down the first button; move the pointer to the end of the desired text; then release the button. The text is highlighted, copied into the global cut buffer (called CUT_BUFFER0) and also made the PRIMARY selection.
The second way to select a passage is even simpler: mark the beginning of the selection by clicking the first pointer button; then mark the end of the selection by clicking the third pointer button. The text between the marks is highlighted, copied into CUT_BUFFER0, and made the PRIMARY selection.
You can select a single word or line simply by clicking. To select a single word, place the pointer on the word and double-click the first button.* To select a single line, place the pointer on the line and triple-click the first button.
If you hold the button down after double- or triple-clicking (rather than releasing it) and move the pointer, you will select additional text by words or lines at a time. Then release the button to end the selection.
Table 5-2 lists the possible pointer actions and the selections they make. You always begin by placing the pointer on the text you want to select.
Table 5-2. Button Combinations to Select Text for Copying
| To select | Do this |
| Passage | At the beginning of the selection, hold down the first button; move the pointer to the end of the desired text; and release the button. Or: Click the first button at the start of the selection and the third button at the end of the selection. |
| Word | Double-click the first button anywhere on the word. |
| Line | Triple-click the first button anywhere on the line. |
Each selection replaces the previous contents of CUT_BUFFER0 and the previous PRIMARY text selection. You can make only one selection at a time. (The xclipboard client, described later in this chapter, can be used to store multiple text selections.)
Once you have made a selection with the first button, you can extend that selection with the third button. This example shows how this works:
- Bring up vi (or any other text editor with which you are familiar) in an xterm window, and type in this sample sentence:
The X Window System is a network-based graphics window system that was developed at MIT in 1984. - Place the pointer on the word graphics in the sample sentence and select it by double-clicking the first button.
- Then press and hold down the third pointer button. Move the pointer away from the word graphics to the left or right. A new selection now extends from the last selection (graphics) to the pointer's location and looks something like this:
The X Window System is a network-based graphics window system that was developed at MIT in 1984.or:
The X Window System is a network-based graphics window system that was developed at MIT in 1984.
Remember that the extension always begins from the last selection. By moving the pointer up or down, or to the right or left of the last selection, you can use this technique to select part of one line or add or subtract several lines of text.
To select text that fills more than one screen, select the first screenful. Use the scrollbar to view the additional text. Then use the third pointer button to extend the selection. The original selection does not need to be in view; clicking the third button will extend it to the point you choose.
To clear the highlighting, move the pointer off the selection and click the first button anywhere else in the window. Note, however, that the text still remains in memory until you make another selection.
Complications can arise if you're copying text that includes tabs. With the current implementation of the copy and paste feature, tabs are saved as spaces. If you're copying a large amount of text with many tabs from one text file to another, having tabs converted to spaces can create problems. A possible workaround is to change all tabs in the first file to some unique character or string (using a global command provided by your text editor); copy and paste the text into the second file; convert the unique strings back to tabs in both files using your text editor.

Pasting Text Selections
The second button inserts the text from the PRIMARY selection (or CUT_BUFFER0, if the selection is empty) as if it were keyboard input. You can move data from one xterm window to another by selecting the data in one window with the first button, moving the pointer to another window, and clicking the second button.
You can paste text either into an open file or at a command line prompt. To paste text into an open file, as illustrated in Figure 5-3, click the second button within the window containing the file. The text from the memory area will be inserted at the text editor cursor. (Of course, the file must be in a mode where it is expecting text input, such as the insert mode of an editor.) You can paste the same text as often as you like. The contents of the PRIMARY selection remain until you make another selection.
To paste text at a command line prompt, you must first close any open file within the window. Then click the second button anywhere within the window to place the text on the command line at the end of text in the window. (Note that the window will scroll to the bottom on input.) You can make multiple insertions by repeatedly clicking the second button.
Note that you can paste text into a window when click-to-type focus is in effect, even if the window does not have the input focus. The act of pasting does not transfer focus either. (Similarly, if you click on a window to focus input, the click is not interpreted as an attempt to start a text selection.)

Keep in mind that you can paste over existing text in a file with the vi change text commands (such as cw, for change word). For example, you can paste over five words by specifying the vi command 5cw, and then pasting text by clicking the second pointer button. Note that you can paste over existing text in any editor that has an overwrite mode.
More About Text Selections
Prior to Release 3, many clients exchanged information solely by means of global cut buffers, which are, in effect, owned by the server, and available to all clients. Cut buffers are useful only for copying and pasting information that does not need to be translated to another format, such as ASCII text between two xterm windows.
In accordance with the newer interclient communication conventions developed since Release 2, most Release 3 and 4 clients, notably xterm, primarily exchange information via selections. The advantage of the selection mechanism is that it allows data from one client to be converted to a different format to be used by another client. Cut buffers do not perform this type of translation.
A selection is globally available but not owned by the server. A selection is owned by a client—initially by the client from which you copy it. Then when the text selection is pasted in another window, that window becomes the owner of the selection.
As we've said, if you are copying text between xterm windows, the contents of CUT_BUFFER0 and the PRIMARY selection should be the same. However, while some applications (notably the current version of xterm) copy to both the cut buffer and the selection, other applications (generally prior to Release 3) copy only to the cut buffer. If you are using both types of applications together and are trying to transfer text between them, differences between the contents of the cut buffer and the PRIMARY selection may make copying and pasting problematic. If you are only copying text between xterm windows (Release 3 or later), problems of this type will never arise.
Because of the rules of precedence governing cut buffers and selections and the nature of selections (particularly the issue of ownership), the following problems can arise in transferring data:
- If one client communicates via cut buffers while another communicates via selections, copying and pasting between them is inherently problematic. By default, the selection takes precedence. How do you paste the contents of the cut buffer instead?
- By default, you can save only one selection at a time.
- For a selection to be transferred to a client, the selection must be owned by a client. If the client that owns the selection no longer exists, the transfer cannot be made.
The xcutsel and xclipboard clients address the first two of these problems, respectively.
Most users will probably not encounter the third problem. You are probably doing all of your copying and pasting between xterm windows. If you've made a selection from an xterm window and the window is killed, the selection contents are lost. However, the cut buffer contents remain intact and are pasted instead. (Since all xterm windows interpret ASCII text, the translation capabilities of the selection mechanism are not needed.)
Problems involving the loss of selections are more likely to happen if you are transferring information between clients that require information to be in different formats. If you are having such problems, you can customize the clients involved to copy information to what is known as the CLIPBOARD selection.
The CLIPBOARD selection is intended to avert problems of selection ownership by providing centralized ownership. Once the CLIPBOARD owns a selection, the selection can be transferred (and translated), even if the client that previously owned the selection goes away.
You can customize a client to send data to the CLIPBOARD selection by using event translations, which are discussed in Chapter 10. See the client reference pages in Part Three of this guide for information on the appropriate translations. For more information on selections and translations, see Volume One, Xlib Programming Manual.
Copying and Pasting between Release 2 and 3 Clients: xcutsel
The xcutsel client is intended to bridge a gap that exists between the ways older and newer clients allow you to copy text. If all the clients you are using are from Release 3 or later, you will probably have no use for xcutsel and should skip ahead to the next section.
Since Release 3, when you select text from an xterm window with the pointer, the text is copied into the global cut buffer and made the PRIMARY selection. (Thus, generally, the contents of the cut buffer and the PRIMARY selection are the same.) By default, the PRIMARY selection is what gets pasted into a window. If there is no PRIMARY selection, the contents of the cut buffer are pasted.
Prior to Release 3, clients did not use selections. Text was copied into the cut buffer only (and was not equated with a PRIMARY selection). Problems can arise if you run clients that only use cut buffers (many Release 2 clients and uwm, any release) with clients that primarily use selections (Release 3 and later) and try to paste text between them.
For instance, say you copy text in a Release 3 xterm window using the pointer. The text is copied into the cut buffer and also becomes the PRIMARY selection. If you paste in any window, the PRIMARY selection is what you get. Then, say you copy text in a R2 xterm window. The text is stored in the cut buffer, replacing the text in the cut buffer from the R3 window but it does not replace the PRIMARY selection. You can paste the text from the R2 window in another R2 window because the window only understands cut buffers but you can't paste it in an R3 window. If you try to, by default you get the PRIMARY selection (from the other R3 window).
xcutsel enables you to switch the text in the cut buffer and the PRIMARY selection so that you can cut and paste between clients that use cut buffers and clients that use selections.
To open an xcutsel window, type:
% xcutsel &
and then position the window on your screen. Figure 5-4 shows an xcutsel window.

The window contains three command buttons whose functions are described below:
quit
Exits the xcutsel program.
copy PRIMARY to 0
Copies the contents of the PRIMARY selection to CUT_BUFFER0.
copy 0 to PRIMARY
Copies the contents of CUT_BUFFER0 to the PRIMARY selection.
Now let's go back to the problem we set up earlier in this section. If you copy text from an R2 window and want to paste in an R3 window, you merely click on the copy 0 to PRIMARY button. The contents of the cut buffer (from the R2 client) replace the previous PRIMARY selection (from the R3 client). When you paste, you get the text you want (from the R2 window).
Now say you have the same situation but the opposite problem. You made a selection from an R3 window, which filled the cut buffer and the PRIMARY selection. Then you copied text from an R2 window, which merely filled the buffer. (The contents of the buffer and the PRIMARY selection are different.) But now say you want to paste the text from the PRIMARY selection (from the R3 window) in an R2 window. If you paste text in an R2 window, you get the contents of the cut buffer (the text from the other R2 window).
To solve this problem, just click on the copy PRIMARY to 0 button in the xcutsel window. The contents of the PRIMARY selection (from the R3 window) replace the contents of the cut buffer (from the R2 window). When you paste in an R2 window, you get still get the contents of the cut buffer but it is now the text you want.
This business of selections versus cut buffers can be pretty confusing. If you have problems pasting the text you want, experiment a little with xcutsel.
Saving Multiple Selections: xclipboard
The xclipboard client provides a window in which you can paste multiple text selections and from which you can copy text selections to other windows. Similar to the clipboard feature of the Macintosh operating system, the xclipboard is basically a storehouse for text you may want to paste into other windows, perhaps multiple times. The xclipboard window is shown in Figure 5-5.

% xclipboard &
You can paste text into the xclipboard window using the pointer in the manner described previously and then copy and paste it elsewhere but this is not its intended use. To use the xclipboard most effectively, you must do some customization involving a resource file, such as .Xresources. The necessary steps are described in detail in Chapter 10. For now, suffice it to say that you want to set up the xclipboard so that you can select text to be made the CLIPBOARD selection and have that text automatically pasted in the xclipboard window, as illustrated in Figure 5-6.
Since the xclipboard client is intended to be coordinated with the CLIPBOARD selection, the X server allows you to run only one xclipboard at a time.
In order to illustrate how the clipboard works, let's presume it has been set up according to the guidelines in Chapter 10. According to those guidelines, you make text the CLIPBOARD selection by selecting it with the first pointer button (as usual) and then, while holding down the first button, clicking the third button. (You could specify another button combination or a button and key combination but we've found this one works pretty well.) The first pointer action makes the text the PRIMARY selection (and it is available to be pasted in another window using the pointer); the second pointer action additionally makes the text the CLIPBOARD selection (and it is automatically sent to the xclipboard window).
These guidelines still allow you to select text with the first pointer button alone and that text will be made the PRIMARY selection; however, the text will not automatically be sent to the xclipboard. This enables you to make many selections but to direct to the xclipboard only those selections you consider important (perhaps those you might want to paste several times).
In order to allow you to store multiple text selections, the seemingly tiny xclipboard actually provides multiple screens, each of which can be thought of as a separate buffer. (However, as we'll see, a single text selection can span more than one screen.) Each time you use the pointer to make text the CLIPBOARD selection, the xclipboard advances to a new screen in which it displays and stores the text.
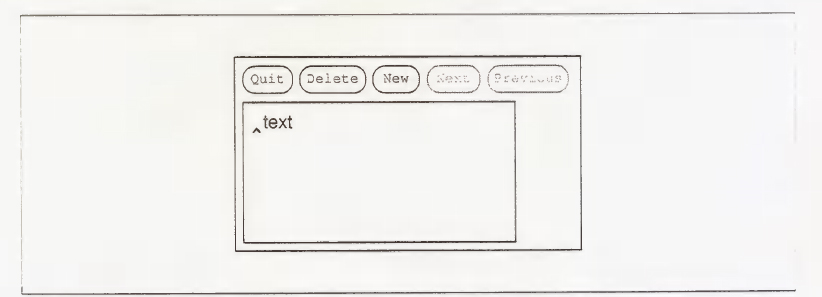
Once you have saved multiple selections, the client's Next and Previous command buttons allow you to move forward and backward among these screens of text. The functionality of the client's command buttons is summarized in Table 5-3. They are all selected by clicking the first pointer button.
Table 5-3. Command Buttons and Functions
| Button | Function |
| Quit | Causes the application to exit. |
| Delete | Deletes the current xclipboard buffer; the current screenful of text is cleared from the window and the next screenful (or previous, if there is no next) is displayed. |
| New | Opens a new buffer into which you can insert text; the window is cleared. |
| Next and Previous | Once you have sent multiple selections to the xclipboard, Next and Previous allow you to move from one to another (e.g., display them sequentially). Before two or more CLIPBOARD selections are made, these buttons are not available for use. (Their labels will appear in a lighter typeface to indicate this.) |
The command buttons you will probably use most frequently are Delete, Next, and Previous.
When you select text using the first and third pointer buttons, the text will automatically be displayed in the xclipboard window and will, in effect, be the first screenful of text (or first buffer) saved in the xclipboard. Subsequent CLIPBOARD selections will be displayed and saved in subsequent screens.
You select text from the xclipboard and paste it where you want it just as you would any text. Just display the text you want in the xclipboard window, using Next or Previous as necessary. Then select the text using the first pointer button and paste it using the second pointer button.
You can remove a screenful of text from the xclipboard by displaying that screenful and then clicking on the Delete command button. When you delete a screenful of text using this command button, the next screenful (if any) will be displayed in the window. If there is no next screenful, the previous screenful will be displayed.
Certain features (and limitations) of the xclipboard become apparent only when you make a very large CLIPBOARD selection. Say you select a full xterm window of text with the first and third pointer buttons, as described above. The text extends both horizontally and vertically beyond the bounds of a single xclipboard screen. (As we suggested earlier, a CLIPBOARD selection can actually span more than one xclipboard screen. Pressing Delete will remove all screensful the selection comprises.) When you make a selection that extends beyond the bounds of the xclipboard screen (either horizontally, vertically, or both), scrollbars will be activated in the window to allow you to view the entire selection.

If the text extends both horizontally and vertically beyond the bounds of the xclipboard screen, as it does in Figure 5-7, the window will display both horizontal and vertical scrollbars. If the text extends beyond the screen in only one of these two ways, the window will display either a horizontal or vertical scrollbar, as needed.* These scrollbars are selection-specific: they are only displayed as long as the current selection cannot be viewed in its entirety without them. If you move to a previous or subsequent selection that can be viewed without scrollbars, the scrollbars will be deactivated.
Problems with Large Selections
If you experiment making large selections with xclipboard, you may discover what seems to be a bug in the program. Though in most circumstances, making a new selection causes the screen to advance and display the new text, this does not happen reliably after a selection vertically spanning more than one screenful. In these cases, the new selection is saved in the xclipboard; however, the xclipboard window does not automatically advance to show you the new current selection. Instead, the previous long selection is still displayed. This is a bit of xclipboard sleight-of-hand. The new selection has been successfully made but the appearance of the window belies this fact. (The Next button will probably add to your confusion; it will not be available for selection, suggesting that the text in the window is the last selection saved. This is not the case.)
In order to get around this problem and display the actual current selection, press the Previous button. The same long selection (which is, in actuality, the Previous selection) will again be displayed. Then the Next button will be enabled, and you can click on it to display the actual current selection.
Editing Text Saved in the xclipboard
You can edit text you send to the xclipboard using the same commands recognized by xedit. These commands are described in the section “The xedit Text Editor” in Chapter 8. A small caret cursor will be visible in each screenful of text. You can move this cursor by clicking the pointer where you'd like it to appear. Then you can backspace to delete letters or type to insert them. When you edit a screenful of text, the xclipboard continues to store the edited version, until you delete it or exit the program.
Be aware that, without performing customization, you can still use xclipboard on a very simple level. You can paste text into and copy text from the xclipboard window just as you would any other, using the pointer movements described earlier in this chapter. You can also type in the xclipboard window and then copy and paste what you've typed. Just move the pointer into the window and try typing. However, keep in mind that this is not the intended use of the xclipboard.
If you do choose to use the clipboard in a limited way, it can still be a helpful editing tool. For example, say you wanted to create a paragraph composed of a few lines of text from each of two files. You could copy the text from each file using the pointer and paste it into the xclipboard window. (Each time you paste text into the xclipboard window, the text is appended to whatever text was already pasted there.) Again using the pointer, you could copy the newly formed paragraph from the xclipboard window and paste it into a file in another window.
Running a Program in a Temporary xterm Window
Normally, when you start up an xterm window, it automatically runs another instance of the UNIX Bourne or C shell (depending on which is set in your .Xresources file or the SHELL environment variable). If you want to create an xterm window that runs some other program and goes away when that program terminates, you can do so with the xterm –e option:
% xterm -e command [arguments]
For example, if you want to look at the file temp in a window that will disappear when you quit out of the file, you can use the UNIX more program as follows:
% xterm -e more temp
When you are using other options to xterm on the command line, the –e option must appear last because everything after the –e option is read as a command.
The xterm Menus
xterm has four different menus:
- Main Options menu (formerly called xterm menu).
- VT Options menu (formerly called Modes menu).
- VT Fonts menu (available as of Release 4).
- Tek Options menu (formerly called Tektronix menu).
The VT Fonts menu, which allows you to change the xterm display font dynamically, was introduced in Release 4. The other three menus are updated versions of menus available in Release 3. As is indicated above, these three menus have been renamed in Release 4. Most of the items available on these menus have not changed in functionality since Release 3, though many have been renamed and some have been reorganized.
As shown in Figure 5-8, three of the four xterm menus are divided into sections separated by horizontal lines. The top portion of each divided menu contains various modes that can be toggled. (The one exception is the Redraw Window item on the Main Options menu, which is a command.) A check mark appears next to a mode that is currently active. Selecting one of these modes toggles its state.

The items on the VT Fonts menu change the font in which text is displayed in the xterm window. Only one of these fonts can be active at a time. To toggle one off, you must activate another.
Most mode entries can also be set by command line options when invoking xterm, or by entries in a resource startup file (such as .Xdefaults or .Xresources) as described in Chapter 10. (See the xterm reference page in Part Three of this guide for a complete list of command options and resource variables.) The various modes on the menus are very helpful if you've set (or failed to set) a particular mode on the command line and then decide you want the opposite characteristic.
The sections below the modes portion of each menu contain various commands. Selecting one of these commands performs the indicated function. Many of these functions can only be invoked from the xterm menus. However, some functions can be invoked in other ways: for example, from an mwm menu, on the command line, by a sequence of keystrokes (such as Control-C). This chapter includes alternatives to some of the menu items which, in certain cases, may be more convenient. Of course, the xterm menus can be very helpful when other methods to invoke a function fail.
Menus are displayed by placing the pointer on the window and simultaneously pressing a keyboard key and pointer button. (The exact key and button combinations are described below with each menu.) When you're using a window manager, such as mwm, that provides a titlebar or frame, the pointer must rest within the window proper—not on any window decoration. (Note that the pointer be within the window, even if click-to-type focus is enabled. See Chapter 1 for a discussion of focus policy.)
When you display an xterm menu, the pointer becomes the arrow pointer and initially appears in the menu's title. Once the menu appears, you can release any keyboard key. The menu will remain visible as long as you continue to hold down the appropriate pointer button. (You can move the pointer off the menu without it disappearing.)
If you decide not to select a menu item after the menu has appeared, move the pointer off the menu and release the button. The menu disappears and no action is taken.
In this discussions of the four xterm menus, we'll consider some of the more useful items as well as some alternatives to menu items. For more complete information about each menu, see the xterm reference page in Part Three of this guide.
The Main Options Menu
The Main Options menu, shown in Figure 5-9, allows you to set certain modes and to send signals (such as SIGHUP) that affect the xterm process.
To bring up the Main Options menu, move the pointer to the xterm window you want to change, hold down the Control key, and press the first (usually the left) pointer button.* The pointer changes to the menu pointer, and this menu of three modes and eight commands appears. (You can release the Control key but must continue to press the first pointer button to hold the Main Options menu in the window.) Note that Main Options menu items apply only to the xterm window the pointer is in when you display the menu. To effect changes in another xterm, you must move the pointer to that window, display the menu, and specify the items you want.

To select a menu item, move the menu pointer to that item and release the first button. After you have selected a mode (Secure Keyboard, Allow SendEvents, or Log to File), a check mark appears before the item to remind you that it is active. The Log to File mode on the Main Options menu can also be set by a command line option when invoking xterm. In addition, both Log to File and Allow SendEvents can be set by entries in a resource startup file such as .Xresources. The menu selections enable you to change your mind once xterm is running. (See the xterm reference page in Part Three for more information on these modes.)
The Secure Keyboard mode toggle was added to the menu (in a Release 3 patch) to help counteract one of the security weaknesses of X. This mode is intended to be activated when you want to type a password or other important text in an xterm window. Generally, when you press a keyboard key or move the pointer, the X server generates a packet of information that is available for other clients to interpret. These packets of information are known as events. Moving the pointer or pressing a keyboard key causes input events to occur.
There is an inherent security problem in the client-server model. Because events such as the keys you type in an xterm window are made available via the server to other clients, hypothetically an adept system hacker could access this information. (Naturally, this is not an issue in every environment.) A fairly serious breach of security could easily occur, for instance, if someone were able to find out a user's password or the root password. Enabling Secure Keyboard mode causes all user input to be directed only to the xterm window itself.
Of course, in many environments, precaution is probably not necessary: if the nature of the work is in no way sensitive, if the system administrator has taken pains to secure the system in other ways, etc. If your environment might be vulnerable, you can enable Secure Keyboard mode before typing passwords and other important information and then disable it again using the menu.
When you enable Secure Keyboard mode, the foreground and background colors of the xterm window will be exchanged (as if you had enabled the Reverse Video mode from the VT Options menu), as shown in Figure 5-10. When you disable Secure Keyboard mode, the colors will be switched back.

Be aware that only one X client at a time can secure the keyboard. Thus, if you have enabled Secure Keyboard mode in one xterm, you will not be allowed to enable it in another xterm until you disable it in the first. If Secure Keyboard mode is not available when you request it, the colors will not be switched and a bell will sound.
If you request Secure Keyboard mode and are not refused but the colors are not exchanged, be careful: you are not in Secure Keyboard mode. If this happens, there's a good chance that someone has tampered with the system. If the application you're running displays a prompt before asking for a password, it's a good idea to enable Secure Keyboard mode before the prompt is displayed and then verify that the prompt is displayed in the proper colors. Before entering the password, you can also display the Main Options menu again and verify that a check mark appears next to Secure Keyboard mode.
Be aware that Secure Keyboard will be disabled automatically if you iconify the xterm window, or start mwm or another window manager that provides a titlebar or other window decoration. (You can enable Secure Keyboard mode once mwm is running, though.) This limitation is due to the X protocol. When the mode as disabled, the colors will be switched back and the bell will sound to warn you.
Though intended to counteract a security weakness, the Secure Keyboard mode toggle can also be used to get around a weakness of mwm. As described in Chapter 4, if mwm dies, it's possible that the focus can be lost—i.e., the focus is no longer directed to any application window. Selecting Secure Keyboard mode for any xterm should cause that window to grab the focus again.
In addition to modes that can be toggled, the Main Optons menu includes several commands. All of the commands (except for Redraw Window) send a signal that is intended to affect the xterm process: suspend it (Send STOP Signal), terminate it (Send TERM Signal), etc. Given that your operating system may recognize only certain signals, every menu item may not produce the intended function.
Note that most of these commands are equivalent to common keystroke commands, which are generally simpler to invoke. For example, in most terminal setups Control-C can be used to interrupt a process. This is generally simpler than using the Send INT Signal menu command, which performs the same function.
Similarly, if your system supports job control, you can probably suspend a process by typing Control-Z and start the process again by typing Control-Y, rather than using the Send STOP Signal and Send CONT Signal menu commands. If your system does not support job control, neither the menu commands nor the keystrokes will work.
Four of the commands (Send HUP Signal, Send TERM Signal, Send KILL Signal, and Quit) send signals that are intended to terminate the xterm window. Depending on the signals your system recognizes, these commands may or may not work as intended. Be aware that in most cases you can probably end an xterm process simply by typing some sequence (such as Control-D or exit) in the window. Of course the menu items may be very helpful if the more conventional ways of killing the window fail. Also be aware that, in addition to being recognized only by certain systems, some signals are more gentle to systems than others. See the xterm reference page in Part Three of this guide for information on the signal sent by each of the menu commands and the signal(3C) reference page in the UNIX Programmer's Manual for more information on what each signal does.
The Quit command sends a SIGHUP to the process group of the process running under xterm, usually the shell. (The Send HUP Signal command sends the same signal.) This ends up killing the xterm process, and the window disappears from the screen.
Quit is separated from the earlier commands by a horizontal line so it's easier to point at. Sending a SIGHUP with Quit is slightly more gentle to the system than sending a SIGKILL with Send KILL Signal.
The Redraw Window command redraws the contents of the window. As an alternative, you can redraw the entire screen using the xrefresh client. See the xrefresh reference page in Part Three of this guide for more information about this client.
VT Options Menu
The VT Options menu provides many VT102 setup functions. Some of these mode settings are analogous to those available in a real VT102's setup mode; others, such as scrollbar, are xterm-only modes.
The VT Options menu items allow you to reset several modes at once, select the Tektronix window to accept input, and hide the VT window.
To bring up the VT Optons menu, move the pointer to the xterm window, hold down the Control key, and then press and hold down the second pointer button. (You can release the Control key but must continue to press the second button to keep the VT Options menu in the window.) The menu shown in Figure 5-11 appears.

Check marks indicate the active modes. For example, Jump Scroll, Auto Wraparound, and Scroll to Bottom on Tty Output* are active in the VT Options menu displayed in Figure 5-12. These are the only modes active by default. To turn off one of these modes, move the menu pointer to that mode and release the second button.
Most of these modes can also be set by command line options when invoking xterm or by entries in a resource startup file like .Xresources (see Chapter 10). The menu selections allow you to change your mind once xterm is running.
The toggle Allow 80/132 Column Switching warrants a little more explanation. This mode allows xterm to recognize the DECCOLM escape sequence, which switches the terminal between 80- and 132-column mode. The DECCOLM escape sequence can be included in a program (such as a spreadsheet) to allow the program to display in 132-column format. See Appendix E, xterm Control Sequences, for more information. This mode is off by default.
The VT Options menu commands (in the second and third partitions of the menu) perform two sets of functions, neither of which can be performed from the command line or a resource definition file. The commands Soft Reset and Full Reset reset some of the modes on the menu to their initial states. See the xterm reference page in Part Three of this guide for more information.
The Show Tek Window, Switch to Tek Mode, and Hide VT Window menu items allow you to manipulate the Tektronix and VT102 windows.
The Show Tek Window command displays the Tek window and its contents without making it the active window (you can't input to it). Use the Switch to Tek Mode command to display a Tektronix window and make it the active window. When you select Switch to Tek Mode, the Show Tek Window command is automatically enabled, since the Tek window is displayed. (Note that a Tektronix window is not commonly used for general purpose terminal emulation but for displaying the output of graphics or typesetting programs.)
Both of these commands are toggles. If Show Tek Window is active and you toggle it off, the Tek window becomes hidden. (As we'll see, you can also do this with the Hide Tek Window item on the Tek Options menu.) If both Switch to Tek Mode and Show Tek Window are active (remember, enabling the former automatically enables the latter), toggling off either one of them switches the xterm back to VT mode. (This can also be done from the Tek Options menu with the Switch to VT Mode item.)
The Hide VT Window command hides the VT102 window but does not destroy it or its contents. It can be restored (and made the active window) by choosing Select VT Mode from the Tek Options menu.
VT Fonts Menu
The VT Fonts menu is a welcome Release 4 innovation. It allows you to change the display font of an xterm window while the window is running. To bring up the VT Fonts menu, move the pointer inside the xterm window. Press and hold down the Control key on the keyboard and press the third (usually the right) pointer button. The VT Fonts menu is shown in Figure 5-12.

If you have not toggled any items on this menu, a check mark will appear before the Default mode setting. The Default is the font specified when the xterm window was run. This font could have been specified on the xterm command line or in a resource file such as .Xresources. Whatever the case, this font remains the Default for the duration of the current xterm process.
The items Default, Tiny, Small, Medium, and Large can be toggled to set the font displayed in the xterm window. The font can be changed any number of times to accommodate a variety of uses. You might choose to use a large font for editing a file (chances are you've chosen a large enough default font, though). You could then change to a smaller font while a process is running since you don't need to be reading or typing in that xterm. Changing the font also changes the size of the window.
There are also default settings for the Tiny, Small, Medium, and Large fonts. They are all constant-width fonts from the directory /usr/lib/X11/fonts/misc and are listed in Table 5-4.
Table 5-4. VT Fonts Menu Defaults
| Menu Item | Default Font |
| Tiny | nil2 |
| Small | 6x10 |
| Medium | 8x13 |
| Large | 9x15 |
Bring up the VT Fonts menu and toggle some of these fonts to see what they look like. The default Tiny font, nil2, is actually too small to be legible. It is not intended to be read. If you select this font, your xterm window becomes tiny, almost the size of some application icons. Though you cannot read the actual text in a window this size, the window is still active and you can observe if additional output, albeit minuscule, is displayed. An xterm window displaying text in such a small font can, in effect, serve as an active icon.
Be aware that you can specify your own Tiny, Small, Medium, and Large fonts using entries in a resource startup file such as .Xresources. The corresponding resource names are font1, font2, font3, and font4. See Chapter 6 for more information about available fonts. See Chapter 10 for instructions on how to set resource variables.
In addition to the menu selections we've discussed, the VT Fonts menu offers two other possible selections: Escape Sequence and Selection. When you first run an xterm window, these selections appear on the VT Fonts menu but they are not functional. (They will appear in a lighter typeface than the other selections, indicating that they are not available.) In order to enable these selections for use, you must perform certain actions which are outlined in Chapter 6.
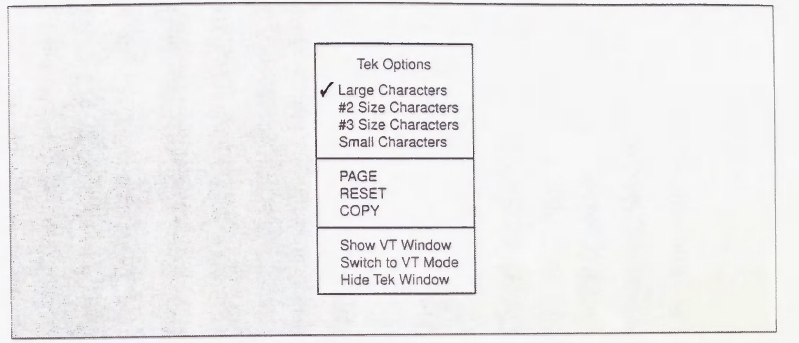
Tek Options Menu
The Tek Options menu controls certain modes and functions of the Tektronix window. The menu can only be displayed from within the Tektronix window. As previously described, you can display the Tek window and make it the active window by using the Switch to Tek Mode command on the VT Options menu.
To display the Tek Options menu, move the pointer inside the Tektronix window. Press and hold down the Control key on the keyboard and press the second pointer button. The Tek Options menu appears. With this menu you set the size of the text in the Tektronix window and select some commands.
Note that these modes (above the first line) can only be set from the Tek Options menu. All of these modes set the point size of the text displayed in the Tektronix window. (Only one of these four modes can be enabled at any time.)
The most important command on the Tek Options menu, shown in Figure 5-13, is Switch to VT Mode. If the Tek window has been made the active window (using the Switch to Tek Mode command from the VT Options menu), you can choose Switch to VT Mode to make the VT window the active window again. (If both windows are showing, you can also toggle Switch to Tek Mode on the VT Options menu to deactivate it; that is, switch from Tek mode and back to VT mode.) Switch to VT Mode is also a toggle; if you deactivate it, xterm will switch back to Tek mode.
Selecting Show VT Window displays the VT window if it has been hidden (using the Hide VT Window command from the VT Options menu) or hides it if it is being displayed. (Again, the command is a toggle.) Remember that you cannot input to the VT window until you make it the active window by using Switch to VT Mode.
*The PRIMARY selection and the cut buffer are stored as properties of the root window. A property is a piece of information associated with a window (or font) and stored in the server, where it can be accessed by any client. The property mechanism permits “cut” text to be stored and later “pasted” into the windows of other clients. See Chapter 1 and Chapter 10 for more about properties and interclient communication.
*To be more precise, double-clicking selects all characters of the same class (e.g., alphanumeric characters). By default, punctuation characters and whitespace are in a different class from letters or digits—hence, the observed behavior. However, character classes can be changed. For example, if you wanted to double-click to select email addresses, you'd want to include the punctuation characters !, %, @, and . in the same class as letters and digits. However, redefining the character classes is not something you'd do every day. See the xterm reference page in Part Three of this guide for details.
*An application created using the X Toolkit, which provides horizontal and vertical scrollbars, is described as a viewport. See Chapter 8 for mom information about viewports and other X Toolkit features.
*The right button can be made to function as the “first” button. This is especially useful if you are left-handed. See Chapter 12, Setup Clients, for instructions on how to customize the pointer with xmodmap.
*This mode indicates that if you are using the scrollbar and the window receives output (or a key is pressed, if stty echo is enabled), the window scrolls forward so that the cursor is at the current line. (You can use the menu to toggle off this mode but it is generally desirable to have.)