
The Content Pipeline in XNA is a significant part of XNA Game Studio development, on par with the XNA Framework in terms of value and importance. The Content Pipeline handles asset management, including the freeing of memory, so we don’t need to be overly concerned with cleanup after shutting down a game. The real power of the Content Pipeline, though, is in its ability to pre-process gameplay assets during build time, making them available to an XNA game at runtime in the most convenient format for a game. Furthermore, the Content Pipeline is extendable, meaning we can add our own custom assets to the Content Pipeline and have them converted to XNA format like the native file types (meshes, textures, etc.). As you will learn in this chapter, we can create a custom Content Pipeline extension library to convert any file into a managed asset—any file at all! If you have the specifications for 3DS Max or Maya native binary files, then it’s possible to write an extension to convert such a file to the XNA format without the need for a third-party or custom conversion tool. The importance of scripting in a game project is also paramount! The ability to import a gameplay script file into XNA is extremely important, so we will learn how to create such an extension in this chapter. Here’s the important stuff:
We don’t need to go over all the classes in this namespace because they are used internally by XNA to manage assets that we tell it to load, and we will not need to use any class other than ContentManager. Here are the classes and their descriptions for completeness.
Following are the classes found within this namespace.
Used to report errors from the ContentManager.Load method. All the properties and methods are inherited from Exception.
The runtime component that loads managed objects from the binary files produced by the design-time Content Pipeline. It also manages the lifespan of the loaded objects. Disposing of the content manager will also dispose of any assets that are themselves IDisposable.
Public Properties | |
| Gets or sets the root directory associated with this |
| Gets the service provider associated with the |
Public Methods | |
| Loads an asset that has been processed by the Content Pipeline. |
| Disposes all data that was loaded by this |
Protected Methods | |
| Opens a stream for reading the specified asset. Derived classes can replace this to implement pack files or asset compression. |
| Low-level worker method that reads asset data. |
A worker object that implements most of ContentManager.Load. A new ContentReader is constructed for each asset loaded. Most of the properties and methods are derived from BinaryReader.
Public Properties | |
| Gets the name of the asset currently being read by this |
| Gets the |
Public Methods | |
| Reads a |
| Reads a double value from the currently open stream. |
| Reads a link to an external file. |
| Reads a |
| Reads a single managed object from the current stream as an instance of the specified type. If a base class of the actual object type is specified, only data from the base type will be read. |
| Reads a shared resource ID and records it for subsequent fix-up. |
| Reads a float value from the currently open stream. |
| Reads a |
| Reads a |
| Reads a |
A custom Attribute that marks a field or property to control how it is serialized or to indicate that protected or private data should be included in serialization.
Public Properties | |
| Gets or sets a value indicating whether this member can have a null value (default=true). |
| Gets or sets the XML element name for each item in a collection (default = “Item”). |
| Gets or sets the XML element name (default=name of the managed type member). |
Gets or sets a value indicating whether to write member contents directly into the current XML context rather than wrapping the member in a new XML element (default=false). | |
| Indicates whether an explicit |
| Indicates whether to write this element if the member is null and skip past it if not found when deserializing XML (default=false). |
| Indicates whether this member is referenced from multiple parents and should be serialized as a unique ID reference (default=false). |
A custom Attribute that marks a collection class to specify the XML element name for each item in the collection.
Public Properties | |
| Gets the name that will be used for each item in the collection. |
A custom Attribute that marks public fields or properties to prevent them from being serialized. All properties and methods are inherited from Attribute.
A custom Attribute that specifies the corresponding runtime type of this object.
Public Properties | |
| Gets the runtime type for the object. |
A custom Attribute that specifies the corresponding runtime type version of this object.
Public Properties | |
| Gets the runtime type version for the object. |
Worker for reading a specific managed type from a binary format. Derive from this class to add new data types to the Content Pipeline system.
Public Properties | |
| Determines if deserialization into an existing object is possible. |
| Gets the type handled by this reader component. |
| Gets a format version number for this type. |
Protected Methods | |
| Retrieves and caches nested type readers. Called by the framework at creation time. |
| Reads a strongly typed object from the current stream. |
A manager that constructs and keeps track of type reader objects.
Public Methods | |
| Looks up a reader for the specified type. |
Subclass of ContentManager, which is specialized to read from RESX resource files rather than directly from individual files on disk. Most of the properties and methods are inherited from ContentManager.
Protected Methods | |
| Opens a stream for reading the specified resource. Derived classes can replace this to implement pack files or asset compression. |
We can load an asset as a known type with the Content.Load() method by passing the content class name to the templated Load method like so:
Content.Load<SpriteFont>("font1");
The following types of files may be imported by the content processor:
Model (FBX, X)
Effect (FX)
SpriteFont (BMP, SPRITEFONT, DDS, DIB, HDR, JPG, PFM, PNG, PPM, TGA)
Texture (BMP, DDS, DIB, HDR, JPG, PFM, PNG, PPM, TGA)
Texture2D (same extensions as Texture)
TextureCube (DDS)
After an asset file has been imported by the content processor at compile time, the imported file will have an extension of .xnb. XNA does not load asset files from their native formats, such as WAV and BMP; it loads only from imported files. Once loaded, it’s up to your code to do something with the asset. XNA is not a game engine. Although XNA has a collection of drawable objects, you have to inherit from a DrawableComponent class to take advantage of the collection. Even then, there’s no control over the object at runtime, such as the ability to move and manipulate it.
The good news is, we can add new types of assets to an XNA project by extending the Content Pipeline with a new library of our own.
XNA makes it possible for you to add your own types of assets to the content manager so they can be built in the project like the known assets, and still loaded using Content.Load(). This ability is really helpful in more ways than mere asset loading. You could, for instance, write a custom content loader that returns the data for a class as a loaded object filled with data, rather than a traditional asset like texture, mesh, etc. A new content type is added to an XNA project, identified as “Content Pipeline Extension Library” in the list of project templates. Because this is a lot more work than just loading a file directly, it is not recommended for unique file types, only files that are common in a game project.
To give it a try yourself, add a new project to an existing XNA solution and choose this type of template to add a new extension to your solution, and we’ll then see how to use it. After creating the new extension project, a source code file called ContentProcessor1.cs will be added with this code. Just remove this default file because we’ll be adding our own from a template.
To demonstrate how to create a custom Content Pipeline extension library, I will go over a simple extension that teaches XNA how to import a normal text file. Although simple in premise, there are actually quite far-reaching uses for a text file importer, not least of which is the ability to load a Lua or Python script file and process it!
Three classes are required to build a Content Pipeline extension importer, which has the job of reading a file in a native format and converting it to an XNA file with an extension of .xnb. You can store anything you want in the XNB file, because both text and binary data can be stored. The three classes needed to convert a file are as follows: Importer, Processor, and Writer. An additional class must be added to a secondary library project in order to load the asset from its XNB file into memory: Reader.
It’s also up to you to write the XNB reader for your custom file so it can be read in by the game. It’s a bit of a workaround process—importing, exporting, and then reading—but the result is that we can import any native file format (such as a 3DS Max or Maya file) and then have XNA process it during build time. Some studios prefer to build tools that process the native files into a proprietary format that the studio’s game engines use. Either way, a custom importer makes the whole process run very smoothly. Also, this allows artists and designers to work with the native files. By simply saving them in their XNA content folders, those files can be built into the project without any intermediate steps.
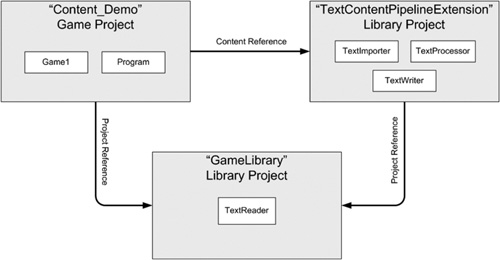
Working with a Content Pipeline extension library can be extremely frustrating if you try to do it with just two projects—the extension library and your game. To resolve circular references and namespace problems, I recommend using a third project (itself a library) to act as a data share between the extension library and your game. If you have a game engine, then it’s natural to use your engine project for that purpose.
For this example, we need three projects: a primary game project, a Content Pipeline extension project, and a working data library project to help the two communicate effectively. Figure 5.1 shows how the three projects work together.
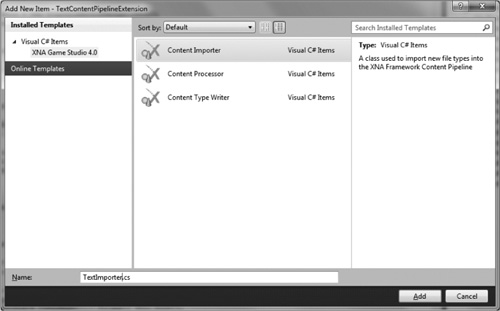
Add a new file to the Content Pipeline extension project using the Project, Add New Item menu command. The Add New Item dialog box opens. Click XNA Game Studio 4.0 under Visual C# Items in the left column; then click Content Importer, as shown in Figure 5.2.
Following is the source code for the importer class, called TextImporter in this example. The purpose of this class is threefold:
To describe the type of file to be processed using the file extension
To specify how that asset file is to be processed
To read the asset file into memory
In the case of your text file importer, only one line of code is needed to read the entire text file into a string variable in memory. Note the namespace used in these classes: TextContentPipelineExtension.
using Microsoft.Xna.Framework;
using Microsoft.Xna.Framework.Content.Pipeline;

using TImport = System.String;

namespace TextContentPipelineExtension
{
    [ContentImporter(".txt", DisplayName = "Text File Importer",
        DefaultProcessor = "TextProcessor")]
    class TextImporter : ContentImporter<TImport>
    {
        public override TImport Import(string filename,
            ContentImporterContext context)
        {
            return System.IO.File.ReadAllText(filename);
        }
    }
}
The next class we need in the extension library project is the Processor, which has the job of converting the input data from the Importer into whatever format needed in the resulting XNB file (which will be written using the Writer class). You need a new class for the Processor, so add it via the Project, Add New Item menu command. The Add New Item dialog box opens. Click XNA Game Studio 4.0 under Visual C# Items in the left column; then click Content Processor, as shown in Figure 5.3.

Here is the source code for the sample TextProcessor class. This very simple class just passes the string read in from the text file to Writer. Normally, you would need to do some processing on the input data to make it palatable within the XNA game. For instance, an image file loader would need to convert the read bytes into data compatible with a Texture or Texture2D class. In the interest of keeping this example simple, I’m just working with character data.
using Microsoft.Xna.Framework;
using Microsoft.Xna.Framework.Content.Pipeline;
using Microsoft.Xna.Framework.Content.Pipeline.Processors;

using TInput = System.String;
using TOutput = GameLibrary.MyData;

namespace TextContentPipelineExtension
{
    [ContentProcessor(DisplayName = "Text File Processor")]
    public class TextProcessor : ContentProcessor<TInput, TOutput>
    {
        public override TOutput Process(TInput input,
            ContentProcessorContext context)
        {
            GameLibrary.MyData data = new GameLibrary.MyData();
            data.MyString = input;
            return data;
        }
    }
}
Now we have the Writer class. After the Processor class manipulates data read in by Importer into whatever format we need to use, the Writer class writes the data passed to it from Processor out to an XNA file with an extension of .xnb. To add a Writer class, run the Project, Add New Item menu command. The Add New Item dialog box opens; click XNA Game Studio 4.0 under Visual C# Items in the left column; then click Content Writer, as shown in Figure 5.4.

The source code for the TextWriter class is shown in Listing 5.1. Normally, there would be more than one line of code to write out the data for a custom asset file, but because we’re just working with text data, we only need to write out the string to a text file. This is kept simple to demonstrate how the project works. After you’ve learned how to create a Content Pipeline extension, you will be able to work with more complex file types.
Example 5.1. The TextWriter Class
using Microsoft.Xna.Framework;
using Microsoft.Xna.Framework.Content.Pipeline;
using Microsoft.Xna.Framework.Content.Pipeline.Processors;
using Microsoft.Xna.Framework.Content.Pipeline.Serialization.Compiler;

using TWrite = GameLibrary.MyData;

namespace TextContentPipelineExtension
{
    [ContentTypeWriter]
    public class TextWriter : ContentTypeWriter<TWrite>
    {
        protected override void Write(ContentWriter output, TWrite value)
        {
            //write the .xnb file
            output.Write(value.MyString);
        }
        public override string GetRuntimeReader(TargetPlatform target
Platform)
        {
            return "GameLibrary.TextReader, GameLibrary";
        }
    }
}
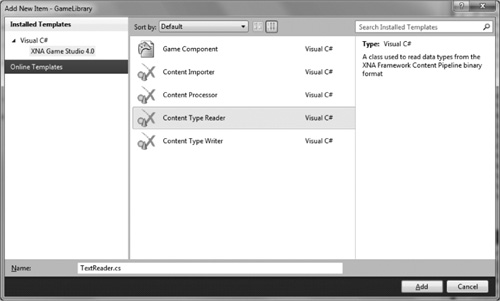
The Reader class is not part of the Content Pipeline, but is instead a class in the game project. The Reader is responsible for reading the XNB file that has been pre-processed by the custom Content Pipeline extension library (see Listing 5.2). The reason this class is not found in the Content Pipeline extension project is because that library does not exist at runtime! The content importer is not even part of the XNA Framework used at runtime, so you cannot put any class into the extension library project that you need to use at runtime. For that purpose, we have a second library that reads the XNA file and makes it available to Content.Load. This new class is called TextReader (note the namespace). See Figure 5.5.
Example 5.2. The Reader Class
using System;
using Microsoft.Xna.Framework;
using Microsoft.Xna.Framework.Content;
using Microsoft.Xna.Framework.Graphics;

using TRead = GameLibrary.MyData;

namespace GameLibrary
{
    public struct MyData
    {
        public string MyString;
    }

    public class TextReader : ContentTypeReader<TRead>
    {

        protected override TRead Read(ContentReader input,
            TRead existingInstance)
        {
            //read the .xnb file
            GameLibrary.MyData data = new GameLibrary.MyData();
            data.MyString = input.ReadString();
            return data;
        }
    }
}
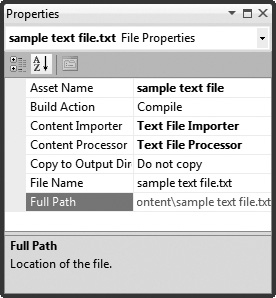
When the project is built, XNA processes any files with the extensions specified in the TextImporter class, running the code in our importer to process the input file (sample text file.txt), and writing out the output file (sample text file.xnb). Our code has full control over what, exactly, goes into the XNB file. That happens in the TextWriter class. When a text file is added to the project, XNA should recognize it (by file type) and associate it with the new text file extension library. Per the descriptions in the TextImporter, the file is associated with the “Text File Importer” and “Text File Processor” (as you can see in Figure 5.6).
Building sample text file.txt -> C:. . .Content Demo
    Content Demoinx86DebugContentsample text file.xnb
Rebuilding because asset is new
Importing sample text file.txt
    with TextContentPipelineExtension.TextImporter
Processing sample text file.txt
    with TextContentPipelineExtension.TextProcessor
Compiling C:. . .Content DemoContent Demo
    binx86DebugContentsample text file.xnb
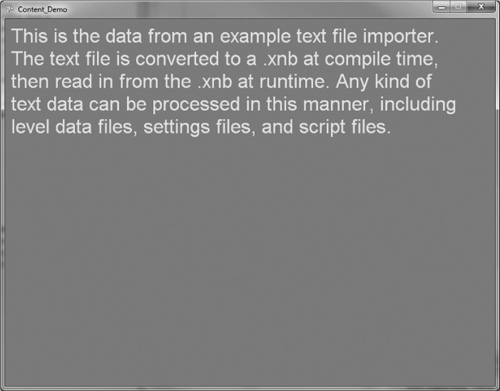
Building the project is just the first step, which produces the XNB files. The next step is to read the XNB file at runtime as a content item with Content.Load. The data should already be processed and simply provided to the function (via the TextReader class, which has the simple job of just passing the data along to Content.Load). But, errors can occur here. The most common error occurs when the wrong content type strings are specified in the writer class (TextWriter in this example). Here is the source code for the Content Demo program that puts these pieces together. The result is shown in Figure 5.7, which displays the contents of the file “sample text file.txt.”
Note
If the Content Importer and Content Processor are not automatically set when you add your custom item to the Content project, then it’s a reference problem. Be sure to add a reference to the ContentPipelineExtension in the Content project so it can “see” your custom content handler.
public class Game1 : Microsoft.Xna.Framework.Game
{
    GraphicsDeviceManager graphics;
    SpriteBatch spriteBatch;
    SpriteFont font;
    string textData;

    public Game1()
    {
    graphics = new GraphicsDeviceManager(this);
    Content.RootDirectory = "Content";
}

protected override void Initialize()
{
    base.Initialize();
    this.IsMouseVisible = true;
}

protected override void LoadContent()
{
    spriteBatch = new SpriteBatch(GraphicsDevice);
    font = Content.Load<SpriteFont>("Arial");

    //load custom content text file
    GameLibrary.MyData mydata;
    mydata = Content.Load<GameLibrary.MyData>("sample text file");
    textData = mydata.MyString;
}

protected override void UnloadContent()
{
}
protected override void Update(GameTime gameTime)
{
    GamePadState gamepad = GamePad.GetState(PlayerIndex.One);
    KeyboardState keyboard = Keyboard.GetState();
    if (gamepad.Buttons.Back == ButtonState.Pressed) this.Exit();
    if (keyboard.IsKeyDown(Keys.Escape)) this.Exit();
    base.Update(gameTime);
}
protected override void Draw(GameTime gameTime)
{
    GraphicsDevice.Clear(Color.CornflowerBlue);
    spriteBatch.Begin();

    //print string read from text file
    print(10, 10, textData, Color.Yellow);
        spriteBatch.End();
        base.Draw(gameTime);
    }

    void print(int x, int y, string text, Color color)
    {
        spriteBatch.DrawString(font, text, new Vector2((float)x,
            (float)y), color);
    }
}
This chapter was a bit more than just a reference of the content manager in XNA; it was a full tutorial on how to write a Content Pipeline extension! This capability gives us a great deal of control over the types of asset files we can use in our XNA games, above and beyond the default assets supported by XNA.