
An avatar is a 3D model that serves as a gamer’s virtual representation online in Xbox Live, and can be customized to the gamer’s preferences with different body types, gender, hair style, clothing, and so forth. In this chapter, you will learn how to use an avatar in a game. In addition to retrieving and rendering the gamer’s custom-designed avatar in your own code, you can also generate random avatars for use as non-player characters (NPCs) for computer-controlled AI players or for scenery.
Here are topics of import in this chapter:
Retrieving a gamer avatar
Creating a random avatar
Rendering a gamer avatar
Avatar Demo project
Custom avatar animations
Note
Unfortunately, this feature is not available for a Windows game, so this chapter is necessarily specific only to the Xbox 360. The code will run under Windows but no avatars will render.
There is a 3D model of the profile avatar available for use in our own games for the Xbox 360. It really adds a lot of fun to a game when the player can see his or her own avatar in the game! There are a couple of drawbacks, though. First, the avatar model is not available for Windows projects, only for Xbox 360 projects. Second, you must be signed on to your gamer profile on Xbox Live to retrieve your official gamer avatar model in order to render it.
Wouldn’t it be great if we could just request the avatar mesh from Xbox Live without being officially signed on—like through an HTTP connection or by some other means? Alas, that is not possible. You simply must be signed on to retrieve it. There is an interesting workaround, though. In the AvatarDescription class is a property called Description. Despite its name, Description does not contain a string description of the avatar at all. Rather, it’s a byte buffer with properties that describe the avatar, from the body type to the height to the clothes and so on. This Description property is used to synchronize the gamer profile avatars of multiple players in a multiplayer game. The buffer is only 1,021 bytes (in XNA 4.0), so this roughly 1KB of data can be transmitted to the other players in a game so they can render the avatar. One way to render an avatar offline would be to save this Description property to a file and then read it for rendering as if it had been transmitted over the network.
The official avatar for a valid Xbox Live gamer profile can be retrieved and used as a character in an XNA game. Although you can render the avatar, you cannot save it as a mesh to local storage because no access to the mesh data is provided. You can, however, save the Description data for any avatar to a file and retrieve it later, even if Internet access is disrupted (due to a loss of wireless connection or an unplugged cable)! As mentioned, the Description property of AvatarDescription is a 1,021-byte buffer that describes the properties of an avatar. This is used to show everyone in a multiplayer game what their friends (or opponents) look like! To that end, the Description buffer is transmitted to each player in a multiplayer game so everyone sees the same avatars being rendered in their local game.
The first step to retrieving the avatar is to get a valid Gamer object initialized. This can be done a couple of ways, but the way I’ll describe here is using the Gamer.SignedInGamers[] collection. Hard-coding PlayerIndex.One is the easiest way to pull the default gamer profile, but of course, multiple local player profiles can be retrieved by using the four player indexes in SignedInGamers. Once a gamer is accessed on the local system, the profile data can be retrieved by using SignedInGamer.GetProfile(). Here is a quick example:
SignedInGamer gamer = Gamer.SignedInGamers[PlayerIndex.One];
GamerProfile profile = gamer.GetProfile();
The profile object is actually not needed here, but it’s common to retrieve this object with the gamer profile object at the same time. Using the gamer object, we can use an asynchronous function to retrieve the gamer avatar—an object containing properties and methods for rendering the avatar—without giving up any details or raw data. In other words, it’s an object we can use but can’t really modify in any meaningful way. The skeletal bone structure is available to you, however, so we can manipulate and transform it like any biped character, even with a physics system if desired.
IAsyncResult result =
    AvatarDescription.BeginGetFromGamer(gamer, null, null);
Once BeginGetFromGamer() is called, it will run in a background thread and update the IAsyncResult variable when the data has been fully received. We can look at IAsyncResult.IsCompleted to determine when it is finished. At that point, we need to call AvatarDescription.EndGetFromGamer() to retrieve the actual description data.
AvatarDescription avatarDesc =
    AvatarDescription.EndGetFromGamer(result);
Note
Refer to Chapter 6, “GamerServices,” for quick-reference information about the GamerServices namespace and for a refresher on retrieving information for a gamer profile.
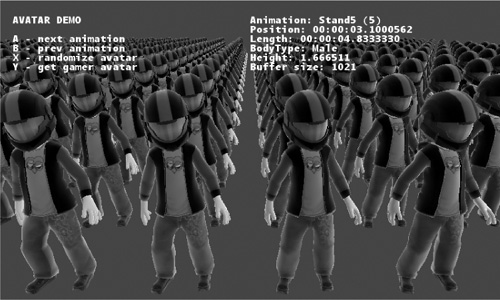
Figure 12.1 shows an example of a gamer avatar retrieved from Xbox Live and rendered using the example at the end of this chapter. This was my avatar, wearing an achievement item (the Halo 3 ODST helmet).
The AvatarDescription class has a method called CreateRandom() that will generate an avatar with randomized attributes for the body type, height, hair style, and so on. This can be used to create random characters for use in a game like so:
AvatarDescription avatarDesc = AvatarDescription.CreateRandom();
Figure 12.2 shows an example of a gamer avatar that was generated randomly and rendered using the program at the end of this chapter.

Once we obtain an avatar, either by retrieving one from the gamer’s profile or by generating a random one, then we can render it using the usual shader-based rendering techniques. The primary rendering class is AvatarRenderer, which is used to render any and all avatars in the game. The AvatarRenderer.Draw() method accepts two parameters: the BoneTransforms property from a loaded AvatarAnimation object and the predefined AvatarAnimation.Expression.
AvatarRenderer avatarRenderer;
AvatarAnimation avatarAnimation;
AvatarAnimationPreset animationIndex;
As of XNA 4.0, there are 31 animation sets defined in the AvatarAnimationPreset enumeration. You can use these existing animations or tap into the BoneTransforms in order to manipulate an avatar with your own animation data (or physics system, for instance).
Stand0= 0Stand1= 1Stand2= 2Stand3= 3Stand4= 4Stand5= 5Stand6= 6Stand7= 7Clap= 8Wave= 9Celebrate= 10FemaleIdleCheckNails= 11FemaleIdleLookAround= 12FemaleIdleShiftWeight= 13FemaleIdleFixShoe= 14FemaleAngry= 15FemaleConfused= 16FemaleLaugh= 17FemaleCry= 18FemaleShocked= 19FemaleYawn= 20MaleIdleLookAround= 21MaleIdleStretch= 22MaleIdleShiftWeight= 23MaleIdleCheckHand= 24MaleAngry= 25MaleConfused= 26MaleLaugh= 27MaleCry= 28MaleSurprised= 29MaleYawn= 30
Here is sample code to create the renderer object and establish the desired animation set:
avatarRenderer = new AvatarRenderer(avatarDesc, true);
animationIndex = (AvatarAnimationPreset) 0;
avatarAnimation = new AvatarAnimation(animationIndex);
Any existing camera code will work for the actual rendering of the scene. All that matters is that you have a properly set up projection matrix and view matrix to create a camera. The AvatarRenderer class has both Matrix properties built in, so you just set them to your existing camera properties or manually create a camera like so:
avatarRenderer.Projection = Matrix.CreatePerspectiveFieldOfView(
    MathHelper.ToRadians(45.0f), GraphicsDevice.Viewport.
    AspectRatio, .01f, 1000.0f);
Vector3 cameraPos = new Vector3(0, 2.0f, 1.5f);
Vector3 cameraLook = new Vector3(0, 1.5f, 0);
avatarRenderer.View = Matrix.CreateLookAt(cameraPos, cameraLook, Vector3.Up);
Finally, we can draw the avatar:
avatarRenderer.Draw( avatarAnimation.BoneTransforms,
    avatarAnimation.Expression);
Listing 12.1 contains the source code for the Avatar Demo project:
Example 12.1. Avatar Demo Project
using System;
using System.Collections.Generic;
using System.Diagnostics;
using System.IO;
using System.Xml;
using System.Xml.Serialization;
using Microsoft.Xna.Framework;
using Microsoft.Xna.Framework.Audio;
using Microsoft.Xna.Framework.GamerServices;
using Microsoft.Xna.Framework.Graphics;
using Microsoft.Xna.Framework.Input;
using Microsoft.Xna.Framework.Net;
using Microsoft.Xna.Framework.Storage;
namespace Project
{
    public class Game1 : Microsoft.Xna.Framework.Game
    {
        GraphicsDeviceManager graphics;
        SpriteBatch spriteBatch;
        SpriteFont font;
        GamePadState padState;
        Random rand;
        IAsyncResult result;
        GamerProfile profile = null;
        SignedInGamer gamer = null;
        AvatarDescription avatarDesc;
        AvatarRenderer avatarRenderer;
        AvatarAnimation avatarAnimation;
        AvatarAnimationPreset animationIndex;
        Matrix rotate;
        Vector3 cameraPos, cameraLook;

        public Game1()
        {
            graphics = new GraphicsDeviceManager(this);
            Content.RootDirectory = "Content";
            Components.Add(new GamerServicesComponent(this));
        }

        protected override void Initialize()
        {
            base.Initialize();
            rand = new Random();
            cameraPos = new Vector3(0, 2.0f, 1.5f);
            cameraLook = new Vector3(0, 1.5f, 0);
            RandomizeAvatar();
        }

        protected override void LoadContent()
        {
            spriteBatch = new SpriteBatch(GraphicsDevice);
            font = Content.Load<SpriteFont>("font1");
        }
        protected override void UnloadContent() { }

        protected override void Update(GameTime gameTime)
        {
            //update input states
            GamePadState oldState = padState;
            padState = GamePad.GetState(PlayerIndex.One);

            //back button
            if (padState.Buttons.Back == ButtonState.Pressed) this.Exit();

            //A - next animation
            if (padState.Buttons.A == ButtonState.Released &&
                oldState.Buttons.A == ButtonState.Pressed)
            {
                animationIndex += 1;
                if (animationIndex > (AvatarAnimationPreset)30)
                    animationIndex = (AvatarAnimationPreset)0;
                avatarAnimation = new AvatarAnimation(animationIndex);
            }

            //B - prev animation
            if (padState.Buttons.B == ButtonState.Released &&
                oldState.Buttons.B == ButtonState.Pressed)
            {
                animationIndex -= 1;
                if (animationIndex > (AvatarAnimationPreset)0)
                    animationIndex = (AvatarAnimationPreset)30;
                avatarAnimation = new AvatarAnimation(animationIndex);
            }

            //X - random avatar
            if (padState.Buttons.X == ButtonState.Released &&
                oldState.Buttons.X == ButtonState.Pressed)
            {
                RandomizeAvatar();
            }

            //Y - gamer avatar
            if (padState.Buttons.Y == ButtonState.Released &&
        oldState.Buttons.Y == ButtonState.Pressed)
    {
        GetGamerAvatar();
    }

    //update avatar animation
    avatarAnimation.Update(gameTime.ElapsedGameTime, true);

    GamerServicesDispatcher.Update();
    base.Update(gameTime);
}

protected override void Draw(GameTime gameTime)
{
    GraphicsDevice.Clear(Color.DarkSlateBlue);

    avatarRenderer.View = Matrix.CreateLookAt(cameraPos,
        cameraLook, Vector3.Up);

    for (float y = 0; y < 20.0f; y += 1.0f)
    {
        for (float x = 0; x < 20.0f; x += 1.0f)
        {
            avatarRenderer.World = rotate * Matrix.
                CreateTranslation(-10.5f + x, 0, -20.0f + y);
            avatarRenderer.Draw(avatarAnimation.BoneTransforms,
                avatarAnimation.Expression);
        }
    }

    spriteBatch.Begin();
    print(20, 20, "AVATAR DEMO");
    print(20, 50, "A - next animation");
    print(20, 65, "B - prev animation");
    print(20, 80, "X - randomize avatar");
    print(20, 95, "Y - get gamer avatar");
    print(400, 20, "Animation: " +
        ((AvatarAnimationPreset)animationIndex).ToString()
        + " (" + ((int)animationIndex).ToString() + ")");
    print(400, 35, "Position: " + avatarAnimation.CurrentPosition.
        ToString());
    print(400, 50, "Length: " + avatarAnimation.Length.ToString());
    print(400, 65, "BodyType: " + avatarDesc.BodyType.ToString());
    print(400, 80, "Height: " + avatarDesc.Height.ToString());
    print(400, 95, "Buffer size: " + avatarDesc.Description.
        Length.ToString());

    spriteBatch.End();
    base.Draw(gameTime);
}

void print(int x, int y, string text)
{
    print(x, y, text, Color.White);
}

void print(int x, int y, string text, Color color)
{
    try {
        spriteBatch.DrawString(font, text, new Vector2(
            (float)x, (float)y), color);
    }
    catch (Exception e) { Console.WriteLine(e.Message); }
}

void RandomizeAvatar()
{
    avatarDesc = AvatarDescription.CreateRandom();
    avatarRenderer = new AvatarRenderer(avatarDesc, true);
    animationIndex = (AvatarAnimationPreset)rand.Next(30);
    avatarAnimation = new AvatarAnimation(animationIndex);
    rotate = Matrix.CreateRotationY(MathHelper.ToRadians(180.0f));
    avatarRenderer.Projection = Matrix.CreatePerspectiveFieldOfView(
        MathHelper.ToRadians(45.0f), GraphicsDevice.Viewport.
        AspectRatio, .01f, 1000.0f);
}

void GetGamerAvatar()
{
    if (gamer == null)
            {
                if (Gamer.SignedInGamers[PlayerIndex.One] != null)
                {
                   gamer = Gamer.SignedInGamers[PlayerIndex.One];
                   profile = gamer.GetProfile();
                }
            }

            //request avatar from Xbox Live
            result = AvatarDescription.BeginGetFromGamer(gamer, null, null);

            //this locks up the program!
            while (!result.IsCompleted) { }
            if (result.IsCompleted)
            {
                avatarDesc = AvatarDescription.EndGetFromGamer(result);
                avatarRenderer = new AvatarRenderer(avatarDesc, true);
                animationIndex = (AvatarAnimationPreset)rand.Next(30);
                avatarAnimation = new AvatarAnimation(animationIndex);
                rotate = Matrix.CreateRotationY(
                   MathHelper.ToRadians(180.0f));
                avatarRenderer.Projection =
                   Matrix.CreatePerspectiveFieldOfView(
                   MathHelper.ToRadians(45.0f),
                   GraphicsDevice.Viewport.AspectRatio, .01f, 1000.0f);
            }
        }
    }
}
The Microsoft XNA team has released an expanded collection of avatar animations that you can download and use in your own games called the Avatar Animation Pack. The pack can be downloaded from the following Web site: http://create.msdn.com/en-US/education/catalog/utility/avatar_animation_pack. (Because Web links often change, be aware that you may have to perform a search for “XNA Avatar Animation Pack” if this URL expires.) Here is the list of new animations that come with the pack:
Climb | Punch | Swim Freestyle |
Crawl | Push | Swim Underwater |
Faint | Run | Swing Bat |
Jump | Sit Idle | Swing Club |
Kick | Steer | Swing Hammer |
Pick Up | Strafe Left | Throw |
Pull | Strafe Right | Walk |
After downloading the Avatar Animation Pack, you must add the animations to your XNA projects manually, one at a time (as needed). The animations are each stored in the Autodesk FBX format. The Maya format is also available for anyone who wants to open the avatar animation files to see how they are structured. To see these new animations in action, you can use one of the educational resources on the XNA App Hub Web site that demonstrates it. You can find them here: http://create.msdn.com/en-US/education/catalog/sample/custom_avatar_animation.
This short chapter explained how to use gamer avatars in an XNA game. Although this feature is available only on Xbox 360 builds of a game, it is compelling enough to warrant releasing a game only on that one platform, even though users of other platforms (Windows, etc.) will miss out on your game.