
While unit tests are used to test standalone components or component groups, functional tests allow for the testing of the complete application, like black box testing. We don't know what is inside and can only provide an input and get/verify the output. In our case, the input is the actions the user carries out in a browser, such as clicking on buttons or links, loading pages, and so on, while the output is what happens in the browser.
For our example, we will create a simple "check all" widget with a single button that checks and unchecks all checkboxes on the current page.
- Make sure that you have a ready-to-use application and the required testing tools as described in the Setting up the testing environment recipe of this chapter.
- Don't forget to run the server.
- Drop the widget code into
protected/components/ECheckAllWidget.phpas follows:<?php class ECheckAllWidget extends CWidget { public $checkedTitle = 'Uncheck all'; public $uncheckedTitle = 'Check all'; public function run() { Yii::app()->clientScript->registerCoreScript('jquery'), echo CHtml::button($this->uncheckedTitle, array( 'id' => 'button-'.$this->id, 'class' => 'check-all-btn', 'onclick' => ' switch($(this).val()) { case "'.$this->checkedTitle.'": $(this).val("'.$this->uncheckedTitle.'"); $("input[type=checkbox]").attr("checked", false); break; case "'.$this->uncheckedTitle.'": $(this).val("'.$this->checkedTitle.'"); $("input[type=checkbox]").attr("checked", true); break; } ' )); } } - Now create
protected/controllers/CheckController.phpas follows:<?php class CheckController extends Controller { function actionIndex() { $this->render('index'), } } - In addition, create a view,
protected/views/check/index.php, as follows:<?php $this->widget('ECheckAllWidget')?> <?php echo CHtml::checkBox('test1', true)?> <?php echo CHtml::checkBox('test2', false)?> <?php echo CHtml::checkBox('test3', true)?> <?php echo CHtml::checkBox('test4', false)?> <?php echo CHtml::checkBox('test5', true)?> <?php echo CHtml::checkBox('test6', true)?>
Let's imagine how we would test it manually:
- Load the page.
- Verify that the button title is Check all.
- Click on the button once.
- Verify that all checkboxes are checked and the button title is Uncheck all.
- Click on the button again.
- Verify that all checkboxes are unchecked and the button title is Check all.
Now we will implement the functional test, doing exactly the same as described previously:
- Create
protected/tests/functional/CheckAllWidgetTest.phpas follows:<?php class CheckAllWidgetTest extends WebTestCase { public function testWidget() { $this->open('check/index'), $this->assertEquals("Check all", $this->getAttribute("class=check-all-btn@value")); $this->click("class=check-all-btn"); $this->assertChecked("css=input[type=checkbox]"); $this->assertEquals("Uncheck all", $this->getAttribute("class=check-all-btn@value")); $this->click("class=check-all-btn"); $this->assertNotChecked("css=input[type=checkbox]"); $this->assertEquals("Check all", $this->getAttribute("class=check-all-btn@value")); } } - Now open the console and type the following:
cd path/to/protected/tests
phpunit functional/CheckAllWidgetTest.php
You should get the following output:

- Now, try to break a widget and run the test again. For example, you can comment the
onclickhandler: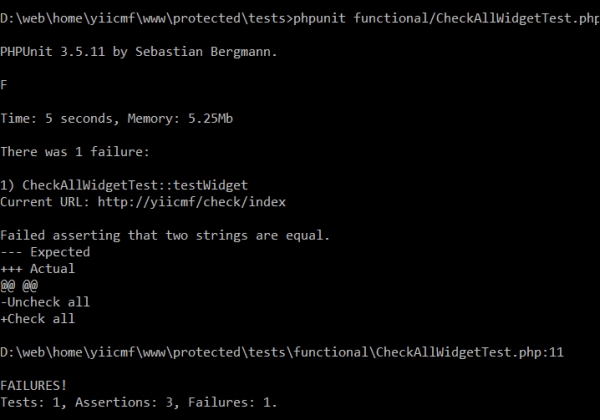
This means that your widget does not work as expected. In this case, the test failed on line
11.$this->assertEquals("Uncheck all", $this->getAttribute("class=check-all-btn@value"));The actual value was still
Check allbut the test expectedUncheck all.
PHPUnit starts executing all the methods named like testSomething one by one. As we have only one method, it executes testWidget:
$this->open('check/index'),It opens a page we created for testing:
$this->assertEquals("Check all", $this->getAttribute("class=check-all-btn@value"));It gets button text and checks if it equals the string provided. The getAttribute method searches for a DOM element with a class check-all-btn and returns its value attribute text.
$this->click("class=check-all-btn");It clicks an element with a class check-all-btn. That is the button.
$this->assertChecked("css=input[type=checkbox]");The assertChecked and assertNotChecked methods are used to find whether a checkbox is checked. This time we use a CSS selector, input[type=checkbox], to get all the checkboxes.
Inside, we call methods such as getAttribute or assertChecked, and pass it to the Selenium server, which does the actual work and returns the result.
In order to learn more about the functional testing, you can refer to the following resources: