
If you are posting code, be it a company's internal wiki or a public developer's blog, it is always better to have the syntax highlighted, so users who read the code will feel comfortable. Yii has PEAR's Text_Highlighter code-highlighting class bundled. It is used to highlight Yii definitive guide examples, and we can use it to do the same for our application.
In this recipe, we will create a simple application that will allow for adding, editing, and viewing code snippets.
- Create a new application by using
yiic webappas described in the official guide at the following URL:http://www.yiiframework.com/doc/guide/en/quickstart.first-app
- Set up a database connection and create a table named
snippetas follows:CREATE TABLE `snippet` ( `id` int(11) unsigned NOT NULL auto_increment, `title` varchar(255) NOT NULL, `code` text NOT NULL, `html` text NOT NULL, `language` varchar(20) NOT NULL, PRIMARY KEY (`id`) );
- Generate a
Snippetmodel by using Gii.
- First, we will tweak the
protected/models/Snippet.phpmodel code. Change therulesmethod to the following:public function rules() { return array( array('title, code, language', 'required'), array('title', 'length', 'max'=>255), array('language', 'length', 'max' => 20), ); } - Add methods to the same
Snippetmodel:protected function afterValidate() { $highlighter = new CTextHighlighter(); $highlighter->language = $this->language; $this->html = $highlighter->highlight($this->code); return parent::afterValidate(); } public function getSupportedLanguages() { return array( 'php' => 'PHP', 'css' => 'CSS', 'html' => 'HTML', 'javascript' => 'JavaScript', ); } - The model is ready. Now, we will create a controller. Therefore, create
protected/controllers/SnippetController.phpas follows:<?php class SnippetController extends CController { public function actionIndex() { $criteria = new CDbCriteria(); $criteria->order = 'id DESC'; $models = Snippet::model()->findAll($criteria); $this->render('index', array( 'models' => $models, )); } public function actionView($id) { $model = Snippet::model()->findByPk($id); if(!$model) throw new CException(404); $this->render('view', array( 'model' => $model, )); } public function actionAdd() { $model = new Snippet(); $data = Yii::app()->request->getPost('Snippet'), if($data) { $model->setAttributes($data); if($model->save()) $this->redirect(array('view', 'id' => $model->id)); } $this->render('add', array( 'model' => $model, )); } public function actionEdit($id){ $model = Snippet::model()->findByPk($id); if(!$model) throw new CHttpException(404); $data = Yii::app()->request->getPost('Snippet'), if($data) { $model->setAttributes($data); if($model->save()) $this->redirect(array('view', 'id' => $model->id)); } $this->render('edit', array( 'model' => $model, )); } } - Now views; create
protected/views/snippet/index.phpas follows:<h2>Snippets</h2> <?php echo CHtml::link('Add snippet', array('add'))?> <ol> <?php foreach($models as $model):?> <li> <?php echo CHtml::link( CHtml::encode($model->title), array('view', 'id' => $model->id) )?> </li> <?php endforeach?> </ol> - Create
protected/views/snippet/view.phpas follows:<h2><?php echo CHtml::link('Snippets', array('index'))?> → <?php echo CHtml::encode($model->title)?> </h2> <?php echo CHtml::link('Edit', array ('edit', 'id' => $model->id))?> <div> <?php echo $model->html?> </div> - Create
protected/views/snippet/add.phpas follows:<h2><?php echo CHtml::link('Snippets', array('index'))?> → Add snippet </h2> <?php $this->renderPartial('_form', array('model' => $model))?> - Create
protected/views/snippet/edit.phpas follows:<h2><?php echo CHtml::link('Snippets', array('index'))?> → Edit snippet </h2> <?php $this->renderPartial('_form', array('model' => $model))?> - Create
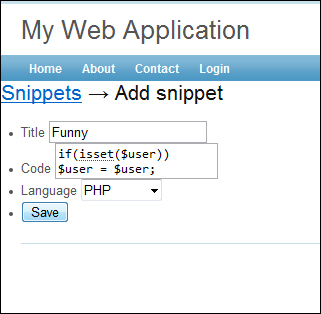
protected/views/snippet/_form.phpas follows:<?php echo CHtml::beginForm()?> <ul> <li> <?php echo CHtml::activeLabel($model, 'title')?> <?php echo CHtml::activeTextField($model, 'title')?> </li> <li> <?php echo CHtml::activeLabel($model, 'code')?> <?php echo CHtml::activeTextArea($model, 'code')?> </li> <li> <?php echo CHtml::activeLabel($model, 'language')?> <?php echo CHtml::activeDropDownList($model, 'language', $model->getSupportedLanguages())?> </li> <li> <?php echo CHtml::submitButton('Save')?> </li> </ul> <?php echo CHtml::endForm()?> - That is it. Now, run the snippet controller and try creating code snippets, as shown in the following screenshot:
- When it is viewed, it will look similar to the following screenshot:

The snippet model's function is used to store the code and snippet title. Additionally, we have added the html and language fields. The first one (html) is used to store HTML representing the highlighted code, while the language field is used for the snippet language (PHP, HTML, CSS, JavaScript, and so on). We need to store these, as we need them when we edit the snippet.
As we remove the safe rule from the Snippet model, we make title, code, and language as the required fields. There is no rule for html, which means that it cannot be set through the form directly.
The afterValidate method, as its name states, is executed after the validation gives us no errors. In this method we transform the code that is stored in the code field to HTML, representing the highlighted code in the html field by using the Yii's CTextHighlighter class and passing the language value to it.
The getSupportedLanguages function returns languages we want to support in the value-label array. We use this method in the snippet form.