Chapter 9. Death by Cropping: (Don’t shoot the messenger!)
Knock knock! Who’s there? The crop tool. The crop tool who? (Whack!)
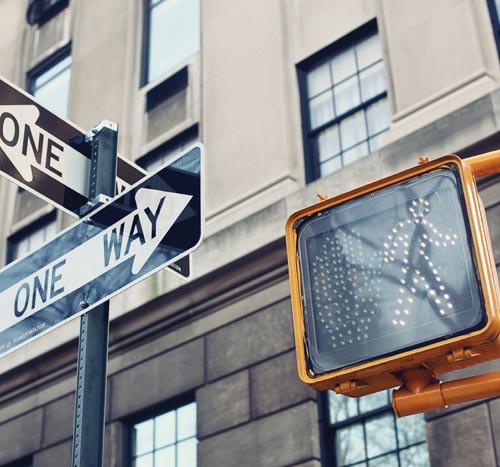
Like turning the wrong way down a one-way street or crossing an intersection without looking, the dangers of the crop tool can catch you by surprise. The more you know about how cropping works and what your options are, the better off you’ll be.
Even with the grooviest, most super-schmanciest camera in all the world, there’s one thing that can seriously spoil an image no matter how brilliant your timing or how well you nailed the white balance. It’s known as—cropping.
(Ominous music here.)
It starts out innocently enough. Uncle Joe falling asleep during his niece’s wedding vows? Gone! That huge mess under the table as Tommy blows out the candles on his birthday cake? Vanished! Those random strangers in the background of all your must-have tourist photos? No more!
I don’t want to induce a panic, so before you break into a cold sweat, let me say this—not all forms of cropping are menacing. Some crops are mild and may actually be unavoidable. But if used recklessly—as is frequently done—cropping has the potential be one of the most destructive things you could possibly do to an otherwise great image.
If you’re among the chronic croppers out there who may have gotten a bit too comfortable with the cropping tool—this chapter is for you.
Mild and unavoidable crops
Anytime you print an image at a size that’s not a multiple of the original size, cropping is unavoidable. For example, Figure 9.1 shows an image as originally captured in camera. Figure 9.2 shows the same image as it would appear when printed as a 5×7, and Figure 9.3 shows the image as cropped for an 8×10.
Figure 9.1. The original, uncropped image.

Figure 9.2. The black strips represent the area that would be unavoidably cropped away for a 5×7 print.
Figure 9.3. The same image, as it would be cropped for an 8×10.
This unavoidable cropping is due to a difference in something called “aspect ratio,” which is the relationship between the width and height of an image. Because common photo and frame sizes (such as 4×6, 5×7, 8×10, and 11×14) are all different aspect ratios, they each result in a different crop of the same image. (A 16×20, however, would have the same crop as an 8×10 or a 4×5 because they’re all multiples of 4×5. Get it?)
Tip
When you order photos at various sizes, the default crop will be centered (as seen in Figures 9.2 and 9.3). Some labs allow you to adjust the crop on either side when placing your order. This may help prevent important parts of your scene from getting trimmed off.
Thankfully, cropping for aspect ratio is generally mild enough that there’s no harm done, as long as important parts of the photo don’t get trimmed away. It’s only when you venture beyond the innocent realm of aspect ratio cropping, onto the slippery slope I like to call “extreme cropping,” that things get dicey.
Extreme cropping
Like any extreme sport (bungee jumping, cliff diving, or wind surfing), extreme cropping can be dangerous and should be practiced with care. Anytime you crop images, you are literally throwing away pixels—which you likely paid good money for! And after spending an entire chapter talking about how valuable pixels are (Chapter 8, “Resolution Revelation: Power to the Pixels!”), you can see how recklessly abandoning them could demolish your chances for high-quality enlargements.
The extent of the damage you do with the crop tool will ultimately depend on how many pixels you started with, how dramatically you cropped, and how large you were hoping to output the image afterward. It’s possible that even though you originally had enough pixels for a high-quality enlargement (poster size, anyone?), after an extreme cropping massacre, you may be lucky to get a high-quality wallet-size print, let alone a 4×6.
What constitutes an extreme crop? Generally, it’s any crop where the size of the area being cut away is larger than the size of what is left behind. The photo in Figure 9.4, for example, is a prime target for extreme cropping. Captured from a considerable distance, the subject appears small and the scene is stolen by a smorgasbord of visual clutter.
Figure 9.4. With only a mild crop for aspect ratio, this 10 megapixel image has more than enough pixels to be printed as an 8×10 with an overflowing resolution of 342 ppi.
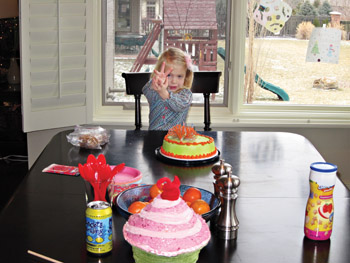
If you were to overlook the clutter and print the 10 megapixel image as an 8×10 (with mild cropping for aspect ratio only), the resulting image would weigh in with a whopping 342 ppi—well above the 300 ppi standard for high-quality prints.
Of course, cropping for aspect ratio isn’t quite as exciting as extreme cropping. The results aren’t nearly as dramatic. There’s no adrenaline rush, no butterflies in your stomach, or sweat beads on your brow—and it certainly wouldn’t get rid of all that clutter! And it’s precisely because of all the unwanted clutter that people roll up their sleeves, sharpen their crop tools (figuratively speaking), and start hacking away. Unfortunately, the improved image may come at a high cost.
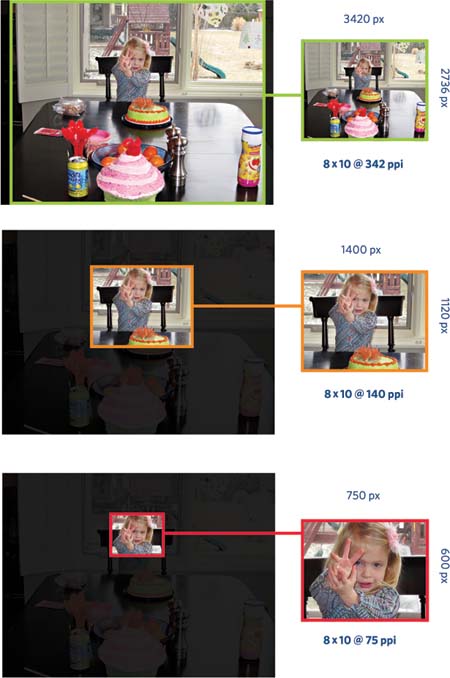
Figure 9.5 illustrates the effect cropping has on image size and, subsequently, on output options. Cropping for aspect ratio only, the first example leaves behind more than enough pixels for a high-resolution 8×10. Conversely, both of the remaining examples are extreme crops and would severely limit your enlargement options. An 8×10 of the middle crop would have only 140 pixels per inch, while an 8×10 of the most extreme crop would have an even more dismal resolution of 75 pixels per inch. (As you learned in Chapter 8, that’s a long way from the 150 to 300 ppi required for a decent print!)
Figure 9.5. Even a fancy 10-megapixel image can be brought to its mercy by extreme use of the crop tool. Notice how the pixel dimensions and enlargement potential dwindle as the crops become more extreme.
Rather than continuing to shoot photos peppered with clutter and learning to live with the cropping consequences—why not figure out how to have your cake and eat it too?
Getting closer and cropping less
With a little practice, you can lessen your dependency on the crop tool for clutter removal and start enjoying better-looking images complete with the megapixels you deserve (and paid for). The trick is to get closer.
Much closer.
It’s the number one way to dramatically improve your images. And—it’s free.
By default, most people snap photos from waaay too far away. Don’t believe me? The next time you’re on vacation, ask a stranger to take your photo and watch what they do next. Chances are they’ll turn and walk fairly far away, leaving you with something like the photo in Figure 9.6.
Figure 9.6. Our unknown shutterbug managed to fit nearly the entire colosseum in the background behind us. On the flip side, my eyes might be closed, but it’s shot from so far away, I can’t tell!
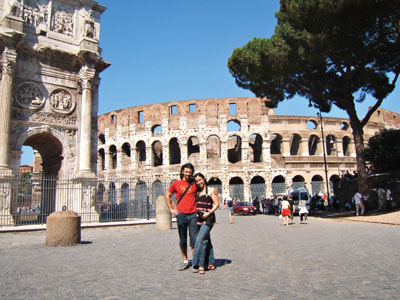
The kind (and insistent) stranger who took our photo walked far enough away to not only fit almost the entire colosseum in the background, but also a few motor vehicles, an additional example of Roman architecture, and a collection of random strangers.
While many of the strangers who offer to take your photo may not have read this book (of course, there is the possibility that it will become a runaway best seller, reaching camera-loving strangers around the globe—spread the word!), you have read it. And now it’s your responsibility to do your part to rid your photos of unnecessary clutter. This chapter could easily be a turning point for you and your images!
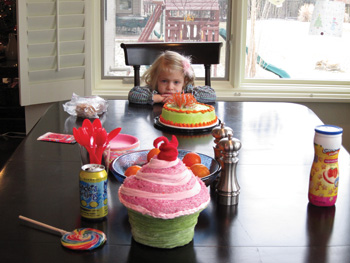
Improving your photography (while simultaneously preventing a cropping massacre) is as simple as becoming aware of and making conscious choices about where you position yourself relative to your subject. To see what I mean, take a look at Figure 9.7. Because the photo was taken from the far end of the table, it includes a fair amount of wasted space and extra items in the foreground (soda can, napkins, etc.), all of which are competing for the viewer’s attention, taking away from the subject.
Figure 9.7. Taken from the far end of the table, this image includes a lot of unnecessary clutter, becoming a prime candidate for extreme cropping.
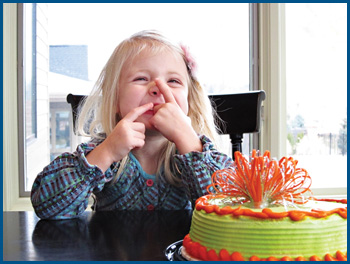
Contrast Figure 9.7 with the photo in Figure 9.8, captured from a much closer position. What a difference! There’s no magic, special equipment, or luck involved. All it takes is self-awareness and the conscious decision (choice) to get closer.
Figure 9.8. Captured from a closer position, the image becomes much stronger and more compelling.
So before you snap your next photo, as you peer through your viewfinder (or at the back of your LCD screen), ask yourself this question: If you capture the image from your current position, will you feel compelled to crop it later? If the answer is yes, get those feet moving and get closer!
Tip
Obviously, you can’t always get closer. There are sometimes fences, barricades, other people in your way, or various rules you just can’t bend. A good zoom lens is nice to have, but in general, you’d be surprised how much you can get away with by just moving your own two feet.
Instead of sloppy shooting followed by extreme cropping, practice making yourself aware of your position relative to your subject (as well as the other items in the scene), and adjust as needed. Then proceed to shoot the photo the way you would otherwise want to crop it later.
It can’t be said enough—this simple practice is the easiest way to improve your photos, not only slightly, but dramatically. Plus, you might burn a calorie or two, and who doesn’t love that?
Chapter snapshot
![]()
While it’s true that cropping can be harmful to your images, it doesn’t have to be. The more you know about how it works and what your options are, the better off you’ll be.
• The extent of the damage done to your image depends on how many pixels you start with, how extremely you crop, and what size you were hoping to output the image to later.
• Some degree of cropping is unavoidable when switching between respective aspect ratios.
• Extreme cropping is any crop that cuts away more pixels than it leaves behind. It’s a sloppy excuse for poor composition—don’t do it!
• Save yourself time (and grief) and get better photos by capturing the image the way you would otherwise feel compelled to crop it later.
• Get close—and then get closer!