Chapter 1. Three’s Company: Understanding shutter speed, aperture, and ISO

Fast shutter speeds make it possible to freeze the action in your photos. Here, a shutter speed of 1/800th of a second made it possible to freeze Ryan mid-air as he leapt over his brother Adam.
Remember that scene in The Wizard of Oz where Toto pulls back the green curtain and we all see that the man behind the “all powerful Oz” isn’t nearly as scary as everyone thought? In fact, he turned out to be kind of sweet, even offering to fly Dorothy home in his hot air balloon.
Think of this chapter as your own look “behind the curtain.” While you won’t find a sparkling Emerald City, you will find your way to an understanding of the “magic” that happens with every photo you take.
A lot of things happen in an instant when you press the shutter button and they all directly impact the resulting photo—whether it pleasantly surprises you, is just what you were expecting, or leaves you shaking your head and aiming to try again. A little bit of understanding goes a long way toward helping you get the results you want (without requiring a Ph.D. in camera technology, thankfully). As sophisticated as today’s cameras are, in many ways they’re actually still quite simple. So don’t let the bells, whistles, and mountains of megapixels fool you. The mechanics of photography haven’t changed and are simpler than you’d think—I promise!
A simple press of the button
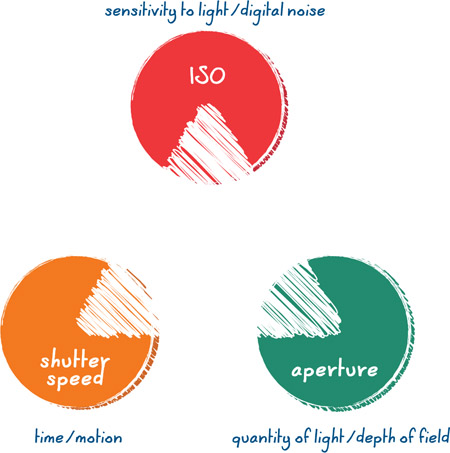
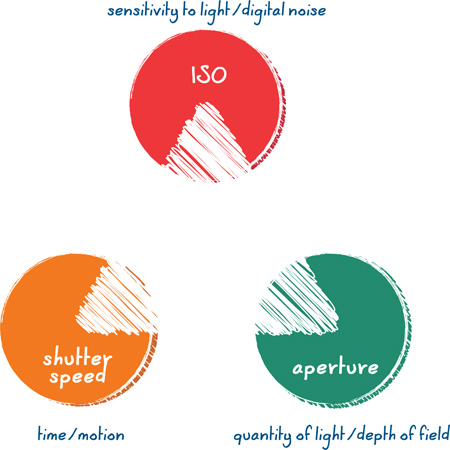
Every photo you take is the direct result of the combination of three things known as shutter speed, aperture, and ISO (Figure 1.1). Each one controls a single aspect of how the resulting image will look.
Figure 1.1. This is the ever-famous “exposure triangle.” It represents the way shutter speed, aperture, and ISO come together to create an exposure.
You may be relieved to know that there’s no right or wrong answer when it comes to how to combine these three variables—as long as you get an exposure (aka: picture) you’re happy with.
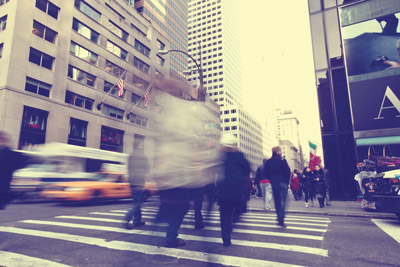
To understand how Figures 1.2 and 1.3, captured only moments apart, can be made to look different from each other, we need to get on a first-name basis with each of the three variables.
Figure 1.2. The movement in this scene appears crisp, as if frozen in time. 1/100, f/4.5, 100, dSLR
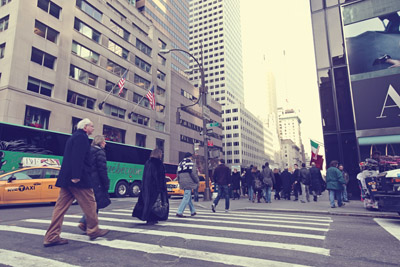
Figure 1.3. Here, the movement in the scene is blurred, conveying a sense of motion. 1/4, f/22, 100, dSLR
Tip
Wondering what all those numbers at the end of the figure captions mean? They indicate the shutter speed, aperture, and ISO settings (in that order) used to capture the related image. Some captions even include the style of camera used—a dSLR or a point & shoot.
Shutter speed
Controls time and motion, and how much of it gets recorded in a single photo
If we compare a camera to the human eye, the shutter would be the equivalent of your eyelid. The shutter—which can open and close in a fraction of a second, or much slower—is directly responsible for the incredible images you’ve seen of blurred waterfalls and streaked car lights as well as pictures of exploding balloons and your favorite sports hero, frozen in time.
Typically measured in fractions of a second, the shutter speed controls the length of time light is allowed to access the camera’s sensor (where the image is actually captured). In other words, it controls how long the camera’s eye is open, so to speak. For example, a shutter speed of 1/500th of a second means that when you take a picture, the shutter will be open and the camera will be recording (exposing) for exactly 1/500th of a second.
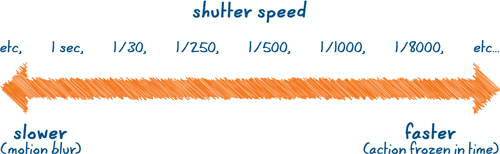
Minimum and maximum shutter speeds vary, and may range from as fast as 1/8000th of a second to as slow as several seconds or even hours. Some cameras also include a shutter speed setting called “bulb,” where the shutter will stay open for as long as you continue to hold the shutter down. Neato! Figure 1.4 shows the relationship between shutter speed and time.
Figure 1.4. Measured in fractions of a second, faster shutter speeds freeze action whereas slower shutter speeds allow for the creative use of motion blur.
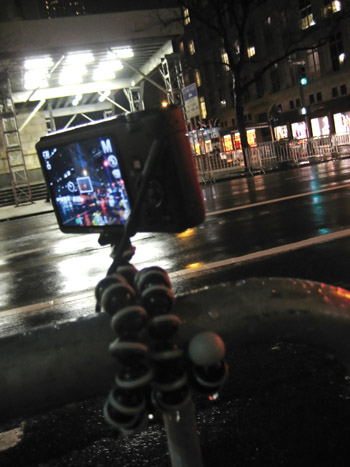
Slower shutter speeds result in moving objects being recorded as blurry streaks—so if you want to convey movement or the passing of time in a photo, you choose a slower shutter speed. How slow? The answer depends on what you’re shooting, and how blurred you want it to be. The only way to know for sure is to experiment. You might start with a shutter speed of 1/15th, and later discover through trial and error that you prefer the effects of a full four-second exposure, or something even longer! Figure 1.5 shows some of the fun to be had with slower shutter speeds. Depending on how slow you go, you may require the use of a tripod, as shown in Figure 1.6.
Figure 1.5. A slow shutter speed of five seconds made it possible to capture passing vehicles as blurred streaks of taillights. (Note: The slow shutter speed of five seconds required the use of a tripod to stabilize the camera and prevent camera shake.) 5 seconds, f/8, 80, point & shoot
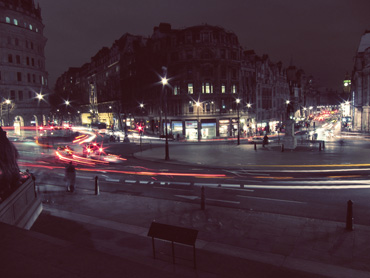
Figure 1.6. I keep this tripod in my purse for occasions when I might want to shoot with slower shutter speeds. It’s the GorillaPod from Joby (www.joby.com) and it makes an awesome addition to any equipment arsenal. Its legs can stand straight like a traditional tripod, or you can wrap them around objects (poles, posts, rails, and the like) to get the shot you want.
Conversely, faster shutter speeds allow you to seemingly stop time by freezing your subjects, as in Figure 1.7. Whether trying to capture your two-year-old toddler, your daughter’s basketball game, or anything else on the move, a faster shutter speed makes it possible. How fast exactly? Well, just as before, it depends. You’ll need to consider how fast your subject is moving and then—experiment!
Figure 1.7. To freeze the soccer player and ball in action, a faster shutter speed of 1/1000 was used. 1/1000, f/4.5, 100, dSLR

Aperture
Controls the amount of light that passes through the lens, as well as something called “depth of field.”
As long as we’re comparing cameras to human eyes, we might also say that the aperture is akin to your pupil. Just as your pupil dilates or constricts in response to different lighting conditions, aperture is an opening inside your lens that can be set wide to let in more light, or closed down to let in less light.
Measured in something called “f-stops,” aperture controls how much light is allowed to pass through the camera lens on its way to the sensor. In darker shooting conditions, the aperture might be opened wider to allow more light to reach the sensor, while brighter lighting environments may require the aperture to be closed down to keep light out.
Unlike shutter speed, which relates to the camera body itself, aperture is a function of the lens. Therefore, the f-stop range available to you will vary from one lens to the next (Figure 1.8).
Figure 1.8. Here’s a representation of various f-stop opening sizes as they range from f/1.4 to f/16. Note that f/16 has a smaller opening than f/1.4, even though 16 is a larger number than 1.4. The larger numbers let in less light.
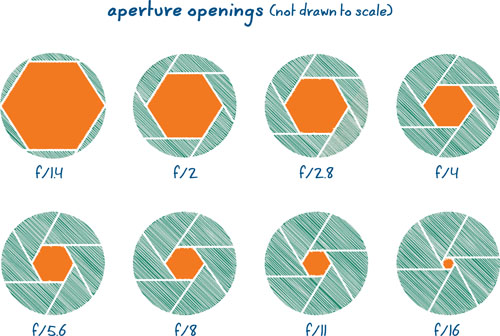
Because aperture values are really fractions (for the curious minds out there, the formula is focal length divided by effective diameter), the smaller numbers are actually wider openings than the bigger numbers. Thus, a setting of f/2.8 is wider and lets in more light than f/11 does.
Aperture comes with an added bonus
Not only does aperture control how much light passes through the lens, but it also has the power to direct the viewer’s attention by controlling something called “depth of field.”
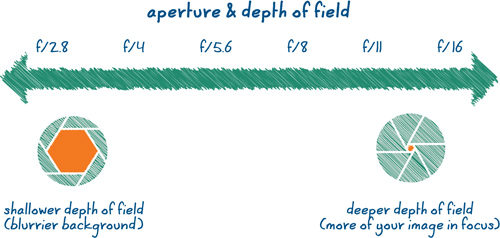
Depth of field refers to the size of the range of focus within a given image (Figure 1.9).
• Deep: A deep depth of field ensures that both the foreground (the area in front of your subject) and background (the area behind your subject) will appear in focus, whereas a shallow depth of field makes it possible for the subject to be in focus while the foreground and background are not.
• Shallow: Wider aperture openings (smaller numbers like f/3.5 or f/4), therefore, not only let in more light, but they also create a shallower depth of field, resulting in a blurrier foreground/background.
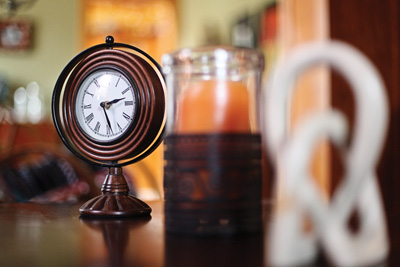
Figure 1.9. An extremely wide aperture of f/1.4 causes the image to become blurrier as the distance from the subject (the clock) increases in either direction (away from or toward the camera). 1/60, f/1.4, 800, dSLR
Conversely, narrower aperture openings (larger numbers such as f/16 or f/22) reduce the quantity of light while creating a deeper depth of field, allowing more of the foreground and background to be in focus (Figure 1.10).
Figure 1.10. An aperture of f/22 brings more of the background and foreground info focus. 4/5, f/22, 3200, dSLR

In Figure 1.11, you can literally see the shallow depth of field appearing as a small strip of focus running across the focal plane of the frame. The image becomes blurred as it moves in either direction away from the focal plane.
Figure 1.11. This is a close-up (macro) shot of a small stationery box I keep on my desk. The decorative pattern makes it easy to see where the shallow focal plane cuts across the frame. 1/200, f/2.8, 640, dSLR
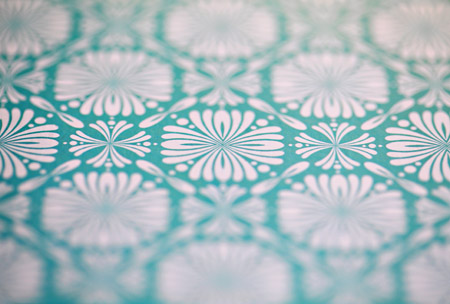
Figure 1.12 will help you begin to wrap your mind around the idea that your f-stop setting not only controls the quantity of light, but also the depth of field.
Figure 1.12. Your effective depth of field is the result of your chosen f-stop setting combined with other factors, including the focal length of your lens and the distance between you and the subject.
To help you remember and make sense of all this, just ask yourself this question: When you’re in your car driving down the highway, and you attempt to read a sign far off in the distance, what do you do?
You squint. We instinctively try to expand our focal range by literally making our eyes smaller (not sure if it really helps you read the road sign, but it does make a really great analogy!). Aperture works the same way. The smaller the opening, the bigger the focal range, and vice versa.
No one said this has to be complicated!
ISO
Controls the camera’s sensitivity to light. It’s the digital equivalent of film speed
Back in the day, we bought different rolls of film for different kinds of shooting situations. For most people, this meant a last-minute trip to the drugstore only to end up standing in the checkout aisle confused about which box to buy. Should you get 800 or 200 speed? 24 exposures or 36? Such decisions! And whatever you bought, you were stuck with it until you finished the roll.
The pictures on the boxes were somewhat helpful in helping folks decide which film to buy. Sunny outdoor pictures graced the boxes of 200 speed film to let us know it was a good choice for bright/outdoor scenes, while indoor pictures of candlelit birthday parties reminded us that 800 speed film was for low light or indoor situations. Most people were just happy to have picked something—anything—even if they didn’t always know what it meant. At least they could get out of the store and on with their lives!
Thankfully, we no longer need to stand in the drugstore, scratching our heads in a quandary about which film to purchase, nor do we need to finish a whole roll before switching to something that might be more appropriate for a given shooting situation. With digital, you can change the ISO from one photo to the next.
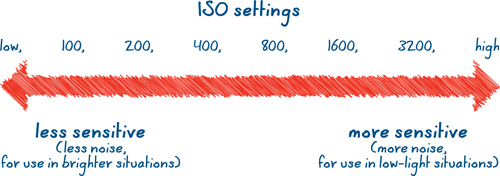
The available ISO range varies from camera to camera, but a typical example might range from 100 to 1600 or higher (Figure 1.13). The higher the number, the more sensitive the camera’s sensor becomes. Thus, a low setting such as ISO100 will require more light to make a photo than a higher setting such as ISO1600 would.
Figure 1.13. Available ISO capabilities vary from camera to camera, but they generally range from low (100) to 1600, 3200, and higher. The lower the number, the less sensitive the sensor is to light, whereas the higher the number, the more sensitive the sensor becomes, making it possible to make a photograph with less available light.
While every situation is different and the possible combinations for ISO, shutter speed, and aperture are too numerous to list, it’s nice to at least have a loose reference point.
• Low/100–200 ISO: Bright, sunny, or otherwise well-lit environment.
• 200–800 ISO: Indoors or outdoors with less light (very cloudy, in the shade, twilight hours, and so on).
• 800+ ISO: Low-light situations where it’s considerably darker.
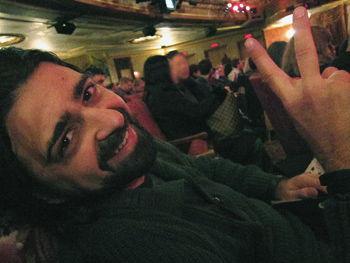
Just like high-speed film, high ISO settings have a drawback you may already be familiar with—digital noise. Aka, gunk or “rubbish,” as our British friends might say (Figure 1.14). It’s the digital equivalent of film grain, only somewhat less romantic. The problem has been dramatically reduced over the years and continues to improve, but it is still noticeable and worth consideration.
Figure 1.14. Taken in the darkness of a Broadway theater, this photo illustrates the effects of digital noise (exaggerated a tad here to make it easier to see). 1/15, f/2.0, 1600, point & shoot
For this reason, shooting with a high ISO setting (1000+) is typically a last resort, used only when all other combinations of shutter speed and aperture have been exhausted. If your shutter speed is as slow as can be without a tripod, and your aperture is as wide open as the lens is capable of being (or as wide as your desired depth of field demands), and you still aren’t able to achieve a decent exposure, then it makes sense to reach for a higher ISO. But generally, it’s not where you want to start.
Putting it all together
Regardless of whether you prefer to let the camera handle all the decision making (auto mode) or if you like calling your own shots (manual mode), it’s all just a triangular-shaped balancing act. Now that you understand the variables, let’s revisit the infamous exposure triangle (Figure 1.15).
Figure 1.15. The triangular-shaped balancing act known as creating an exposure.
The overall objective is a pretty simple one—to create something that is, to you, an ideal exposure. Whether the camera does it for you, or you take control by selecting your own shutter speed, aperture, and/or ISO, balance is the key. A shift to one part of the equation will require an adjustment to the other two settings. There’s no right or wrong way to combine the three variables—as long as you get the results you want.
The good news is that there are all different kinds of shooting modes that facilitate this process, giving you a choice as to how the variables are combined and how much control you want to keep for yourself, or turn over to the camera.
Are you starting to feel the love? Onward to Chapter 2!
Chapter snapshot
![]()
The unique combination of three things is responsible for creating the exposure of your image: shutter speed, aperture, and ISO.
• Shutter speed controls time and motion.
• Aperture controls quantity of light and depth of field.
• ISO is how sensitive your camera’s sensor is to light.
There’s no right or wrong way to combine all these variables, as long as you get the exposure that you want.